Loyalty points for completing a survey
By incorporating loyalty points into your survey strategy, you can gather valuable insights while fostering a loyal customer base, ultimately enhancing customer satisfaction and driving business growth. Offering loyalty points in exchange for survey participation can encourage new customers to enroll in your loyalty program as well as foster long-term loyalty with exsisting ones. Rewarding customers with loyalty points upon completing a survey creates a compelling incentive for customers to not only share their valuable feedback but also increase their spending.
In this use case, we will create a workflow that grants 500 loyalty points for customers who fill out a survey.
Prerequisites
- Integrate mechanism for awarding loyalty points.
- Create a dynamic content campaign with a survey according to your business needs.
- Implement a custom event (
survey.completed) that is generated on customer’s profiles when they submit a form. - Integrate Synerise mobile SDK in your mobile application.
Note: Find more in the Loyalty programs basics use case.
Security configuration
Before you start working with this module, if you are a Synerise customer or partner, consider reading the section about denylisting events. This natively accessible configuration will allow you to manage the restrictions in points management that may help you prevent fraud.
Create a workflow
Create a workflow that grants 500 loyalty points for filling out a survey.
- Go to
 Automation > Workflows > New workflow.
 - Enter the name of the workflow.
Define the Profile Event trigger node
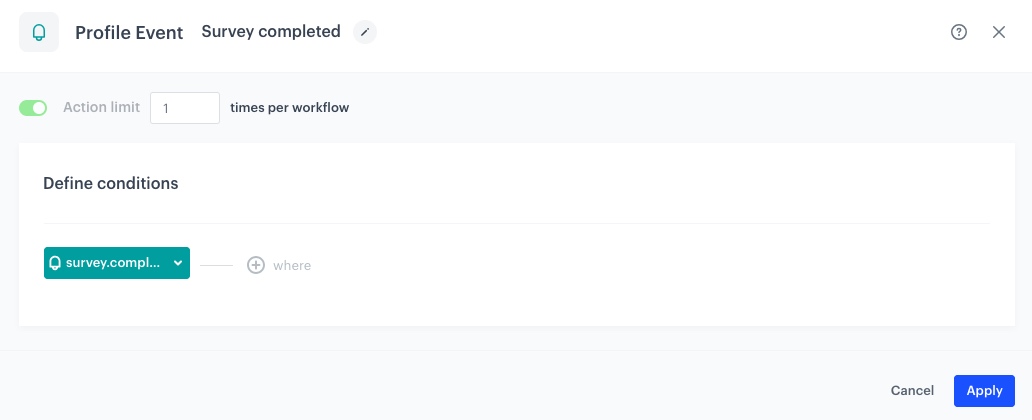
At this stage, we will configure the conditions that launch the workflow. As a trigger, we will use the survey.completed event.
- As the first node of the workflow, add Profile Event. In the configuration of the node:
- From Choose event dropdown menu, choose the
survey.completedevent. - Confirm by clicking Apply.
- From Choose event dropdown menu, choose the

Congifure the Generate Event node
-
Add Generate Event node.
-
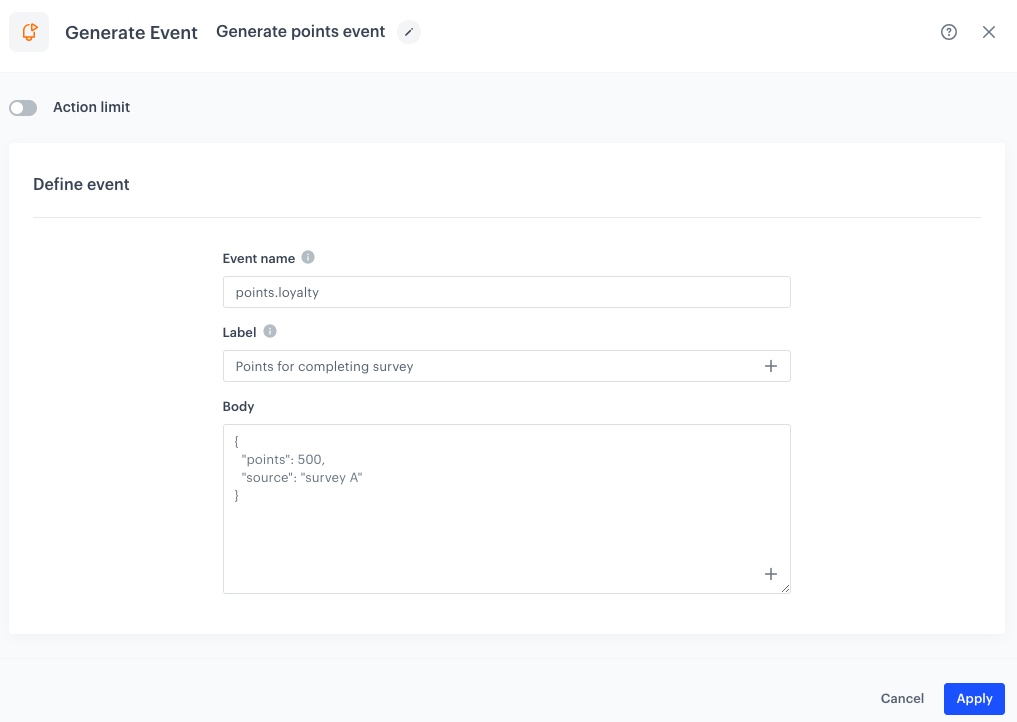
In the settings of the node:
-
In the Event name field, enter the name of the event. In our case, we are using
points.loyaltyevent. -
In the Body section, use the following code and modify it to your needs:
        {
        "points": "500"
        "source": "survey A"
        }
-
-
Click Apply.

Add final setting to your workflow
- Add the End node to both paths.
- Launch the workflow by clicking Save&Run.

Check the use case set up on the Synerise Demo workspace
In Synerise Demo workspace, you can check the configuration of the Workflow.
If you’re our partner or client, you already have automatic access to the Synerise Demo workspace (1590), where you can explore all the configured elements of this use case and copy them to your workspace.
If you’re not a partner or client yet, we encourage you to fill out the contact form to schedule a meeting with our representatives. They’ll be happy to show you how our demo works and discuss how you can apply this use case in your business.