
Capturing customer attention and encouraging them to complete a purchase has become crucial for business success. Personalized push notifications about price drops are one of the most effective ways to achieve this goal. Price is often the decisive factor influencing customer purchase decisions, especially for those who are more sensitive to pricing. They might delay or even abandon a purchase if the price offer does not meet their expectations. In this context, it is crucial to inform customers about price reductions, especially those who have shown interest in a product by adding it to their favorites or cart without completing the purchase. This can be very useful in boosting sales.

<figure>
<img src="/api/docs/image/54176ad07f146575310749eba44b7c2f42c1b327/use-cases/all-cases/_gfx/price-drop-cover.png" alt="Campaign registration"  class="large no-frame">
</figure>  

The following use case provides an example of a price drop alert campaign that you can implement in your business. The scenario described involves sending mobile push notifications to customers regarding products whose price has been reduced. These products were previously added to their favorites or cart but were not purchased. 

## Prerequisites 
---
- Implement a [custom event](https://developers.synerise.com/DataManagement/DataManagement.html#operation/CustomEvent) of adding products to favorites. In this use case, this event is named `product.addToFavorites`.
- [Create an item catalog](/docs/ai-hub/recommendations-v2/item-feed-requirements) that contains all product information, including current price.
- [Create a mobile push template](/docs/campaign/Mobile) to be used in the price drop campaign. 

## Process
---
1. [Create a product.priceDrop event](/use-cases/mobile-push-price-drop#create-a-productpricedrop-event)
2. [Create an aggregate that returns a list of SKUs of recently purchased products](/use-cases/mobile-push-price-drop#create-an-aggregate-that-collects-sku-of-recently-purchased-products)
3. [Create an aggregate that returns a list of SKUs of items added to favorites by a customer](/use-cases/mobile-push-price-drop#create-an-aggregate-that-returns-sku-of-discounted-products-added-to-favorites)
4. [Create an aggregate that returns the latest prices of products added to favorites](/use-cases/mobile-push-price-drop#create-an-aggregate-that-collects-the-latest-prices-of-products-added-by-users-to-their-favorites)
5. [Create an aggregate that collects the last sku's of products received by users with a discounted price](/use-cases/mobile-push-price-drop#create-an-aggregate-that-collects-the-last-skus-of-products-received-by-users-with-a-discounted-price)
6. [Create a mobile push template](/use-cases/mobile-push-price-drop#create-a-mobile-push-with-template)
7. [Create a workflow](/use-cases/mobile-push-price-drop#create-a-workflow)

## Create a product.priceDrop event
---
In this part of the process, create the `product.priceDrop` event, which will later be used in aggregates and a workflow.

1.  Go to <img src="/api/docs/image/54176ad07f146575310749eba44b7c2f42c1b327/icons/data-modeling-hub-icon.svg" alt="Data Modeling Hub icon" class="icon"> **Data Modeling Hub > Events > Add event**.
3. Define the name of the event. In our case, it's `product.priceDrop`  
    In the API and SDK, this parameter is usually called "action" or "action name".
4. Optionally, define a human-friendly display name that will be shown in **Data Modeling Hub** and **Decision Hub**.
5. Optionally, describe the event.
6. Enable the **Make this event available to anonymous profiles without JWT** toggle.
7. Confirm the settings by clicking **Apply**.
8. In the list of events, find the event you just created. 
9. On the right side of the screen, click **Add property**.
10. In the **Source parameter** field, enter the name of the parameter - `sku`.
11. In the **Property name** field, enter a human-readable label for display in the Synerise platform.
12. Optionally, in the **Description** field, you can add an explanation about the purpose of this parameter. 
13. To complete the process, click **Save**.  

## Create an aggregate that collects sku of recently purchased products
---

This aggregate will be used in the next part of the process to exclude products that the customer has already bought.

1. Go to <img src="/api/docs/image/54176ad07f146575310749eba44b7c2f42c1b327/icons/behavioral-data-hub-icon.svg" alt="Behavioral Data Hub icon" class="icon"> **Behavioral Data Hub > Live Aggregates > Create aggregate**.
2. As the aggregate type, select **Profile**.  
2. Enter the name of the aggregate.
3. Click **Analyze profiles by** and select **Last multi** and in the **Size** field, enter `100`.
4. Select the **Consider only distinct occurrences of the event parameter** option.
5. From the **Choose event** dropdown list, select the **product.buy** event.
6. As the event parameter, select **sku**.
7. As the analyzed period, set **Last 30 days**. 
8. Save the aggregate.

<figure>
<img src="/api/docs/image/54176ad07f146575310749eba44b7c2f42c1b327/use-cases/all-cases/_gfx/last-purch-sku.png" class="full" alt="Configuration of the aggregate">
<figcaption>Configuration of the aggregate</figcaption>
</figure>

## Create an aggregate that returns SKU of discounted products added to favorites
---
This aggregate will be used in the further part of the process. The result of this aggregate will be filtered to prevent sending notifications about discounts on the same favorite items. 

1. Go to <img src="/api/docs/image/54176ad07f146575310749eba44b7c2f42c1b327/icons/behavioral-data-hub-icon.svg" alt="Behavioral Data Hub icon" class="icon"> **Behavioral Data Hub > Live Aggregates > Create aggregate**.
2. As the aggregate type, select **Profile**.  
2. Enter the name of the aggregate.
3. Click **Analyze profiles by** and select **Last multi** and in the **Size** field, enter `100`.
5. From the **Choose event** dropdown list, select the **product.addToFavorites** event.
6. As the event parameter, select **sku**.
7. Click **+ where** button.
8. From the **Choose parameter** dropdown list, select the **sku** parameter.
9. From the **Choose operator** dropdown list, select **Not in Array**.
10. From the **Choose value** dropdown list, select the aggregate you created in the [previous step](/use-cases/mobile-push-price-drop#create-an-aggregate-that-collects-sku-of-recently-purchased-products). 
11. Click **+ where** button.
12. From the **Choose parameter** dropdown list, select the **sku** parameter.
13. From the **Choose operator** dropdown list, select Boolean **Is true**.
14. As the analyzed period, set **Last 30 days**. 
15. Save the aggregate.

<figure>
<img src="/api/docs/image/54176ad07f146575310749eba44b7c2f42c1b327/use-cases/all-cases/_gfx/price-drop-agregat-1.png" class="full" alt="Configuration of the aggregate">
<figcaption>Configuration of the aggregate</figcaption>
</figure>

## Create an aggregate that collects the latest prices of products added by users to their favorites
---
This aggregate will return the prices of products from the [previous aggregate](/use-cases/mobile-push-price-drop#create-an-aggregate-that-returns-sku-of-discounted-products-added-to-favorites). 


<div class="admonition admonition-note"><div class="admonition-icon"><svg xmlns="http://www.w3.org/2000/svg" fill="none" viewBox="0 0 24 24" stroke="currentColor" stroke-width="2.5"><path stroke-linecap="round" stroke-linejoin="round" d="M13 16h-1v-4h-1m1-4h.01M21 12a9 9 0 11-18 0 9 9 0 0118 0z" /></svg></div><div class="admonition-body"><div class="admonition-content">

It is important to make sure that the conditions defined in both aggregates are the same in order to get the desired results when combining these aggregates.

</div></div></div>


1. Go to <img src="/api/docs/image/54176ad07f146575310749eba44b7c2f42c1b327/icons/behavioral-data-hub-icon.svg" alt="Behavioral Data Hub icon" class="icon"> **Behavioral Data Hub > Live Aggregates > Create aggregate**.
2. As the aggregate type, select **Profile**.  
2. Enter the name of the aggregate. 
3. Click **Analyze profiles by** and select **Last multi** and in the **Size** field, enter `100`.
5. From the **Choose event** dropdown list, select the **product.addToFavorites** event.
6. As the event parameter, select **price**.
7. Click **+ where** button.
8. From the **Choose parameter** dropdown list, select the **price** parameter.
9. From the **Choose operator** dropdown list, select Boolean **Is true**.
10. Click **+ where** button.
11. From the **Choose parameter** dropdown list, select the **sku** parameter.
12. From the **Choose operator** dropdown list, select **Not in Array**.
13. From the **Choose value** dropdown list, select the aggregate you created [earlier](/use-cases/mobile-push-price-drop#create-an-aggregate-that-collects-sku-of-recently-purchased-products).
14. As the analyzed period, set **Last 30 days**. 
15. Save the aggregate.

<figure>
<img src="/api/docs/image/54176ad07f146575310749eba44b7c2f42c1b327/use-cases/all-cases/_gfx/price-drop-agregat-2.png" class="full" alt="Configuration of the aggregate">
<figcaption>Configuration of the aggregate</figcaption>
</figure>

## Create an aggregate that collects the last sku's of products received by users with a discounted price 
---
This aggregate later in the process will be used to exclude discounted products already sent to users when the next message is executed. 

1. Go to <img src="/api/docs/image/54176ad07f146575310749eba44b7c2f42c1b327/icons/behavioral-data-hub-icon.svg" alt="Behavioral Data Hub icon" class="icon"> **Behavioral Data Hub > Live Aggregates > Create aggregate**.
2. As the aggregate type, select **Profile**.  
2. Enter the name of the aggregate. 
3. Click **Analyze profiles by** and select **Last multi** and in the **Size** field, enter `100`.
5. From the **Choose event** dropdown list, select the **product.priceDrop** event.
6. As the event parameter, select **sku**.
14. As the analyzed period, set **Last 30 days**. 
8. Save the aggregate.

<figure>
<img src="/api/docs/image/54176ad07f146575310749eba44b7c2f42c1b327/use-cases/all-cases/_gfx/price-drop-agregat-3.png" class="full" alt="Configuration of the aggregate">
<figcaption>Configuration of the aggregate</figcaption>
</figure>

## Create a mobile push with template
---

In this part of the process, create a mobile push template that will be used later in a [workflow](/use-cases/mobile-push-price-drop#create-a-workflow). It should inform a mobile app user about price drop.

1. Go to **Experience Hub > Mobile Push > Templates**.
2. You can use the template from the folder or create your own one using the mobile push code editor. Click **New Template > Simple Push**.
3. Create your mobile push in the code editor.
4. You can use Jinja that lets you refer to event context from the Event Filter that will be configured in [the next part of the process](#configure-the-event-filter-node). This node will be waiting for occurrence of the `product.priceDrop`. This event will contain the object with the list of products' SKU that will be retrieved to the notification template. You can learn more about the logic of inserting dynamic values in such a way in [Reusing event context from preceding nodes](/docs/automation/event-params-reuse). The following code is an example of how to do it:
  
   <pre><code class="language-jinja">
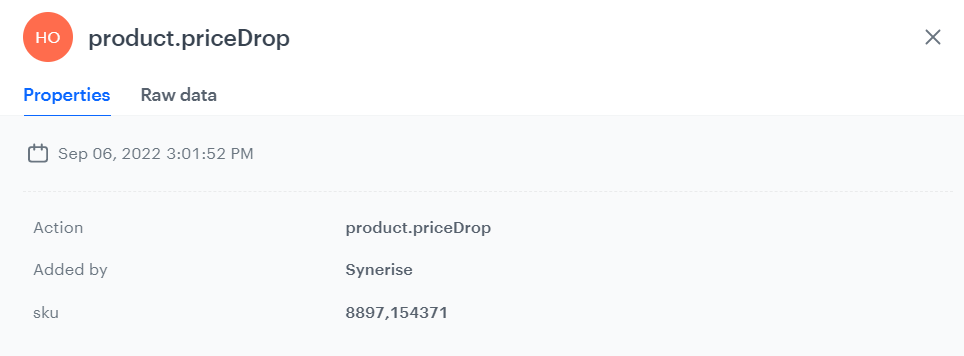
The product price you were interested in is dropped. New price: ${%set eventParams = event.params%}{%set sku = eventParams.sku|split(',')|last%}{%catalogitemv2.store-1(sku)%}{%set itemObject=catalog_result%}{{itemObject.price}}{%endcatalogitemv2%}</code></pre>

5. In the **URL box**, add the following code, which will redirect the customer to the page of the specific product after clicking the notification:
  
   <pre><code class="language-jinja">{%set eventParams = event.params%}{%set sku = eventParams.sku|split(',')|last%}{%catalogitemv2.store-1(sku)%}{%set itemObject=catalog_result%}{{itemObject.productUrl}}{%endcatalogitemv2%}</code></pre>

6. In an additional settings, in the **image URL** field enter the code below. It will let you display the image of the discounted product.
  
   <pre><code class="language-jinja">{%set eventParams = event.params%}{%set sku = eventParams.sku|split(',')|last%}{%catalogitemv2.store-1(sku)%}{%set itemObject=catalog_result%}{{itemObject.image}}{%endcatalogitemv2%}
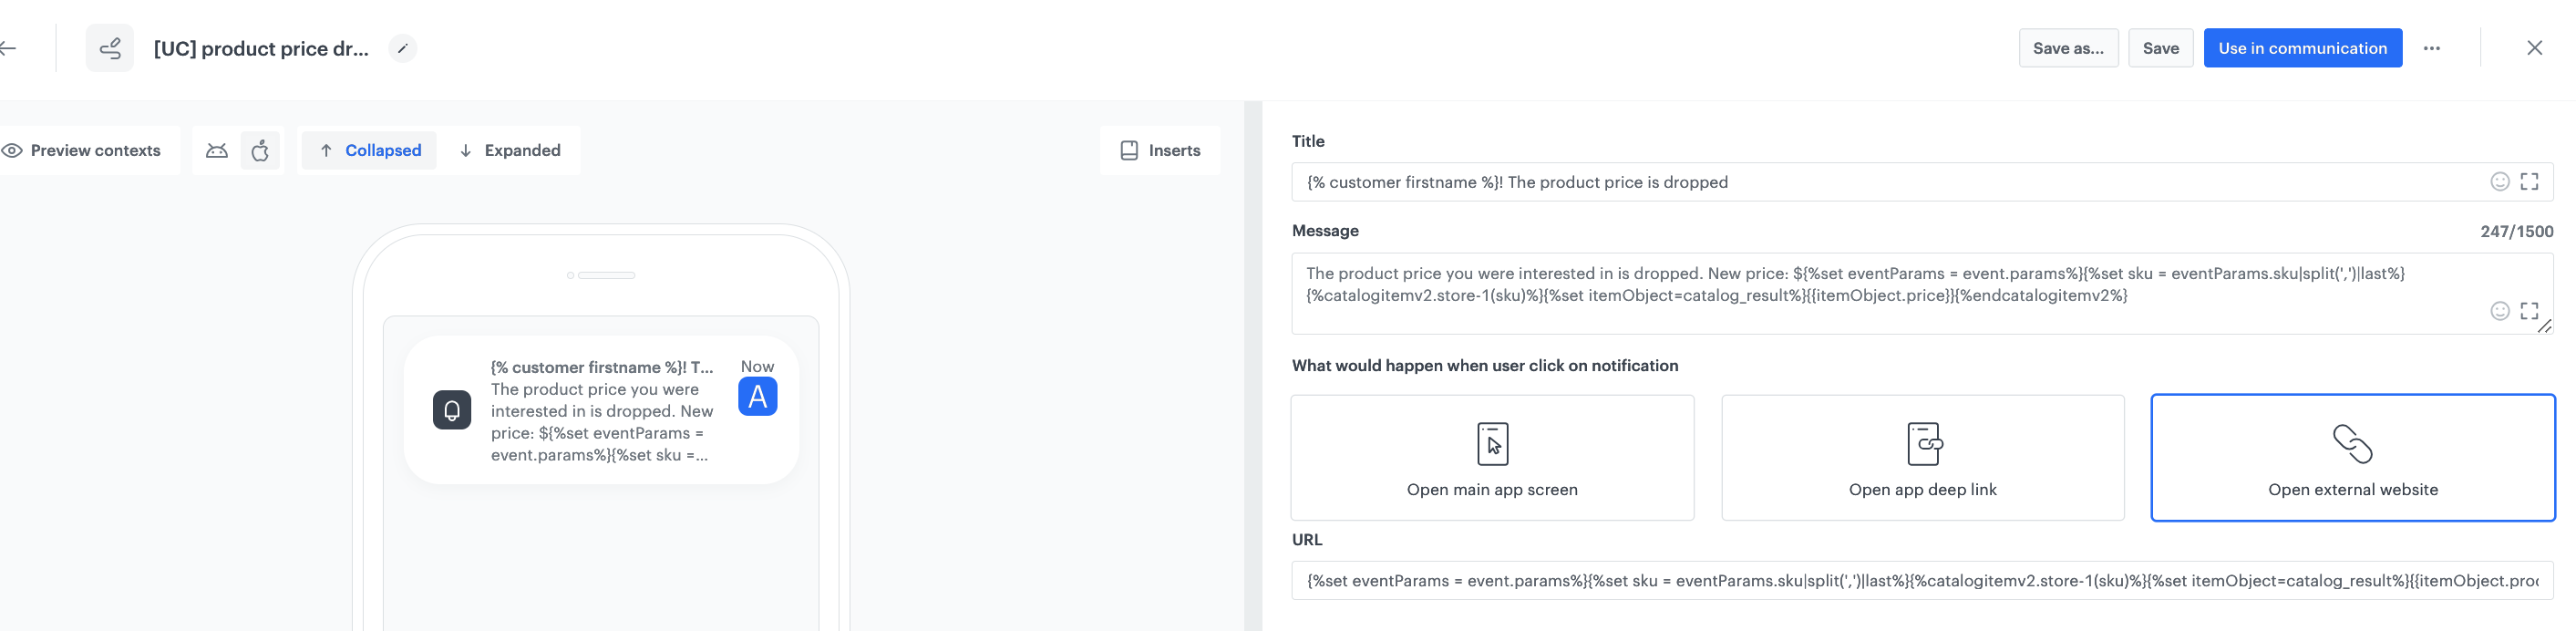
</code></pre>

7. Personalize other settings in the template according to your business needs.
8. Save the template. 

<figure>
<img src="/api/docs/image/54176ad07f146575310749eba44b7c2f42c1b327/use-cases/all-cases/_gfx/price-drop-template.png" class="large" alt="Example of mobile push notification">
<figcaption>Example of mobile push notification</figcaption>
</figure>

## Create a workflow
---
Create a workflow that will be launched for customers that have all necessary consents to receive mobile push notifications and who added any product to favorites. If there is a price drop of products they added to favorites, they will recevie a push notification about discounts on products they liked.

1. Go to **Automation Hub > Workflows > New workflow**.
2. Enter the name of the workflow.

### Configure the trigger
---
In this part of the process, define the conditions for the audience for whom you will run this campaign. In our case, these are customers who have added products to favorites and who have necessary consents in the mobile push channel. 

1. As the trigger node, select the **Audience** node. In the configuration of the node:  
    1. Set the **Run trigger** option to **repeatable**.
    2. Set the interval at which you want to run the automation.
    3. Select the time zone.
    4. Select the **New audience** tab.
    5. Click **Define conditions**. 
    6. From the choose filter dropdown list select the **product.addToFavorite** event. 
    7. Define the time period for the **last 30 days**. 
    8. From the **Choose filter** dropdown list, select the `profile.receive_push_messages`. This attribute contains the marketing consent status for push notifications.
    9. From the **Choose parameter** dropdown list, select the **Equal** operator and specify the condition as **true**.
    10. Click **Choose filter** and from the dropdown list, select the `snrs_has_mobile_push_devices`. It includes information on whether the customer has an active FCM token or not. For more information, please visit this [Conditions for sending and displaying mobile notifications](/docs/campaign/Mobile/mobile_campaign#conditions-for-sending-and-displaying-mobile-notifications).
    11. From the **Choose parameter** dropdown list, select the **Equal** operator and set the condition to **true**.
    12. Confirm by clicking **Apply**.  

  <figure>
  <img src="/api/docs/image/54176ad07f146575310749eba44b7c2f42c1b327/use-cases/all-cases/_gfx/price-drop-audience.png" class="large" alt="Configuration of the Profile filter">
  <figcaption>Configuration of the Profile filter</figcaption>
  </figure>  

### Configure the Generate event node
---
1. Add the **Generate event** node. In this step, check if the product added to favorites by the user has been discounted.  
    In the configuration of the node:
    1. Enter the **Event name**. In our case, we are using `product.addToFavorite` event.
    2. In the **Body** section, use the following Jinjava and modify it to your needs:  
    
   <div class="admonition admonition-note"><div class="admonition-icon"><svg xmlns="http://www.w3.org/2000/svg" fill="none" viewBox="0 0 24 24" stroke="currentColor" stroke-width="2.5"><path stroke-linecap="round" stroke-linejoin="round" d="M13 16h-1v-4h-1m1-4h.01M21 12a9 9 0 11-18 0 9 9 0 0118 0z" /></svg></div><div class="admonition-body"><div class="admonition-content">

   Jinjava inserted in **Generate event** body must have all empty spaces deleted.

   </div></div></div>


<pre><code class="language-jinja">{
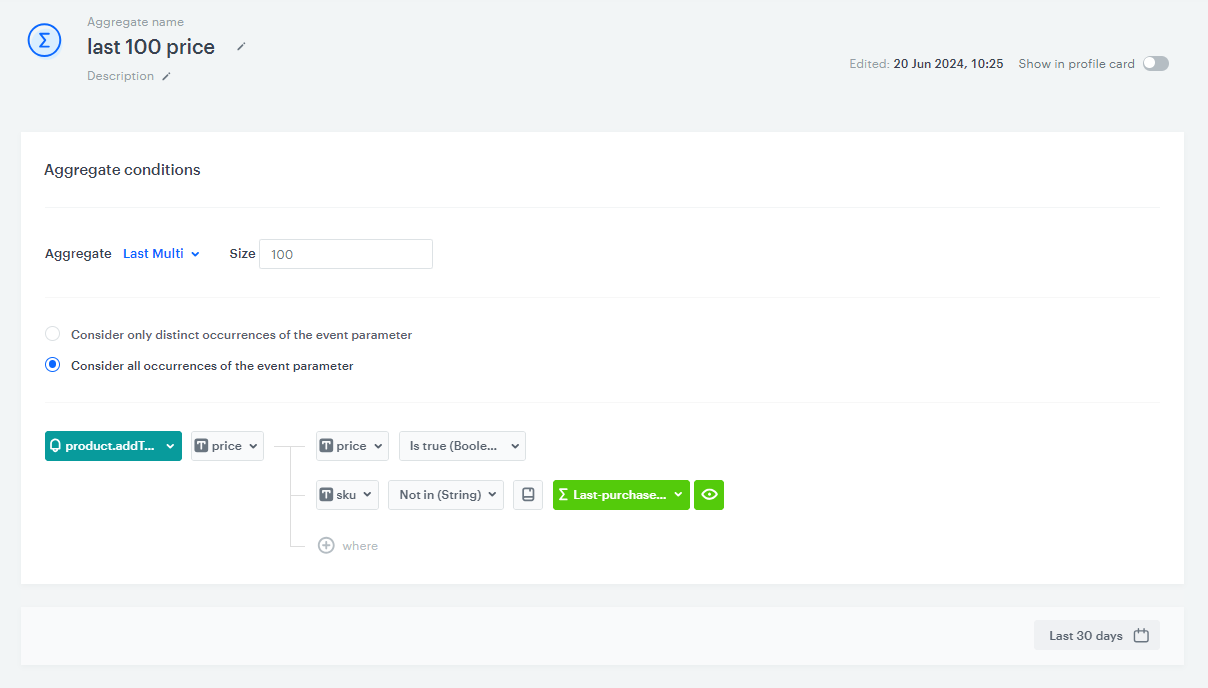
  "sku": "{%set last_sku=[]%}{%set last_price=[]%}{%set last_objects_array=[]%}{%set final_sku=[]%}{%set list=[]%}{%aggregate 9d8f2b6d-c9d8-39f5-90f2-c354fd387c28%}{%-for sku in aggregate_result|reverse-%}{%do last_sku.append(sku)%}{%-endfor-%}{%endaggregate%}{%aggregate 28e5708e-b957-3b7d-ae3c-09eae2a3e29b%}{%-for price in aggregate_result|reverse-%}{%do last_price.append(price)%}{%-endfor-%}{%endaggregate%}{%aggregate 8ba45452-30e2-3107-9548-a2841040a5fe%}{%-for listSku in aggregate_result-%}{%do list.append(listSku)%}{%-endfor-%}{%endaggregate%}{%-for sku in last_sku-%}{%set index=loop.index0%} {%do last_objects_array.append({sku: sku, price: last_price[index], index: index})%}{%-endfor-%}{%set last_objects_array_uniq=last_objects_array|unique(attr='sku')%}{%-for last in last_objects_array_uniq-%}{%set key_name=last.sku%}{%catalogvar.store-1(key_name).price%}{%set catalog_item=catalog_result|float%}{%-if last.price|float &gt; catalog_item|float-%}{%-if last.sku in list|join(',')-%}{%-else-%}{%do final_sku.append(last.sku)%}{%-endif-%}{%-endif-%}{%endcatalogvar%}{%-endfor-%}{%-for sku in final_sku-%}{{sku}}{%-if loop.index != final_sku|length-%},{%-endif-%}{%-endfor-%}{%-if final_sku|length &lt; 1-%}{{kill}}{%-endif-%}"
}</code></pre>


<div class="admonition admonition-important"><div class="admonition-icon"><svg xmlns="http://www.w3.org/2000/svg" fill="none" viewBox="0 0 24 24" stroke="currentColor" stroke-width="2.5"><path stroke-linecap="round" stroke-linejoin="round" d="M12 8v4m0 4h.01M21 12a9 9 0 11-18 0 9 9 0 0118 0z" /></svg></div><div class="admonition-body"><div class="admonition-content">

Remember to base your code preparation on your aggregate IDs and the directories that contain them. The example code uses the IDs used in the earlier steps.

</div></div></div>


<div class="admonition admonition-tip"><div class="admonition-icon"><svg xmlns="http://www.w3.org/2000/svg" fill="none" viewBox="0 0 24 24" stroke="currentColor" stroke-width="2.5"><path stroke-linecap="round" stroke-linejoin="round" d="M9.663 17h4.673M12 3v1m6.364 1.636l-.707.707M21 12h-1M4 12H3m3.343-5.657l-.707-.707m2.828 9.9a5 5 0 117.072 0l-.548.547A3.374 3.374 0 0014 18.469V19a2 2 0 11-4 0v-.531c0-.895-.356-1.754-.988-2.386l-.548-.547z" /></svg></div><div class="admonition-body"><div class="admonition-content">

If you would like to make a change to the condition that must be met in order for the event to be generated, you can do so in this line: 
<pre><code class="language-jinja">{% if last.price|float &gt; catalog_item|float %}</code></pre>
 
  Currently, this condition checks if the price varies, regardless of how big the change in value will be.

</div></div></div>


  The result of this node is an event, which contains the sku of the discounted products in the sku attribute, separated by commas. If the event is empty, it means that none of the products met the price drop condition.

  An example of a generated event:

  <figure>
  <img src="/api/docs/image/54176ad07f146575310749eba44b7c2f42c1b327/use-cases/all-cases/_gfx/product.priceDrop_sku.png" class="large" alt="An example of a generated product.priceDrop event">
  <figcaption>An example of a generated product.priceDrop event</figcaption>
  </figure>

### Configure the Event filter node
---
1. Add the **Event filter** node. In the configuration of the node:  
    1. Check event **for period of time**.
    2. Define the time range to **1 minute**.
    3. From the **Choose event** dropdown list, select the **product.priceDrop** event.
    4. As the event parameter, select **sku**.
    5. From the **Choose operator** dropdown list, select **Regular expression**.
    6. As the value, enter `.+`
    7. Confirm by clicking **Apply**. 
2. For the **not matched** path, select the **End** node. 
3. For the matched path, select the **Send mobile push** node. 

### Configure the Send mobile push node
---
At this stage, a mobile push is sent to customers, which contains the products returned in the event from the previous step.

1. In the node configuration, select the **template type**(in our example simple push) and **push template** from the list. 
2. Confirm by clicking Apply.

### Add final setting to your workflow
---
1. Add the **End** node. 
2. Launch the workflow by clicking **Save&Run**.

  <figure>
  <img src="/api/docs/image/54176ad07f146575310749eba44b7c2f42c1b327/use-cases/all-cases/_gfx/price-drop-automat.png" class="full" alt="Configuration of the workflow">
  <figcaption>Configuration of the workflow</figcaption>
  </figure>

## Check the use case set up on the Synerise Demo workspace
---
You can check the configuration of each step directly in the Synerise Demo workspace:  

- [Aggregate that collects sku of recently purchased products](https://app.synerise.com/analytics/aggregates/cf726d37-39af-3a09-bc8b-36953f1a4411)

- [Aggregate that collects product sku's added by the users to their favorites](https://app.synerise.com/analytics/aggregates/9d8f2b6d-c9d8-39f5-90f2-c354fd387c28)

- [Aggregate that collects the latest prices of products added by users to their favorites](https://app.synerise.com/analytics/aggregates/28e5708e-b957-3b7d-ae3c-09eae2a3e29b)

- [Aggregate that counts sku's of products added to favorites by a user](https://app.synerise.com/analytics/aggregates/8ba45452-30e2-3107-9548-a2841040a5fe)

- [Workflow](https://app.synerise.com/automations/workflows/automation-diagram/3ca070b9-91c1-4883-85e8-81274a21502f)

If you’re our partner or client, you already have automatic access to the **Synerise Demo workspace (1590)**, where you can explore all the configured elements of this use case and copy them to your workspace.  

If you’re not a partner or client yet, we encourage you to fill out the contact [form](https://demo.synerise.com/request) to schedule a meeting with our representatives. They’ll be happy to show you how our demo works and discuss how you can apply this use case in your business. 

## Read more
---
- [Aggregates](/docs/analytics/aggregates)
- [Automation Hub](/docs/automation)
- [Catalogs](/docs/assets/catalogs/introduction-to-catalogs)
- [Email campaigns](/docs/campaign/e-mail)
- [Product feed](/developers/product-feed)
- [Reusing event context from preceding nodes](/docs/automation/event-params-reuse)
- [Segmentation](/docs/analytics/segmentations)
