
In this use case, you will create a segmentation that groups customers based on their average number of transactions per month. This allows you to identify more and less active buyers and use that information in downstream actions, such as cross-workspace audience sharing, personalized recommendations, and dynamic content targeting.

**Context**

To make this scenario clear, we assume two separate workspaces:

- Workspace A – dedicated to Brand A
- Workspace B – dedicated to Brand B

Each workspace collects its own customer behavior data independently.

**Goal**

The main goal of this setup is to identify highly active customers (heavy buyers) in Workspace A (Brand A) and use this information in Workspace B (Brand B).

This allows you to deliver more relevant product recommendations and promotional communication to users who have already demonstrated strong purchasing intent in another brand ecosystem.

**Process**
In Workspace A (Brand A):
- Calculate the average number of transactions per user per month.
- Based on this metric, create a segment of highly active customers (heavy buyers).
- Share this audience segment with Workspace B (Brand B).
In Workspace B (Brand B):
- Target users from this imported segment when they visit Brand B.
- Use AI recommendations to present: products with a price higher than X, or
products aligned with premium or high-value categories.

As a result users identified as heavy buyers in Brand A receive more tailored, potentially higher-value offers in Brand B.

## Prerequisites
---
- Add a [tracking code](/developers/web/installation-and-configuration) to your website. 
- Create a [workspace group](/docs/settings/workspace/multibrand-workspaces/create-workspace-group) connecting minimum 2 of your workspaces, giving you the possibility to synchronize profile information across them.

## Process
---
1. Create a [segmentation](/use-cases/multibrand-segmentation#create-a-segmentation-of-heavy-buyers) of heavy buyers.
2. Share the results from this segmentation [to the workspace group](/use-cases/multibrand-segmentation#prepare-the-multi-workspace-sync-of-segmentation).
3. Create [the final segmentation](#prepare-the-final-segmentation) on the second workspace based on the membership attribute synchronization.
3. Prepare the [AI recommendations](/use-cases/multibrand-segmentation#prepare-the-ai-recommendations) proposing products with the price higher than X and present them to users who are among heavy buyers on the first workspace while visiting the brand B. 
4. Create a [dynamic content](/use-cases/multibrand-segmentation#create-a-dynamic-content)

## Create a segmentation of heavy buyers
---
In this part of the process, you will create a segmentation of heavy buyers based on the number of transactions generated by these customers in the previous period. Before you proceed to creating the segmentation, you will create an aggregate and metric which you will use in the conditions of the segmentation.


<div class="admonition admonition-note"><div class="admonition-icon"><svg xmlns="http://www.w3.org/2000/svg" fill="none" viewBox="0 0 24 24" stroke="currentColor" stroke-width="2.5"><path stroke-linecap="round" stroke-linejoin="round" d="M13 16h-1v-4h-1m1-4h.01M21 12a9 9 0 11-18 0 9 9 0 0118 0z" /></svg></div><div class="admonition-body"><div class="admonition-content">

Depending on your business needs, you can create a segmentation of heavy buyers based on various criteria and choose a period that meets your requirements.

</div></div></div>


### Create an aggregate 

Create an aggregate that sums up the number of transactions in the previous period.

1. Go to <img src="/api/docs/image/54176ad07f146575310749eba44b7c2f42c1b327/icons/behavioral-data-hub-icon.svg" alt="Behavioral Data Hub icon" class="icon"> **Behavioral Data Hub > Aggregates > Create aggregate**.
2. As the aggregate type, select **Profile**.  
2. Enter the name of the aggregate.
3. Click **Analyze profiles by** and select **Count** (this way the aggregate result will show the total number of transactions in the time range selected in the analysis).
4. From the **Choose event** dropdown list, select the **transaction.charge** event.

    
   <div class="admonition admonition-tip"><div class="admonition-icon"><svg xmlns="http://www.w3.org/2000/svg" fill="none" viewBox="0 0 24 24" stroke="currentColor" stroke-width="2.5"><path stroke-linecap="round" stroke-linejoin="round" d="M9.663 17h4.673M12 3v1m6.364 1.636l-.707.707M21 12h-1M4 12H3m3.343-5.657l-.707-.707m2.828 9.9a5 5 0 117.072 0l-.548.547A3.374 3.374 0 0014 18.469V19a2 2 0 11-4 0v-.531c0-.895-.356-1.754-.988-2.386l-.548-.547z" /></svg></div><div class="admonition-body"><div class="admonition-content">

   Events may have different labels between workspaces, but you can always find them by their action name (in this step, it’s **transaction.charge**).

   </div></div></div>


5. Change the date range, by clicking the calendar icon. Create the following custom date range `last 365 days before 365 days`.
6. Confirm the changes with the **Apply** button. 
7. Save the aggregate by clicking **Save**.

<figure>
<img src="/api/docs/image/54176ad07f146575310749eba44b7c2f42c1b327/use-cases/all-cases/_gfx/transaction.charge_count_new.png" alt="Example settings of the aggregate"  class="full">
<figcaption>Example settings of the aggregate</figcaption>
</figure> 

### Create a metric

Create a metric that sets a cutoff value for the customer segmentation with the highest number of transactions. 

1. Go to <img src="/api/docs/image/54176ad07f146575310749eba44b7c2f42c1b327/icons/decision-hub-icon.svg" alt="Decision Hub icon" class="icon"> **Decision Hub > Metrics > New metric**.
2. Enter the name of the metric.
3. As a metric kind, select **Simple metric**.
4. As a metric type, select **Profile**.
5. As the aggregator, set **Quantile**.

    
   <div class="admonition admonition-note"><div class="admonition-icon"><svg xmlns="http://www.w3.org/2000/svg" fill="none" viewBox="0 0 24 24" stroke="currentColor" stroke-width="2.5"><path stroke-linecap="round" stroke-linejoin="round" d="M13 16h-1v-4h-1m1-4h.01M21 12a9 9 0 11-18 0 9 9 0 0118 0z" /></svg></div><div class="admonition-body"><div class="admonition-content">

   Quantile is used to divide a sample of data into equal-sized subgroups.

   </div></div></div>


6. In the input field which appears next to the aggregator, type `0.7` (to create a cutoff that defines the highest number of values).
7. Click **Choose event**.
8. From the dropdown list, select the [aggregate you created before](/use-cases/find-heavy-buyers#create-an-aggregate).
9. Define the same time range as in the aggregate you use in the metric. 
10. Click **Save**.

<figure>
<img src="/api/docs/image/54176ad07f146575310749eba44b7c2f42c1b327/use-cases/all-cases/_gfx/transaction.charge_0.7q.png" alt="The final configuration of the metric"  class="full">
<figcaption>The final configuration of the metric</figcaption>
</figure> 

### Create a segmentation

In this part of the process, you will create a segmentation of customers with the highest scoring (30% of customers who made the highest number of transactions).

1. Go to <img src="/api/docs/image/54176ad07f146575310749eba44b7c2f42c1b327/icons/decision-hub-icon.svg" alt="Profiles icon" class="icon"> **Decision Hub > Segmentation > New segmentation**.
2. Enter the name of segmentation.
3. On the canvas, click **Add condition**.
4. From the dropdown list, select the [aggregate you created before](/use-cases/find-heavy-buyers#create-an-aggregate).
5. From the **Choose operator** dropdown list, select **More than**.
6. In the text field, enter the value returned from [the metric you created in the previous step](/use-cases/find-heavy-buyers#create-a-metric).
7. Click **Save**.

<figure>
<img src="/api/docs/image/54176ad07f146575310749eba44b7c2f42c1b327/use-cases/all-cases/_gfx/heavybuyers-segmentation.png" alt="The final configuration of the metric"  class="full">
<figcaption>The final configuration of the metric</figcaption>
</figure> 

## Prepare the Multi Workspace Sync of Segmentation
1. Go to <img src="/api/docs/image/54176ad07f146575310749eba44b7c2f42c1b327/icons/decision-hub-icon.svg" alt="Profiles icon" class="icon"> **Decision Hub > Segmentation**.
3. On the top bar on the segmentation list, click **Share as**.
4. On the pop-up, click **Multi Workspace Sync.**
5. From the Process frequency dropdown list, select how often membership attributes will be synchronized.
    - Daily - The process will start once a day at a random time between 4 A.M. and 6 A.M.
    - Every 6 hours - The process will start every 6 hours.
6. Click **Go to sharing process.**
7. On the pop-up, select the [segmentations whose results will be shared](#create-a-segmentation-of-heavy-buyers) and synchronized to a workspace group. The results will be saved as membership attributes.

    
   <div class="admonition admonition-note"><div class="admonition-icon"><svg xmlns="http://www.w3.org/2000/svg" fill="none" viewBox="0 0 24 24" stroke="currentColor" stroke-width="2.5"><path stroke-linecap="round" stroke-linejoin="round" d="M13 16h-1v-4h-1m1-4h.01M21 12a9 9 0 11-18 0 9 9 0 0118 0z" /></svg></div><div class="admonition-body"><div class="admonition-content">

   Only customers who belong to the selected segmentation and also exist in the target workspace will be assigned the membership attribute.
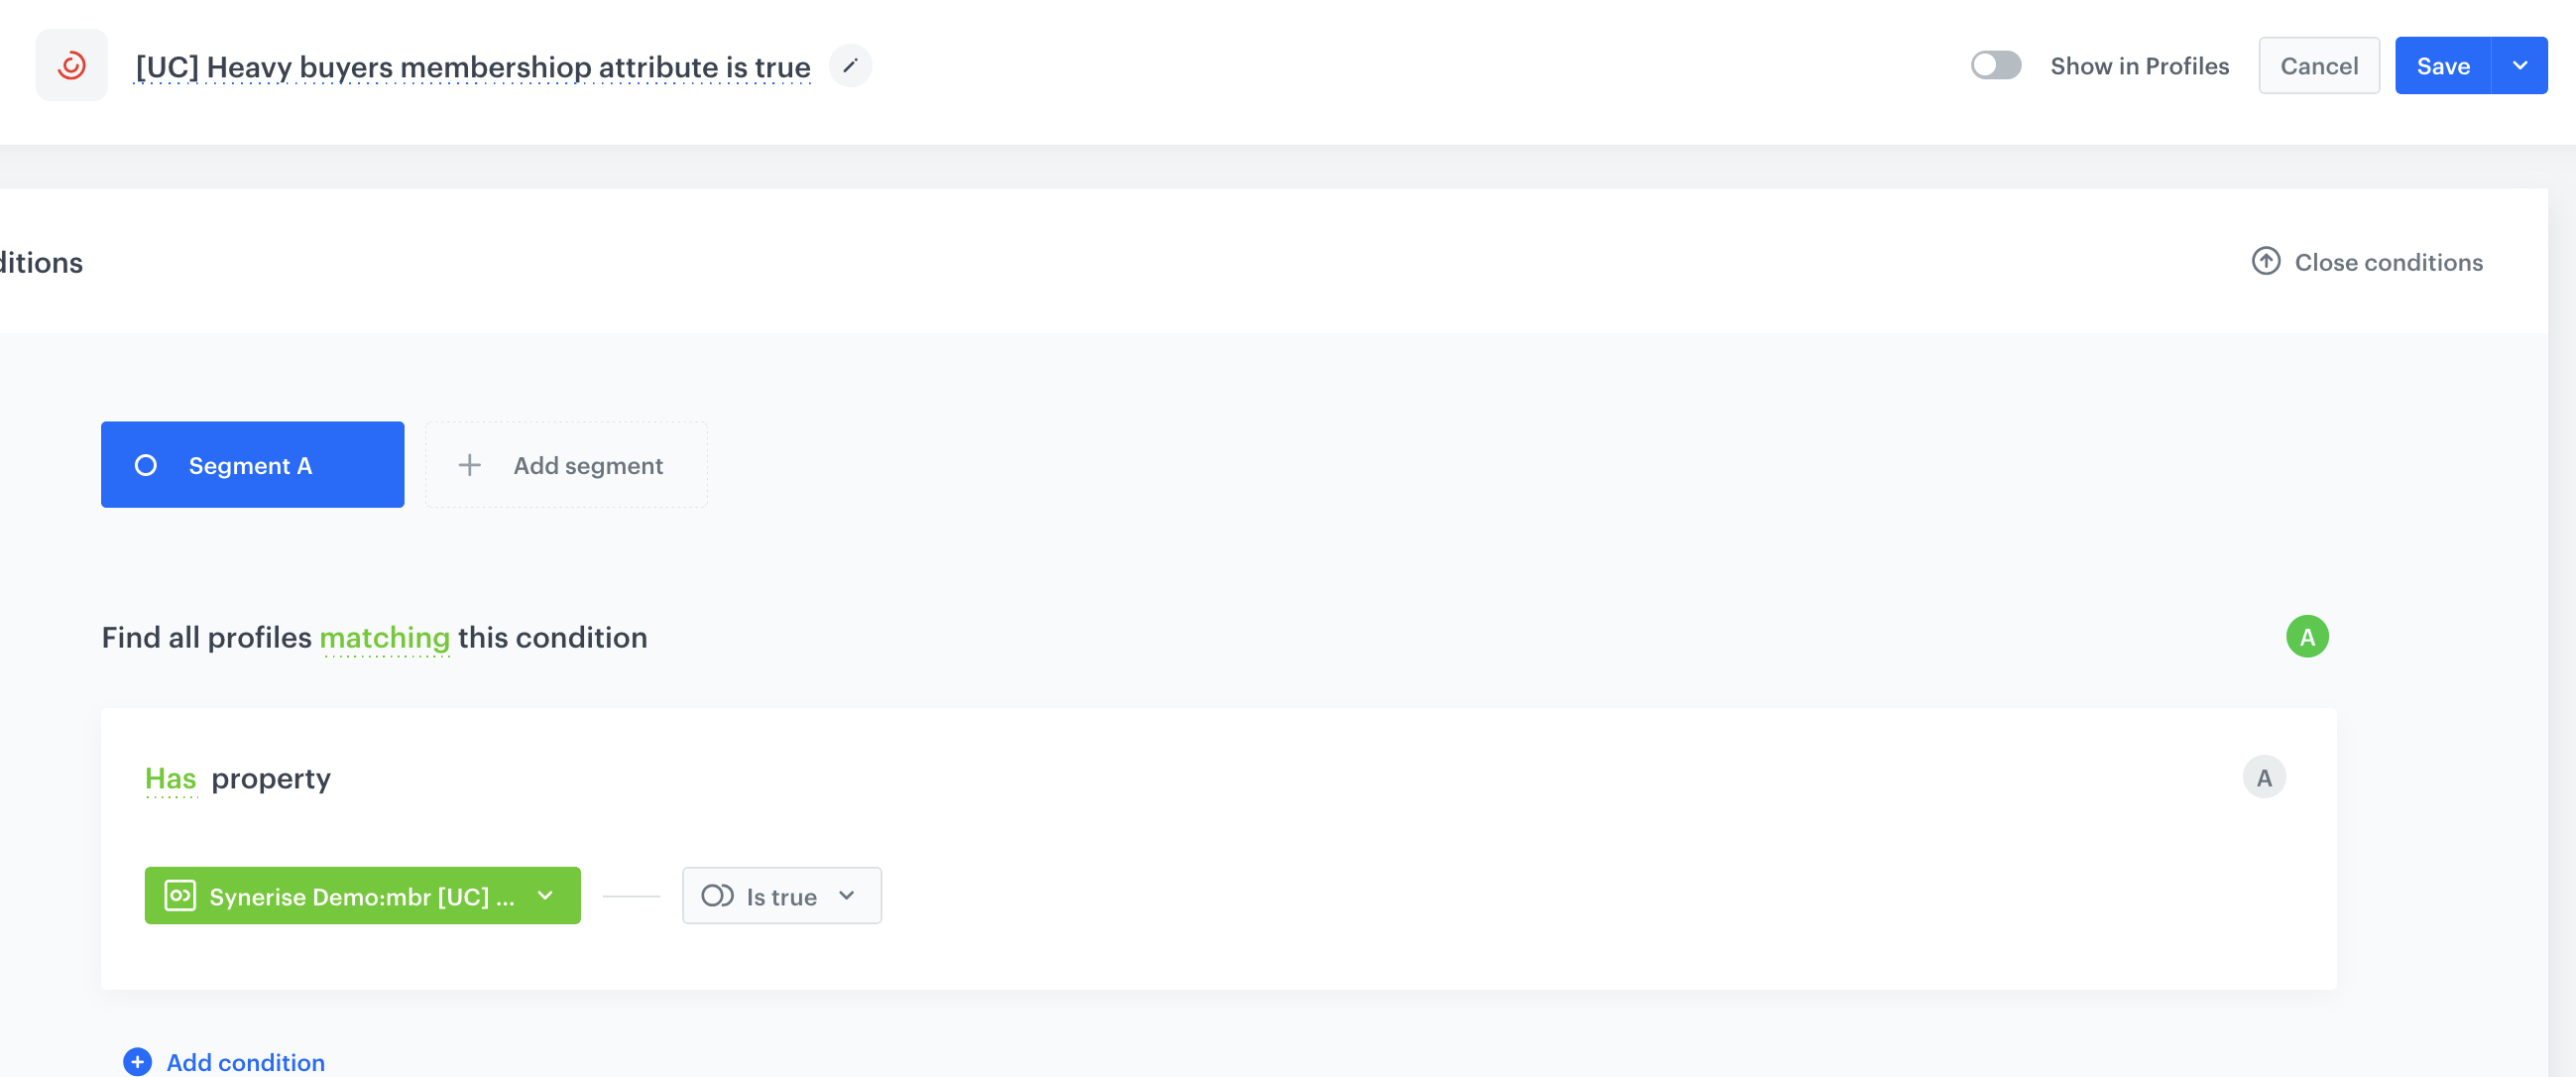
       During the sharing process, you will be informed about the default name of the membership attribute that will be created in the target workspace. Please note that this name cannot be modified at this stage.

   </div></div></div>


8. To start the process, click **Apply**.
9. Confirm by clicking **Yes, start**.

**Result:** The synchronization will occur according to the schedule. To get to know details about each synchronization time, time window and effects, see the ["Synchronization ferquency" section](/docs/settings/workspace/multibrand-workspaces/sharing-segmentation-results#synchronization-frequency).

## Prepare the final segmentation
---
On the target workspace, create a segmentation based on the synchronized membership attribute. 

1. Go to <img src="/api/docs/image/54176ad07f146575310749eba44b7c2f42c1b327/icons/decision-hub-icon.svg" alt="Decision Hub icon" class="icon" > **Decision Hub > Segmentations > New segmentation**. 
2. Enter the name of the segmentation.
1. Click **Add condition**.
2. Select the [attribute created in the previous step](#prepare-the-multi-workspace-sync-of-segmentation). In our case it will look like this:

     <figure>
<img src="/api/docs/image/54176ad07f146575310749eba44b7c2f42c1b327/use-cases/all-cases/_gfx/multibrand1.png" alt="The view of the segmentation configuration"  class="full">
<figcaption>Membership attribute synchronization view</figcaption>
</figure> 

3. From the **Choose** dropdown list, select **is true** operator.
5. Click **Save**.

<figure>
<img src="/api/docs/image/54176ad07f146575310749eba44b7c2f42c1b327/use-cases/all-cases/_gfx/multibrand2.png" alt="The view of the segmentation configuration"  class="full">
<figcaption>Segmentation view</figcaption>
</figure> 

## Prepare the AI recommendations
---
In this part of the process, you will configure AI Recommendation which excludes last seen and last bought products. AI Recommendation will be added to the product page. 

1. Go to <img src="/api/docs/image/54176ad07f146575310749eba44b7c2f42c1b327/icons/ai-hub-icon.svg" alt="AI Hub icon" class="icon" > **AI Hub > (AI Recommendations) Models > Add recommendation**.
2. Enter the name of the recommendation (it is only visible on the list of recommendations).
3. In the **Type & Items Feed** section, click **Define**.
4. From the **Items Feed** dropdown list, select an item feed.
5. In the **Type** section, choose the **Personalized** recommendation type.
6. Confirm the settings by clicking **Apply**.
7. In the **Items** section, click **Define**.
    1. Define the minimum and maximum number of items that will be recommended to the customer in each slot.
    3. Define [Static filters](/docs/ai-hub/recommendations-v2/creating-recommendation-campaign#static-filters) and [Elastic filters](/docs/ai-hub/recommendations-v2/creating-recommendation-campaign#elastic-filters).
    4. In our case, in the **Static filter** section, click **Define filter**.  
    5. Select **Visual Builder**.  
    6. Click **Select value**. 
    5. Choose **$price**.
    6. As an operator, choose **More than**.
    7. Add the value as `100`.
    4. Confirm by clicking **Apply**. 

     <figure>
     <img src="/api/docs/image/54176ad07f146575310749eba44b7c2f42c1b327/use-cases/all-cases/_gfx/multibrand-static.png" alt="The view of the aggregate configuration"  class="large">
     <figcaption>Configuration of the elastic filter</figcaption>
        </figure> 
  
8. Define the boosting rules by clicking **Define** in the **Boosting** section.
    1. In **Attributes** section, click **Add rule**. 
    2. Click **Define rule**.
    3. Choose **Visual builder**.
    3. From the **Select value** dropdown list, choose **price**.
    4. As **Operator**, choose **More than**. 
    5. As the value, enter the minimum price a product should cost to be included in the recommendations. This way, you exclude recommending products that are too cheap and encourage the purchase of more expensive ones.
    6. Click **Apply**.
    7. Click **Promote**.
    8. In the **Impact** section, set the impact of this rule to **High**.

9. Optionally add the  **Additional settings**.
9. In the right upper corner, click **Save**.

## Create a dynamic content
---
Create a dynamic content campaign that displays the results of AI recommendations (products more expensive than 100). Use the predefined template. This dynamic content will be displayed as a pop-up on your site for customers who [are assigned with a membership attribute](#prepare-the-multi-workspace-sync-of-segmentation).

1. Go to <img src="/api/docs/image/54176ad07f146575310749eba44b7c2f42c1b327/icons/experience-hub-icon.svg" alt="Experience Hub icon" class="icon" > **Experience Hub > Dynamic Content > Create new**.
2. Enter the name of the content.
3. Choose the **Web layer** type.

### Define audience
---

1. To select the recipients of the dynamic content, on the **Audience** tab, click **Define**.
2. Select the target [segmentation](#prepare-the-final-segmentation) created based on the membership attribute synchronization in the previous step.

### Define content

1. In the **Content** section, click **Create Message**.
2. From the list of template folders, select a folder with the predefined **Web layer templates** or create your own one from scratch. 
3. In the template configuration form, use the predefine AI recommendation selector and select the [AI recommendation](#prepare-the-ai-recommendations) created in the previous step to make sure that you present only products more expensive than 100$.

    <figure>
    <img src="/api/docs/image/54176ad07f146575310749eba44b7c2f42c1b327/use-cases/all-cases/_gfx/multi3.png" alt="The view of the Web layer template"  class="large">
    <figcaption>Web layer template</figcaption>
    </figure> 

### Define schedule and display settings 

1. In the **Schedule** section, click **Define** and set the time when the message will be active.
2. In the **Display Settings** section, click **Define**.
3. Specify circumstances for dynamic content to be displayed. Optionally, you can also define **Advanced options**. 
4. Click **Apply**.
5. Optionally, you can define the UTM parameters and additional parameters for your dynamic content campaign.
6. Click **Activate**.

## Check the use case set up on the Synerise Demo workspace
---

You can also check the configuration directly in Synerise Demo workspace:
- [Segment of heavy buyers](https://app.synerise.com/analytics/segmentations/f22d73d7-5aba-48e7-b70f-54bbc1dba0a2)
- [Target segmentation](https://app.synerise.com/analytics-v2/segmentations/86d6e5e2-1f0b-4155-a5c3-42ef9024defd)
- [AI Recommendation](https://app.synerise.com/ai-v2/recommendations/dxhcfJpHDuWA)
- [Dynamic content](https://app.synerise.com/campaigns/dynamic-content/create/799fe2e3-e9ec-4ca8-a8cb-2b3e118b0ba6)


If you’re our partner or client, you already have automatic access to the **Synerise Demo workspace (1590)**, where you can explore all the configured elements of this use case and copy them to your workspace.  

If you’re not a partner or client yet, we encourage you to fill out the contact [form](https://demo.synerise.com/request) to schedule a meeting with our representatives. They’ll be happy to show you how our demo works and discuss how you can apply this use case in your business. 

## Read more
---
- [AI recommendation](/docs/ai-hub/recommendations-v2/creating-recommendation-campaign)
- [Dynamic content](/docs/campaign/dynamiccontent)
- [Multibrand workspaces](/docs/settings/workspace/multibrand-workspaces)
- [Segmentation](/docs/analytics/segmentations)