A properly personalized campaign can encourage the customer to make a purchase - but it is even more effective if it is sent at the very best time. For this purpose, it is worth using the time optimizer, a solution that allows you to send campaigns at the time best suited to the activity of a specific customer. Thanks to this option, you can be sure that the campaign will reach them during the time of their activity and will not go unnoticed. Using time optimizer, you increase the chances that the customer will read the communication, use the discount, and finalize the purchase.
In this use case, we will present sending a reminder to a customer with the information about promotion for a specific product category which they visited 7 days before and did not make a purchase. The email will be sent based on the time optimizer to reach each customer at the time when they open emails most often. We consider the time range between 8-22, during the specific day.
## Prerequisites
---
- Configure an [email account](/docs/campaign/e-mail/configuring-email-account).
- [Enable time optimizer](/docs/settings/configuration/time-optimizer#enabling-time-optimizer) in Synerise settings.
- [Create an Email mode](/docs/settings/configuration/time-optimizer#creating-modes) for time optimizer that will analyze the customer’s activity time in the email channel.
- Create an [email template](/docs/campaign/e-mail/creating-email-templates) with information about promotions for specific product category.
Optionally you can implement [coupons](/docs/assets/code-pools) which you can import and add to your email template as the [insert](/developers/inserts/insert-usage#code-pools).
- Implement transaction events using [SDK](/developers/web/transactions-sdk) or [API](https://developers.synerise.com/DataManagement/DataManagement.html#operation/CreateATransaction). Make sure that you implement `category` parameter in the transaction events.
- Implement [Synerise JS SDK](/developers/web/installation-and-configuration) on your website.
- Implement [OG tags](/developers/web/og-tags). Thanks to this, the `product:category` parameter will be available in the `page.visit` events. We will later use this parameter to determine which product category the customer visited.
## Create a workflow
---
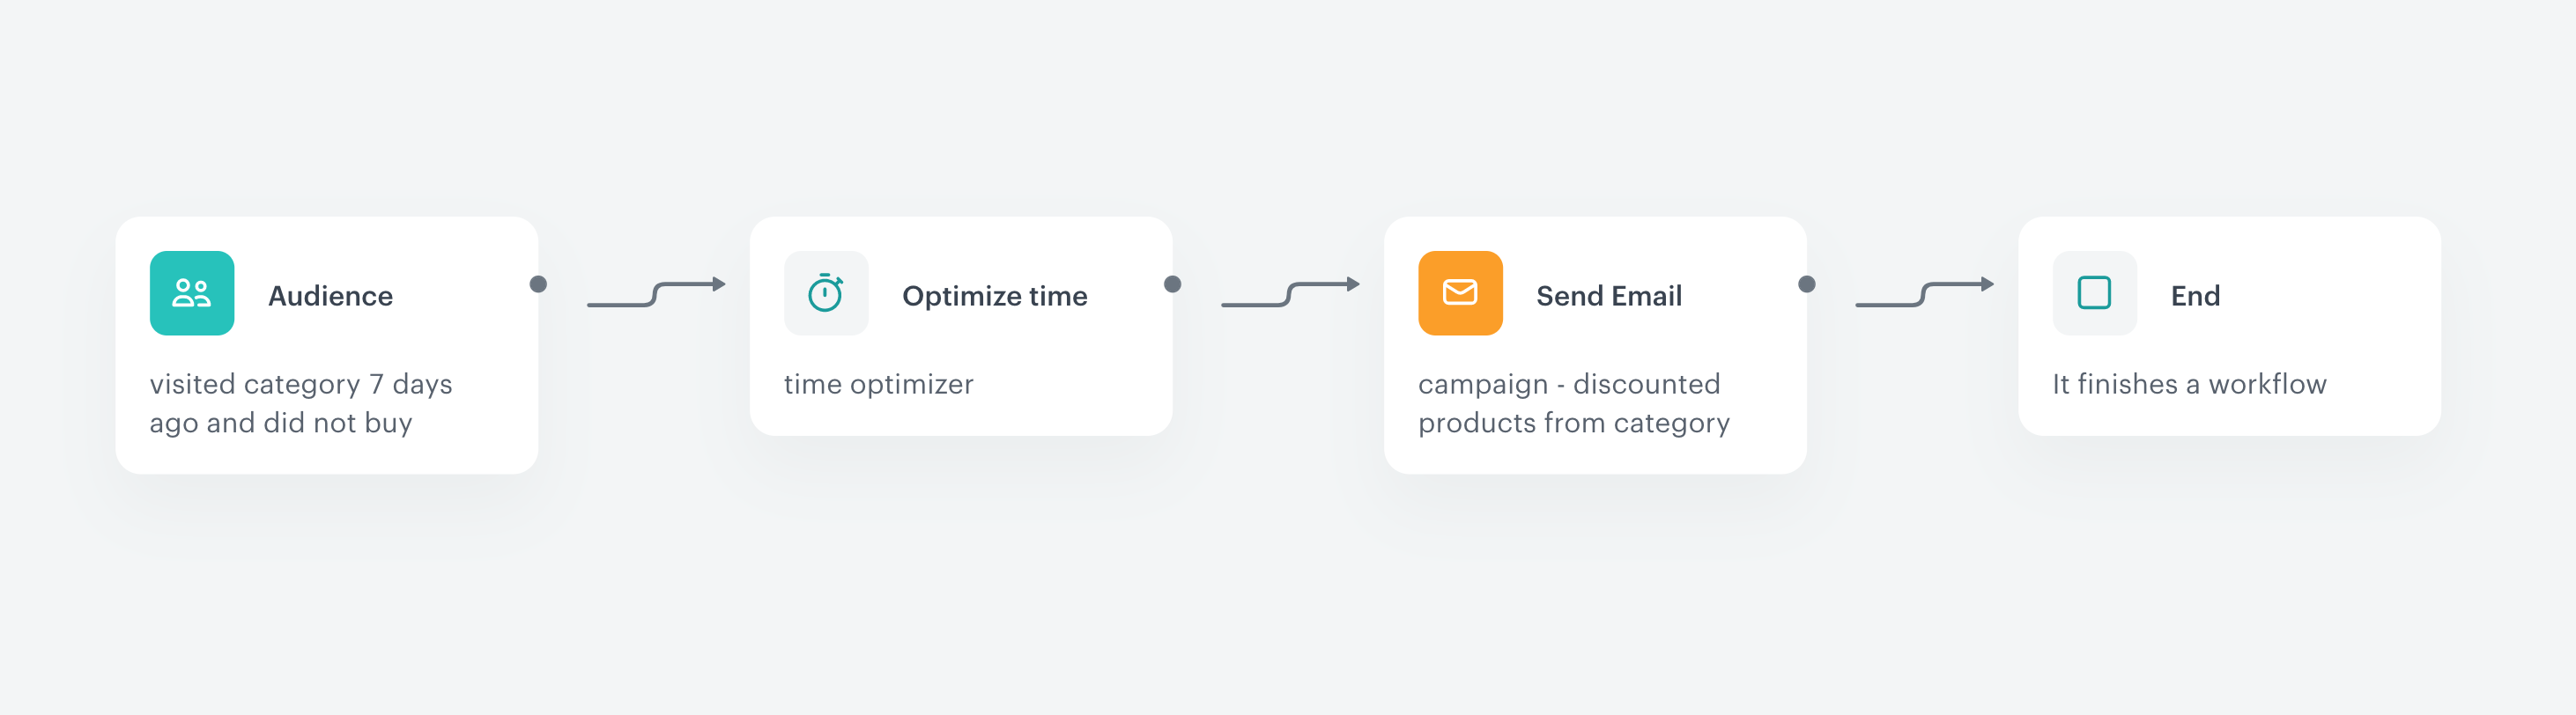
Prepare a workflow that sends an email with the information about discount for the product category, which customer visited 7 days before but have not made the purchase since then. In our case, it will be a promotion for the `decorations` category.
The workflow starts every day at 8 A.M. and it is targeted to people who meet the conditions above. Then, the time optimizer chooses the best time to deliver the email for the next 14 hours for every customer and then, the email is send.
1. Go to **Automation Hub > Workflows > New workflow**.
2. Enter the name of the workflow.
### Define the Audience node
---
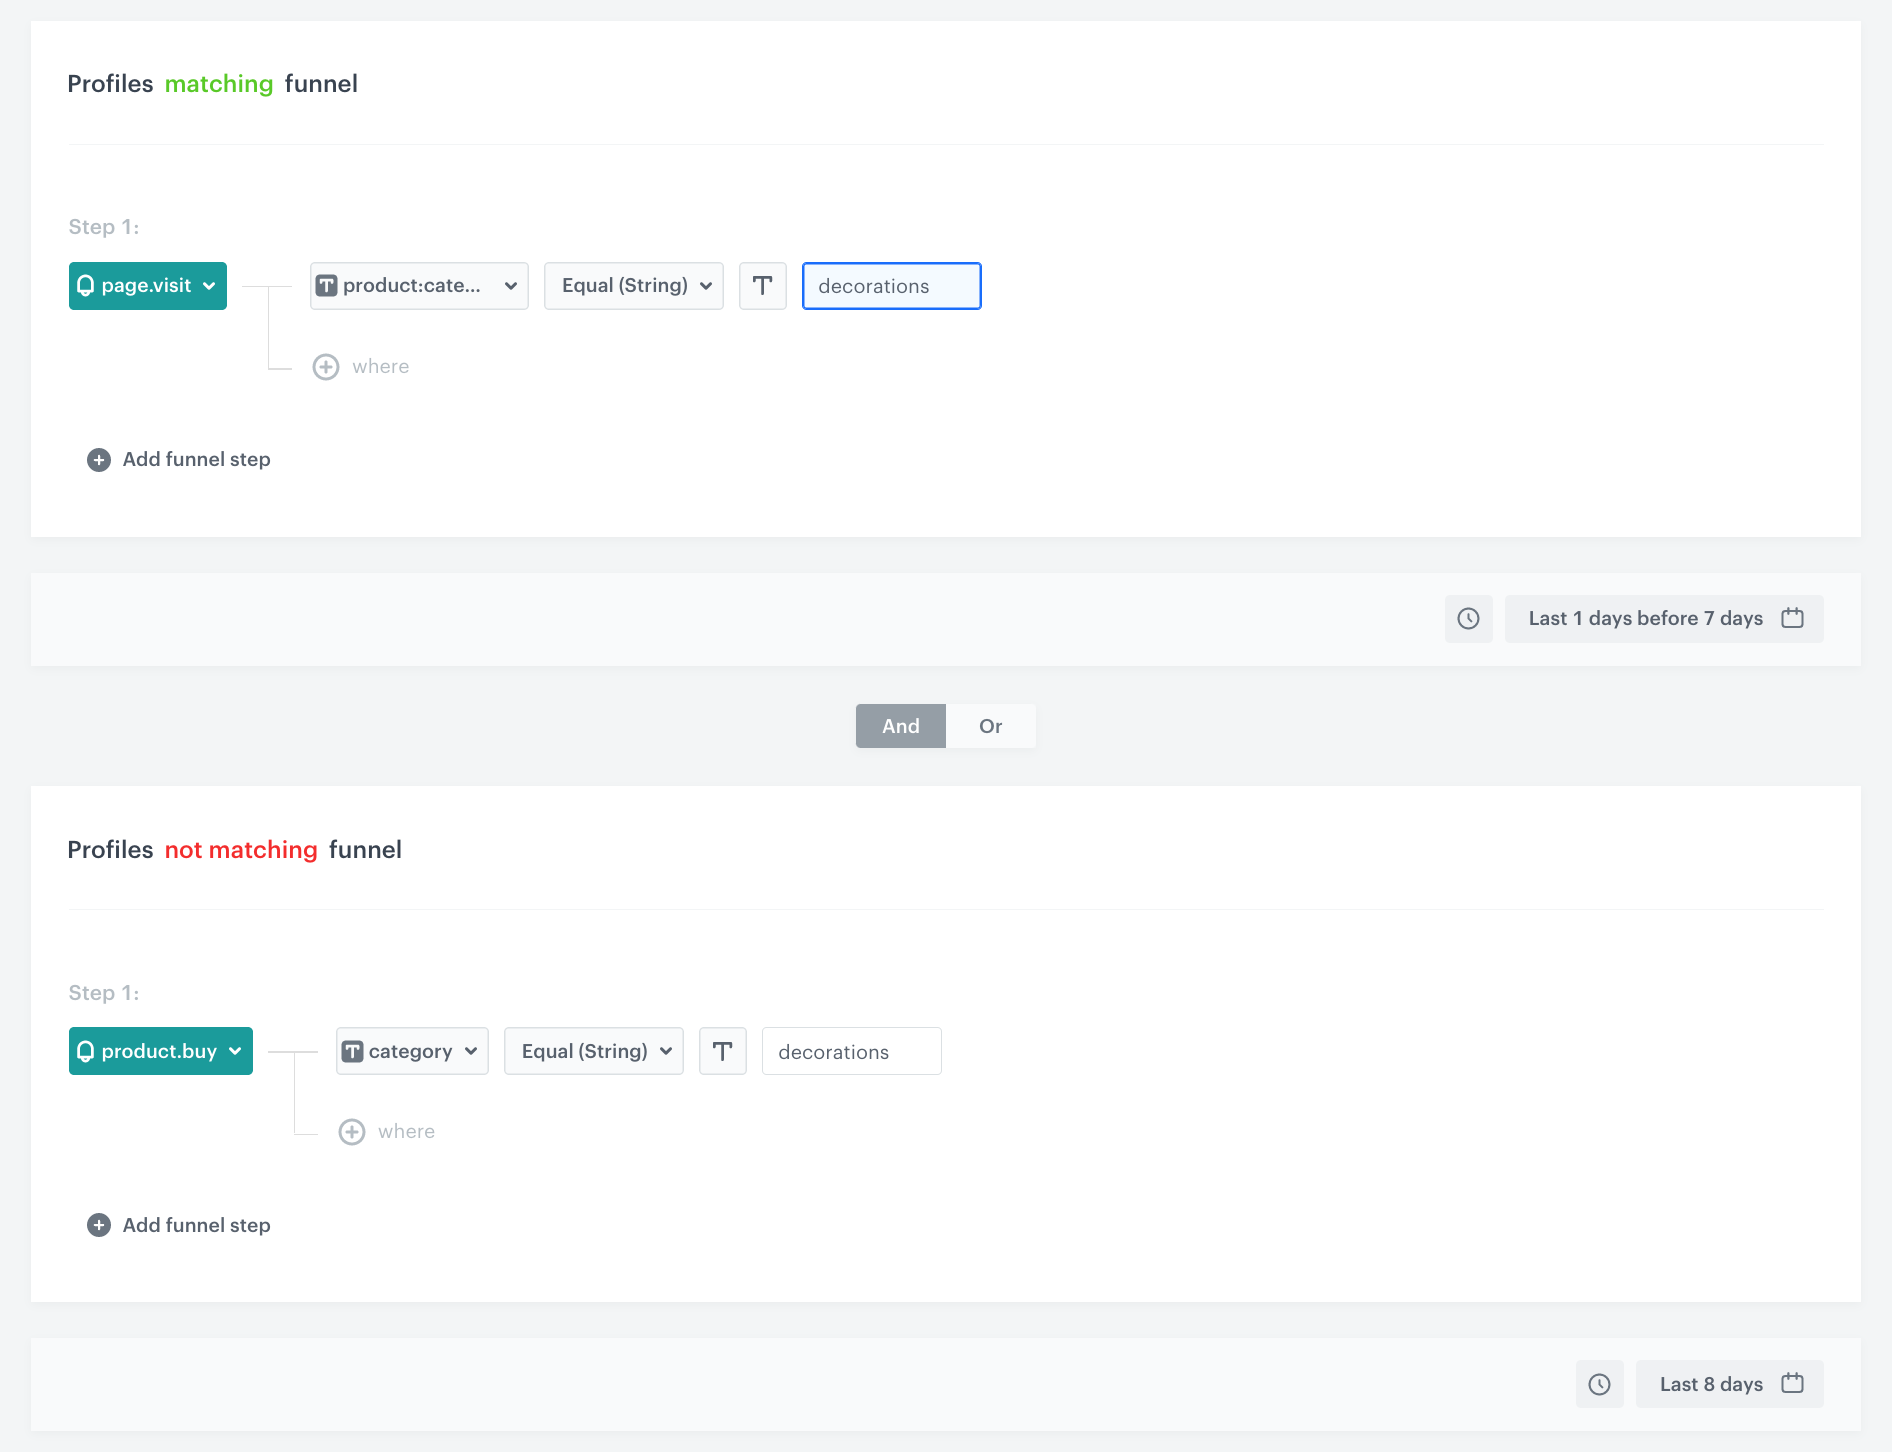
Choose the **Audience** node as the trigger. In this step, you will select the group of customers who have visited the `decorations` category exactly 7 days before but did not make a purchase since then.
1. Start the workflow with the **Audience** node.
2. In the configuration of the node, set the **Run trigger** option to **repeatable**.
3. Set the interval to 1 per day.
4. Choose the day and time when the process starts. Choose 8 A.M. to provide plenty of time for the time optimizer to choose the best time for a particular customer.
5. Select the time zone.
6. In **Define audience**, choose **New Audience** and click **Define conditions**.
1. As the first condition, from **Choose filter** dropdown menu, choose `page.visit` event.
2. Click the **+ where** button, choose **product:category**, and then select **Equal**. As the value, enter the name of the category. In our case it is `decorations`.
3. Set the time range to **Last 1 day before 7 days**.
4. As the second condition, from **Choose filter** dropdown menu, choose the `product.buy` event.
5. Click the **+ where** button, choose **category**, and then select **Equal**. As the value, enter the category `decorations`.
6. Set the time range to **Last 8 days** to exclude the customers who have not made a purchase since the last visit in a specific category.
7. Change the **Profiles matching funnel** option to **Profiles not matching funnel** by clicking the **matching** word.
8. Click **Apply**.
Configuration of the Audience node
### Define the Optimize Time node
---
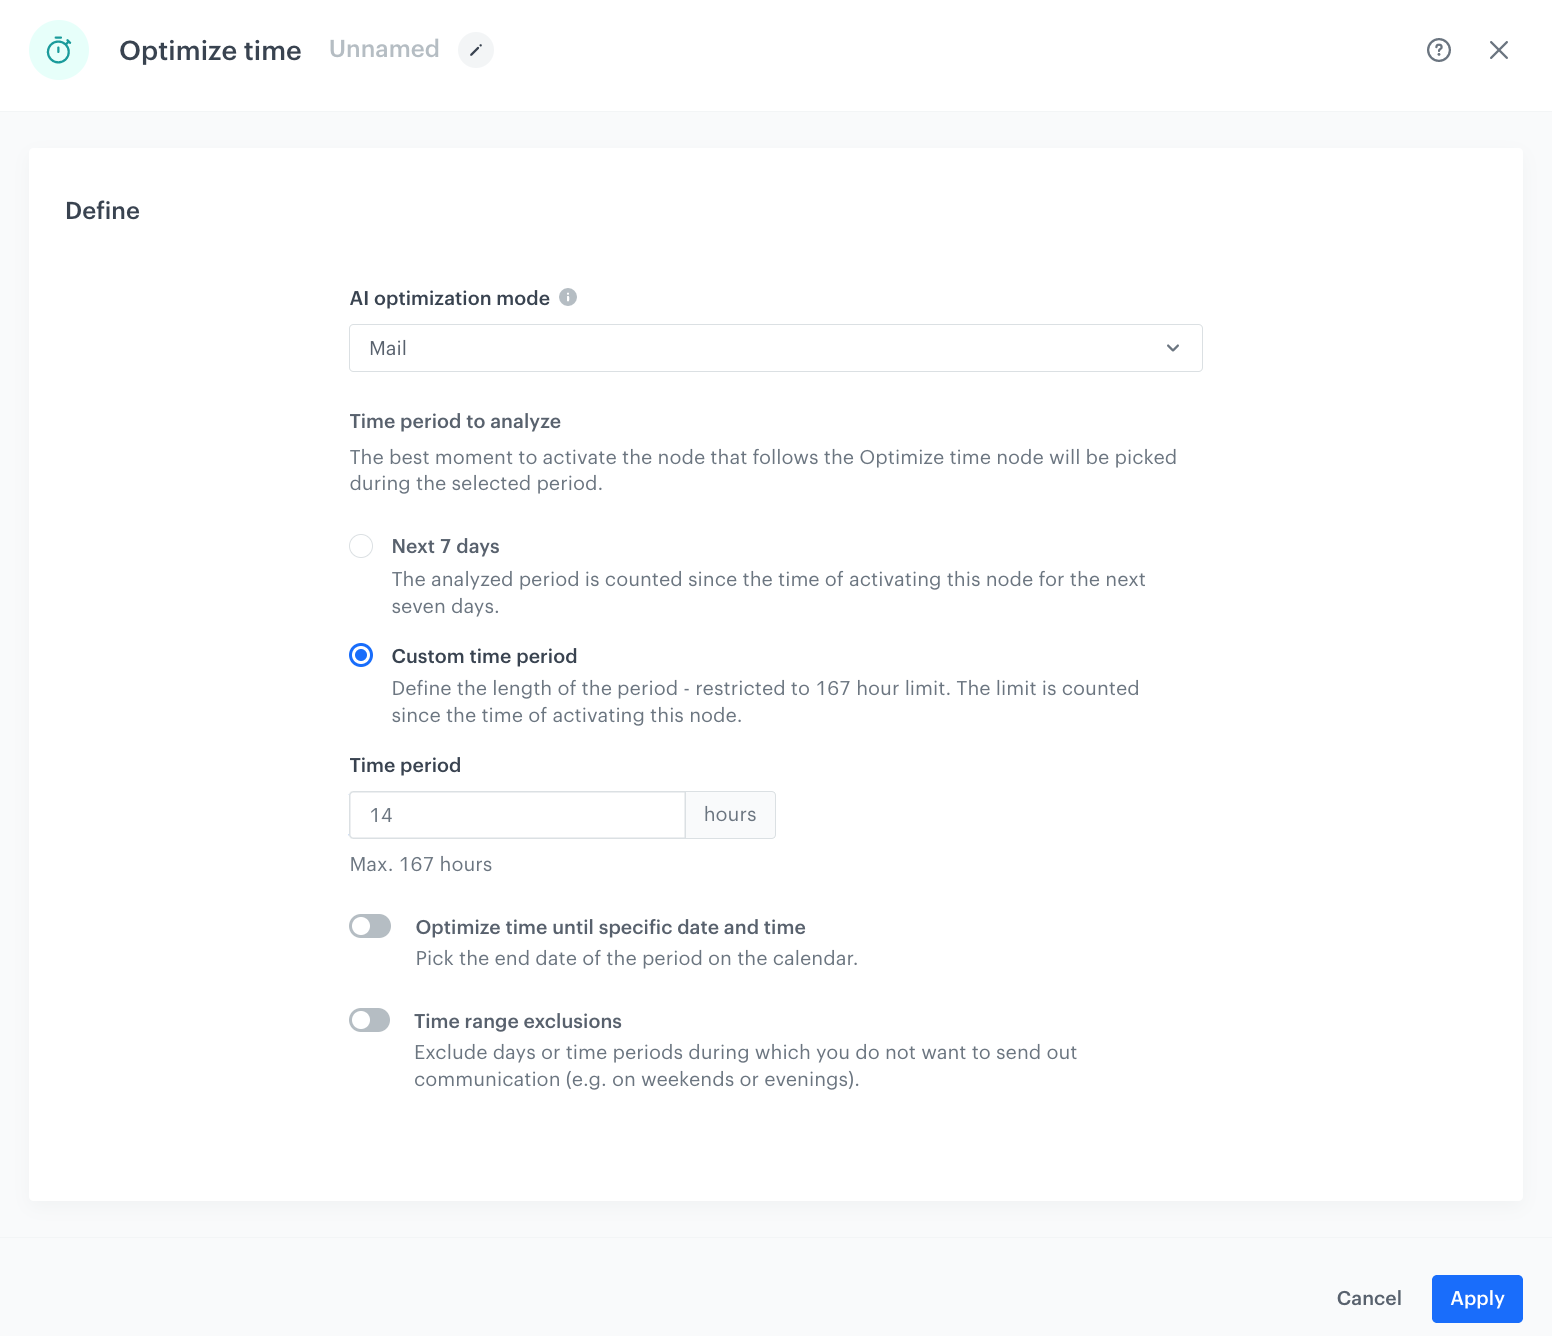
In this step you will set up the time optimizer, which will select the best time to send email for every customer.
1. Add the **Optimize Time** node.
2. From the **AI optimization mode** dropdown, choose **Mail**.
3. In **Time period to analyze**, choose the best moment to activate the node that follows the Optimize Time node. In our case it will be **Custom time period**.
4. In the **Time period** field, enter `14`, to be sure that the message will be sent between 8 and 22, and the best time for every customer will be narrowed to this period.
5. Click **Apply**.
Configuration of the Optimize Time node
You can choose the time period for sending your campaign based on your business needs. You can choose a wider range with the end date, and additional exclusions, for example - for weekends or night hours.
### Define the Send Email node
---
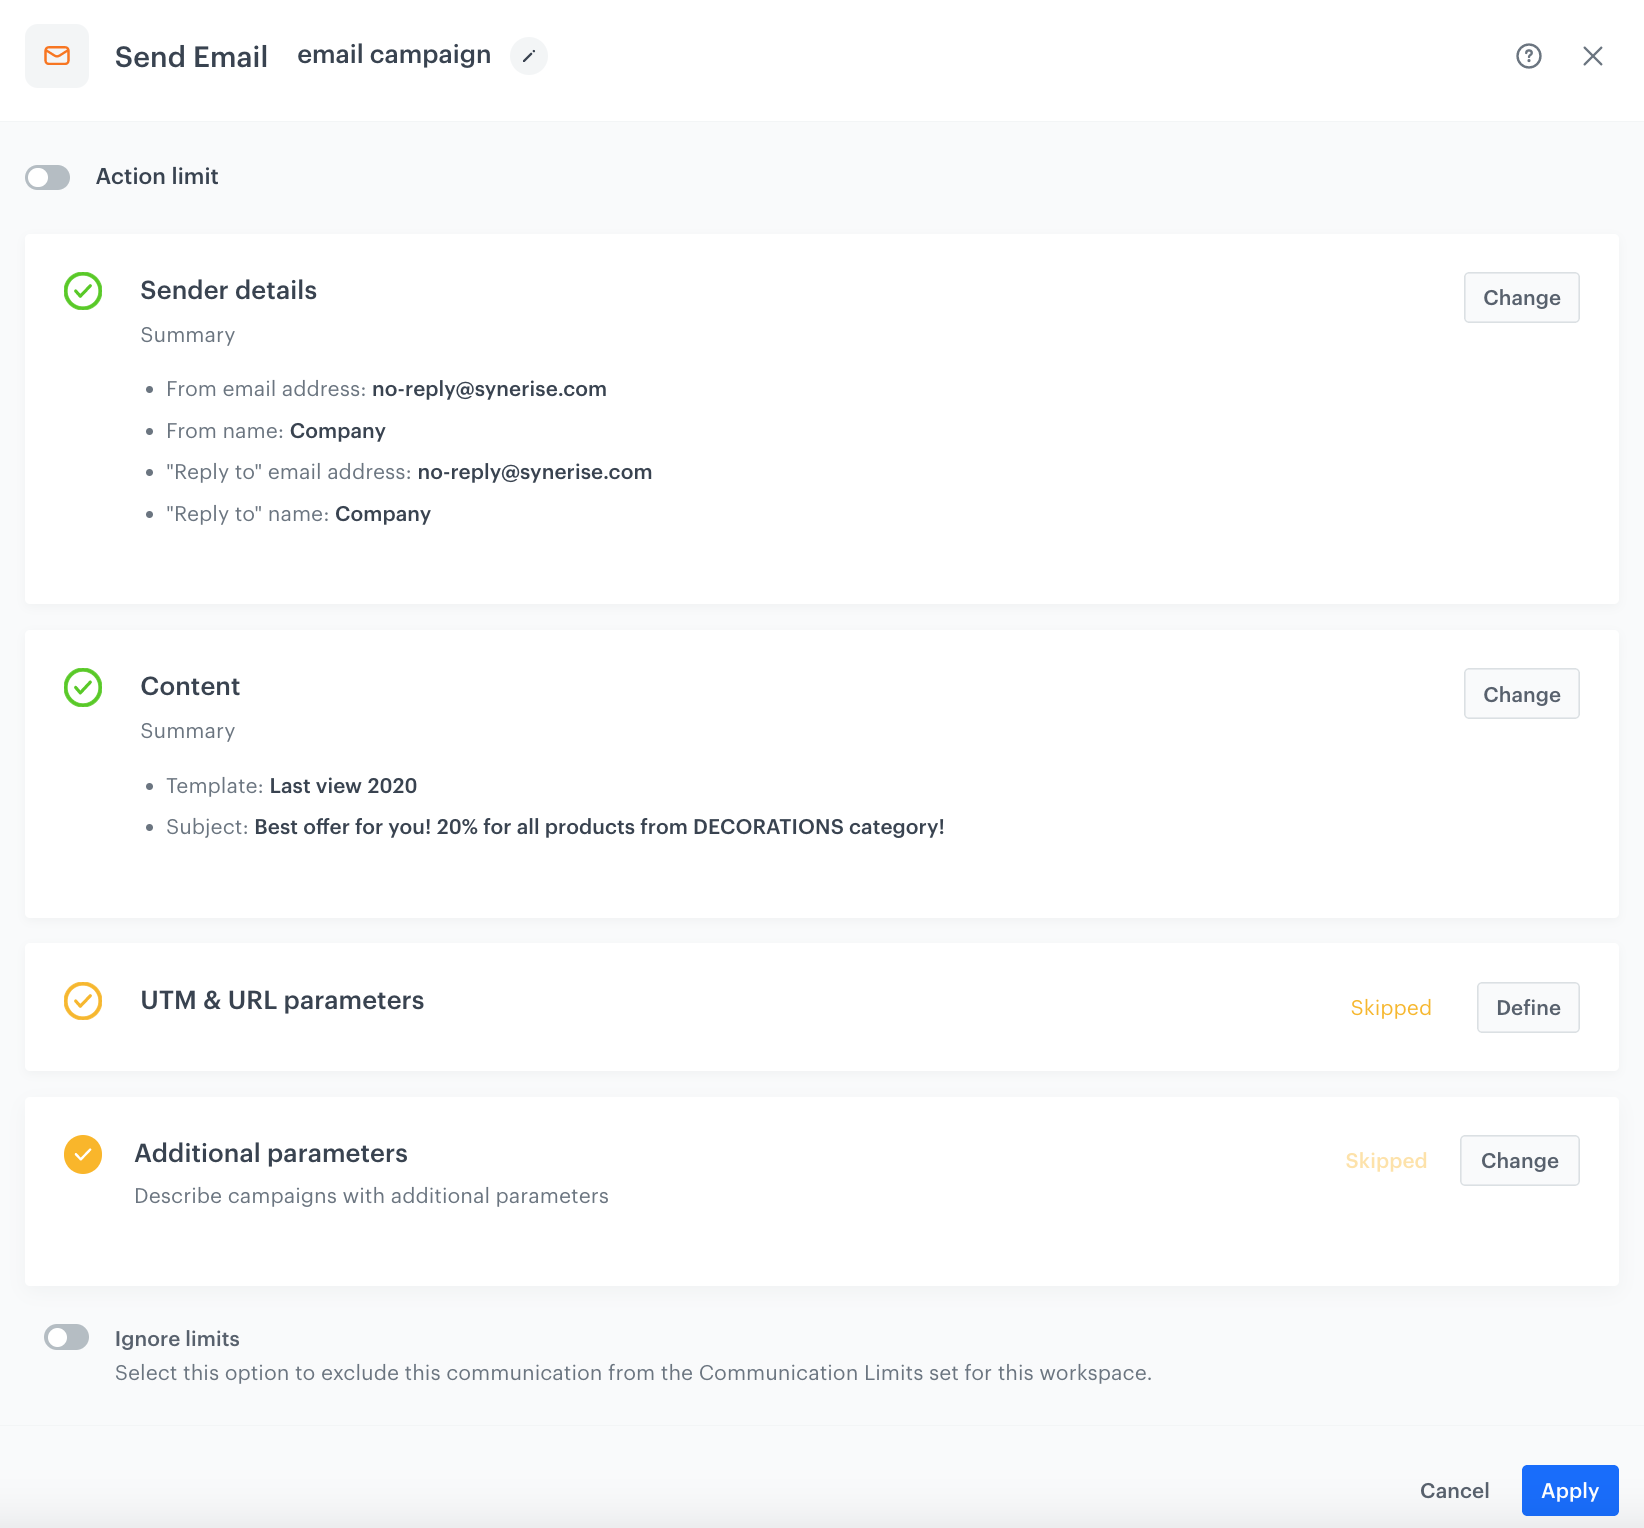
In this step, select the email template with information about the promotion for products from the `decorations` category and set up the final sending settings.
1. Add the **Send Email** node.
1. In the **Sender details** section, choose the email account from which the email is sent.
2. In the **Content** section, select the template that you prepared as a part of the prerequisites with information about current promotion for specific product category. Add the subject of the email.
3. In the **UTM & URL parameters** section, define the UTM parameters added to the links included in the email.
4. In the **Additional parameters** section, optionally describe campaigns with [additional parameters](/docs/campaign/e-mail/creating-email-campaigns#adding-custom-parameters).
5. Click **Apply**.
Send Configuration of the Send Email node
### Prepare the final settings
---
1. Add the **End** node.
2. Optionally, add titles to each node so the workflow will be more understandable to your colleagues.
3. Name the workflow.
4. To save it as a draft, click **Save** it or activate by clicking **Save & Run**.
Configuration of the workflow
## Check the use case set up on the Synerise Demo workspace
---
You can check the [workflow configuration](https://app.synerise.com/automations/automation-diagram/4b934898-00ef-49fb-927d-6bb3aff7e39a) directly in Synerise Demo workspace.
If you’re our partner or client, you already have automatic access to the **Synerise Demo workspace (1590)**, where you can explore all the configured elements of this use case and copy them to your workspace.
If you’re not a partner or client yet, we encourage you to fill out the contact [form](https://demo.synerise.com/request) to schedule a meeting with our representatives. They’ll be happy to show you how our demo works and discuss how you can apply this use case in your business.
## Read more
---
- [Automation Hub](/docs/automation)
- [Coupons](/docs/assets/code-pools)
- [Email campaigns](/docs/campaign/e-mail)
- [Time optimizer](/docs/settings/configuration/time-optimizer)