
In today's digital age, offering personalized promotions within your mobile application is a smart strategy to elevate your customers' overall experience. By tailoring promotions to align with each user's unique preferences and needs, you can foster deeper engagement and lasting loyalty. In this use case, we will delve into the art of crafting a seamless personalized promotion experience.

This use case describes the scenario where AI Engine selects a personalized promotion for each app user. The campaign is based on the following assumptions:
- The promotion is chosen from the breakfast menu,
- It is visible on the app for three hours, specifically between 6 AM and 9 AM, and will be available for use for one hour once activated.

## Prerequisites 
---
- Implement promotions in your mobile application using Synerise [mobile SDK](/developers/mobile-sdk/loyalty) or [API](https://developers.synerise.com/LoyaltyandEngagement/LoyaltyandEngagement.html#operation/profileLogin).
- [Import your product feed to catalog](/use-cases/import-product-feed-to-catalog).
- [Meet the documents requirements](/docs/assets/documents/introduction-to-documents#requirements).
- Apply [this method](https://developers.synerise.com/LoyaltyandEngagement/LoyaltyandEngagement.html#operation/getHandbillForClient_GET) to assign personalized promotions to a Profile. 
- Create promotions and tag them to use later as a filter when creating a personalized promotion.
- Create a filter on the list of (regular) promotions to be reused while preparing the personalized promotion. In our case, we create a filter for breakfast promotions.
   
  <details class="accordion"><summary>Click here to see how to build the filter</summary><div class="accordion-content"><ol> <li>Go to <strong>AI Hub &gt; Regular Promotions</strong>.</li> <li>On the right side of the screen, click <figure><img src="/api/docs/image/54176ad07f146575310749eba44b7c2f42c1b327/docs/campaign/_gfx/promotion-filter-define.gif" alt="Clicking the filter icon" class="full"></figure> </li> <li>Click <strong>Define</strong>.</li> <li>
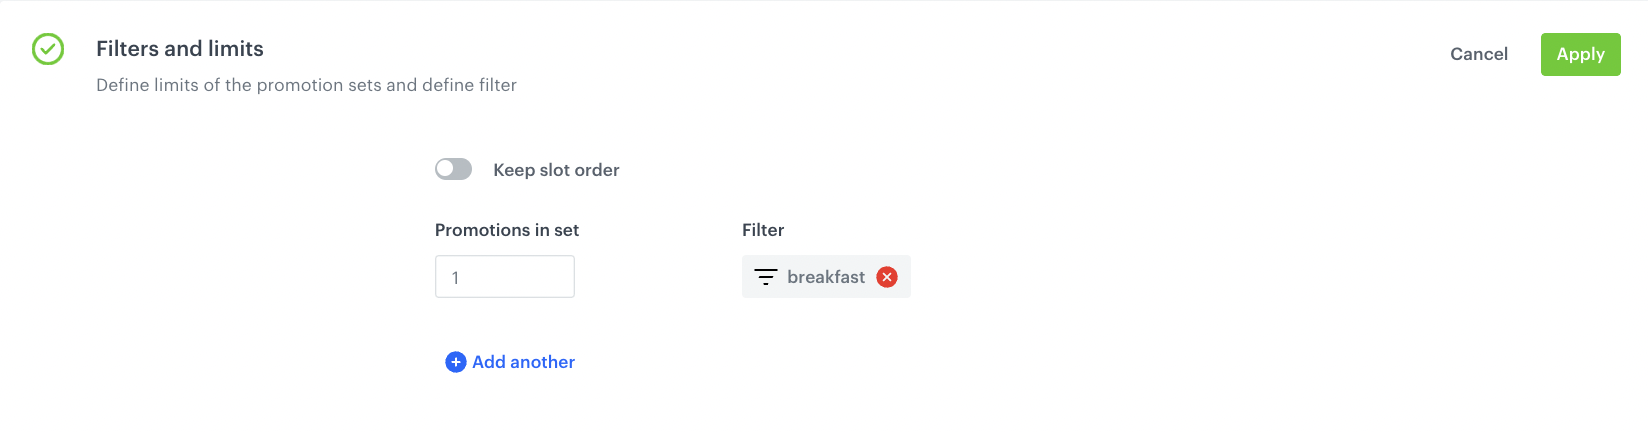
On the pop-up, define the conditions by clicking <strong>Choose filters</strong>. The list contains all parameters from the product feed.
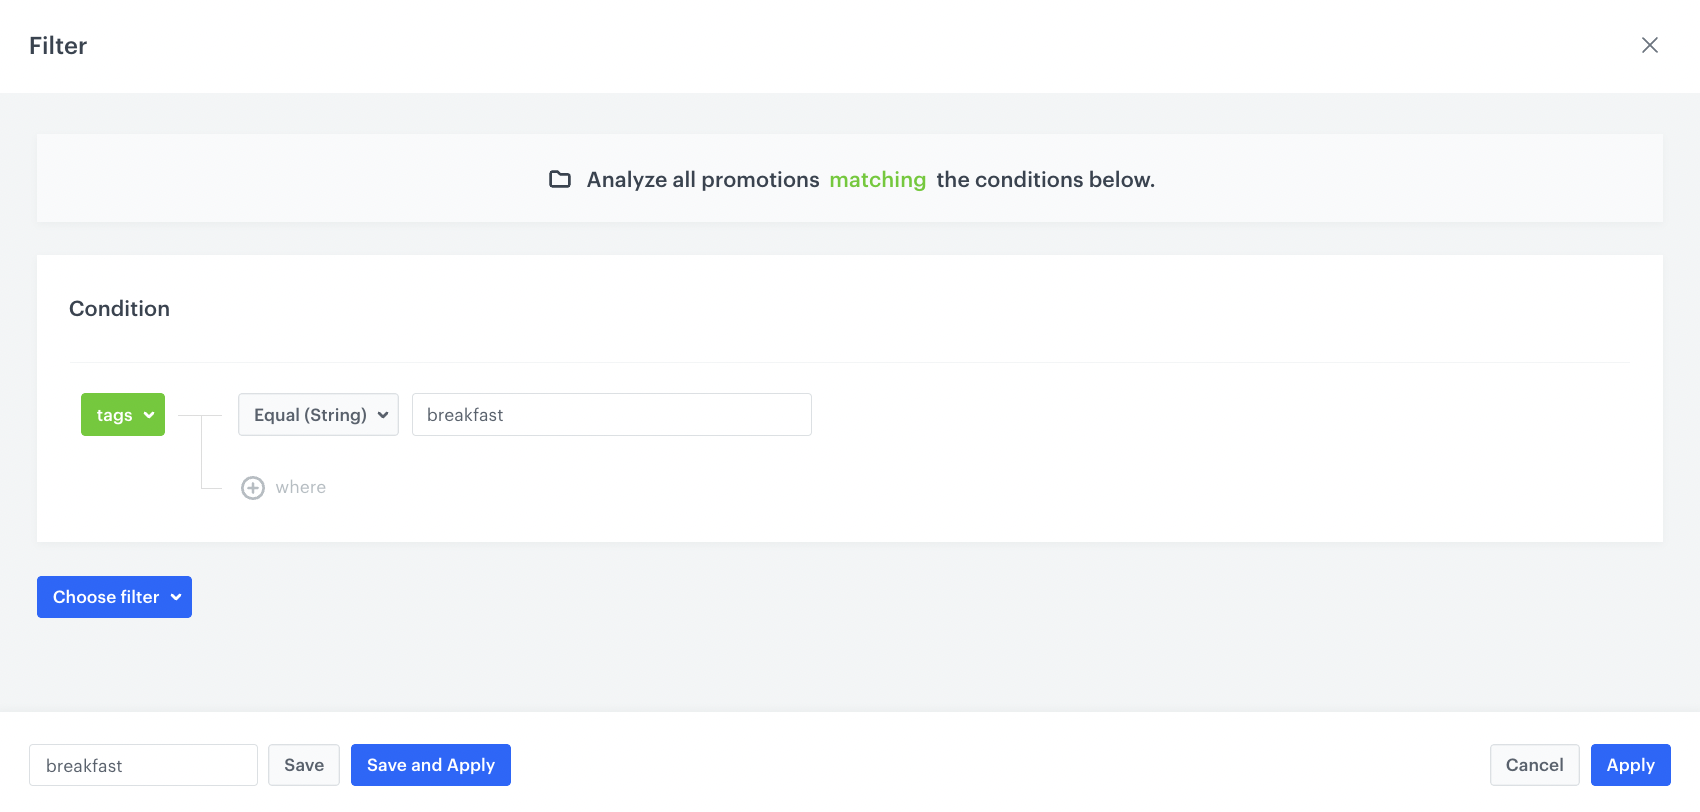
 <figure> <img src="/api/docs/image/54176ad07f146575310749eba44b7c2f42c1b327/use-cases/all-cases/_gfx/promotion-filter-defined-tag.png" alt="Definition of promotion filter" class="full"> <figcaption>Definition of promotion filter</figcaption> </figure> </li> <li>To add a new condition, repeat the previous step.</li> <li>Save the filter by clicking <strong>Save and Apply</strong>.</li> </ol></div></details>


## Process 
---

In this use case, you will go through the following steps:
1. [Create a personalized promotion](/use-cases/personalized-mobile-promotion-with-time-limit#create-a-personalized-promotion).
2. [Create a document](/use-cases/personalized-mobile-promotion-with-time-limit#create-a-document).

### Create a personalized promotion
---
In this part of the process, create a personalized promotions for breakfast promotions that will be active for customers for 1 hour after activation.

1. Go to <img src="/api/docs/image/54176ad07f146575310749eba44b7c2f42c1b327/icons/ai-hub-icon.svg" alt="AI Hub icon" class="icon" > **AI Hub > Personalized Promotions > New personalized promotion**.
2. Select the type of promotion - **Mobile app**.
3. In **A/B test settings**, add variants of the personalized promotion by clicking **Define**.
   1. To add the first variant, click the plus button.
   2. In **Advanced options**, leave the default option - **AI Engine** (the AI engine chooses the items to be included in the promotion).
   3. Confirm by clicking **Apply**.
    <figure>
    <img src="/api/docs/image/54176ad07f146575310749eba44b7c2f42c1b327/use-cases/all-cases/_gfx/handbill-AB-test-settings.png" alt="AB test settings"  class="full">
    <figcaption>AB test settings</figcaption>
    </figure> 
4. In the **Filter and limits** section, define:
   - the filter you created in prerequisites,
   - the number of items that match a filter,
   - the order of the items in the promotion (from top to the bottom).
    <figure>
    <img src="/api/docs/image/54176ad07f146575310749eba44b7c2f42c1b327/use-cases/all-cases/_gfx/handbill-filters-and-limits-configuration.png" alt="Filters and Limits configuration"  class="full">
    <figcaption>Filters and Limits configuration</figcaption>
    </figure> 
5. In the **Activity** section, define the activity of the personalized promotion as **Relative** defining the activity time of promotion. In our case it's 1 hour. 

   <div class="admonition admonition-note"><div class="admonition-icon"><svg xmlns="http://www.w3.org/2000/svg" fill="none" viewBox="0 0 24 24" stroke="currentColor" stroke-width="2.5"><path stroke-linecap="round" stroke-linejoin="round" d="M13 16h-1v-4h-1m1-4h.01M21 12a9 9 0 11-18 0 9 9 0 0118 0z" /></svg></div><div class="admonition-body"><div class="admonition-content">

   You can find more detailed information on all Activity types [here](/docs/ai-hub/personalized-promotions/creating-ai-promotions#defining-promotion-schedule).

   </div></div></div>

    <figure>
    <img src="/api/docs/image/54176ad07f146575310749eba44b7c2f42c1b327/use-cases/all-cases/_gfx/handbill-activity-new.png" alt="Handbill activity"  class="full">
    <figcaption>Personalized promotions activity</figcaption>
    </figure> 
6. Optionally, define the AI Engine boosting settings. You can find the instruction on how to do that [here](/docs/ai-hub/personalized-promotions/creating-ai-promotions#ai-engine-boosting-settings).
7. After configuring all settings, publish the promotion.

### Create a document
---
Create a document with personalized promotion targeted to the whole database. The document will be used to display the promotion in the mobile app during the specific time frame. In our case, the promotion is scheduled for 1 month throughout the week, from 6 to 9 AM.

If you want to learn more about the various document settings, read the article ["Creating documents"](/docs/assets/documents/creating-documents).

1. Go to <img src="/api/docs/image/54176ad07f146575310749eba44b7c2f42c1b327/docs/assets/_gfx/assets-icon.png" alt="Data Modeling Hub icon" class="icon"> **Data Modeling Hub > Documents > Add document**.
2. Enter the name for your document.
2. In the **Audience** section, choose to whom the document will be displayed. Select **Everyone**.
3. In the **Configuration** section:
    1. In the **Slug** field, enter the slug of the document, we recommend using the following name convention: `this-is-slug-name`.
    2. In the **Priority** field, use a number to define the document priority. The order of documents is defined by the priority value (1 is the highest, 100 is the lowest).
    3. Optionally, you can choose the group to which you add your document by using the **Group** option. In this case we focus on single promotion.
    4. From the **Type** drop-down list, select a document type. Document type defines how the document is validated by your mobile application. To create a new type, from the drop-down list, click **Add type**.  
        
       <div class="admonition admonition-note"><div class="admonition-icon"><svg xmlns="http://www.w3.org/2000/svg" fill="none" viewBox="0 0 24 24" stroke="currentColor" stroke-width="2.5"><path stroke-linecap="round" stroke-linejoin="round" d="M13 16h-1v-4h-1m1-4h.01M21 12a9 9 0 11-18 0 9 9 0 0118 0z" /></svg></div><div class="admonition-body"><div class="admonition-content">

       Full explanation of the type is available [here](/docs/assets/documents/introduction-to-documents#terminology).

       </div></div></div>
 
    5. In the **Body** field, insert JSON which includes a reference to the promotion. Below you will find an example of the document body that contains the reference to the promotion created in Synerise. `uri` used in the body aims to get personalized promotions for the customer from the available list of promotions defined earlier in the personalized promotion: 
    
       <pre><code class="language-json">{
         "card": "handbill",
         "promotions": {
           "childSchema": "promotion",
           "uri": "https://api.synerise.com/v4/promotions/promotion/get-for-client/handbill/a136d91c-21db-444a-9c0b-101b9a49cd40"
         }
       }</code></pre>
  

    7. Optionally, to check the preview of the document for the specific customer, use **Preview body**.
    8. To save your changes, click **Apply**.
    <figure>
    <img src="/api/docs/image/54176ad07f146575310749eba44b7c2f42c1b327/use-cases/all-cases/_gfx/document-configuration.png" alt="Document body configuration"  class="full">
    <figcaption>Document body configuration</figcaption>
    </figure> 
1. In the **Schedule** section, define the time when the document will be active.
    1. Schedule the activation of the document by selecting the **Scheduled** option.
    2. Define the start and end date according to your business needs. In our case it starts from the Ocrober 2nd till the October 31. 
    3. Turn on the switch dedicated to setting time windows for the document to be active. 
    4. In this case, we select all days of the week.
    5. Click **+ Add time**.
    6. Define the time frame in which the document will be active. In our case, we select the time between 6 and 9 AM. 
    <figure>
    <img src="/api/docs/image/54176ad07f146575310749eba44b7c2f42c1b327/use-cases/all-cases/_gfx/document-schedule.png" alt="Document schedule configuration"  class="full">
    <figcaption>Document schedule configuration</figcaption>
    </figure> 
2. To save your changes, click **Apply**.
3. To activate immediately or at a scheduled date, click the **Activate** button.

## Check the use case set up on the Synerise Demo workspace
---
You can check the configuration of the [personalized promotion](https://app.synerise.com/campaigns/handbills/a136d91c-21db-444a-9c0b-101b9a49cd40) and [Document](https://app.synerise.com/assets/documents/bc40ec0e-61d3-4813-a02d-3c541f674d39) directly in Synerise Demo workspace.

If you’re our partner or client, you already have automatic access to the **Synerise Demo workspace (1590)**, where you can explore all the configured elements of this use case and copy them to your workspace.  

If you’re not a partner or client yet, we encourage you to fill out the contact [form](https://demo.synerise.com/request) to schedule a meeting with our representatives. They’ll be happy to show you how our demo works and discuss how you can apply this use case in your business.

## Read more
---
- [Documents](/docs/assets/documents)
- [Promotions](/docs/ai-hub/promotions)
