
Personalized promotions play a crucial role in enhancing customer engagement and driving sales. By offering tailored discounts and exclusive deals, businesses can create a sense of value and build stronger relationships with their customers. Leveraging advanced automation and AI ensures that customers receive offers that are most relevant to their preferences, driving higher engagement and conversion rates.

This use case focuses on delivering personalized promotions directly through a mobile application. The AI-powered system assigns six tailored promotions to each customer every seven days, ensuring fresh and relevant offers. Customers can view, activate, and redeem these **mobile promotions** during their visit in the store, with the system automatically tracking their usage and marking them as redeemed. Additionally, it is possible to print personalised promotions directly on the receipt using **Check-out**, enhancing the shopping experience in the physical channel and improving customer engagement through multiple touchpoints.

In this use case, we address scenarios where a Synerise user want to import promotions from a CSV file rather than create them using the Synerise portal. However, this does not exclude cases where the user wishes to manually create promotions in the system. For such cases, the [Promotion feature](/docs/ai-hub/promotions) can be used to add promotions individually.

## Prerequisites  
--- 

### Basic requirements

- Integrate Synerise [promotions](/docs/ai-hub/promotions). 
- Implement promotions in your mobile application using Synerise [mobile SDK](/developers/mobile-sdk/loyalty) or [API](https://developers.synerise.com/LoyaltyandEngagement/LoyaltyandEngagement.html#operation/profileLogin).
- [Import your product feed to a catalog](/use-cases/import-product-feed-to-catalog).
- Apply [this method](https://developers.synerise.com/LoyaltyandEngagement/LoyaltyandEngagement.html#operation/getHandbillForClient_GET) to assign personalized promotion to a Profile. 
- Implement those custom events in your [mobile application](/developers/mobile-sdk/event-tracking).: 
    - `handbill.assign`: Assigns a set of personalized promotions to a customer, refreshed every seven days. Apply [this method](https://developers.synerise.com/LoyaltyandEngagement/LoyaltyandEngagement.html#operation/getHandbillForClient_GET) to assign personalized promotion to a Profile. 
    - `client.activatePromotion`: Tracks when a customer activates a specific promotion in the mobile app. 
    - `client.removePoints`: event is generated through the `/promotion/redeem` method, after the coupon is redeemed.
    - `sale.processed`: Updates the system with redeemed promotions and finalized basket values. This event is generated in Synerise with details about the products purchased using Synerise promotions.


### Integrate with the checkout

Implement transactions in checkout registers using the [API](https://developers.synerise.com/DataManagement/DataManagement.html#operation/CreateATransaction).


<div class="admonition admonition-tip"><div class="admonition-icon"><svg xmlns="http://www.w3.org/2000/svg" fill="none" viewBox="0 0 24 24" stroke="currentColor" stroke-width="2.5"><path stroke-linecap="round" stroke-linejoin="round" d="M9.663 17h4.673M12 3v1m6.364 1.636l-.707.707M21 12h-1M4 12H3m3.343-5.657l-.707-.707m2.828 9.9a5 5 0 117.072 0l-.548.547A3.374 3.374 0 0014 18.469V19a2 2 0 11-4 0v-.531c0-.895-.356-1.754-.988-2.386l-.548-.547z" /></svg></div><div class="admonition-body"><div class="admonition-content">

We recommend implementation of transactional events so that the hash of the card can become an identifier for the customer when they are paying by card. Thanks to this, a customer who will come to the store and pay with the same card can get personalized offer (even if they are not recognized, for example does not scan the mobile application at checkout), because we will be able to properly collect their transaction history.

</div></div></div>


For this promotion to work you need to implement the personalized promotion  in stores. Personalization of promotions on check out works for any customer, even for the anonymous ones.


<div class="admonition admonition-note"><div class="admonition-icon"><svg xmlns="http://www.w3.org/2000/svg" fill="none" viewBox="0 0 24 24" stroke="currentColor" stroke-width="2.5"><path stroke-linecap="round" stroke-linejoin="round" d="M13 16h-1v-4h-1m1-4h.01M21 12a9 9 0 11-18 0 9 9 0 0118 0z" /></svg></div><div class="admonition-body"><div class="admonition-content">

Read more about implementing Check-out promotions [here.](/use-cases/personalized-promotions-on-checkout)

</div></div></div>


Create promotions and assign tags to them for use later as a filter when creating a personalized promotion. You can do it manually, but in case of having more promotions we recommend to prepare them as a CSV file and import them to Synerise using Automation Hub. More about the integration we will discuss later as a 1st step of the process.

## Process 
--- 
In this use case, you will:

1. [Import promotions](/use-cases/personalized-promotions#import-promotions).
1. [Create a workflow](/use-cases/personalized-promotions#create-a-workflow) to import the data about promotions to Synerise.
2. [Create a personalized promotion](#create-a-personalized-promotion) to launch an AI campaign which will choose 6 personalized promotions for each user.

## Import promotions
---

In case of having more promotions we recommend to prepare them as a CSV file and import them to Synerise using Automation Hub. The example file with the list of promotions for specific products can be prepared based on our example, described below.


<details class="accordion"><summary>Check required column names:</summary><div class="accordion-content"><ul> <li><p>catalogIndexItems</p> </li> <li><p>storeItemType</p> </li> <li><p>storeIds</p> </li> <li><p>visibilityStatus</p> </li> <li><p>name</p> </li> <li><p>redeemQuantityPerActivation</p> </li> <li><p>discountValue</p> </li> <li><p>expireAt</p> </li> <li><p>description </p> </li> <li><p>catalogItemType</p> </li> <li><p>priority</p> </li> <li><p>discountTypediscountType</p> </li> <li><p>displayTo</p> </li> <li><p>displayFrom</p> </li> <li><p>redeemLimitPerClient</p> </li> <li><p>type</p> </li> <li><p>headline</p> </li> <li><p>startAt</p> </li> <li><p>storeCatalog</p> </li> <li><p>catalog</p> </li> <li><p>headerName</p> </li> <li><p>redeemType</p> <div class="admonition admonition-note"><div class="admonition-icon"><svg xmlns="http://www.w3.org/2000/svg" fill="none" viewBox="0 0 24 24" stroke="currentColor" stroke-width="2.5"><path stroke-linecap="round" stroke-linejoin="round" d="M13 16h-1v-4h-1m1-4h.01M21 12a9 9 0 11-18 0 9 9 0 0118 0z" /></svg></div><div class="admonition-body"><div class="admonition-content"> <p>
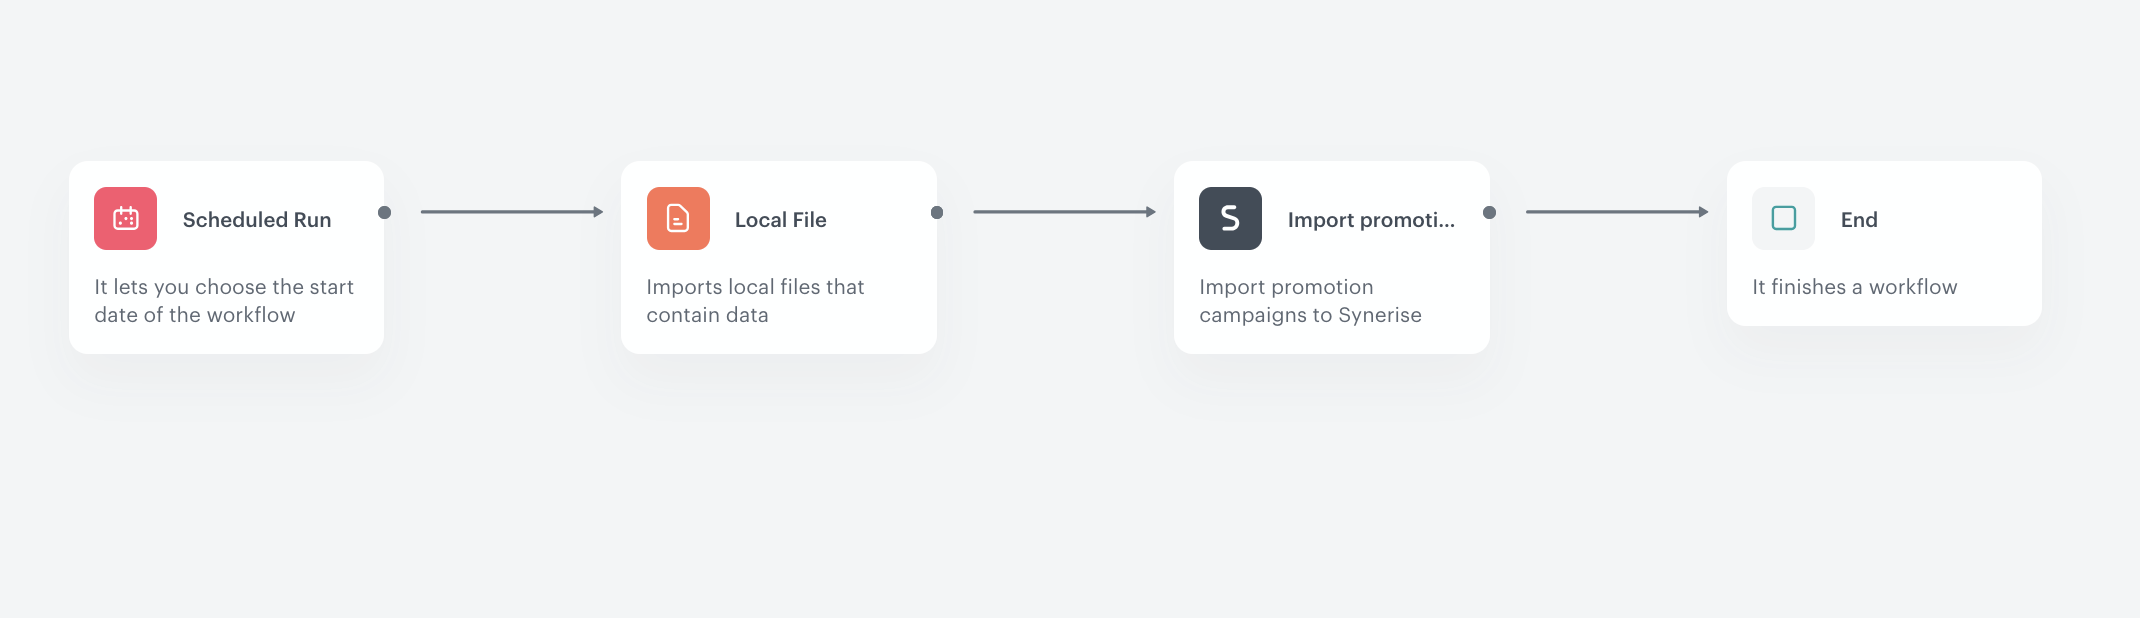
If these are personalized promotions, you can set the <strong>type</strong> parameter to <strong>Personalized promotion</strong> permanently for this use case.</p> </div></div></div></li> </ul> <p>Read more about those parameters <a href="https://developers.synerise.com/LoyaltyandEngagement/LoyaltyandEngagement.html#operation/CreateOrUpdateAPromotion">here.</a></p> <div class="admonition admonition-note"><div class="admonition-icon"><svg xmlns="http://www.w3.org/2000/svg" fill="none" viewBox="0 0 24 24" stroke="currentColor" stroke-width="2.5"><path stroke-linecap="round" stroke-linejoin="round" d="M13 16h-1v-4h-1m1-4h.01M21 12a9 9 0 11-18 0 9 9 0 0118 0z" /></svg></div><div class="admonition-body"><div class="admonition-content"> <p>
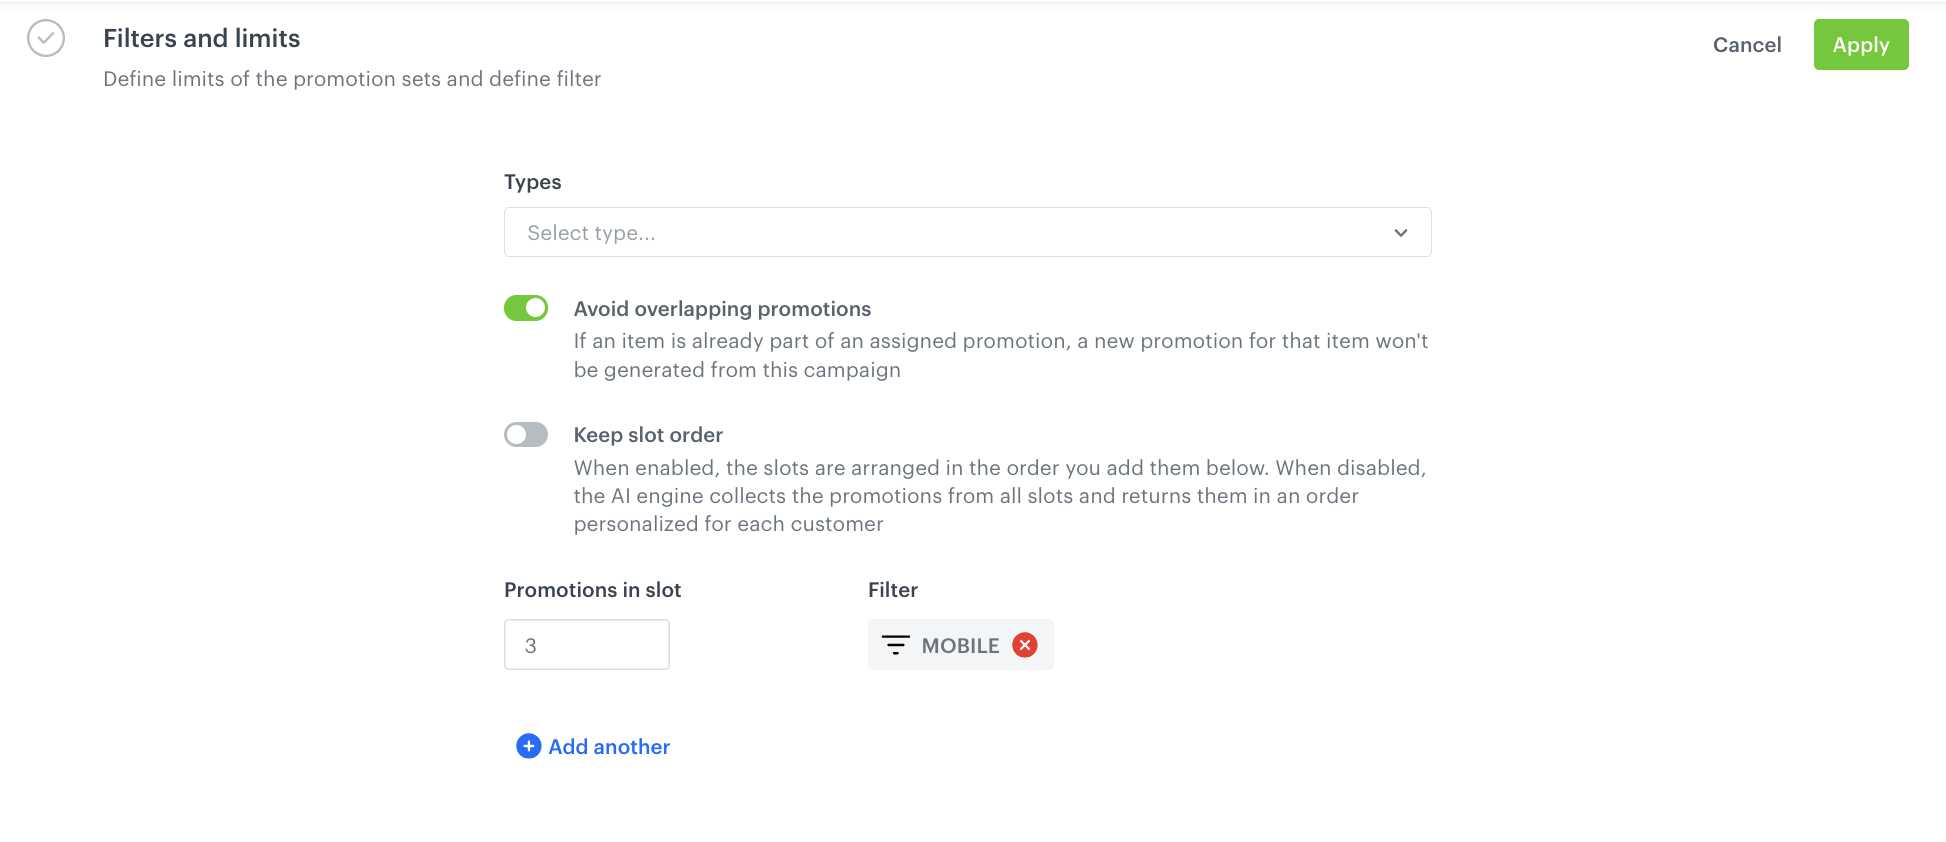
If you wish to generate promotions across different channels, such as on receipts in addition to the app, you can configure this within the campaign using tags. For example: Promotions marked with tag CHECKOUT will display on receipts. Promotions marked with MOBILE will appear in the app. Ensure these tags are already defined in the csv file during the preparation process as <code>tags.0.name</code>. <strong>Important</strong>: The tag must first be created in <strong>Data Modeling Hub -&gt; Tags</strong>.</p> </div></div></div></div></details>


If custom information for promotions, such as unique store icons, descriptions, or additional details, is required, an appropriately structured CSV file must be prepared in advance. Read more about additional columns and their requirements [here.](https://developers.synerise.com/LoyaltyandEngagement/LoyaltyandEngagement.html#operation/CreateAPromotion)


- If you collect promotion data in a different way, and it is organized differently, you can easily transform column names and the format of their values using [data transformation](/docs/automation/data-transformation-and-imports) in Synerise.
- Data transformations during the import of promotions may require additional configuration and testing, as this depends on your implementation of the promotions.


## Create a workflow
---

In this part, you will create a workflow which imports a local file to add promotions to Synerise.

1. Go to <img src="/api/docs/image/54176ad07f146575310749eba44b7c2f42c1b327/icons/automation-hub-icon.svg" alt="Automation Hub icon" class="icon" > **Automation Hub > Workflows > New workflow**.  
2. Enter the name of the workflow.

### Define the Scheduled Run trigger node 
---
At this stage, we will configure launching the workflow.

1. As the trigger node, add **Scheduled Run**.  
2. In the configuration of the node:  
    1. Leave the **Run trigger** option at default (**one time**) and choose the **Immediately** option.  
    4. Confirm by clicking **Apply**.

<figure><img src="/api/docs/image/54176ad07f146575310749eba44b7c2f42c1b327/use-cases/all-cases/_gfx/handbill-automation.png" class="full" alt="The configuration of the Scheduled Run node"><figcaption>The configuration of the Scheduled Run node</figcaption></figure>

### Add local file with sample data

This node allows you to add a data sample. In our case use the csv file prepared as a part of [prerequisites](#prerequisites)

1. On the pop-up, click **Add example**.  
2. Upload the CSV file from the [prerequisites](#prerequisites) as the sample data. 
3. Set **Delimiter** to the delimiter that you used in your CSV file.  
    The delimiter is usually a comma or a semicolon, depending on the application you used to create the file and the regional settings of your system.
3. Click **Generate**.  

<figure><img src="/api/docs/image/54176ad07f146575310749eba44b7c2f42c1b327/use-cases/all-cases/_gfx/data-input-hanbill.png" class="full" alt="The configuration of the Data input node"><figcaption>The configuration of the Data input node</figcaption></figure>

### Add import promotions node and finishing node
---
In this part of the process, you will import the transformed file with customers to Synerise.  

1. Add the **Import Promotions** node. 
2. Add the **End** node.
3. In the upper right corner, click **Save & Run**.
<figure><img src="/api/docs/image/54176ad07f146575310749eba44b7c2f42c1b327/use-cases/all-cases/_gfx/handbill-automation2.png" class="full" alt="The view of the workflow configuration"><figcaption>The workflow configuration</figcaption></figure>

**Results**: After import, all the promotions from the file will be created in Promotions in Synerise.

## Create a personalized promotion
---

This part involves generating personalized promotions, tailored to each user based on the pool of available promotions. Synerise dynamically assigns these promotions, ensuring relevant offers for every customer.

1. Go to <img src="/api/docs/image/54176ad07f146575310749eba44b7c2f42c1b327/icons/ai-hub-icon.svg" alt="AI Hub icon" class="icon" > **AI Hub > Personalized Promotions > New personalized promotion**.
2. Select the type of promotion - **Mobile**.
3. In **A/B test settings**, click **Define**.
4. Click the plus button to create the first variant (at least one variant must exist).
5. If you want to add more variants, click the plus button again.
5. If you want to use a control group, select **Enable a control group**.
6. If you want to change the distribution of variants, use the slider.
7. In **Advanced options**, leave the default option - **AI Engine** (the AI engine chooses the items to be included in the promotion).
8. Confirm by clicking **Apply**.
4. In the **Filters and limits** section:
   - Enable the **avoid overlapping promotions** option. Thanks to that, if an item is already part of an assigned promotion, a new promotion for that item won't be generated from this campaign.
   - Define the filter using the tags added to the promotions to determine the channel where the promotions appear, in our case we can display 3 promotions with the tag "MOBILE".
   - the number of items that match a filter,
   - optionally - the order of the items in the promotion (from top to the bottom).
    <figure>
    <img src="/api/docs/image/54176ad07f146575310749eba44b7c2f42c1b327/use-cases/all-cases/_gfx/handbill-filters-and-limits-configuration2.png" alt="Filters and Limits configuration"  class="full">
    <figcaption>Filters and Limits configuration</figcaption>
    </figure>

5. In the **Activity** section, define the activity of the personalized promotion as **Relative** and set the time to 7 days.
    
   <div class="admonition admonition-note"><div class="admonition-icon"><svg xmlns="http://www.w3.org/2000/svg" fill="none" viewBox="0 0 24 24" stroke="currentColor" stroke-width="2.5"><path stroke-linecap="round" stroke-linejoin="round" d="M13 16h-1v-4h-1m1-4h.01M21 12a9 9 0 11-18 0 9 9 0 0118 0z" /></svg></div><div class="admonition-body"><div class="admonition-content">

   You can find more detailed information on all Activity types [here](/docs/ai-hub/personalized-promotions/creating-ai-promotions#defining-promotion-schedule).

   </div></div></div>

6. Optionally, define the AI Engine boosting settings. You can find the instruction on how to do that [here](/docs/ai-hub/personalized-promotions/creating-ai-promotions#ai-engine-boosting-settings).
7. After configuring all settings, publish the promotion.


   <div class="admonition admonition-note"><div class="admonition-icon"><svg xmlns="http://www.w3.org/2000/svg" fill="none" viewBox="0 0 24 24" stroke="currentColor" stroke-width="2.5"><path stroke-linecap="round" stroke-linejoin="round" d="M13 16h-1v-4h-1m1-4h.01M21 12a9 9 0 11-18 0 9 9 0 0118 0z" /></svg></div><div class="admonition-body"><div class="admonition-content">

   If you want to additionally activate promotions displayed on receipts, create the same personalized promotion as described above, but **change the type to Check-out and update the** **tag to CHECKOUT**. If you require specific personalized settings based on your business needs, feel free to configure them accordingly. 
   Read more about implementing Check-out promotions [here.](/use-cases/personalized-promotions-on-checkout)

   </div></div></div>


## Check the use case set up on the Synerise Demo workspace 
--- 

You can check the configuration directly in Synerise Demo workspace: 

- [Workflow](https://app.synerise.com/automations/workflows/automation-diagram/66f44f33-4b74-4dde-a47b-6e7e72ad2e09) 

-[Personalized promotion](https://app.synerise.com/campaigns/handbills/db010e47-cc9a-4126-9125-e56b19bbc25f)  

If you’re our partner or client, you already have automatic access to the **Synerise Demo workspace (1590)**, where you can explore all the configured elements of this use case and copy them to your workspace.  

If you’re not a partner or client yet, we encourage you to fill out the contact [form](https://demo.synerise.com/request) to schedule a meeting with our representatives. They’ll be happy to show you how our demo works and discuss how you can apply this use case in your business.  

## Read more 
--- 
- [Automation Hub](/docs/automation) 
- [Promotions](/docs/ai-hub/promotions) 
