
We can predict the likelihood of offline visit for customers with their push notifications enabled. They may be a great target for promotions, so you may want to [send them push notifications with promotions at the best time](/use-cases/mobile-push-birthday-best-time). You can automate sending mobile push notifications to promote products and boost the value of in-store visits by sending promo coupons to customers who are predicted to visit our offline store.

This use case describes a workflow that sends a mobile push notification with a promotional code to customers who are predicted to visit an offline store. In this case, we consider transactions made in an offline store as a visit. However, depending on your business, you can take any other event that will be equal to a customer's presence in your offline store, for example scanning a mobile application at the entrance. The workflow is triggered by the `snr.prediction.score` event with the high score and sends a mobile push at the time they are most likely to visit in the next seven days.

## Prerequisites
---
- [Implement Synerise SDK in your mobile application](/developers/mobile-sdk).
- Implement mobile push notifications in your mobile application: [iOS](/developers/mobile-sdk/configuring-push-notifications/ios), [Android](/developers/mobile-sdk/configuring-push-notifications/android).
- Implement offline transaction events using [API](https://developers.synerise.com/DataManagement/DataManagement.html#operation/CreateATransaction).

  <div class="admonition admonition-note"><div class="admonition-icon"><svg xmlns="http://www.w3.org/2000/svg" fill="none" viewBox="0 0 24 24" stroke="currentColor" stroke-width="2.5"><path stroke-linecap="round" stroke-linejoin="round" d="M13 16h-1v-4h-1m1-4h.01M21 12a9 9 0 11-18 0 9 9 0 0118 0z" /></svg></div><div class="admonition-body"><div class="admonition-content">

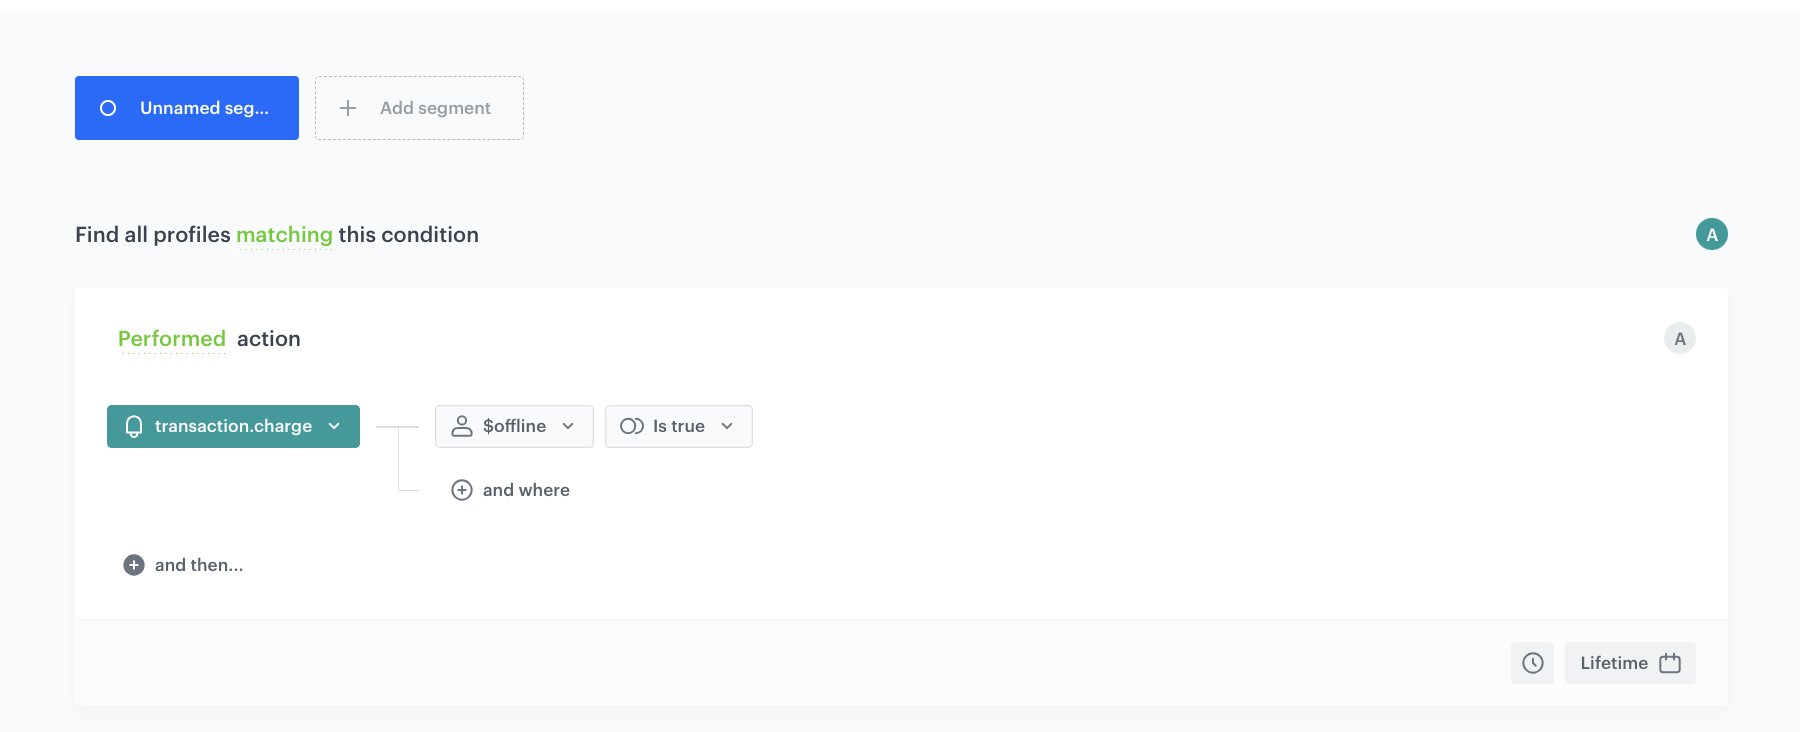
  In this case, we consider an offline transaction as a visit to the store, but if necessary, you can implement a different event that will mean visiting the offline store, such as a [custom event for scanning the mobile application](https://developers.synerise.com/DataManagement/DataManagement.html#operation/CustomEvent).

  </div></div></div>


- [Enable time optimizer](/docs/settings/configuration/time-optimizer#enabling-time-optimizer).
- [Create a Mobile mode](/docs/settings/configuration/time-optimizer#creating-modes) for Time Optimizer that will calculate the customer's activity time in the mobile application.
- [Create a mobile push template](/docs/campaign/Mobile/simple_push) with a promo code. 


  <div class="admonition admonition-tip"><div class="admonition-icon"><svg xmlns="http://www.w3.org/2000/svg" fill="none" viewBox="0 0 24 24" stroke="currentColor" stroke-width="2.5"><path stroke-linecap="round" stroke-linejoin="round" d="M9.663 17h4.673M12 3v1m6.364 1.636l-.707.707M21 12h-1M4 12H3m3.343-5.657l-.707-.707m2.828 9.9a5 5 0 117.072 0l-.548.547A3.374 3.374 0 0014 18.469V19a2 2 0 11-4 0v-.531c0-.895-.356-1.754-.988-2.386l-.548-.547z" /></svg></div><div class="admonition-body"><div class="admonition-content">

  For promo codes, you can use our [Voucher pools](/docs/assets/code-pools), which allows you to assign a unique coupon from a specified pool for each customer.

  </div></div></div>


## Process
---

In this use case, you will go through the following steps:
1. [Create a segmentation](#create-a-segmentation) of customers who have made transaction in an offline store.
2. [Create an expression](#create-an-expression).
3. [Create a segmentation of customers for whom the prediction is made](#create-a-segmentation-of-customers-for-whom-the-prediction-is-made).
3. [Create a prediction](#create-a-prediction).
4. [Create a workflow](/use-cases/predicting-likelihood-of-offline-visit#create-a-workflow).

## Create a segmentation
---
In this step, we create a group of customers who have made transaction in an offline store. This segmentation will be used in an expression in the next step.

1. Go to <img src="/api/docs/image/54176ad07f146575310749eba44b7c2f42c1b327/icons/decision-hub-icon.svg" alt="Decision Hub icon" class="icon">**Decision Hub > Segmentations > New segmentation**.
3. Enter the name of the segmentation.
4. From the **Add condition** dropdown list, select the `transaction.charge` event.
5. Click the **+ where** button, from the **Choose parameter** dropdown menu, choose `$offline`.
6. From the **Choose operator** dropdown, choose **Boolean**, and then select **Is true**.
7. Using the date picker in the lower-right corner, set the time range to **Relative time range > Lifetime**. Confirm by clicking **Apply**.
6. Save the segmentation.

 <figure><img src="/api/docs/image/54176ad07f146575310749eba44b7c2f42c1b327/use-cases/all-cases/_gfx/offline-transactions.png" class="full" alt="The view of the segmentation configuration"><figcaption>Segmentation configuration</figcaption></figure>  

## Create an expression
---
In this part of the process, create an expression that will serve as the target for the prediction model. The expression will return 1 if a customer belongs to the previously defined segmentation and 0 if they don’t.

7. Go to <img src="/api/docs/image/54176ad07f146575310749eba44b7c2f42c1b327/icons/behavioral-data-hub-icon.svg" alt="Behavioral Data Hub icon" class="icon"> **Behavioral Data Hub > Expressions > New expression**.
8. Enter the name of the expression.
9. From the **Expressions for** dropdown list, select **Attribute**.  
    Predictions work only with attribute expressions.
10. In the formula creator, click the **Select** node and from the drop-down list select **Function > If**.
11. As the first argument, select the [segmentation you created earlier](#create-a-segmentation):
12. As the second argument, select **Constant** with a value of `1`.
12. As the third argument, select **Constant** with a value of `0`.
13. Save the expression.

 <figure><img src="/api/docs/image/54176ad07f146575310749eba44b7c2f42c1b327/use-cases/all-cases/_gfx/offline_pred_exp.png" class="full" alt="The view of the expression configuration"><figcaption>Expression configuration</figcaption></figure>  

## Create a segmentation of customers for whom the prediction is made
---
In this step, we create a group of customers who have visited our online store in the last 7 or 14 days. This segmentation will be used as an audience for the prediction.

1. Go to <img src="/api/docs/image/54176ad07f146575310749eba44b7c2f42c1b327/icons/decision-hub-icon.svg" alt="Decision Hub icon" class="icon">**Decision Hub > Segmentations > New segmentation**.
3. Enter the name of the segmentation.
4. From the **Add condition** dropdown list, select the `Visited page` event.
5. Using the date picker in the lower-right corner, set the time range to **Relative time range > More > Last 7 days**. Confirm by clicking **Apply**.
6. Click **Add segment**.
7. From the **Add condition** dropdown list, select the `Visited page` event.
5. Using the date picker in the lower-right corner, set the time range to **Relative time range > Custom > Last 14 days**. Confirm by clicking **Apply**.
6. Save the segmentation. 

 <figure><img src="/api/docs/image/54176ad07f146575310749eba44b7c2f42c1b327/use-cases/all-cases/_gfx/offline-transactions2.png" class="full" alt="The view of the segmentation configuration"><figcaption>Segmentation configuration</figcaption></figure>  

## Create a prediction
---
In this step, we will calculate the prediction, create a segmentation of customers who will be analyzed while making a prediction. The output of the prediction is  a `snr.prediction.score` event that will appear on the customers’ profiles. The event contains a `score.label` parameter which determines the probability of a customer's visit to your store.
The workflow configuration will be based on this parameter. We will select customers who have the highest probability to visit our store.

1. Go to <img src="/api/docs/image/54176ad07f146575310749eba44b7c2f42c1b327/icons/ai-hub-icon.svg" alt="AI Hub icon" class="icon" > **AI Hub > (AI Predictions) Models > New prediction**.
2. Enter a name for the prediction.
3. In the **Prediction type** section, click **Define**.
4. Select **Classification** and click **Apply**.

### Select the audience
In this section you decide which group of the customers will be taken into account while making a prediction. For every individual in the segmentation, Synerise produces a single prediction.

Segmentations can be very complex and the possibilities of building the conditions are practically unlimited. In this example, a simple segmentation will include customers who have made a transaction in the last week or two weeks.

1. In the **Audience** section, click **Define**.
2. Click **Choose segmentation**.
3. Enter the name of the [segmentation you've created in the previous step](#create-a-segmentation-of-customers-for-whom-the-prediction-is-made).
./8. Click **Apply**.

### Select prediction target
1. In the **What would you like to predict?** section, click **Define**.
2. Click **Select expression** and select the [expression created earlier](#create-an-expression).
3. Click **Apply**.

### Select inputs
In this section, you set up input [features](/docs/glossary#feature) based on which the prediction model will be trained. 

It is possible to select feature inputs manually, but we recommend using the automatic selection, as explained below. Our algorithms evaluate feature relevance in context of the prediction target and are, in most cases, more effective than manual selection.

1. In the **Model inputs** section, click **Define**.
2. Click **Add feature > Automatically**.  
    **Result:** The list is populated with input features.
3. Click **Apply**.

### Configure additional settings
The additional settings define how often re-calculations are made and the content of events produced by the prediction.

1. In the **Settings** section, click **Define**.
2. From the **How many days in advance do you want to make a prediction** list, select **30 days**.  
3. For the purposes of this example, select **One-time calculation** checkbox.
4. In the **Prediction start** section, select **Immediately**.
4. In **How would you like to display results**, select **5-point scale**.  
    The algorithm detects the importance of a prediction.
6. In the **Define the value of the score name parameter** section, enter a user-friendly name for the prediction score.
The name is shown as the value of the `scoreName` parameter in the `snr.prediction.score` event.
7. Click **Apply**.
7. To finish and calculate the prediction, click **Save & Calculate**.

**Result:**  
The prediction results are saved as `snr.prediction.score` events in customer profiles.


## Create a workflow
---
As the final part of the process, create a workflow that manages the push notifications. The `snr.prediction.score` event with the high score triggers the start of the workflow. The push notification will be sent to customers with the high prediction score to visit offline store on the day they are most likely to visit.

1. Go to **Automation Hub > Workflows > New workflow**.
2. Enter the name of the workflow. 

### Define the Profile Event trigger node

1. As the first node of the workflow, add **Profile Event**. In the node settings:
    1. Click **Choose filter** and from the dropdown list, select the `snr.prediction.score` event.
    2. For the event parameter, click the **+ where** button and select `modelId`.
    2. As the logical operator, select **Equal**.
    3. Enter the ID of the [custom prediction](#create-a-prediction) created in the previous step.
    4. Click the **+ and where** button and select `score_label`.
    5. As the logical operator, select **Equal**. 
    6. Type `High`.

    <figure><img src="/api/docs/image/54176ad07f146575310749eba44b7c2f42c1b327/use-cases/all-cases/_gfx/trigger-node-predictions.png" class="full" alt="The screenshot presents Profile Event node configuration"><figcaption>Profile Event node configuration</figcaption></figure>  
2.  Confirm by clicking **Apply**.  

### Configure the Optimize Time node
The time of sending the push message for each customer is adjusted to their `snr.prediction.score` value.

1. Add an **Optimize Time** node.  
2. In the configuration of the node:  
    1. Select the Mobile mode you created as a part of the prerequisites.   
    2. Select **Next 7 days**.
    4. Confirm by clicking **Apply**.

### Configure the Send Mobile Push node

1. Add a **Send Mobile Push** node.
2. In the configuration of the node: 
    1. In the **Template type**, select the mobile push type according to your business needs.
    2. Select proper push template that you created earlier.
    3. Confirm by clicking **Apply**.
3. Add the **End** node.
4. In the upper right corner, click **Save & Run**.

<figure><img src="/api/docs/image/54176ad07f146575310749eba44b7c2f42c1b327/use-cases/all-cases/_gfx/offline_pred_workflw.png" class="full" alt="The view of Workflow"><figcaption>The final workflow configuration</figcaption></figure> 

## Check the use case set up on the Synerise demo workspace
---

You can check all configurations directly in Synerise Demo workspace:
- [Segmentation](https://app.synerise.com/analytics-v2/segmentations/68d98a1e-54dc-4b42-b5fb-34d223b4e398) of customers who have made transaction in an offline store.
- [Expression](https://app.synerise.com/analytics/expressions/ee6d687c-a4d8-4a23-abc3-04474ec6d522)
- [Segmentation](https://app.synerise.com/analytics-v2/segmentations/f90c0bd1-634c-4fff-9d9b-2612f97edc18) of customers for whom the prediction is made.
- [Prediction](https://app.synerise.com/ai-v2/predictions/generic-scoring/aeqciwzidvgt)
- [Workflow](https://app.synerise.com/automations/automation-diagram/29c8cac2-34ca-4e96-b0d7-439a3ade8be9)

If you’re our partner or client, you already have automatic access to the **Synerise Demo workspace (1590)**, where you can explore all the configured elements of this use case and copy them to your workspace.  

If you’re not a partner or client yet, we encourage you to fill out the contact [form](https://demo.synerise.com/request) to schedule a meeting with our representatives. They’ll be happy to show you how our demo works and discuss how you can apply this use case in your business. 
## Read more
---
- [Automation Hub](/docs/automation)
- [Expressions](/docs/analytics/expressions)
- [Mobile push](/docs/campaign/Mobile/simple_push)
- [Predictions](/docs/ai-hub/predictions)
- [Time optimizer](/docs/settings/configuration/time-optimizer)