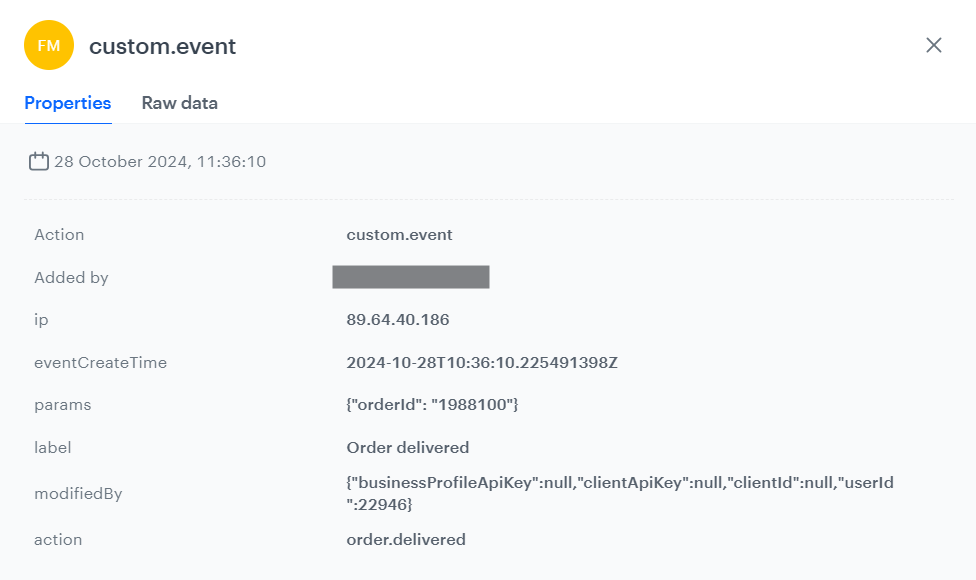
Online shopping gives customers huge opportunities to compare offers between different e-commerce sites and to search for the best price. Many online services, like price comparison websites, offer access to reviews and average ratings of a given store. Low rates can discourage potential customers from buying in a particular store.

Generally, it is often dissatisfied customers who make the effort to express their opinion, while people who have successfully completed the purchasing process are not motivated to share their positive experiences. In this way, a store's opinion can be easily damaged, so it is so important to maintain its good rating.

A good idea is to **encourage your loyal and satisfied customers to leave their opinion and reviews** to collect more feedback and improve your ratings. To do this, you need to use some kind of reward, such as a discount or any other special offer which will be added to the customer’s account if they leave their feedback. 

This use case describes an automated process in which, after the transaction and receiving the order, the customer gets an email encouraging them to leave reviews on the website. As a gift, the customer receives a discount on future purchases, and additionally participates in the contest in which they can win a voucher for a higher amount. 


<div class="admonition admonition-tip"><div class="admonition-icon"><svg xmlns="http://www.w3.org/2000/svg" fill="none" viewBox="0 0 24 24" stroke="currentColor" stroke-width="2.5"><path stroke-linecap="round" stroke-linejoin="round" d="M9.663 17h4.673M12 3v1m6.364 1.636l-.707.707M21 12h-1M4 12H3m3.343-5.657l-.707-.707m2.828 9.9a5 5 0 117.072 0l-.548.547A3.374 3.374 0 0014 18.469V19a2 2 0 11-4 0v-.531c0-.895-.356-1.754-.988-2.386l-.548-.547z" /></svg></div><div class="admonition-body"><div class="admonition-content">

An additional incentive you encourage your customers with is to make the reward only available for a specific amount of time, for example one month.

</div></div></div>


## Prerequisites 
---
- Implement a [tracking code](/developers/web/installation-and-configuration#creating-a-tracking-code).
- Send [transactional events](/developers/web/transactions-sdk).
- Configure an [email account](/docs/campaign/e-mail/configuring-email-account).

## Process
---
1. [Send custom event](/use-cases/ratings-on-external-sites#send-custom-event) with information about the order status.
2. [Prepare an email template](/use-cases/ratings-on-external-sites#prepare-an-email-template).
3. [Create a workflow](/use-cases/ratings-on-external-sites#create-a-workflow).

## Send custom event
---
To run a workflow which allows you to send an email after customers receive their orders, you must send information to Synerise that the order was delivered. Using the API, [send a custom event](https://developers.synerise.com/DataManagement/DataManagement.html#operation/ClientVisitedScreen) with information about the order status.

The example event:

<pre><code class="language-json">{   
"label": "Order delivered",
"action": "order.delivered",
"client": {
        "email": "john.doe@test.com"
    },
    "params": {
        "orderId": "1988100"
    }
}</code></pre>


<div class="admonition admonition-tip"><div class="admonition-icon"><svg xmlns="http://www.w3.org/2000/svg" fill="none" viewBox="0 0 24 24" stroke="currentColor" stroke-width="2.5"><path stroke-linecap="round" stroke-linejoin="round" d="M9.663 17h4.673M12 3v1m6.364 1.636l-.707.707M21 12h-1M4 12H3m3.343-5.657l-.707-.707m2.828 9.9a5 5 0 117.072 0l-.548.547A3.374 3.374 0 0014 18.469V19a2 2 0 11-4 0v-.531c0-.895-.356-1.754-.988-2.386l-.548-.547z" /></svg></div><div class="admonition-body"><div class="admonition-content">

If you don’t want to create custom events, you can send the `transaction.charge` event with the updated `orderStatus` parameter using [this API method](https://developers.synerise.com/DataManagement/DataManagement.html#operation/BatchAddOrUpdateTransactions). You must include `eventSalt` parameter in such case.

</div></div></div>


<figure>
    <img src="/api/docs/image/54176ad07f146575310749eba44b7c2f42c1b327/use-cases/all-cases/_gfx/ce.png" class="full" alt="Custom event example">
    <figcaption> Example of custom event </figcaption>
    </figure> 

## Prepare an email template
---
In this part of the process, create an email template that will be sent to the customers who received their orders. 

1. Go to **Experience Hub > Email**.  
2. On the left side of the screen, click **Templates**.  
3. Select the wizard in which you will create your message.  
    - **Drag&drop builder** - It lets you create templates with ready-made components.
    - **Code editor** - It lets you create templates in CSS and HTML.
4. Prepare the template according to your business needs. 
5. Click **Save this template > Save as**.  
6. Enter the name of the template and select the folder in which the template will be saved.  


   <div class="admonition admonition-tip"><div class="admonition-icon"><svg xmlns="http://www.w3.org/2000/svg" fill="none" viewBox="0 0 24 24" stroke="currentColor" stroke-width="2.5"><path stroke-linecap="round" stroke-linejoin="round" d="M9.663 17h4.673M12 3v1m6.364 1.636l-.707.707M21 12h-1M4 12H3m3.343-5.657l-.707-.707m2.828 9.9a5 5 0 117.072 0l-.548.547A3.374 3.374 0 0014 18.469V19a2 2 0 11-4 0v-.531c0-.895-.356-1.754-.988-2.386l-.548-.547z" /></svg></div><div class="admonition-body"><div class="admonition-content">

   You can prepare the second version of the email template. This will let you perform A/B test of emails and find out which provides better conversion.

   </div></div></div>


## Create a workflow
---
In this part of the procedure, create a workflow triggered by the event that signifies the delivery of the order to the customer. 3 days after the occurrence of the event, send the email to the customers who received their orders. Optionally, you can send two versions of the email.

1. Go to **Automation Hub > Workflows > New workflow**.  
2. Enter the name of the workflow.
3. As the first node, add **Profile Event**. 
4. In the configuration of the node:
    1. As the name of the node, enter `OrderDelivered`.
    2. Select the event that is generated when the order is delivered to a customer. In this use case, it is `order.delivered`.  
    5. Confirm by clicking **Apply**. 
5. As the second node, add **Delay**. In the configuration of the node, set the delay to 3 days.  
6. As the third node, add **Send Email** node. In the configuration of the node:  
    1. In the **Sender details** section, select the email account from which the email will be sent.  
    2. In the **Content** section, select the email template.  
        
       <div class="admonition admonition-tip"><div class="admonition-icon"><svg xmlns="http://www.w3.org/2000/svg" fill="none" viewBox="0 0 24 24" stroke="currentColor" stroke-width="2.5"><path stroke-linecap="round" stroke-linejoin="round" d="M9.663 17h4.673M12 3v1m6.364 1.636l-.707.707M21 12h-1M4 12H3m3.343-5.657l-.707-.707m2.828 9.9a5 5 0 117.072 0l-.548.547A3.374 3.374 0 0014 18.469V19a2 2 0 11-4 0v-.531c0-.895-.356-1.754-.988-2.386l-.548-.547z" /></svg></div><div class="admonition-body"><div class="admonition-content">

       In the email subject, you can insert information about order ID, which is retrieved from the **Profile Event** trigger. Insert the `{{ automationPathSteps['OrderDelivered'].event.params.orderId }}` snippet, which will display as the order ID . Note that `OrderDelivered` is the name of the **Profile Event** trigger added manually.

       </div></div></div>

    3. In the **UTM & URL parameters** section, add the parameters to your email.  
    4. Confirm by clicking **Apply**. 
    
       <details class="accordion"><summary>If you want to perform A/B test instead of sending a single email, click here</summary><div class="accordion-content"><ol> <li><p>Instead of performing step 6 and its substeps, add the <strong>ABx Test</strong> node. In the configuration of the node, define the allocation of groups. Optionally, you can add more groups. </p> </li> <li><p>On the <strong>ABx Test</strong> node, click the plus icon. </p> </li> <li><p>From the dropdown list, select the <strong>Send Email</strong> node.<br> <strong>Result</strong>: <strong>Group A</strong> path appears.</p> </li> <li><p>On the <strong>ABx Test</strong> node, click the plus icon. </p> </li> <li><p>From the dropdown list, select the <strong>Send Email</strong> node.<br> <strong>Group B</strong> path appears.</p> </li> <li><p>In the configuration of the <strong>Send Email</strong> nodes:</p> <ol> <li>In the <strong>Sender details</strong> section, select the email account from which the email will be sent. </li> <li>In the <strong>Content</strong> section, select the email template.</li> </ol> <div class="admonition admonition-tip"><div class="admonition-icon"><svg xmlns="http://www.w3.org/2000/svg" fill="none" viewBox="0 0 24 24" stroke="currentColor" stroke-width="2.5"><path stroke-linecap="round" stroke-linejoin="round" d="M9.663 17h4.673M12 3v1m6.364 1.636l-.707.707M21 12h-1M4 12H3m3.343-5.657l-.707-.707m2.828 9.9a5 5 0 117.072 0l-.548.547A3.374 3.374 0 0014 18.469V19a2 2 0 11-4 0v-.531c0-.895-.356-1.754-.988-2.386l-.548-.547z" /></svg></div><div class="admonition-body"><div class="admonition-content"> <p>In the email subject, you can insert information about order ID, which is retrieved from the <strong>Profile Event</strong> trigger. Insert the <code>{{ automationPathSteps[&#39;OrderDelivered&#39;].event.params.orderId }}</code> snippet, which will display as the order ID . Note that <code>OrderDelivered</code> is the name of the <strong>Profile Event</strong> trigger added manually.</p> </div></div></div> <ol start="3"> <li>In the <strong>UTM &amp; URL parameters</strong> section, add the parameters to your email. </li> <li>Confirm by clicking <strong>Apply</strong>.</li> </ol> <figure> <img src="/api/docs/image/54176ad07f146575310749eba44b7c2f42c1b327/use-cases/all-cases/_gfx/ratings-ab-tests.png" class="full" alt="The configuration of the workflow with A/B testing"> <figcaption> The configuration of the workflow with A/B testing </figcaption> </figure></li> </ol></div></details>
 
7. Add the **End** node.
8. Click **Save & Run**. 

<figure>
<img src="/api/docs/image/54176ad07f146575310749eba44b7c2f42c1b327/use-cases/all-cases/_gfx/ratings-standard-workflow.png" class="full" alt="The configuration of the workflow">
<figcaption>The configuration of the workflow </figcaption>
</figure> 


## Check the use case set up on the Synerise Demo workspace
---
Check the [workflow](https://app.synerise.com/automations/workflows/automation-diagram/2854a513-4b2b-42a9-951a-6eec92c96bd9) settings in Synerise Demo workspace.

If you’re our partner or client, you already have automatic access to the **Synerise Demo workspace (1590)**, where you can explore all the configured elements of this use case and copy them to your workspace.  

If you’re not a partner or client yet, we encourage you to fill out the contact [form](https://demo.synerise.com/request) to schedule a meeting with our representatives. They’ll be happy to show you how our demo works and discuss how you can apply this use case in your business.


## Read more
---
- [ABx Test node](/docs/automation/conditions/abx-split-node)
- [Automation Hub](/docs/automation)
- [Automation Jinjava inserts](/developers/inserts/automation)
- [Creating email templates](/docs/campaign/e-mail/creating-email-templates)
- [Send Email node](/docs/automation/actions/send-email)

