
Want an effective way to attract new customers? Use referral programs to work for you. Referral marketing is a great way to reach out to future customers while engaging your current ones to endorse your brand. A win-win benefit for both parties. 

Referral programs are one of the most powerful tools in building your sales by encouraging your customers to share something valuable with their friends. The power of a customer recommending your product to their friends is undeniable. When they do, they not only help you win business, but also increase awareness of your brand, which ultimately helps you reap big profits.

This use case describes the process of creating a refferal program by which current users of a mobile app can refer it to their friends and earn additional loyalty points for this action. 

**The main principles of the referral program:**

**Referrer**

An active user of the application can refer it by distributing its unique code among friends and will receive 500 loyalty points as a reward. 

The list below contains the business assumptions this use case is based on:

- A unique code is generated for each active app user, which they can share with their friends as a part of the referral program. In order to see their code, users must verify phone number first. Only after the phone number is correctly verified, the code is displayed in the user's account.
- A user can only receive 500 loyalty points when the invitee downloads the app, makes a purchase for min. $20, and has a verified phone number. 
- A user can recommend the app to a maximum of 3 people. When as all 3 invited users make a purchase, the referrer receives points (3x500) and the code section disappears which means the user can no longer continue to refer the app.
- Loyalty points can only be awarded to the referrer. 
- The referrer is informed each time after receiving loyalty points for referring the application through a mobile push.

**Invitee**

- A new user does not receive additional loyalty points for using the provided code. 
- The new user must have a verified phone number for the referrer to receive loyalty points.

To simplify naming in this use case, in further steps of the process referrer will be represented as `user 1` and invitee will be described as `user 2`. 

## Prerequisites 
---
- Implement [loyalty programs basics](/use-cases/loyalty-programs-basics)
- Integrate Synerise [mobile SDK](/developers/) in your mobile application. 
- Implement [mobile pushes](/developers/mobile-sdk/configuring-push-notifications) in your mobile application.
- [Configure mobile push notifications](/docs/campaign/Mobile/mobile_campaign)

## Process 
---
In this use case, you will go through the following steps:  

1. [Create an aggregate](/use-cases/referral-program#create-an-aggregate-that-counts-the-sum-of-all-user-transactions) that counts the sum of all user transactions.
2. [Create a segment](/use-cases/referral-program#create-a-segment-of-users-who-meet-the-requirements-of-the-referral-program) of users who meet the requirements of the referral program.
3. [Create an expression](/use-cases/referral-program#create-an-expression-that-determines-the-number-of-points-awarded-for-each-referral) that determines the number of points awarded for each referral.
4. [Create an expression](/use-cases/referral-program#create-an-expression-to-determine-the-maximum-number-of-points-to-be-awarded) to determine the maximum number of points to be awarded.
5. [Create a workflow](/use-cases/referral-program#create-a-workflow-that-generates-a-unique-referral-code) that generates a unique referral code for the user 1.
6. [Create a workflow](/use-cases/referral-program#create-a-workflow-that-adds-referral-points) that adds referral points to user 1.
7. [Create an expression](/use-cases/referral-program#create-an-expression-that-calculates-the-number-of-points-remaining-for-user-1) that calculates the number of points left.
8. [Prepare a mobile push notification](/use-cases/referral-program#prepare-a-mobile-push-notification).
9. [Create a workflow](/use-cases/referral-program#create-a-workflow-that-assigns-the-number-of-points-awarded) that assigns the number of codes awarded to user 1.

## Create an aggregate that counts the sum of all user transactions 
---
In this part of the process, create an aggregate that returns the sum of all transactions a user made. This aggregate will be used to describe a condition (an invited user must spend at least $20, so the referring person can receive loyalty points for a referral) in a segmentation that will be created in further part of the proces.

1. Go to <img src="/api/docs/image/54176ad07f146575310749eba44b7c2f42c1b327/icons/behavioral-data-hub-icon.svg" alt="Behavioral Data Hub icon" class="icon"> **Behavioral Data Hub > Live Aggregates > Create aggregate**.
2. As the aggregate type, select **Profile**.  
2. Enter the name of the aggregate.
3. Click **Analyze profiles by** and select **Sum**.
4. From the **Choose event** dropdown list, select the **transaction.charge** event.
5. As the event parameter, select **$revenue**.
6. Set the period from which the aggregate will analyze results to **Lifetime**. 
7. Save the aggregate.

 <figure>
    <img src="/api/docs/image/54176ad07f146575310749eba44b7c2f42c1b327/use-cases/all-cases/_gfx/transaction.charge-revenue.png" alt="Aggregate settings" class="full" >
    <figcaption>Aggregate settings</figcaption>
</figure>

## Create a segment of users who meet the requirements of the referral program
--- 
The conditions that **user 2** must meet include:  
- execution of transactions for a minimum of $20,
- verification of the phone number,
- user 1 can receive loyalty points for a successful referral of a friend only once - the last condition is a security feature: **webhook.response** with the addition of points to **user 1** can not occur more than 1 time.

1. Go to <img src="/api/docs/image/54176ad07f146575310749eba44b7c2f42c1b327/icons/decision-hub-icon.svg" alt="Decision Hub icon" class="icon" > **Decision Hub > Segmentations > New Segmentation**.
2. Enter the name of the segmentation. 
3. Choose **Add condition** and find the [aggregate counting the sum of all user transactions](/use-cases/referral-program#create-an-aggregate-that-counts-the-sum-of-all-user-transactions), created in the previous step. 
4. From the **Choose operator** dropdown, choose **Number**, and then select **More or equal to**.
5. In the next field, enter the required transaction value, in our case it is `20`.
6. Choose **Add condition** and find **phoneVerified** tag.
7. From the **Choose operator** dropdown, choose **Is true**.
8. Choose **Add condition** and find **webhook.response** event. 
9. Click the + where button, from the **Choose parameter** dropdown menu, choose **name**.
10. From the **Choose operator** dropdown, choose **Contain**.
11. In the next field, type `add points to user 1`.

    <div class="admonition admonition-note"><div class="admonition-icon"><svg xmlns="http://www.w3.org/2000/svg" fill="none" viewBox="0 0 24 24" stroke="currentColor" stroke-width="2.5"><path stroke-linecap="round" stroke-linejoin="round" d="M13 16h-1v-4h-1m1-4h.01M21 12a9 9 0 11-18 0 9 9 0 0118 0z" /></svg></div><div class="admonition-body"><div class="admonition-content">

    `add points to user 1` is the name of the Outgoing Integration node used in [this automation](/use-cases/referral-program#create-a-workflow-that-adds-referral-points).

    </div></div></div>

12. Change the **Performed** action to **Not performed** by clicking the **Performed** word.
13. Set the period from which the aggregate will analyze results to **Lifetime**.
14. Save the aggregate.

 <figure>
    <img src="/api/docs/image/54176ad07f146575310749eba44b7c2f42c1b327/use-cases/all-cases/_gfx/referral-program-segmentation.png" alt="The segmentation settings" class="full" >
    <figcaption>The segmentation settings</figcaption>
</figure>

This segmentation will be used [in a workflow that assigns loyalty points to user 1](/use-cases/referral-program#create-a-workflow-that-adds-referral-points). 

## Create an expression that determines the number of points awarded for each referral 
---
In this part of the process, create an expression that will later be used to assign a defined number of points to **user 1** for an application referral. In our case, each user receive 500 points for each referral. 

1. Go to <img src="/api/docs/image/54176ad07f146575310749eba44b7c2f42c1b327/icons/behavioral-data-hub-icon.svg" alt="Behavioral Data Hub icon" class="icon"> **Behavioral Data Hub > Expressions > New expression**. 
2. Enter the name of the expression. 
3. Leave the **Expression** option at default (**Attribute**).
4. Click the **Select** button.  
5. Choose **# Constant**. 
6. Open the settings of Constant value by clicking `0`.
7. In the field below, type `500`
8. Click **Save**.

## Create an expression to determine the maximum number of points to be awarded
---
In this part of the process, you will create an expression that determines the maximum number of points that can be awarded to **user 1**. In our case, it is 1500 points. This expression will be used to [calculate the number of points remaining for user 1](/use-cases/referral-program#create-an-expression-that-calculates-the-number-of-points-remaining-for-user-1). 

1. Go to <img src="/api/docs/image/54176ad07f146575310749eba44b7c2f42c1b327/icons/behavioral-data-hub-icon.svg" alt="Behavioral Data Hub icon" class="icon"> **Behavioral Data Hub > Expressions > New expression**. 
2. Enter the name of the expression. 
3. Leave the **Expression** option at default (**Attribute**).
4. Click the **Select** button.  
5. Choose **# Constant**. 
6. Open the settings of Constant value by clicking `0`.
7. In the field below, type `1500`
8. Click **Save**.

## Create a workflow that generates a unique referral code
---
In this part of the process, you will create a workflow that will generate a unique referral code for both new users who are about to join the application and existing ones, which will be stored in the **my_referral_code** attribute. In addition, you will generate a special attribute that will be used to count the number of codes granted to **user 1** - **referral_points_received**.

1. Go to <img src="/api/docs/image/54176ad07f146575310749eba44b7c2f42c1b327/icons/automation-hub-icon.svg" alt="Automation Hub icon" class="icon" > **Automation Hub > Workflows > New workflow**.  
2. Enter the name of the workflow.

### Define the trigger nodes
Configure the conditions that will trigger the workflow. In this case, you will run a workflow for new users who are just joining the application and for existing users for whom the code has not been generated yet.

#### Define the Profile Event node
1. As the first node of the workflow, add **Profile Event**. In the configuration of the node: 
    1. From **Choose event** dropdown menu, choose `client.add` event.  
2. Confirm by clicking **Apply**.

#### Define the Audience node
1. Add the **Audience node**. 
2. In the configuration of the node, leave the value of the **Run trigger** option at default (**one time**).
3. In **Define audience**, choose **New Audience** and click **Define conditions**.
    1. As the first condition, from **Choose filter** dropdown menu, choose `anonymous_type` attribute. 
    2. From the **Choose operator** dropdown list, select **Equal**.  
    3. **Result**: A text field appears.
    4. In the text field type `NONE`.
    
       <div class="admonition admonition-note"><div class="admonition-icon"><svg xmlns="http://www.w3.org/2000/svg" fill="none" viewBox="0 0 24 24" stroke="currentColor" stroke-width="2.5"><path stroke-linecap="round" stroke-linejoin="round" d="M13 16h-1v-4h-1m1-4h.01M21 12a9 9 0 11-18 0 9 9 0 0118 0z" /></svg></div><div class="admonition-body"><div class="admonition-content">

       The `anonymous_type` attribute determines whether the profile is anonymous or recognized. By selecting the value `NONE`, you will include only recognized users.

       </div></div></div>

    5. Click **Choose filter** and from the dropdown list, select **my_referral_code**. 
    6. From the **Choose operator** dropdown list, select **Boolean - Is true**.
    7. Change the **Profiles matching attribute** option to **Profiles not matching attribute** by clicking the **matching** word.
    8. Click **Apply**.

### Add the Merge Paths node
Join the paths of the triggers created in the previous step by adding a **Merge Paths** node.

### Configure the Delay node

1. Add the **Delay** node. In the node settings:
    1. In the **Delay** field, type `3`.
    2. From the dropdown list, choose **Second**.
2. Click **Apply**.

### Define the Profile Filter node
In this step, you will check whether the user passing this workflow already has the **my_referral_code** attribute assigned to their profile. If the user does not have the **my_referral_code** attribute, it will be generated in the next step of the workflow. If the user already has this attribute assigned, the flow ends. 

1. Add the **Profile Filter** node. 
2. In the settings of the node, click **Choose filter** and from the dropdown list, select **my_referral_code**. 
3. As the **Operator**, choose **Boolean - Is false**.
4. Click **Apply**.
5. Add the **End** node to the unmatched path from the **Profile Filter** node.

### Define the Update Profile node
In this part of the process, you will create an attribute **my_referral_code** for users who do not have this attribute yet. 
- The attribute value with a unique referral code will be generated using the Jinjava code presented in the following steps.
- The generated code will be used by **user 1** to invite friends to the application.  

For later tracking of points received by **user 1**, an additional attribute is added - **referral_points_received**, which is initially assigned the value `0`, since the user has not yet received points for the referral. 

1. Join the matched paths from the **Profile Filter** node with the **Update Profile** node.
2. From the left dropdown list, select **Attributes > my_referral_code**.
3. From the right dropdown list, select **Change**.
4. In the text field, add Jinjava that will generate a unique reference code for **user 1** based on the user's unique client ID. 

   <div class="admonition admonition-note"><div class="admonition-icon"><svg xmlns="http://www.w3.org/2000/svg" fill="none" viewBox="0 0 24 24" stroke="currentColor" stroke-width="2.5"><path stroke-linecap="round" stroke-linejoin="round" d="M13 16h-1v-4h-1m1-4h.01M21 12a9 9 0 11-18 0 9 9 0 0118 0z" /></svg></div><div class="admonition-body"><div class="admonition-content">

   For security reasons, we do not publish any examples. In case you need any support in creating such a unique mechanism, do not hesitate to contact us, we will be happy to help.

   </div></div></div>

5. Click **Add field** and from the dropdown list, select **Attributes > referral_points_received**
6. From the right dropdown list, select **Change**.
7. In the text field, enter `0`.
8. Click **Apply**.

    <figure>
    <img src="/api/docs/image/54176ad07f146575310749eba44b7c2f42c1b327/use-cases/all-cases/_gfx/update-profile-my-referral-code-new.png" alt="The configuration of the Update Profile node" class="large">
    <figcaption> The configuration of the Update Profile node </figcaption>
    </figure>
9. Select the **End** node.
<figure>
    <img src="/api/docs/image/54176ad07f146575310749eba44b7c2f42c1b327/use-cases/all-cases/_gfx/generate-my_referral_code-workflow-updated.png" alt="Final configuration of the workflow" class="full">
    <figcaption> Final configuration of the workflow </figcaption>
</figure>

## Create a workflow that adds referral points
---
In this part of the process you will create a workflow that will add points to **user 1** if all the necessary conditions are met, such as:  
- **user 2** has made a transaction for a minimum of $20,
- **user 2** has a verified phone number,
- **user 1** has not exceeded the limit of the possible number of referrals (3 referrals).

1. Go to <img src="/api/docs/image/54176ad07f146575310749eba44b7c2f42c1b327/icons/automation-hub-icon.svg" alt="Automation Hub icon" class="icon" > **Automation Hub > Workflows > New workflow**.  
2. Enter the name of the workflow.

### Define the trigger nodes
Configure the conditions that will trigger the workflow. In this case, the workflow is triggered for invited users who have already verified their phone number or completed a transaction. Meeting both conditions will also be checked in a further step of the workflow.

#### Define the Profile Event node 
1. As the first node of the workflow, add **Profile Event**. In the configuration of the node: 
    1. From **Choose event** dropdown menu, choose `transaction.charge` event.  
2. Confirm by clicking **Apply**.

#### Define the Profile Event node
1. Add **Profile Event**. In the configuration of the node: 
    1. From **Choose event** dropdown menu, choose `client.addTag` event.  
    2. Click the + where button, from the **Choose parameter** dropdown menu, choose **name**. 
    3. From the **Choose operator** dropdown, choose **Equal**.
    4. In the next field, type `phoneVerified`.
    
   <div class="admonition admonition-note"><div class="admonition-icon"><svg xmlns="http://www.w3.org/2000/svg" fill="none" viewBox="0 0 24 24" stroke="currentColor" stroke-width="2.5"><path stroke-linecap="round" stroke-linejoin="round" d="M13 16h-1v-4h-1m1-4h.01M21 12a9 9 0 11-18 0 9 9 0 0118 0z" /></svg></div><div class="admonition-body"><div class="admonition-content">

   The tag name shown in this case is only an example. You can use any other tag that is dedicated to recognizing a verified phone number.

   </div></div></div>

2. Confirm by clicking **Apply**.

### Add the Merge Paths node
Join the nodes defined in the previous step into a single path using the **Merge Paths** node.

### Configure the Delay node

1. Add the **Delay** node. In the node settings:
    1. In the **Delay** field, type `10`.
    2. From the dropdown list, choose **Second**.
2. Click **Apply**.

### Define the Profile Filter node
In this step, you will verify if all conditions have been met in order to assign points to **user 1** . If not, the workflow ends for a user.

1. Add the **Profile Filter** node. 
2. In the settings of the node click **Choose filter** and from the dropdown list, select the segmentation you already created in [this step](/use-cases/referral-program#create-a-segment-of-users-who-meet-the-requirements-of-the-referral-program). 
3. As the **Operator**, choose **Boolean - Is true**.
4. Click **Apply**.

### Define the Outgoing Integration node 
In the **Outgoing Integration** node, you will create a webhook that will find the user to whom the points should be assigned - **user 1**.

Outgoing Integration will be performed only for users who meet the conditions defined in the **Profile Filter** node, otherwise the flow is finished - to the **Not matched** path from the **Profile Filter** node, add the **End** node. 

1. Add the **Outgoing Integration** node for the matching path.
2. In the **Definition** section, choose the **Custom webhook** tab.
3. In the **Webhook name** field, enter a name for the webhook. In this case `find user 1`.
4. Select the **GET** method.
    3. In the URL of the endpoint, enter `https://api.synerise.com/crm/v1/list?search=my_referral_code:{{client.friends_referral_code}}`.  

   <div class="admonition admonition-note"><div class="admonition-icon"><svg xmlns="http://www.w3.org/2000/svg" fill="none" viewBox="0 0 24 24" stroke="currentColor" stroke-width="2.5"><path stroke-linecap="round" stroke-linejoin="round" d="M13 16h-1v-4h-1m1-4h.01M21 12a9 9 0 11-18 0 9 9 0 0118 0z" /></svg></div><div class="admonition-body"><div class="admonition-content">

   We are looking for a profile in Synerise whose attribute value corresponds to the referrer.

   </div></div></div>

5. In the **Authorization** section, select **by API key** as your method of authorization.
6. From the dropdown list below, select your **API key**.
7. Click **Apply**.

### Define the Event Filter node
In this step, you will check whether:
- **user 1** has been found,
- **user 1** has already reached the maximum number of possible points received from the referral program,
- there are no phone fraud tags for this user (the number of that user isn't used in more than one profile).

1. As the next node, add **Event Filter**. In the configuration of the node: 
    1. In the **Check** field, leave the default value **without limits**.
    2. In the **Define conditions** field, from the **Choose event** dropdown menu, choose `webhook.response` event.
    3. Click the + where button, from the **Choose parameter** dropdown menu, choose **name**.
    4. From the **Choose operator** dropdown, choose **Equal**.
    5. In the next field, type `find user 1`.
    6. From the **Choose parameter** dropdown menu, choose **body.customers[0].referral_points_received**.

       <div class="admonition admonition-note"><div class="admonition-icon"><svg xmlns="http://www.w3.org/2000/svg" fill="none" viewBox="0 0 24 24" stroke="currentColor" stroke-width="2.5"><path stroke-linecap="round" stroke-linejoin="round" d="M13 16h-1v-4h-1m1-4h.01M21 12a9 9 0 11-18 0 9 9 0 0118 0z" /></svg></div><div class="admonition-body"><div class="admonition-content">

       In order for such a parameter to appear in the webhook.response options, you need to launch the automation at least once for a test user.

       </div></div></div>

    7. From the **Choose operator** dropdown, choose **Less or equal**.
    8. In the next field, type `3`
2. Confirm by clicking **Apply**.

### Define the Outgoing Integration node 
In this **Outgoing Integration** node, you will create a webhook that sends the **points.upcharge** event that adds points to **user 1**. 

1. Add the **Outgoing Integration** node for the matching path.
2. In **Definition** section, choose the **Custom webhook** tab.
3. In the **Webhook name**, field enter a name for the webhook. In this case `add points to user 1`.
4. Select the **POST** method.
3. In the URL of the endpoint, enter `https://api.synerise.com/v4/events/custom`.
5. In the headers section:  
    - set `content-type` value to `application/json`
    - set`accept` value to `application/json`
    - define `api-version` to `4.4`

6. Enter the request body. The structure of the request body includes:
    - the expression created in [this step](/use-cases/referral-program#create-an-expression-that-determines-the-number-of-points-awarded-for-each-referral)
    - dynamic reference to a customer ID 
        
      <pre><code class="language-json">{
        "time": "",
        "label": "refer a friend points",
        "action": "points.upcharge",
        "client": {
            "id": {{event.params['body.customers[0].id']}}
        },
        "params": {
            "points": {% expression %} f05e644c-7009-49d0-9208-18e9319af4a5 {% endexpression %},
            "description": "referral_points"
        }
      }</code></pre>


7. In the **Authorization** section, select **by API key** as your method of authorization.
1. From the dropdown list below, select your **API key**.
8. Click **Apply**.

### Add the End node
1. On the **Outgoing Integration** node, click the plus button.
2. From the dropdown list, select **End**.
3. Save and activate the automation by clicking **Save&Run**.
<figure>
    <img src="/api/docs/image/54176ad07f146575310749eba44b7c2f42c1b327/use-cases/all-cases/_gfx/add-points-workflow.png" alt="Final configuration of the workflow" class="full">
    <figcaption> Final configuration of the workflow </figcaption>
</figure>

## Create an expression that calculates the number of points remaining for user 1
---
In this part of the process, you will create a formula that will calculate the number of points remaining for **user 1**. To do this, you will subtract the value of the **points.upcharge** event from [the expression with the maximum number of points](/use-cases/referral-program#create-an-expression-to-determine-the-maximum-number-of-points-to-be-awarded). 

1. Go to <img src="/api/docs/image/54176ad07f146575310749eba44b7c2f42c1b327/icons/behavioral-data-hub-icon.svg" alt="Behavioral Data Hub icon" class="icon"> **Behavioral Data Hub > Expressions > New expression**. 
2. Enter the name of the expression. 
3. Leave the **Expression** option at default (**Attribute**).
4. In the formula of the expression:  
    1. Click **Select**.
    2. From the dropdown list, select **Function > Profile**.  
    3. Click the **unnamed** node. 
    4. At the bottom of the page, click **Choose attribute**. 
    5. From the dropdown list, select the [expression with the maximum number of points](/use-cases/referral-program#create-an-expression-to-determine-the-maximum-number-of-points-to-be-awarded) you created earlier. 
    6. Click + button and from the dropdown list select **Profile**.
    7. Click the **unnamed** node. 
    8. At the bottom of the page, click **Choose attribute**. 
    9. From the dropdown list, select the **points.upcharge** attribute.
    10. Click the + button and change it to `-`.
    11. In the upper-right corner, click **Save**.
    12. In the upper-right corner, click **Publish**.

<figure>
    <img src="/api/docs/image/54176ad07f146575310749eba44b7c2f42c1b327/use-cases/all-cases/_gfx/left.points.png" alt="Final configuration of the expression" class="full">
    <figcaption> Final configuration of the expression </figcaption>
</figure>

## Prepare a mobile push notification
--- 
Prepare a mobile push notification informing about the number of points awarded and points remaining for **user 1**, which will be used in the workflow created in the next steps of the process.

1. Go to **Experience Hub > Mobile > Templates**.
2. Create your mobile push using the code editor or Drag&drop builder. 
3. If you use the code editor, you can use the code sample available below and adjust it as needed.


   <div class="admonition admonition-note"><div class="admonition-icon"><svg xmlns="http://www.w3.org/2000/svg" fill="none" viewBox="0 0 24 24" stroke="currentColor" stroke-width="2.5"><path stroke-linecap="round" stroke-linejoin="round" d="M13 16h-1v-4h-1m1-4h.01M21 12a9 9 0 11-18 0 9 9 0 0118 0z" /></svg></div><div class="admonition-body"><div class="admonition-content">

   Remember to change the expression IDs in this code, as they refer to the expressions created in this use case.

   </div></div></div>


<details class="accordion"><summary>Check the Jinjava code</summary><div class="accordion-content"><pre><code class="language-jinja">
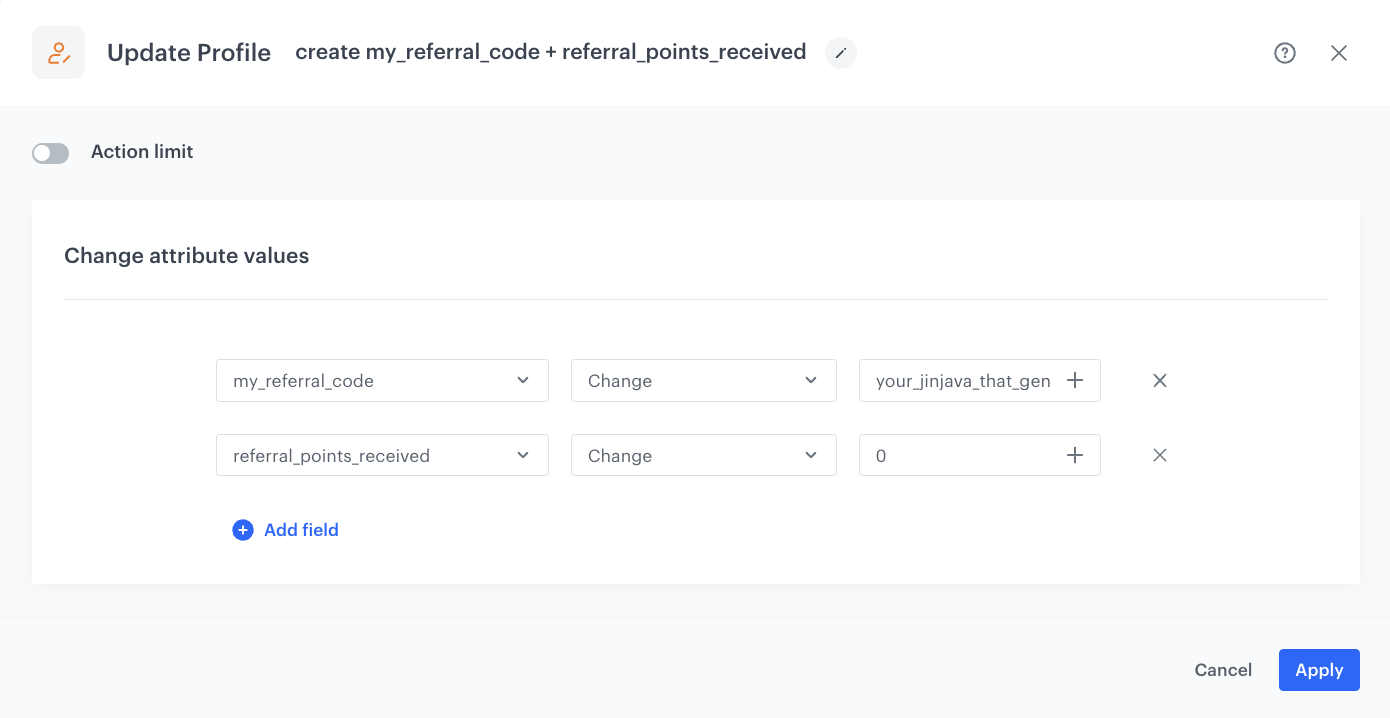
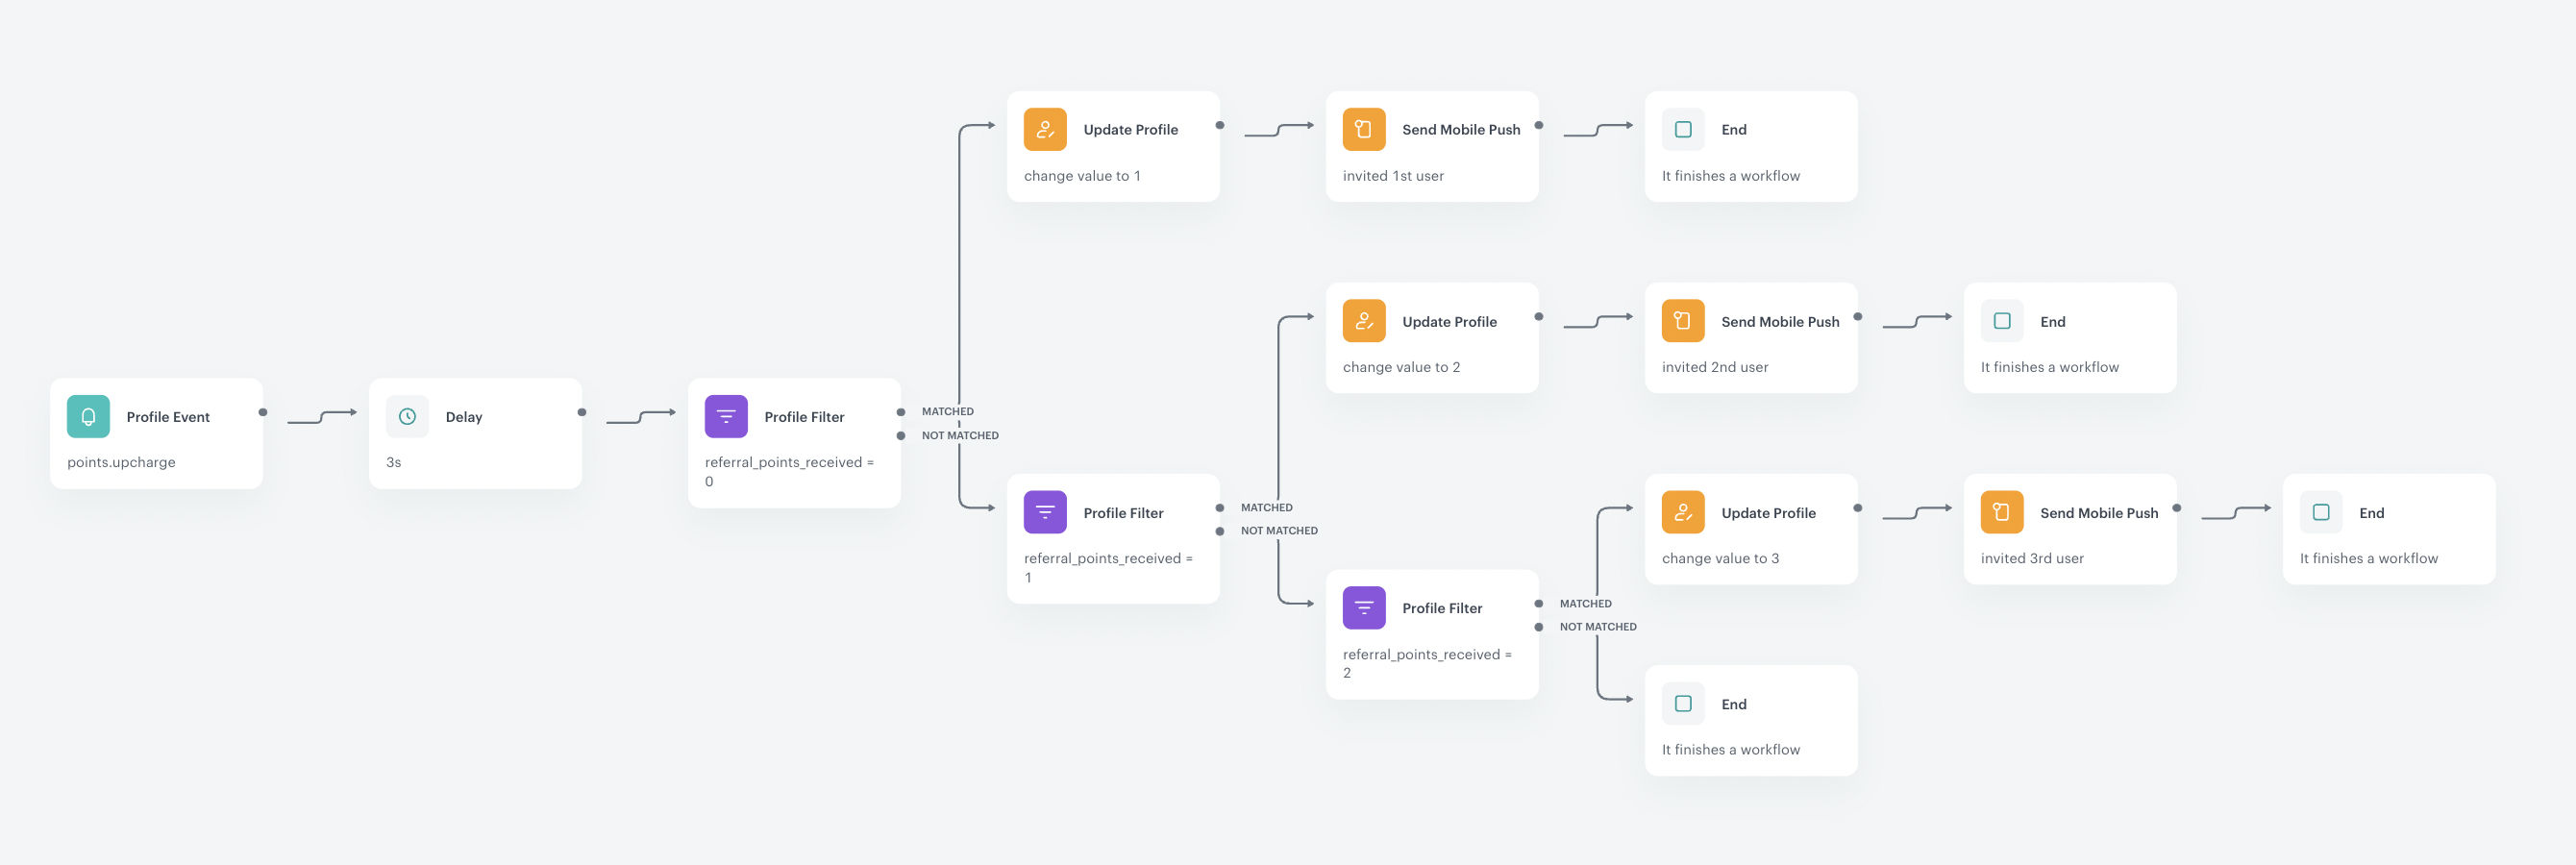
{ "notification": { "title": "You have earned 500 points!", "body": "Congratulations!!! You just earned 500 points for the registration of a new referred user!", "sound": "default", "priority":"high" }, "data": { "issuer": "Synerise", "message-type": "static-content", "content-type": "simple-push", "content": { "notification": { "action": { "type": "OPEN_APP" } } }, "payload": { "type": "points-earned", "pointsReward": "{% expression %} f05e644c-7009-49d0-9208-18e9319af4a5 {% endexpression %}", "title": "You have earned 500 points!", "subtitle": "Thank you for being with us!", "description": "You receive 500 points for the registration of a new user. You can earn {% expression %} 819f23f5-4f97-4039-b3ef-eb83130ac7c6 {% endexpression %} more points for the registration of additional users in the application." } } }</code></pre></div></details>


## Create a workflow that assigns the number of points awarded
---
In this part of the process, you will create a workflow that will assign the amount of times that points have been awarded to **user 1**. This information is stored in the **referral_points_received** attribute. Once the **referral_points_received** attribute is updated, **user 1** will receive information about the number of points still to be earned, in the form of a mobile push.

### Define the Profile Event node

Configure the condition that will trigger the workflow. This workflow will be triggered by the event generated in the previuos step - `points.upcharge`.

1. Add the **Profile Event** node. In the configuration of the node: 
2. From **Choose event** dropdown menu, choose `points.upcharge` event.  
3. Click the + where button, from the **Choose parameter** dropdown menu, choose **description**.
4. From the **Choose operator** dropdown, choose **Contain**.
5. In the next field, type `referral_points`.
6. Confirm by clicking **Apply**.

### Configure the Delay node

1. Add the **Delay** node. In the node settings:
    1. In the **Delay** field, type `3`.
    2. From the dropdown list, choose **Second**.
2. Click **Apply**.

### Define the Profile Filter node
In this step, as well as in further steps related to the **Profile Filter** node, you will check whether the **user 1** **referral_points_received** attribute is equal to `0`, `1` or `2`, presenting the total number of times user 1 has received referral points.  
Depending on the value of the attribute, it will be increased by one.   
For example:
- if the attribute value is equal to `0`, it will be updated to `1`; 
- if the attribute value is equal to `1`, it will be updated to `2`; 
- if the attribute value is equal to `2`, it will be updated to `3`. 

1. Add the **Profile Filter** node. 
2. In the settings of the node, click **Choose filter** and from the dropdown list, select **referral_points_received**. 
3. As the **Operator**, choose **Equal**.
4. In the next field, enter `0`.
5. Click **Apply**.
6. To the **Matched** path, add the **Update Profile** node.

### Define the Update Profile node
In this part of the process you will update the **referral_points_received** attribute by increasing its value by a unit. 

1. Select the **Update Profile** node.
2. From the left dropdown list, select **Attributes > referral_points_received**.
3. From the right dropdown list, select **Change**.
4. In the text field, type `1`.
5. Click **Apply**.

### Define the Send Mobile Push node

Add **Send Mobile Push** node. This node will send a mobile push to **user 1** with information about the number of points still available to earn from the referral campaign. 

1. Select the type of the mobile push notification as **Simple Push**.
2. Select the push template, created [in this step](/use-cases/referral-program#prepare-a-mobile-push-notification) with the information about points gained.
3. Skip the **Additional parameters**.
3. Confirm the settings by clicking **Apply**.

### Add the End node

Add the **End** node for this part of the flow. 

To the **Not Matched** path from the [Profile Filter node](/use-cases/referral-program#define-the-profile-filter-node-2) add **Profile Filter node**.

### Define the Profile Filter node

In this step, you will check whether the attribute **referral_points_received** of **user 1** is equal to `1`. 

1. Add the **Profile Filter** node after the first **Profile Filter** node. 
2. In the settings of the node, click **Choose filter** and from the dropdown list, select **referral_points_received**. 
3. As the **Operator**, choose **Equal**.
4. In the next field, type `2`.
5. Click **Apply**.
6. Define the **Update Profile** node for the **Matched** path. 


For the **Matched** path:
1. Define the **Update Profile** node in the same way as in the [previous node](/use-cases/referral-program#define-the-update-profile-node-1), but updating the value of the **referral_points_received** attribute to `2`. 
2. Add **Send Mobile Push** node with the same settings as in [this step](/use-cases/referral-program#define-the-send-mobile-push-node) of the process. 
3. Add the **End** node.

For the **Unmatched** path of the [Profile Filter node](/use-cases/referral-program#define-the-profile-filter-node-3):
1. Define **Profile Filter** node that will check whether the attribute **referral_points_received** of **user 1** is equal to `2`.   
    For the **Unmatched** path, add the **End** node.
2. For the **Matched** path:
    1. Define **Update Profile** node updating the value of the **referral_points_received** attribute to `3`.
    2. Add **Send Mobile Push** node.
    3. Add the **End** node.
3. Save and activate the automation by clicking **Save&Run**.

<figure>
    <img src="/api/docs/image/54176ad07f146575310749eba44b7c2f42c1b327/use-cases/all-cases/_gfx/mobile-push-increment-workflow.png" alt="Final configuration of the workflow" class="full">
    <figcaption> Final configuration of the workflow </figcaption>
</figure>


## Check the use case set up on the Synerise Demo workspace
---

You can check the configuration of all process steps directly in the Synerise Demo workspace:

- [Aggregate that counts the sum of all user transactions](https://app.synerise.com/analytics/aggregates/8072b100-e090-3d59-8067-c27df1e1d735)
- [Segment of users who meet the requirements of the referral program](https://app.synerise.com/analytics-v2/segmentations/9323140e-6226-4117-8b79-06bb088d828c)
- [Expression that determines the number of points awarded for each referral](https://app.synerise.com/analytics/expressions/f05e644c-7009-49d0-9208-18e9319af4a5)
- [Expression to determine the maximum number of points to be awarded](https://app.synerise.com/analytics/expressions/3581a34e-6dbb-431a-a84d-987826a28b94)
- [Workflow that generate a unique refferal code for user 1](https://app.synerise.com/automations/automation-diagram/5928505b-2814-4f20-b160-405bb2607877)
- [Workflow that add referral points to the user 1](https://app.synerise.com/automations/automation-diagram/5c270e53-3b72-462e-985b-b2eac91e5a0e)
- [Expression that calculate the number of points remaining for user 1](https://app.synerise.com/analytics/expressions/819f23f5-4f97-4039-b3ef-eb83130ac7c6)
- [Workflow that assign the number of codes granted by user 1](https://app.synerise.com/automations/automation-diagram/91b849b9-0196-4e5a-aa04-8db479c9143c)

If you’re our partner or client, you already have automatic access to the **Synerise Demo workspace (1590)**, where you can explore all the configured elements of this use case and copy them to your workspace.  

If you’re not a partner or client yet, we encourage you to fill out the contact [form](https://demo.synerise.com/request) to schedule a meeting with our representatives. They’ll be happy to show you how our demo works and discuss how you can apply this use case in your business. 

## Read more
---

- [Aggregates](/docs/analytics/aggregates)
- [Automation Hub](/docs/automation)
- [Expressions](/docs/analytics/expressions)
- [Segmentation](/docs/analytics/segmentations)


