
Recurring purchases are those purchases that are usually made with some frequency and regularity, such as the purchase of coffee, printer paper, hygiene products, etc. Products purchased on a regular basis fill the greater part of most customers' shopping baskets. That's why it's so important to provide customers with the best experience when making such purchases, reminding them of an upcoming purchase and encouraging them to return more often for these products in your store. 

The prediction created in this case is based entirely on analytics and calculates the average time between purchases for customers who have made at least three transactions in a given category, so we can calculate when a customer may make the next purchase, anticipating their intention by sending them an email reminder of the upcoming purchase. The described process consists of two automations, where one calculates the average interval between purchases and the other sends an email to the customer at the appropriate time to encourage to replenishment.

<figure>
<img src="/api/docs/image/54176ad07f146575310749eba44b7c2f42c1b327/use-cases/all-cases/_gfx/coffee-repetitive-purchase.png" alt="Communication for customers making repetitive coffee purchases"  class="full no-frame">
</figure>

## Prerequisites 
---
- Implement transaction events using [SDK](/developers/web/transactions-sdk) or [API](https://developers.synerise.com/DataManagement/DataManagement.html#operation/CreateATransaction).
- [Create an email account](/docs/campaign/e-mail/configuring-email-account).
- [Create an email template](/docs/campaign/e-mail/creating-email-templates) to be used in the email campaign. 


  <div class="admonition admonition-tip"><div class="admonition-icon"><svg xmlns="http://www.w3.org/2000/svg" fill="none" viewBox="0 0 24 24" stroke="currentColor" stroke-width="2.5"><path stroke-linecap="round" stroke-linejoin="round" d="M9.663 17h4.673M12 3v1m6.364 1.636l-.707.707M21 12h-1M4 12H3m3.343-5.657l-.707-.707m2.828 9.9a5 5 0 117.072 0l-.548.547A3.374 3.374 0 0014 18.469V19a2 2 0 11-4 0v-.531c0-.895-.356-1.754-.988-2.386l-.548-.547z" /></svg></div><div class="admonition-body"><div class="admonition-content">

  We recommend including an [insert](/developers/inserts/recommendations-v2) in the email template with a product recommendation from the specific category to make the buying decision process easier for customers. You can refer to [this use case](/use-cases/personalized-category-reco#create-a-recommendation) to see how to build recommendations filtered to the product category.

  </div></div></div>


## Process 
---
1. [Create an event expression](/use-cases/repetitive-purchases#create-an-expression) that converts the time of transaction to a number.
2. [Create an aggregate](/use-cases/repetitive-purchases#create-an-aggregate) that returns the timestamps of the purchased products from the specific category.
3. [Create a workflow](/use-cases/repetitive-purchases#create-a-workflow-to-predict-purchase-time) that calculates the average number of days between a customer's purchases of a product in a specific category and calculates the date of the next purchase based on that number.
4. [Create a workflow](/use-cases/repetitive-purchases#create-a-workflow-to-encourage-a-purchase) that is responsible for sending a reminder to a customer about the next recurring purchase.

## Create an expression
---
In this part of the process, you need to create an event expression that converts the timestamp of transaction to a number. This expression will be used later to create an aggregate.

1. Go to <img src="/api/docs/image/54176ad07f146575310749eba44b7c2f42c1b327/icons/behavioral-data-hub-icon.svg" alt="Behavioral Data Hub icon" class="icon"> **Behavioral Data Hub > Expression > New expression**. 
2. Enter the name of the expression. 
3. Set the **Expression for** option to **Event**. 
4. From the drop-down list, select **product.buy**. 
5. In the **Formula definition** section, click **Select**.
6. From the list that opens, select **Function > To number**.
7. In the brackets, click the **Select** button and from the list, select **Event attribute**.
8. Click the **Unnamed** node that appeared.
9. At the bottom of the page, click **Choose parameter**.
10. In the list of attributes, find and select **TIMESTAMP**.
11. Save the expression. 

<figure>
<img src="/api/docs/image/54176ad07f146575310749eba44b7c2f42c1b327/use-cases/all-cases/_gfx/timestamp-to-number.png" alt="An expression that converts the timestamp to a number"  class="full">
<figcaption>An expression that converts the timestamp to a number</figcaption>
</figure> 

## Create an aggregate
---
In this part of the process, you create a dynamic aggregate that returns timestamps of purchases from a specific category. The aggregate will return timestamps (as numbers) from **product.buy** events.

1. Go to <img src="/api/docs/image/54176ad07f146575310749eba44b7c2f42c1b327/icons/behavioral-data-hub-icon.svg" alt="Behavioral Data Hub icon" class="icon"> **Behavioral Data Hub > Live Aggregates > Create aggregate**.
2. As the aggregate type, select **Profile**.  
2. Enter a meaningful name of the aggregate.
3. Click **Analyze profiles by** and select **Last Multi** and size `15`.

   <div class="admonition admonition-note"><div class="admonition-icon"><svg xmlns="http://www.w3.org/2000/svg" fill="none" viewBox="0 0 24 24" stroke="currentColor" stroke-width="2.5"><path stroke-linecap="round" stroke-linejoin="round" d="M13 16h-1v-4h-1m1-4h.01M21 12a9 9 0 11-18 0 9 9 0 0118 0z" /></svg></div><div class="admonition-body"><div class="admonition-content">

   This is the maximum number of a customer's past transactions to be used in the calculation. You can change the number according to your business needs.

   </div></div></div>

4. Select **Consider only distinct occurences of the event parameter**.
5. Select the **product.buy** event.
6. From the **Choose event** drop-down list, select the expression you created [in the previous step](/use-cases/repetitive-purchases#create-an-expression). 
7. Click the **+ where** button and from the **Choose parameter** drop-down menu, choose **category**.
8. From the **Choose operator** drop-down, choose **Equal**.
9. Enter the name of the product category.  
    In our example, it's `coffee`.
10. Define the time range as **Last 365 days**. 
11. Confirm by clicking **Apply**.

<figure>
<img src="/api/docs/image/54176ad07f146575310749eba44b7c2f42c1b327/use-cases/all-cases/_gfx/timestamp-product.buy.png" alt="The final configuration of the aggregate"  class="full">
<figcaption>The final configuration of an aggregate</figcaption>
</figure> 

## Create a workflow to predict purchase time
---
You need to create a workflow that calculates the average number of days between a customer's purchases from a given category. The result is used to calculate the customer's next purchase probability.

1. Go to **Automation Hub > Workflows > New workflow**.
2. Enter the name of the workflow. 

### Define the Profile Event trigger node

At this stage you will configure the conditions that will trigger the workflow. As a trigger, you will use the `product.buy` event for the coffee category.

1. As the first node of the workflow, add **Profile Event**. In the configuration of the node: 
    1. From the **Choose event** drop-down menu, choose the **product.buy** event. 
    2. Click the **+ where** button and from the **Choose parameter** drop-down menu, choose **category**.
    3. From the **Choose operator** drop-down, choose **Equal**.
    4. Enter the name of the product category for which you want to predict the time of the customer's next purchase.  
    In our case, it's `coffee`.
    5. Confirm by clicking **Apply**.

### Define the Profile Filter node

In this part of the process, you need to identify customers for whom the workflow calculates the date of next purchase. It takes into consideration customers who have made at least three separate transactions (**transaction.charge** event) with products from the "coffee" category.  

1. Add the **Profile Filter** node. 
2. Click the node to open its settings.
3. Click the **Choose filter** button and choose the **product.buy** event. 
4. Click the **+ where** button and from the **Choose parameter** drop-down menu, choose **category**.
5. From the **Choose operator** drop-down, choose **Equal**.
6. Enter the name of the product category for which you want to predict the time of the customer's next purchase.  
    In our case it's `coffee`.
7. Click **+ Add funnel step** button and repeat steps 3-6. 
8. Set the time range to **Last 365 days before 1 days**.
9. Click the **Choose filter** button and choose the **transaction.charge** event. 
10. Click **+ Add funnel step** button and another **transaction.charge** event.
11. Set the time range to **Last 365 days before 1 days**.
12. Confirm by clicking **Apply**.
13. For the **Not matched** path, add the **End** node.

<figure>
<img src="/api/docs/image/54176ad07f146575310749eba44b7c2f42c1b327/use-cases/all-cases/_gfx/profile-filter-repetitive.purch.png" alt="The Profile Filter node configuration"  class="large">
<figcaption>The Profile Filter node configuration</figcaption>
</figure> 

### Define the Generate Event node

At this stage, an event is generated on the customer's profile, returning the number of days between purchases and the date when the customer may make the next purchase. It contains the following parameters:

- **category** - the category of products for which the calculation is made,  
- **itemId** - the ID of last product bought from the specific category,  
- **predictedTime** - calculated date of the next purchase from the specific category,  
- **predictedTimeInDays**  - average number of days between purchases from the specific category.

1. To the **Matched** path of the **Profile Filter** node created earlier, add a **Generate Event** node. In the configuration of the node:
    1. In the **Event name**, enter the name of the event that will be generated on the customer's profile. In this case, it is `product.purchasePredictedTime`
    3. Add the JSON body of the event. You can use the example below.
    
       <details class="accordion"><summary>Example jinjava code</summary><div class="accordion-content"><pre><code class="language-jinja">
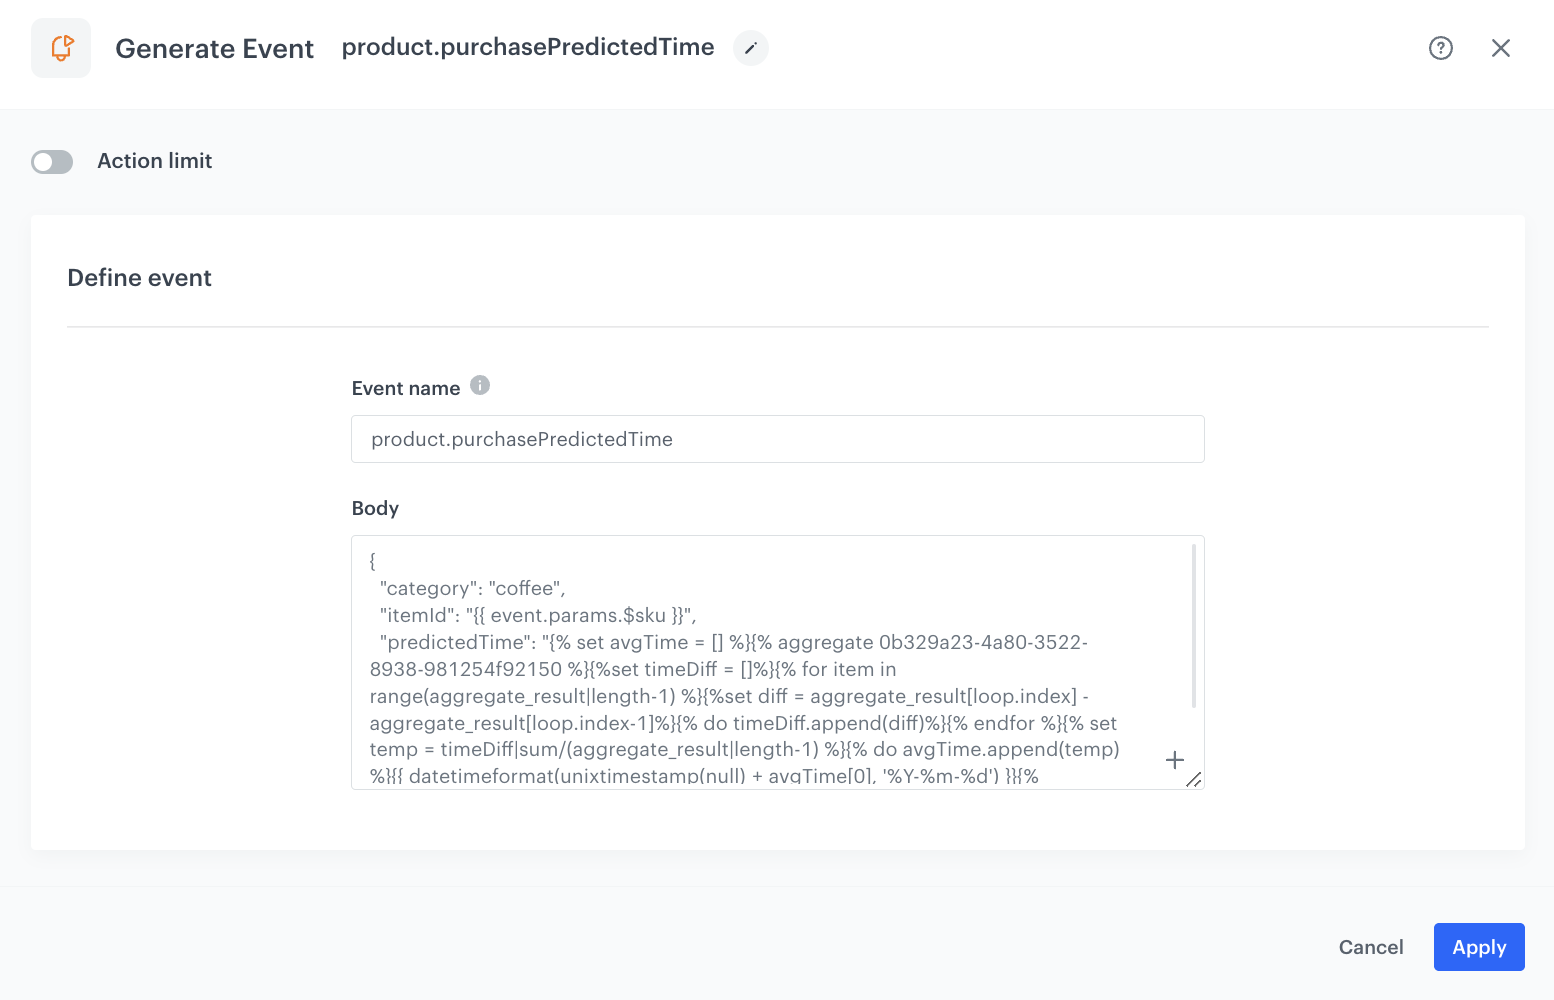
{ "category": "coffee", "itemId": "{{ event.params.$sku }}", "predictedTime": "{% set avgTime = [] %}{% aggregate PASTE_AGGREGATE_ID_HERE %}{%set timeDiff = []%}{% for item in range(aggregate_result|length-1) %}{%set diff = aggregate_result[loop.index] - aggregate_result[loop.index-1]%}{% do timeDiff.append(diff)%}{% endfor %}{% set temp = timeDiff|sum/(aggregate_result|length-1) %}{% do avgTime.append(temp) %}{{ datetimeformat(unixtimestamp(null) + avgTime[0], '%Y-%m-%d') }}{% endaggregate %}", "predictedTimeInDays": "{{avgTime[0]/86400000}}" }</code></pre></div></details>
  

<div class="admonition admonition-note"><div class="admonition-icon"><svg xmlns="http://www.w3.org/2000/svg" fill="none" viewBox="0 0 24 24" stroke="currentColor" stroke-width="2.5"><path stroke-linecap="round" stroke-linejoin="round" d="M13 16h-1v-4h-1m1-4h.01M21 12a9 9 0 11-18 0 9 9 0 0118 0z" /></svg></div><div class="admonition-body"><div class="admonition-content">

The above jinjava code contains the logic of calculating the average number of days between purchases from the specific category and calculating the date of a next purchase. It can be copied 1:1 into the Generate Event node. However, remember to replace the ID of aggregate in this code with the [ID of the aggregate created earlier in the process](/use-cases/repetitive-purchases#create-an-aggregate).

</div></div></div>

   4. Confirm by clicking **Apply**.

<figure>
<img src="/api/docs/image/54176ad07f146575310749eba44b7c2f42c1b327/use-cases/all-cases/_gfx/purchasePredictedTime.png" alt="Configuration of the Generate Event node"  class="large">
<figcaption>Configuration of the Generate Event node</figcaption>
</figure> 

Example of a generated **product.purchasePredictedTime** event:

<figure>
<img src="/api/docs/image/54176ad07f146575310749eba44b7c2f42c1b327/use-cases/all-cases/_gfx/event-product.purchasePredictedTime.png" alt="Example of a generated event"  class="large">
<figcaption>Example of a generated event</figcaption>
</figure> 

### Add final settings to your workflow 

1. Add the **End** node.
2. Launch the workflow by clicking **Save & Run**.

<figure>
<img src="/api/docs/image/54176ad07f146575310749eba44b7c2f42c1b327/use-cases/all-cases/_gfx/workflow-recurring.purchuses.png" alt="Configuration of the workflow"  class="full">
<figcaption>Configuration of the workflow</figcaption>
</figure> 


## Create a workflow to encourage a purchase
---

With the above workflow in place, you can create another workflow in which you send a message reminding the customer of the next purchase. This workflow starts each day for a group of customers whose expected purchase date is the current day.

1. Go to **Automation Hub > Workflows > New workflow**.
2. Enter the name of the workflow. 

### Define the Audience node

In this stage, you create an Audience that checks for the presence of the **product.purchasePredictedTime** event on a user's card in the last 30 days with a specific product category (in our case, coffee), where the predicted purchase date is on the current day. In addition, the Audience filter includes only those customers who have agreed to receive communications. 

1. Start the workflow with the **Audience** node and open the node's settings.
2. In **Define audience**, choose **New Audience** and click **Define conditions**.
3. From the **Choose filter** drop-down menu, choose the **product.purchasePredictedTime** event.
4. Click the **+ where** button and from the **Choose parameter** drop-down menu, choose **predictedTime**.
5. From the **Choose operator** drop-down menu, select **Date > Current date > Matches current day**.
6. Click the **+ where** button and from the **Choose parameter** drop-down menu, choose **predictedTime**.
7. From the **Choose operator** drop-down menu, select **Date > Current date > Matches current month**.
8. Click the **+ where** button and from the **Choose parameter** drop-down menu, choose **predictedTime**.
9. From the **Choose operator** drop-down menu, select **Date > Current date > Matches current year**.
10. Click the **+ where** button and from the **Choose parameter** drop-down menu, choose **category**.
11. From the **Choose operator** drop-down, choose **Equal**. 
12. Type the name of the product category - `coffee`. 
13. Define the time range to the **Last 30 days**.
14. From the **Choose filter** drop-down, choose the **newsletter_agreement** parameter.
15. From the **Choose operator** drop-down, choose **Equal** and and specify the condition as **enabled**.
16. Confirm by clicking **Apply**.

<figure>
<img src="/api/docs/image/54176ad07f146575310749eba44b7c2f42c1b327/use-cases/all-cases/_gfx/profile.filter-product.purchasePredictedTime-event.png" alt="Configuration of the Audience node"  class="large">
<figcaption>Configuration of the Audience node</figcaption>
</figure>

### Define the Send Email node

In this step, choose an email template for the upcoming purchase. 

1. To the **Matched** path, add the **Send Email** node and open its settings. 
2. In the **Sender details** section, choose the email account from which the email is sent.
3. In the **Content** section, select the template that you prepared as a part of the prerequisites. 
4. **Optional**: In the **UTM & URL parameters** section, define the UTM parameters added to the links included in the email. 
5. In the **Additional parameters** section, optionally describe campaigns with [additional parameters](/docs/campaign/e-mail/creating-email-campaigns#adding-custom-parameters).
6. Click **Apply**.

### Add final settings to your workflow 

1. Add the **End** node.
2. Launch the workflow by clicking **Save & Run**.

<figure>
<img src="/api/docs/image/54176ad07f146575310749eba44b7c2f42c1b327/use-cases/all-cases/_gfx/upcoming-purchase-reminder-workflow.png" alt="Configuration of the workflow"  class="full">
<figcaption>Configuration of the workflow</figcaption>
</figure> 

## Check the use case set up on the Synerise Demo workspace
---

You can check the configuration of each step directly in the Synerise Demo workspace:

- [Expression](https://app.synerise.com/analytics/expressions/04e342d8-5e14-4d7b-be39-a6bf117c1bff)

- [Aggregate](https://app.synerise.com/analytics/aggregates/0b329a23-4a80-3522-8938-981254f92150)

- [Workflow for purchasing time calculations](https://app.synerise.com/automations/automation-diagram/44c9e618-f72a-4720-8dbc-774f8752ad30)

- [Workflow for sending a mailing communication](https://app.synerise.com/automations/automation-diagram/dfaf267d-c186-40c3-965f-810646b4a982)


If you’re our partner or client, you already have automatic access to the **Synerise Demo workspace (1590)**, where you can explore all the configured elements of this use case and copy them to your workspace.  

If you’re not a partner or client yet, we encourage you to fill out the contact [form](https://demo.synerise.com/request) to schedule a meeting with our representatives. They’ll be happy to show you how our demo works and discuss how you can apply this use case in your business. 

## Read more
---

- [Aggregates](/docs/analytics/aggregates)
- [Automation Hub](/docs/automation)
- [Email campaigns](/docs/campaign/e-mail)
- [Expressions](/docs/analytics/expressions)
- [Segmentation](/docs/analytics/segmentations)

