You can encourage customers to reorder items that they have previously purchased, to meet demand. This kind of campaign increases the chances of making a purchase and thus increase your revenue.
It might be useful especially in the FMCG industry, for products that sell quickly as coffee or milk. Additionally, we can use boosting to promote more products based on chosen indicators. Boosting rules are built using the same editor as the filters, but unlike filtering, boosting does not entirely exclude items that do not meet the conditions.
In this use case, we will create the workflow which, after a month from the transaction, will send an email with recommended products from a specific category (coffee) to encourage the customer to reorder. The recommendation will be boosted by the personalization model to boost products whose price exceeds the average price of all the customer's transaction from a specific category.
## Prerequisites
---
- Implement transaction events either through [SDK](/developers/web/transactions-sdk) or [API](https://developers.synerise.com/DataManagement/DataManagement.html#operation/CreateATransaction).
- Create [an email account](/docs/campaign/e-mail/configuring-email-account)
- Create [items feed](/docs/ai-hub/recommendations-v2/item-feed-requirements)
- **Recommended**: Become familiar with [creating recommendations](/docs/ai-hub/recommendations-v2/creating-recommendation-campaign).
## Process
---
In this use case, you will go through the following steps:
1. [Create an aggregate](/use-cases/replenishment#create-an-aggregate) that calculates the average value of products from the `Coffee` category previously bought by the customer.
2. [Create the recommendation with boosting rules](/use-cases/replenishment#create-the-recommendation-with-boosting-rules).
2. [Create an email template](/use-cases/replenishment#create-an-email-template).
3. [Create a workflow](/use-cases/replenishment#create-a-workflow).
## Create an aggregate
---
In this part of the process, create an aggregate that calculates the average value of products bought by the customer from `Coffee` category.
1. Go to **Behavioral Data Hub > Live Aggregates > Create aggregate**.
2. As the aggregate type, select **Profile**.
2. Enter the name of the aggregate.
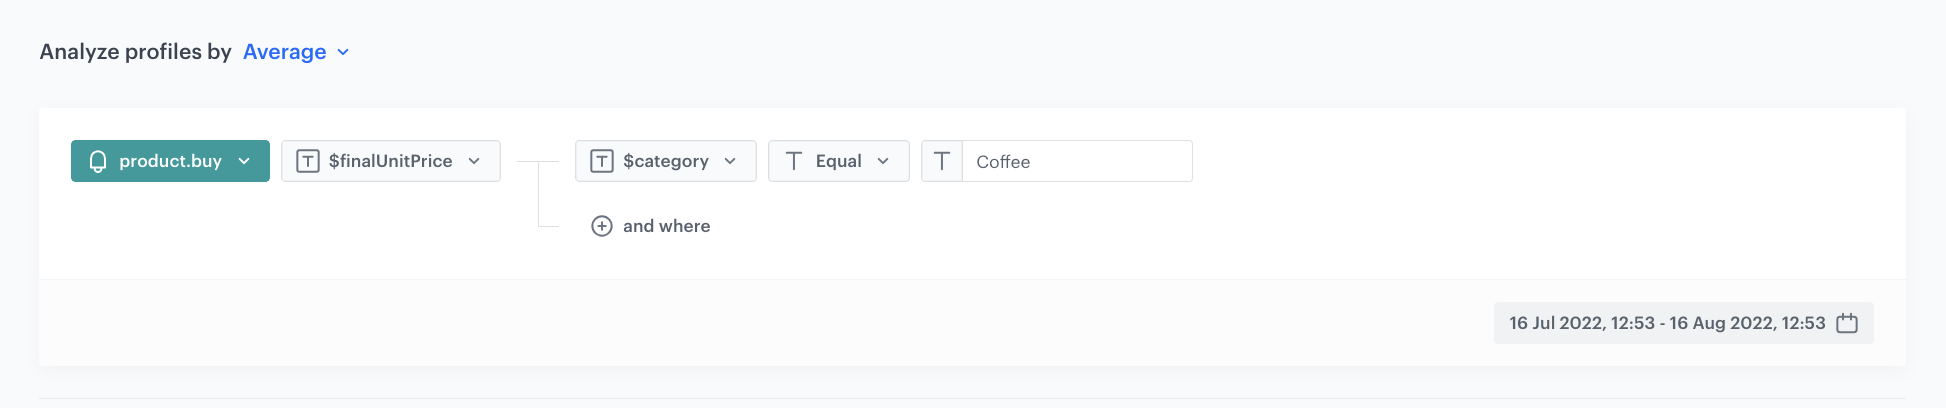
3. Click **Analyze profiles by** and select **Average**.
4. From the **Choose event** dropdown list, select the `product.buy` event.
4. As the event parameter, select **$finalUnitPrice**.
5. Next to the **$finalUnitPrice**, click **+where**.
6. From the dropdown list, select **$category**.
7. As the operator, choose **Equal**.
9. In the text field, enter the value of the category you want to use in replenishment campaign - in this use case, it will be `Coffee`.
8. Define the period analyzed in the aggregate.
9. Save the aggregate.
Configuration of the aggregate
Configuration of this aggregate depends on the implementation of the transaction events and it might differ for each workspace.
## Create the recommendation with boosting rules
---
In this step, we create a personalized recommendation that will be filtered to the coffee category. Additionally, we will apply boosting rules to this campaign to promote products whose price is higher than the average price of the previously purchased products from this category by a customer.
### Create the campaign
---
1. Go to **AI Hub > (AI Recommendations) Models > Add recommendation**.
2. In the **Type & Items feed** section:
1. Select an item catalog.
2. As a recommendation type, select **Personalized recommendations**.
3. Click **Apply**.
3. In the **Items** section, configure at least one slot.
1. Choose the minimum and maximum number of products to be displayed in the recommendation frame.
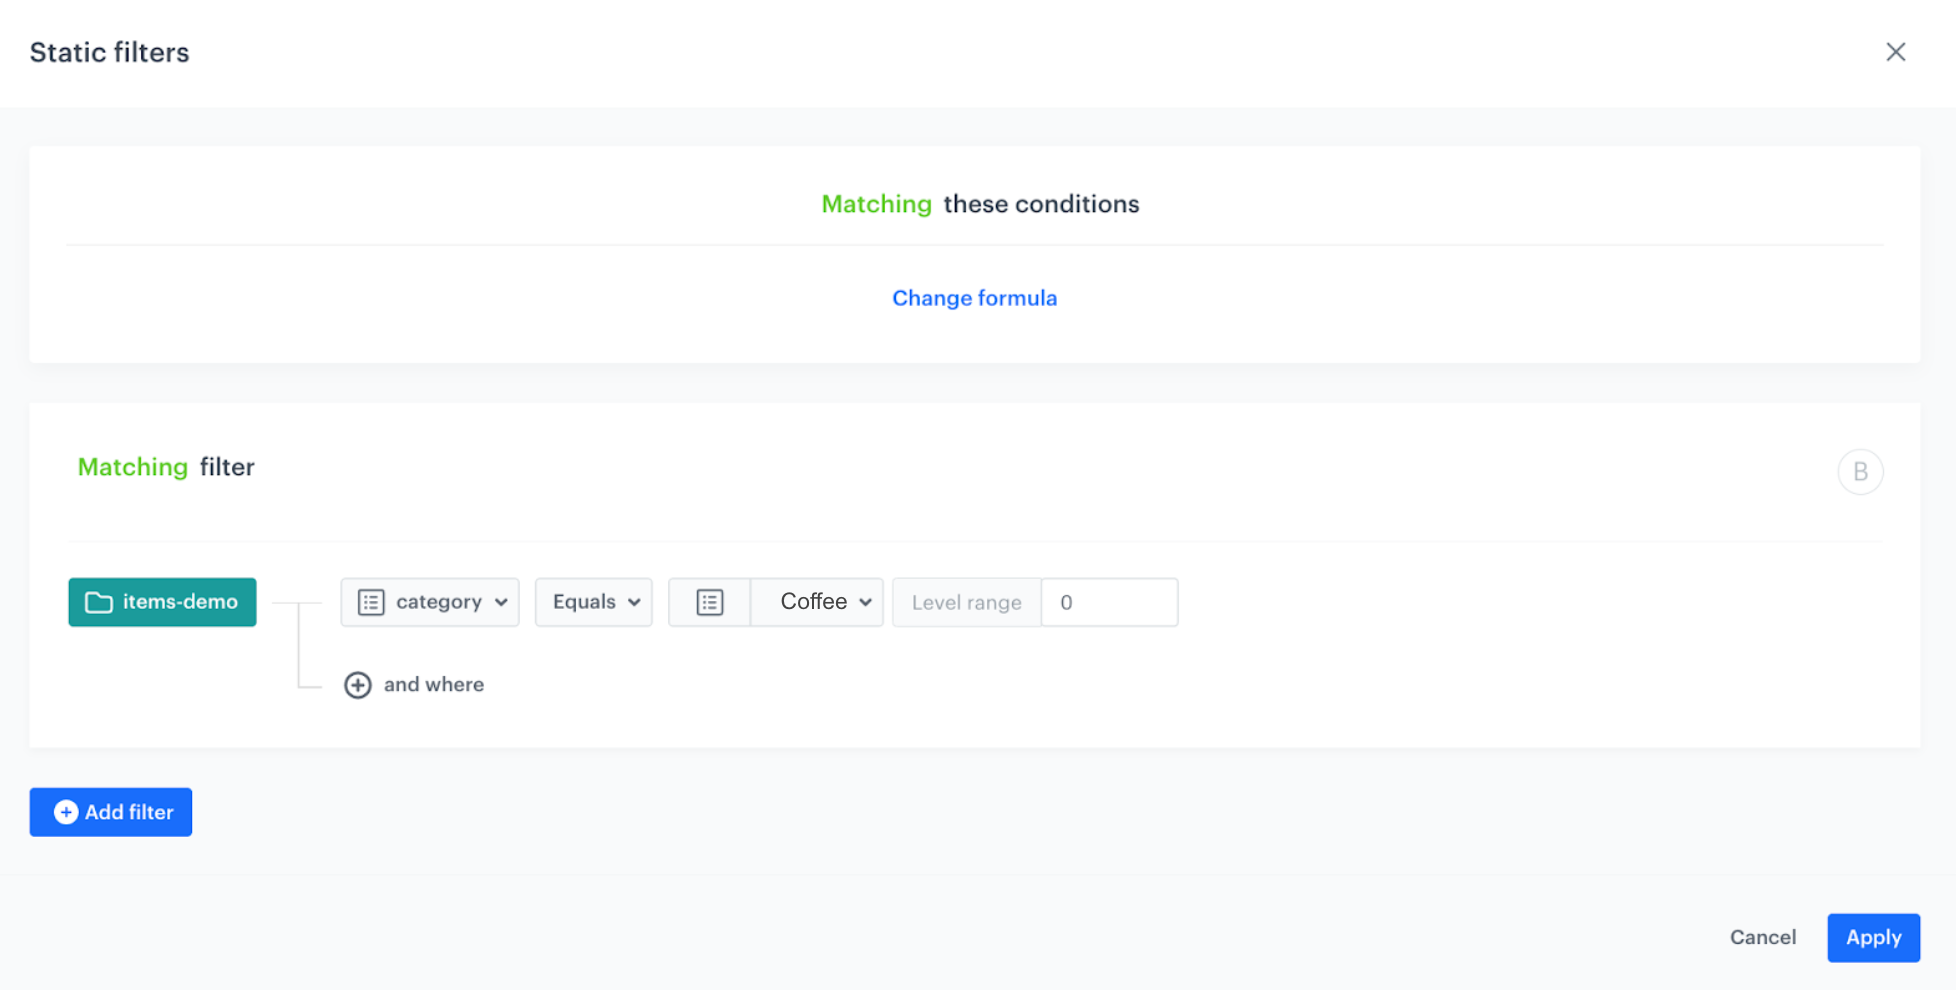
2. In the **Static filter** section, click **Choose filter**.
3. Select **Visual Builder**.
**Result**: The Visual Builder window appears.
4. From the **Select attribute** dropdown list, choose the **category** attribute.
5. As the logical operator, select **Equals**.
6. From the **Select value** dropdown list, select **Coffee**.
7. In the **Level range** field, enter `0`.
4. Click **Apply**.
Static filter section
### Build the boosting rule
---
In this part of the process, you will build a rule that boosts the products whose price is higher than the average price a customer paid for the transaction during the specific period.
1. In the **Boosting** section, click **Define**.
2. Click **Add rule**.
3. Click **Define rule** and select **IQL Query**.
**Result**: The IQL Query window opens.
4. Click the **Select** node.
5. From the dropdown list, select **Attribute**.
6. Click the **null** node.
**Result**: The **Select value** button appears.
7. Click **Select value**.
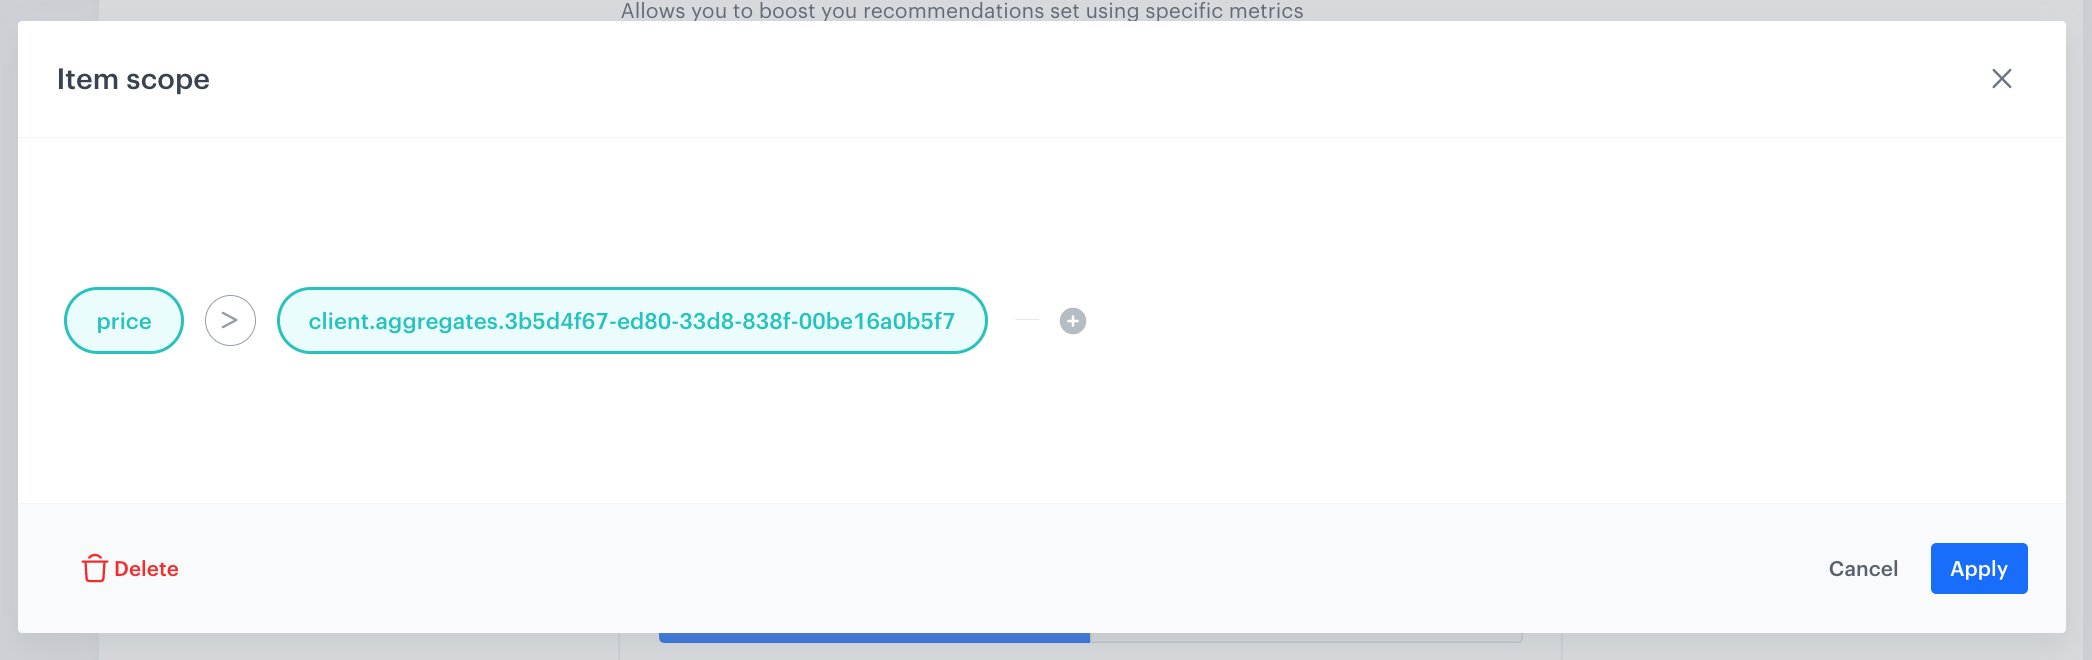
8. From the dropdown list, select the **price** attribute.
9. Click the
10. From the dropdown list, select **Context**.
11. Click the **null** node.
**Result**: The **Select value** and **Property** buttons appear.
12. From the **Property** dropdown list, select **Aggregate context**.
13. From the **Select value** dropdown list, select an aggregate created in [the previous step](/use-cases/replenishment#create-an-aggregate).
14. Change the mathematical operator between the nodes to the greater-than sign (**>**).
8. Click **Apply**.
Boosting items with the price higher than the average value of order in this category
9. In the **Promote/Demote** selector, select **Promote** (default value).
10. Use the slider to adjust how much you want the rule to affect the results.
11. Save the **Boosting** section settings by clicking **Apply**.
12. Optionally, you can define the settings in the **Additional settings** section.
13. Save the recommendation.
## Create an email template
---
In this part of the process, prepare an email template with the recommendation created in [the previous step](/use-cases/replenishment#create-the-recommendation-with-boosting-rules) that will encourage a customer to make another purchase from the specific category.
1. Go to **Experience Hub > Emails > Templates > Drag&drop builder** or **Code editor** to create an email template.
2. In the upper right corner, click **Inserts**. In the **AI Cart Recommendations 2** catalog, find [previously build recommendations](/use-cases/replenishment#create-the-recommendation-with-boosting-rules) on the list of inserts.
3. Copy and paste the Jinjava code of the recommendation and insert it to the template of your email.
4. Adjust the visual layer of the email to your needs.
4. Save your template.
## Create a workflow
---
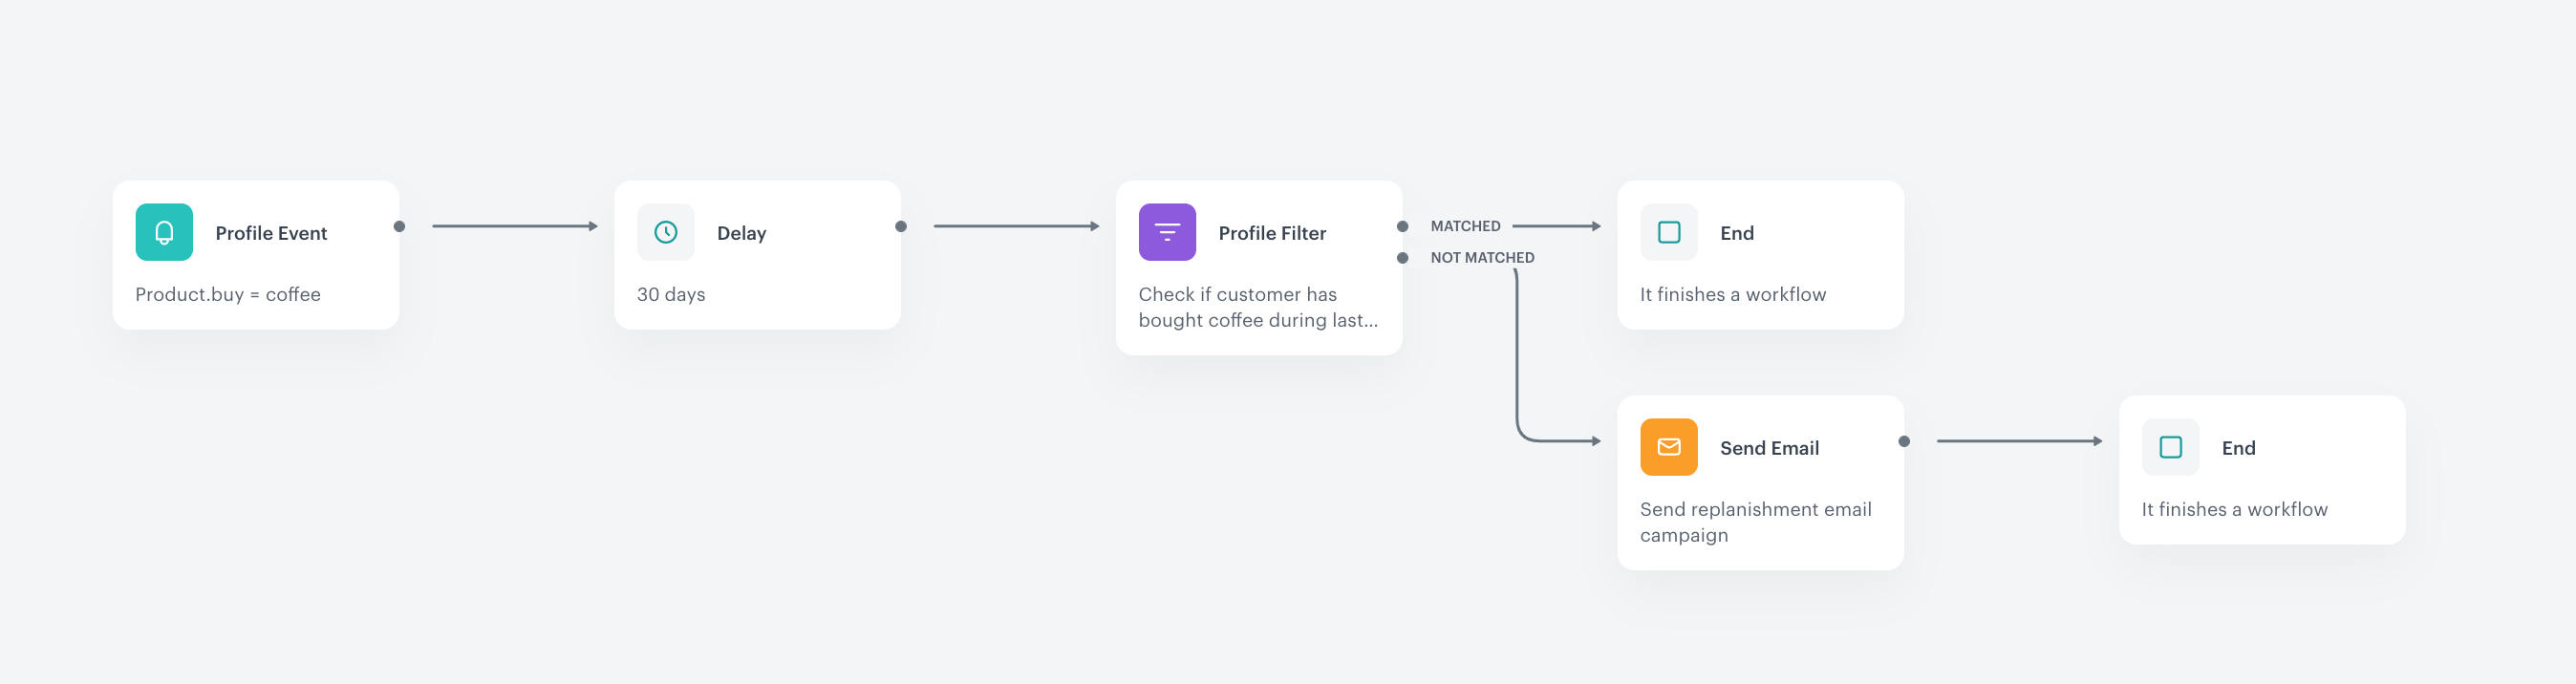
In this part of the process, create a workflow which is triggered by the `product.buy` event from `Coffee` category. The workflow will wait 30 days. If a customer did not make another purchase from this category after that period, we will send the email with the recommended products.
1. In Synerise, go to **Automation Hub > Workflows > New workflow**.
2. Enter the name of the workflow.
3. As the first node, add **Profile Event**. In the configuration of the node, select the event that triggers the workflow. In this use case, it's a `product.buy` event,
4. Click **+ where** and choose **$category**.
5. As the logical operator, select **Equal**.
6. In the text field, enter `Coffee`.
4. Confirm by clicking **Apply**.
5. As the second node, add **Delay**. In the configuration of the node, set the period to `30 days`.
6. As the next node, choose **Profile Filter** to check if customers have bought a product from the coffee category during last 30 days. To do this:
1. Choose the `product.buy` event.
2. As the parameter, choose **$category**.
5. As the logical operator, select **Equal**.
6. In the text field, enter `Coffee`.
3. Set the time range to last 30 days.
4. Click **Apply**.
7. To the **Matched** path, add the **End** node.
8. To the **Not matched** path, add the **Send Email** node.
9. In the **Send email** node configuration:
1. In the **Sender details**, define the account from which the email will be sent.
2. In the **Content** section:
1. Enter the subject of the email which will be visible in the customer's inbox.
2. Select the email template created in [the previous step](/use-cases/replenishment#create-an-email-template).
3. Optionally, you can add UTM and URL parameters. If not, click **Skip step**.
10. Confirm by clicking **Apply**.
7. Add the **End** node to finish the workflow.
8. Optionally, you can set up the capping for this workflow based on your business needs.
8. Click **Save & Run**.
Workflow configuration
## Check the use case set up on the Synerise Demo workspace
---
You can check the the configuration of each step from this use case in our Synerise Demo workspace:
- [Aggregate](https://app.synerise.com/analytics/aggregates/3b5d4f67-ed80-33d8-838f-00be16a0b5f7)
- [Recommendation](https://app.synerise.com/ai-v2/recommendations/gHRu3EMcjO6w)
- [Workflow](https://app.synerise.com/automations/automation-diagram/3b9158df-b63f-4845-a81e-a53adf9101c8)
If you’re our partner or client, you already have automatic access to the **Synerise Demo workspace (1590)**, where you can explore all the configured elements of this use case and copy them to your workspace.
If you’re not a partner or client yet, we encourage you to fill out the contact [form](https://demo.synerise.com/request) to schedule a meeting with our representatives. They’ll be happy to show you how our demo works and discuss how you can apply this use case in your business.
## Read more
---
- [Aggregates](/docs/analytics/aggregates)
- [Automation Hub](/docs/automation)
- [Email campaigns](/docs/campaign/e-mail)
- [Recommendations](/docs/ai-hub/recommendations-v2)