
Automation capabilities in the area of data transformation can be used to update and change large amounts of data in a fast, advanced way, eliminating the process of manually adjusting the whole file. All transformations are performed on a sample file in desired format.

In this use case, you will find out how to transform and import customer data from a `.JSON` file with data transformation and workflows. 
In this use case, you will make the following modifications to the sample file:

- Edit values:
    - replace the value of the `city` attribute from blank to `unknown`; if the `city` attribute is defined, keep the existing city,
    - replace the `en`, `es`, `fr` values of the `language` attribute with `English`, `Spanish`, `French`, respectively,
    - replace the value of `payment_cash` and `payment_online` attributes from `1`/`0` to `cash`/`Null` and `online`/`Null`.
- Merge `payment_cash` and `payment_online` attributes into the `payment_info` attribute.

### Input data in use case

In this use case, we use two files:
- the complete `.JSON` file with your customer database. Make sure you include one of the required parameters: `clientID, uuid, email, customId`. The only requirement for JSON files is that they must be UTF-8 encoded. 
- Prepare a sample JSON file with data you want to import. Below you will find an example how such a a file can look.


  <details class="accordion"><summary>Example JSON file might look like this</summary><div class="accordion-content"><pre><code class="language-jinja">
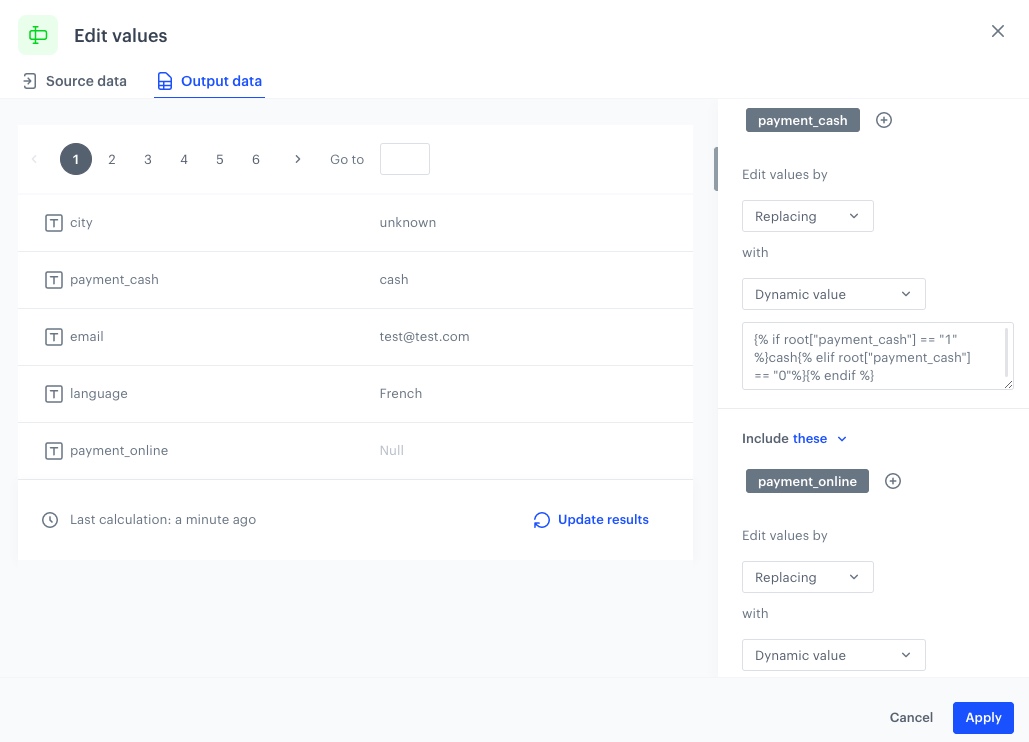
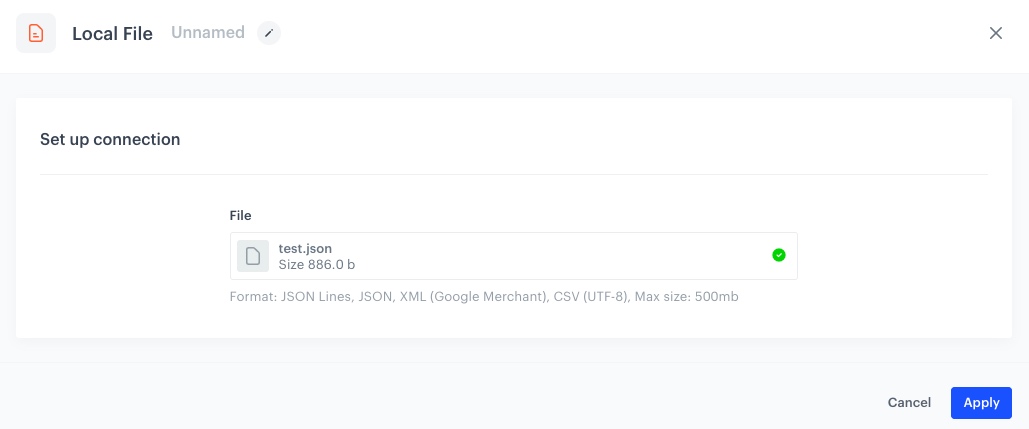
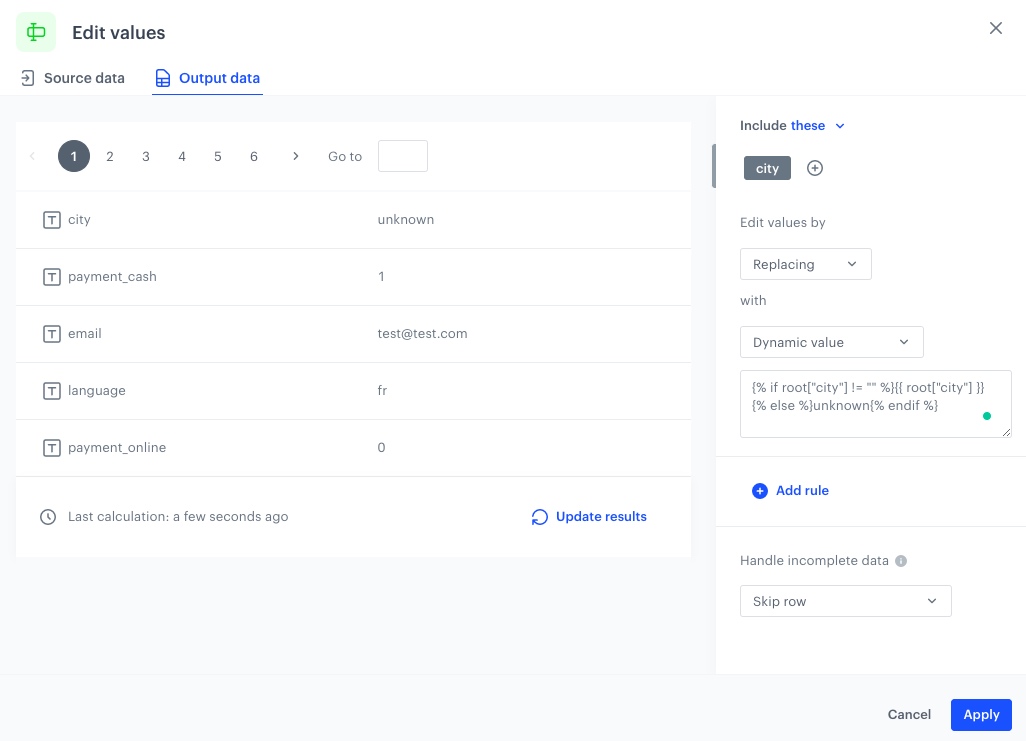
{ "email": "test@test.com", "city": "", "language": "fr", "payment_cash": "1", "payment_online": "0" }, { "email": "test2@test.com", "city": "New York", "language": "en", "payment_cash": "0", "payment_online": "1" }</code></pre></div></details>


<div class="admonition admonition-note"><div class="admonition-icon"><svg xmlns="http://www.w3.org/2000/svg" fill="none" viewBox="0 0 24 24" stroke="currentColor" stroke-width="2.5"><path stroke-linecap="round" stroke-linejoin="round" d="M13 16h-1v-4h-1m1-4h.01M21 12a9 9 0 11-18 0 9 9 0 0118 0z" /></svg></div><div class="admonition-body"><div class="admonition-content">

If your data is complete, you can skip transforming data. But if you need to modify the file with data before an import to Synerise, you can modify the data in **Automation Hub > Data Transformation**. To do so, create a sample of your data and include all attributes you want to modify. If you miss the attributes in the sample file, but import the actual data with them, the data will be imported as delivered in the actual file.

</div></div></div>


## Process
---

1. [Prepare data transformation rules](#create-data-transformation-rules) to transform the data in the file.
2. [Prepare a workflow](#prepare-a-workflow) to import the `.JSON` file to Synerise.

## Create data transformation rules
---
In this part of the process, you define the rules of modifying data before sending it to Synerise, so the data is consistent. Each of the following sub-steps describes the individual changes performed on the file. 

1. Go to <img src="/api/docs/image/54176ad07f146575310749eba44b7c2f42c1b327/icons/automation-hub-icon.svg" alt="Automation Hub icon" class="icon" > **Automation Hub > Data Transformation > Create transformation**.  
2. Enter the name of the workflow.  


   <div class="admonition admonition-note"><div class="admonition-icon"><svg xmlns="http://www.w3.org/2000/svg" fill="none" viewBox="0 0 24 24" stroke="currentColor" stroke-width="2.5"><path stroke-linecap="round" stroke-linejoin="round" d="M13 16h-1v-4h-1m1-4h.01M21 12a9 9 0 11-18 0 9 9 0 0118 0z" /></svg></div><div class="admonition-body"><div class="admonition-content">

   Before you proceed with selecting sample data and defining transformation rules, optionally, you can select a goal to help you structure the data. If you want to create a transformation diagram without a specific goal and you know the structure of the output data, skip this step. 

   Goals will suggest you the required fields needed to perform the import into Synerise.

   </div></div></div>


### Add input data

This node allows you to add a data sample. In further steps, you define how the data must be modified. Later, when this transformation is used in the  workflow, the system uses the rules created with the sample data as a pattern for modifying actual data.

1. Click the **Add input** node on the canvas.
2. On the pop-up, click **Upload a new file or drag one here**.
3. Upload the `.JSON` file.
4. You can preview the file, then click **Apply**.

**Result:** The **Data input** view is filled with data from the sample.

<figure>
<img src="/api/docs/image/54176ad07f146575310749eba44b7c2f42c1b327/use-cases/all-cases/_gfx/dt_datainput.png" alt="Data input of the sample file  class="large">
<figcaption>Data input of the sample file</figcaption>
</figure> 

### Handle missing data

In this part of the process, you will use the **Edit values** node to edit the `city` attribute values with Jinja code to keep the existing city and add the `unknown` value to the blanks.

1. Add the **Edit values** node.
2. In the configuration of the node:
    1. Click **Add rule**.
    3. Click **Add column**.
    4. Select the `city` column.
    4. Under **Edit values by**, from the dropdown list, select **Replacing**.
    5. Under **with**, from the dropdown list, select **Dynamic value**.
    6. In the **Type value** field, paste the following Jinja code:

        
       <pre><code class="language-jinja">{% if root["city"] != "" %}{{ root["city"] }}{% else %}unknown{% endif %}</code></pre>


        <figure><img src="/api/docs/image/54176ad07f146575310749eba44b7c2f42c1b327/use-cases/all-cases/_gfx/dt_city_ev.png" class="full" alt="The view of the configuration of the Edit values node"><figcaption>The configuration of the Edit values node</figcaption></figure> 

        As a result, in the **Output data** tab, you will get an updated file:

         <figure><img src="/api/docs/image/54176ad07f146575310749eba44b7c2f42c1b327/use-cases/all-cases/_gfx/dt_city_ev_update.png" class="full" alt="Output data after applying Edit values node"><figcaption>Output data after applying Edit values node</figcaption></figure>  

### Change data

In this part of the process you will use the same **Edit values** node [created in the previous part of the process](#handle-missing-data), to also edit the `language`, `payment_cash` and `payment_online` attributes values with jinjava code to change the data. You will change the `language` attribute value from "en" to "English" and so on. In case of `payment_cash` and `payment_online` attributes you will change “1/0“ values to “cash/Null“ and "online/Null" to later merge them into `payment_info` attribute.

1. In the configuration of the node:
    1. Click **Add rule**.
    2. Click **Add column**.
    4. Select the `language` column.
    4. Under **Edit values by**, from the dropdown list, select **Replacing**.
    5. Under **with**, from the dropdown list, select **Dynamic value**.
    6. In the **Type value** field, paste the following Jinja code:

        
       <pre><code class="language-jinja">
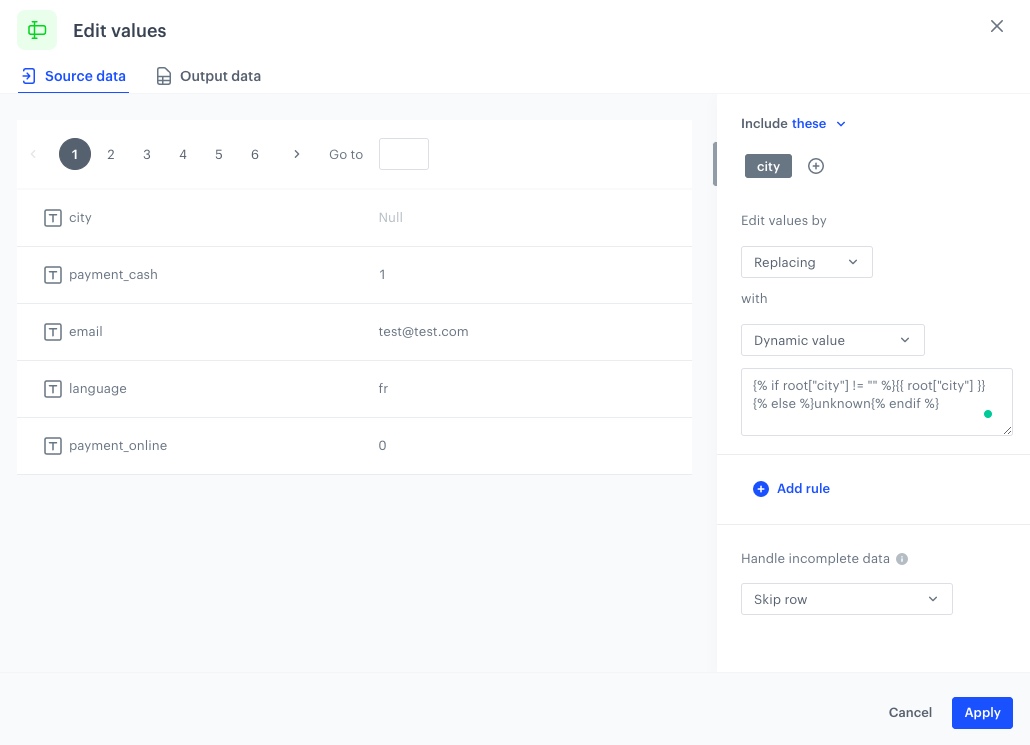
{% if root["language"] == "en" %}English{% elif root["language"] == "es"%}Spanish{% elif root["language"] == "fr"%}French{% endif %}</code></pre>


         <figure><img src="/api/docs/image/54176ad07f146575310749eba44b7c2f42c1b327/use-cases/all-cases/_gfx/dt_lang_ev.png" class="full" alt="The view of the configuration of the Edit values node"><figcaption>The configuration of the Edit values node</figcaption></figure> 

2. Click **Add rule**.
    1. Click **Add column**.
    2. Select the `payment_cash` column.
    3. Under **Edit values by**, from the dropdown list, select **Replacing**.
    5. Under **with**, from the dropdown list, select **Dynamic value**.
    6. In the **Type value** field, paste the following Jinja code:
        
       <pre><code class="language-jinja">
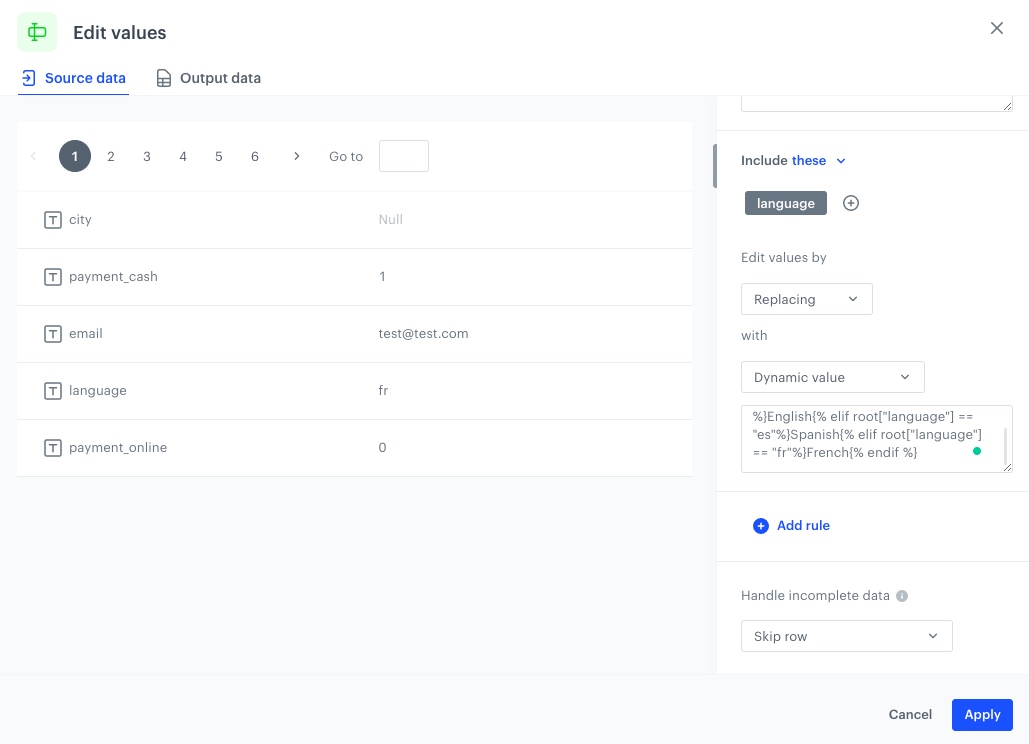
{% if root["payment_cash"] == "1" %}cash{% elif root["payment_cash"] == "0"%}{% endif %}</code></pre>


2. Click **Add rule**.
    1. Click **Add column**.
    2. Select the `payment_online` column.
    3. Under **Edit values by**, from the dropdown list, select **Replacing**.
    5. Under **with**, from the dropdown list, select **Dynamic value**.
    6. In the **Type value** field, paste the following Jinja code:
        
       <pre><code class="language-jinja">{% if root["payment_online"] == "1" %}online{% elif root["payment_online"] == "0"%}{% endif %}</code></pre>


    As a result, in the **Output data** tab, you will get an updated file:
        <figure>
        <img src="/api/docs/image/54176ad07f146575310749eba44b7c2f42c1b327/use-cases/all-cases/_gfx/dt_payment.png" class="full" alt="Output data after applying Edit values node"><figcaption>Output data after applying Edit values node</figcaption>
        </figure> 

3. Click **Apply**.

### Merge columns

In this part of the process, you will use the **Merge columns** node to merge `payment_cash` and `payment_online` attributes into one `payment_info` attribute.

1. Click **THEN** on the canvas.
2. From the dropdown list, select **Merge columns** node.
3. In the configuration of the node:
    1. Click **Add rule**.
    2. Click **Add column**.
    4. Select the `payment_cash` and `payment_online` columns.
    4. In the **Merge values to new column** section, in the **New column name** field, type the name for the new column: `payment_info`.
    5. Enable the **Remove original columns** option.

        <figure>
            <img src="/api/docs/image/54176ad07f146575310749eba44b7c2f42c1b327/use-cases/all-cases/_gfx/dt_merge.png" class="full" alt="The view of the configuration of the Edit values node"><figcaption>The configuration of the Merge columns node</figcaption>
        </figure> 
    
     As a result, in the **Output data** tab, you will get an updated file:

    <figure>
            <img src="/api/docs/image/54176ad07f146575310749eba44b7c2f42c1b327/use-cases/all-cases/_gfx/dt_merge_update.png" class="full" alt="Output data after applying Edit values node"><figcaption>Output data after applying Merge columns node</figcaption>
    </figure>  

4. Click **Apply**.
5. As the final node, add **Data Output** in which you will see the final result of file modifications.
6. Click **Save and publish**.

## Prepare a workflow
---
The scenario for this use case involves a one-time import of `.JSON` file with a customer database directly to Synerise.

1. Go to <img src="/api/docs/image/54176ad07f146575310749eba44b7c2f42c1b327/icons/automation-hub-icon.svg" alt="Automation Hub icon" class="icon" > **Automation Hub > Workflows > New workflow**.  
2. Enter the name of the workflow.  

### Define the launch date

3. As the trigger node, add **Scheduled Run**.  
4. In the configuration of the node:  
    1. Change the **Run trigger** option to **one time**.  
    2. Select **Immediately**.
    3. Confirm by clicking **Apply**.

     <figure><img src="/api/docs/image/54176ad07f146575310749eba44b7c2f42c1b327/use-cases/all-cases/_gfx/scheduled-run-dt.png" class="full" alt="The configuration of the Scheduled Run node"><figcaption>The configuration of the Scheduled Run node</figcaption></figure>

### Select file to import

1. Add the **Local File** node.  
2. In the configuration of the node:  
    1. Upload the file. 
    2. Confirm by clicking **Apply**.  

 <figure><img src="/api/docs/image/54176ad07f146575310749eba44b7c2f42c1b327/use-cases/all-cases/_gfx/dt_json.png" class="full" alt="The view of the Local File transfer"><figcaption>Local File transfer</figcaption></figure>  

### Add Data Transformation node

1. Add the **Data Transformation** node.
2. In the configuration of the node, select [the data transformation you have created before](#create-data-transformation-rules).

    <figure><img src="/api/docs/image/54176ad07f146575310749eba44b7c2f42c1b327/use-cases/all-cases/_gfx/dt_workflow_transform.png" class="full" alt="The view of the configuration of the Data Transformation node"><figcaption>The configuration of the Data Transformation node</figcaption></figure>  

3. Click **Apply**

### Add Import Profiles and finishing node

1. Add the **Import Profiles** node.
2. Add the **End** node.
3. In the upper right corner, click **Save & Run**.

    <figure><img src="/api/docs/image/54176ad07f146575310749eba44b7c2f42c1b327/use-cases/all-cases/_gfx/dt_workflow.png" class="full" alt="The view of the workflow configuration"><figcaption>The workflow configuration</figcaption></figure>


## Check the use case set up on the Synerise Demo workspace
---
You can check the [Data Transformation](https://app.synerise.com/automations/data-transformation/269c63b8-ea4b-4baf-9028-005b06e8e06d) and [Workflow](https://app.synerise.com/automations/automation-diagram/39155d5e-b0cd-4d92-b887-ebf931166a96) configurations directly in Synerise Demo workspace. 

If you’re our partner or client, you already have automatic access to the **Synerise Demo workspace (1590)**, where you can explore all the configured elements of this use case and copy them to your workspace.  

If you’re not a partner or client yet, we encourage you to fill out the contact [form](https://demo.synerise.com/request) to schedule a meeting with our representatives. They’ll be happy to show you how our demo works and discuss how you can apply this use case in your business. 

## Read more
---

- [Customer properties](/docs/assets/customer-properties)
- [Data Transformation](/docs/automation/data-transformation-and-imports)
- [Jinjav inserts](/developers/inserts)