With Synerise, you can effortlessly send any custom segmentation to Google Ads, ensuring that your ad campaigns are precisely targeted to the right audience.
Using Synerise's powerful integrations, you can unlock many benefits when using custom segments in Google Ads. Tailoring your offerings to specific customer segments allows you to deliver highly personalized ads that resonate with customers' individual preferences, increasing their engagement and conversion rates. With more precise targeting, you can minimize wasted advertising expenses and optimize your advertising budget, resulting in savings and better ROI.
Synerise segments allow you to gain deeper insights into your customer base, identify and target ads to high-value customer groups, and create customized marketing campaigns that increase customer loyalty and repeat purchases.
This use case describes the scenario of sending a list of profiles with a high propensity to buy to Google Ads. This is just an exemplary segment. You can send any other customer segment that meets your specific business needs.
## Prerequisites
---
- Make sure to meet prerequisites from the ["Update Customer List" node](/docs/automation/integration/google-ads/google-ads-send-profiles-to-list#prerequisites) configuration.
- Create a propensity to buy prediction based on this [use case](/use-cases/propensity-brand). The results of this prediction will be used later in the process to create a segmentation of customers with the highest propensity to buy the product(s).
## Process
---
1. [Create a segmentation](/use-cases/send-customer-segmentation-to-google-ads#create-a-segmentation) based on the `snr.propensity.score` event.
2. [Create Data Transformation rules](/use-cases/send-customer-segmentation-to-google-ads#create-data-transformation-rules) to adjust the file with customers to [Google Ads requirements](/docs/automation/integration/google-ads/google-ads-send-profiles-to-list#prerequisites-1).
2. [Create a workflow](/use-cases/send-customer-segmentation-to-google-ads#create-a-workflow) that sends a list of profiles from Synerise to Google Ads.
## Create a segmentation
---
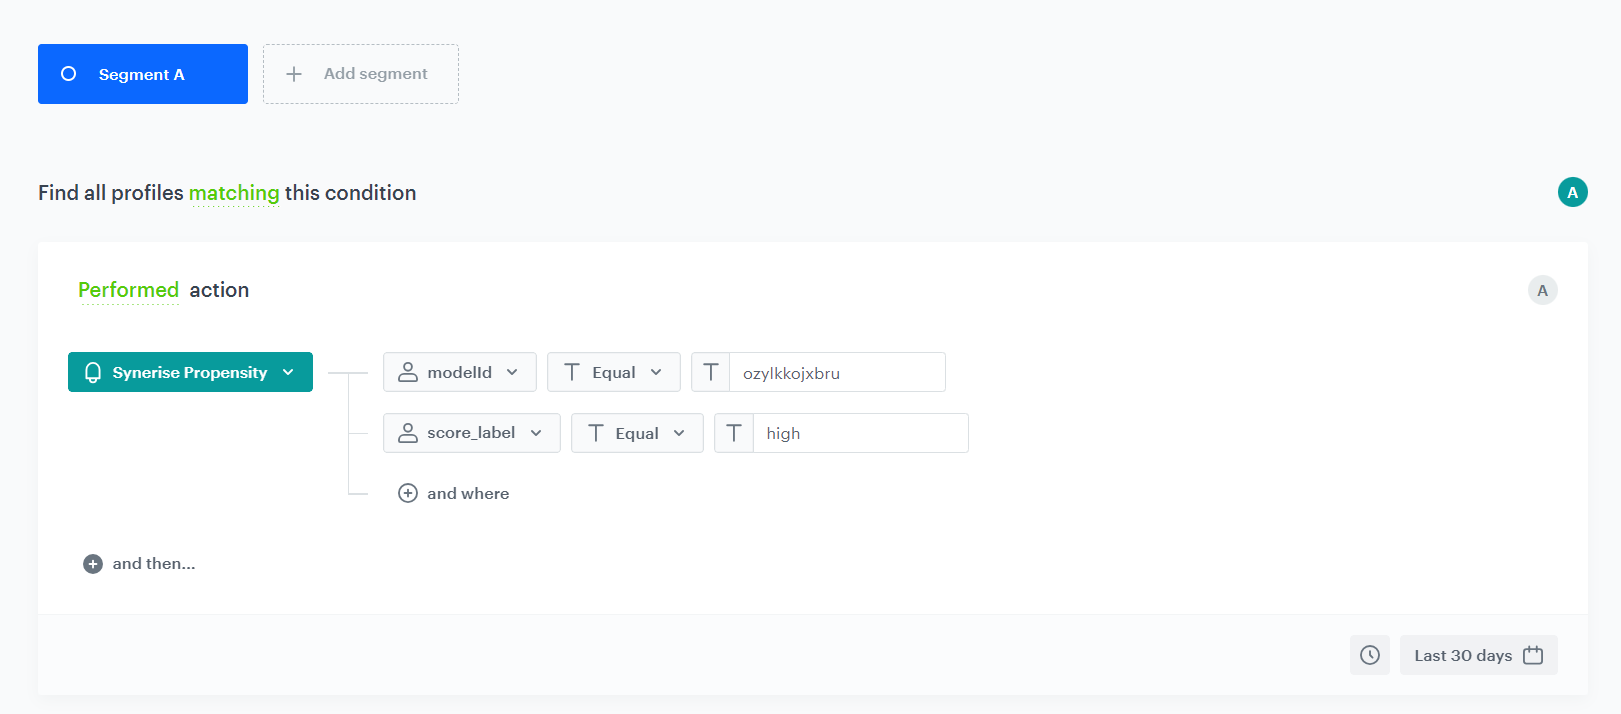
Based on the `snr.propensity.score` event, create a segmentation of customers with high propensity to purchase selected item(s).
1. Go to **Decision Hub > Segmentations > New segmentation**.
2. Enter the name of the segmentation.
3. Click **Add condition**.
4. Select the `snr.propensity.score` event.
5. Click **+ where**.
6. As the event parameter, select `modelId`.
7. As the logical operator, select **Equal**.
8. In the text field, enter the value of the `modelId` parameter.
9. Click **+ and where**.
10. As the event parameter, select `score_label`.
11. As the logical operator, select **Equal**.
12. In the text field, enter `high`.
13. Set the date range according to your business needs.
14. Click **Save**.
Segmentation configuration
## Create Data Transformation rules
---
At this part of the process, create Data Transformation Rules that adjust the file with exported segmentation to [the Google Ads requirements](/docs/automation/integration/google-ads/google-ads-send-profiles-to-list#prerequisites-1), before it is sent to Google Ads.
Later [in the process of creating a workflow](/use-cases/send-customer-segmentation-to-google-ads#create-a-workflow) you will define customer attributes whose values will be exported to Google Ads. As a result, a file with the chosen attributes as columns names will be exported to the Google Ads list. However, the column names in the file need to follow [the specific requirements](/docs/automation/integration/google-ads/google-ads-send-profiles-to-list#prerequisites-1) so in case your attributes names are not compliant with them, you need to use Data Transformation rules to adjust it.
If you are sure that the data format of your exported file meets Google Ads requirements, you can skip this step.
In our case, to use **Email address matching** in Google Ads, we will choose the `email` attribute so we will change the `email` column name to `Email`. Additionally, we will remove the `id` column which is exported automatically but it is not accepted by Google Ads.
1. Go to **Automation Hub > Data Transformation > Create transformation**.
2. Enter the name of the transformation.
### Add file with sample data data
This operation allows you to add a data sample. In further steps, you define how the data must be modified. Later, when this transformation is used in the workflow, the system uses the rules created with the sample data as a pattern for modifying actual data. You can use the exact file from the example below.
Click here to see an example data sample used in this use case
email,id test@gmail.com,1234
1. Click the **Add input** node on the canvas.
2. On the pop-up, click **Upload a new file or drag one here**.
3. Upload the `.CSV` file.
4. You can preview the file, then click **Apply**.
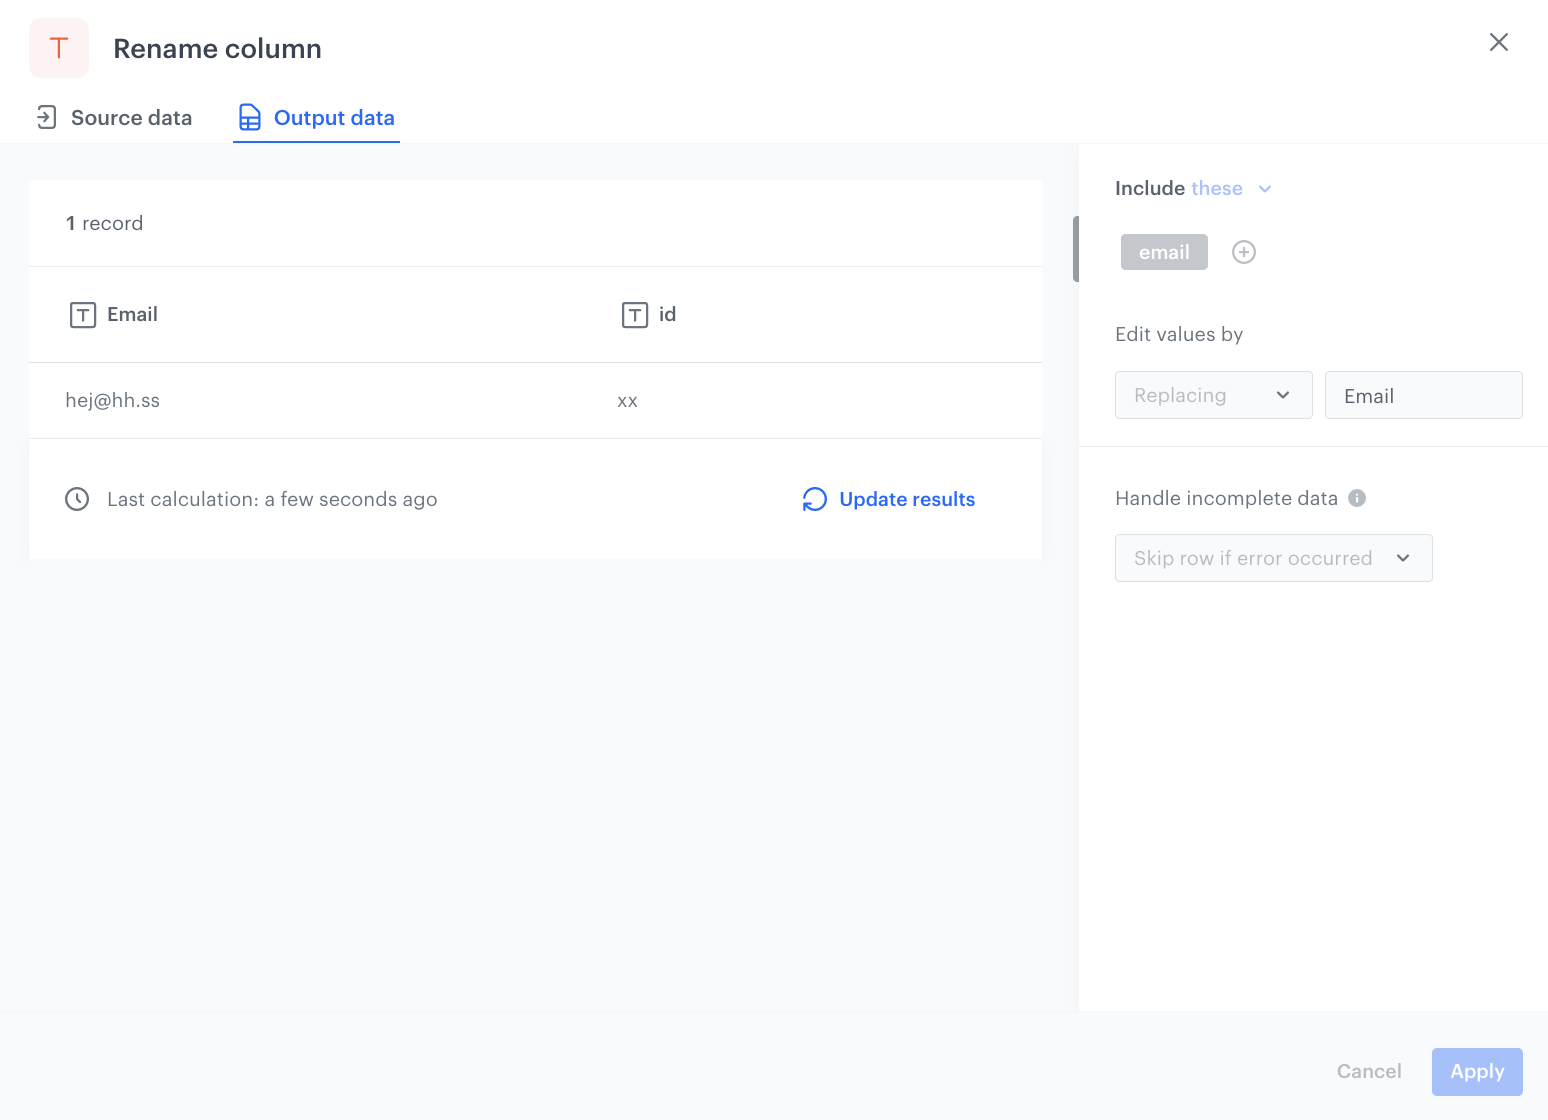
### Rename column
In this part of the process, we will use the **Rename column** node to rename the **email** column to **Email**.
1. On the canvas, click the right mouse button.
2. From the dropdown list, select **Rename column**.
3. Click the **Rename column** node.
4. In the configuration of the node:
1. Click **Add rule**.
2. Select the **Include these** option.
This is the default option. All column names you select will be changed as you specify in the further configuration.
3. Click **Add column**.
4. From the dropdown list, select the columns you want to rename.
5. Under the **Edit values by** subheader, select the **Replacing** option.
This options finds values matching the conditions and replaces them with the value you specify.
6. In the right field, enter the name you want to replace the original name with. In our example, it is `Email`.
Example of the configuration of the Rename column node
5. Before you save the settings, you can check the preview of the file after changes in the **Output data** tab.
6. Confirm by clicking **Apply**.
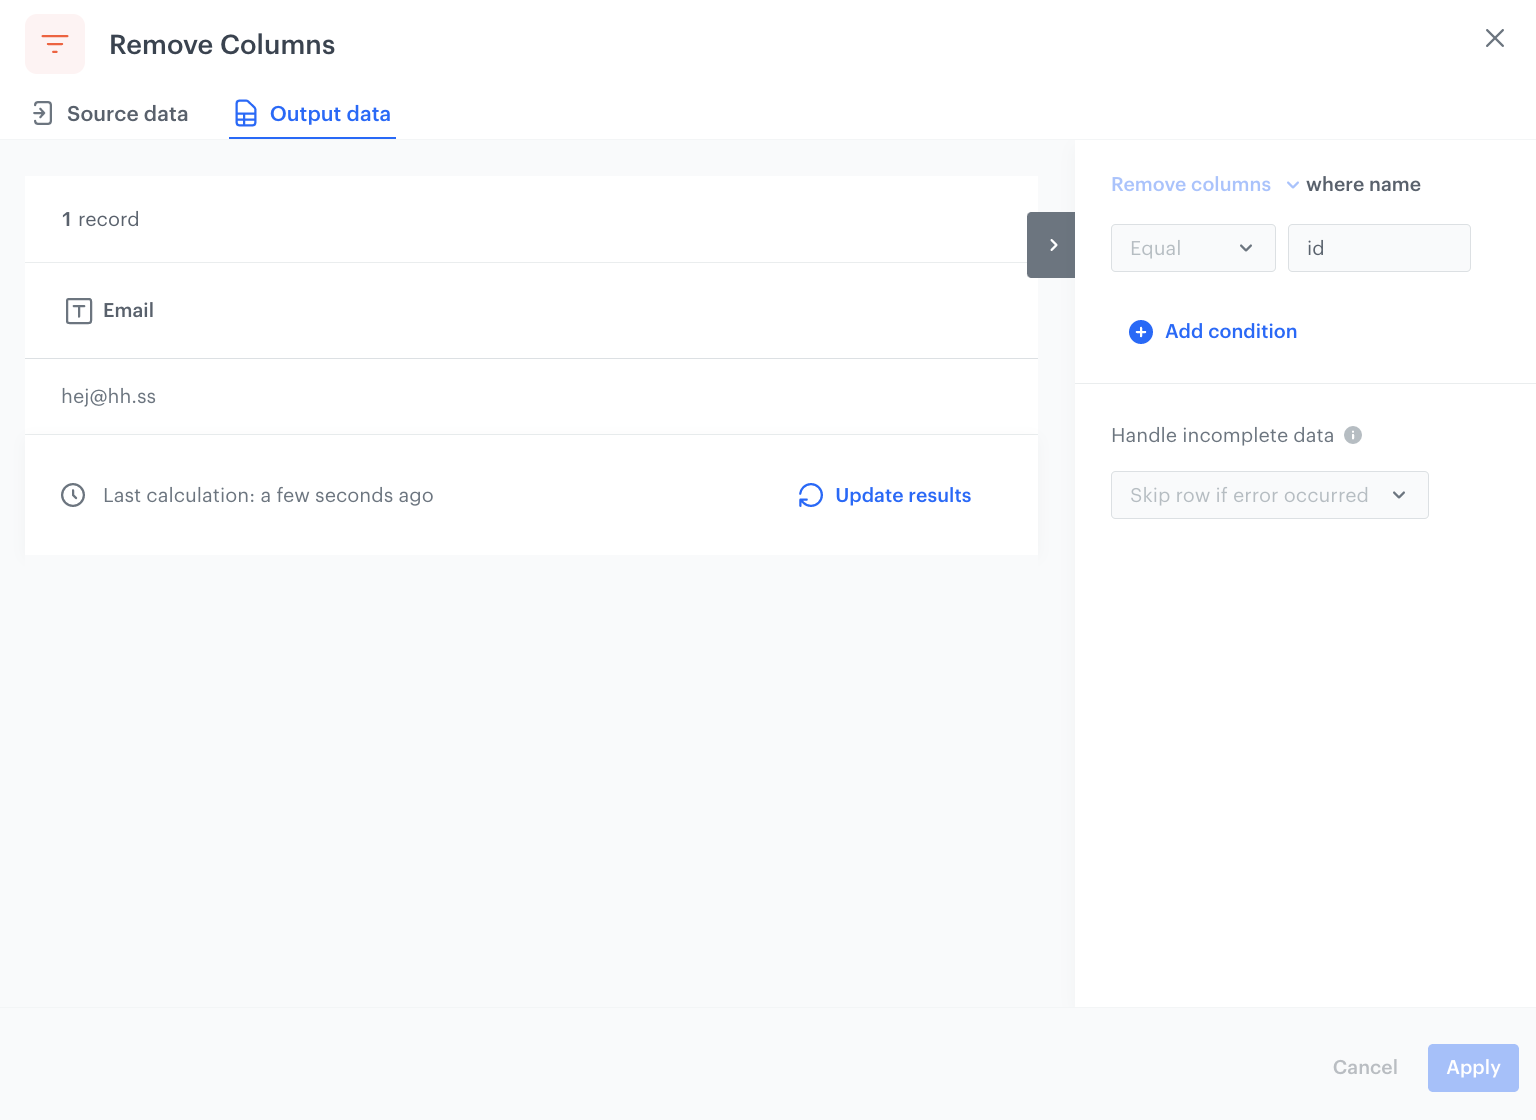
### Remove column
In this part of the process, we will remove the **id** column.
1. On the canvas, click the right mouse button.
2. From the dropdown list, select **Remove columns**.
3. Click the **Remove columns** node.
4. In the configuration of the node:
1. Enter the name of the column to be removed. In our case, it is `id`.
Example of the configuration of the Rename column node
5. Before you save the settings, you can check the preview of the file after changes in the **Output data** tab.
6. Confirm by clicking **Apply**.
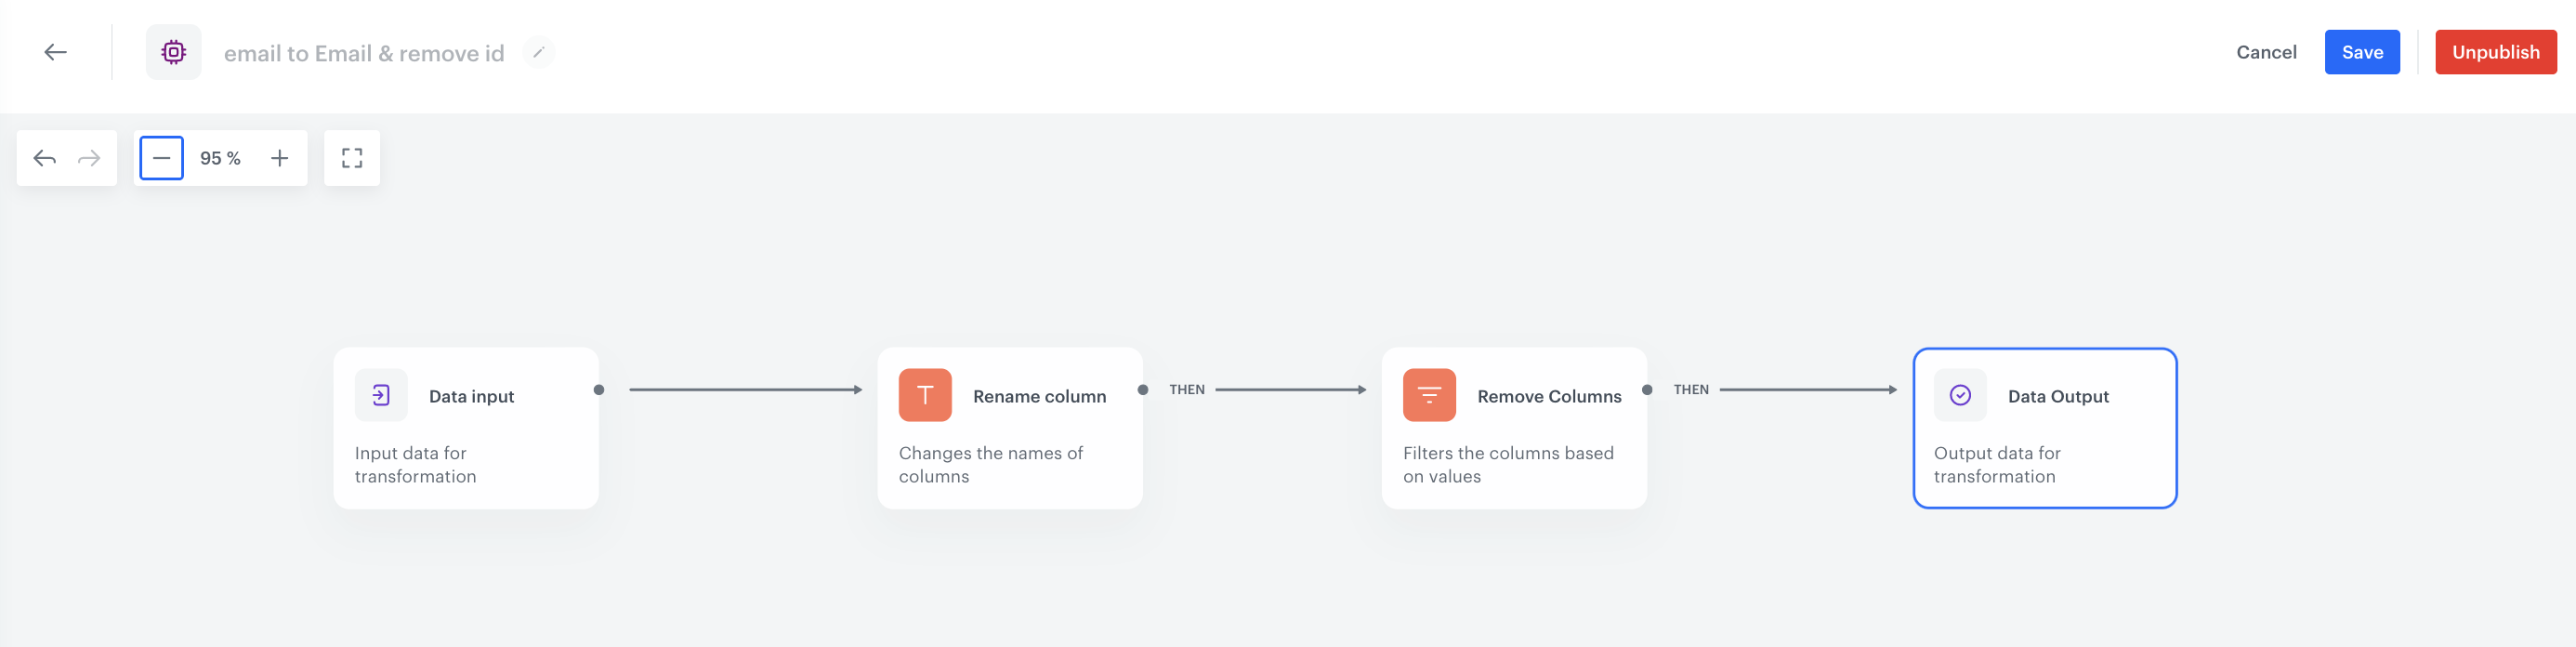
### Add the finishing node
This node ends the transformation and allows you to view a preview of all the changes made to the file.
1. On the canvas, click the right mouse button.
2. From the dropdown list, select **Data output**.
3. In the upper right corner, click **Save and publish**.
**Result**:
The diagram of data transformation
After the data transformation is published, you can use it in the Data Transformation node while preparing a workflow that imports the files.
## Create a workflow
---
As the final part of the process, create a workflow that sends customers with the high propensity to buy item(s) to Google Ads, every day at 6:00 A.M.
1. Go to **Automation Hub > Workflows > New workflow**.
2. Enter the name of the workflow.
### Define the Scheduled Run trigger node
1. As the trigger node, add **Scheduled Run**.
2. In the configuration of the node:
1. Leave the **Run trigger** option at default (**all time**).
2. From the **Timezone** dropdown list, select the time zone consistent with the timezone selected for your workspace.
3. Define the frequency of the workflow. In this use case, it's every day at 6:00 A.M.
4. Confirm by clicking **Apply**.
### Select customers to export
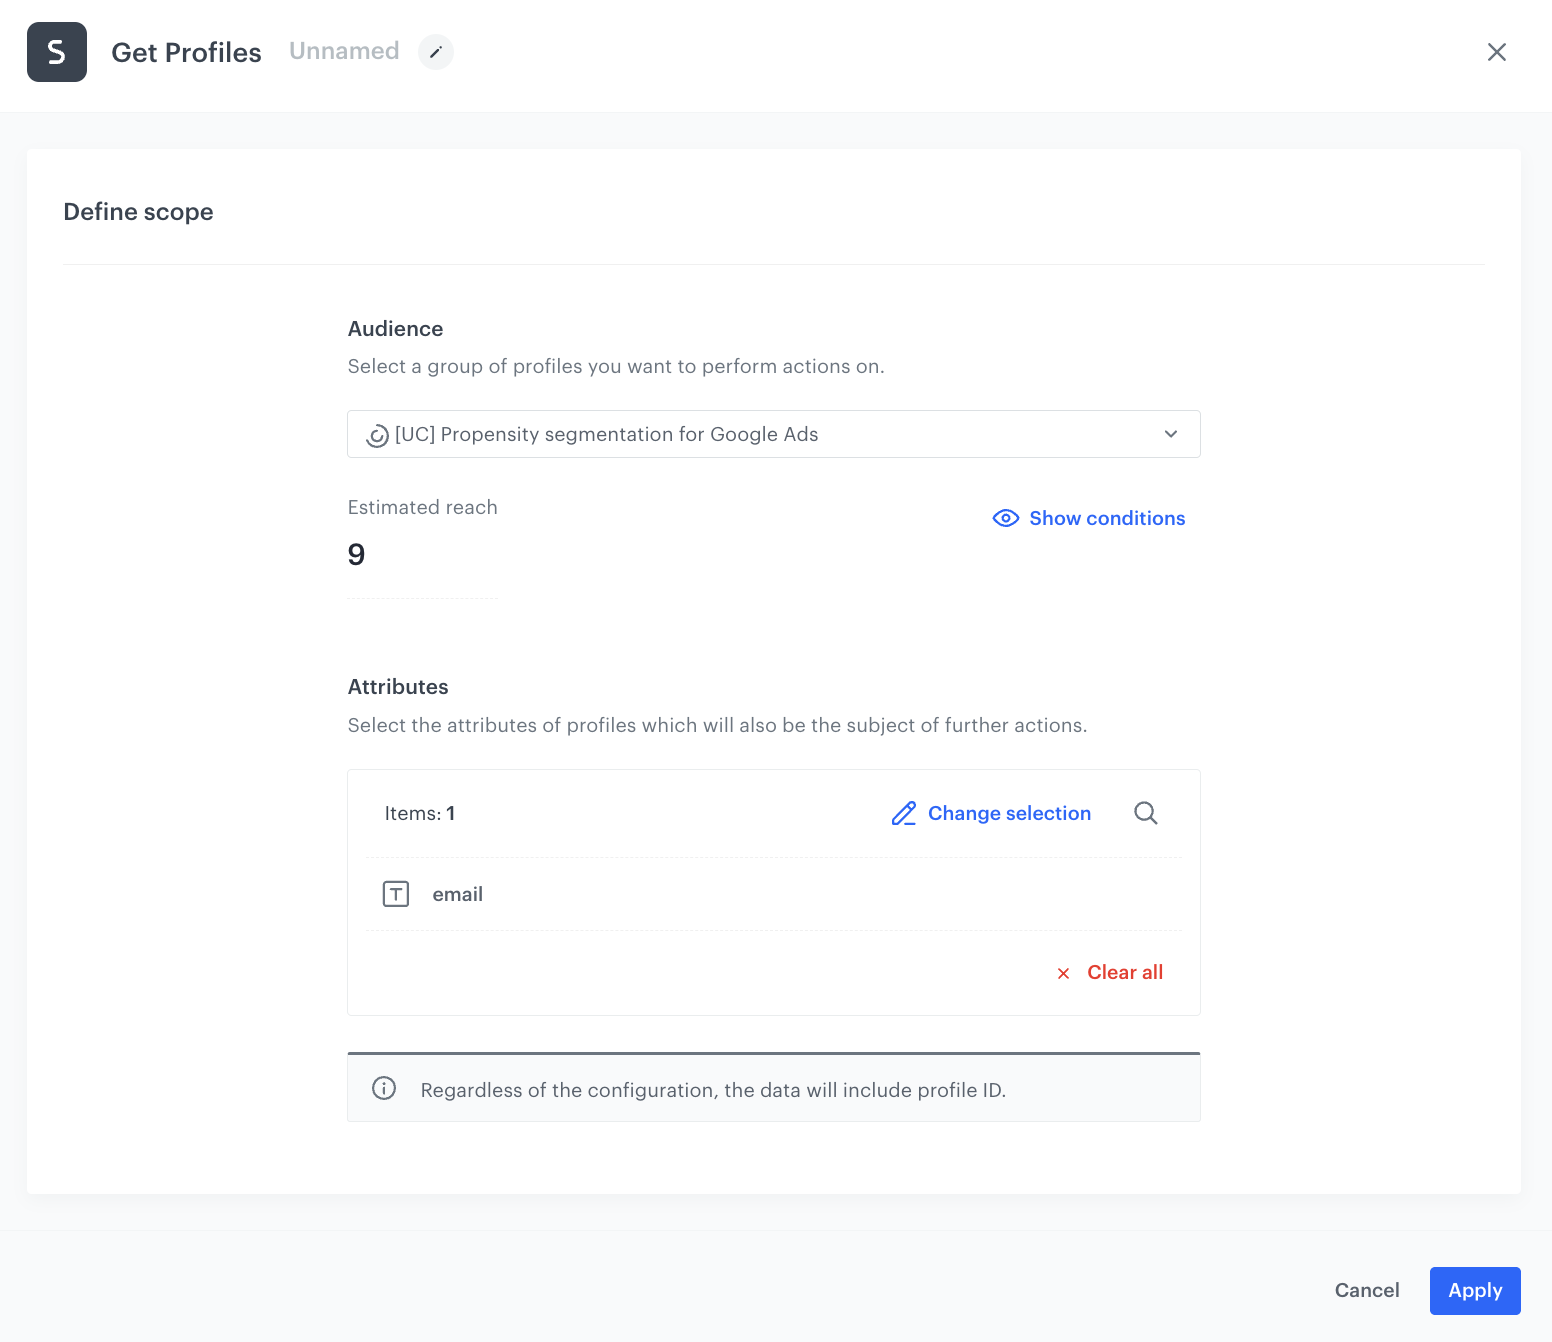
In this part of the process, select a [segmentation of customers with the high propensity to buy](/use-cases/send-customer-segmentation-to-google-ads#create-a-segmentation) that you created earlier in the process. Then select the desired attributes, whose values will be exported to Google Ads in further steps. In our case, it is `email`. As a result, the system gathers all customers data in a file which will be transformed in the next steps according to the data transformation rules you created in [the previous part of the process](/use-cases/send-customer-segmentation-to-google-ads#create-data-transformation-rules).
1. Add the **Get Profiles** node.
2. In the configuration of the node:
1. Select the segmentation you [created in the previous step](/use-cases/send-customer-segmentation-to-google-ads#create-a-segmentation) to extract customers’ data.
2. In the **Attributes** section, select `email`.
3. Confirm by clicking **Apply**.
The configuration of the Get Profiles node
### Transform the data before sending it to Google Ads
During this part of the process, define the Data Transformation node with [the transformation rules defined previously](/use-cases/send-customer-segmentation-to-google-ads#create-data-transformation-rules).
7. Add a **Data Transformation** node.
8. In the configuration of the node, select the [data transformation you have created before](/use-cases/send-customer-segmentation-to-google-ads#create-data-transformation-rules).
9. Confirm by clicking **Apply**.
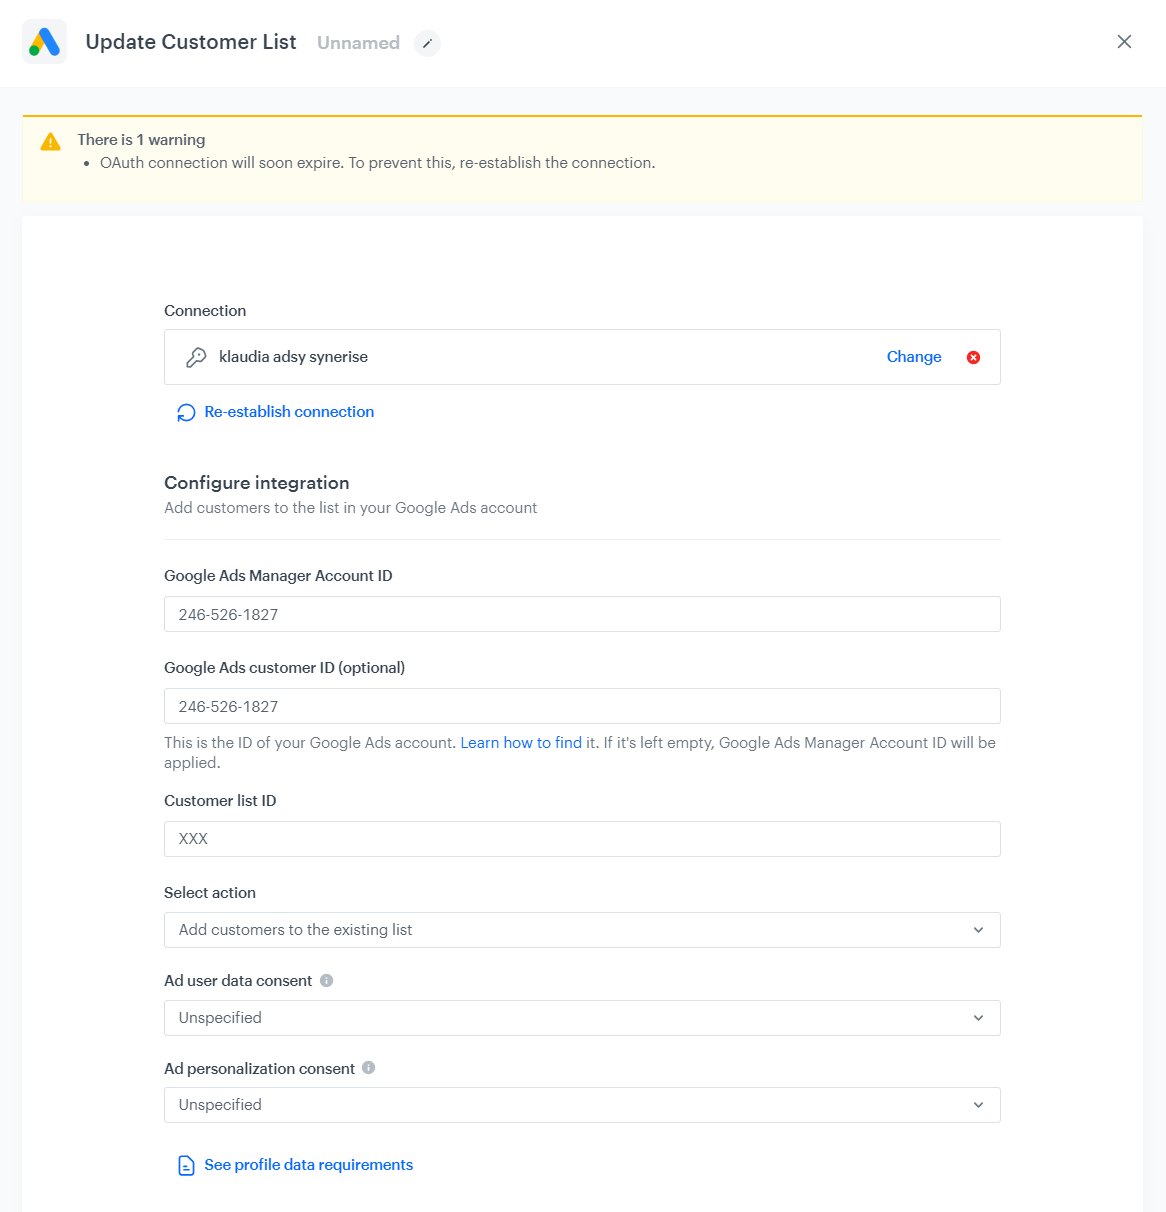
### Configure the Update Customer List node
---
1. Click **Google Ads > Update Customer List**.
2. Click **Select connection**.
3. From the **Select connection** dropdown list, select an existing connection which allows you to authorize in Google Ads.
If you haven’t established a connection yet:
1. At the bottom of the **Select connection** dropdown list, click **Add connection**.
2. On the pop-up, click **Sign in with Google**.
3. Select a Google Ads Account that meets the requirements to access [Customer Match](https://support.google.com/adspolicy/answer/6299717).
4. Follow the instructions on the interface.
5. After the successful authentication, click **Next**.
6. In the Connection name field, enter the name of the connection.
7. It’s used to find the connection on the list.
8. Click **Apply**.
**Result:** A connection is created and selected.
1. In the **Google Ads Manager Account ID** field, provide the manager account identifier.
2. In the **Google Ads customer ID (optional)** field, provide the ID of your Google Ads account. If it's left empty, Google Ads Manager Account ID will be applied. Learn how to find a [Google Ads customer ID (optional)](https://support.google.com/google-ads/answer/1704344).
3. In the **Customer list ID** field, enter the identifier of the customer list to which would like to add profiles.
4. In the **Select action** dropdown list, select one of available options:
1. **Add customers to the existing list** - adds new records to the existing records in the list
2. **Overwrite the existing list** - existing records will be overwritten by new ones, you will lose previous data.
5. In the **Ad user data consent** indicate whether the customer has given consent for their data to be used in advertising processes.
6. In the **Ad personalization consent** signifies whether the customer agrees to personalized advertising based on their preferences or behavior.
5. Confirm by clicking **Apply**.
Update Customer List node configuration
### Add the End node
1. On the **Update Customer List** node, click **then**.
2. From the dropdown list, select **End**.
3. In the upper right corner, click **Save & Run**.
Workflow configuration
## Check the use case set up on the Synerise Demo workspace
---
You can check the configuration of every element of this process directly in Synerise Demo workspace:
- [Propensity prediction](https://app.synerise.com/ai-v2/predictions/propensity/pngsuydybpkq)
- [Segmentation](https://app.synerise.com/analytics-v2/segmentations/8a3dd54a-10de-402e-8987-2630acdbb03a)
- [Data Transformation diagram](https://app.synerise.com/automations/data-transformation/24483d53-6638-4714-9e10-bcc41be1719c)
- [Workflow configuration](https://app.synerise.com/automations/automation-diagram/fc1e1d96-312e-4bba-8d0a-5ee6bfe03e4c)
If you’re our partner or client, you already have automatic access to the **Synerise Demo workspace (1590)**, where you can explore all the configured elements of this use case and copy them to your workspace.
If you’re not a partner or client yet, we encourage you to fill out the contact [form](https://demo.synerise.com/request) to schedule a meeting with our representatives. They’ll be happy to show you how our demo works and discuss how you can apply this use case in your business.
## Read more
---
- [Predictions](/docs/ai-hub/predictions)
- [Segmentation](/docs/analytics/segmentations)
- [Data Transformation](/docs/automation/data-transformation-and-imports)
- [Update Customer List node](/docs/automation/integration/google-ads/google-ads-send-profiles-to-list)