
In order to increase conversions, you might look into the use of lookalike predictions to identify the customers comparable to prior successful target audiences. Lookalikes let you compare two segments of customers and find those who display similar qualities of performance. Marketers may extend reach of campaigns by incorporating these lookalike audiences into their communication. 

This use case describes a workflow that sends a mobile push notification to customers who did not receive it before, and might be likely to purchase after receiving it. Those customers are chosen using highest lookalike prediction score which is calculated on the basis of the segment of customers who reacted well to a previous iteration of that campaign. The workflow is triggered by the `session.start` event in the mobile application, and sends a mobile push after 48 hours if the customer did not make a purchase.


<div class="admonition admonition-note"><div class="admonition-icon"><svg xmlns="http://www.w3.org/2000/svg" fill="none" viewBox="0 0 24 24" stroke="currentColor" stroke-width="2.5"><path stroke-linecap="round" stroke-linejoin="round" d="M13 16h-1v-4h-1m1-4h.01M21 12a9 9 0 11-18 0 9 9 0 0118 0z" /></svg></div><div class="admonition-body"><div class="admonition-content">

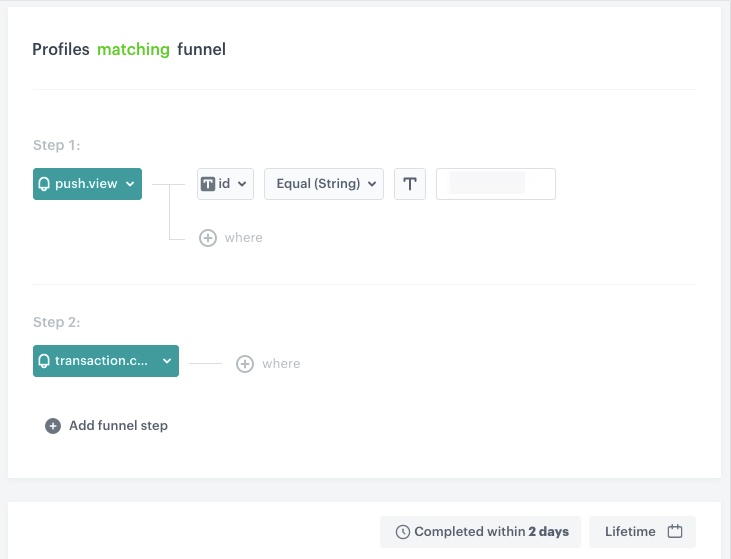
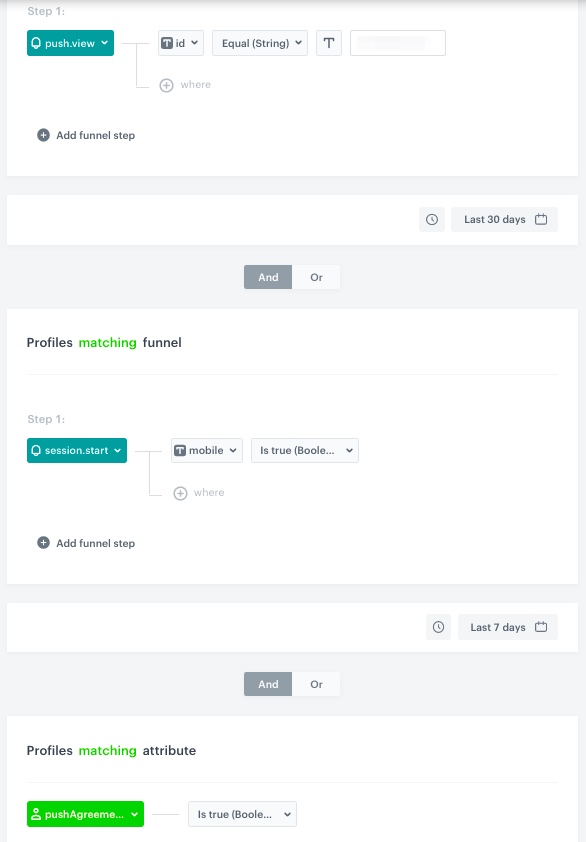
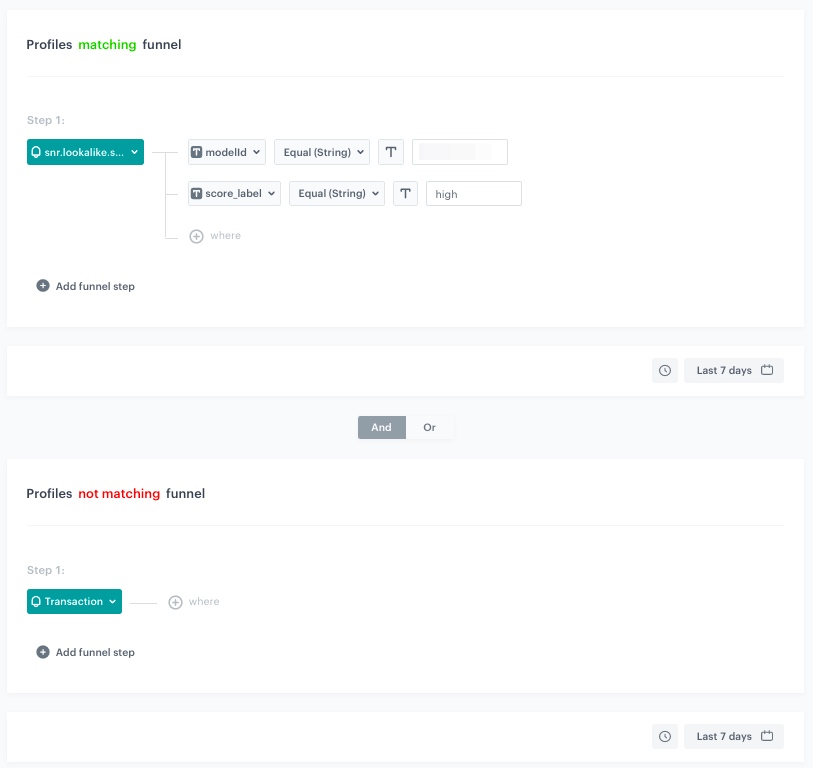
In this use case, we start from the assumption that we want to find customers similar to those who once made the desired conversion in a specific mobile push campaign. Therefore, we use the Lookalikes model. However, if we simply wanted to find customers with the highest probability of purchase, then we would use the propensity prediction model.

</div></div></div>


## Prerequisites
---
- [Enable the Lookalike prediction type](/docs/ai-hub/predictions/enabling-predictions#enabling-lookalikes).
- Select a campaign sent in the past, on the basis of which we will create a segment for lookalike prediction.
- Implement [transaction events](https://developers.synerise.com/DataManagement/DataManagement.html#operation/CreateATransaction). 
- [Implement Synerise SDK in your mobile application](/developers/mobile-sdk).
- Implement mobile push notifications in your mobile application: [iOS](/developers/mobile-sdk/configuring-push-notifications/ios), [Android](/developers/mobile-sdk/configuring-push-notifications/android).
- [Create a mobile push template](/docs/campaign/Mobile/simple_push).

## Process
---
1. [Create a lookalike prediction](/use-cases/send-mobile-push-customers-most-likely-to-buy#create-a-lookalike-prediction).
2. [Create a workflow](/use-cases/send-mobile-push-customers-most-likely-to-buy#create-a-workflow) that sends the mobile push.

## Create a lookalike prediction
---
In this step, we will calculate the prediction. As a result, on the customers' profiles from the target segmentation a [`snr.lookalike.score`](/docs/assets/events/event-reference/predictions#snrlookalikescore) event will appear. It contains a `score.label` parameter, which determines the similarity between the customers in the target and the source segmentations. The workflow configuration, will be based on this parameter. We will select customers who have the highest similarity to people who previously converted after receiving a given campaign.

1. Go to <img src="/api/docs/image/54176ad07f146575310749eba44b7c2f42c1b327/icons/ai-hub-icon.svg" alt="AI Hub icon" class="icon" > **AI Hub > (AI Predictions) Models > New prediction**.
2. Enter a meaningful name for the prediction.
2. In the **Select prediction type** window that appears, click **Lookalikes**.
3. Click **Apply**.

### Create a source segmentation

A source segmentation is a group of model customers to whom you compare the target group of customers in order to find similar customers in the target group. In this scenario, customers who made a purchase during past marketing campaign will be the source segmentation.

1. In the **Audience** section, click **Define**.
2. In the **Source segmentation** sub-section, click **Choose segmentation**.
3. On the dropdown list, click **Create new**.
4. In the **Segmentation name** field, enter a meaningful name of the segmentation. 
5. Click **Netx step**.
5. Click **Choose filter**:
    1. From the dropdown list, select the [`push.view`](/docs/assets/events/event-reference/mobile-push#pushview) event.
    2. Click the **+ and where** button and select `id`.
    3. As the logical operator, select **Equal**.
    4. Type the campaign ID.
6. Click **+ Add funnel step**.
7. Click **Choose filter**:
    1. From the dropdown list, select the [`transaction.charge`](/docs/assets/events/event-reference/items#transactioncharge) event.
8. In the lower-right corner, click the clock icon.  
    **Result**: **Completed within** section will appear. 
9. Type `2` and from the dropdown list, select **Days**.
9. Using the date picker in the lower-right corner, select the **Lifetime** value.
6. Save the segmentation by clicking **Create segmentation**.


 <figure>
    <img src="/api/docs/image/54176ad07f146575310749eba44b7c2f42c1b327/use-cases/all-cases/_gfx/source-customers-lookalike.png" alt="Source segmentation configuration" class="full">
    <figcaption>Source segmentation configuration</figcaption>
    </figure>


### Create a target segmentation 
A target segmentation is a group of customers among which you want to find customers who are similar to those included in the source group. In this scenario, we are looking for customers who visited a mobile application in the specified time period and did not receive the previous campaign.

1. In the **Audience** section, click **Define**.
2. In the **Target segmentation** sub-section, click **Choose segmentation**.
3. On the dropdown list, click **Create new**.
4. In the **Segmentation name** field, enter a meaningful name of the segmentation. 
5. Click **Netx step**.
5. Click **Choose filter**:
    1. From the dropdown list, select the `push.view` event.
    2. Click the **+ and where** button and select `id`.
    3. As the logical operator, select **Equal**.
    4. Type the campaign ID.
    5. Change **Profiles matching funnel** to **not matching**.
7. Using the date picker in the lower-right corner, specify the time period:
    1. Set the time range in **Relative date range** to **Custom**.
    2. Type 30 below, and from the dropdown list next to the field, choose **Days**.
    3. Click **Apply**.
8. Click **Choose filter**:
    1. From the dropdown list, select the [`session.start`](/docs/assets/events/event-reference/web-and-app#sessionstart) event.
    2. Click the **+ and where** button and select `mobile`.
    3. As the logical operator, select **Is true**.
9. Using the date picker in the lower-right corner, specify the time period:
    1. Set the time range in **Relative date range** to **Last 7 d**.
    2. Click **Apply**.
10. Click **Choose filter**:
    1. From the dropdown list, select the attribute for push agreement.
    2. As the logical operator, select **Is true**.
6. Save the segmentation by clicking **Create segmentation**.
7. Confirm the settings in the **Audience** section by clicking **Apply**.

 <figure>
    <img src="/api/docs/image/54176ad07f146575310749eba44b7c2f42c1b327/use-cases/all-cases/_gfx/target-customers.png" alt="Target segmentation configuration" class="full">
    <figcaption>Target segmentation configuration</figcaption>
    </figure>


### Configure further settings
1. In the **Settings** section, click **Change**.
2. Choose **Set up recurring prediction calculation**:
    1. Set the frequence of model training to 7 days.
3. Change the scale from 5 point scale to 2. The scale a customer reached will be available in the `snr.lookalike.score` event, as the `score_label` parameter.
4. Confirm the changes in the Settings section by clicking **Apply**.
5. Click **Save & Calculate**.

## Create a workflow
---
As the final part of the process, create a workflow that manages the push notifications. Visiting the mobile app triggers the start of the workflow. The push notification will be sent after 48 hours to customers with high prediction score and who didn't make a purchase.

1. Go to **Automation Hub > Workflows > New workflow**.
2. Enter the name of the workflow. 

### Define the Profile Event trigger node 
At this stage, we will configure the conditions that launch the workflow. As a trigger, we will use the `session.start` event. 

1. As the first node of the workflow, add **Profile Event**. In the node settings:
    1. From the dropdown list, select the `session.start` event.
    2. Click the **+ and where** button and from the dropdown list, select `mobile`.
    3. As the logical operator, select **Is true**.
    4. Click **Apply**.

### Configure Delay node
This node will delay sending the push notification.

1. Add the **Delay** node. In the node settings:
    1. In the **Delay** field, type `48`.
    2. From the dropdown list, choose **Hour**.
2. Click **Apply**.

### Configure the Profile Filter node
This node will filter the customers visiting the mobile application to those who received the `high` value of the `score.label` parameter and those who didn't make a purchase in the last 7 days.

1. As the next node, add **Profile Filter**. 
2. In the setting of the node, click **Choose filter** and from the dropdown list, select the `snr.lookalike.score` event:
    1. For the event parameter, click the **+ where** button and select `modelId`.
    2. As the logical operator, select **Equal**.
    3. Enter the ID of the [lookalike prediction](/use-cases/send-mobile-push-customers-most-likely-to-buy#create-a-lookalike-prediction) created in the previous step.
    8. Click the **+ and where** button and select `score_label`.
    9. As the logical operator, select **Equal**.
    10. Type `high`.
    9. In the calendar in the right bottom of the page, in the **Relative date range** section, select **Last 7 d**.
    3. Click **Apply**.
3. Click **Choose filter** and from the dropdown list, select the transaction charge event:
    1. Change the Profiles **matching** funnel to **not matching**.
    2. In the calendar in the right bottom of the page, in the **Relative date range** section, select **Last 7 d**.
    3. Click **Apply**.

     <figure>
    <img src="/api/docs/image/54176ad07f146575310749eba44b7c2f42c1b327/use-cases/all-cases/_gfx/profile-filter-lklk.png" alt="Profile Filter node configuration" class="full">
    <figcaption>Profile Filter node configuration</figcaption>
    </figure>

4. For the **Not matched** path, add the **End** node .

### Configure settings for mobile push
1. As the next node for the **Matched** path, add the **Send Mobile Push** node. Configure it according to your business needs:
    1. Select the template type of mobile push.
    2. Select a template prepared earlier.
2. Confirm by clicking **Apply**.

### Add the finishing node and capping
1. Add the **End** node.
2. In the top right corner of the page, click the **Set capping** button. Define the settings:
    1. Type as follows **Limit** 1 **Time** 7, and from the dropdown list choose **Day**.
    2. Click **Apply**.
3. In the upper right corner, click **Save & Run**.

<figure>
    <img src="/api/docs/image/54176ad07f146575310749eba44b7c2f42c1b327/use-cases/all-cases/_gfx/result-lklk.png" alt="The workflow configuration" class="full">
    <figcaption>The workflow configuration</figcaption>
    </figure>

## Check the use case set up on the Synerise Demo workspace
---

You can check the configuration of the [workflow](https://app.synerise.com/automations/automation-diagram/a5388fc9-cf92-4fc2-9225-85e994162e87) in our Synerise Demo workspace:

If you’re our partner or client, you already have automatic access to the **Synerise Demo workspace (1590)**, where you can explore all the configured elements of this use case and copy them to your workspace.  

If you’re not a partner or client yet, we encourage you to fill out the contact [form](https://demo.synerise.com/request) to schedule a meeting with our representatives. They’ll be happy to show you how our demo works and discuss how you can apply this use case in your business. 

## Read more
---
- [Configuring mobile notifications](/docs/campaign/Mobile/mobile_campaign)
- [Lookalikes predictions](/docs/ai-hub/predictions/lookalikes)
- [Predictions](/docs/ai-hub/predictions/predictions-introduction)
- [Workflow](/docs/automation/creating-automation)

