Sometimes push notifications can end up annoying customers when sent at the wrong time. You can optimize time of sending push notifications with the help of our time optimizer and connect with your customers at the right time.
This use case describes a workflow that sends a mobile push notification encouraging to purchase when a customer adds a product to a wishlist. The sending time is adjusted to the customers' activity in the mobile app.
## Prerequisites
---
- [Implement Synerise SDK in your mobile application](/developers/mobile-sdk).
- Implement mobile push notifications in your mobile application: [iOS](/developers/mobile-sdk/configuring-push-notifications/ios), [Android](/developers/mobile-sdk/configuring-push-notifications/android).
- Implement the add to wishlist event in your [mobile application](/developers/mobile-sdk/event-tracking#product-added-to-favorites).
- [Create a mobile push template](/docs/campaign/Mobile/simple_push).
## Process
---
1. [Enable time optimizer](/use-cases/send-mobile-push-with-time-optimizer#enable-time-optimizer).
2. [Create a custom mode](/use-cases/send-mobile-push-with-time-optimizer#create-a-custom-mode) in time optimizer.
3. [Create a workflow](/use-cases/send-mobile-push-with-time-optimizer#create-a-workflow) to send the mobile push at the best time.
## Enable time optimizer
---
1. Go to **Settings > AI Engine Configuration**.
2. Select **Time optimizer** tab.
3. Click **Define**.
4. Switch the toggle on.
## Create a custom mode
---
In this part of the process, create a custom time optimizer mode which you will use in the workflow in further part of the process. In this use case, the idea is to define the events that will be taken into account by the time optimizer while calculating the best time to send the message. In our case, it will be the `screen.view` event, so the optimizer will choose the time when the customer is most active in the application (when the customer generates the `screen.view` events the most).
1. Go to **Settings > AI Engine Configuration**.
2. Select the **Time optimizer** tab.
3. Click **Define**.
4. Click **Add new node**.
5. Select **Custom** to create a new mode:
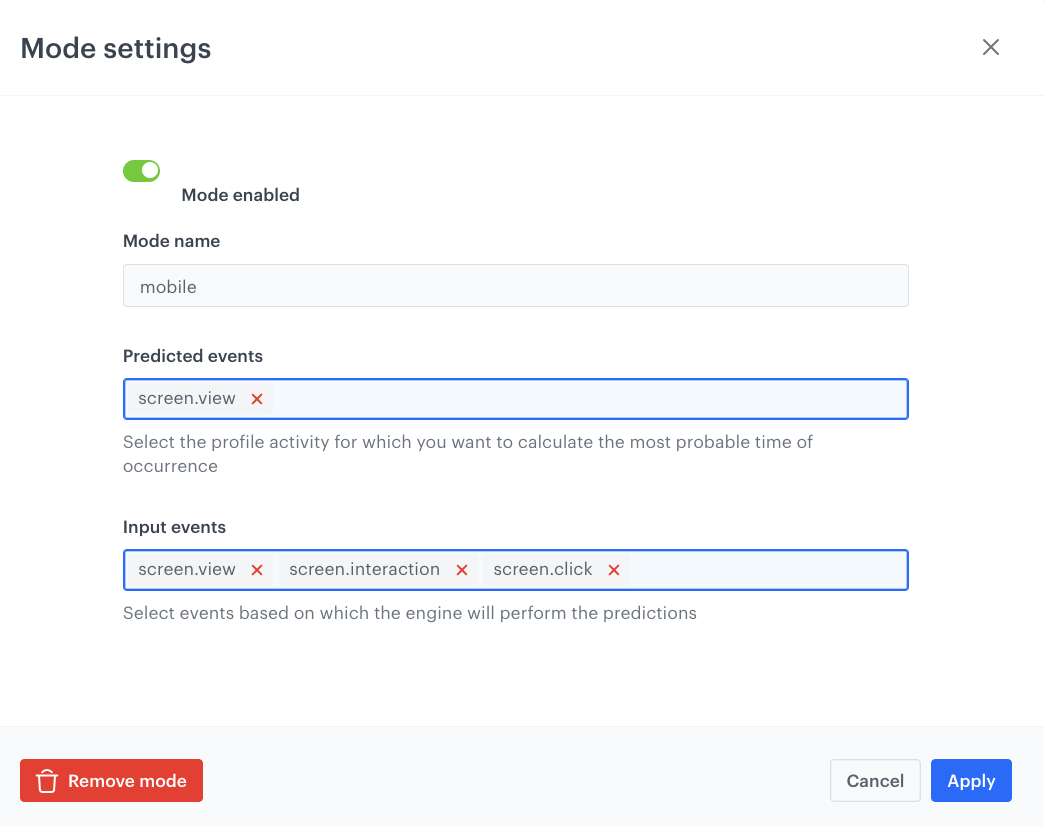
1. In the **Mode name** field enter the name for the custom mode.
2. From the **Predicted event** dropdown list, select the `screen.view` activity to calculate the most probable time of occurrence.
3. From the **Input events** dropdown list, select the event `screen.view`, based on which the engine will perform the predictions.
4. Click **Apply**.
6. Click **Apply** to save the new mode.
To keep the time optimizer enabled, at least one mode must be active.
Configuration of custom mode in time optimizer
## Create a workflow
---
As the second part of the process, create a workflow that manages the push notifications.
1. Go to **Automation Hub > Workflows > New workflow**.
2. Enter the name of the workflow.
3. As the first node of the workflow, add **Profile Event**. In the node settings:
1. In the **Define conditions** field, select the `addToWishlist` event.
8. Confirm by clicking **Apply**.
4. Add an **Optimize Time** node. In the configuration of the node:
1. Select the [custom mode](/use-cases/send-mobile-push-with-time-optimizer#create-a-custom-mode) you created in previous part of the process.
2. Set the time period to analyze according to your business needs.
3. Confirm by clicking **Apply**.
4. Add **Send Mobile Push** node. In the configuration of the node:
1. Define the **Template type**.
2. Select the **Push template** you have created.
3. Confirm by clicking **Apply**.
5. Add the **End** node to finish the workflow.
6. To run the workflow, click **Save & Run**.
The final configuration of the workflow
## Check the use case set up on the Synerise Demo workspace
---
You can check the [workflow configuration](https://app.synerise.com/automations/automation-diagram/d12e52a8-5827-4fca-b064-9b21d6f4c536) directly in Synerise Demo workspace.
If you’re our partner or client, you already have automatic access to the **Synerise Demo workspace (1590)**, where you can explore all the configured elements of this use case and copy them to your workspace.
If you’re not a partner or client yet, we encourage you to fill out the contact [form](https://demo.synerise.com/request) to schedule a meeting with our representatives. They’ll be happy to show you how our demo works and discuss how you can apply this use case in your business.
## Read more
---
- [Configuring mobile notifications](/docs/campaign/Mobile/mobile_campaign)
- [Time optimizer](/docs/settings/configuration/time-optimizer)
- [Workflow settings](/docs/automation/creating-automation)