Synerise allows you to collect data from any touchpoint with a customer. With advanced Synerise Decision Hub, you can create precise customer segments that you can use not only in Synerise, but also pass them to external tools. Using Synerise's seamless integration with Google Cloud Storage (GCS), you can transfer any data collected in Synerise and use it in other Google tools.
In this use case, we will send a customer database with a marketing communications agreement to Google Cloud Storage. Before creating the workflow, we will also create a Data Transformation rule, which will modify the value of one of the exported attributes to another format. This is not a mandatory step, you can export the data in the format you store it in the platform, in accordance with your needs.
## Prerequisites
---
- Implement solutions that collect marketing agreements from various touch points with your customers.
- Prepare a sample of data that will be used in data transformation.
Click here to see an example file
- Make sure you meet all [prerequisites](/docs/automation/integration/google-cloud-storage/send-file-to-gcp#prerequisites) to integrate Synerise with Google Cloud Storage.
## Process
---
In this use case, you will go through the following steps:
1. [Create a segmentation of customers](/use-cases/send-profiles-to-gcs#prepare-a-segmentation) whose data you want to send to the GCS.
2. [Create a data transformation diagram](/use-cases/send-profiles-to-gcs#prepare-data-transformation) to prepare the data for sending to Google Cloud Storage.
This is an optional step. If you don't need to change the exported data, you can skip it.
3. [Create a workflow](/use-cases/send-profiles-to-gcs#prepare-a-workflow) that will send selected customer profiles to GCS.
## Prepare a segmentation
---
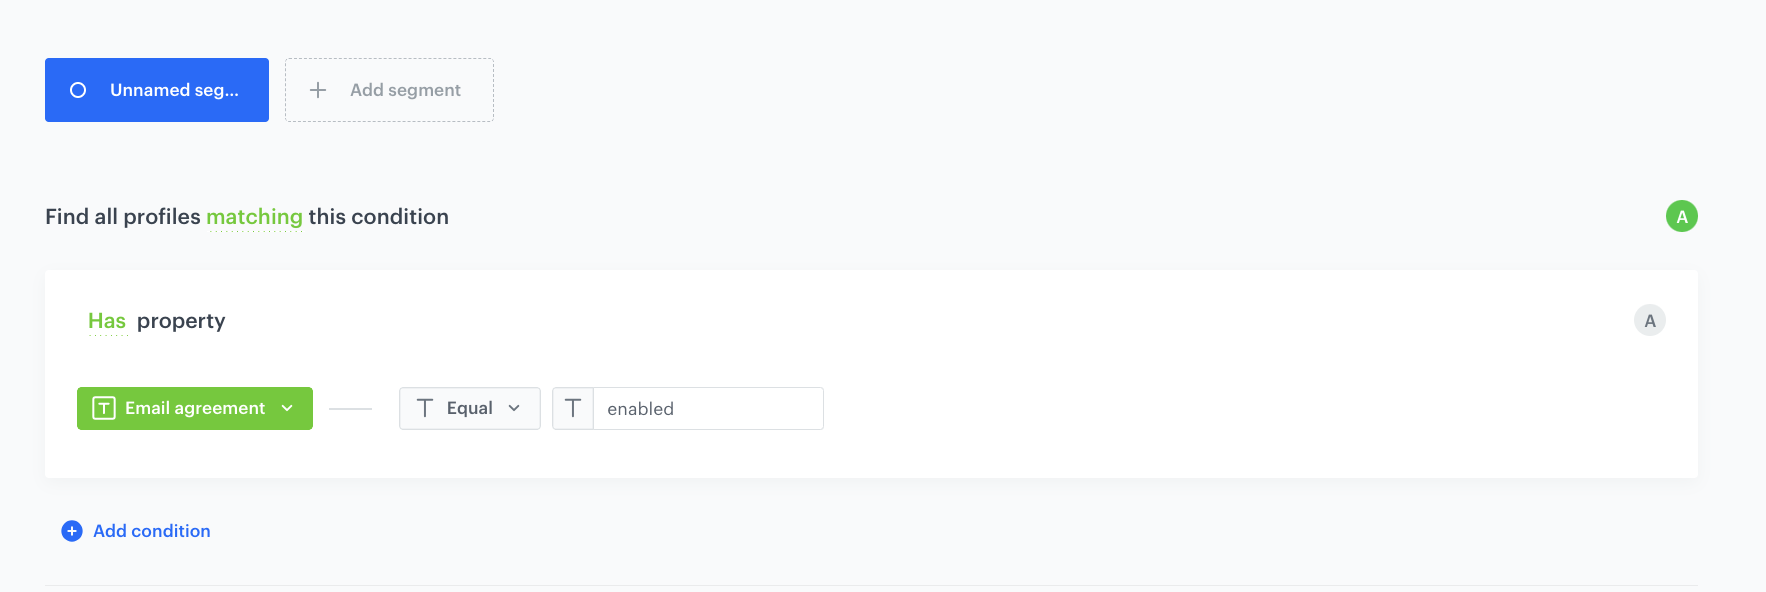
As the first part of the process, create a segmentation of customers who agreed to receive emails. The data of these customers will be sent to the external resource.
1. Go to **Decision Hub > Segmentations > New segmentation**.
2. Define the name of the segmentation.
3. Click **Add condition**.
4. From the dropdown list, select `newsletter_agreement`.
5. As the logical operator, select **Equal**.
6. In the text field, enter `enabled`.
7. Click **Save**.
The configuration of the segmentation
## Prepare data transformation
---
This step is not mandatory, you can skip it in case you don't need to make any changes to the exported data.
In this part of the process, you define the rules of modifying data before sending it to GCS. For the purposes of this case, the `newsletter_agreement` parameter value will be changed from `enabled` to `true`.
The data transformation diagram which is the output of this part of the process is used later to [automate sending the data](/use-cases/send-profiles-to-gcs#prepare-a-workflow).
1. Go to **Automation Hub > Data Transformation > Create transformation**.
2. Enter the name of the transformation.
3. Click **Add input**.
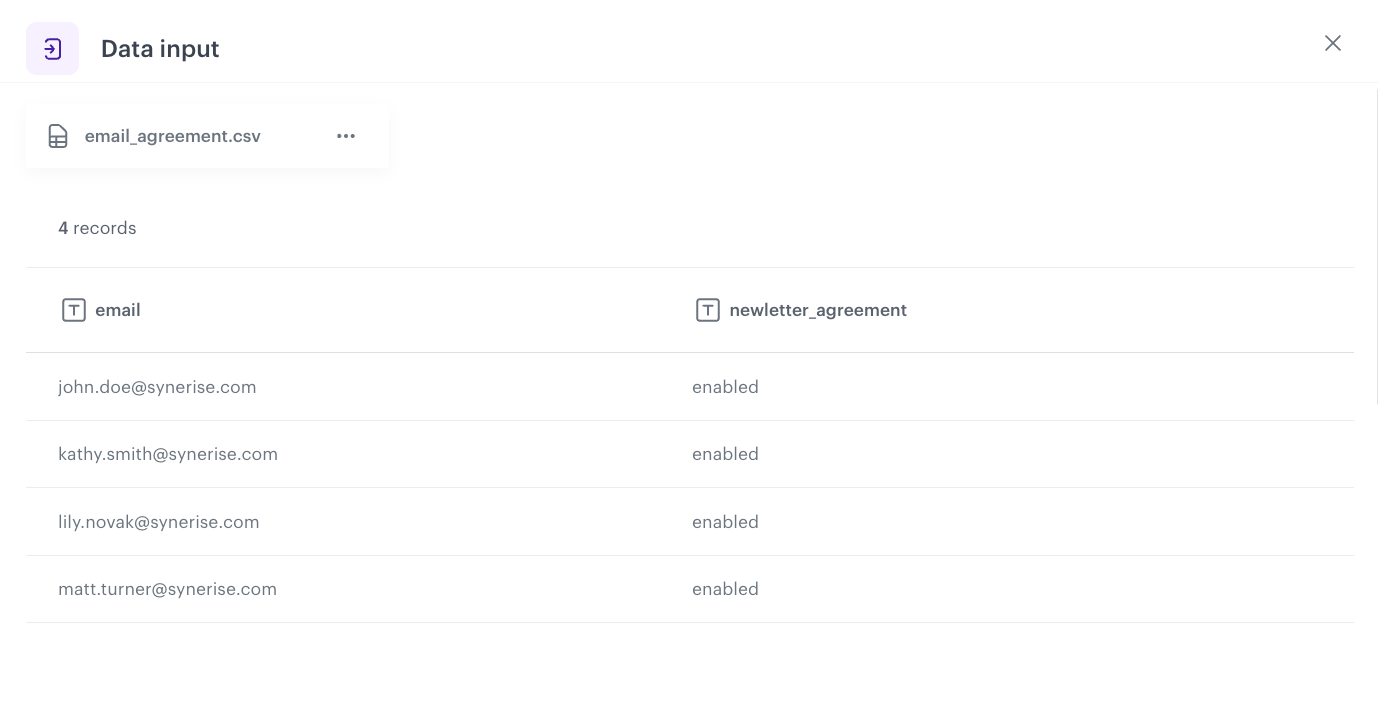
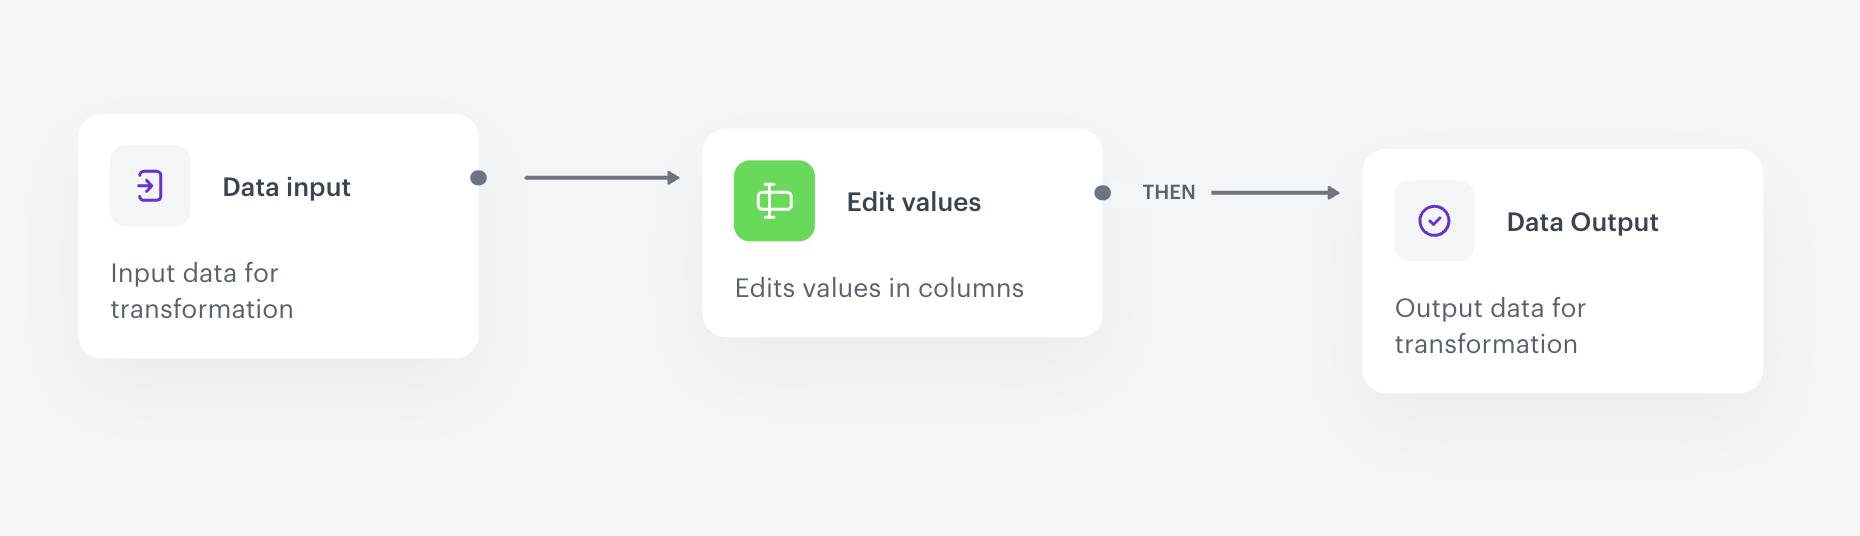
### Add file with sample data
Add the **Data input** node to add a data sample. In further steps, you define how the data must be modified. Later, when this transformation is used in the workflow, the system uses the rules created with the sample data as a pattern for modifying actual data.
4. On the pop-up, upload the file with the sample data you prepared earlier.
5. Click **Apply**.
The configuration of the Data input node
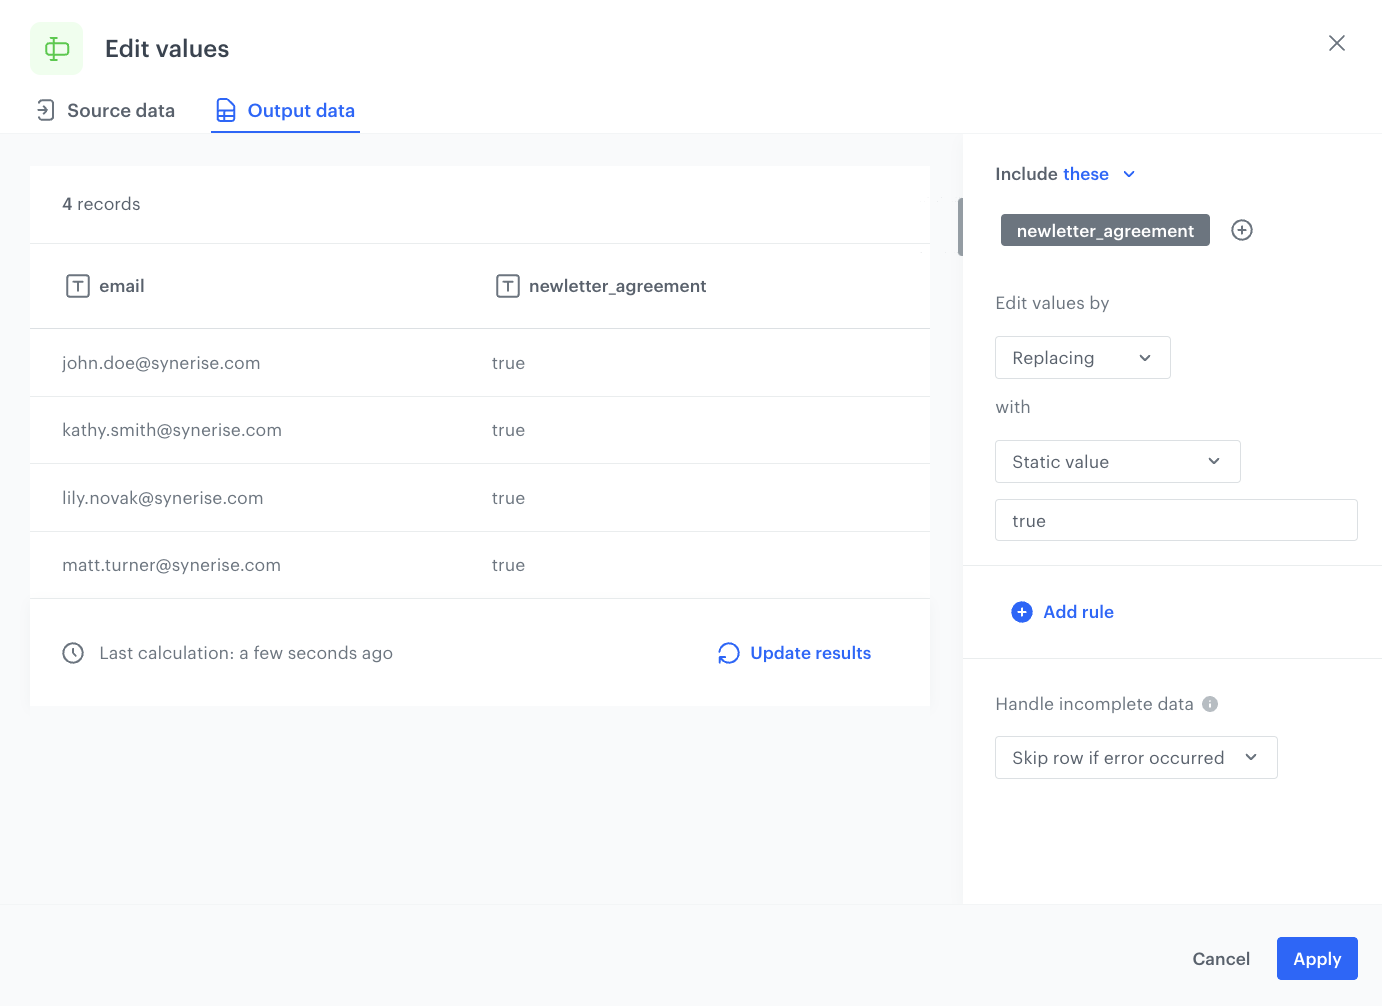
### Edit the newsletter_agreement value
In this part of the process, you will use the **Edit value** node. This node allows you to replace the `enabled` value of the `newsletter_agreement` attribute with `true`.
7. On the canvas, click the right mouse button.
8. From the dropdown list, select **Edit values**.
9. Click the **Edit values** node.
10. In the configuration of the node:
1. Click **Add rule**.
2. Click **Add column**.
3. Select the **newsletter_agreement** column.
4. Under **Edit values by**, from the dropdown list, select **Replacing**.
5. In the left dropdown, leave the **Static value** option at default.
6. In the text field, enter `true`.
7. Confirm by clicking **Apply**.
The configuration of the Edit values node
### Add the finishing node
To complete the transformation, use the **Data Output** node, which allows you to preview the output of the modifications to the sample data.
11. On the canvas, click the right mouse button.
12. From the dropdown list, select **Data output**.
13. In the upper right corner, click **Save and publish**.
The diagram of data transformation
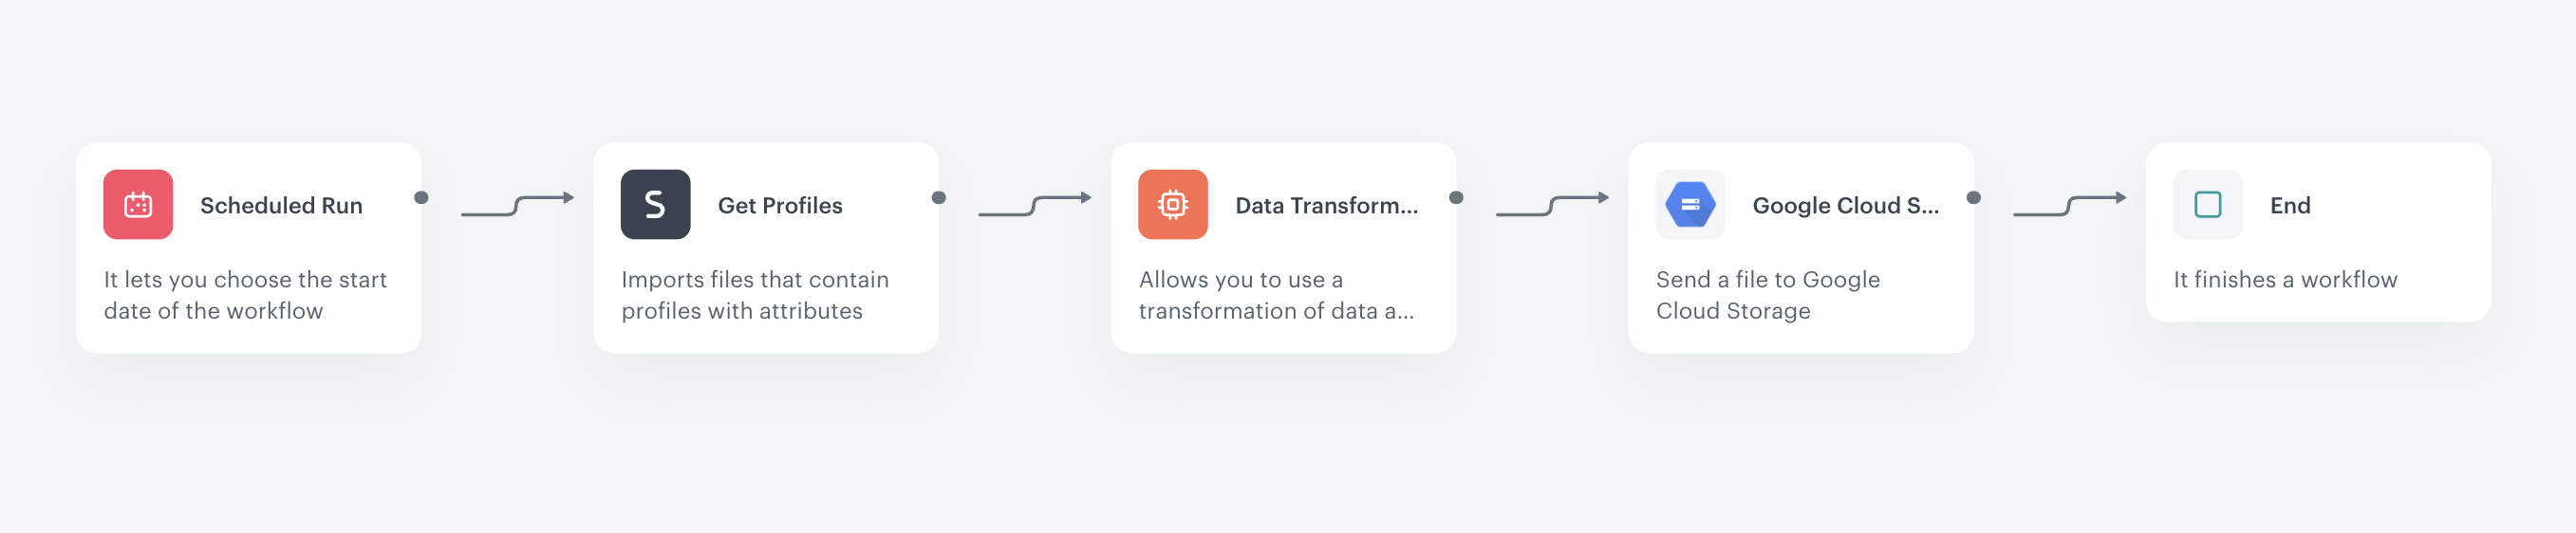
## Prepare a workflow
---
As the final part of the process, create a workflow which sends the customers' data every day to GCS.
1. Go to **Automation Hub > Workflows > New workflow**.
2. Enter the name of the workflow.
### Define the launch date
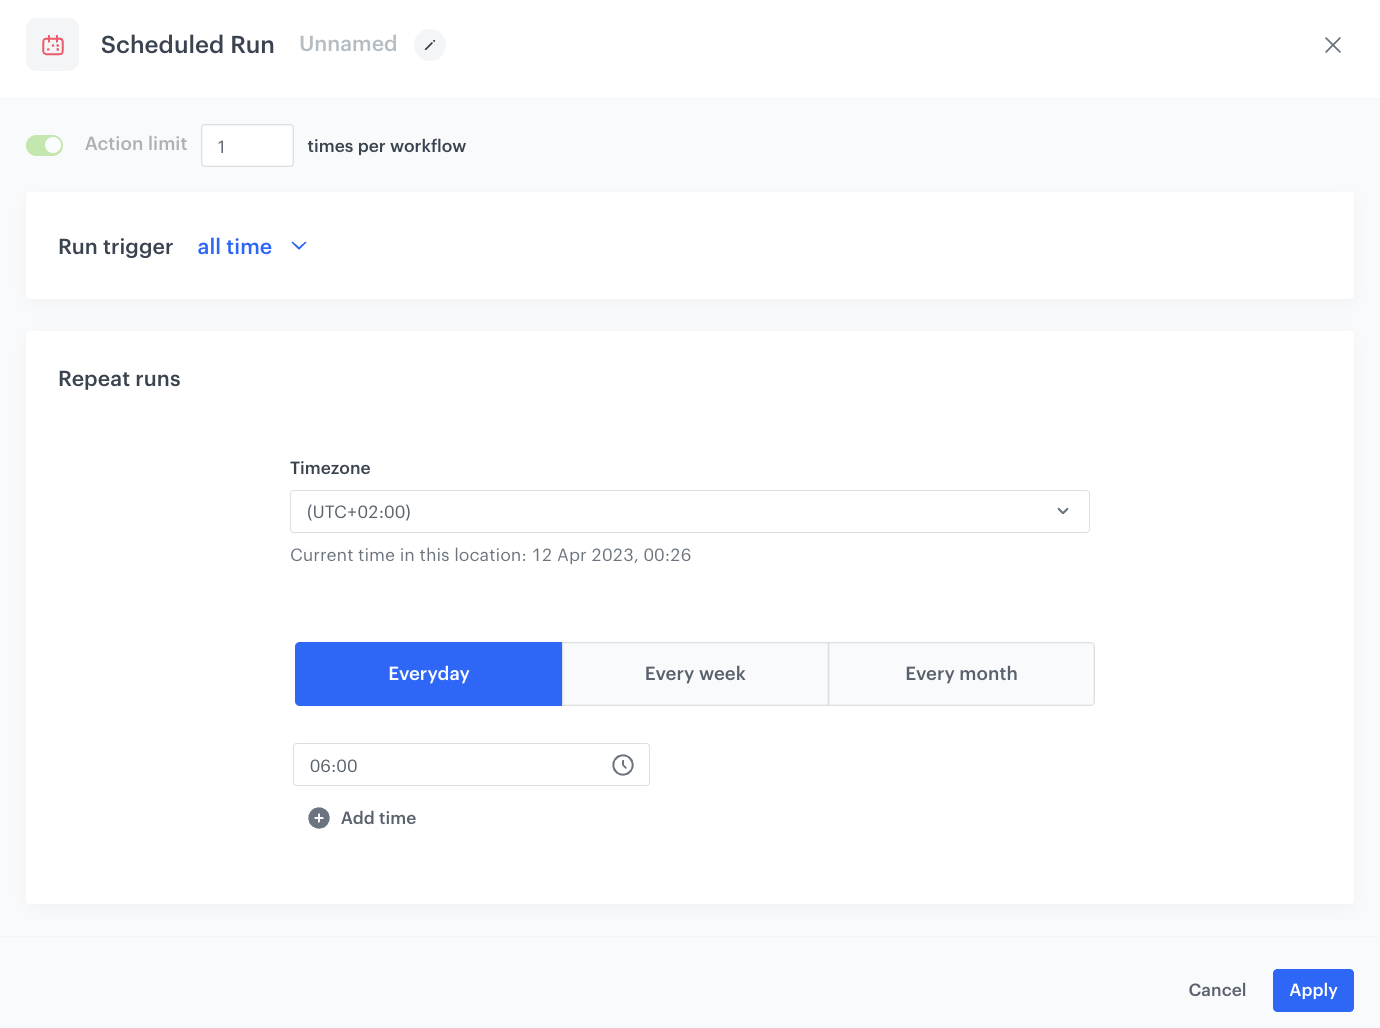
3. As the trigger node, add **Scheduled Run**.
4. In the configuration of the node:
1. Leave the **Run trigger** option at default (**all time**).
2. From the **Timezone** dropdown list, select the time zone consistent with the timezone selected for your workspace.
3. Define the frequency of the workflow (for example, every day at 6.00 A.M.).
The workflow will automatically launch at the scheduled time.
4. Confirm by clicking **Apply**.
The configuration of the Scheduled Run node
### Select customers to export
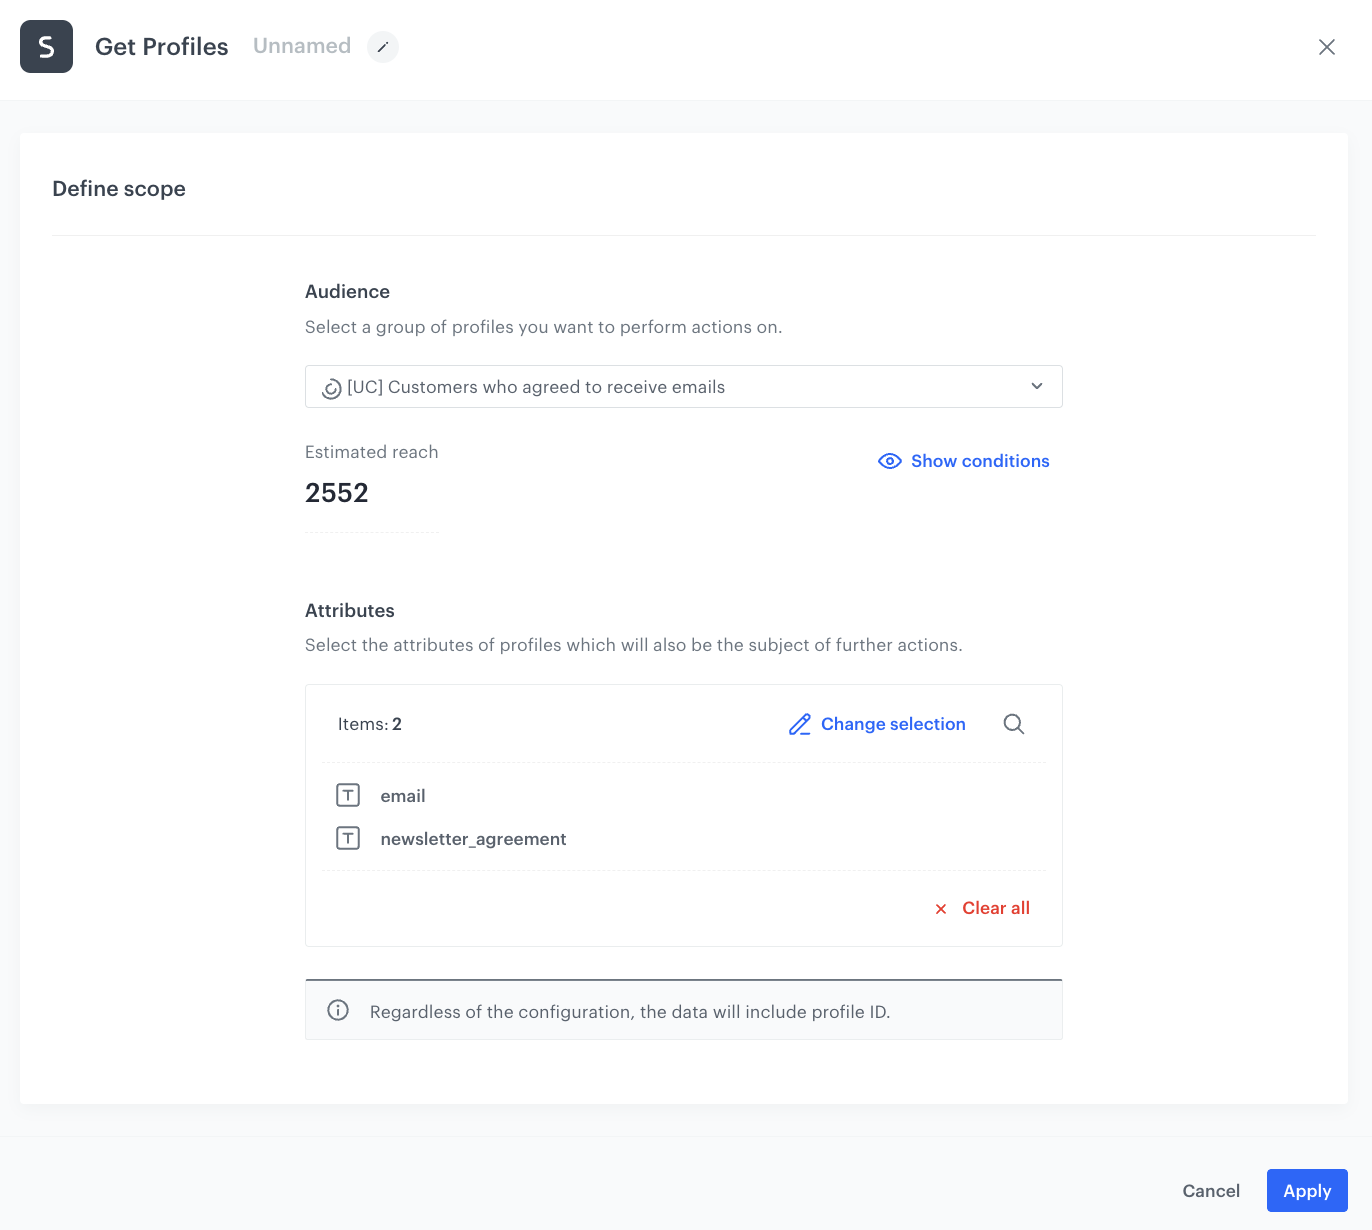
5. Add a **Get Profiles** node.
6. In the configuration of the node:
1. Select the segmentation you [created in the first part of the process](/use-cases/send-profiles-to-gcs#prepare-a-segmentation).
2. In the **Attributes** section, select **newsletter_agreement** and **email**.
3. Confirm by clicking **Apply**.
The configuration of the Get Profiles node
### Select the data transformation rules
7. Add a **Data Transformation** node.
8. In the configuration of the node, select the [data transformation you have created before](/use-cases/send-profiles-to-gcs#prepare-data-transformation).
9. Confirm by clicking **Apply**.
### Configure Send File node
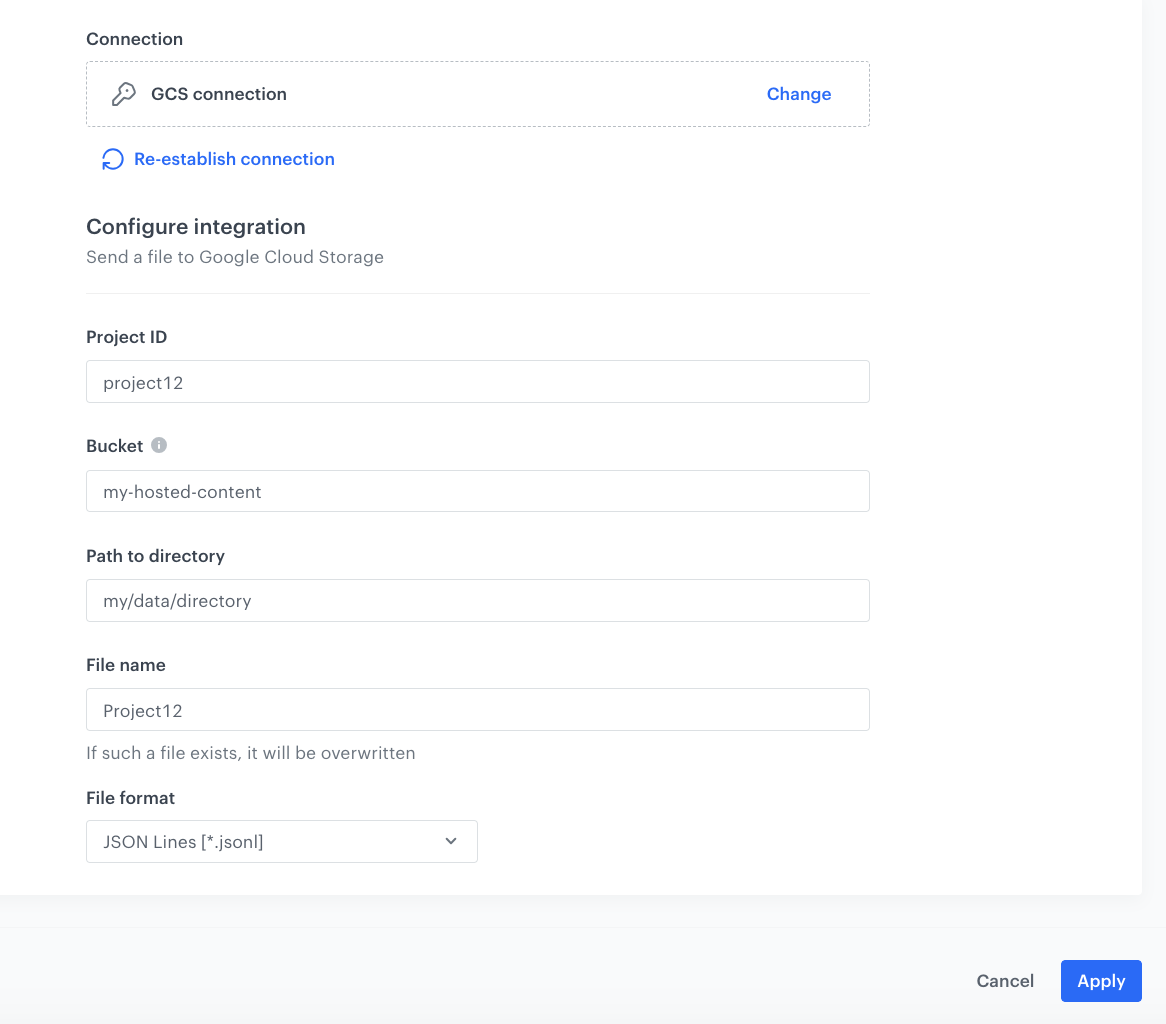
1. Add **Google Cloud Storage > Send File** node.
2. Click **Select connection**.
3. From the dropdown list, select the connection.
- If no connections are available or you want to create a new one, see [Create a connection](/docs/automation/integration/google-cloud-storage/send-file-to-gcp#create-a-connection).
- If you selected an existing connection, proceed with the integration settings.
1. In the **Project ID** field, enter the unique identifier of your project in Google Cloud.
You can learn how to find the project ID [here](https://support.google.com/googleapi/answer/7014113).
2. In the **Bucket** field, enter the name of an existing bucket (container) to which you will send a file with data.
3. In the **Path to directory** field, enter the path to which the file will be saved in the bucket.
4. In the **File name** field, enter the name of the file you want to send to the storage. If the file already exists, the contents of the file will be overwritten.
5. From the **File format** dropdown list, select the format in which the file will be saved in the storage.
6. Confirm by clicking **Apply**.
The configuration of the Send File node
### Add the finishing node
12. Add the **End** node.
13. In the upper right corner, click **Save & Run**.
The workflow configuration
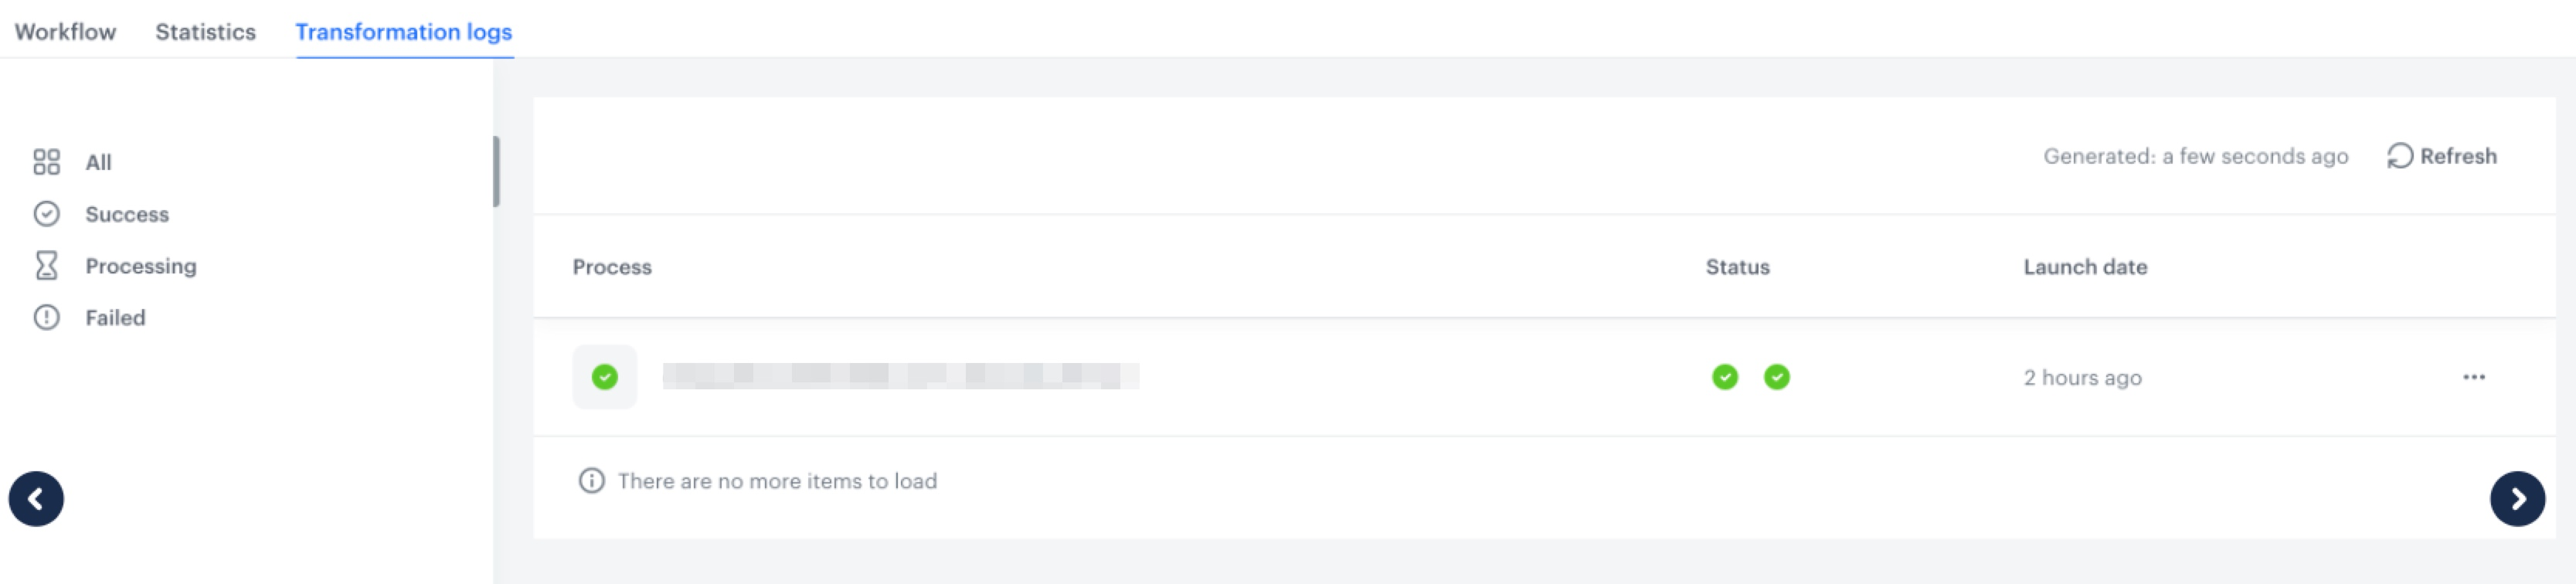
You can monitor the flow of the workflow in the **Transformation logs** tab. It contains information about each execution of the workflow.
The logs for the workflow
## Check the use case set up on the Synerise Demo workspace
---
You can check the configuration of each item created in this use case on our Synerise Demo workspace:
- [Segmentation](https://app.synerise.com/analytics-v2/segmentations/7655038e-99bc-4876-9d7a-90f801ae6a5c)
- [Data Transformation](https://app.synerise.com/automations/data-transformation/032c34b2-1eae-4542-98db-5392244119aa)
- [Workflow](https://app.synerise.com/automations/automation-diagram/56ba2ace-197f-4361-b9ef-db5aab607656)
## Read more
---
- [Data Transformation](/docs/automation/data-transformation-and-imports/introduction)
- [Send File](/docs/automation/integration/google-cloud-storage/send-file-to-gcp)
- [Segmentations](/docs/analytics/segmentations)
- [Workflows](/docs/automation)