With Synerise you can choose very specific segments of customers for your marketing communication on Facebook and spend less on your campaigns.
In this use case, you will use the Predictions feature to calculate the probability of customers buying items from shoes category. The results will be later used in the conditions of segmentation that will trigger the workflow. In the workflow we will use the native Facebook integration to send customers with highest propensity to buy, as a Custom Audience. This group of customers can be later used for better targeting of your marketing efforts.
## Prerequisites
---
- [Enable the Propensity prediction type](/docs/ai-hub/predictions/enabling-predictions#enabling-propensity-and-best-fit-predictions).
- [Generate the system user access token in Facebook](https://developers.facebook.com/docs/audience-network/optimization/report-api/system-user/); as the `scope` value, select `ads_management`.
- [Create Custom Audience in Facebook](https://developers.facebook.com/docs/marketing-api/reference/custom-audience/)
- Implement transaction events using [SDK](/developers/web/transactions-sdk) or [API](https://developers.synerise.com/DataManagement/DataManagement.html#tag/Events).
- Create an [item feed](/docs/ai-hub/recommendations-v2/item-feed-requirements).
- The `category` attribute must be added to [filterable attributes](/docs/ai-hub/ai-search/define-attributes#filterable-attributes).
## Process
---
In this use case, you will go through the following steps:
1. [Create a Propensity prediction](/use-cases/send-propensity-to-facebook#create-a-propensity-prediction) that produces the 2-point score (low and high).
2. [Create a segmentation](/use-cases/send-custom-audience-webhook#create-a-segmentation) of customers.
3. [Create a workflow](/use-cases/send-custom-audience-webhook#create-a-workflow).
## Create a Propensity prediction
---
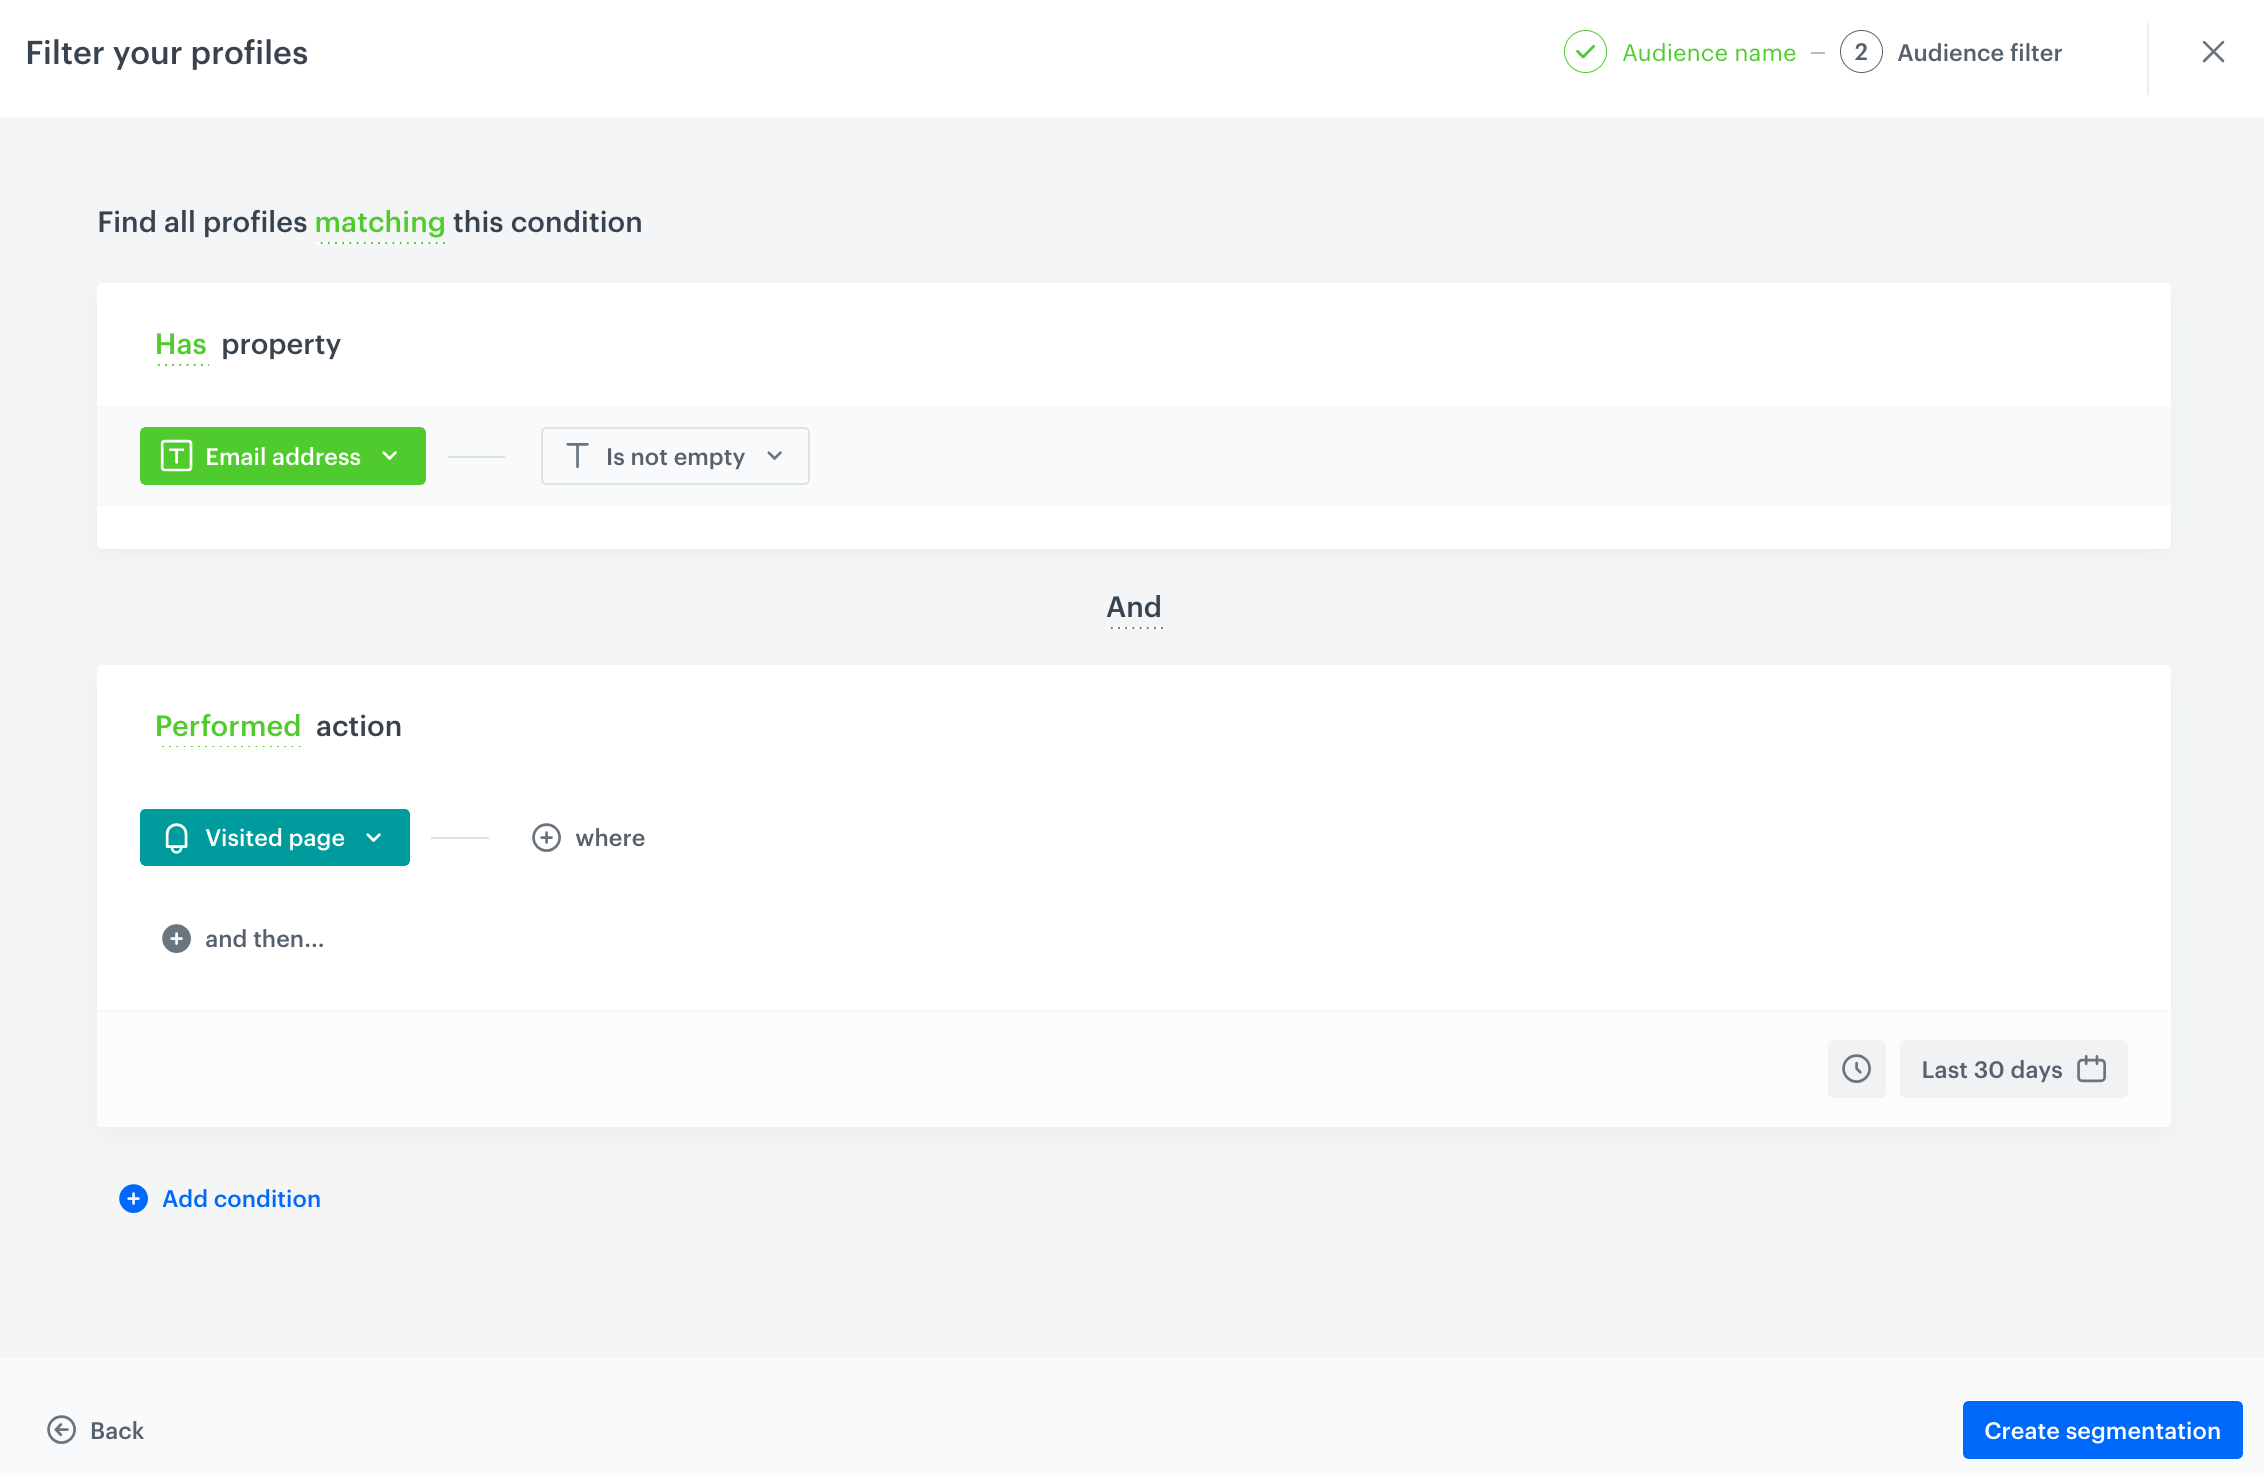
In this part of the process, you will create a propensity prediction to purchase any product from the shoes category for the audience of recognized customers (those that have the email attribute, and have a page vist event in the last 30 days). In further steps, an email address will be used as a customer identifier while sending audience to Facebook.
### Select the model type
1. Go to **AI Hub > (AI Predictions) Models > New prediction**.
2. On the pop-up, select the **Create from scratch** option.
3. Select **Propensity**.
4. Name your prediction.
### Select customers to be analyzed
Select the audience for whom you want to prepare a prediction.
1. In the **Audience** section, click **Define**.
2. Click **Choose segmentation**.
3. On the dropdown list, click **Create new**.
4. In the **Segmentation name** field, enter a meaningful name of the segmentation.
5. Click **Next step**.
5. Click **Add condition**:
1. From the dropdown list, select the `email` attribute.
2. From the **Choose operator** dropdown list, select **String** and **Is not empty**.
6. Once again click **Add condition**:
1. From the dropdown list, select the `Visited page` event.
2. In the calendar in the bottom right corner, leave **Last 30 days**.
7. Save the segmentation by clicking **Create segmentation**.
8. Click **Apply**.
Propensity audience configuration
### Define the item
In this section, you define the category for which you want to calculate the prediction, in our case it's the shoes category. This is done by creating a filter that matches the category in the catalog.
1. In the **Item selection** section, click **Define**.
2. Click **Choose item feed**.
3. Select the catalog that contains the items you want to make the prediction for.
**Result**: The **Item filter** section appears.
4. Click **Define item filter**.
5. From the **Select attribute** dropdown list, select the `category` attribute.
6. As the logical operator, select **Equal**.
7. Click **0 items**.
**Result**: An **Array values** pop-up appears.
8. Use the search field to add the desired product category. In our case:`root catalog> default category>men>shoes`.
9. Click **Add**.
10. Click **Apply**.
12. Click **Add filter** and repeat steps **5-10** to add another category. In our case: `root catalog> default category>women>shoes`.
13. Click **Save**.
10. Save the item feed configuration by clicking **Apply**.
Propensity item filter configuration
### Additional settings and saving
Configure the [additional settings](/docs/ai-hub/predictions/propensity#additional-settings) (or leave them at default) and click **Save & Calculate**.
**Result:**
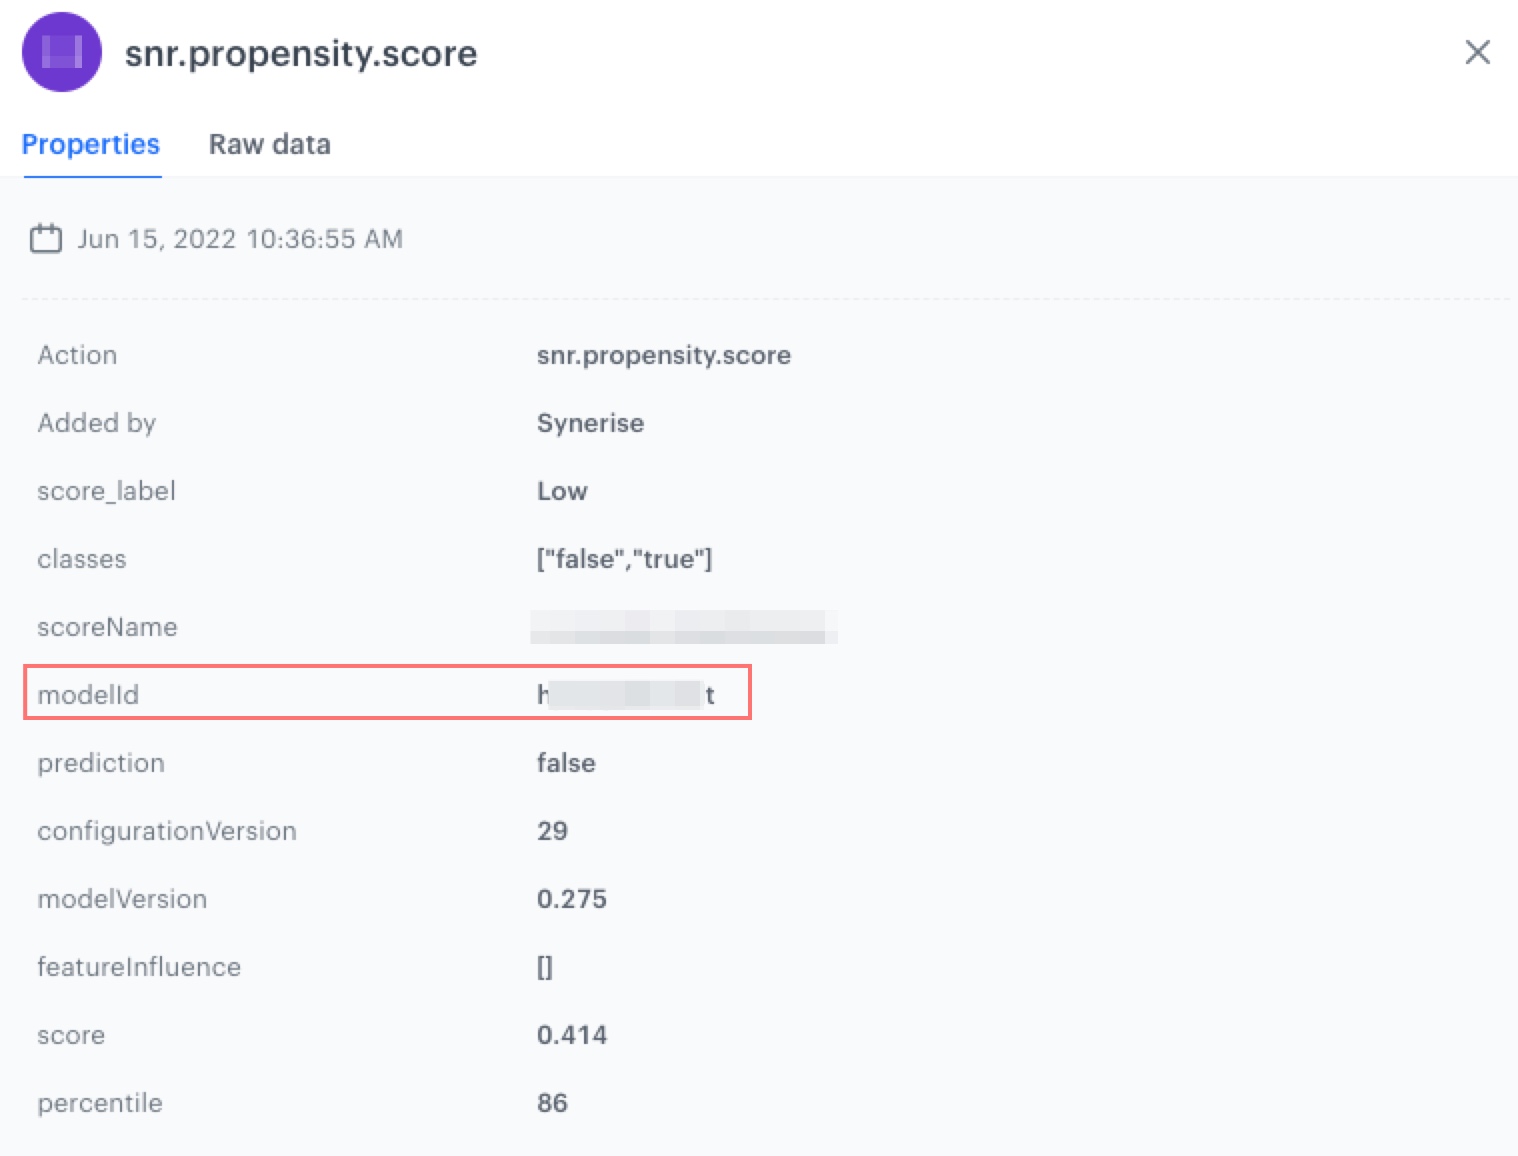
After the calculation is complete a `snr.propensity.score` event is saved in the profiles of each customer in the audience. The event data includes detailed results of the prediction. Based on the `snr.propensity.score` event, you can create segmentations of customers with different propensity.
## Create a segmentation
---
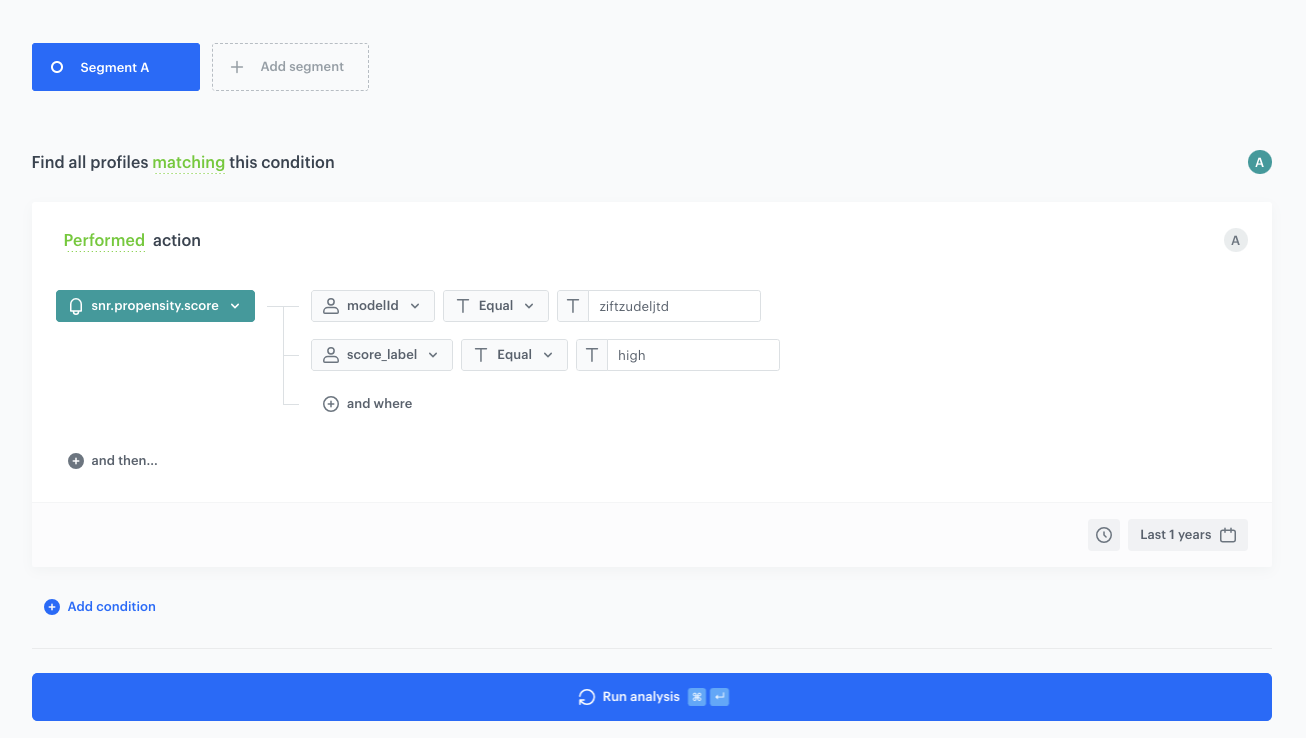
Based on the `snr.propensity.score` event, create a segmentation of customers with high propensity to purchase any item from the shoes category.
1. Go to **Decision Hub > Segmentations > New segmentation**.
2. Enter the name of the segmentation.
1. Click **Add condition**.
2. Select the `snr.propensity.score` event.
3. Click **+ where**.
4. As the event parameter, select `modelId` (available in the parameters of the `snr.propensity.score` event).
Properties of the snr.propenisty.score event
3. As the logical operator, select **Equal**.
4. In the text field, enter the value of the `modelId` parameter.
5. Click **+ and where**.
6. As the event parameter, select `score_label`.
7. As the logical operator, select **Equal**.
8. In the text field, enter `high`.
9. Set the date range according to your buisness needs.
5. Click **Save**.
Segmentation configuration
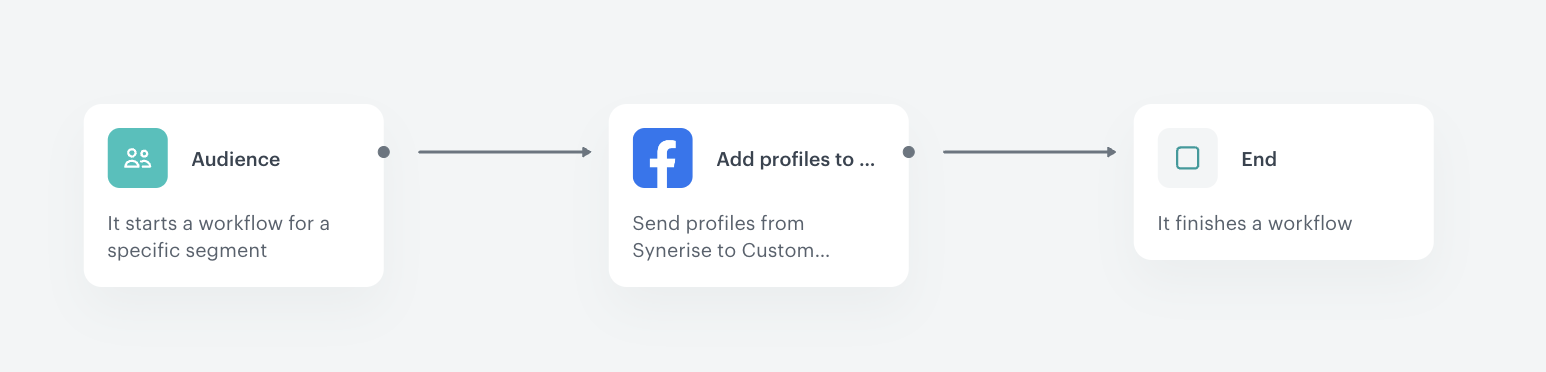
## Create a workflow
---
As the final part of the process, create a workflow that sends customers with the high propensity to buy items from the shoes category to Facebook.
1. Go to **Automation Hub > Workflows > New workflow**.
2. Enter the name of the workflow.
### Choose the segmentation of customers
1. As the first node of the workflow, add **Audience**. In the node settings:
1. In the **Define audience** section, select the [segmentation you created in the previous step](#create-a-segmentation), click **Apply** to confirm.
9. Confirm by clicking **Apply**.
### Configure the Facebook integration
1. On the **Audience** node, click **then**.
2. From the dropdown list, select the **Add Profiles to Custom Audience** node.
3. Click the node.
4. From the **Select connection** dropdown list, select an existing connection which allows you to authorize in Facebook Ad.
If you haven't established a connection yet:
1. At the bottom of the dropdown list, click **Add connection**.
2. In the **Access token** field, paste the token generated as a part of [prerequisites](#prerequisites).
3. Click **Next**.
4. In the **Connection name**, enter the name of the connection (it will be only visible on the list of connections).
The connection can be re-used to any custom audience created in the Facebook Ad Account related to the token generated as a part of [prerequisites](#prerequisites).
3. In the **API version** field, enter the Facebook API version according to the [Facebook documentation](https://developers.facebook.com/docs/marketing-api/audiences/guides/custom-audiences/).
5. From the **Identified type** dropdown list, select **Email**.
6. In the **Identifier source** field, enter `{{ client.email }}`.
You can read more about Jinjava tags in Automation Hub [here](/developers/inserts/automation).
4. In the **Audience ID** field, enter the ID of the Custom Audience to which you want to send your group of customers.
5. Confirm by clicking **Apply**.
### Add the End node
1. On the **Add Profiles to Custom Audience** node, click **then**.
2. From the dropdown list, select **End**.
3. In the upper right corner, click **Save & Run**.
Wait a few minutes for the response of the webhook.
**Result**: An **automation** event is saved to the profiles of the customers. Then, go Facebook, to **Facebook Manager > Audiences** to check your Custom Audience.
Workflow configuration
## What's next?
---
You can start creating personalized ads to your customers in Facebook. You can see your custom audience in **Facebook Manager > Audiences**.
## Check the use case set up on the Synerise Demo workspace
---
You can check the configuration of every element of this process directly in Synerise Demo workspace:
- [Propensity prediction](https://app.synerise.com/ai-v2/predictions/rrkxxklvzaip)
- [Segmentation](https://app.synerise.com/analytics-v2/segmentations/cf199cb0-c497-4c04-bfe4-4136f2640982)
- [Workflow configuration](https://app.synerise.com/automations/automation-diagram/e9aa0276-521f-44df-8774-cc2484d266c2)
If you’re our partner or client, you already have automatic access to the **Synerise Demo workspace (1590)**, where you can explore all the configured elements of this use case and copy them to your workspace.
If you’re not a partner or client yet, we encourage you to fill out the contact [form](https://demo.synerise.com/request) to schedule a meeting with our representatives. They’ll be happy to show you how our demo works and discuss how you can apply this use case in your business.
## Read more
---
- [Predictions](/docs/ai-hub/predictions)
- [Segmentation](/docs/analytics/segmentations)
- [Add Profiles to Custom Audience node](/docs/automation/integration/facebook/send-custom-audience)