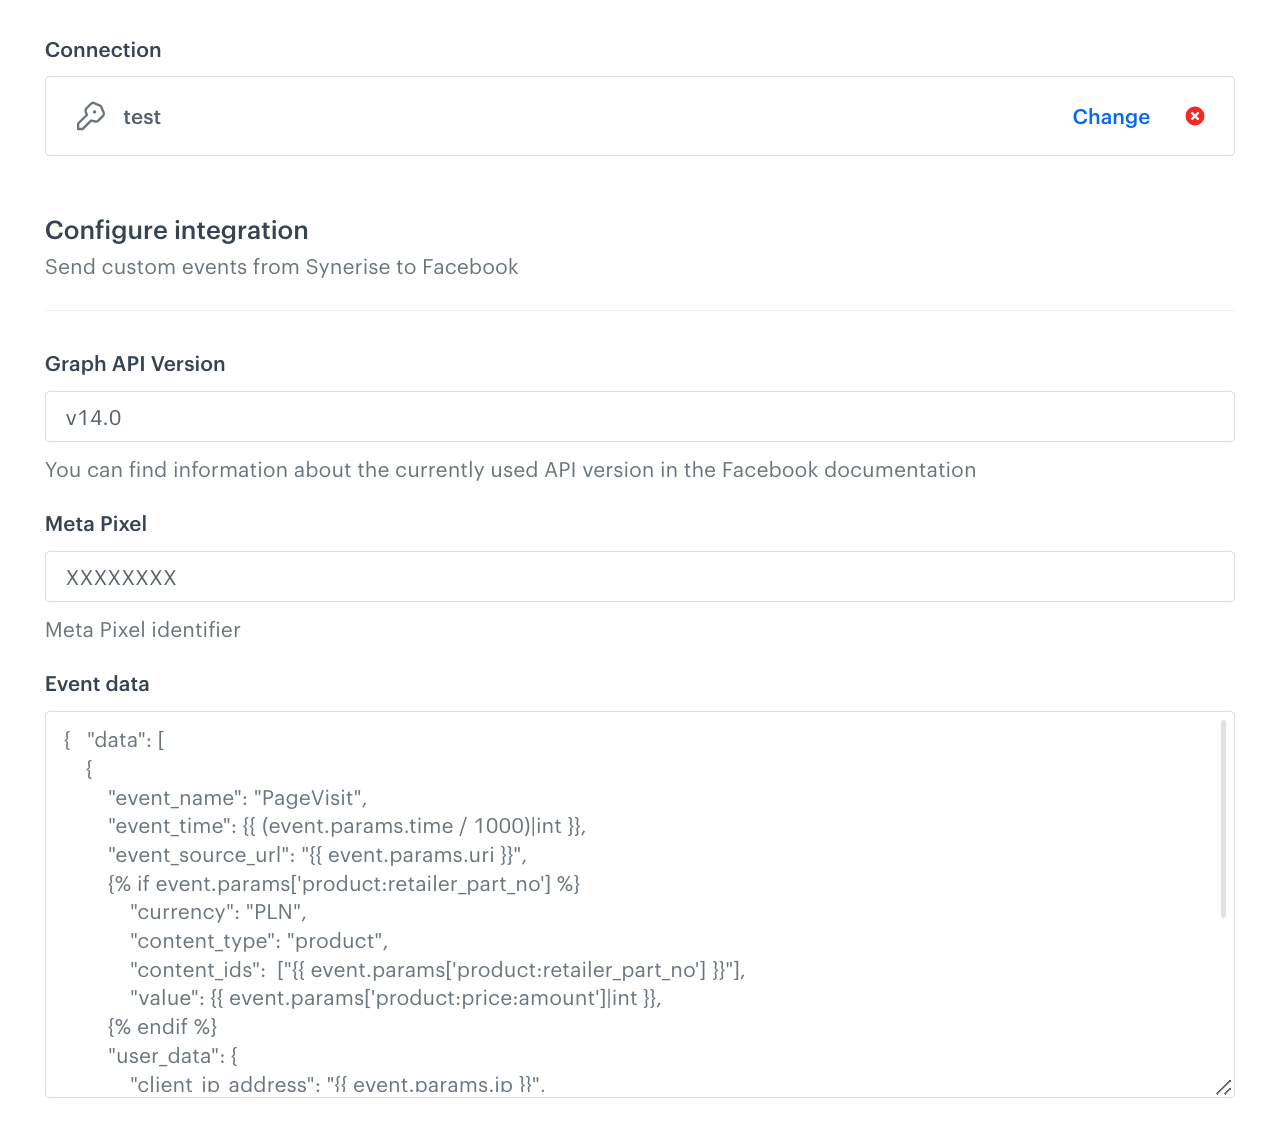
You can relay any events collected by Synerise to [Facebook Conversion API](https://developers.facebook.com/docs/marketing-api/conversions-api/) in order to enrich the customer's history and create more personalized ads in Facebook.

Example events:
- page visits
- adding a product to cart
- clicking a recommendation
- prediction results
- many more, including your own custom event types

In this use case, we will send `page.visit` events to Facebook using the dedicated integration node in Automation Hub.


<div class="admonition admonition-note"><div class="admonition-icon"><svg xmlns="http://www.w3.org/2000/svg" fill="none" viewBox="0 0 24 24" stroke="currentColor" stroke-width="2.5"><path stroke-linecap="round" stroke-linejoin="round" d="M13 16h-1v-4h-1m1-4h.01M21 12a9 9 0 11-18 0 9 9 0 0118 0z" /></svg></div><div class="admonition-body"><div class="admonition-content">

Completing this procedure requires some knowledge on sending API requests using tools such as curl or Postman.

</div></div></div>


## Prerequisites
---
- [Create a Pixel in Facebook](https://developers.facebook.com/docs/facebook-pixel).
- [Generate an access token in Facebook](https://developers.facebook.com/docs/marketing-api/conversions-api/get-started/#access-token).
- In Synerise, you must have permissions that allow you to access **Automation Hub** and create an outgoing integration and a workflow.
- In Synerise, implement tracking of [events](/docs/assets/events) that you want to send to Facebook.

## Create a workflow
---
In this part of the process, you will create a workflow that is triggered by an event. Through the outgoing integration, the system sends this event to Facebook.

### Add the Profile Event trigger

In this part of the process, you will configure the trigger of workflow. Whenever the event in trigger happens, the system launches the workflow and performs action configured in it - in our case it will be sending event to Facebook. 

1. In the Synerise app, go to **Automation Hub > Workflows > New workflow**.
2. On the dashboard, click the plus button.
3. From the dropdown list, select **Profile Event**.
4. Double-click the **Profile Event** node.
5. On the pop-up, from the **Choose event** list, select the page visit event. If you're not sure of the event's label in your system, search for `page.visit` (or other event you want to send to Facebook).
6.  Confirm by clicking **Apply**.

<figure>
<img src="/api/docs/image/54176ad07f146575310749eba44b7c2f42c1b327/use-cases/all-cases/_gfx/trigger-cust.png" alt="Configuration of the Profile Event trigger" class="large">
<figcaption> Configuration of the Profile Event trigger. No conditions are used, all page.visit events activate the trigger. </figcaption>
</figure>

### Configure Facebook Integration node

In this part of the process, you will configure an action that workflow performs - outgoing integration that sends the event to Facebook. Values of the event parameters will be dynamic and will be passed from the event trigger using [inserts](/developers/inserts/automation).

1. On the **Profile Event** node, click the plus icon.
2. From the dropdown list, select **Facebook**. 
3. From the dropdown list, select **Send Custom Event**. 
4. Click the node. 
5. Click **Select connection**.  
6. From the dropdown list, select the connection.  
   If you haven't established a connection yet, see [Create a connection](/use-cases/sending-events-facebook#create-a-connection).

<figure>
<img src="/api/docs/image/54176ad07f146575310749eba44b7c2f42c1b327/use-cases/all-cases/_gfx/fb-cust-node.png" alt="Configuration of the Facebook Integration node" class="full">
<figcaption> Final configuration of the Facebook Integration node </figcaption>
</figure>

### Create a connection
Use an access token which allows you to send a request.  

1. At the bottom of the **Select connection** dropdown list, click **Add connection**.  
2. In the **Access token** field, enter the app access token.  
    
   <div class="admonition admonition-note"><div class="admonition-icon"><svg xmlns="http://www.w3.org/2000/svg" fill="none" viewBox="0 0 24 24" stroke="currentColor" stroke-width="2.5"><path stroke-linecap="round" stroke-linejoin="round" d="M13 16h-1v-4h-1m1-4h.01M21 12a9 9 0 11-18 0 9 9 0 0118 0z" /></svg></div><div class="admonition-body"><div class="admonition-content">

   You can read more about access tokens in [Facebook documentation](https://developers.facebook.com/docs/marketing-api/conversions-api/get-started/#access-token).

   </div></div></div>
  
3. Click **Next**.  
4. In the **Connection name** field, enter the name for the access token you generated. 
5. Click **Apply**.  
        **Result**: A connection is created and selected. 

### Define the integration settings

1. In the **Graph API version** field, enter the currently used API version in Facebook.  
    You can find information about the currently used API version in the Facebook documentation.  
2. In the **Meta Pixel ID** field, enter the identifier of the Pixel you use in Facebook.  
    You can find information about how to find ID of the Pixel in the Facebook documentation.
3. In the **Event data** input field, enter the JSON body of event. Use [inserts](/developers/inserts/automation) to insert dynamic values and [Facebook developer documentation](https://developers.facebook.com/docs/marketing-api/conversions-api) to build the structure of event body.


   <div class="admonition admonition-important"><div class="admonition-icon"><svg xmlns="http://www.w3.org/2000/svg" fill="none" viewBox="0 0 24 24" stroke="currentColor" stroke-width="2.5"><path stroke-linecap="round" stroke-linejoin="round" d="M12 8v4m0 4h.01M21 12a9 9 0 11-18 0 9 9 0 0118 0z" /></svg></div><div class="admonition-body"><div class="admonition-content">

   It is mandatory to provide one of the customer identifiers listed under the Customer Information Parameters section of the [Conversions API Documentation - Meta for Developers](https://developers.facebook.com/docs/marketing-api/conversions-api/parameters/customer-information-parameters).

   </div></div></div>


   **Example** of `page.visit` event body:

   <pre><code class="language-json">{   "data": [
    {
        "event_name": "PageVisit",
        "event_time": {{ (event.params.time / 1000)|int }},
        "event_source_url": "{{ event.params.uri }}",
        {% if event.params['product:retailer_part_no'] %}
            "currency": "PLN",
            "content_type": "product",
            "content_ids":  ["{{ event.params['product:retailer_part_no'] }}"],
            "value": {{ event.params['product:price:amount']|int }},
        {% endif %}
        "user_data": {
            "client_ip_address": "{{ event.params.ip }}",
            "client_user_agent": "",
            "em": ["{% if 'anonymous' in client.email %}{% else %}{{ client.email|trim|lower|hash("SHA-256") }}{% endif %}"],
            "ph": ["{% if 'phone' in customer|string %}{{ client.phone|trim|lower|hash("SHA-256") }}{% endif %}"],
            "fbc": "",
            "fbp": ""
        },
        "custom_data": {}
    }]
   }</code></pre>

 
   where:

   | Line number | Description |
   | --- | --- |
   | 4 | Inserts event time from the trigger node and re-calculates it into seconds (this is required by Facebook). |
   | 5 | Inserts URI from the trigger node as the `event_source_url` param. |
   | 6-11 | If the visited page has product metadata, inserts that metadata. |
   | 13 | Inserts customer's IP from the trigger node. |
   | 15 | Inserts email encoded using SHA-256 algorithm, if available. |
   | 16 | Inserts phone number encoded using SHA-256 algorithm, if available. |


   <div class="admonition admonition-important"><div class="admonition-icon"><svg xmlns="http://www.w3.org/2000/svg" fill="none" viewBox="0 0 24 24" stroke="currentColor" stroke-width="2.5"><path stroke-linecap="round" stroke-linejoin="round" d="M12 8v4m0 4h.01M21 12a9 9 0 11-18 0 9 9 0 0118 0z" /></svg></div><div class="admonition-body"><div class="admonition-content">

   In the example of body described above, you can see that customer's personal data is encoded. While sending events to Facebook, the customers' identifiers must be encoded using SHA-256 algorithm. Read more about encoding function in [inserts](/developers/inserts/filter#hash).

   </div></div></div>


6. Confirm by clicking **Apply**.  

### Add the End node
12. On the **Send Custom Event** node, click the plus button.
13. From the dropdown list, select **End**.
14. Save and activate the automation by clicking **Save&Run**. 
15. Go to your Facebook Ad account, select **Facebook Manager > Events Manager** to see the events.  

<figure>
<img src="/api/docs/image/54176ad07f146575310749eba44b7c2f42c1b327/use-cases/all-cases/_gfx/fb-conf-flow.png" alt="The final structure of the workflow" class="large">
<figcaption> The final structure of the workflow </figcaption>
</figure>

**Result**: After the customer performs event trigger, the `webhook.response` event is visible on the customer's profile with 200 status. That means that the event has successfully been sent to Facebook. 

## Check the use case set up on the Synerise Demo workspace
---

You can also check [the workflow configuration](https://app.synerise.com/automations/automation-diagram/a9180cf5-847f-4d90-8573-66371c8fe837) directly in Synerise Demo.

If you’re our partner or client, you already have automatic access to the **Synerise Demo workspace (1590)**, where you can explore all the configured elements of this use case and copy them to your workspace.  

If you’re not a partner or client yet, we encourage you to fill out the contact [form](https://demo.synerise.com/request) to schedule a meeting with our representatives. They’ll be happy to show you how our demo works and discuss how you can apply this use case in your business.

## Read more
---
- [Add Profiles to Custom Audience](/use-cases/send-custom-audience-webhook)
- [Send offline transactions to Facebook](/use-cases/sending-offline-transactions-facebook)
