
Running competitions between physical stores is a proven way to motivate staff and increase loyalty program sign-ups. By assigning each store a unique QR code that links to the registration page, you can track exactly which store drove each new membership.

This use case describes how to set up end-to-end tracking and reporting of in-store loyalty program registrations in Synerise. Each physical store distributes a unique QR code containing a registration URL with a store identifier (for example, `https://www.example.com/create-account?store_ABC`). When a customer scans the code and completes the full registration process — e.g. submitting the form, confirming the account, and opting in to the newsletter — the registration is attributed to that store.

Synerise collects the relevant events, builds a segmentation of fully qualified registrations, and generates a monthly report broken down by store. This use case covers the full process up to the point where the report is ready — how you choose to distribute the results (for example, via email, SharePoint, or another external tool) depends on your specific business needs.

Based on the report, the business can reward the stores with the highest number of complete registrations in a given period.


<div class="admonition admonition-important"><div class="admonition-icon"><svg xmlns="http://www.w3.org/2000/svg" fill="none" viewBox="0 0 24 24" stroke="currentColor" stroke-width="2.5"><path stroke-linecap="round" stroke-linejoin="round" d="M12 8v4m0 4h.01M21 12a9 9 0 11-18 0 9 9 0 0118 0z" /></svg></div><div class="admonition-body"><div class="admonition-content">

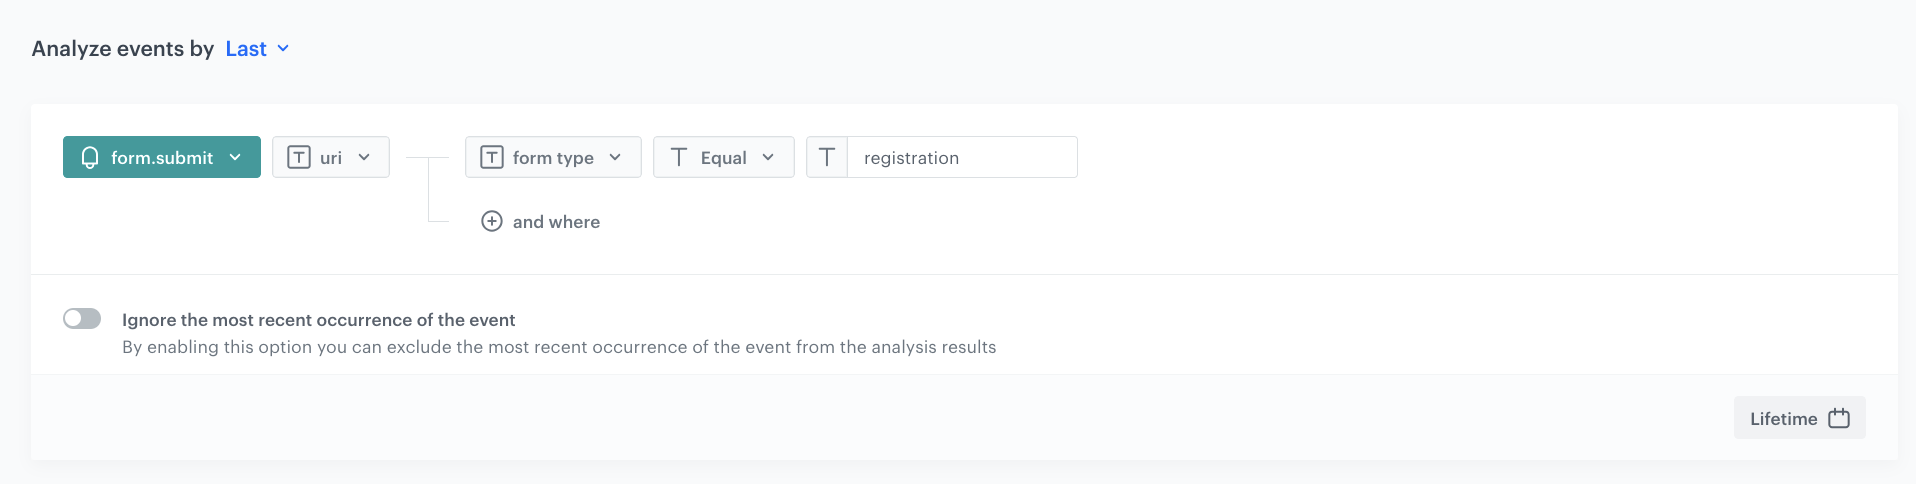
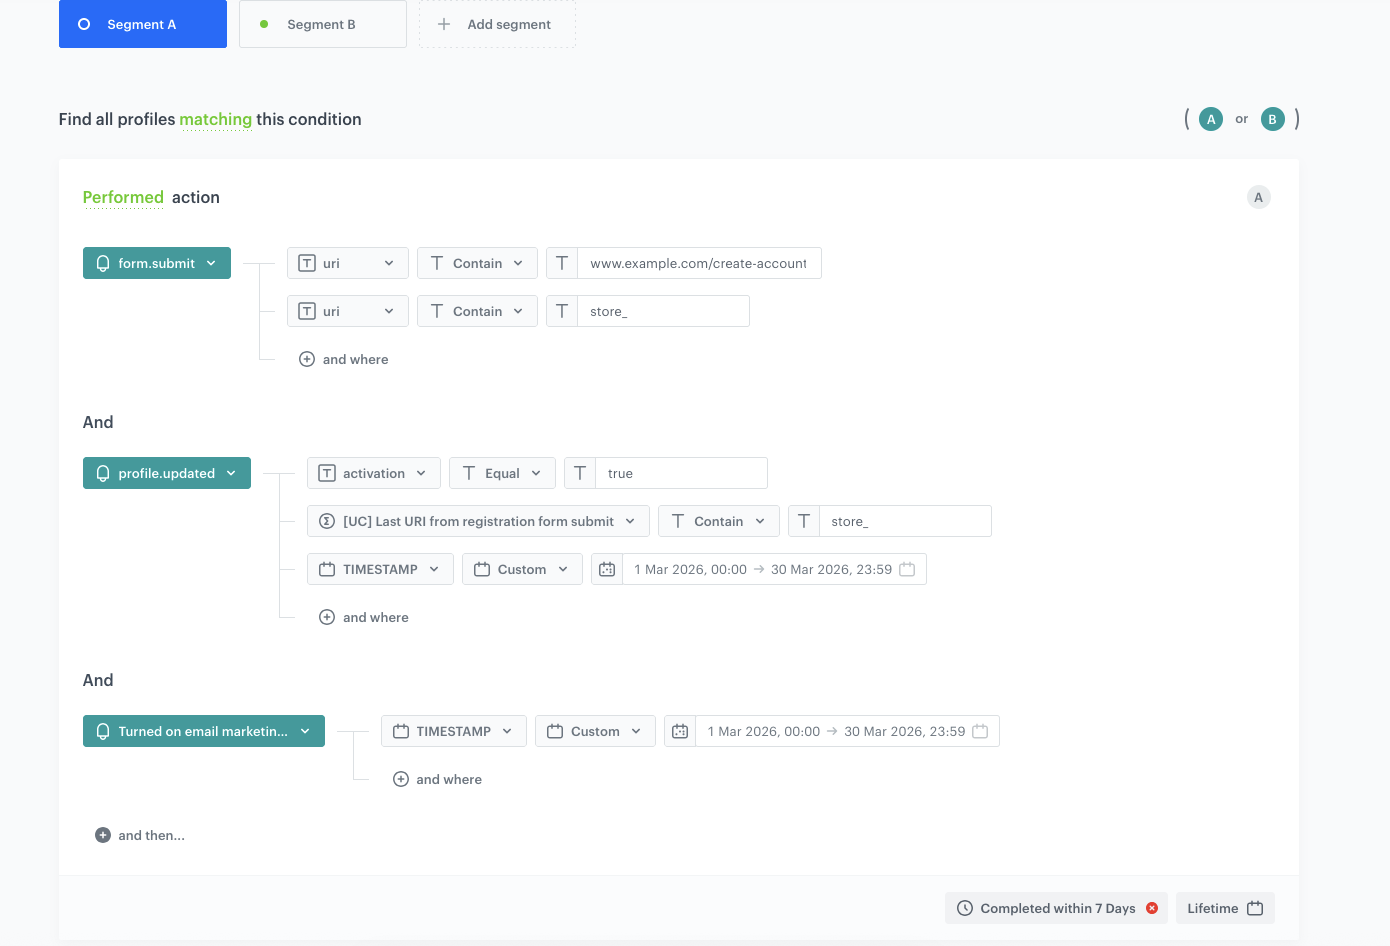
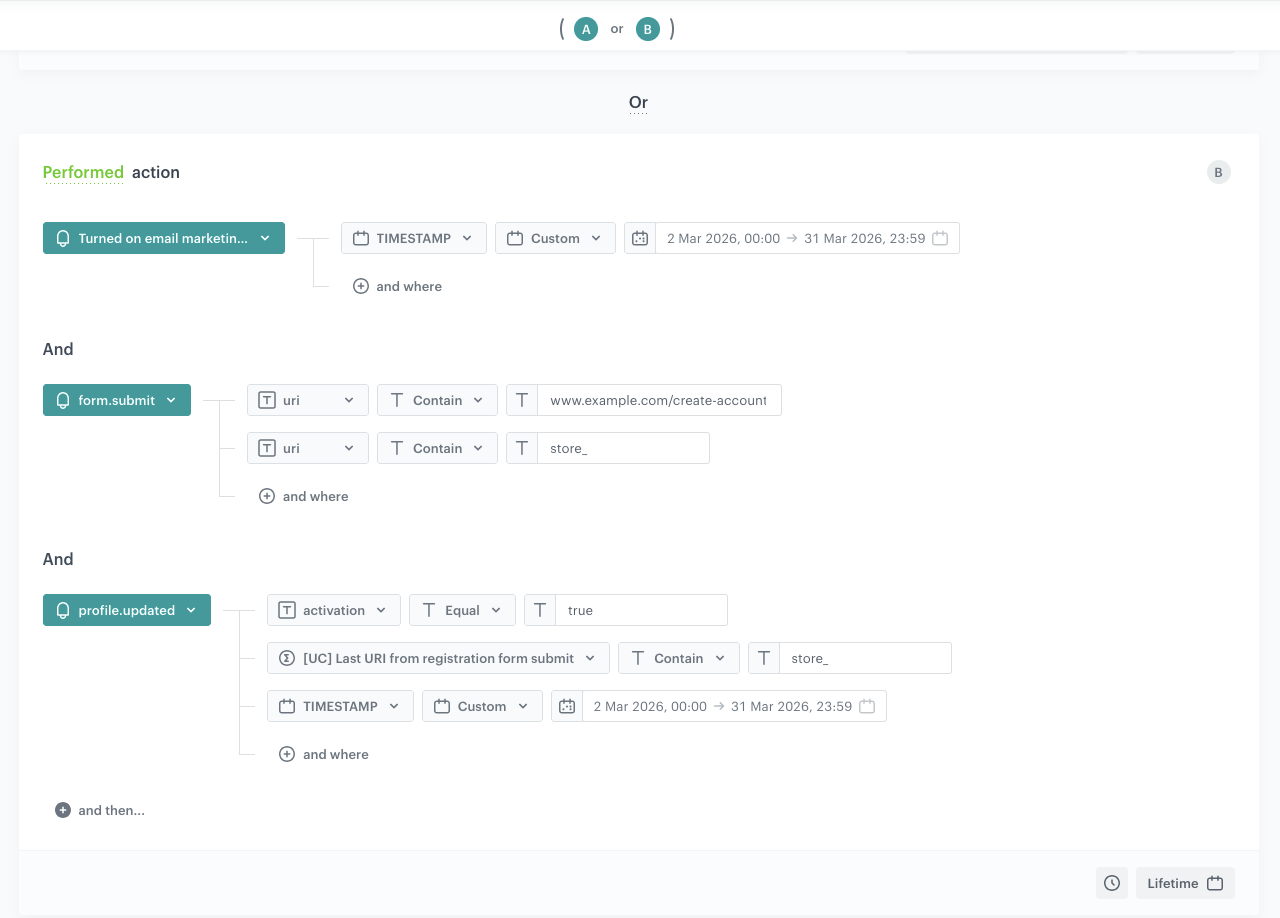
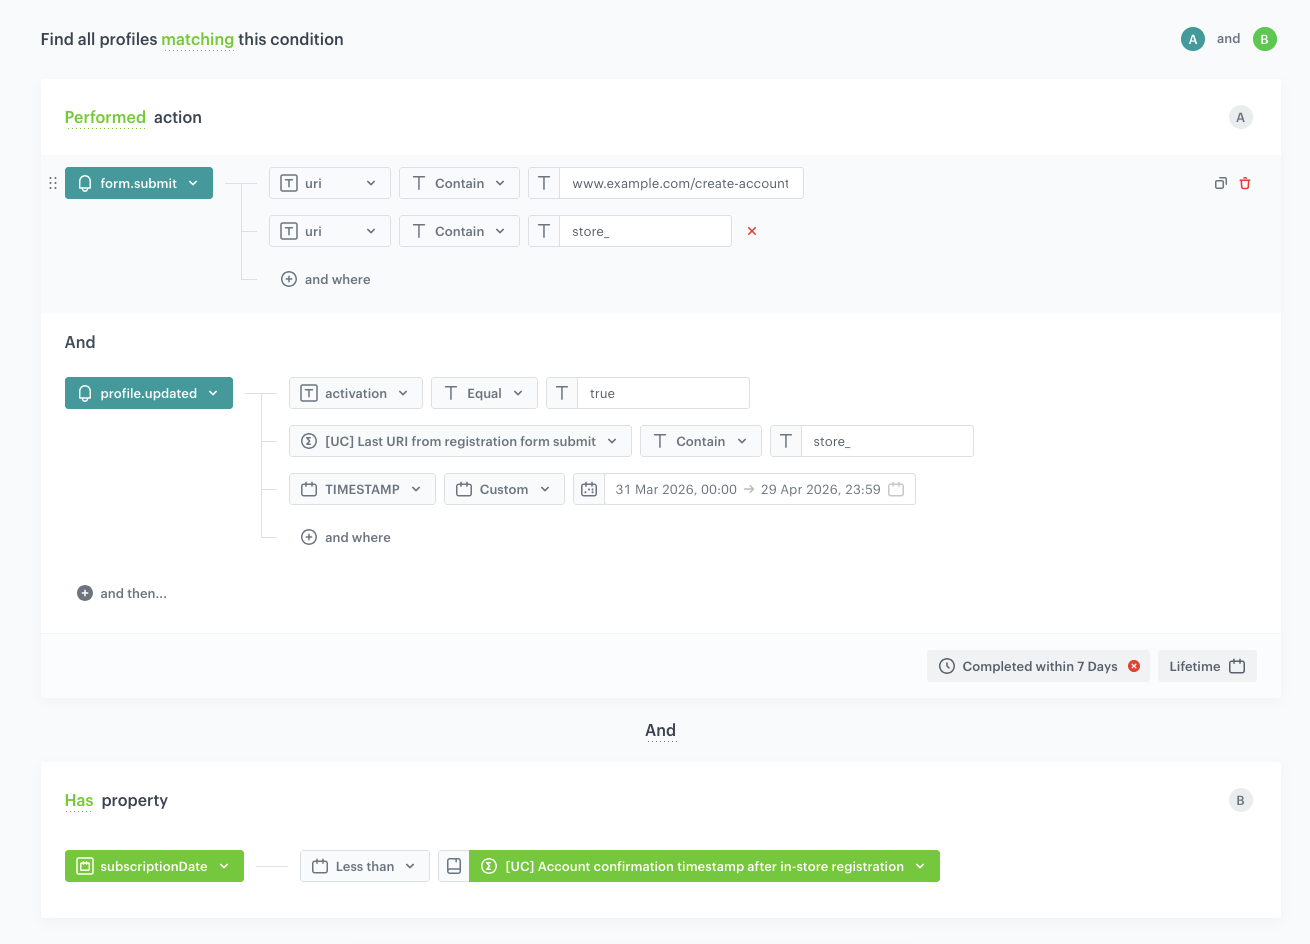
All event names, attributes, and business rules described in this use case are specific to this implementation and serve as an example. For other projects, different naming conventions, conditions, or constraints may apply — for example, which store identifier is used, which marketing agreements are required, or what the time window between registration and confirmation should be.

</div></div></div>


## Prerequisites
---
- Implement a [tracking code](/docs/settings/tool/tracking_codes) on your website.
- Have an integrated registration form on the website so that when a customer completes the form, a `form.submit` event is generated on their profile. This event must contain at least the following parameters:
    - `uri` — the full URL of the registration page (including the store identifier in the query string),
    - `formType` — the type of form, for example with the value `registration`.
- Have a mechanism for tracking account confirmation. In this example, the `profile.updated` event is generated with the `activation` parameter set to `true` when a customer confirms their account.
- Have a mechanism for tracking newsletter agreement activation. In this example, the `marketingAgreement.turnOn` event is generated when a customer enables the newsletter agreement.
- Have a custom profile attribute (in this example, `subscriptionDate`) that stores the date when the customer opted in to the newsletter, in date format (`yyyy-mm-dd`). This attribute is not available by default — it must be implemented separately, for example by sending it from an external system or by creating a workflow that reacts to the `marketingAgreement.turnOn` event and saves the current date to this attribute on the customer's profile.
- Generate unique registration URLs per store with a consistent identifier pattern in the query string (for example, `?store_ABC`, `?store_XYZ`).
- Create [API keys](/docs/settings/tool/api#adding-api-keys) with appropriate permissions for report retrieval.

## Process
---
In this use case, you will go through the following steps:

1. [Create an event aggregate that returns the last registration form URI](#create-an-event-aggregate-for-registration-uri).
2. [Create a profile aggregate for account confirmation with store origin](#create-a-profile-aggregate-for-account-confirmation).
3. [Create a segmentation of fully qualified registrations](#create-a-segmentation-of-qualified-registrations).
4. [Create a report with monthly registration counts per store](#create-a-report-with-registration-counts-per-store).

## Create an event aggregate for registration URI
---
This aggregate returns the last URI from the `form.submit` event where the form type is `registration`. It will be used later in the profile aggregate and segmentation to check whether the registration originated from a store link.

1. Go to <img src="/api/docs/image/9994bf4f700ac60725ac3a71a9eeb985e07090a3/icons/behavioral-data-hub-icon.svg" alt="Behavioral Data Hub icon" class="icon" > **Behavioral Data Hub > Live Aggregates > Create aggregate**.
2. As the aggregate type, select **Event**.
3. Enter a name for the aggregate, for example `Last URI from registration form submit`.
4. Set **Analyze events by** to **Last**.
5. From the **Choose event** dropdown list, select the `form.submit` event.
6. As the event parameter, select **uri**.
7. Click the **+ where** button.
8. From the **Choose parameter** dropdown list, select the **formType** parameter.
9. From the **Choose operator** dropdown, choose **Equal**.
10. In the next field, enter `registration`.
11. Set the time range to **Lifetime**.
12. Save the aggregate.

<figure><img src="/api/docs/image/9994bf4f700ac60725ac3a71a9eeb985e07090a3/use-cases/all-cases/_gfx/store-competition-event-aggregate-uri.png" class="full" alt="Configuration of the event aggregate returning last registration form URI"><figcaption>Configuration of the event aggregate returning the last registration form URI</figcaption></figure>

## Create a profile aggregate for account confirmation
---
This aggregate returns the last timestamp of the `profile.updated` event where the account was confirmed (`activation` = `true`) and where the registration originated from a store link (the event aggregate from the previous step contains the store identifier). It will be used in the segmentation to verify the chronological order of events.

1. Go to <img src="/api/docs/image/9994bf4f700ac60725ac3a71a9eeb985e07090a3/icons/behavioral-data-hub-icon.svg" alt="Behavioral Data Hub icon" class="icon" > **Behavioral Data Hub > Live Aggregates > Create aggregate**.
2. As the aggregate type, select **Profile**.
3. Enter a name for the aggregate, for example `Account confirmation timestamp after in-store registration`.
4. Set **Analyze profiles by** to **Last**.
5. From the **Choose event** dropdown list, select the `profile.updated` event.
6. As the event parameter, select **TIMESTAMP**.
7. Click the **+ where** button.
8. From the **Choose parameter** dropdown list, select the **activation** parameter.
9. From the **Choose operator** dropdown, choose **Equal**.
10. In the next field, enter `true`.
11. Click the **+ where** button.
12. From the **Choose parameter** dropdown list, select the event aggregate created in the [previous step](#create-an-event-aggregate-for-registration-uri).
13. From the **Choose operator** dropdown, choose **Contain**.
14. In the next field, enter the store identifier prefix, for example `store_`.
15. Set the time range to **Last month** (or adjust according to the reporting period).
16. Save the aggregate.

<figure><img src="/api/docs/image/9994bf4f700ac60725ac3a71a9eeb985e07090a3/use-cases/all-cases/_gfx/store-competition-profile-aggregate-confirmation.png" class="full" alt="Configuration of the profile aggregate for account confirmation with store origin"><figcaption>Configuration of the profile aggregate for account confirmation with store origin</figcaption></figure>

## Create a segmentation of qualified registrations
---
In this part of the process, create a segmentation that identifies customers who completed a full loyalty program registration through a store link. A customer qualifies if they performed all of the following actions within 7 days, in any order:

- Submitted the registration form (`form.submit`) from a URL containing the store identifier.
- Confirmed their account (`profile.updated` with `activation` = `true`).
- Enabled the newsletter agreement (`marketingAgreement.turnOn`).

The segmentation consists of two segments connected by an **OR** operator. The reason for splitting the segmentation into two segments is that there are two distinct groups of customers who qualify:

- **Segment A** — customers who registered through the store QR code, confirmed their account, **and** opted in to the newsletter — all within 7 days. These are entirely new customers who completed the full process during the competition period.
- **Segment B** — customers who registered through the store QR code and confirmed their account within 7 days, but **already had the newsletter agreement from before** (for example, they subscribed via the website footer months ago). These customers did not need to opt in again — they only needed to register and confirm.

To track when the newsletter agreement was originally given, this implementation uses a custom profile attribute (in this example, `subscriptionDate`) that stores the date of the newsletter opt-in in date format (`yyyy-mm-dd`). It must be set up beforehand (see [Prerequisites](#prerequisites)).

1. Go to <img src="/api/docs/image/9994bf4f700ac60725ac3a71a9eeb985e07090a3/icons/decision-hub-icon.svg" alt="Analytics icon" class="icon" > **Decision Hub > Segmentations > New segmentation**.
2. Enter the name of the segmentation, for example `Fully qualified in-store loyalty registrations`.

### Configure Segment A
---
Segment A captures customers who completed all three actions (form submission, account confirmation, newsletter opt-in) within 7 days. Because the events can happen in different orders (for example, newsletter agreement before or after account confirmation), you define two condition groups connected by **OR** to cover both orderings.

**First condition group:**

3. Click **Add condition**.
4. From the dropdown list, select the `form.submit` event.
5. Click the **+ where** button and select the **uri** parameter.
6. From the **Choose operator** dropdown, choose **Contain** and enter the registration page URL, for example `www.example.com/create-account`.
7. Click the **+ where** button and select the **uri** parameter again.
8. From the **Choose operator** dropdown, choose **Contain** and enter the store identifier prefix, for example `store_`.
9. Below the first condition, in the **and then...** section, click **Add condition**.
10. From the dropdown list, select the `profile.updated` event.
11. Click the **+ where** button and select the **activation** parameter.
12. From the **Choose operator** dropdown, choose **Equal** and enter `true`.
13. Click the **+ where** button and select the event aggregate created [earlier](#create-an-event-aggregate-for-registration-uri).
14. From the **Choose operator** dropdown, choose **Contain** and enter the store identifier prefix, for example `store_`.
15. Click the **+ where** button and select the **TIMESTAMP** parameter.
16. From the **Choose operator** dropdown, choose **Custom** and set the date range to the reporting period (for example, `1 Feb 2026, 00:00` to `28 Feb 2026, 23:59`).

    
    <div class="admonition admonition-note"><div class="admonition-icon"><svg xmlns="http://www.w3.org/2000/svg" fill="none" viewBox="0 0 24 24" stroke="currentColor" stroke-width="2.5"><path stroke-linecap="round" stroke-linejoin="round" d="M13 16h-1v-4h-1m1-4h.01M21 12a9 9 0 11-18 0 9 9 0 0118 0z" /></svg></div><div class="admonition-body"><div class="admonition-content">

    The custom date range on the TIMESTAMP parameter should be adjusted each month to match the reporting period, or the segmentation should be configured to use a dynamic time range.

    </div></div></div>


17. In the **and then...** section, click **Add condition**.
18. From the dropdown list, select the `marketingAgreement.turnOn` event.
19. Click the **+ where** button and select the **TIMESTAMP** parameter.
20. From the **Choose operator** dropdown, choose **Custom** and set the same date range as above.
21. Set the completion window to **Completed within 7 Days**.
22. Set the time range to **Lifetime**.

<figure><img src="/api/docs/image/9994bf4f700ac60725ac3a71a9eeb985e07090a3/use-cases/all-cases/_gfx/store-competition-segmentation-segment-a.png" class="full" alt="Configuration of the first condition group in Segment A"><figcaption>Configuration of the first condition group in Segment A</figcaption></figure>

**Second condition group:**

23. Click **Add condition**.
23. Click **Or** to add an alternative condition group.
24. Configure the same three events (`form.submit`, `marketingAgreement.turnOn`, `profile.updated`) but in a different order to account for customers who enabled the newsletter agreement before confirming their account.
25. Apply the same filters, time ranges, and the 7-day completion window.

<figure><img src="/api/docs/image/9994bf4f700ac60725ac3a71a9eeb985e07090a3/use-cases/all-cases/_gfx/store-competition-segmentation-segment-a2.png" class="full" alt="Configuration of the second condition group in Segment A"><figcaption>Configuration of the second condition group in Segment A</figcaption></figure>

### Configure Segment B
---
Segment B captures customers who registered through the store QR code and confirmed their account within 7 days, but already had the newsletter agreement from before the registration. This segment consists of two parts connected by an **AND** operator.

**Part 1 — Performed action:**

This part verifies that the customer submitted the registration form from a store link and confirmed their account within 7 days during the reporting period. Unlike Segment A, there is no `marketingAgreement.turnOn` event here — the newsletter opt-in happened earlier.

26. Click **Add segment** to create Segment B.
27. Click **Add condition**.
28. From the dropdown list, select the `form.submit` event.
29. Click the **+ where** button and select the **uri** parameter.
30. From the **Choose operator** dropdown, choose **Contain** and enter the registration page URL, for example `www.example.com/create-account`.
31. Click the **+ where** button and select the **uri** parameter again.
32. From the **Choose operator** dropdown, choose **Contain** and enter the store identifier prefix, for example `store_`.
33. Below the first condition, in the **and then...** section, click **Add condition**.
34. From the dropdown list, select the `profile.updated` event.
35. Click the **+ where** button and select the **activation** parameter.
36. From the **Choose operator** dropdown, choose **Equal** and enter `true`.
37. Click the **+ where** button and select the event aggregate created [earlier](#create-an-event-aggregate-for-registration-uri).
38. From the **Choose operator** dropdown, choose **Contain** and enter the store identifier prefix, for example `store_`.
39. Click the **+ where** button and select the **TIMESTAMP** parameter.
40. From the **Choose operator** dropdown, choose **Custom** and set the date range to the reporting period (for example, `1 Mar 2026, 00:00` to `31 Mar 2026, 23:59`).
41. Set the completion window to **Completed within 7 Days**.
42. Set the time range to **Lifetime**.

**Part 2 — Has property (chronological check):**

This part verifies that the customer's newsletter opt-in date (`subscriptionDate` attribute) is earlier than the account confirmation timestamp. This means the customer had already subscribed to the newsletter before completing the in-store registration.

43. Below the performed action block, click **Add condition** and select **Has property**.
44. Select the `subscriptionDate` attribute (a custom attribute storing the date when the customer opted in to the newsletter).
45. From the **Choose operator** dropdown, choose **Less than**.
46. As the value, select the profile aggregate for account confirmation created in [the earlier step](#create-a-profile-aggregate-for-account-confirmation).

<figure><img src="/api/docs/image/9994bf4f700ac60725ac3a71a9eeb985e07090a3/use-cases/all-cases/_gfx/store-competition-segmentation-segment-b.png" class="full" alt="Configuration of Segment B with registration from store and pre-existing newsletter agreement"><figcaption>Configuration of Segment B with registration from store and pre-existing newsletter agreement</figcaption></figure>

### Finalize the segmentation
---
1. Connect Segment A and Segment B using the **OR** operator (visible in the top-right corner of the conditions panel). A customer qualifies if they match **either** Segment A (all three actions within 7 days) **or** Segment B (registration + confirmation within 7 days, with a pre-existing newsletter agreement).
2. Save the segmentation.


## Create a report with registration counts per store
---
In this part of the process, create a report that returns the number of qualified registrations broken down by store and month. Before creating the report itself, you need to prepare several supporting analyses. The full list of elements to create in this section is:

1. **Metric** — counts profiles matching the segmentation of qualified registrations.
2. **Aggregate: Newsletter agreement timestamp after in-store registration** — returns the last `marketingAgreement.turnOn` timestamp for store-originated registrations.
3. **Aggregate: Account confirmation timestamp after in-store registration** — returns the last `profile.updated` timestamp for confirmed accounts from store-originated registrations.
4. **Expression: `TIMESTAMP`** — returns the earlier available timestamp (newsletter agreement or account confirmation) using `IfNull`.
5. **Aggregate: `Last_store`** — returns the last store identifier from `form.submit`, filtered by store origin and timestamp.
6. **Expression: `Data`** — extracts the registration date (year-month) from the timestamp for grouping by month.
7. **Expression: `Data_Store`** — combines the registration date with the store identifier into a single dimension.
8. **Report** — uses the metric and the three dimensions above.

### Create a metric for counting qualified registrations
---
This metric counts all profiles that belong to the segmentation created in the [previous step](#create-a-segmentation-of-qualified-registrations). It will be used as the base metric for the report.

1. Go to <img src="/api/docs/image/9994bf4f700ac60725ac3a71a9eeb985e07090a3/icons/decision-hub-icon.svg" alt="Analytics icon" class="icon" > **Decision Hub > Metrics > New metric**.
2. Enter the name of the metric, for example `Count of in-store loyalty registrations`.
3. As the metric kind, select **Simple metric**.
4. As **Type**, select **Profile**.
5. As **Aggregator**, select **Count**.
6. Click the filter icon to add a profile filter.
8. From the **Choose filter** dropdown, select the segmentation created in the [previous step](#create-a-segmentation-of-qualified-registrations).
9. From the **Choose operator** dropdown, choose **Is true (Boolean)**.
10. Confirm by clicking **Apply**.
11. Save the metric.

<figure><img src="/api/docs/image/9994bf4f700ac60725ac3a71a9eeb985e07090a3/use-cases/all-cases/_gfx/store-competition-metric-configuration.png" class="full" alt="Configuration of the metric counting profiles from the qualified registrations segmentation"><figcaption>Configuration of the metric counting profiles from the qualified registrations segmentation</figcaption></figure>

### Create an aggregate for newsletter agreement timestamp after in-store registration
---
This aggregate returns the last timestamp of the `marketingAgreement.turnOn` event for customers whose registration originated from a store link. It will be used in the expressions that serve as report dimensions.

1. Go to <img src="/api/docs/image/9994bf4f700ac60725ac3a71a9eeb985e07090a3/icons/decision-hub-icon.svg" alt="Analytics icon" class="icon" > **Behavioral Data Hub > Live Aggregates > Create aggregate**.
2. As the aggregate type, select **Profile**.
3. Enter a name for the aggregate, for example `Newsletter agreement timestamp after in-store registration`.
4. Set **Analyze profiles by** to **Last**.
5. From the **Choose event** dropdown list, select the `marketingAgreement.turnOn` event.
6. As the event parameter, select **TIMESTAMP**.
7. Click the **+ where** button.
8. From the **Choose parameter** dropdown list, select the event aggregate created in the [first step](#create-an-event-aggregate-for-registration-uri) (last URI from registration form submit).
9. From the **Choose operator** dropdown, choose **Contain (String)**.
10. In the next field, enter the store identifier prefix, for example `store_`.
11. Set the time range to **Last 1 months before 1 months** (this ensures the aggregate covers the previous month's data for reporting purposes).
12. Save the aggregate.

<figure><img src="/api/docs/image/9994bf4f700ac60725ac3a71a9eeb985e07090a3/use-cases/all-cases/_gfx/store-competition-aggregate-newsletter-timestamp.png" class="full" alt="Configuration of the aggregate for newsletter agreement timestamp after in-store registration"><figcaption>Configuration of the aggregate for newsletter agreement timestamp after in-store registration</figcaption></figure>


### Create an aggregate for account confirmation timestamp after in-store registration
---
This aggregate returns the last timestamp of the `profile.updated` event where the account was confirmed and the registration originated from a store link. It will be used as the fallback value in the `TIMESTAMP` expression — for customers who already had the newsletter agreement before the registration and therefore did not trigger the `marketingAgreement.turnOn` event during the process.


<div class="admonition admonition-note"><div class="admonition-icon"><svg xmlns="http://www.w3.org/2000/svg" fill="none" viewBox="0 0 24 24" stroke="currentColor" stroke-width="2.5"><path stroke-linecap="round" stroke-linejoin="round" d="M13 16h-1v-4h-1m1-4h.01M21 12a9 9 0 11-18 0 9 9 0 0118 0z" /></svg></div><div class="admonition-body"><div class="admonition-content">

This aggregate uses the same event and conditions as the [profile aggregate for account confirmation](#create-a-profile-aggregate-for-account-confirmation) created earlier in the process, but its time range is set to **Last 1 months** to align with the monthly reporting cycle. You can reuse the same aggregate if the time range matches, or create a separate one for reporting purposes.

</div></div></div>


1. Go to <img src="/api/docs/image/9994bf4f700ac60725ac3a71a9eeb985e07090a3/icons/behavioral-data-hub-icon.svg" alt="Behavioral Data Hub icon" class="icon" > **Behavioral Data Hub > Live Aggregates > Create aggregate**.
2. As the aggregate type, select **Profile**.
3. Enter a name for the aggregate, for example `Account confirmation timestamp after in-store registration`.
4. Set **Analyze profiles by** to **Last**.
5. From the **Choose event** dropdown list, select the `profile.updated` event.
6. As the event parameter, select **TIMESTAMP**.
7. Click the **+ where** button.
8. From the **Choose parameter** dropdown list, select the **activation** parameter.
9. From the **Choose operator** dropdown, choose **Equal**.
10. In the next field, enter `true`.
11. Click the **+ where** button.
12. From the **Choose parameter** dropdown list, select the event aggregate created in the [first step](#create-an-event-aggregate-for-registration-uri) (last URI from registration form submit).
13. From the **Choose operator** dropdown, choose **Contain**.
14. In the next field, enter the store identifier prefix, for example `store_`.
15. Set the time range to **Last 1 months**.
16. Save the aggregate.

<figure><img src="/api/docs/image/9994bf4f700ac60725ac3a71a9eeb985e07090a3/use-cases/all-cases/_gfx/store-competition-aggregate-confirmation-timestamp.png" class="full" alt="Configuration of the aggregate for account confirmation timestamp after in-store registration"><figcaption>Configuration of the aggregate for account confirmation timestamp after in-store registration</figcaption></figure>


### Create the TIMESTAMP expression
---
This expression returns the earliest available timestamp from the registration process — either the newsletter agreement timestamp or the account confirmation timestamp. It uses the `IfNull` function: if the newsletter agreement timestamp is available, it is returned; otherwise, the account confirmation timestamp is used as a fallback. This expression will be referenced in the `Last_store` aggregate (to ensure the form submission occurred before the confirmation) and serves as a building block for other report dimensions.

1. Go to <img src="/api/docs/image/9994bf4f700ac60725ac3a71a9eeb985e07090a3/icons/behavioral-data-hub-icon.svg" alt="Behavioral Data Hub icon" class="icon" > **Behavioral Data Hub > Expressions > New expression**.
2. Enter the name of the expression: `TIMESTAMP`.
3. Set **Expressions for** to **Attribute**.
4. Build the formula using the following structure:
    - **IfNull** - newsletter agreement timestamp aggregate, account confirmation timestamp aggregate
    - The first argument is the aggregate for the newsletter agreement timestamp after in-store registration (created in the [previous step](#create-an-aggregate-for-newsletter-agreement-timestamp-after-in-store-registration)).
    - The second argument (fallback) is the profile aggregate for account confirmation created [earlier](#create-a-profile-aggregate-for-account-confirmation).
5. Save the expression.

<figure><img src="/api/docs/image/9994bf4f700ac60725ac3a71a9eeb985e07090a3/use-cases/all-cases/_gfx/store-competition-expression-timestamp-ap.png" class="full" alt="Configuration of the TIMESTAMP expression"><figcaption>Configuration of the TIMESTAMP expression</figcaption></figure>

### Create the Last_store aggregate
---
This aggregate returns the last store identifier extracted from the `form.submit` event. It filters for registrations that came from a store link and whose timestamp is earlier than the registration confirmation timestamp (using the `TIMESTAMP` expression). It will be used directly as a report dimension and also within the `Data_Store` expression.

1. Go to <img src="/api/docs/image/9994bf4f700ac60725ac3a71a9eeb985e07090a3/icons/behavioral-data-hub-icon.svg" alt="Behavioral Data Hub icon" class="icon" > **Behavioral Data Hub > Live Aggregates > Create aggregate**.
2. As the aggregate type, select **Profile**.
3. Enter a name for the aggregate: `Last_store`.
4. Set **Analyze profiles by** to **Last**.
5. From the **Choose event** dropdown list, select the `form.submit` event.
6. As the event parameter, select the parameter that contains the store identifier extracted from the URI (for example, `fd:lastStore_`).
7. Click the **+ where** button and select the **uri** parameter.
8. From the **Choose operator** dropdown, choose **Contain (String)** and enter the registration page URL, for example `www.example.com/create-account`.
9. Click the **+ where** button and select the **uri** parameter again.
10. From the **Choose operator** dropdown, choose **Contain (String)** and enter the store identifier prefix, for example `store_`.
11. Click the **+ where** button and select the **TIMESTAMP** parameter.
12. From the **Choose operator** dropdown, choose **Less than (Date)**.
13. As the value, select the `TIMESTAMP` expression created in the [previous step](#create-the-timestamp-expression).
14. Set the time range to **Lifetime**.
15. Save the aggregate.

<figure><img src="/api/docs/image/9994bf4f700ac60725ac3a71a9eeb985e07090a3/use-cases/all-cases/_gfx/store-competition-aggregate-last-store-ap.png" class="full" alt="Configuration of the Last_store aggregate"><figcaption>Configuration of the Last_store aggregate</figcaption></figure>

### Create the Data expression
---
This expression returns the registration date (used as a report dimension to group results by month). It uses the `Regexp` and `IfNull` functions to extract the date from one of two aggregates: the newsletter agreement timestamp or the account confirmation timestamp — whichever is available first.

1. Go to <img src="/api/docs/image/9994bf4f700ac60725ac3a71a9eeb985e07090a3/icons/behavioral-data-hub-icon.svg" alt="Behavioral Data Hub icon" class="icon" > **Behavioral Data Hub > Expressions > New expression**.
2. Enter the name of the expression: `Data`.
3. Set **Expressions for** to **Attribute**.
4. Build the formula using the following structure:
    - **Regexp** ( **IfNull** ( `[newsletter agreement timestamp aggregate]` , `[account confirmation timestamp aggregate]` ) , `......` )
    - The first argument of `IfNull` is the aggregate for the newsletter agreement timestamp after in-store registration (created in the step above).
    - The second argument (fallback) is the profile aggregate for account confirmation created [earlier](#create-a-profile-aggregate-for-account-confirmation).
    - The `Regexp` pattern (`......`) extracts the date portion (for example, year-month) from the timestamp.
5. Save the expression.

<figure><img src="/api/docs/image/9994bf4f700ac60725ac3a71a9eeb985e07090a3/use-cases/all-cases/_gfx/store-competition-expression-data-ap.png" class="full" alt="Configuration of the Data expression"><figcaption>Configuration of the Data expression</figcaption></figure>


### Create the Data_Store expression
---
This expression combines the registration date with the store identifier into a single dimension. It uses the `Concat` function to join the date (extracted via `Regexp` and `IfNull`, same logic as in `Data`) with a separator (`_`) and the `Last_store` aggregate.

1. Go to <img src="/api/docs/image/9994bf4f700ac60725ac3a71a9eeb985e07090a3/icons/behavioral-data-hub-icon.svg" alt="Behavioral Data Hub icon" class="icon" > **Behavioral Data Hub > Expressions > New expression**.
2. Enter the name of the expression: `Data_Store`.
3. Set **Expressions for** to **Attribute**.
4. Build the formula using the following structure:
    - **Concat** ( **Regexp** ( **IfNull** ( `[newsletter agreement timestamp aggregate]` , `[account confirmation timestamp aggregate]` ) , `......` ) , **Concat** ( `_` , `Last_store` ) )
    - The inner `Regexp(IfNull(...))` portion is the same logic as in the `Data` expression — it extracts the date from the first available timestamp.
    - The outer `Concat` appends an underscore and the store identifier from the `Last_store` aggregate.
5. Save the expression.

<figure><img src="/api/docs/image/9994bf4f700ac60725ac3a71a9eeb985e07090a3/use-cases/all-cases/_gfx/store-competition-expression-data-store-ap.png" class="full" alt="Configuration of the Data_Store expression"><figcaption>Configuration of the Data_Store expression</figcaption></figure>

### Configure the report
---
Now that all the required analyses are ready, create the report.

1. Go to <img src="/api/docs/image/9994bf4f700ac60725ac3a71a9eeb985e07090a3/icons/decision-hub-icon.png" alt="Analytics icon" class="icon" > **Decision Hub > Reports > New report**.
2. Enter the name of the report, for example `Monthly in-store loyalty registrations by store`.
3. Click **Choose metric** and from the dropdown list, select the metric created [above](#create-a-metric-for-counting-qualified-registrations).
4. From the **Range** dropdown list, select **Top 1000**.
5. In the **Dimension** section, add the following dimensions:
    - `Data_Store` — the expression combining date and store identifier.
    - `Data` — the expression returning the registration date.
    - `Last_store` — the aggregate returning the store identifier.
6. Set the **Format** to `19 000,7` for all dimensions.
7. Enable the **Show null values** toggle.
8. Set the time range to **Lifetime**.
9. Save the report.

<figure><img src="/api/docs/image/9994bf4f700ac60725ac3a71a9eeb985e07090a3/use-cases/all-cases/_gfx/store-competition-report-configuration.png" class="full" alt="Configuration of the report with three dimensions"><figcaption>Configuration of the report with metric and three dimensions</figcaption></figure>

**Result:** The report returns a table with the month of registration, the store name, and the number of customers who completed a full registration from that store.


<div class="admonition admonition-tip"><div class="admonition-icon"><svg xmlns="http://www.w3.org/2000/svg" fill="none" viewBox="0 0 24 24" stroke="currentColor" stroke-width="2.5"><path stroke-linecap="round" stroke-linejoin="round" d="M9.663 17h4.673M12 3v1m6.364 1.636l-.707.707M21 12h-1M4 12H3m3.343-5.657l-.707-.707m2.828 9.9a5 5 0 117.072 0l-.548.547A3.374 3.374 0 0014 18.469V19a2 2 0 11-4 0v-.531c0-.895-.356-1.754-.988-2.386l-.548-.547z" /></svg></div><div class="admonition-body"><div class="admonition-content">

To ensure the report always returns data for the previous month without manual adjustments, set all aggregates used in the segmentation and report dimensions to a relative time range such as **Last month** or **Last 1 months before 1 months**. This way, the segmentation and report will automatically shift to the correct period each month, and the only element that may still require a manual update is the custom TIMESTAMP range inside the segmentation conditions (if used).

</div></div></div>


## What's next
---
Once the report is configured and saved, you can distribute the results in a way that best fits your business needs. Some common options include:

- **Email** — use a workflow with the [Send Email](/docs/campaign/e-mail) node to deliver the report results directly to the relevant stakeholders on a scheduled basis.
- **External systems (e.g. Microsoft SharePoint, Google Sheets)** — use a workflow with [Outgoing Integration](/docs/automation/integration/outgoing-webhook) nodes to authenticate with the external API, generate the report via the Synerise API, transform the data using Jinjava, and upload it to the target location.
- **Dashboards** — add the report to an [analytical dashboard](/docs/analytics/analytics-dashboard) for convenient, real-time access within Synerise.
- **CSV export** — [export the report to a CSV file](/docs/analytics/reports/exporting-reports-to-file) manually or automate the process via a workflow.

In each case, you can automate the delivery by creating a workflow triggered on a schedule (for example, on the first day of each month) that generates the report and sends or uploads the data to the desired destination.

## Check the use case set up on the Synerise Demo workspace
---
You can check the configuration of each step directly in the Synerise Demo workspace:

- [Event aggregate – Last URI from registration form submit](https://app.synerise.com/analytics-v2/aggregates/e72afcda-7fd2-34e1-8799-3103e084ca6b)
- [Profile aggregate – Account confirmation timestamp after in-store registration](https://app.synerise.com/analytics-v2/aggregates/650cc8a7-705f-3ee8-bb63-ca38d4b57ef1)
- [Aggregate – Newsletter agreement timestamp after in-store registration](https://app.synerise.com/analytics-v2/aggregates/e30e3df1-4fd3-3bdd-8a56-6f30255839c3)
- [Expression – TIMESTAMP](https://app.synerise.com/analytics/expressions/e669fe4a-a3f2-48b9-ba2f-1af01055a2b8)
- [Aggregate – Last_store](https://app.synerise.com/analytics-v2/aggregates/a69e3775-b29f-3554-8b3b-bff1af9ba3f8)
- [Expression – Data](https://app.synerise.com/analytics/expressions/689ceb85-4396-419e-8dfa-07601d90fe41)
- [Expression – Data_Store](https://app.synerise.com/analytics/expressions/85c84329-06db-41c4-8009-a6f95d80ef0f)
- [Metric – Count of in-store loyalty registrations](https://app.synerise.com/analytics/metrics/b155b6a7-9635-4068-9cb9-1252e51a9e15)
- [Segmentation – Fully qualified in-store loyalty registrations](https://app.synerise.com/analytics-v2/segmentations/f461624f-4a3f-49a8-b1d3-9ce6ac2439cc)
- [Report – Monthly in-store loyalty registrations by store](https://app.synerise.com/analytics/reports/73e49afa-29dd-4f3a-b02b-307abe871e7f)

If you’re our partner or client, you already have automatic access to the **Synerise Demo workspace (1590)**, where you can explore all the configured elements of this use case and copy them to your workspace.  

If you’re not a partner or client yet, we encourage you to fill out the contact [form](https://demo.synerise.com/request) to schedule a meeting with our representatives. They’ll be happy to show you how our demo works and discuss how you can apply this use case in your business.

## Read more
---
- [Aggregates](/docs/analytics/aggregates/creating-aggregates)
- [Segmentations](/docs/analytics/segmentations/creating-segmentations)
- [Reports](/docs/analytics/reports/creating-reports)
- [Exporting reports to a file](/docs/analytics/reports/exporting-reports-to-file)
- [Metrics](/docs/analytics/metrics/creating-simple-metrics)
- [Expressions](/docs/analytics/expressions/creating-expressions)
- [Dashboards](/docs/analytics/analytics-dashboard)
- [Outgoing Integration](/docs/automation/integration/outgoing-webhook)
- [Creating workflows](/docs/automation/creating-automation)

