
Effective communication is crucial for maintaining strong relationships with customers and ensuring seamless business operations. 
In scenarios in which message delivery issues occur, such as unsent and failed messages, these disruptions can impact customer satisfaction and operational efficiency.

This use case focuses on implementing a comprehensive monitoring and alert system for unsent and failed messages. 
By using Synerise's Automation Hub, businesses can distribute detailed daily reports and set up real-time alerts to notify channel members in Microsoft Teams and send email alerts when message delivery issues occur. 
This proactive approach helps maintain communication reliability and enhances customer satisfaction. In our case we will start this automation daily to check the number of `message.notSent` events and the list of possible errors. The message alert will be sent only if the number of unsent messages will be higher or equal to `1`.


<div class="admonition admonition-note"><div class="admonition-icon"><svg xmlns="http://www.w3.org/2000/svg" fill="none" viewBox="0 0 24 24" stroke="currentColor" stroke-width="2.5"><path stroke-linecap="round" stroke-linejoin="round" d="M13 16h-1v-4h-1m1-4h.01M21 12a9 9 0 11-18 0 9 9 0 0118 0z" /></svg></div><div class="admonition-body"><div class="admonition-content">

This case specifically describes creating reports based on the `message.notSent` event, which is generated when the process of sending an email fails.
However, it can be easily adapted by incorporating additional events that are generated when delivery issues occur in different communication channels. For instance, events like `push.notSent` or `webpush.notSent` can be included to ensure a broader scope of monitoring.

</div></div></div>


## Prerequisites 
---
Create a workflow from a channel in Teams by following steps below:
1. Go to Power Automate to create [a workflow from a channel in Teams](https://support.microsoft.com/en-us/office/creating-a-workflow-from-a-channel-in-teams-242eb8f2-f328-45be-b81f-9817b51a5f0e). Save workflow to generate incoming webhook URL. 
2. Edit the created workflow by filling out the **TeamId** and **ChannelId** fields. These values will be suggested. If not:
    - To get the value of **TeamId**, go to the MS Teams application and retrieve a link to the team. **TeamId** is the part of generated URL groupId=XXXX. 
    - To get the value of **ChannelId**, go to the MS Teams application and retrieve a link to the channel. **ChannelId** is a part of generated URL channel/XXXXXXXX. 
3. Save the changes in the workflow.  
4. If you want to send an interactive message (such message can contain links, simple surveys, sections), prepare it in [AdaptiveCard](https://adaptivecards.io/designer/).

## Process
---

In this use case, you will go through the following steps:
1. [Create a metric which counts the occurrences of `message.notSent` events](/use-cases/teams-alerts#create-a-metric).
3. [Create a report](/use-cases/teams-alerts#create-a-report).
2. [Create an email template](/use-cases/teams-alerts#create-an-email-template) that contains description of error parameters.
2. [Create a workflow](/use-cases/teams-alerts#create-a-workflow) which sends an email alert.
2. [Create a workflow](/use-cases/teams-alerts#create-a-workflow-sending-teams-alert) which sends the message to the Microsoft Teams channel.

## Create a metric 
---
In this part of the process, we will create a metric whose result will be later sent in the Microsoft Teams message. This specific metric will count the number of unsent email messages. 

1. In Synerise, go to <img src="/api/docs/image/54176ad07f146575310749eba44b7c2f42c1b327/icons/decision-hub-icon.svg" alt="Decision Hub icon" class="icon" > **Decision Hub > Metrics > New metric**.
2. Enter the name of the metric.
3. As the metric type, choose **Simple metric**.
3. From the **Type** dropdown, choose **Event**.
4. As an aggregator, choose **Count**.
3. From the **Choose event** dropdown list, select `message.notSent`.
4. Set the time range to **Yesterday**.

 <figure>
    <img src="/api/docs/image/54176ad07f146575310749eba44b7c2f42c1b327/use-cases/all-cases/_gfx/teams-metric.png" alt="The configuration of the metric" class="full">
    <figcaption> The configuration of the metric </figcaption>
    </figure>


## Create a report
---
In this part of the process, we will create a report whose results will be later sent in the Microsoft Teams message. 


1. Go to <img src="/api/docs/image/54176ad07f146575310749eba44b7c2f42c1b327/icons/decision-hub-icon.svg" alt="Decision Hub icon" class="icon" > **Decision Hub > Reports > New report**.  
2. Enter a meaningful name of the report.
3. From the **Choose metric** dropdown list, select [a metric created in "Create a metric" part of the process](#create-a-metric).
4. From the **Range** dropdown list, select the number. This number should be linked to the average number of campaigns sent daily and may therefore be smaller or larger depending on the business. In this case it will be **TOP 20**. 
5. In the **Dimension** section, from the dropdown list, select **Event > Parameters**. From the list, select the following parameters:
    - campaignName
    - info
    - extra
    - exception
    - id
    - diagramId

    
   <div class="admonition admonition-note"><div class="admonition-icon"><svg xmlns="http://www.w3.org/2000/svg" fill="none" viewBox="0 0 24 24" stroke="currentColor" stroke-width="2.5"><path stroke-linecap="round" stroke-linejoin="round" d="M13 16h-1v-4h-1m1-4h.01M21 12a9 9 0 11-18 0 9 9 0 0118 0z" /></svg></div><div class="admonition-body"><div class="admonition-content">

   - You can find descriptions of these parameters in the [documentation](/docs/assets/events/event-reference/email#messagenotsent) for the `message.notSent` event.
    - If needed, you can add more parameters, reduce its number, or modify them to suit your specific business requirements.

   </div></div></div>


8. Choose **Show null values**.
6. Using the date picker in the lower-right corner, set the time range to **Yesterday**.
9. Save the report.

 <figure>
    <img src="/api/docs/image/54176ad07f146575310749eba44b7c2f42c1b327/use-cases/all-cases/_gfx/teams-report.png" alt="The configuration of the report" class="full">
    <figcaption> The configuration of the report </figcaption>
    </figure>


## Create an email template
---

You can use a [ready-made template](https://app.synerise.com/campaigns/email/content-manager/template/161215) (available on the Synerise Demo workspace) that inserts the data you want to send in a table format.

1. On the right panel, click the **Config** tab.
2. Fill out **Title** and **Subtitle** to personalize the header and subtitle in the template.
3. Define **Maximum report table rows number**.
4. In **Report id**, enter the ID of the report you created within ["Create a report"](#create-a-report).  
    You can retrieve the report ID by going to **Decision Hub > Reports**. On the list of reports, find the report you created in the previous part of the process. To the right side of the report author, expand the context menu and at the bottom of the list, copy the ID. 
5. In the **General Settings** section:
    - From the **Synerise environment** dropdown, select the cloud where your workspace is hosted.
    - From the **Campaign type** dropdown, select **email**.
4. Click **Save as**.
5. On the pop-up, you can change the name and select the folder where the template will be saved.  

    <figure>
    <img src="/api/docs/image/54176ad07f146575310749eba44b7c2f42c1b327/use-cases/all-cases/_gfx/teams-emailtemplate.png" alt="Email notification on email performance template"  class="full">
    <figcaption>The configuration of the email template</figcaption>
    </figure> 


## Create a workflow
---
In this part of the process, you will create a workflow that sends a message with the report results through email once a day. The message alert will be sent only if the number of unsent messages will be higher than `1`.

1. In Synerise, go to **Automation Hub > Workflows > New workflow**.
2. Enter the name of the workflow.  

### Define the Scheduled Run trigger node
---

At this stage, configure the conditions that trigger the workflow.

1. As the trigger node, select **Scheduled Run**.  
2. In the configuration of the node:  
    1. Change the **Run trigger** option to **all time**.  
    2. Choose the **Everyday** option.
    3. Choose the timezone and hour (in our case, it's 6.00 A.M.)
    3. Confirm by clicking **Apply**.

<figure><img src="/api/docs/image/54176ad07f146575310749eba44b7c2f42c1b327/use-cases/all-cases/_gfx/teams-doublephone2.png" class="full" alt="The configuration of the Scheduled Run node"><figcaption>The configuration of the Scheduled Run node</figcaption></figure>


### Choose Get Analytics Report Node
---
1. Choose **Get Analytics Report**.
2. From the dropdown list, select the [report created in "Create a report" part of the process](#create-a-report).
3. Set report records limit.
4. Click **Apply**.

 <figure>
    <img src="/api/docs/image/54176ad07f146575310749eba44b7c2f42c1b327/use-cases/all-cases/_gfx/teams-getanalytics.png" alt="The configuration of the Get Analytics Report Node"  class="full">
    <figcaption>The configuration of the Get Analytics Report Node</figcaption>
    </figure> 

### Define the Metric Filter node
---
In the **Metric Filter** node, you will select [the metric prepared in "Create a metric" part of the process](#create-a-metric). The continuation of the workflow will depend on the result of the metric. If the metric result is equal to or more than 1, an alert will be sent. 

1. Add **Metric Filter**.
2. In **Define condition**, choose the [metric created in the previous step](#create-a-metric).
3. As the condition, by using the mathematical operators, set the metric result as equal or more than `1`. 
4. Click **Apply**.

<figure><img src="/api/docs/image/54176ad07f146575310749eba44b7c2f42c1b327/use-cases/all-cases/_gfx/teams-metricfilter.png" class="full" alt="The configuration of the Metric Filter node"><figcaption>The configuration of the Metric Filter node</figcaption></figure>

## Define the Email Alert Node
---
1. Add the **Email Alert** node to the **matched** path. In the configuration of the node:
    1. In the **Content** section, select [the email template created in the previous step](#create-an-email-template) and in the **Subject** field, enter your message subject.
    2. In the **Recipient** section, use the text field to add at least one email address of a workspace user to whom the message will be sent.
    3. Confirm the selection by clicking **Add**.
    3.	Confirm by clicking **Apply**.

## Add the finishing node
---

1. Add the **End** node:
    - To the **Not matched** path,
    - After the **Email Alert** node.
2. In the upper right corner, click **Save & Run**.

<figure>
    <img src="/api/docs/image/54176ad07f146575310749eba44b7c2f42c1b327/use-cases/all-cases/_gfx/teams-workflow.png" alt="Data Reference Workflow"  class="full">
    <figcaption>Workflow configuration</figcaption>
    </figure> 


## Create a workflow sending Teams alert
---

In this part of the process, you will create a workflow that sends a message to the Microsoft Teams channel once a day. The workflow will look similar to one created [previously](#create-a-workflow) but instead of the Email Alert node, we use the **Send Channel Message** node. Its settings are described below.

## Send channel message
---
In this step, you will configure the settings of the outgoing integration that sends the alert message to Microsoft Teams channel. 

1.	Add the **Send Channel message** node. 
3. In the configuration of the node:  
    - If you already created a connection, select the connection from the list.  
    - If you haven't created any connection yet:  
    1. At the bottom of the dropdown list, click **Add connection**.
    2. In the **Incoming Webhook URL** field, enter the incoming webhook URL you created as a part of [prerequisites](/use-cases/teams-integration#prerequisites).
    3. Click **Next**.  
    4. In the **Connection name** field, enter the name for the connection you created. 
    5. Click **Apply**.  
      **Result**: A connection is created and selected.
1. In the **Type of message** field, choose **Interactive message (JSON)**.
2. Below, in **JSON body**, add the content of the message which will be sent to the Microsoft Teams channel.

  
   <div class="admonition admonition-note"><div class="admonition-icon"><svg xmlns="http://www.w3.org/2000/svg" fill="none" viewBox="0 0 24 24" stroke="currentColor" stroke-width="2.5"><path stroke-linecap="round" stroke-linejoin="round" d="M13 16h-1v-4h-1m1-4h.01M21 12a9 9 0 11-18 0 9 9 0 0118 0z" /></svg></div><div class="admonition-body"><div class="admonition-content">

   In the code below, remember to replace a few things:
    - `set mentions`: Replace email addresses with emails of workspace users who are supposed to be mentioned on the Teams channel when a new report is available.
    - `set reportId`: Set this to the ID of the report created in ["Create a report"](#create-a-report).
    - `set env`:  Replace this with the environment your workspace is hosted.
    - `set campaignType`: Replace this with the type of campaign, in our case: email.

   </div></div></div>


<details class="accordion"><summary>Click to expand the code</summary><div class="accordion-content"><pre><code class="language-jinja">
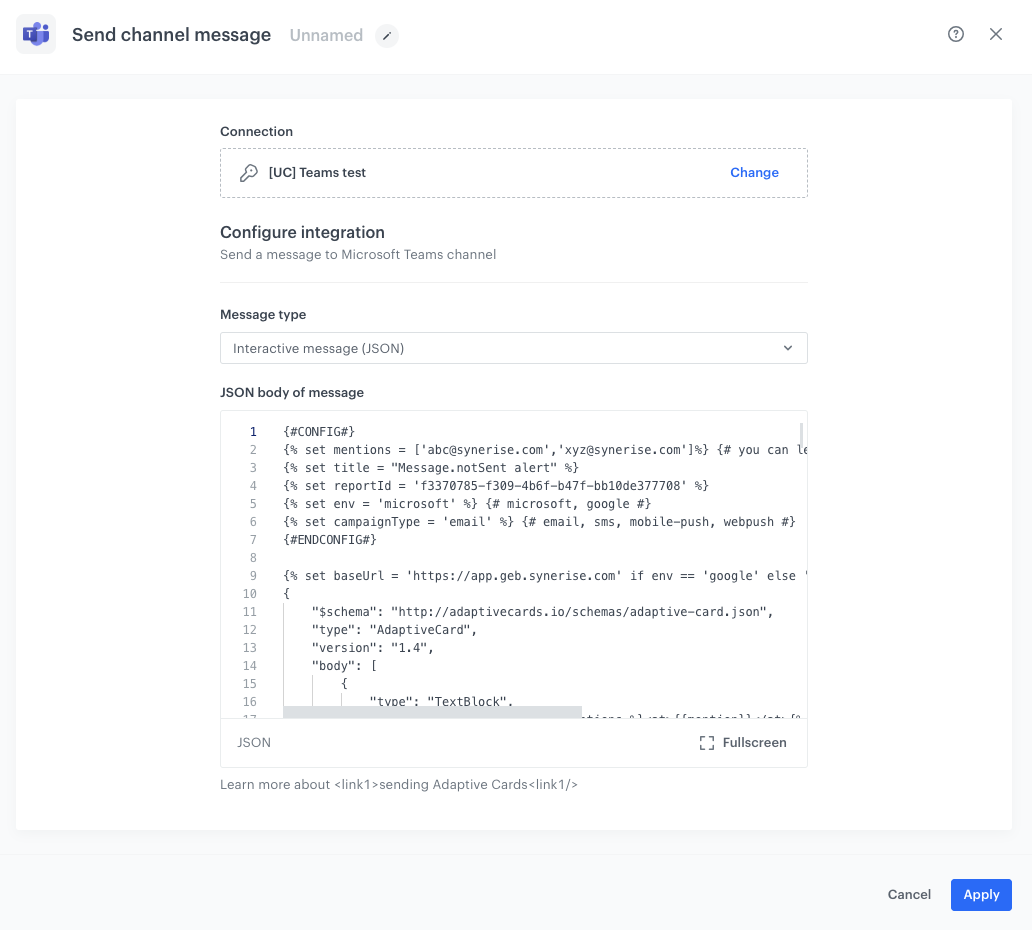
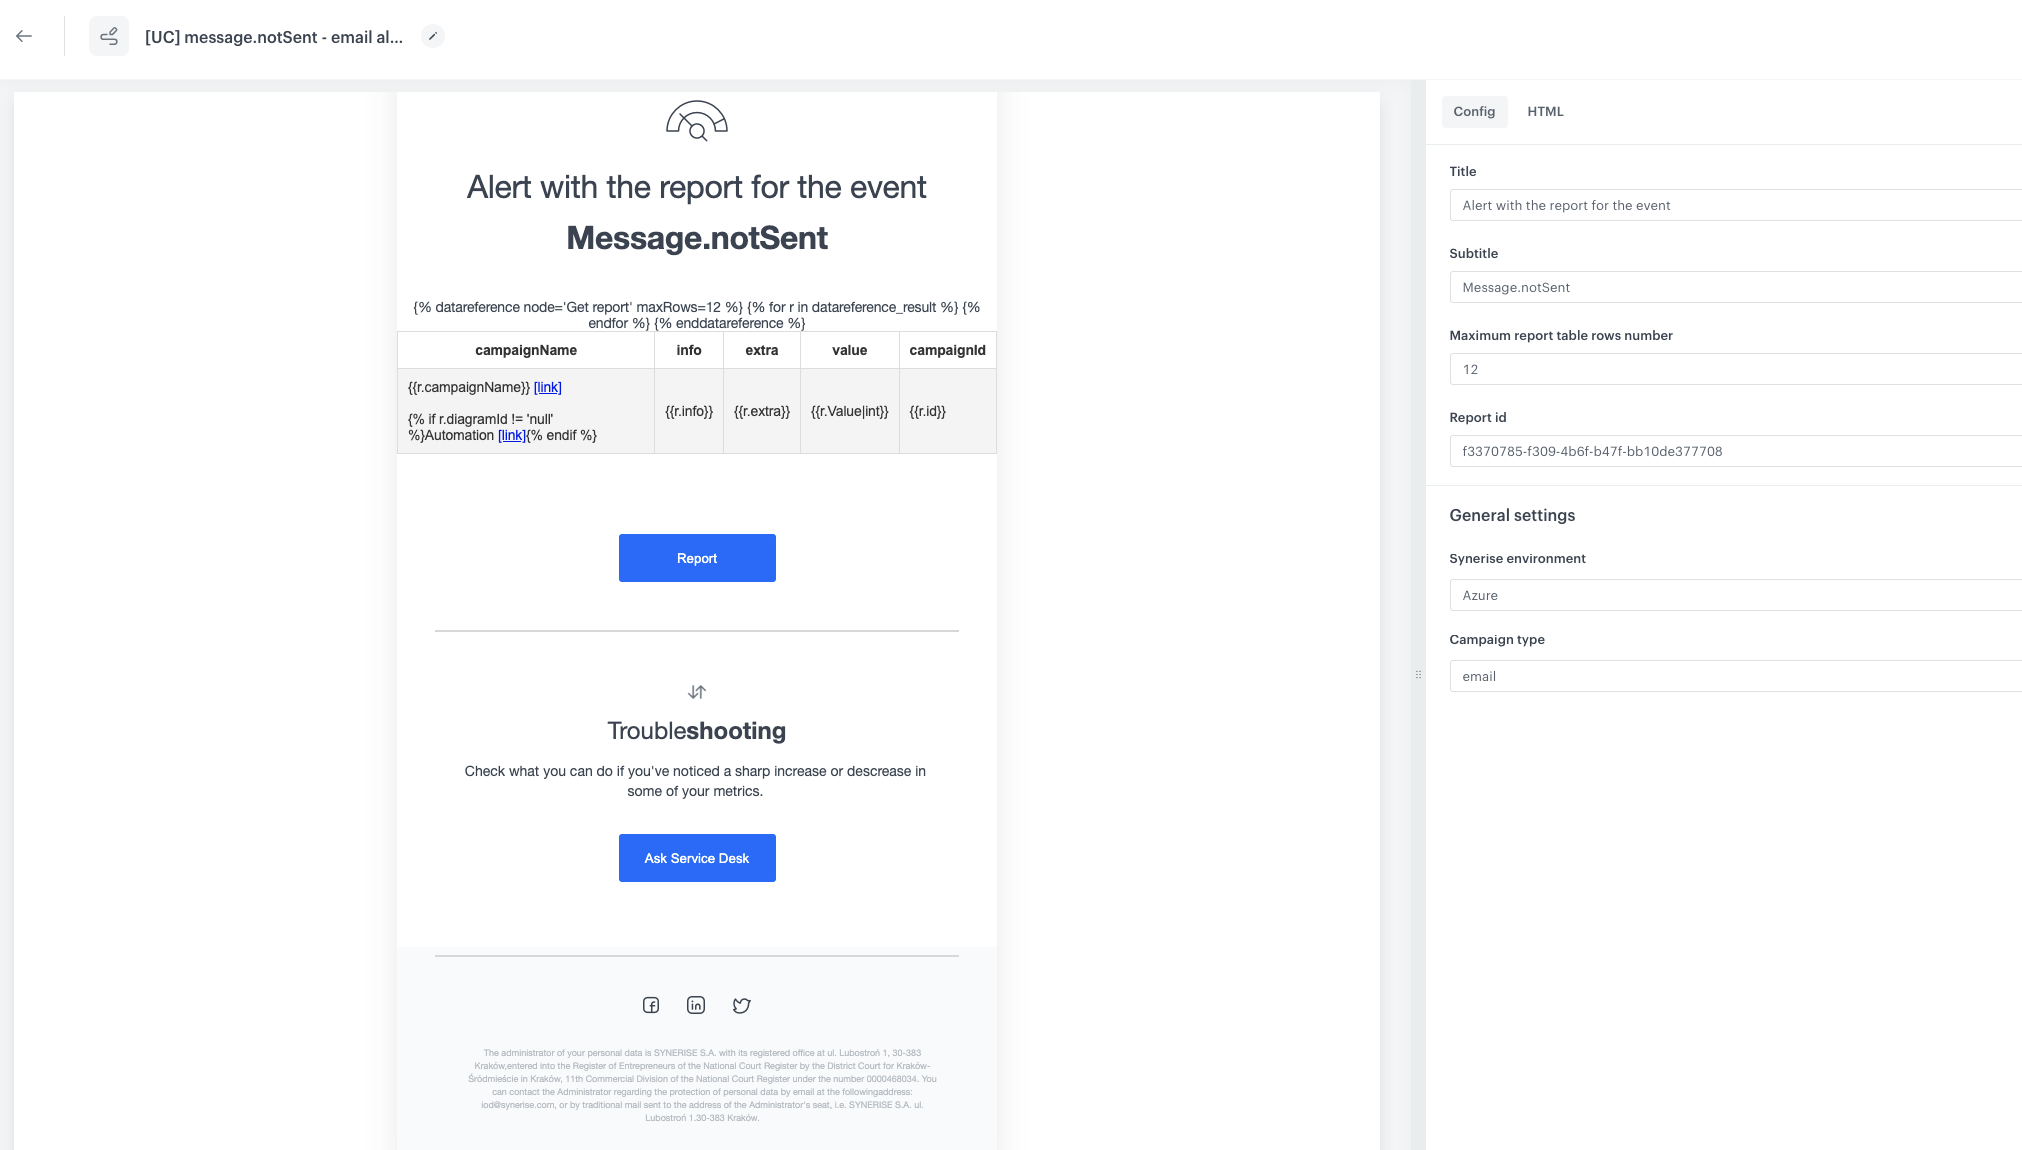
{#CONFIG#} {% set mentions = ['abc@synerise.com','xyz@synerise.com']%} {# you can leave array empty []#} {% set title = "Message.notSent alert" %} {% set reportId = 'f3370785-f309-4b6f-b47f-bb10de377708' %} {% set env = 'microsoft-eu' %} {# microsoft-eu, microsoft-usa, google #} {% set campaignType = 'email' %} {# email, sms, mobile-push, webpush #} {#ENDCONFIG#} {% if env == 'microsoft-usa' %} {% set baseUrl = 'https://app.azu.synerise.com' %} {% elif env == 'google' %} {% set baseUrl = 'https://app.geb.synerise.com %} {% else %} {% set baseUrl = 'https://app.synerise.com' %} {% endif %} { "$schema": "http://adaptivecards.io/schemas/adaptive-card.json", "type": "AdaptiveCard", "version": "1.4", "body": [ { "type": "TextBlock", "text": "{% for mention in mentions %}&lt;at&gt;{{mention}}&lt;/at&gt;{% if not loop.last %}, {% endif %}{% endfor %}", "size": "small" }, { "type": "TextBlock", "size": "Medium", "weight": "Bolder", "text": "{{title}}" }, { "type": "Table", "columns": [ { "width": 1 }, { "width": 1 }, { "width": 1 }, { "width": 1 }, { "width": 1 } ], "rows": {% set dataRow=[] %} {% set titles=['campaignName', 'info', 'extra', 'value', 'campaignId'] %} {% set cells = [] %} {% for t in titles %} {% do cells.append( { "type": "TableCell", "items": [ { "type": "TextBlock", "text": t, "wrap": true } ] } ) %} {% endfor %} {% do dataRow.append({"type": "TableRow","cells":cells}) %} {% datareference node='Get report' maxRows=12 %} {% set cells=[] %} {% for r in datareference_result %} {% set cells=[ { "type": "TableCell", "items": [ { "type": "TextBlock", "text": r.campaignName +' [[link]]('+baseUrl+'/campaigns/'+campaignType+'/preview/'+r.id+')', "wrap": true } , { "type": "TextBlock", "text": 'Automation [[link]]('+baseUrl+'/automations/workflows/automation-diagram/'+r.diagramId+')' if r.diagramId is not string_containing 'null' else '', "wrap": true } ] }, { "type": "TableCell", "items": [ { "type": "TextBlock", "text": r.info, "wrap": true } ] }, { "type": "TableCell", "items": [ { "type": "TextBlock", "text": r.extra, "wrap": true } ] }, { "type": "TableCell", "items": [ { "type": "TextBlock", "text": r.Value|int, "wrap": true } ] }, { "type": "TableCell", "items": [ { "type": "TextBlock", "text": r.id, "wrap": true } ] } ]%} {% do dataRow.append({"type": "TableRow","cells":cells}) %} {% endfor %} {% enddatareference %} {{dataRow|tojson}} } ], "actions": [ { "type": "Action.OpenUrl", "title": "Raport", "url": "{{baseUrl}}/analytics/reports/{{reportId}}" } ], "bleed": true, "msteams": { "width": "Full", "entities": [ {% for mention in mentions %} { "type": "mention", "text": "&lt;at&gt;{{mention}}&lt;/at&gt;", "mentioned": { "name": "{{mention}}", "id": "{{mention}}" } } {% if not loop.last %} , {% endif %} {% endfor %} ] } }</code></pre></div></details>


<div class="admonition admonition-important"><div class="admonition-icon"><svg xmlns="http://www.w3.org/2000/svg" fill="none" viewBox="0 0 24 24" stroke="currentColor" stroke-width="2.5"><path stroke-linecap="round" stroke-linejoin="round" d="M12 8v4m0 4h.01M21 12a9 9 0 11-18 0 9 9 0 0118 0z" /></svg></div><div class="admonition-body"><div class="admonition-content">

Remember, that the rest of the code and the adaptive card are designed to match the parameters of the event described earlier. The results of this report will reflect those parameters. If you want to show fewer, additional, or different parameters, you will need to modify the rest of the code accordingly.

</div></div></div>


3. Confirm by clicking **Apply**.

<figure><img src="/api/docs/image/54176ad07f146575310749eba44b7c2f42c1b327/use-cases/all-cases/_gfx/teams-workflow3.png" class="full" alt="Configuration of the workflow that sends alert messages based on the metric results to the Teams channel"><figcaption>Configuration of the workflow that sends alert messages based on the metric results to the Teams channel</figcaption></figure>


## Add the finishing node
---

5. Add the **End** node after **Send channel message** and to the **not matched** path.
6. In the upper right corner, click **Save & Run**.

<figure>
    <img src="/api/docs/image/54176ad07f146575310749eba44b7c2f42c1b327/use-cases/all-cases/_gfx/teams2-workflow.png" alt="Data Reference Workflow"  class="full">
    <figcaption>Workflow configuration</figcaption>
    </figure> 

## Check the use case set up on the Synerise Demo workspace
---

Directly in our Synerise Demo workspace, you can check the configuration of:
- [metric](https://app.synerise.com/analytics/metrics/901e1213-9c04-4f31-b1d1-226531b95a46) 
- [report](https://app.synerise.com/analytics/reports/f3370785-f309-4b6f-b47f-bb10de377708)
- [workflow sending email alert](https://app.synerise.com/automations/workflows/automation-diagram/828b4892-e681-4d95-b250-e4f127e11565)
- [workflow sending teams alert](https://app.synerise.com/automations/workflows/automation-diagram/44b674e7-4d81-4af6-87e2-31640e50877a)

If you’re our partner or client, you already have automatic access to the **Synerise Demo workspace (1590)**, where you can explore all the configured elements of this use case and copy them to your workspace.  

If you’re not a partner or client yet, we encourage you to fill out the contact [form](https://demo.synerise.com/request) to schedule a meeting with our representatives. They’ll be happy to show you how our demo works and discuss how you can apply this use case in your business. 

## Read more
---
- [Automation Hub](/docs/automation)
- [Metrics](/docs/analytics/metrics)
- [Reports](/docs/analytics/reports)


