
Creating a solid loyalty program is key to building lasting relationships with customers. Among the countless strategies to achieve this, the use of discount codes stands out as a powerful tool. Implementing a referral program based on discount codes opens up many opportunities to attract new users, while encouraging current users to engage more deeply. These codes not only encourage customers to make additional purchases, but also serve as a channel to expand our customer base through word-of-mouth referrals.   

What's more, this referral system isn't just advantageous for the invitee; it's a win-win scenario that rewards both the inviter and the invitee when the shopping voucher is utilized.

In this use case, the loyalty program works by giving customers a discount code that they can share with their friends after they've made a purchase. If a friend then uses this code to buy something, the original customer gets a reward, usually in the form of another discount. These discount codes are shared through email. This approach keeps customers engaged and encourages them to spread the word, benefiting both the business and its customers.

## Prerequisites 
---
- [Create an email account](/docs/campaign/e-mail/configuring-email-account) which you will use to send emails.
- Implement transaction events using [SDK](/developers/web/transactions-sdk) or [API](https://developers.synerise.com/DataManagement/DataManagement.html#operation/CreateATransaction). Additionally, implement a custom parameter for the **transaction.charge** event, which will contain the coupon code that was used in the transaction. In our case, we will use the `discountCode` parameter. 
- Create two different [voucher pools](/docs/assets/code-pools):
    - One pool is for voucher codes that customers can share with their friends.  
    - The second pool contains rewards for customers after someone they shared a voucher code with makes a purchase using the code from the first pool.

   <div class="admonition admonition-tip"><div class="admonition-icon"><svg xmlns="http://www.w3.org/2000/svg" fill="none" viewBox="0 0 24 24" stroke="currentColor" stroke-width="2.5"><path stroke-linecap="round" stroke-linejoin="round" d="M9.663 17h4.673M12 3v1m6.364 1.636l-.707.707M21 12h-1M4 12H3m3.343-5.657l-.707-.707m2.828 9.9a5 5 0 117.072 0l-.548.547A3.374 3.374 0 0014 18.469V19a2 2 0 11-4 0v-.531c0-.895-.356-1.754-.988-2.386l-.548-.547z" /></svg></div><div class="admonition-body"><div class="admonition-content">

   To easily identify discount codes in the next process steps, you can start each voucher with the same set of letters. For example, use prefixes like `SPR`_F45670, `SPR`_J20948.

   </div></div></div>

- Meet [all requirements](https://developers.synerise.com/LoyaltyandEngagement/LoyaltyandEngagement.html#operation/RedeemAVoucher) necessary to redeem a voucher
- Make two types of email templates:
    - One for customers who have made a purchase and will get a voucher code to share with friends.
    - Another for customers whose shared voucher code was used by a friend, so they get a new voucher code for themselves.

   <div class="admonition admonition-note"><div class="admonition-icon"><svg xmlns="http://www.w3.org/2000/svg" fill="none" viewBox="0 0 24 24" stroke="currentColor" stroke-width="2.5"><path stroke-linecap="round" stroke-linejoin="round" d="M13 16h-1v-4h-1m1-4h.01M21 12a9 9 0 11-18 0 9 9 0 0118 0z" /></svg></div><div class="admonition-body"><div class="admonition-content">

   We recommend using Jinjava in templates to retrieve the voucher code for the customer. To get the same voucher code, use this Jinjava code:
   
  <pre><code class="language-jinja">{% voucher assign=false %} pool-uuid {% endvoucher %}</code></pre>


   </div></div></div>


## Process
---
1. [Create a workflow](/use-cases/voucher-codes-share#create-first-workflow) that sends a discount code to customers who have made a transaction to share the code with another person.
2. [Create a workflow](/use-cases/voucher-codes-share#create-second-workflow) that checks the use of the code by the recipient of the code.
3. [Create a workflow](/use-cases/voucher-codes-share#create-third-workflow) that will reward a customer from the first workflow who gifted someone with the code.

## Create first workflow
---
This workflow is used to send a discount code to customers who have made a transaction to share the code with another person.

1. Go to **Automation Hub > Workflows > New workflow**.
2. Enter the name of the workflow. 

### Define the Profile Event trigger node
---
1. As the first node of the workflow, add **Profile Event**. In the node settings:
    1. Click **Choose event** and from the dropdown list, select the [`transaction.charge` event](/docs/assets/events/event-reference/items#transactioncharge).
    2. Confirm by clicking **Apply**. 
    <figure>
    <img src="/api/docs/image/54176ad07f146575310749eba44b7c2f42c1b327/use-cases/all-cases/_gfx/profile-event-transaction.charge.png" alt="Profile Event trigger configuration"  class="full">
    <figcaption>Profile Event trigger configuration</figcaption>
    </figure> 

### Configure the Send email node 
---
In this part of the process, send email communication to customers who have made a transaction. Following the allocation of a voucher to a customer, a [**voucherCode.assigned**](/docs/assets/events/event-reference/loyalty#vouchercodeassigned) event will be recorded in their customer profile.

1. Add the **Send Email** node and open its settings. 
2. In the **Sender details** section, choose the email account from which the email is sent.
3. In the **Content** section, select the template that you prepared as a part of the prerequisites. 
4. **Optional**: In the **UTM & URL parameters** section, define the UTM parameters added to the links included in the email. 
5. **Optional**: In the **Additional parameters** section, assign [additional parameters](/docs/campaign/e-mail/creating-email-campaigns#adding-custom-parameters) to the events generated by interactions with the message.
6. Confirm by clicking **Apply**. 

### Configure the Event filter node
---
In this step, we verify if the **voucherCode.assigned** event has been generated for a customer.

1. Add the **Event Filter** node. In the configuration of the node:  
    1. Enter the title of the node, (for example, we use `voucherCheck`).
    1. Check event **for period of time**.
    2. Define the time range to **5 Minute**.
    3. From the **Choose event** dropdown list, select the **voucherCode.assigned** event.
    4. As the event parameter, select **poolName**.
    5. From the **Choose operator** dropdown list, select **Equal**.
    6. As the value, enter the name of the voucher pool you are referring to. 
    7. Confirm by clicking **Apply**. 
    <figure>
    <img src="/api/docs/image/54176ad07f146575310749eba44b7c2f42c1b327/use-cases/all-cases/_gfx/event-filter-voucherCode.assigned.png" alt="Event filter node configuration"  class="full">
    <figcaption>Event filter node configuration</figcaption>
    </figure> 
2. For the **not matched** path, select the **End** node. 
3. For the matched path, select the **Update profile** node. 

### Add the Update Profile node
---
In this step, assign an attribute to customer's profile with the value of the voucher code. In our case, we use **my_refferal_code** attribute. 

1. For the **Matched** path, add the **Update Profile** node.
2. Click dropdown list and create **my_refferal_code** attribute.
3. From the next dropdown list, choose **Change** operator. 
4. In the **Value** section, insert the following jinjava which will display as the **voucherCode**:  

   <pre><code class="language-jinja">`
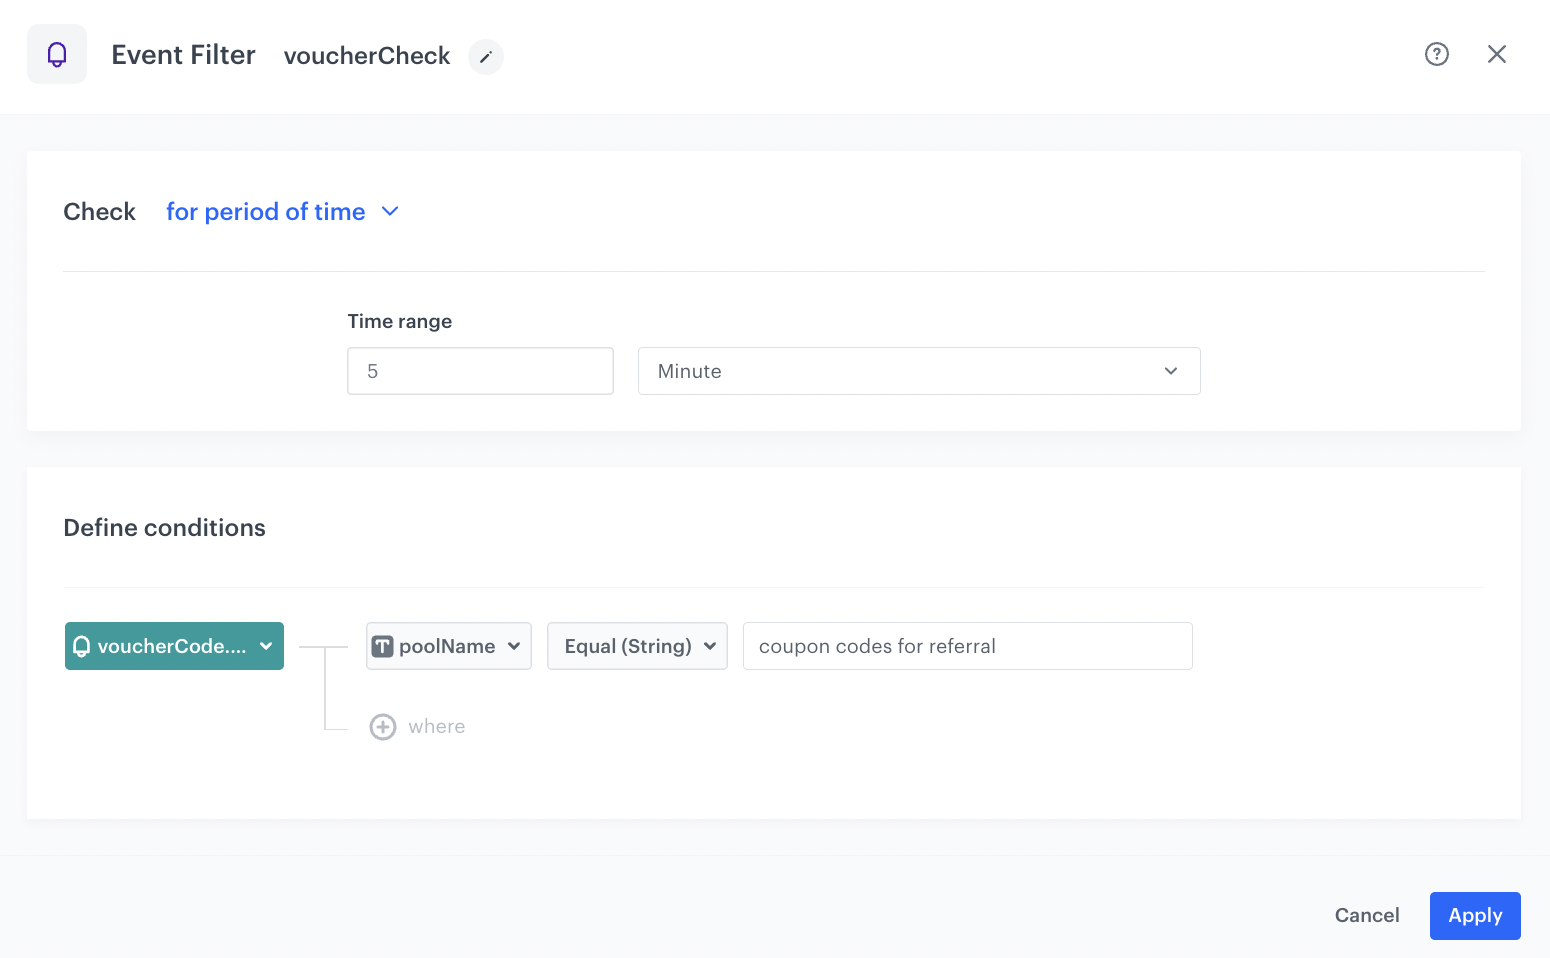
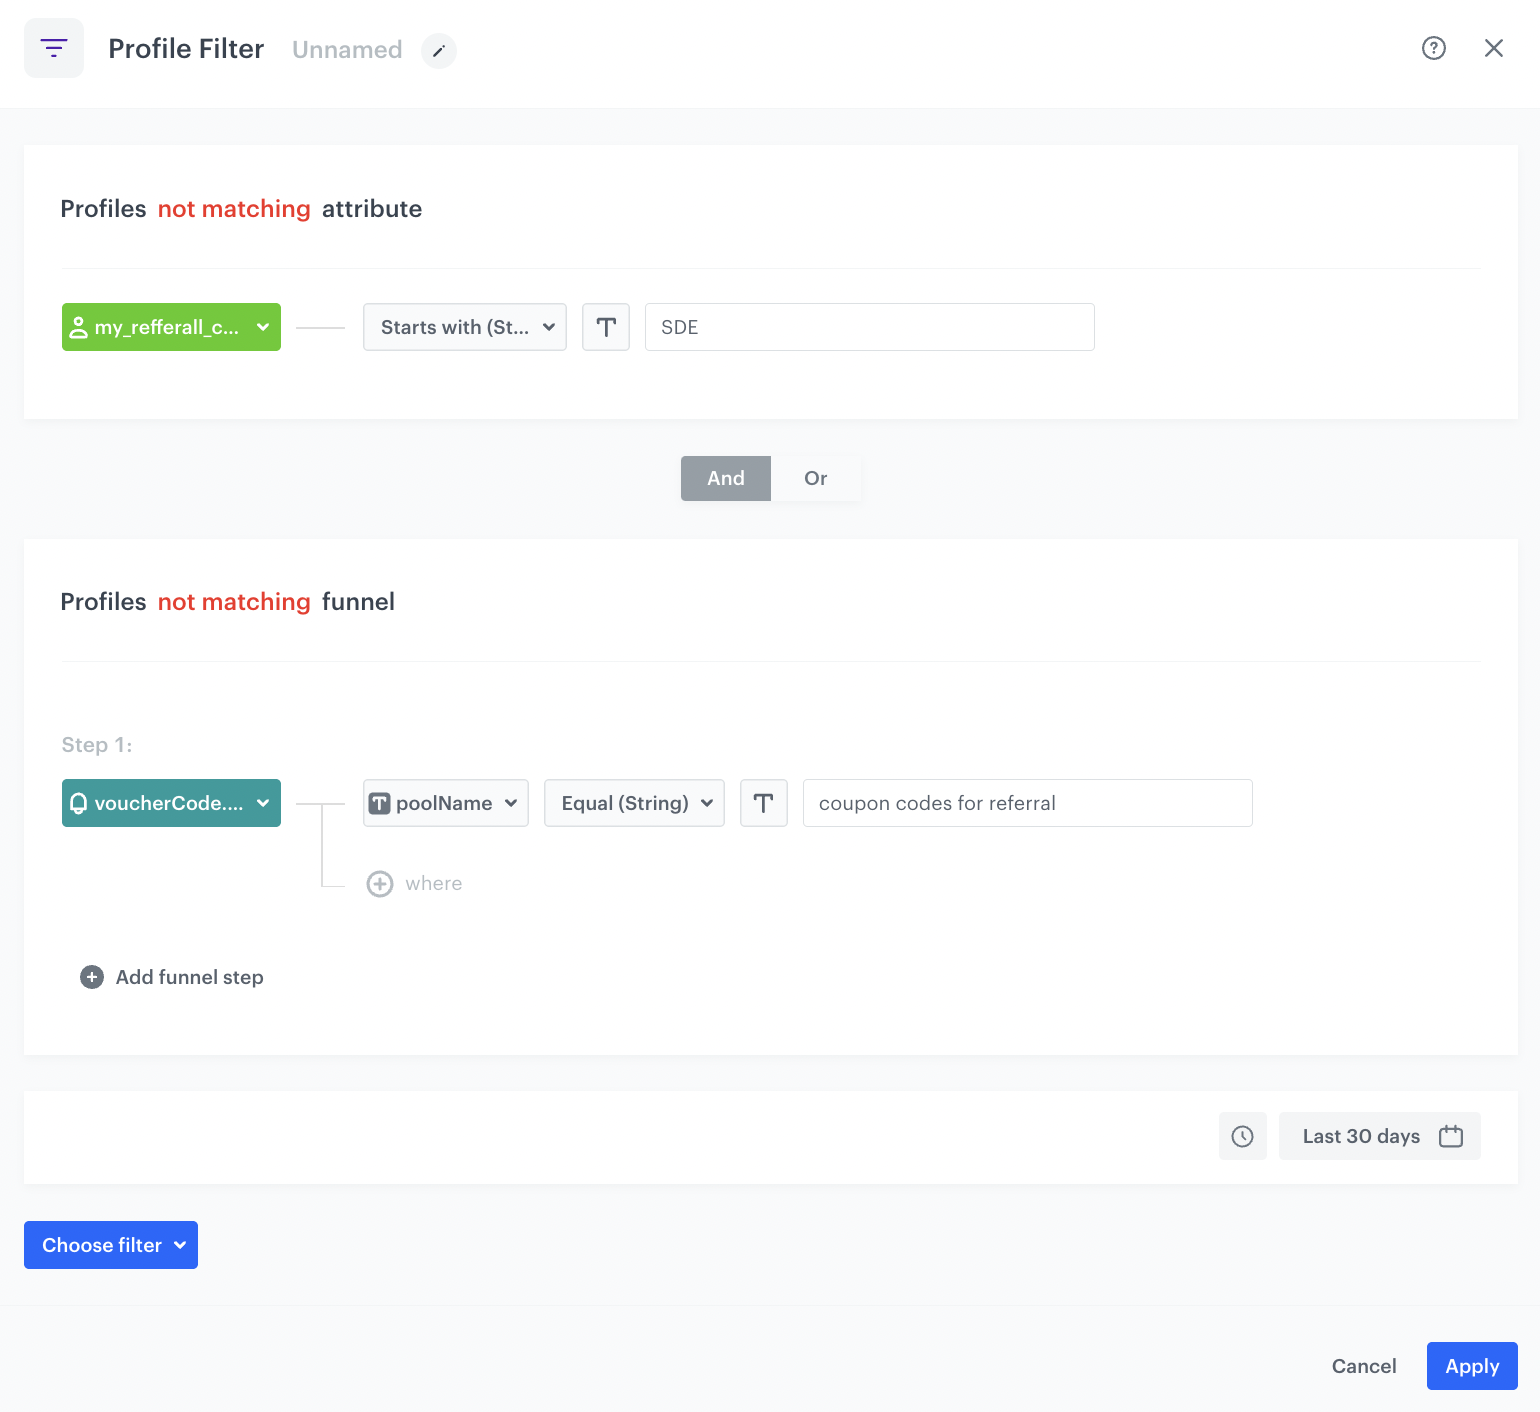
{{ automationPathSteps['voucherCheck'].event.params.voucherCode }}`</code></pre>

   Note that `voucherCheck` is the name of the **Event Filter** trigger added manually.
    <figure>
    <img src="/api/docs/image/54176ad07f146575310749eba44b7c2f42c1b327/use-cases/all-cases/_gfx/update-profile-vouchercode_2.png" alt="Update Profile node configuration"  class="full">
    <figcaption>Update Profile node configuration</figcaption>
    </figure> 
3. To save the changes, click **Apply**.
4. Add the **End** node.
    <figure>
    <img src="/api/docs/image/54176ad07f146575310749eba44b7c2f42c1b327/use-cases/all-cases/_gfx/vouchercodes-for-refferal-workflow.png" alt="Final view of the workflow configuration"  class="full">
    <figcaption>Final view of the workflow configuration</figcaption>
    </figure> 

## Create second workflow
---
This workflow will be used to redeem discount code.

1. Go to **Automation Hub > Workflows > New workflow**.
2. Enter the name of the workflow. 

### Define the Profile Event trigger node
---
1. As the first node of the workflow, add **Profile Event**. In the node settings:
    1. Create name for this node, as it will be used later in the workflow.
    2. Click **Choose event** and from the dropdown list, select the `transaction.charge` event.
    3. Click **+where** and from the dropdown list, select **discountCode** parameter.
    4. From the **Choose operator** dropdown list, select **Starts with (String)**.
    5. In the **Value** section insert the prefix that is used in all codes from the first voucher pool you created as a part of prerequisites. In our case it's `SPR` prefix.
    3. Confirm by clicking **Apply**. 
    <figure>
    <img src="/api/docs/image/54176ad07f146575310749eba44b7c2f42c1b327/use-cases/all-cases/_gfx/transaction-with-discount-code-check.png" alt="Profile Event trigger configuration"  class="full">
    <figcaption>Profile Event trigger configuration</figcaption>
    </figure> 

### Configure the Profile filter node
---
This Profile filter creates a security measure so that this code cannot be used by people who received it through the [first workflow](#create-first-workflow). 

1. Add the **Profile Filter** node. In the configuration of the node:  
1. From the **Choose filter** dropdown list, select the **my_refferal_code** attribute.
2. From the **Choose operator** dropdown list select **Starts with (String)**.
3. In the **Value** section, insert the prefix that is used in all codes from the first voucher pool you created as a part of prerequisites. In our case it's `SPR` prefix.
4. Modify the **Profile matching** attribute to **Profile not matching**.
5. From the **Choose filter** dropdown list, select the **voucherCode.assigned** event.
8. Click **+where** and from the dropdown list, select **poolName** parameter.
9. From the **Choose operator** dropdown list, select **Equal (String))**.
5. In the **Value** section insert the prefix that is used in all codes from the first voucher pool you created as a part of prerequisites. In our case it's `SPR` prefix. 
6. Modify the **Profile matching** attribute to **Profile not matching**.
7. Define the time period for which the event will be calculated.
8. Use the **AND** logical operator to connect set rules.
7. Confirm by clicking **Apply**. 
    <figure>
    <img src="/api/docs/image/54176ad07f146575310749eba44b7c2f42c1b327/use-cases/all-cases/_gfx/profile-filter-conditions-check.png" alt="Event filter node configuration"  class="full">
    <figcaption>Event filter node configuration</figcaption>
    </figure> 
2. For the **not matched** path, select the **End** node. 
3. For the matched path, select the **Outgoing integration** node. 

## Configure the Outgoing Integration node 
---
In this step, we will redeem the used coupon during the transaction using [Synerise API reference](https://developers.synerise.com/LoyaltyandEngagement/LoyaltyandEngagement.html#operation/RedeemAVoucher).

1. Add **Outgoing Integration** node.
2. In **Definition** section, choose the **Custom** tab.
2. Choose Webhook connection type. 
3. Select a connection.  
    If you haven't created any connection yet, see instructions in ["Set up a connection" section](/docs/automation/actions/webhook-node#set-up-a-connection).
3. In the **Webhook name**, enter your preferred name. The value of this field will be stored as a Name parameter in the response event. It makes it easier to identify the event and is useful for creating analysis. In our use case, we will use the following name `voucherRedeemed`.
4. Define the **Webhook event name**. In our use case, we use the `voucherCode.redeemed` event.

   <div class="admonition admonition-note"><div class="admonition-icon"><svg xmlns="http://www.w3.org/2000/svg" fill="none" viewBox="0 0 24 24" stroke="currentColor" stroke-width="2.5"><path stroke-linecap="round" stroke-linejoin="round" d="M13 16h-1v-4h-1m1-4h.01M21 12a9 9 0 11-18 0 9 9 0 0118 0z" /></svg></div><div class="admonition-body"><div class="admonition-content">

   This is the event key. While naming it, follow the pattern used for the default events in the application such as page.visit, product.buy and so on.

   </div></div></div>

5. In the **URL** section, choose the **POST** method.
2. Enter the following URL: `https://api.synerise.com/v4/vouchers/item/redeem`
5. In the **Key** field, enter `Accept` and in the **Value** field, enter `application/json`
6. Click **Add header**.
7. Add **Accept** with `application/json`
7. In the **Key** field, enter `Api-Version` and in the **Value** field, enter `4.4`
4. In the **Body** section, enter the following Jinjava:
    
   <pre><code class="language-json">
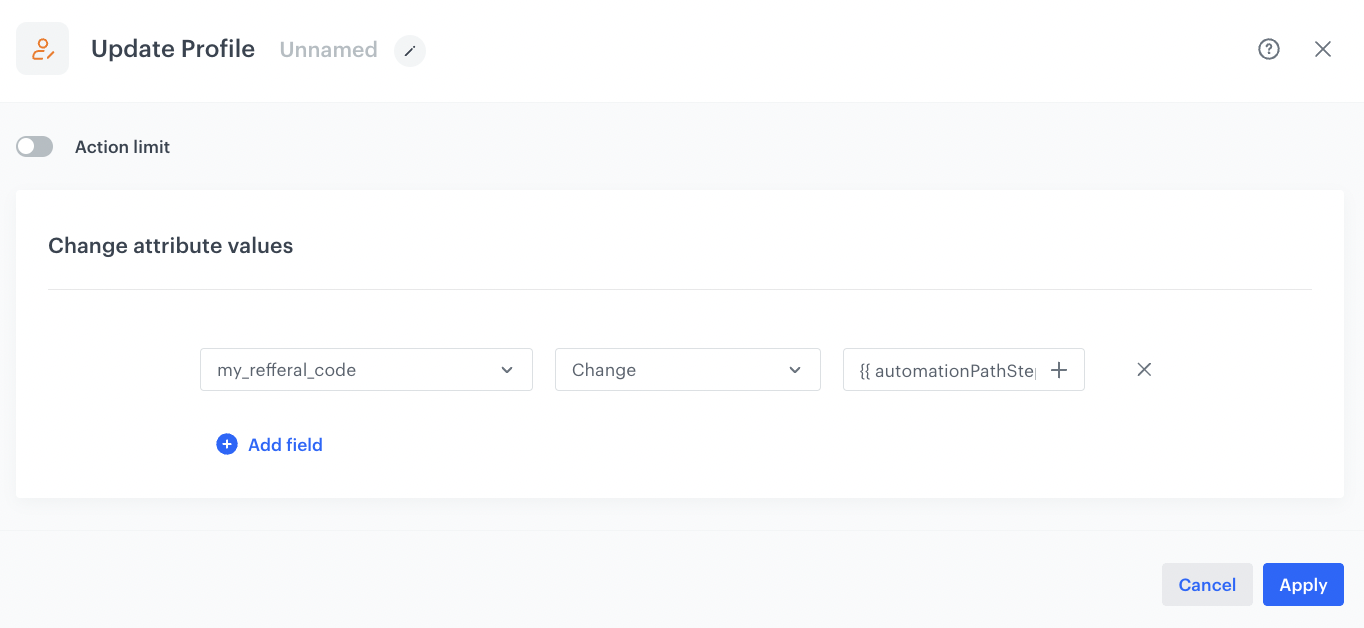
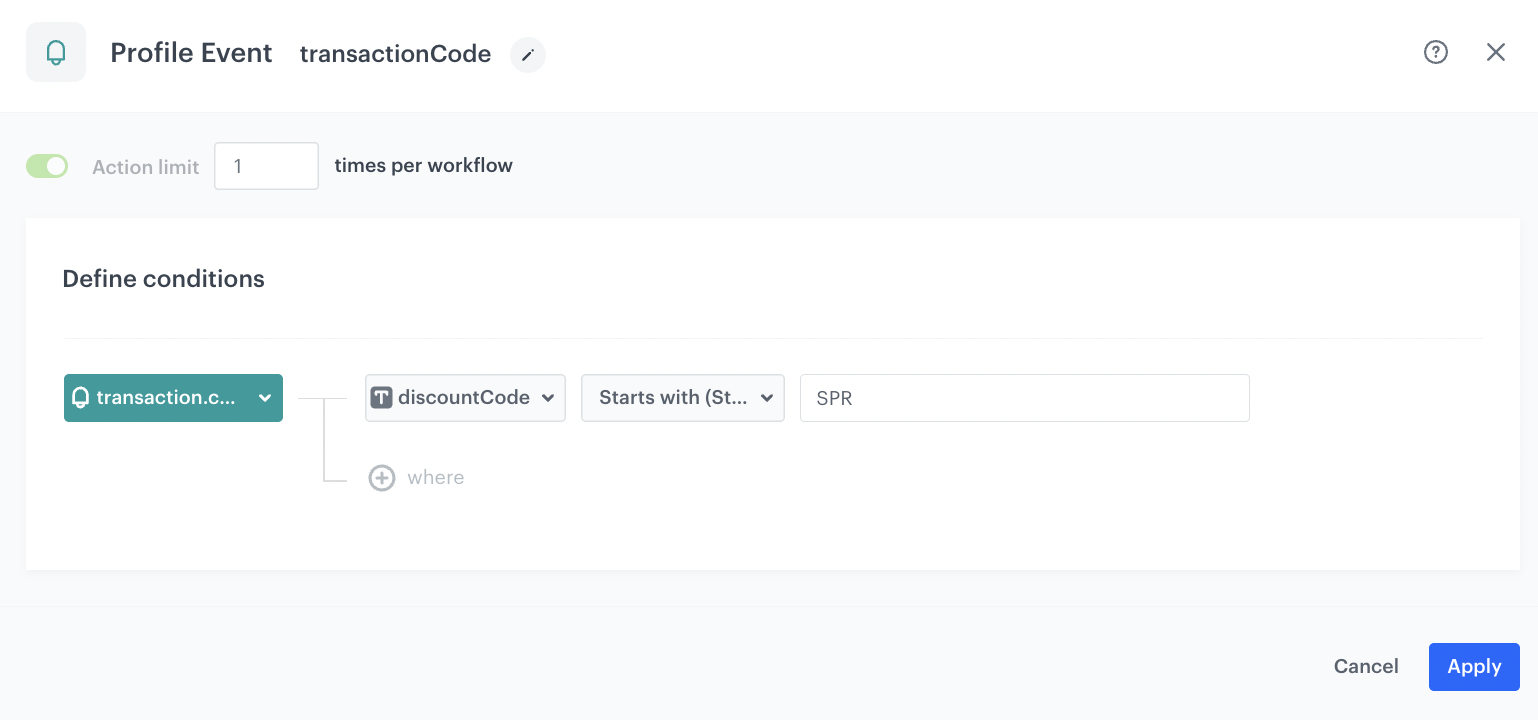
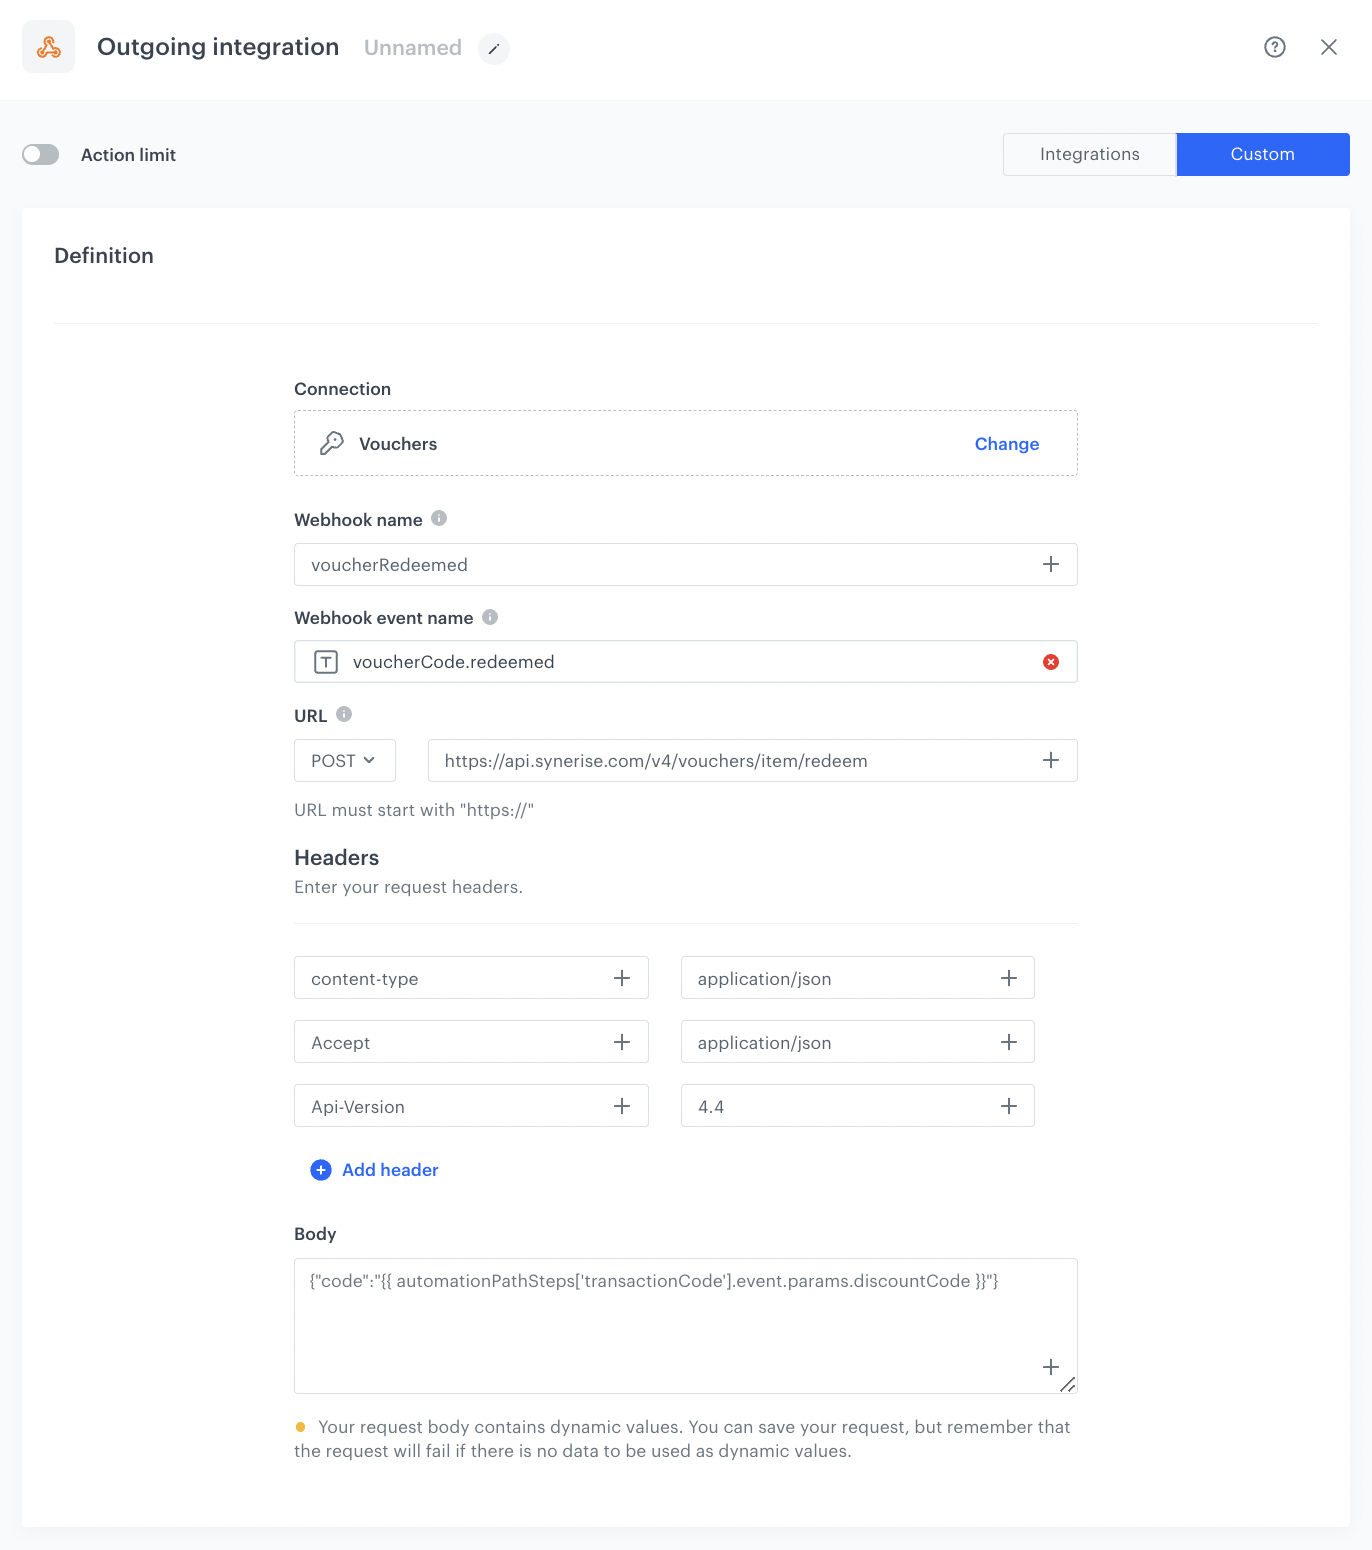
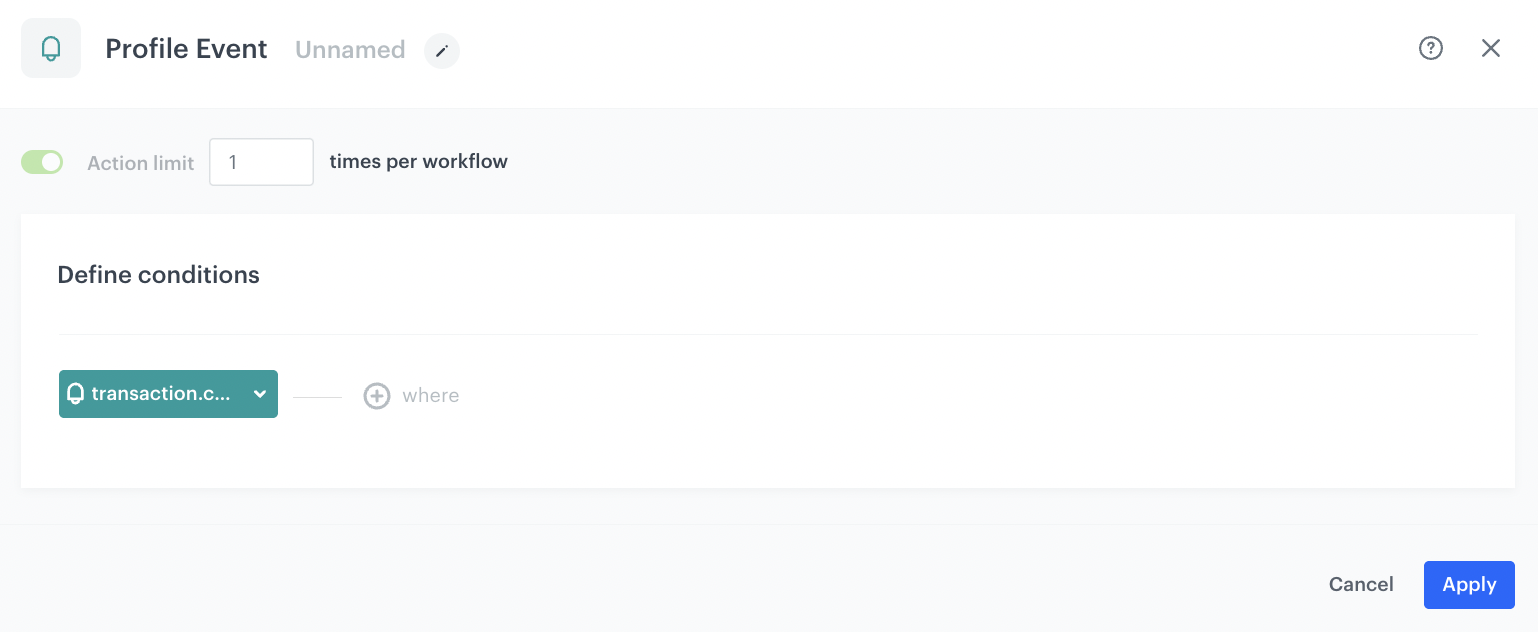
{"code":"{{ automationPathSteps['transactionCode'].event.params.discountCode }}"}</code></pre>
  
    Note that `transactionCode` is the name of the **Profile Event** trigger added manually.  
    In this Jinjava we reference to code that has been used. Because this code was assigned in the first workflow to the user who shares it, the voucherCode.redeemed event (which is the result of using this API request) is assigned to the profile of the person who shares the code. Such configuration is crucial for the [third workflow](#create-third-workflow) which sends out reward discount code which is based on the `voucherCode.redeemed` event. 
3. Confirm by clicking **Apply**.
    <figure>
    <img src="/api/docs/image/54176ad07f146575310749eba44b7c2f42c1b327/use-cases/all-cases/_gfx/outgoing-integration-workflow2_3.png" alt="Outgoing integration node configuration"  class="full">
    <figcaption>Outgoing integration node configuration</figcaption>
    </figure> 
4. Add the finishing **End** node.
    <figure>
    <img src="/api/docs/image/54176ad07f146575310749eba44b7c2f42c1b327/use-cases/all-cases/_gfx/vouchercodes-redeem-workflow.png" alt="Final view of the workflow configuration"  class="full">
    <figcaption>Final view of the workflow configuration</figcaption>
    </figure> 

## Create third workflow
---

This workflow will send a reward to a customer from the first workflow after the code they shared with someone has been used.

### Define the Profile Event trigger node
---
The worflow is triggered by the `voucherCode.redeemed` event which was generated in the previous workflow.

1. As the first node of the workflow, add **Profile Event**. In the node settings:
    1. Click **Choose event** and from the dropdown list, select the `voucherCode.redeemed` event.
    2. Click **+ where** and from the dropdown list, select **poolName**.
    3. From the **Choose operator** dropdown list select **Equal (String)**.
    4. As the value, enter the name of the voucher pool you are referring to.
    5. Confirm by clicking **Apply**. 
    <figure>
    <img src="/api/docs/image/54176ad07f146575310749eba44b7c2f42c1b327/use-cases/all-cases/_gfx/profile.event-workflow3.png" alt="Profile Event trigger configuration"  class="full">
    <figcaption>Profile Event trigger configuration</figcaption>
    </figure> 

### Configure the Send email node 
---
In this part of the process, send email communication to customers who previously shared the code. They'll receive a reward in the form of a voucher code for their own use.

1. Add the **Send Email** node and open its settings. 
2. In the **Sender details** section, choose the email account from which the email is sent.
3. In the **Content** section, select the template that you prepared as a part of the prerequisites. 
4. **Optional**: In the **UTM & URL parameters** section, define the UTM parameters added to the links included in the email. 
5. **Optional**: In the **Additional parameters** section, assign [additional parameters](/docs/campaign/e-mail/creating-email-campaigns#adding-custom-parameters) to the events generated by interactions with the message.
6. Confirm by clicking **Apply**. 
4. Add the **End** node.
    <figure>
    <img src="/api/docs/image/54176ad07f146575310749eba44b7c2f42c1b327/use-cases/all-cases/_gfx/workflow-reward-user1.png" alt="Final view of the workflow configuration"  class="full">
    <figcaption>Final view of the workflow configuration</figcaption>
    </figure> 

## Check the use case set up on the Synerise Demo workspace
---
Check all items (metrics and dynamic content) created in this use case in our Synerise Demo workspace:
- [Workflow 1](https://app.synerise.com/automations/automation-diagram/8b5add66-f831-412b-880a-e687a31e651a)
- [Workflow 2](https://app.synerise.com/automations/automation-diagram/b05c6666-cf7d-49c9-aff4-9efe742e1149)
- [Workflow 3](https://app.synerise.com/automations/automation-diagram/52294202-031a-4a19-ae01-86a91ae456bd)
- [Voucher codes for referral](https://app.synerise.com/assets/vouchers/pools/193bf1b4-3e95-4236-9117-35d161ab62cc/coupons)
- [Voucher codes for those who shared the code](https://app.synerise.com/assets/vouchers/pools/3d914818-46e0-42dd-b703-f07736d73c70/coupons)  

If you’re our partner or client, you already have automatic access to the **Synerise Demo workspace (1590)**, where you can explore all the configured elements of this use case and copy them to your workspace.  

If you’re not a partner or client yet, we encourage you to fill out the contact [form](https://demo.synerise.com/request) to schedule a meeting with our representatives. They’ll be happy to show you how our demo works and discuss how you can apply this use case in your business.


## Read more
---
- [Automation Hub](/docs/automation)
- [API](/developers/api)
- [Email campaigns](/docs/campaign/e-mail)
- [Voucher pools](/docs/assets/code-pools)