
Web push messaging is an effective form of communication that allows businesses to communicate directly with people who visit their website, even when they are not actively using it. Compared to other forms of communication, web push notifications allow you to deliver concise, clickable messages directly to users' devices, making them an ideal channel for delivering product recommendations and driving traffic back to your website.

<figure><img src="/api/docs/image/54176ad07f146575310749eba44b7c2f42c1b327/use-cases/all-cases/_gfx/webpush_with_recommended_cover.png" class="large no-frame" alt="Web Push notification with two action buttons"></figure>

This campaign is targeted at all users and includes additional action buttons that direct them straight to a page to the product card or to a dedicated page with a list of recommendations.

## Prerequisites 
---
- [Configure an item catalog for recommendations](/docs/settings/configuration/ai-engine-configuration/engine-configuration-for-recommendations). Enable personalized recommendations.
- [Import your product feed to AI engine](/docs/settings/configuration/ai-engine-configuration/engine-configuration-for-recommendations).
- [Configure web push notifications](/docs/campaign/Webpush/configuring-web-push)
- Create a workspace [API Key](/docs/settings/tool/api) with the permission - API_CUSTOM_EVENTS_CREATE. 

## Process 
---
In this use case, you will go through the following steps:
1. [Create a personalized recommendation campaign](/use-cases/webpush-with-recommended-products#create-personalized-recommendation-campaign).
2. [Create a webpush template](/use-cases/webpush-with-recommended-products#create-a-web-push-template).
3. [Prepare a workflow](/use-cases/webpush-with-recommended-products#create-workflow) that creates an event with recommended products and sends a web push to customers who receive any recommendation in the campaign.

## Create personalized recommendation campaign
In this part of the process, you will create a personalized recommendation campaign, the ID of which will later be used during [workflow creation](/use-cases/webpush-with-recommended-products#create-workflow).

1. Go to <img src="/api/docs/image/54176ad07f146575310749eba44b7c2f42c1b327/icons/ai-hub-icon.svg" alt="AI Hub icon" class="icon" > **AI Hub > (AI Recommendations) Models > Add recommendation**.
2. Enter the name of the recommendation (it is only visible on the list of recommendations).
3. In the **Type & Items feed** section, click **Define**.
4. From the **Items feed** dropdown list, select a product feed that has a trained model.
5. Select the **Personalized** recommendation type.  
6. Confirm the recommendation type by clicking **Apply**.  
7. In the **Items** section, click **Define**.  
8. Click **Add slot**.  
9. Click the **Unnamed slot** that was created.    
10. Set the minimum and maximum number of products displayed in the frame to 1.
11. Optionally, you can use filters to include specific items in the recommendation frame.
12. Confirm the configuration by clicking **Apply**.  
13. Optionally, you can define the settings in the **Boosting** and **Additional settings** sections.

    
    <div class="admonition admonition-tip"><div class="admonition-icon"><svg xmlns="http://www.w3.org/2000/svg" fill="none" viewBox="0 0 24 24" stroke="currentColor" stroke-width="2.5"><path stroke-linecap="round" stroke-linejoin="round" d="M9.663 17h4.673M12 3v1m6.364 1.636l-.707.707M21 12h-1M4 12H3m3.343-5.657l-.707-.707m2.828 9.9a5 5 0 117.072 0l-.548.547A3.374 3.374 0 0014 18.469V19a2 2 0 11-4 0v-.531c0-.895-.356-1.754-.988-2.386l-.548-.547z" /></svg></div><div class="admonition-body"><div class="admonition-content">

    Learn more about [boosting](/docs/ai-hub/recommendations-v2/creating-recommendation-campaign#define-the-boosting-factors) and [additional settings](/docs/ai-hub/recommendations-v2/creating-recommendation-campaign#additional-settings).

    </div></div></div>
 

14. Click **Save**.

    <figure>
    <img src="/api/docs/image/54176ad07f146575310749eba44b7c2f42c1b327/use-cases/all-cases/_gfx/personalized-inapp.png" alt="AI recommendation configuration" class="full">
    <figcaption> AI recommendation campaign configuration</figcaption>
    </figure>

## Create a web push template 
---

In this part of the process, you will create a web push template with recommended products with two action buttons. The first button links to the product card and the second to the list of recommended products. 

1. Go to <img src="/api/docs/image/54176ad07f146575310749eba44b7c2f42c1b327/icons/experience-hub-icon.svg" alt="Experience Hub icon" class="icon" > **Experience Hub > Web Push > Templates > New template**.
2. Enter the name of the template.
3. In the **Title** field, define the title you want to display in the web push.
4. In the **Message** field, define the copy you want to appear in the web push. In our case it will be an insert with product title:  
 `{{ event.params.title }}`
5. In the **Destination URL** field, define the link you want to redirect your customers by clicking the web push notification. In our case, it will be link to the homepage: `https://demoshop.synerise.com/` (clicking the web push will redirect to homepage, action buttons will redirect to more specific pages).
6. In the **Icon URL** field, define the icon you want to display in the web push.
    1. To get the URL of the icon, go to <img src="/api/docs/image/54176ad07f146575310749eba44b7c2f42c1b327/icons/data-modeling-hub-icon.svg" alt="Data Modeling Hub icon" class="icon"> **Data Modeling Hub > Files**.
    2. Find the icon on the list.
    3. Hover the mouse cursor over the icon on the list.
    4. Click **Copy URL**.
    5. Paste the URL in the **Icon** field.
7. In the **Image URL** field, define the image you want to display in the web push. In our case it will be an insert with product image: `{{ event.params.imageLink }}`
    1. To get the URL of the image, go to <img src="/api/docs/image/54176ad07f146575310749eba44b7c2f42c1b327/icons/data-modeling-hub-icon.svg" alt="Data Modeling Hub icon" class="icon"> **Data Modeling Hub > Files**.
    2. Find the image on the list.
    3. Hover the mouse cursor over the image on the list.
    4. Click **Copy URL**.
    5. Paste the URL in the **Image** field.
8. Select **Action button** and to add two buttons to your web push template by clicking **Add item** twice. In the button's settings: 
    1. The first button link to product card. In the **URL** field, paste the following insert: `{{ event.params.link }}` and in the **Button Label** field, enter the text on the first button.
    2. The second button links to a listing of product recommendations. In **URL** field, paste the link to the listing. In our case, it's `https://demoshop.synerise.com/product-personalized-listing` and in the **Button Label** field, enter the text on the second button.

   
   <div class="admonition admonition-important"><div class="admonition-icon"><svg xmlns="http://www.w3.org/2000/svg" fill="none" viewBox="0 0 24 24" stroke="currentColor" stroke-width="2.5"><path stroke-linecap="round" stroke-linejoin="round" d="M12 8v4m0 4h.01M21 12a9 9 0 11-18 0 9 9 0 0118 0z" /></svg></div><div class="admonition-body"><div class="admonition-content">

   To create a page with a list of recommended products, please refer to the [Creating section recommendations](/docs/ai-hub/recommendations-v2/creating-section-recommendations) article.

   </div></div></div>
 

9. Save the template clicking the button **Save as**, and choose the folder where the template will be saved.
10. Confirm by clicking **Save**.


## Create workflow
---
In this part of the process, create a workflow that will be triggered by the `session.end` event and create an event with the recommended products that you will refer to in the webpush template. If the customer receives any recommended products in the event, then a webpush message will be sent. 

### Define the Profile Event trigger node
At this stage, configure conditions that launch the workflow. As a trigger, we will use the `session.end` event.

1. As the first node of the workflow, add **Profile Event**. In the configuration of the node: 
    1. From **Choose event** dropdown menu, choose `session.end` event.  
2. Confirm by clicking **Apply**.

### Define the Outgoing Integration node 
In the **Outgoing Integration** node, create a webhook that will generate event with recommended products. In our case it is a `webpush.recommendation` event.

1. After the trigger node, add **Outgoing Integration**.
1. Choose the authentication method. In our case, it will be **API key**.
    2. Click **Add connection**, and on the pop-up, enter the name of the connection and from the dropdown list, select the API Key created as a part of prerequisites.
    2. Click **Apply**.
3. In the **Webhook name**, field enter a name for the webhook. In this case `Webpush recommendation`.
4. Select the **POST** method.
3. In the URL of the endpoint, enter `https://api.synerise.com/v4/events/custom`.
5. Leave **content-type** at default: `application/json`. 
6. Click **Add header**.
7. Add **Api-Version** with the value set to `4.4`
8. Enter the request body. For the sheet used in this case, the body is as follows:  
        
   <pre><code class="language-json">{% recommendations3 campaignId=nBzlR4BQtyvD %}
       {% set item = recommended_products3[0] %}
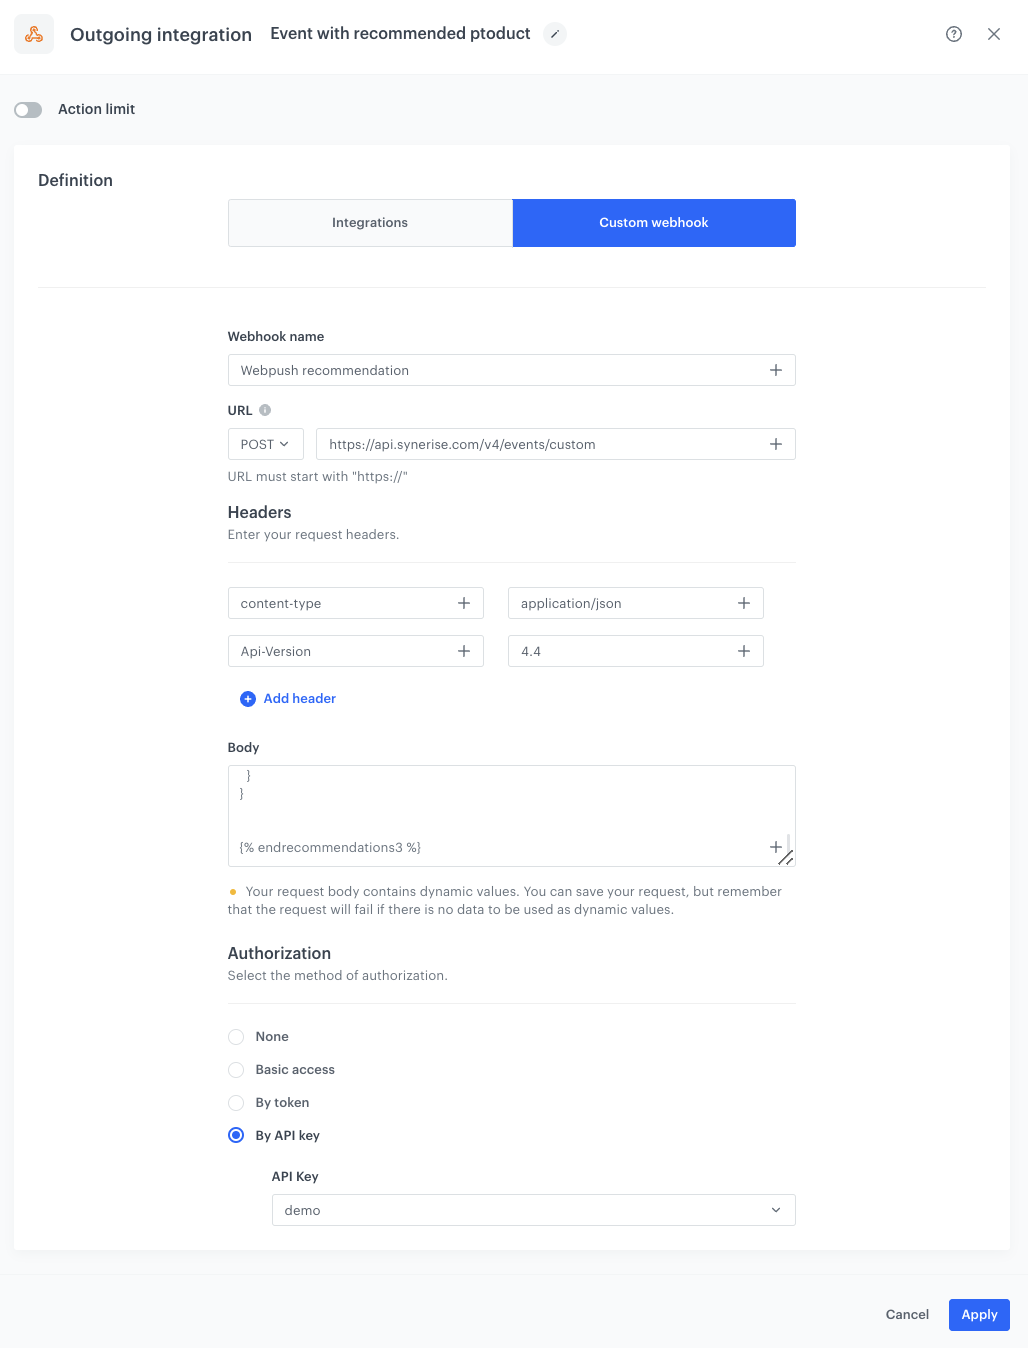
   {
     "label": "Webpush recommendation",
     "client": {
       "id": {{ customer.id }}
     },
     "action": "webpush.recommendation",
     "params": {
       "title": "{{ item.title }}",
       "imageLink": "{{ item.imageLink }}",
       "link": "{{ item.link }}"
     }
   }
   {% endrecommendations3 %}</code></pre>

    Where:
    - The `campaignId=nBzlR4BQtyvD` is the Id of the recommendation campaign you created earlier [in this step](/use-cases/webpush-with-recommended-products#create-personalized-recommendation-campaign).
    - All params contain information about recommended product are used in the [webpush template](/use-cases/webpush-with-recommended-products#create-a-web-push-template). 
6. Click **Apply**.

<figure>
<img src="/api/docs/image/54176ad07f146575310749eba44b7c2f42c1b327/use-cases/all-cases/_gfx/event-with-recommended-product.png" alt="The view of the Outgoing Integration node configuration"  class="large">
<figcaption>Configuration of the Outgoing Integration node</figcaption>
</figure> 

### Configure the Event Filter node
This node will set the workflow to wait for 2 minutes for the creation of a `webpush.recommendation` event for the client. If a customer has not received any recommended products in the event, the workflow ends. However, if a customer receives any recommended products in the event, the workflow goes to the next step, in which a web push will be sent to that customer.

1. As the next node, add **Event Filter**. In the configuration of the node: 
    1. In the **Check** field, from the dropdown menu choose **for period of time**.
    2. Set the time range. In our case, it is 2 minutes.
    3. In the **Define conditions** field, from the **Choose event** dropdown menu, choose `webpush.recommendation` event.
    4. Click the + where button, from the **Choose parameter** dropdown menu, choose **title**.
    5. From the **Choose operator** dropdown, choose **Regular expression**.
    6. As the value, enter `.+`

   <div class="admonition admonition-note"><div class="admonition-icon"><svg xmlns="http://www.w3.org/2000/svg" fill="none" viewBox="0 0 24 24" stroke="currentColor" stroke-width="2.5"><path stroke-linecap="round" stroke-linejoin="round" d="M13 16h-1v-4h-1m1-4h.01M21 12a9 9 0 11-18 0 9 9 0 0118 0z" /></svg></div><div class="admonition-body"><div class="admonition-content">

   The `.+` value means at least 1 character. This excludes events where the item title is empty, meaning there is no recommended item.

   </div></div></div>

2. Confirm by clicking **Apply**.
3. At the **Not Matched** path, add the **End** node .

### Configure Send Web Push node
In this part of the process you will define the Webpush message to be sent.

1. To the **Matched** path, add **Send Web Push**. In the configuration of the node:
    1. In the **Content** section, from the **Webpush template** dropdown, select [the template you created in the previous step](/use-cases/webpush-with-recommended-products#create-a-web-push-template).
    2. In the **Schedule** section, set the **Webpush lifespan (TTL)** according to your business needs.
    3. You can describe campaigns with [additional parameters](/docs/campaign/Webpush/creating-webpush-campaigns#adding-custom-parameters).
2. Click **Apply**.
<figure>
<img src="/api/docs/image/54176ad07f146575310749eba44b7c2f42c1b327/use-cases/all-cases/_gfx/webpush-recommended-products.png" alt="Configuration of the Send Configuration node"  class="large">
<figcaption>Configuration of the Send Configuration node</figcaption>
</figure> 

### Add the finishing node
1. Add the **End** node.
2. In the upper right corner, click **Save & Run**.  
    <figure><img src="/api/docs/image/54176ad07f146575310749eba44b7c2f42c1b327/use-cases/all-cases/_gfx/webpush-workflow.png" class="full" alt="The workflow configuration"><figcaption>The workflow configuration</figcaption></figure>


## Check the use case set up on the Synerise Demo workspace
---
You can check the all the configurations directly in Synerise Demo workspace:
- [Personalized recommendation campaign](https://app.synerise.com/ai-v2/recommendations/nBzlR4BQtyvD)
- [Workflow](https://app.synerise.com/automations/automation-diagram/e02a94cc-dc7c-4df3-9ef3-e03c64d90307)

If you’re our partner or client, you already have automatic access to the **Synerise Demo workspace (1590)**, where you can explore all the configured elements of this use case and copy them to your workspace.  

If you’re not a partner or client yet, we encourage you to fill out the contact [form](https://demo.synerise.com/request) to schedule a meeting with our representatives. They’ll be happy to show you how our demo works and discuss how you can apply this use case in your business. 

## Read more
---

- [Automation Hub](/docs/automation)
- [Jinjava inserts](/developers/inserts)
- [Recommendations](/docs/ai-hub/recommendations-v2)
- [Web push](/docs/campaign/Webpush)