Web push with voucher and promotion for different categories
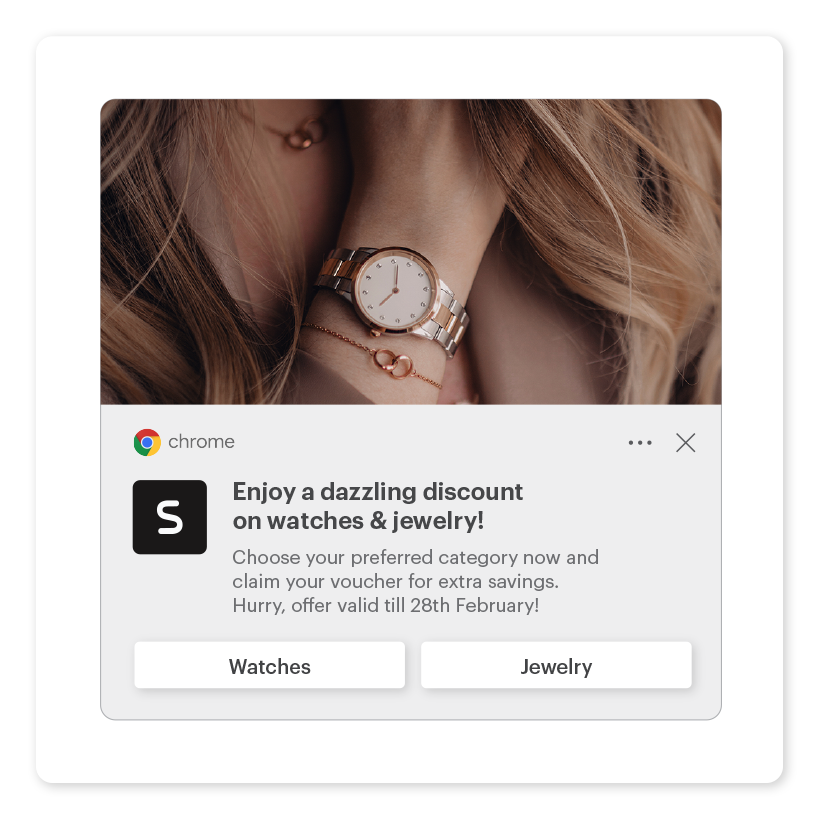
This use case highlights the functionality provided by Synerise through web push notifications - with a keen focus on user engagement and conversion, Synerise introduces a possibility to add two buttons to a web push campaign. These buttons not only act as navigation tools, directing users to the online store, but also serve as triggers, offering a tailored and interactive experience.
This campaign focuses on a targeted approach aimed at users, who have visited specific category, but have not yet made a purchase. The web push notification will highlight special active promotions in the women’s category, which, in our case, will include jewelry and watches. However, this targeting can be customized based on various criteria, such as previously viewed categories (e.g., men/women), where dynamic content placed on the page, which the web push button redirects to, adapts to show relevant promotions based on the visited category. It can also be tailored to other specific user segments, offering flexibility to match our needs.
The campaign described in this specific use case, involves adding two buttons, each associated with a unique listing of products: “watches” and “jewelry” for women. After clicking these buttons, users will go to a specific category page where dynamic content with the unique voucher will be displayed.
What is important you can enrich this use case using personalized recommendations, promotional recommendations or instead add the link to dedicated landing page with personalized promotions.
Prerequisites
- Implement a tracking code.
- Create voucher pools for both promotions.
- Configure web push notifications
- Import your product feed to catalog.
Process
In this use case, you will go through the following steps:
- Create voucher pools.
- Prepare a web push template.
- Create a dynamic content campaign for each promotion.
- Prepare a workflow that will send a web push to customers who visited products of specific categories and didn’t make a purchase within 24 hours after visiting the products.
Create voucher pools
Create a voucher pool in Synerise for the promotion for women watches and jewelry.
-
Go to
 Data Modeling Hub > Voucher Pools > Add pool.
 -
On the pop-up, fill in the following fields:
- In the Pool name field, enter the name of the pool (the name is only visible on the list of the voucher pools).
- Optionally, from the Barcode type dropdown list, select the type of codes which will be imported in the CSV file to Synerise.
Important: The selection in the dropdown has no influence on the further process. It serves only informational purposes for the users. - Optionally, in the Voucher prefix field, enter a number that will be added to the beginning of each code.
- In the Emission start and Emmission end fields, select the dates when the distribution of the codes starts and finishes, respectively.
- Optionally, to limit the size of the pool, fill in the Pool limit field.
- Optionally, in the Description field, enter the internal description of the pool that is visible only on the list of voucher pools.
-
Confirm by clicking Save.
-
Enter into the pool.
-
Using the Import button on the top of the screen, import the vouchers into the pool. Proceed according to this instruction from step 3 (selecting the import method). Result: After importing vouchers, you will be able to see the codes in the pool. You will also see information about whether it is assigned or unassigned to any customer. You can also see the assignment date and the date of use.

Voucher pool -
Repeat all the steps to create voucher pool for the other category.
Do the same with the another voucher pool for watches category.
Prepare a web push template
In this part of the process, you will create a web push template with two action buttons. Each of them will display different product category for which the voucher code can be used.
-
Go to
 Experience Hub > Web Push > Templates.
 -
Click New template.
-
Enter the name of the template.
-
In the Title field, define the title you want to display in the web push.
-
In the Message field, define the main body you want to display in the web push.
-
In the Image URL field, enter the URL of the image you uploaded previously to the Files section in the Data Modeling Hub module. Image requirements are listed at the top of the article.
- To get the URL of the image, go to
 Data Modeling Hub > Files.
 - Find the image on the list.
- Hover the mouse cursor over the image on the list.
- Click Copy URL.
- Paste the URL in the Image field.
- To get the URL of the image, go to
-
If you want the web push to remain visible until the recipient clicks or closes it, switch the Require an action toggle on.
Important: The “requireInteraction” functionality used by this toggle is not supported by some browsers. For more details, go to https://developer.mozilla.org/en-US/docs/Web/API/Notification/requireInteraction#browser_compatibility. -
To configure action buttons for your template, switch the Action Buttons toggle on.
- Click Add item.
- In the Button Label field, enter the text that will appear on the button.
- In the URL field, enter the address to which a customer is redirected after clicking the button.
- To add the second action button, click Add item and follow steps b and c.
Note:In this scenario, we have two buttons labeled “watches” and “jewelry.” Each button corresponds to a specific URL link:
- Clicking the “jewelry” button will redirect to:
https://demoshop.synerise.com/women/jewelry - Clicking the “watches” button will redirect to:
https://demoshop.synerise.com/women/watchesThese links will be employed later in the Dynamic Content (DC) configuration when choosing where to display the DC.
-
For saving the template in a folder of your choice, click Save as button and select the desired folder.
-
Save the template clicking the button Save as, and choose the folder in which template will be saved.
Create a dynamic content campaign
Create a dynamic content campaign where you will display items using a predefined dynamic content template (insert object). This dynamic content will be displayed as a part of the site, only for customers who have clicked the web push.
- Go to
 Experience Hub > Dynamic Content > Create new.
 - Enter the name of the content.
- Choose Insert object type.
Define Audience
-
In the Audience section, select New Audience and click Define conditions.
-
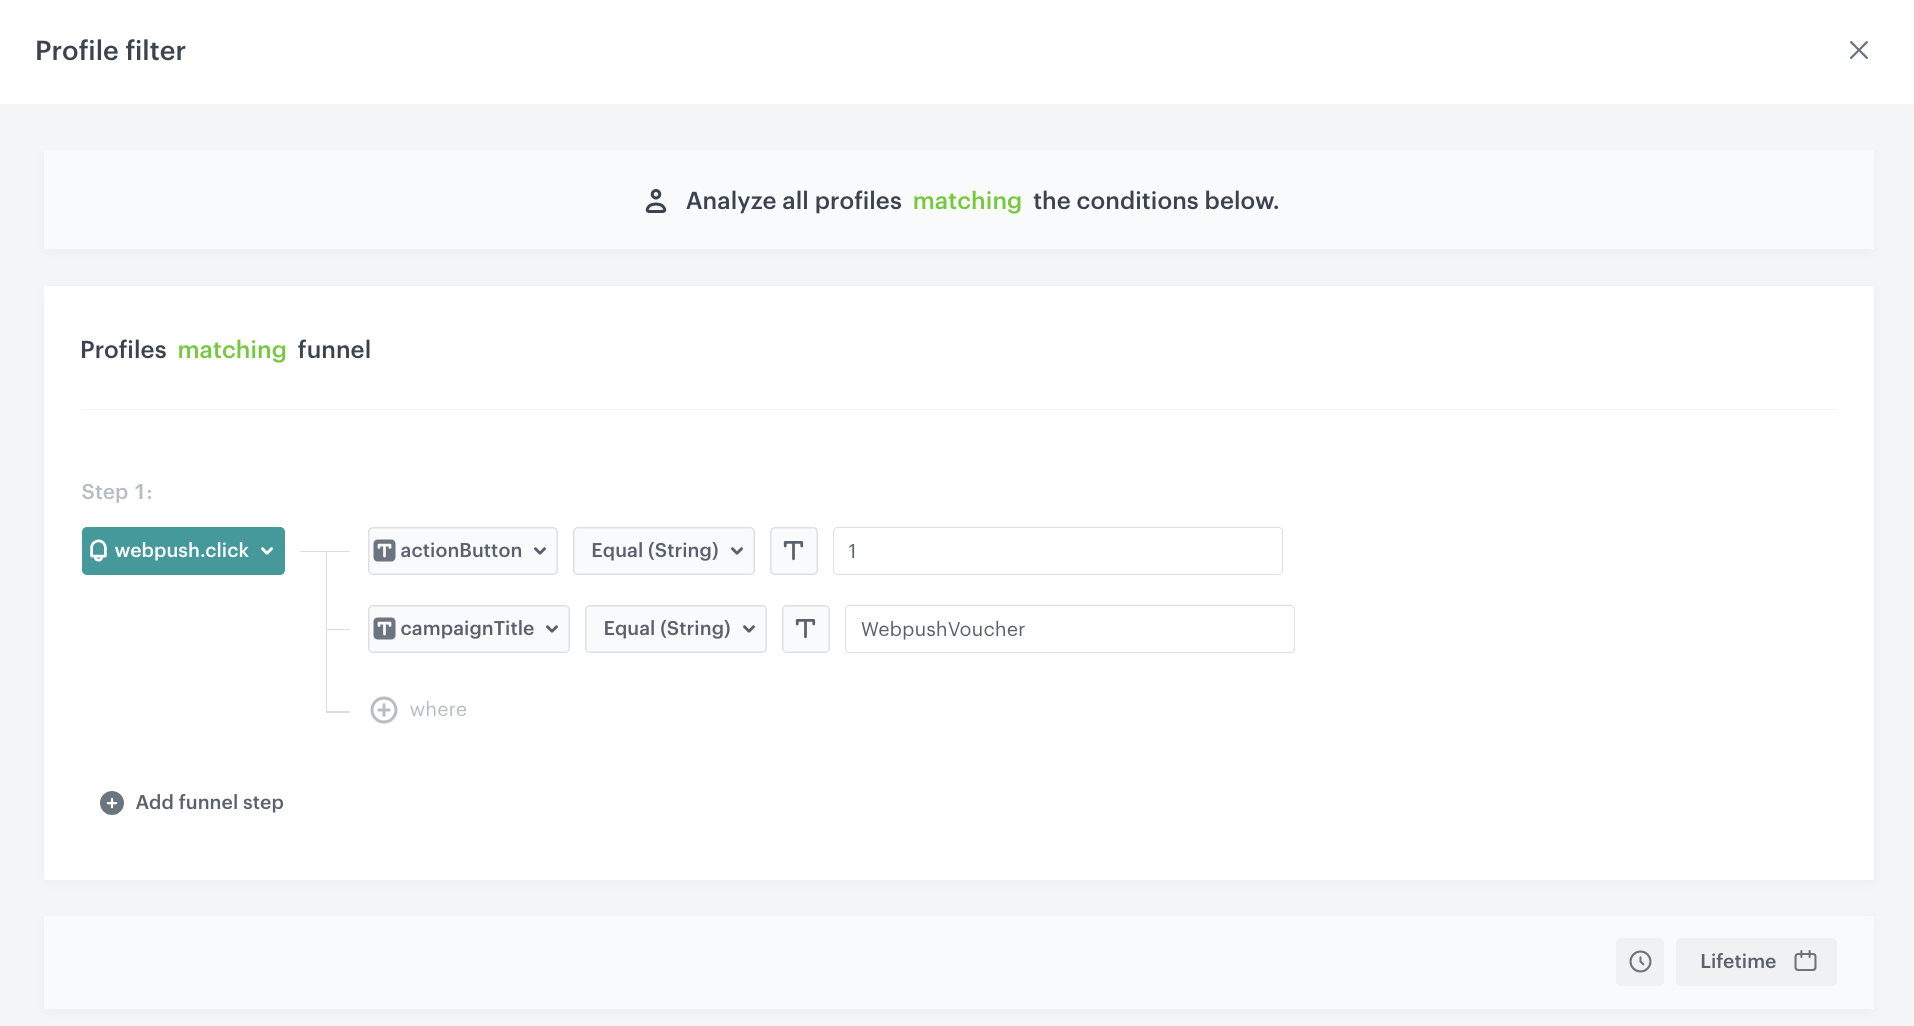
From Choose filter dropdown list, select the
webpush.clickevent,campaignTitleparameter, choose operatorEqual (string)and as the value add the exact title of the Webpush campaign created in the previous step. -
Click
+ whereand from the Choose filter dropdown list, select the webpush.click event. -
Choose the
actionButtonparameter with the value1. It will be visible only for users who have clicked the first button in the webpush campaign. -
Click the calendar in the right bottom of the page and choose the option Lifetime.
-
Click Save.
Audience configuration -
To save the audience, click Apply.
Define content
- In the Content section, click Create Message.
- From the list of template folders, select a folder with the predefined Insert object templates.
Result: You are redirected to the list of predefined templates. - You can also create your own template. In our case we choose predefined template: Small message bar.
- In the Text field, add the copy for your message.
- On the upper right side of the screen, click Inserts. From the dropdown list, choose Pool and select the voucher pool created in the previous part of the process. Click the voucher pool, copy the code and paste to your text box.
- Additionally add background color, text color or add any other additional changes.
- Click the Use in communication button.
- Click Apply.

Define schedule and display settings
- In the Schedule section, click Define and set the time when the message will be active.
- In the Display Settings section, click Define.
- Specify circumstances for dynamic content to be displayed. Optionally, you can also define the Advanced options. You can also define the type of device you want to show your dynamic content.
- In the Page targeting section, choose Others, and in the Display on pages section, click Add rule.
- Select Page URL containing and enter the address of the category page you defined in the first button in the web push template (for example, the main category page).
- Click Apply.
- Optionally, you can define the UTM parameters for your dynamic content campaign.
- Click Activate.
- Prepare another dynamic content template. Duplicate this campaign and add three changes:
- In the Audience section, change the value of the
actionButtonto2. - In the Content section, add voucher pool for jewelry category.
- In the Display settings, select Page URL containing and enter the address of the category page you have defined for the second button in the web push template.
Prepare a workflow
In this part of the process, create a workflow that will be run every 24 hours, and it will be triggered for the group of users who have visited women category in the last 24 hours but did not make any transaction.
Define the Audience trigger node
-
Start the workflow with the Audience node.
-
Click the node to configure it.
-
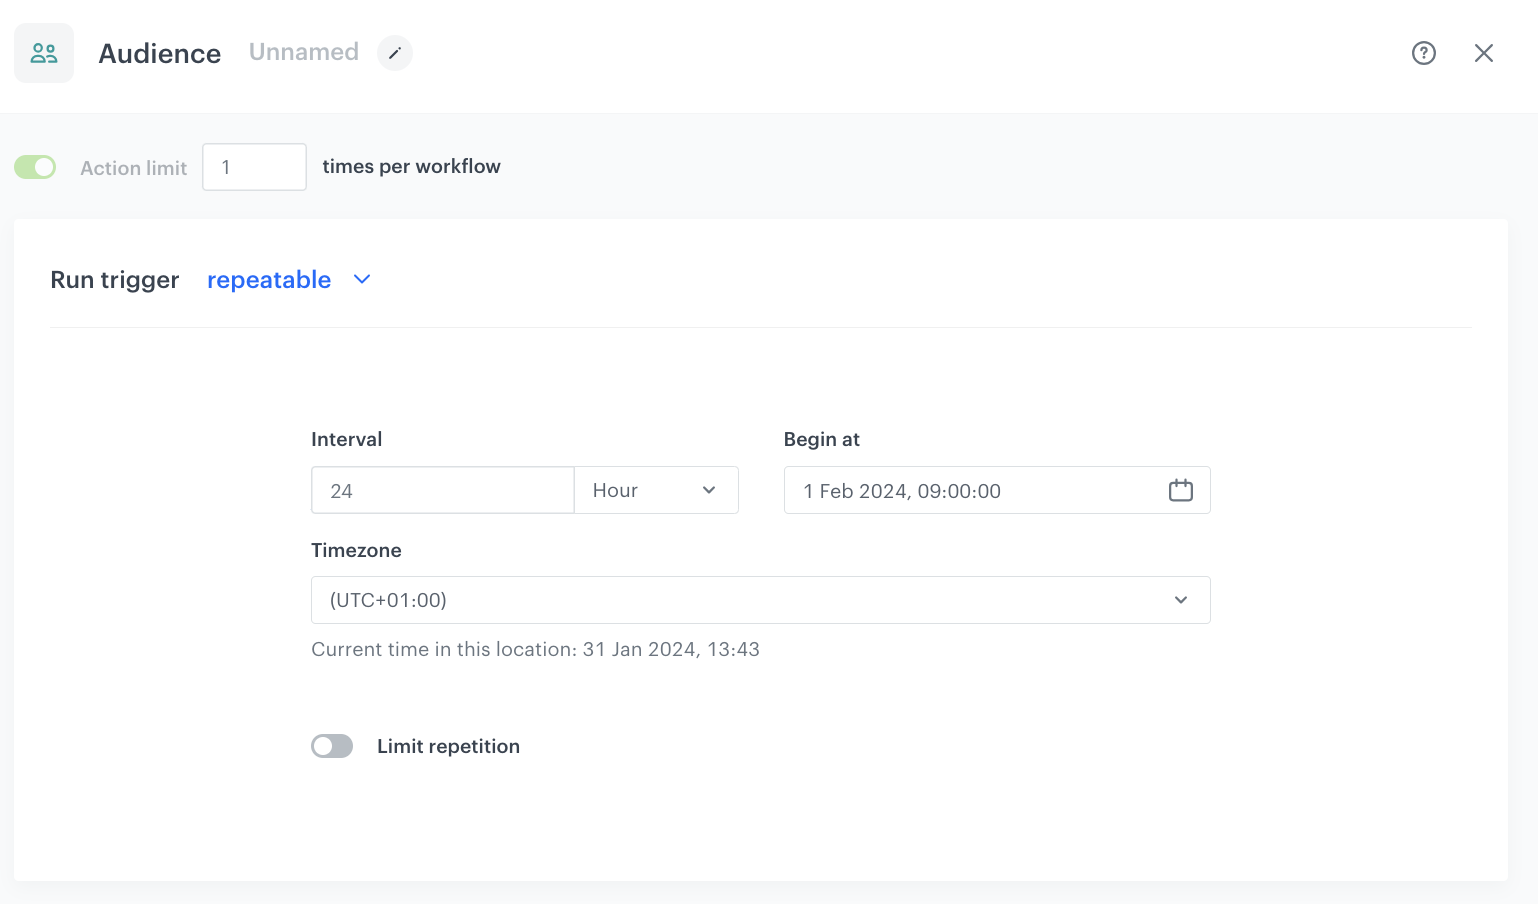
In the Run trigger section, set the option to repeatable, every 24 hours.
Configuration of the Audience node -
In the Define audience section, choose New audience.
- Click Define conditions.
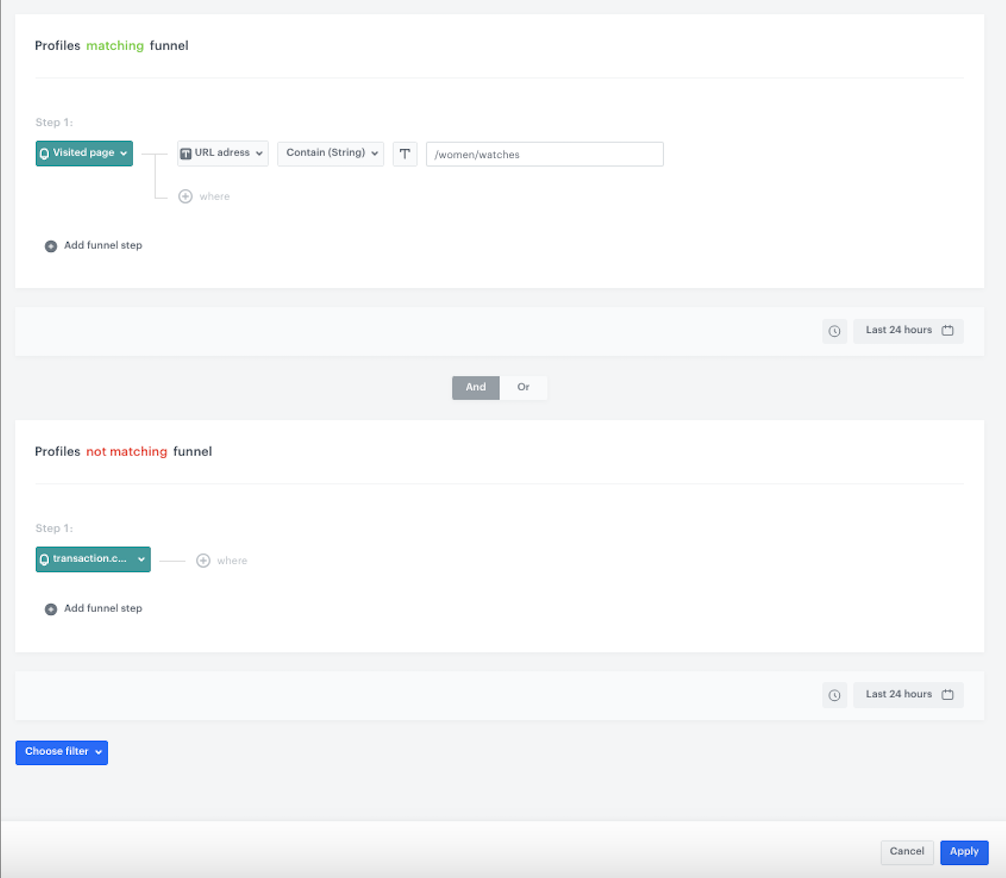
- From the Choose filter dropdown list, select page.visit. As the parameter, select URL and add the URL for the watches category.
- Click Choose filter and from the dropdown list, select page.visit. Choose the URL parameter and add the URL for the jewelry category.
- Betwen those conditions choose operator OR.
- Click Choose filter and from the dropdown list, select transaction.charge.
- Betwen those conditions choose operator AND.
- Set up time for each conditions as the last 24 hours.
- Change filter from matching to not matching.
-
Click Apply
Configure Send Web Push node
In this part of the process you will define the Webpush message to be sent.
- Add Send Web Push. In the configuration of the node:
- In the Content section, from the Webpush template dropdown, select the template you created in the previous step.
- In the Schedule section, set the Webpush lifespan (TTL) according to your business needs.
- You can describe the campaign with additional parameters.
- Click Apply.
Add the finishing node
- Add the End node.
- In the upper right corner, click Save & Run.
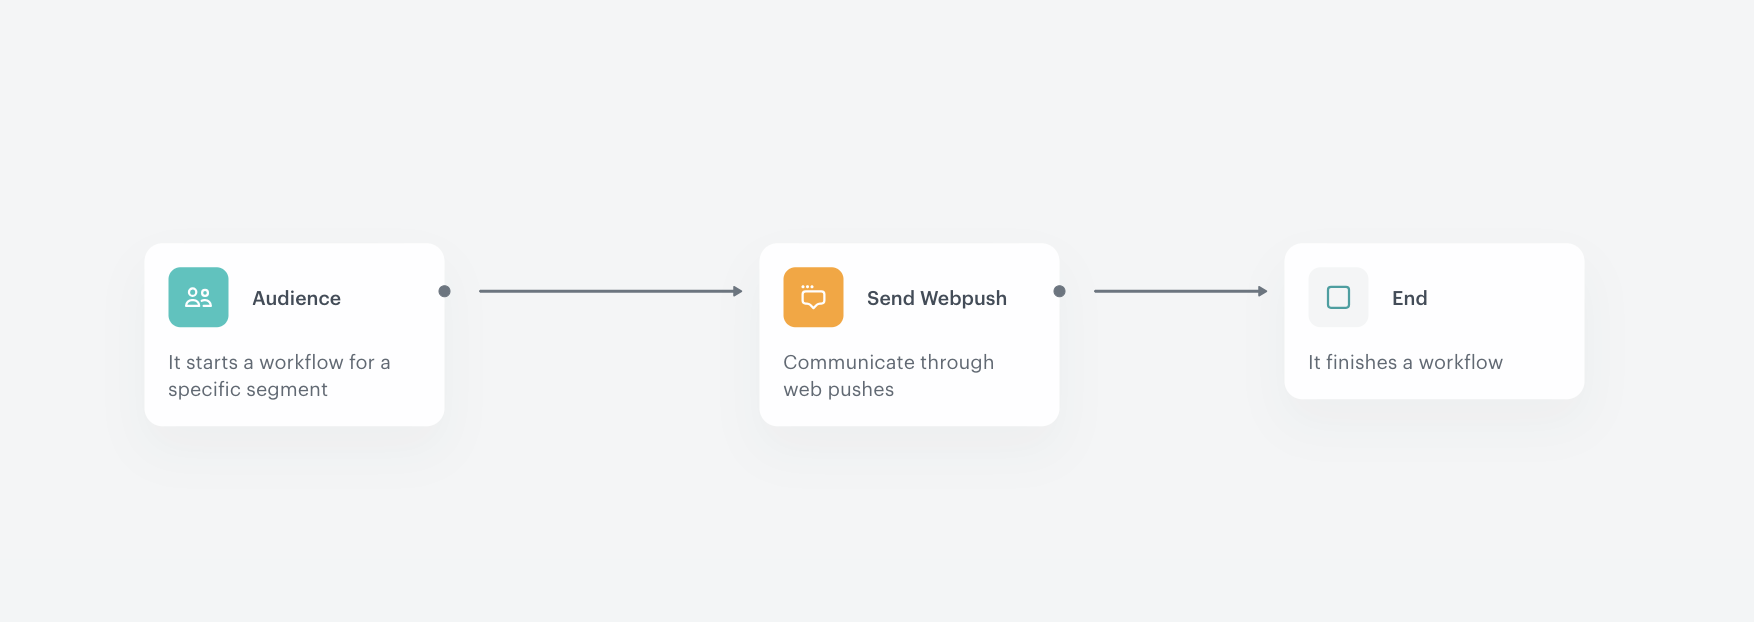
The workflow configuration
What’s more
To further enrich this use case and enhance user engagement, consider a few additional options:
- Incorporate personalized recommendations tailored to individual user preferences. You can dynamically suggest products within the “watches” and “jewelry” (or any other) categories that align with each user’s interests e.g. showing personalized recommendations on the top of the page. These personalized recommendations can be implemented in multiple areas, such as the homepage, category pages, product detail pages, shopping cart, and even during the checkout process. This personalized touch not only captures attention but also increases the likelihood of users finding products they genuinely desire, boosting conversion rates.
Read more about personalized recommendations
- As an alternative strategy, incorporate a link to a dedicated landing page with personalized promotions. This landing page can feature curated product selections, exclusive discounts and codes, and a seamless shopping experience, further encouraging users to take advantage of the promotions in an environment designed to enhance their overall satisfaction.
Read more about preparing a landing page with personalized products
Check the use case set up on the Synerise Demo workspace
You can check the all the configurations directly in Synerise Demo workspace:
If you’re our partner or client, you already have automatic access to the Synerise Demo workspace (1590), where you can explore all the configured elements of this use case and copy them to your workspace.
If you’re not a partner or client yet, we encourage you to fill out the contact form to schedule a meeting with our representatives. They’ll be happy to show you how our demo works and discuss how you can apply this use case in your business.