
Before you create and send your first web push notification, you must:
- integrate with Synerise via JS SDK, 
- create a Firebase account and integrate it with Synerise to start collecting web push agreements on your website.
- [install service worker on your server](#install-service-worker).

Web push notifications will be shown to a visitor, who agreed to receive web push notifications, according to the settings. The following web push related events are collected by default:   
- `webpush.subscribe` - a visitor has agreed to receive web push notifications
- `webpush.subscribeBlock` - a visitor hasn't agreed to receive web push notifications
- `webpush.subscribeDiscard` - a visitor closed an agreement form (there is a possibility that the visitor will subscribe in the future)
- `webpush.send` - a web push notification was sent
- `webpush.show` - a web push notification was displayed
- `webpush.click` - a visitor clicked a web push notification
- `webpush.notRegistered` - a web push notification wasn't sent due to an invalid token


## Requirements
--- 
- You must be granted user permissions to access **Settings**.
- Your site must fully support HTTPS.
- Your site must redirect all `http://` requests to `https://` requests.
- [Integrate with Synerise via Synerise JS SDK](/docs/settings/tool/tracking_codes)  (make sure your tracking code covers web push notifications).


  <div class="admonition admonition-important"><div class="admonition-icon"><svg xmlns="http://www.w3.org/2000/svg" fill="none" viewBox="0 0 24 24" stroke="currentColor" stroke-width="2.5"><path stroke-linecap="round" stroke-linejoin="round" d="M12 8v4m0 4h.01M21 12a9 9 0 11-18 0 9 9 0 0118 0z" /></svg></div><div class="admonition-body"><div class="admonition-content">

  Perform the configuration in the given order.

  </div></div></div>


## Integrate Firebase with Synerise
---

The full procedure of Integrating Firebase with Synerise is available [here](/docs/settings/tool/firebase).

## Install service worker
---

1. Go to <img src="/api/docs/image/54176ad07f146575310749eba44b7c2f42c1b327/icons/settings-icon.svg" alt="Settings icon" class="icon"> **Settings > Web push**.
2. Click **Show** in **General** section.
2. Switch the **Web notifications currently disabled** toggle to **Web notifications currently enabled**.  
    **Result**: The installation instruction appears.
        <figure>
        <img src="/api/docs/image/54176ad07f146575310749eba44b7c2f42c1b327/docs/campaign/_gfx/webpush-conf.png" alt="The Instruction section" class="large" >
        <figcaption> The installation instruction </figcaption>
        </figure>
3. Follow the commands on the interface.
    
   <div class="admonition admonition-tip"><div class="admonition-icon"><svg xmlns="http://www.w3.org/2000/svg" fill="none" viewBox="0 0 24 24" stroke="currentColor" stroke-width="2.5"><path stroke-linecap="round" stroke-linejoin="round" d="M9.663 17h4.673M12 3v1m6.364 1.636l-.707.707M21 12h-1M4 12H3m3.343-5.657l-.707-.707m2.828 9.9a5 5 0 117.072 0l-.548.547A3.374 3.374 0 0014 18.469V19a2 2 0 11-4 0v-.531c0-.895-.356-1.754-.988-2.386l-.548-.547z" /></svg></div><div class="admonition-body"><div class="admonition-content">

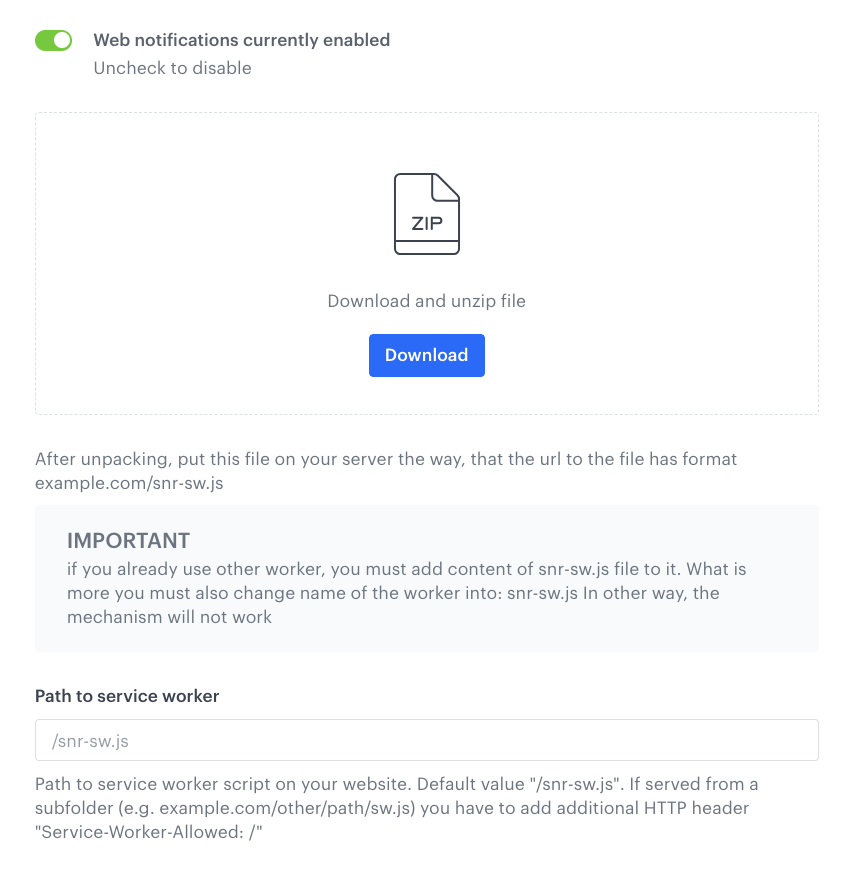
   The file should be available under the site root with the same filename, for example: `example.com/snr-sw.js`. Example for a subfolder: `example.com/other/path/snr-sw.js`.  
       If you choose other directory than the root, to properly use the service worker you must declare the `Service-Worker-Allowed: /` header. In case you use a different worker, you can add `snr-sw.js` contents to your worker file and rename it to `snr-sw.js`.

   </div></div></div>

4. In the **Path to service worker** field, enter the path.
5. Confirm by clicking **Apply**.


   **Result**: The configuration is completed. The next step is to prepare [web push agreement forms](/docs/campaign/Webpush/one-step-agreement-form).


   <div class="admonition admonition-important"><div class="admonition-icon"><svg xmlns="http://www.w3.org/2000/svg" fill="none" viewBox="0 0 24 24" stroke="currentColor" stroke-width="2.5"><path stroke-linecap="round" stroke-linejoin="round" d="M12 8v4m0 4h.01M21 12a9 9 0 11-18 0 9 9 0 0118 0z" /></svg></div><div class="admonition-body"><div class="admonition-content">

   In service worker version 3.0.0 (or higher), we have optimized the size of webpush frames sent to Firebase and enabled action buttons in web push notifications. The version of the service worker stored in the customer's browser can be identified in the [webpushToken.update](/docs/assets/events/event-reference/webpush#webpushtokenupdate) event in the version parameter

   </div></div></div>


   <details class="accordion"><summary>What if web push notifications still don't display?</summary><div class="accordion-content"><ol> <li>Make sure the web push notification doesn&#39;t contain errors. <ul> <li>In case there are any <a href="/docs/assets/snippets">snippets</a> used in the template, make sure that the item of information you want to display using an snippet is available on the customer cards of the recipients. For example, if you want to mention the recipient&#39;s city name in the template, check if all recipients have the name of the city in the customer&#39;s card, otherwise, this snippet will not display.</li> <li>If a web push is displayed differently than expected, check how the specific browser, operating system, or device handles web pushes.</li> </ul> </li> <li>If the web push notification is created correctly, go to your website.</li> <li>Open the console.</li> <li>Search for <code>SR.init</code>.</li> <li>If there is the <code>disableWebPush</code> parameter, contact your developers to remove it.</li> </ol> <figure> <img src="/api/docs/image/54176ad07f146575310749eba44b7c2f42c1b327/docs/campaign/_gfx/disable-webpush.png" alt="Console view" class="full" > <figcaption> Console view </figcaption> </figure></div></details>
