A snippet in Synerise is a reusable piece of code that can be added to any content created in Synerise, such as in-app messages, landing pages, the request body of Outgoing Integrations, documents, and more.
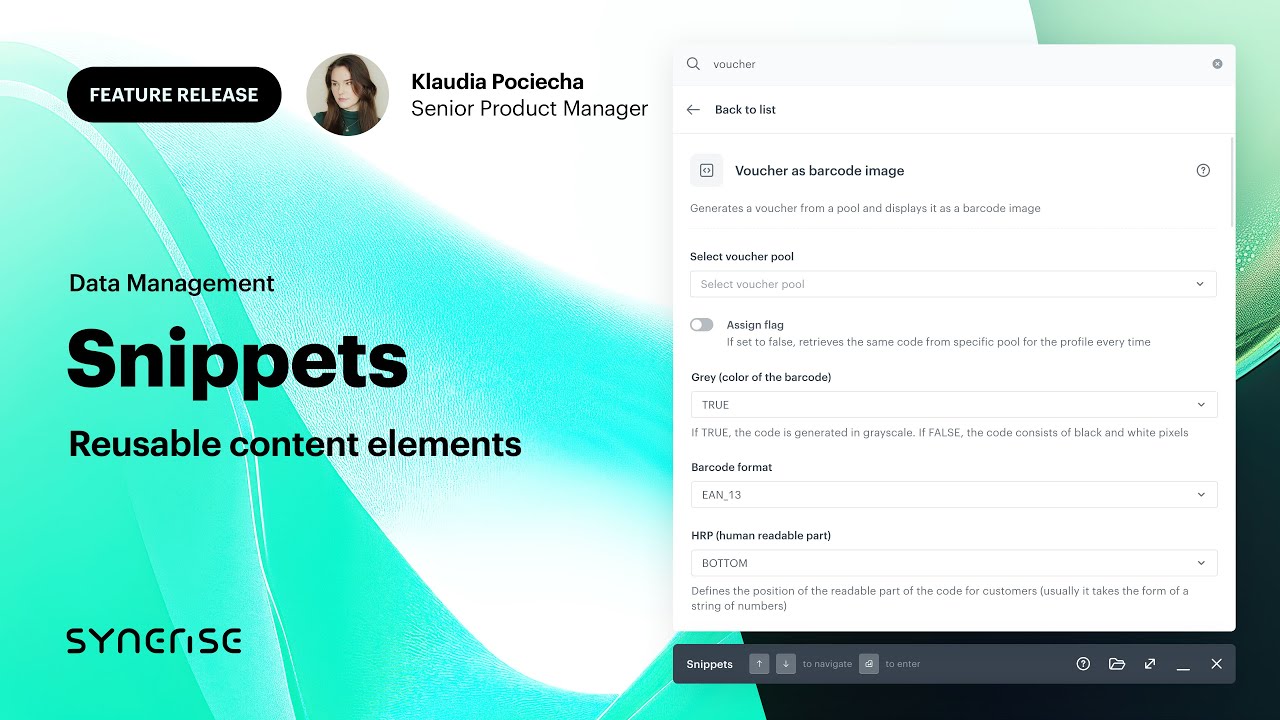
A snippet can represent a content fragment that is frequently used, like a sentence, an email footer, but can also be used to create an entire message template. It can be added in two ways:
- As a dynamic reference to the snippet definition. In this case, the content is updated whenever the definition changes. This approach lets you propagate changes into multiple templates, documents, and so on without editing all of them separately.
A simple example is storing your company address in a snippet and creating a reference to that snippet when you want to show the address in a template. If the address changes, you only need to edit the snippet and the change will apply to all the templates with a reference to it. - As a static fragment of content pasted into the code editor.
You can create your own snippets and use a library of pre-defined snippets.
To add a snippet to the content you're creating, use the snippet widget.
Using snippet widget
The snippet widget lets you access the collection of predefined and custom snippets available across the Synerise platform, providing quick access to a variety of useful code sections.
You can find the snippet widget in features which lets you create any type of content: message templates, landing page, documents, message subject, body requests in Automation Hub.
Snippet widget lets you perform the following actions:
- Add a snippet to your content
- Create a new snippet
- Manage snippets
- Preview snippet contents
- To open a snippet widget, press ⌘/CTRL + / or go to
 Data Modeling Hub > Snippets > Snippet widget.
Result: At the bottom of the page, the snippet manager appears.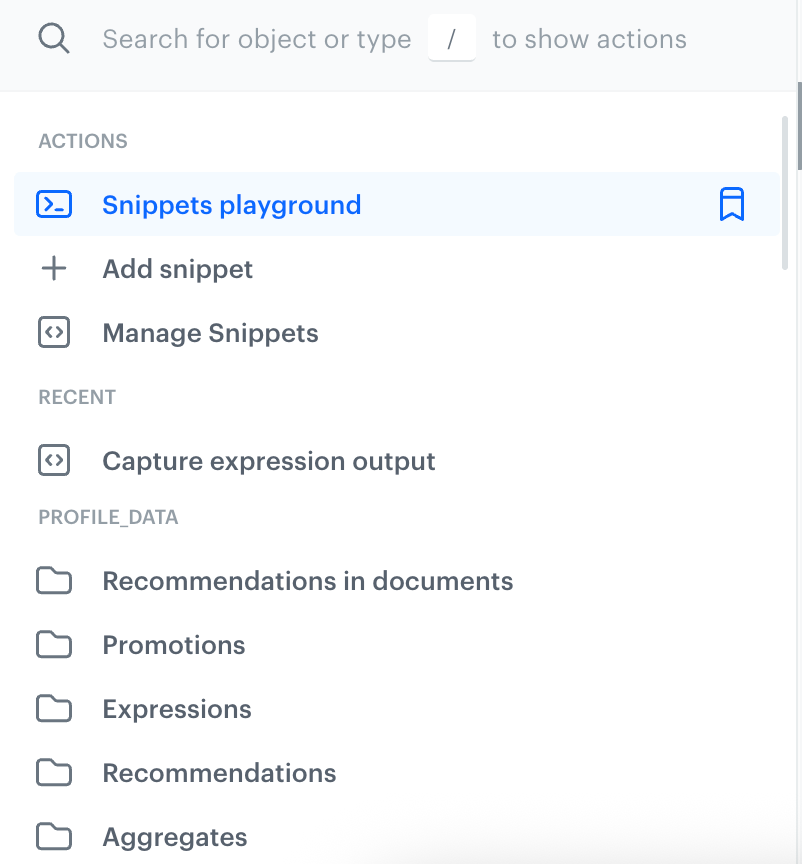
Snippet manager - To change the view mode of the snippet widget:
- In wide mode, click
 to change to compact mode.
 - In compact mode, click
 to change to wide mode.
- In wide mode, click
- From the list, you can:
- Add a snippet - By selecting this option, you will be redirected to the snippet editor.
- Manage snippets - By selecting this option, you will be redirected to the list of snippets.
- Select a predefined or custom snippet to add to the content you're editing.
- Open Snippet playground - By selecting this option, a snippet playground opens, you can create a draft snippet which the Playground holds until you save it as a snippet. This draft follows you across different Synerise platform modules, offering convenient, persistent content while you work throughout the platform.
Inserting snippets
If you want to add a snippet to the content you're editing:
- In the code editor view, open the snippet widget by clicking Snippets.
Select a category of snippets:
You can use the search field at the top of the widget to search for snippets by name.
- Custom snippets
To access your custom snippets, scroll to the end of the list. - Predefined snippets defined by Synerise:
- Profile data: add profile attributes, recommendations, promotions, aggregate results, and expression results.
- Decision Hub: insert the results of metrics.
- Data Modeling: add values of vouchers, catalog items, or files.
- Other: add Jinjava inserts and links.
New predefined snippets are added to the platform periodically.
- Custom snippets
After opening a category, select a snippet from one of the types:
- Configurable snippets require selecting some additional options. For example, a configurable recommendation insert allows you to modify the filters.
- Ready to use snippets let you refer to a Synerise object without any additional configuration. For example, in the "Expressions" category, the "Ready to use" list is a list all expressions in your workspace. Selecting this snippet will let you show the result of the expression in the content.
Result:
The snippet details open.
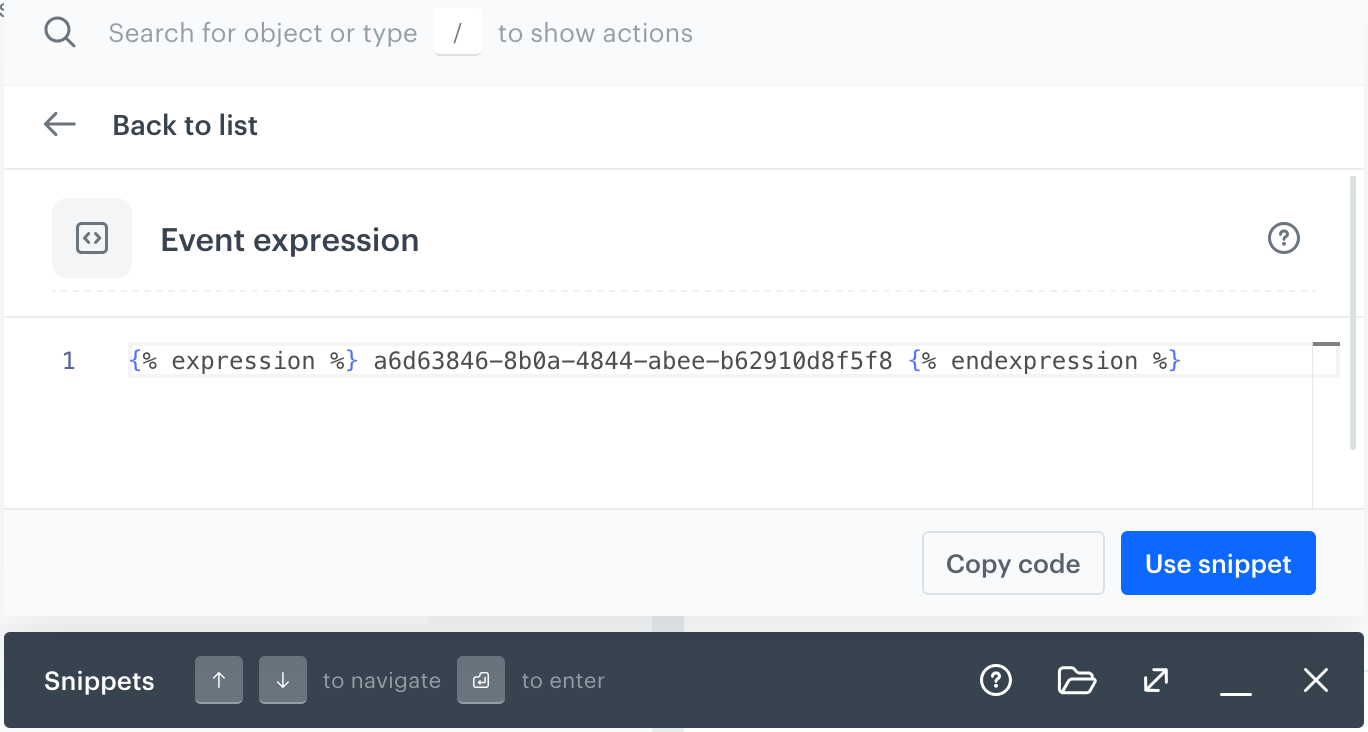
Details of a ready-tu-use snippet - If you selected a configurable snippet, follow the instructions in the snippet details to configure it.
Select how you want to use the snippet:
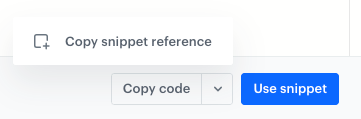
Options of using the snippet - To paste the contents of the snippet into the editor, click Use snippet.
This content won't change when the snippet definition changes. - To copy the content of the snippet into the clipboard, click Copy code.
This content won't change when the snippet definition changes. - To create a dynamic reference to the snippet definition, click the arrow to the right of Copy code and click Copy snippet reference.
This copies the snippet reference to your clipboard. You need to paste it into the editor.
A snippet reference creates a piece of content that will be updated whenever you update the definition of the snippet. In the editor, it looks like this:
This is useful for content that changes often and is used in multiple communications. By using a reference, you only need to update the central definition and the change applies to all references.{% snippet %} SNIPPET_ID {% endsnippet %}
If the referenced snippet uses variables for editing simplification, a reference always uses the default variable values and doesn't allow changing them.
Snippet references are not available for some snippet types. For example, ready-to-use expression references - because the snippet is only a reference to an expression, changing the expression propagates to all content which refers to it.
- To paste the contents of the snippet into the editor, click Use snippet.
Creating custom snippets
You can create custom snippets using the snippet editor. This editor lets you write the snippet code in which you can, for example, reference Synerise objects or other snippets. Additionally, you can create configuration forms to simplify their editing for your co-workers. This enables you to configure the snippet when adding it to the template from the snippet widget.
- Go to Data Modeling Hub > Snippets > Create snippet.
Snippet editor To select the language for syntax highlighting, click HTML and from the dropdown list, select:
- Text
- JSON
- HTML
- CSS
- Javascript
- SQL
In the Code section, enter the contents of the snippet. You can:
- create code from scratch,
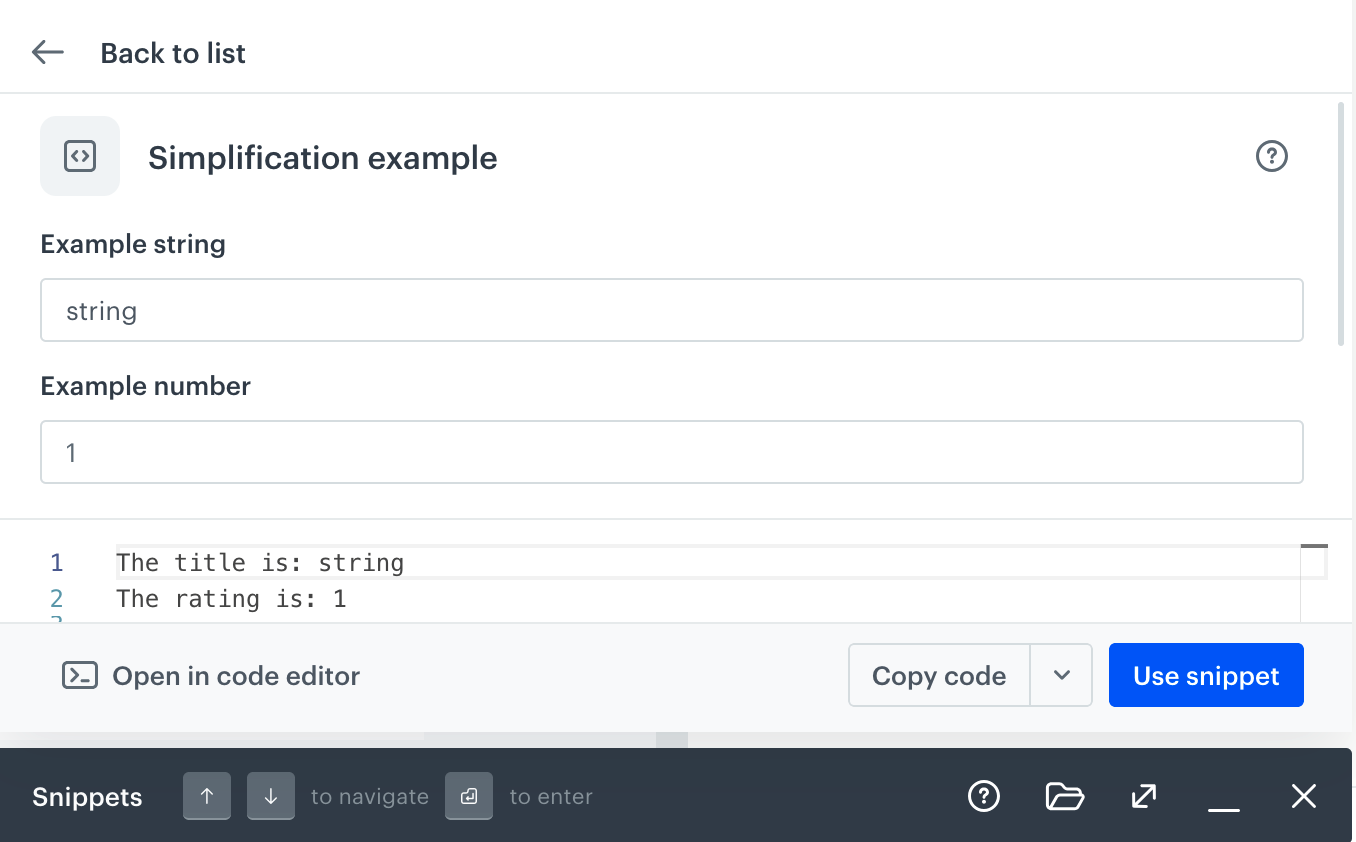
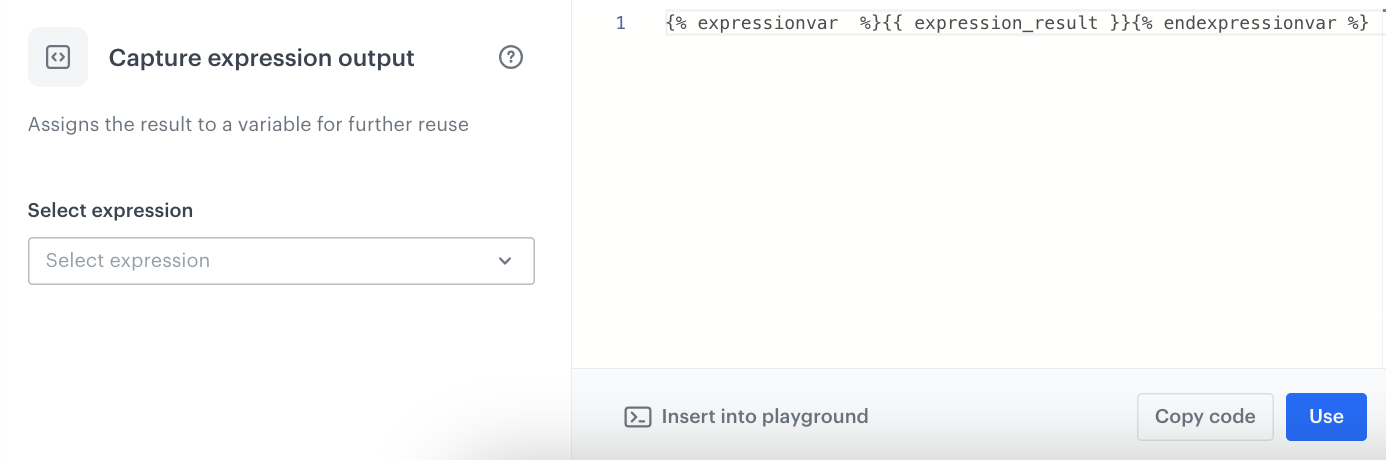
- by using the Snippets option, you can add existing snippets and configure them with the snippet widget. In the screen below, an expression snippet is being added to the snippet. In such case, from the Select expression dropdown list, you must select which expression result you want to retrieve.
This option also lets you add your custom snippets as well.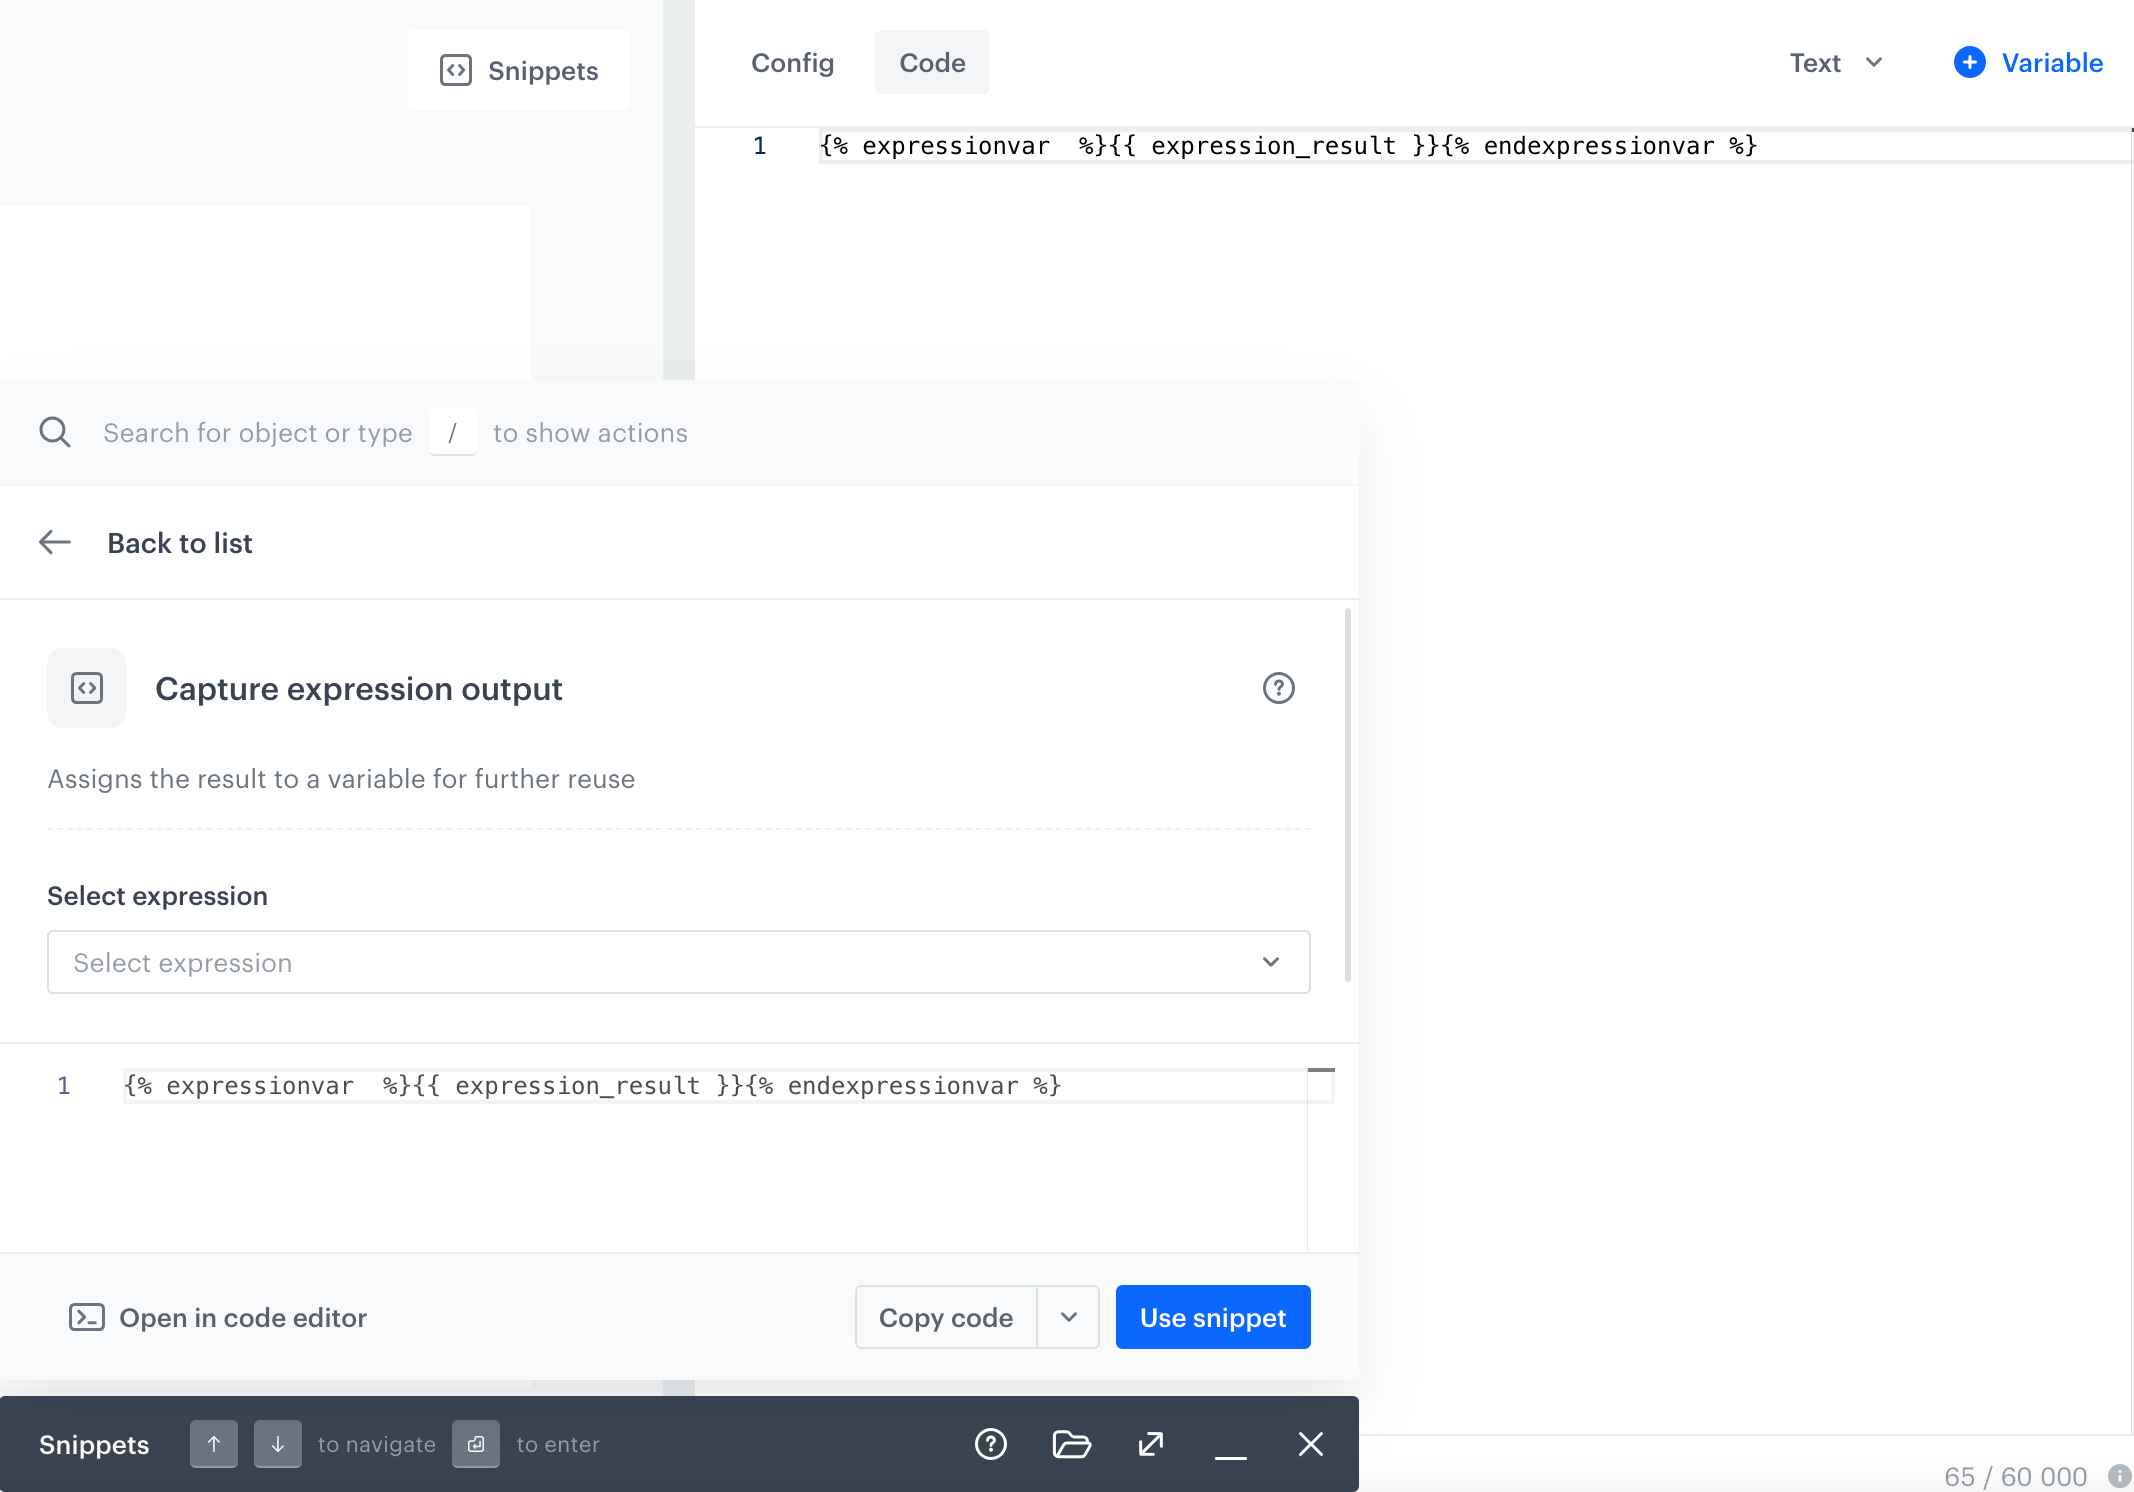
Adding predefined snippet which retrieves result of an expression result - create a form for editing snippets,
- preview the final result from the perspective of a customer.
After you complete a snippet, in the upper right corner, click Save.
Result: A pop-up appears.
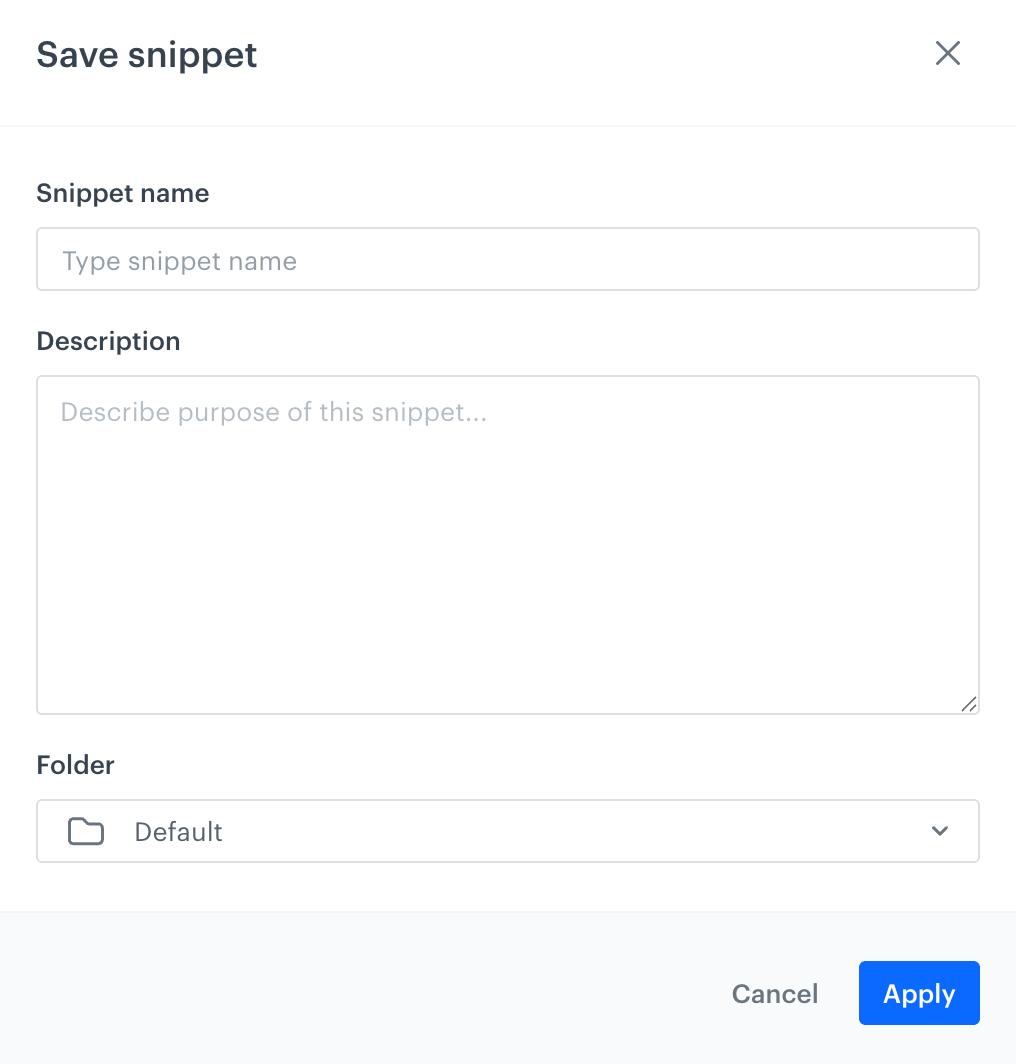
Saving a snippet - In the Snippet name, enter a name of the snippet which will be visible on the snippet list.
- In the Description field, write the purpose of a snippet to make it understandable for your co-workers.
- From the Folder list:
- select a category in which the snippet will be saved.
- to create a new category, at the bottom of the list, click Create.
- In the Folder name field, enter the name of the category.
- Confirm by clicking Apply.
- Click Apply.
Result: The snippet is available in snippet widget.
Previewing snippets
You can check the final form of a snippet from the perspective of any customer you have in your database.
- In the code editor, on the left, click Preview contexts.
Result: A pop-up opens. - From the Customer Context dropdown list:
- select the customer from the list
- use the searchbox to find a customer by typing their email address or ID
Result: A preview modifies to the context of a selected customer.
Snippet editing simplification
To make it easier for non-coders to customize a snippet, you can create a form with specific options just for the snippet. This way, users can define the settings of the snippets (such as selecting recommendations to be displayed) by filling out the form displayed in the widget before using it in the content.
When you simplify the editing process for the template, you can tweak its style by using a simple form with different fields for each part of the template. This form can be found in the Config section.
Simplifying the template involves swapping out values in the code (like HTML, CSS, and JavaScript) with special placeholders called variables. For example, you can change alignment, fonts, colors, or HTML elements like titles, descriptions, or buttons. You can also insert variables in place of Jinjava elements, such as campaign IDs, voucher pool IDs, or catalog names. These variables will be visible in the form within the Config tab when you are editing the template.
When a snippet with variables added as described below is inserted as a reference, all fields in the output use the default value. The value can't be changed. See example.
Example
This is how simplified snippets work in practice:
- A snippet with two variables is created:

- A user opens the snippet in the widget when creating something in a code editor (for example, an email template):
- In the configuration form, the user changes the values from default to their own:
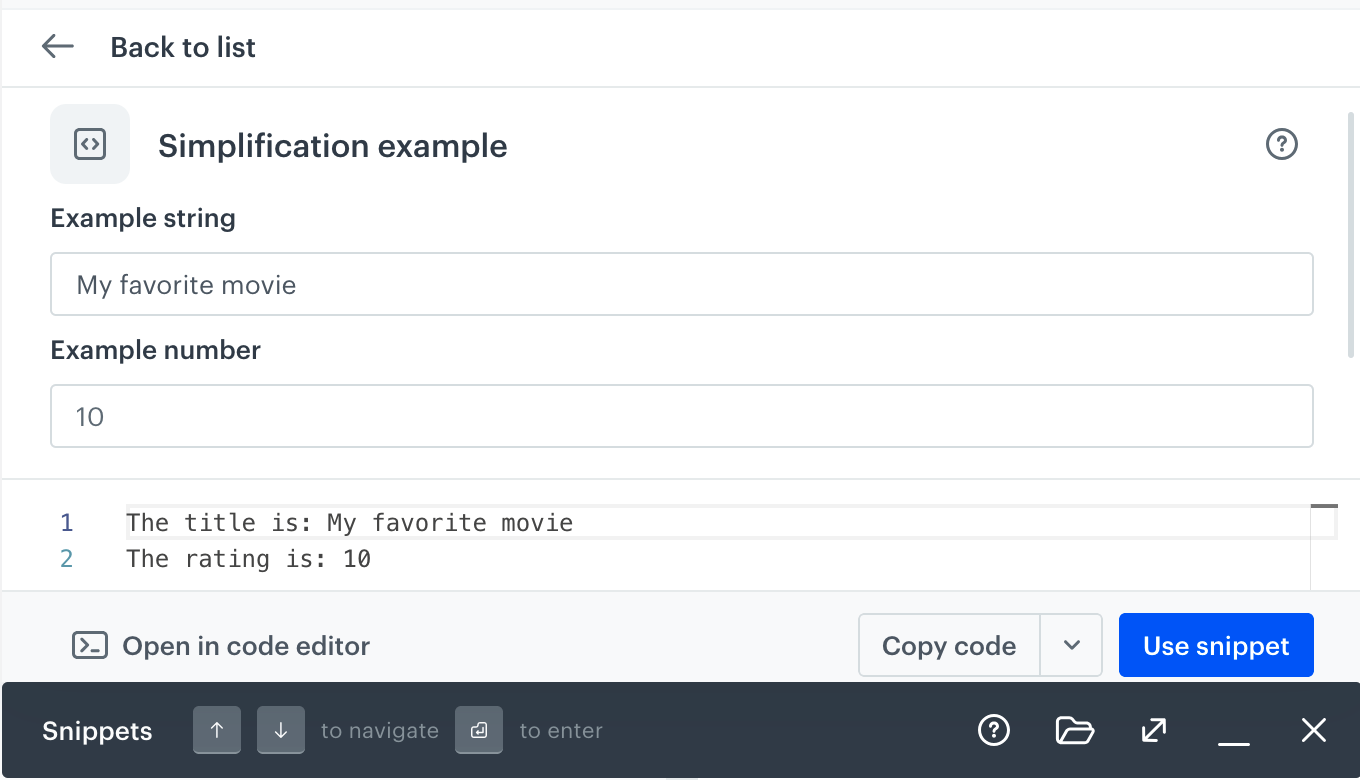
- The result depends on how the user adds the snippet to the content they're creating:
- If the user clicks Use snippet/Copy code, the contents of the snippets are added to the editor/copied to the clipboard with the variable values entered in the configuration form:

- If the user clicks Copy snippet reference, a reference to the snippet is copied to the clipboard. When the content is generated, the default values are always used, regardless of what the user entered in the configuration form:

- If the user clicks Use snippet/Copy code, the contents of the snippets are added to the editor/copied to the clipboard with the variable values entered in the configuration form:
List of variables
| Variable name | Description | Example output |
|---|---|---|
| Synerise insert select | Allows you to add a dropdown list with aggregates, expressions, metrics, voucher pools, recommendations, files, catalogs, or attributes. | 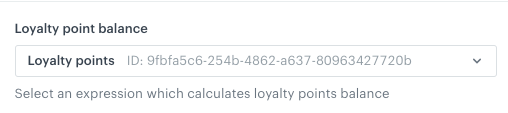 |
| String | Allows you to add a field that requires a string value. | 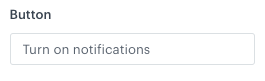 |
| Select | Allows you to add a dropdown list with configurable values. | 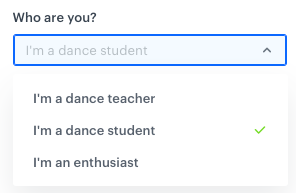 |
| Switch | Allows you to add a field which is enabled/disabled by a toggle. |  |
| Color | Allows you to add a color selector. You can either select a color or enter its code manually. | 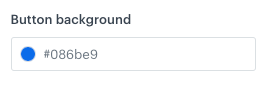 |
| Number | Allows you to add a field that requires a number. You can either select a number from a dropdown or enter it manually. | 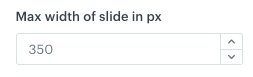 |
Creating a simplified snippet
- To create a user-friendly configuration form of the snippet, in the Code tab, on the right side of the screen, click Add variable.
Result: A sidebar appears.
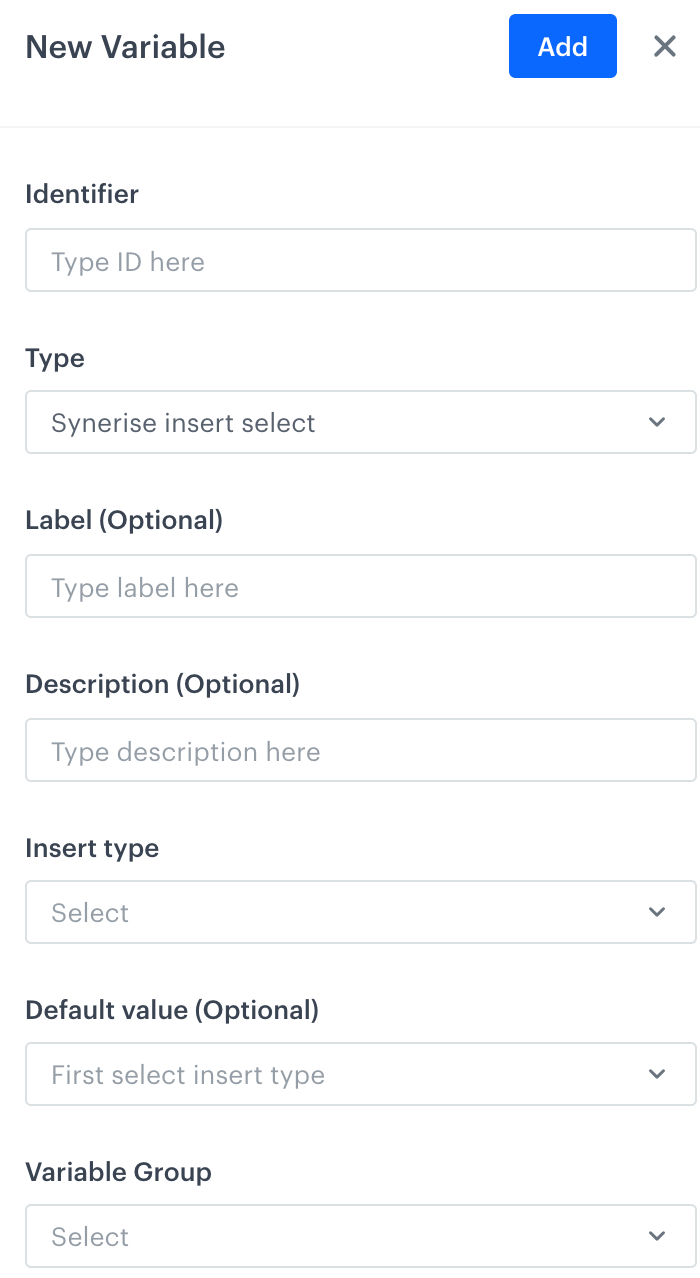
Adding a variable - In the Identifier field, enter the ID of the variable.
This will be the title of the field unless you define the Label field.
The first character of the ID can't be a number. From the Type dropdown list, select the type of variable.
Description of available variables is in List of variables.Allows you to add a field that requires a string value.
- In the Label (Optional) field, enter the name of the field.
If this field is empty, the name of the field will be taken from the Identifier field. - In the Description (Optional) field, enter a short explanation of the field's purpose.
- In the Default Value field, enter the default value.
This value is also used when the snippet is used a reference. In that case, the value can't be changed.
Allows you to add a dropdown list with configurable values.
- In the Label (Optional) field, enter the name of the field. If this field is empty, the name of the field will be taken from the Identifier field.
- In the Description (Optional) field, enter a short explanation what this field is for.
- In the Display Name field, enter the name that will be visible in a dropdown.
- In the Value field, enter a value.
- In the Default Value field, enter the default value.
This value is also used when the snippet is used a reference. In that case, the value can't be changed.

A select variable during configuration Allows you to add a dropdown list with aggregates, expressions, metrics, voucher pools, recommendations, files, catalogs, and attributes.
- In the Label (Optional) field, enter the name of the field. If this field is empty, the name of the field will be taken from the Identifier field.
- In the Description (Optional) field, enter a short explanation what this field is for.
- From the Insert Type dropdown list, select the type of resource:
- Aggregates, AI recommendations, Expressions, Metrics, Voucher pools: creates a dropdown list of available resources of the selected type. When the user selects a resource in the form, its ID is inserted into the code of the template. This ID can be used in Jinjava to display the value of the selected resource.
- Catalogs: creates a dropdown list of catalogs. When the user selects a catalog in the form, its name is inserted into the code of the template. This name can be used in Jinjava to retrieve a value from the catalog.
- Files: creates a dropdown list of files. When user selects a file, its URL is inserted into the code.
- Profile attributes: creates a dropdown list of profile attributes. When a user selects an attribute, its name is inserted into the code of the template. This name can be used in Jinjava to retrieve the attribute value.
- In the Default Value (Optional) field, enter the default value.
This value is also used when the snippet is used a reference. In that case, the value can't be changed.
Result: A dropdown with the insert is added to the form in the Config tab. From the dropdown list, you can select an item of the chosen type (for example, aggregates). As a result, the value of variable will be ID of the selected item.
Synerise insert select in the configuration form
Allows you to add a field which is enabled/disabled by a toggle.
- In the Label (Optional) field, enter the name of the field. If this field is empty, the name of the field will be taken from the Identifier field.
- In the Description (Optional) field, enter a short explanation what this field is for.
- In the Default Value field, select the default value (true/false).
This value is also used when the snippet is used a reference. In that case, the value can't be changed.
Allows you to add a color selector. You can either select a color or enter its code manually.
- In the Label (Optional) field, enter the name of the field. If this field is empty, the name of the field will be taken from the Identifier field.
- In the Description (Optional) field, enter a short explanation what this field is for.
- In the Default Value field, enter the default value.
This value is also used when the snippet is used a reference. In that case, the value can't be changed.
Allows you to add a field that requires a number. You can either select a number from a dropdown or enter it manually.
- In the Label (Optional) field, enter the name of the field. If this field is empty, the name of the field will be taken from the Identifier field.
- In the Description (Optional) field, enter a short explanation what this field is for.
- In the Default Value field, enter the default value.
This value is also used when the snippet is used a reference. In that case, the value can't be changed.
- In the Label (Optional) field, enter the name of the field.
If you want to add the variable to a group that can be more easily displayed together in the form:
- Click Variable Group.
- Select or create a group:
- To select a group, click its name.
- To create a group:
- Click Add new group.
- Enter a group name.
- Enter a group ID.
- Click Apply.
Result: On the Config tab, the groups can be collapsed and expanded.
- In the upper right corner, click Add.
Result: In the template code, a variable appears (it starts with####). It also becomes available on the Config tab. - Optionally, to modify the order of variables appearing in the configuration form, add the
orderparameter to the variable formula (for example,#### type: "string", id: "string", label: "Text", order: 1 !####).
Snippet playground

The Snippet Playground lets you create and preview snippets directly within the snippet widget, without navigating to Snippets. You can draft any content, preview it for selected users, and save it as a snippet—all with full editor features.
Acting as a scratchpad, the Playground holds your draft content until you intentionally clear it. This draft follows you across different Synerise platform hubs, offering convenient, persistent content while you work throughout the platform. You can close the snippet playground, and the draft is restored when you re-open it. It's saved in the local storage of your browser.
Predefined snippets can be opened and automatically loaded into the Playground for editing. We’ve also added an edit mode for custom snippets, allowing in-widget snippet modifications.
The Playground works only in wide mode; if you're in compact mode, a button will switch the interface to wide mode to open it for easy editing and previewing.
Accessing snippet playground
- Press ⌘/CTRL + / or go to Data Modeling Hub > Snippets > Snippet widget.
- On the left pane, click Snippet playground.
Result: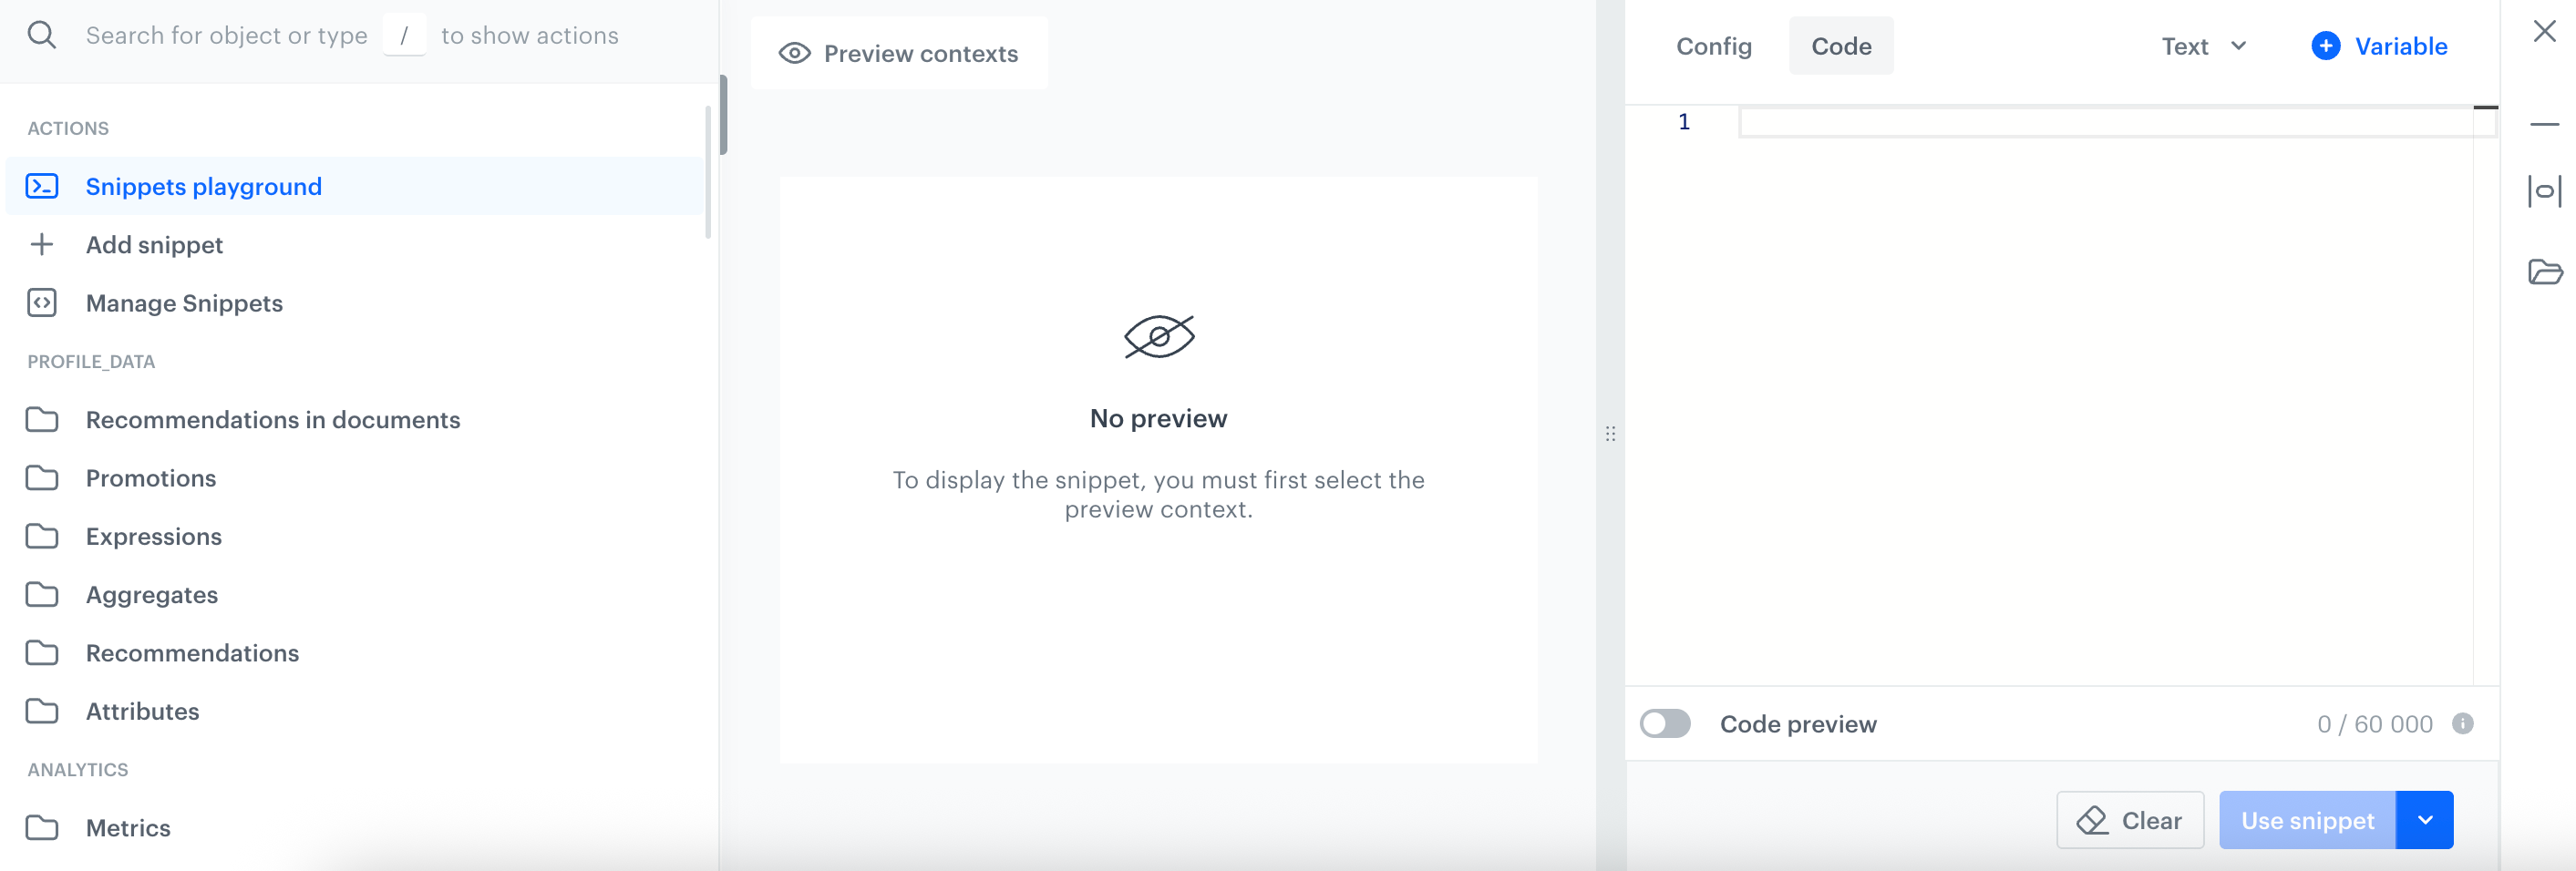
Blank snippet playground
Inserting predefined and custom snippets into playground
- On the left pane, select a predefined snippet or your custom snippet.
A predefined snippet for extracting expression output is selected - If you selected a custom snippet and want to edit it before adding it to the playground, click Edit (to edit in the same window) or click the downward arrow icon and then Code editor (to edit in a new window).
Saving such a snippet affects content where this snippet is dynamically added with the{% snippet %}insert. - At the bottom of the widget, click Insert into playground.
Result: The snippet is inserted at the end of the current playground content.
Previewing snippet results
- After adding a snippet to the playground, on the middle pane, click Preview contexts.
- From the dropdown list, select the profile for whom you want to see the snippet preview.
Result: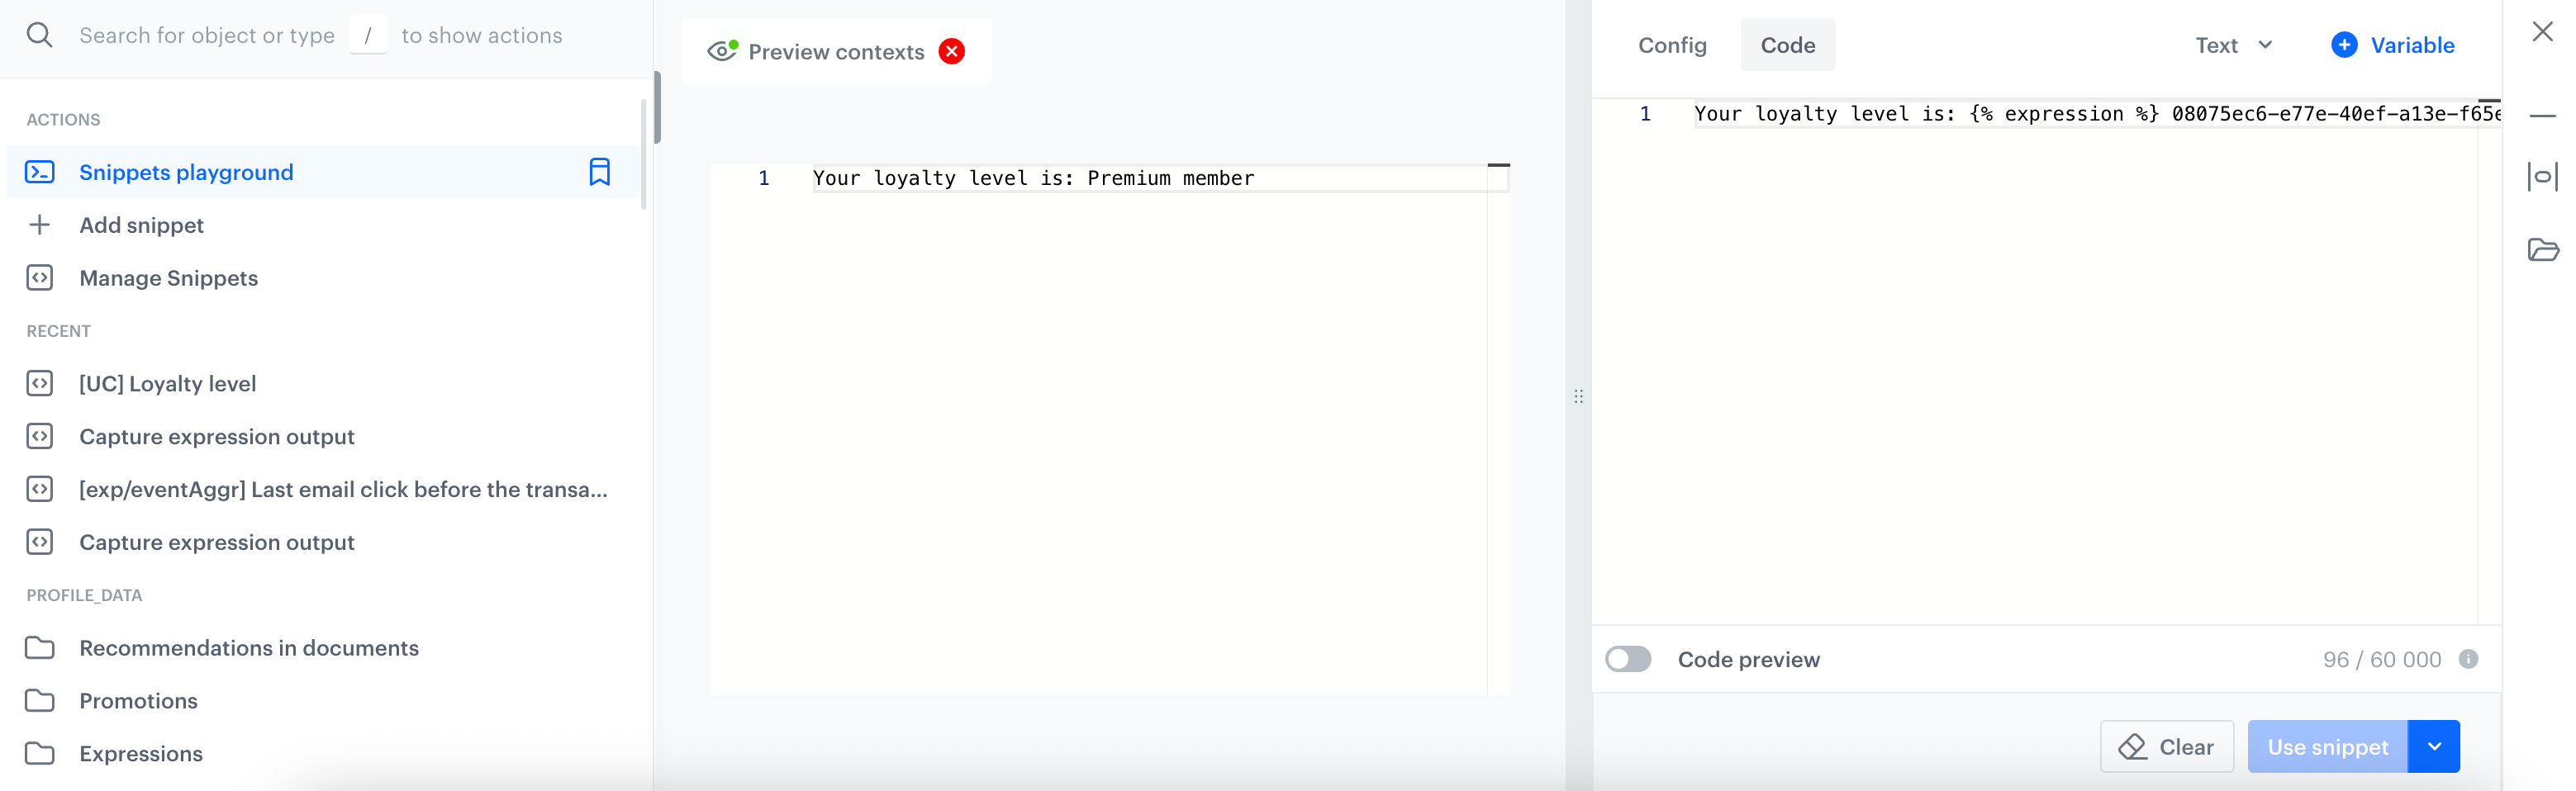
Preview of a snippet that contains a reference to an expression