AI recommendations in blog posts
Blogging enables you to reach your target group in an easier way than other conventional marketing channels. Preparing articles connected with your offer can promote your products or brand, attract an audience, and establish you as an authority in the field.
If you have a blog with a lot of readers, there may be a great opportunity to boost revenue because you can implement recommended products below your blog posts or inside them and make it easier to find the products that engage readers.
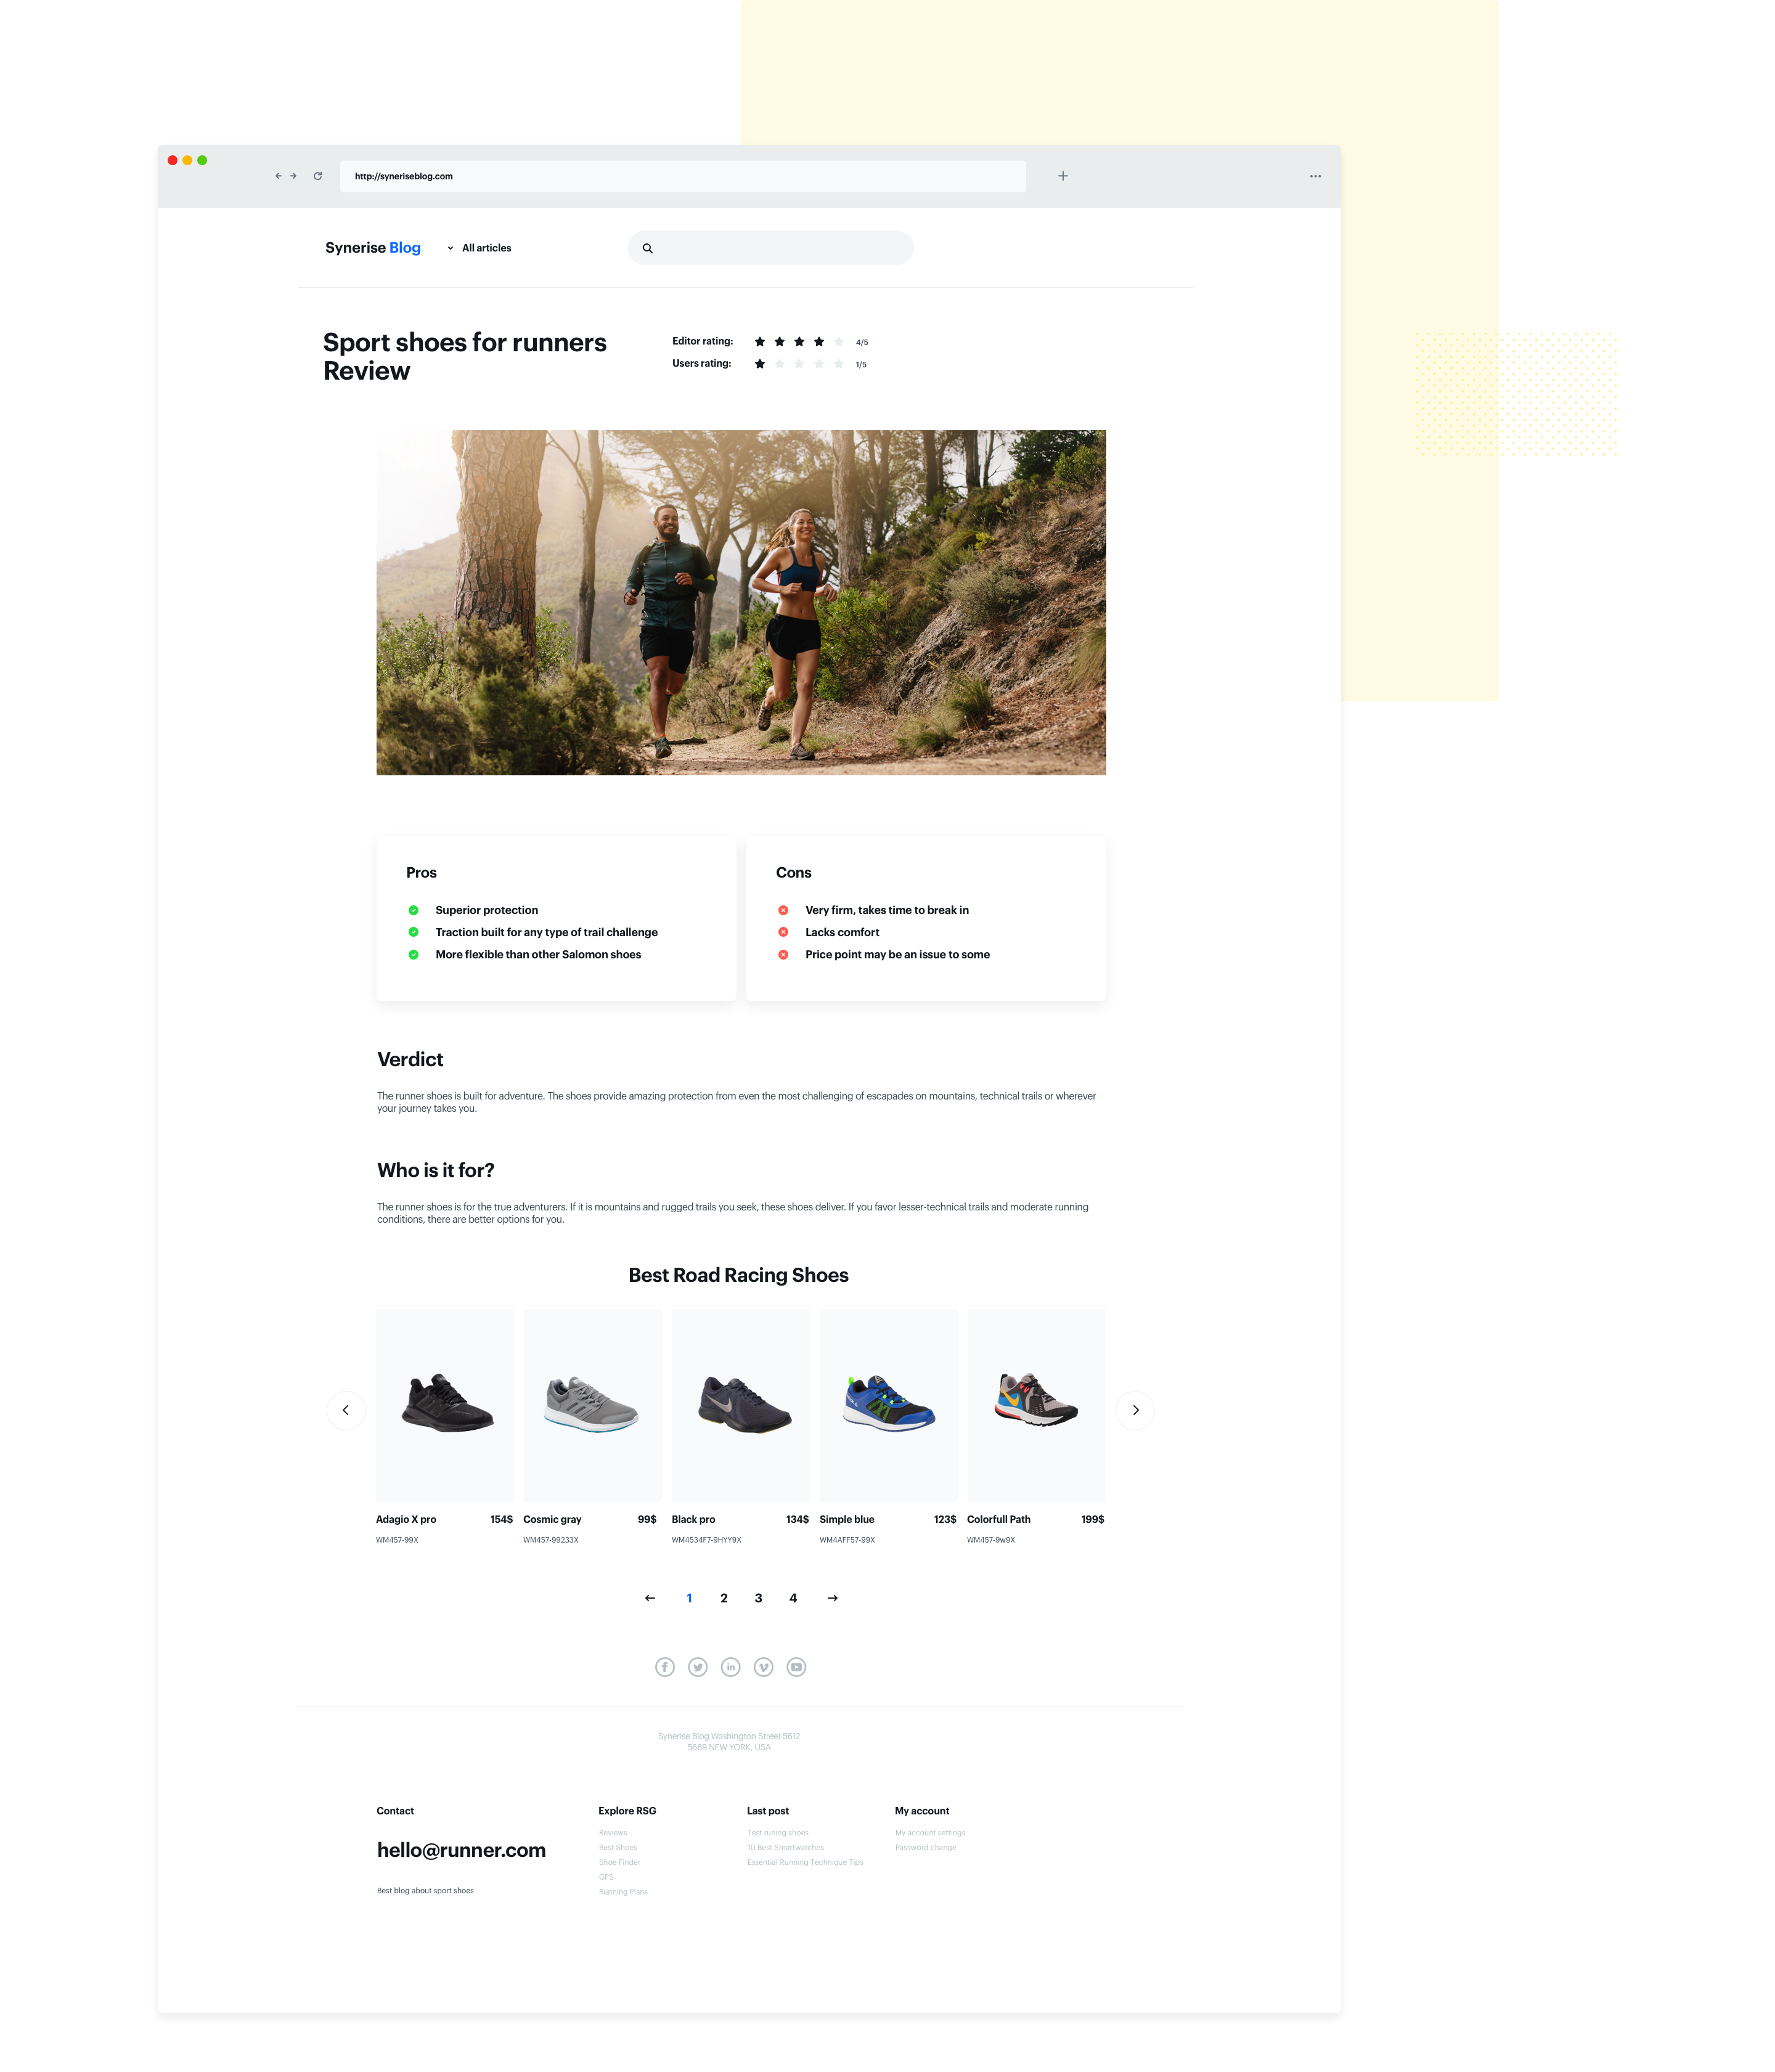
This use case describes how to enrich a blog with recommendations of outdoor running shoes suitable for specific terrains. The output of the use case are two separate frames which present the following recommendations:
-
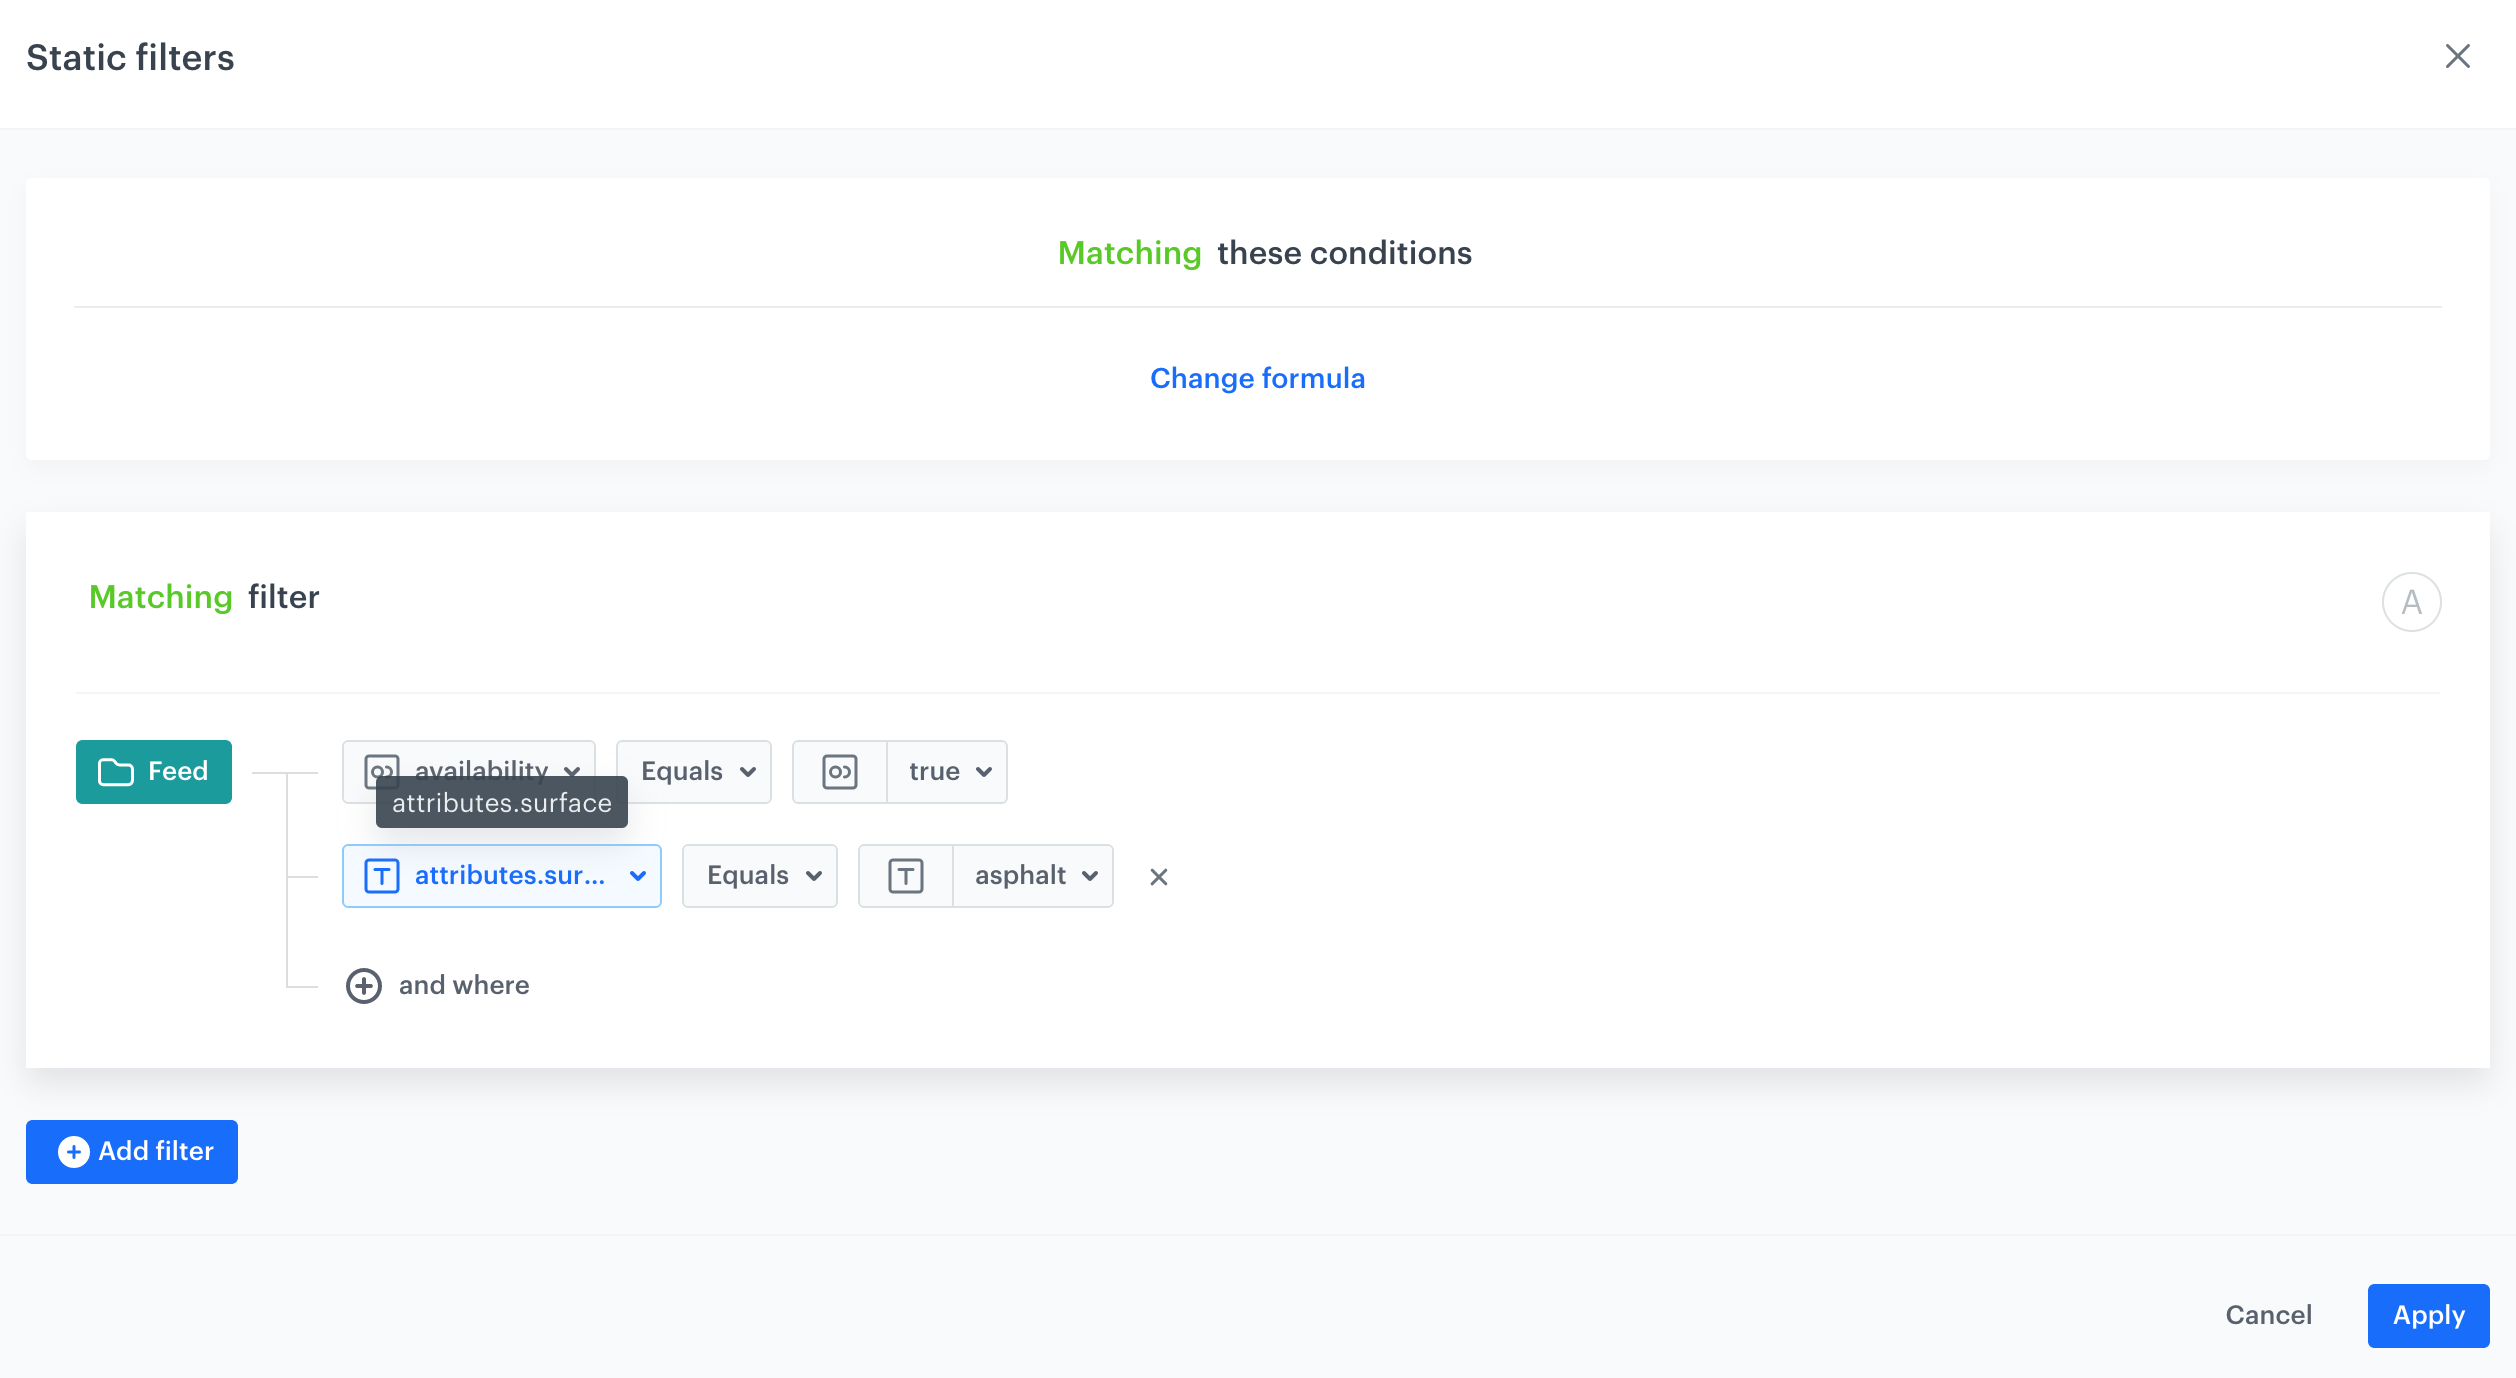
Bestselling road racing shoes - the filters of the recommendation use custom
surfaceattribute set toasphalt. -
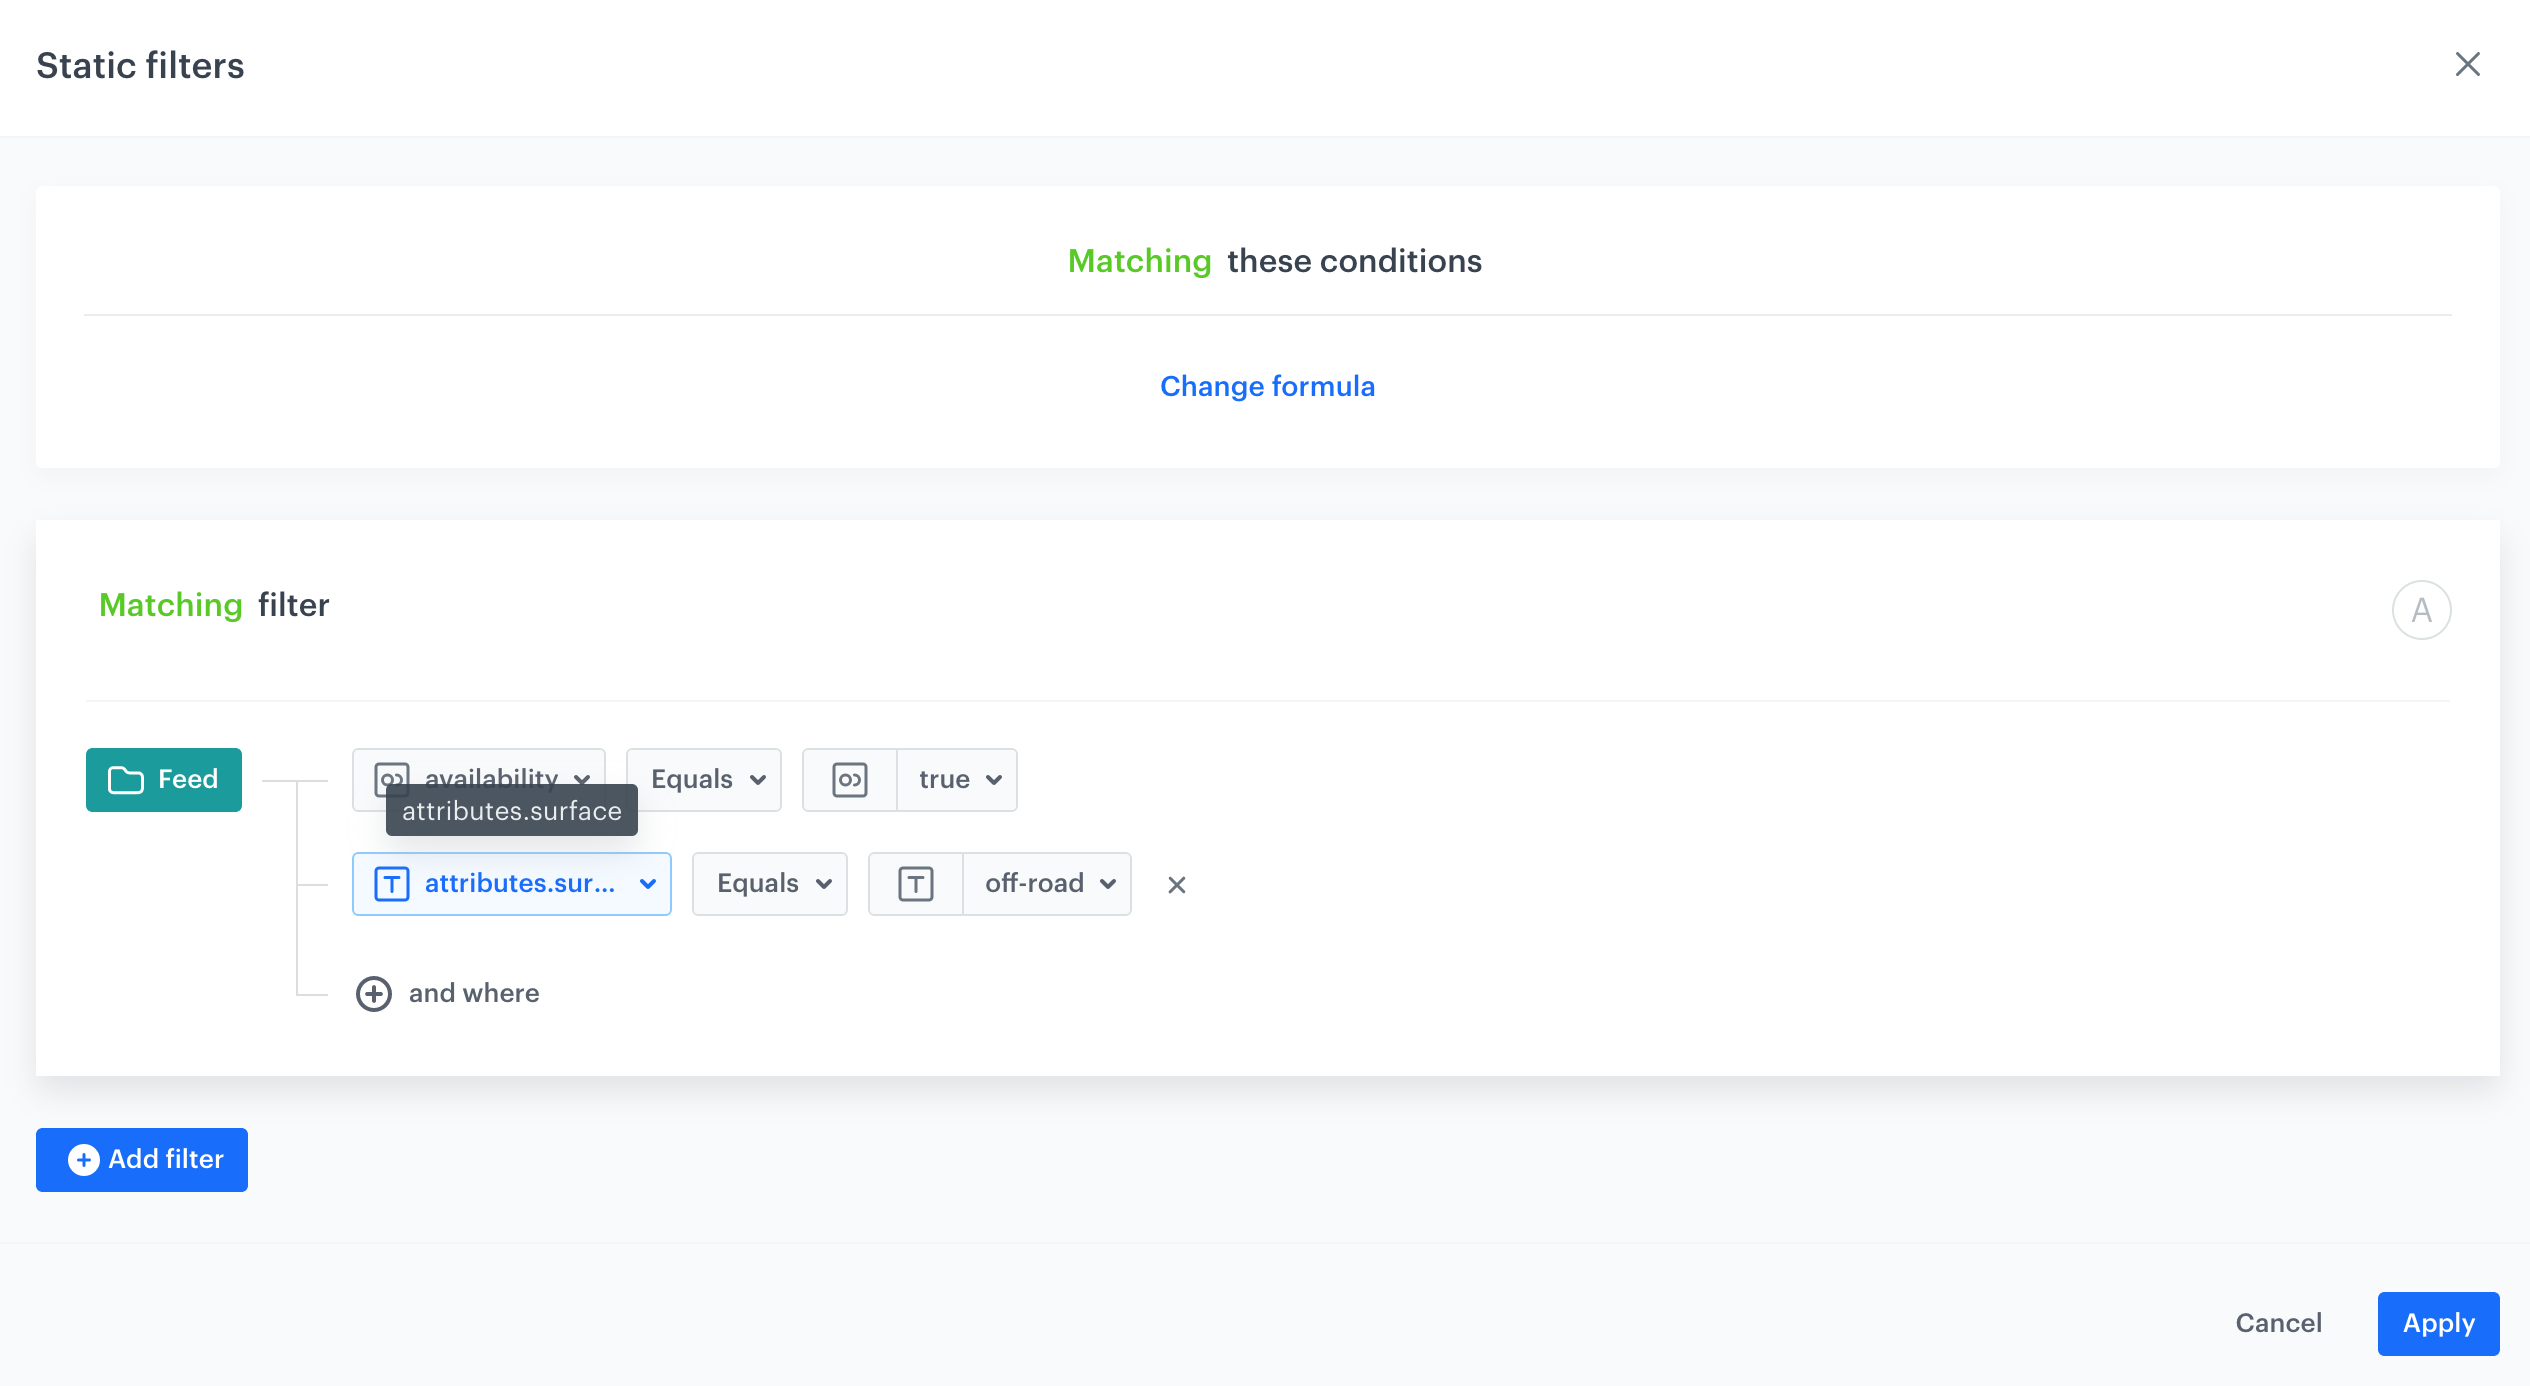
Bestselling trail racing shoes - the filters of the recommendation use custom
surfaceattribute set tooff-road.

Prerequisites
- Implement a tracking code to the blog.
- Import a product feed.
Process
In this use case, you will go through the following steps:
Prepare AI recommendations
As the first part of the process, create two separate AI recommendations:
- Bestselling racing shoes suitable for running on asphalt
- Bestselling racing shoes suitable for running off-road
The recommendations will differ only in the filter conditions.
- Go to Communication > Recommendations > Add recommendation.
- Enter the name of the recommendation (it is only visible on the list of recommendations).
- In the Type & Items feed section and click Define.
- From the Items feed dropdown list, select a product feed that has a trained model.
- Select the Top products recommendation type.

Selected type and product feed of the recommendation - In the Items section, click Define.
- Click Add slot.
- Click the Unnamed slot that was created.
- Define the minimum and maximum number of products displayed in the frame according to your needs.
- In the settings of the Static filters:
- For the bestselling racing shoes suitable for running on asphalt:

Configuration of static filters for racing shoes suitable for running on asphalt - For the bestselling racing shoes suitable for running off-road:

Configuration of static filters for racing shoes suitable for running off-road
- For the bestselling racing shoes suitable for running on asphalt:
- In the Additional settings, click Define.
- From the Sort metric dropdown list, select Conversion Percent in the last 30 days.

A metric that arranges the order of the items in the recommendation according to the conversion percentage - Click Save.
- Create the second recommendation. Repeat the steps.
Create dynamic content
Create two sets of dynamic content to insert the recommendations on your blog. The first set will use in the dynamic content template the AI recommendation that contains bestselling racing shoes suitable for running on asphalt, the other bestselling racing shoes suitable for running off-road. Apart from that, you will put them in different blog posts.
-
Go to Communication > Dynamic content > Create new.
-
Enter the name of the dynamic content.
-
Choose Insert Object type.
-
As the audience, select everyone.
-
In the Content section, select Simple message, and specify the CSS selector where you want to insert recommendations.
-
In the Content tab, click Create Message.
-
In the code editor, insert Jinjava with the AI recommendation and add your own CSS.
Click to see JinjavaReplace
your_campaign_IDwith the ID of the AI recommendation (either of the bestselling shoes suitable for asphalt or off-road). The ID of the AI campaign is contained in the URL of the recommendation.<!-- Downloading the AI campaign --> {% recommendations3 campaignId=your_campaign_ID %} {% for p in recommended_products3 %} <li data-snr-ai-product-id="{{p.itemId}}"> <a class="snrs-AI--item-link" href="{{p.link}}" title="{{p.title}}"> <img src="{{ p.imageLink }}"class="products-slider__item-image snrAI-product-image snrAI-product-image-{{p.itemId}}" width="90" alt="{{p.title}}" id="snrAI-image-{{p.itemId}}"> <h3 class="snrs-AI-product--product-name"> <span class="snrs-AI-product--name-first">{{p.title}}</span> </h3> <span class="snrs-AI-product--series">{{p.attributes.series}}</span> </a> </li> {% endfor %} {% endrecommendations3 %} -
Save the template.
-
In the Schedule section, select the date when the dynamic content is activated.
-
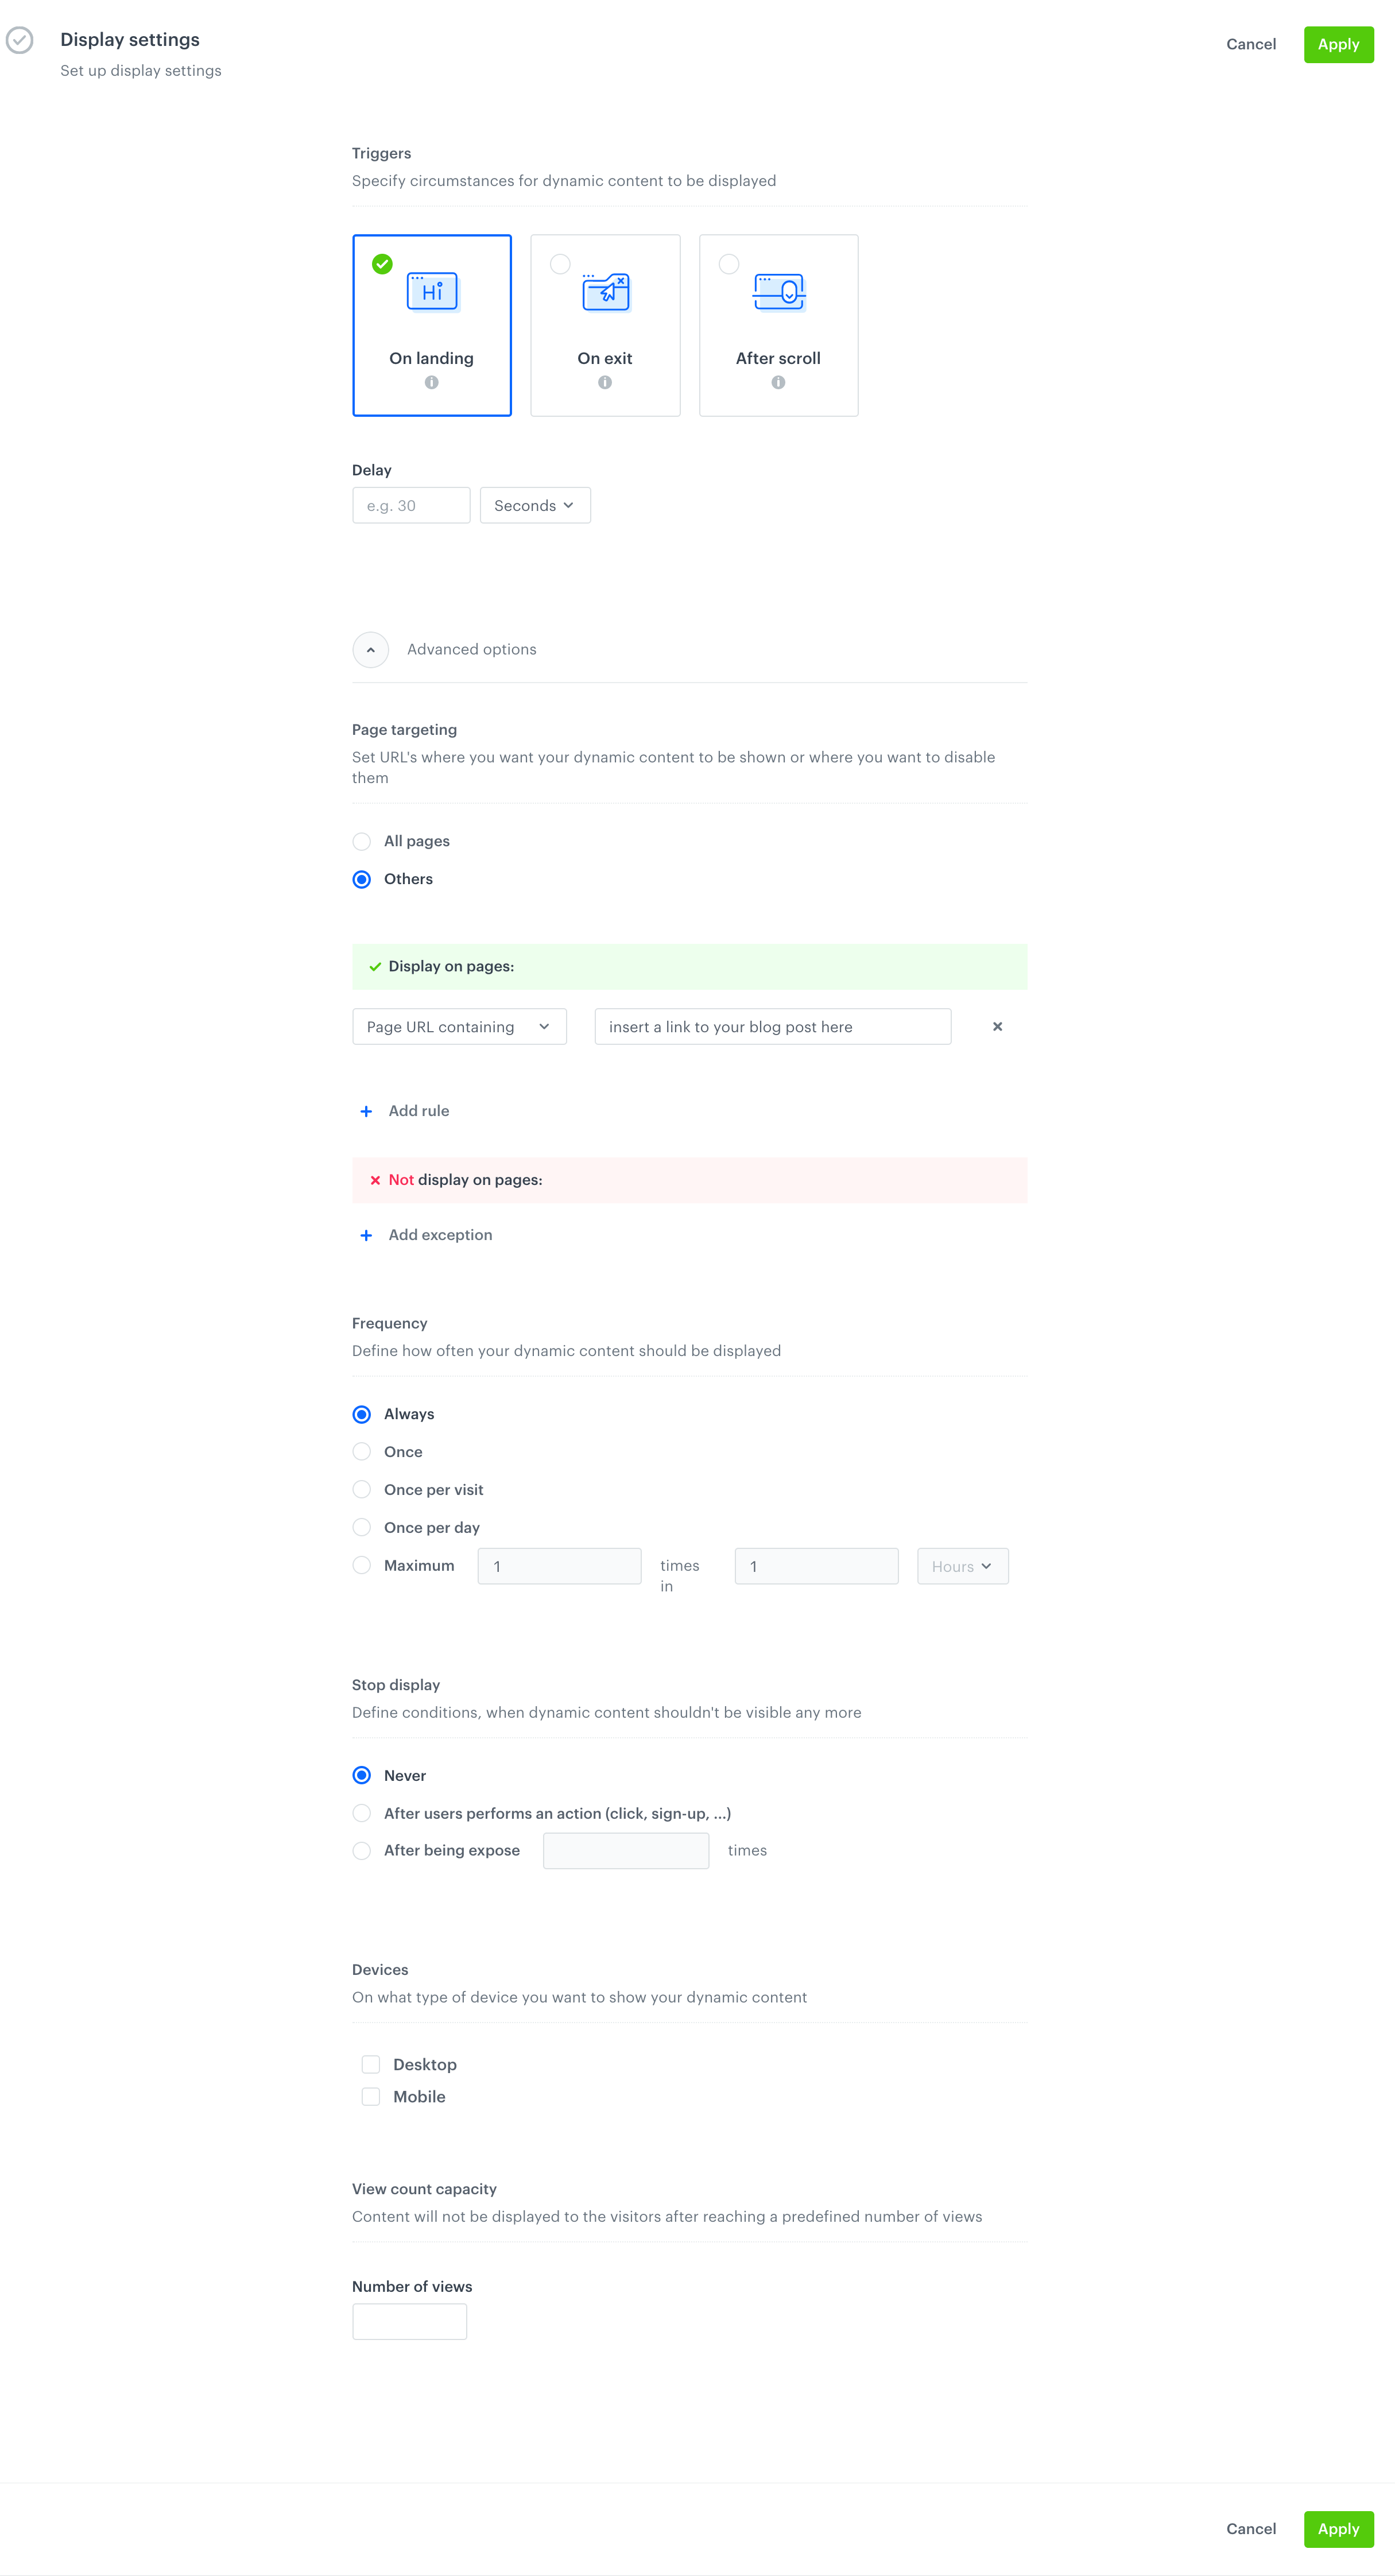
In Display settings, configure the settings:
- Triggers set to On landing.
- Leave Delay at default.
- In the Page targeting section, select Others:
- Under Display on pages banner, click Add rule.
- From the dropdown list, select Page containing URL.
- In the text field, enter the link to your blog post.
- Leave the rest of the settings at default.

Display settings -
Confirm by clicking Apply.
-
In the UTM & URL parameters section, click Skip step.
-
Activate the dynamic content.
-
Create the second dynamic content template to display the recommendations with the other group bestselling shoes for specific terrain. Repeat all the steps.
Result: The recommendation frames are displayed at the URLs with the blog posts.
