Privacy regulations may require that users who decline cookie consent still have the ability to subscribe to communications such as a newsletter. In this use case, we’ll show you how to collect newsletter signups without using tracking mechanisms, and still create a compliant user profile in Synerise.
This setup ensures you're not violating privacy preferences while still growing your subscriber base.
Prerequisites
A privacy-compliant form on your website that works independently of the SDK.
Process
In this use case, you’ll go through the following steps:
- Create an incoming integration (webhook) to receive form data.
- Create a workflow that listens to incoming events.
Create an incoming integration
In this part of the process, you will create an incoming integration to securely receive form submissions from the newsletter form, from users who have opted out of cookies or tracking.
- Go to
 Automation Hub > Incoming > New integration.
 - On the pop-up, select without authentication, JWT authentication or Webhook from Meta based on your business needs.
- Enter the name of the webhook.
In the Endpoint section, click Define.
The URL field is already is filled in with the endpoint to which the data will be sent.
- Optionally, you can add an icon to this integration.
- Confirm by clicking Apply.
- In the Incoming data section, click Define.
- Click Retrieve data. Right after you click the button, send a request to the endpoint in the Endpoint section with the sample of data that will be sent through forms. Example request:
{"firstname": "test",
    "lastname": "test",
    "email": "user@example.com",
    "newsletterAgreement": "true"
    }
You can retrieve the data and parameters you need for your business. An example is shown above.
- When the endpoint receives data from the request, verify the list of variables available in the Incoming data section. If the variables include those which are in the payload click Apply. If not, click Start again re-send request, and wait for the results.
- Click Save & publish.
The full documentation of the incoming integration feature is available in the Incoming Integration article.
Create a workflow
In this part of the process, you will build a workflow that triggers automatically each time new user data is received through the webhook. Make sure the email field is present and valid (in our case, it contains an @ symbol). The workflow sends the email address through the Outgoing Integration node to the endpoint that creates or updates a user profile in Synerise.
- Go to Automation Hub > Workflows > New workflow.
- Enter the name of the workflow.
Define the Business Event node
As the trigger, select Business Event. In the configuration of the node:
- Select the incoming integration for customer's data you created as the first part of the process.
- Add the condition which checks the email address is provided and correct:
- From the Add condition dropdown list, select the body.email.
- As the logical operator, select Contains.
- In the text field, enter
@
- Confirm by clicking Apply.
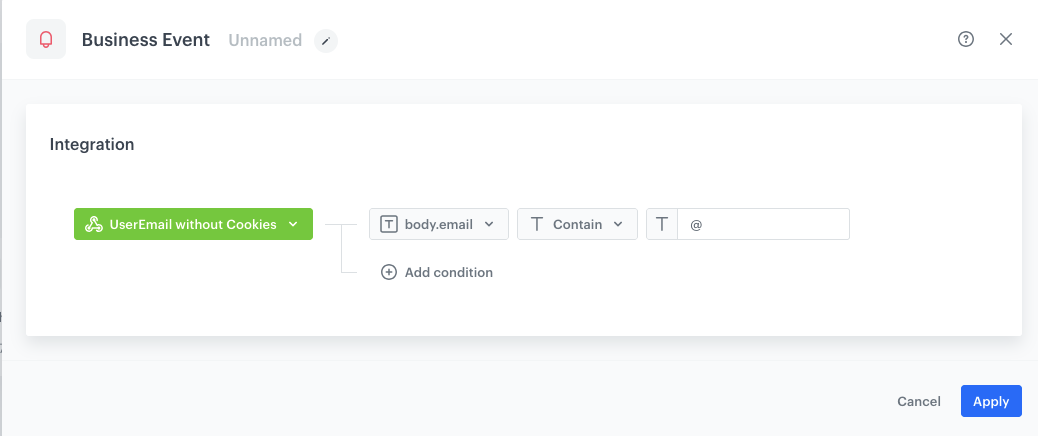
Business Event node configuration
Define the Outgoing Integration node
In this step, you’ll make an API call to create or update a Synerise profile using just the provided email address—no tracking needed. Call the endpoint that handles creating or updating user profiles in Synerise.
- From the dropdown list, select the Outgoing Integration node.
Click the node. In the configuration of the node:
Select the Custom webhook.
- Enter the name of the webhook.
- Choose webhook connection type - select By API key.
- In the Webhook name field, enter the value that will be displayed in the
nameparameter of the event which will contain the request response. - Optionally, in the Event name field, choose an action name for the event that contains the request response from the endpoint.
If you leave the field blank, the action defaults towebhook.response. - Select the POST method.
- In the URL address, enter
https://api.synerise.com/v4/clients/batch. Read more about the Batch add ord update clients method Enter the following headers:
- set the
Content-Typeheader toapplication/json(default), - set the
Api-Versionheader to4.4
- set the
- Enter the request body. For the scenario described in this use case, the body is as follows:
[
{
     "email": "{{ request.body.email }}",
     "agreements": {
        "email": {{ request.body.newsletterAgreement }}
     }
     }
]
This is just an example, you can create JSON according to your business needs.
- Confirm by clicking Apply.
This operation is safe to repeat — if the profile exists (matched by email or ID), it will be updated; if not, a new one will be created.
Add final setting to your workflow
- Add the End node.
Launch the workflow by clicking Save & Run.

Final view of the workflow configuration Process logic:
- For users who did not give consent to tracking – use the webhook + automation method described above.
- For users who gave tracking consent – submit form data as per usual. For implementation details of form tracking, see the documentation.
Learn more about the process from the Do Not Track documentation.