In today’s retail environment, the boundaries between online and offline experiences are increasingly blurred. Mobile applications can bridge this gap by providing interactive tools that connect the physical store with digital personalization. One such solution is an in-app QR code scanner that directs customers to individualized promotions and recommendations based on their unique profile.
By enabling users to scan QR codes placed in physical locations—such as shelves, displays, or posters—brands can drive engagement, gather valuable behavioral data, and deliver a seamless omnichannel experience. Each scan automatically appends the user’s UUID (unique identifier) to the destination link, ensuring that the landing page content is fully personalized to that individual.
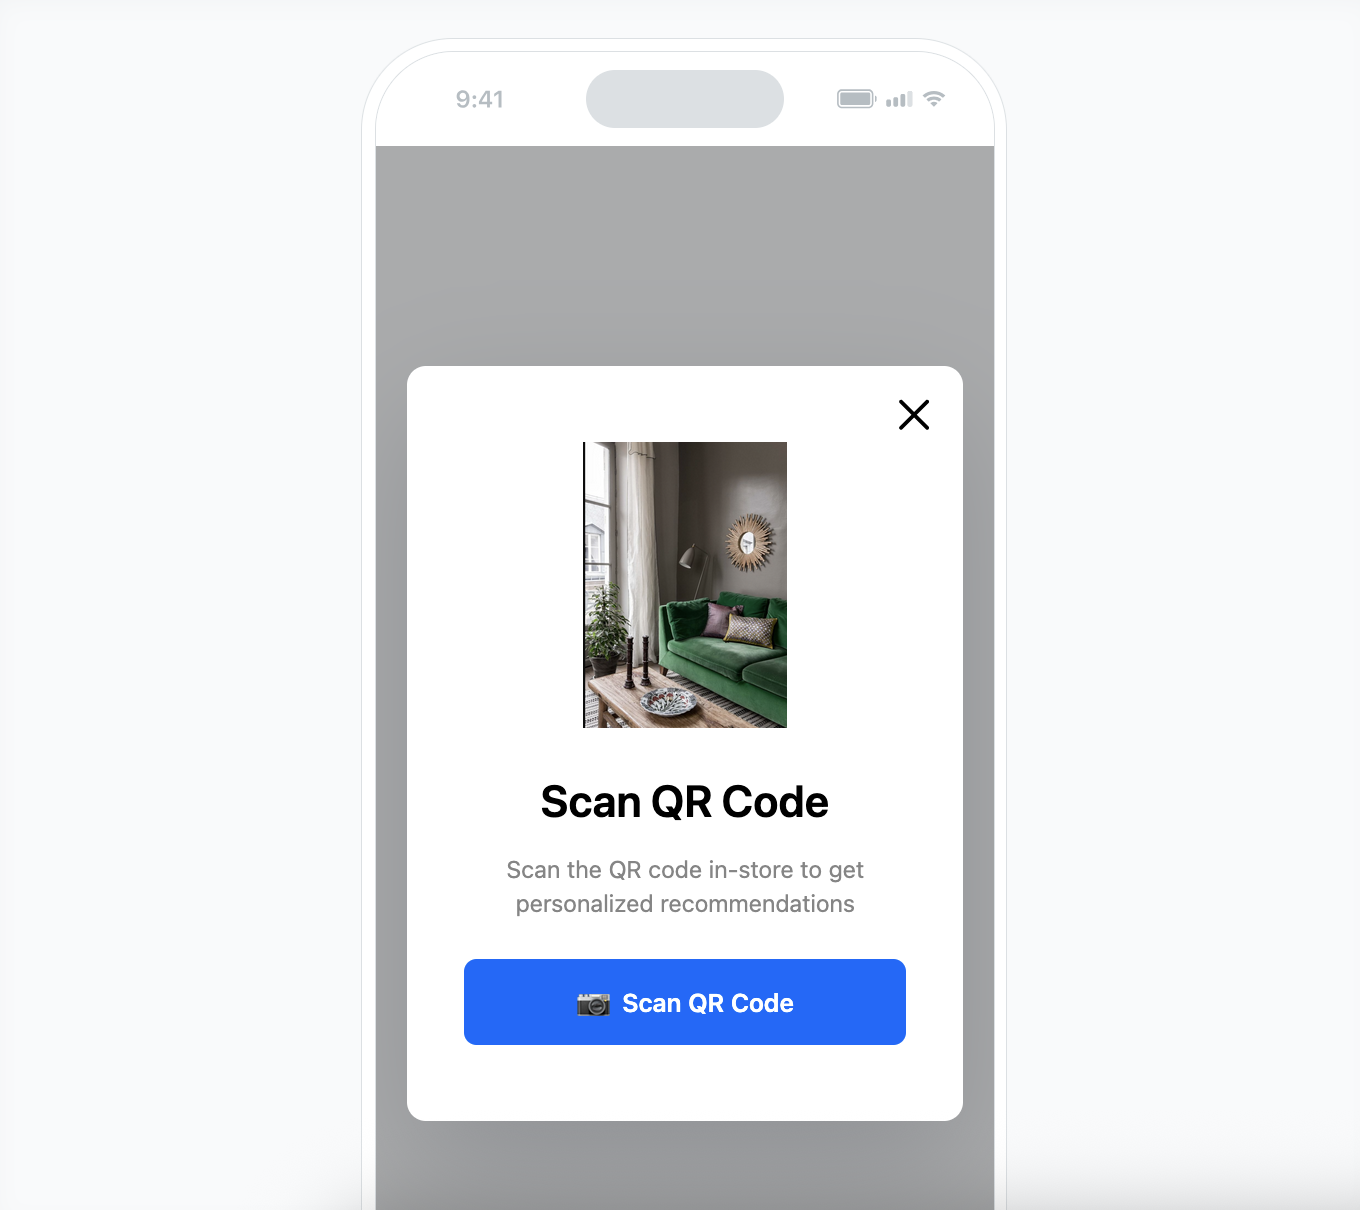
This use case demonstrates how to create an interactive in-app campaign featuring a built-in QR scanner that redirects customers to a personalized landing page with AI-driven recommendations. Using a predefined template, the setup process is quick and does not require building the scanner interface from scratch.
You will use a predefined template with the resize option, which appears permanently in the application as a top or bottom bar, providing easy access to the QR code scanner and simplifying its implementation.
The campaign targets users who interact with a brand in physical locations by scanning an in-store QR code to unlock exclusive discounts for the promoted brand and get product suggestions tailored to their preferences. After scanning the code, the users are directed to a landing page, where they will find the personalized recommendations from 3 specific, promoted brands, costing more than 50$.
What is more, you can use this scanner in different scenarios by letting the user scan QR codes in various placements - in stores, on street banners, in magazines etc. Each time, you deliver personalized content and recommendations, avoiding sending the same content to everyone.
Prerequisites
- Implement Synerise SDK in your mobile app.
- If you plan to publish a landing page within your own domain, follow instructions from "Requirements for custom domains" section; if you choose to publish it on the Synerise domain, no additional requirements are necessary
- Configure AI engine to be able to add personalized AI recommendations to your landing.
Process
In this use case, you will go through the following steps:
- Create AI recommendations with personalized products.
- Create a landing page
- Create an in-app campaign with QR code scanner using the predefined template.
Create AI recommendations
In this step, create an AI attribute recommendation campaign showing products from specific, promoted brands.
- Go to
 AI Hub > (AI Recommendations) Models > Add recommendation.
 - Enter the name of the recommendation (it is only visible on the list of recommendations).
- In the Type & Items feed section, click Define.
- From the Items feed dropdown list, select a product feed.
- Select the Attribute recommendation type.
- Confirm the recommendation type by clicking Apply.
- In the Items section, click Define.
- Click Add slot.
- Define the minimum and maximum number of products that will be recommended to the user. In this example, it's from 3 to 5.
- From the Items attribute dropdown menu, choose the brand attribute.
- Click Define filter in the Static filter section, and from the dropdown list choose Visual Builder.
- From the Select attribute dropdown list, choose brand.
- From the Operator dropdown list, select In.
- From the Select value dropdown list, select the specific brands you want to promote.
- Click Apply.
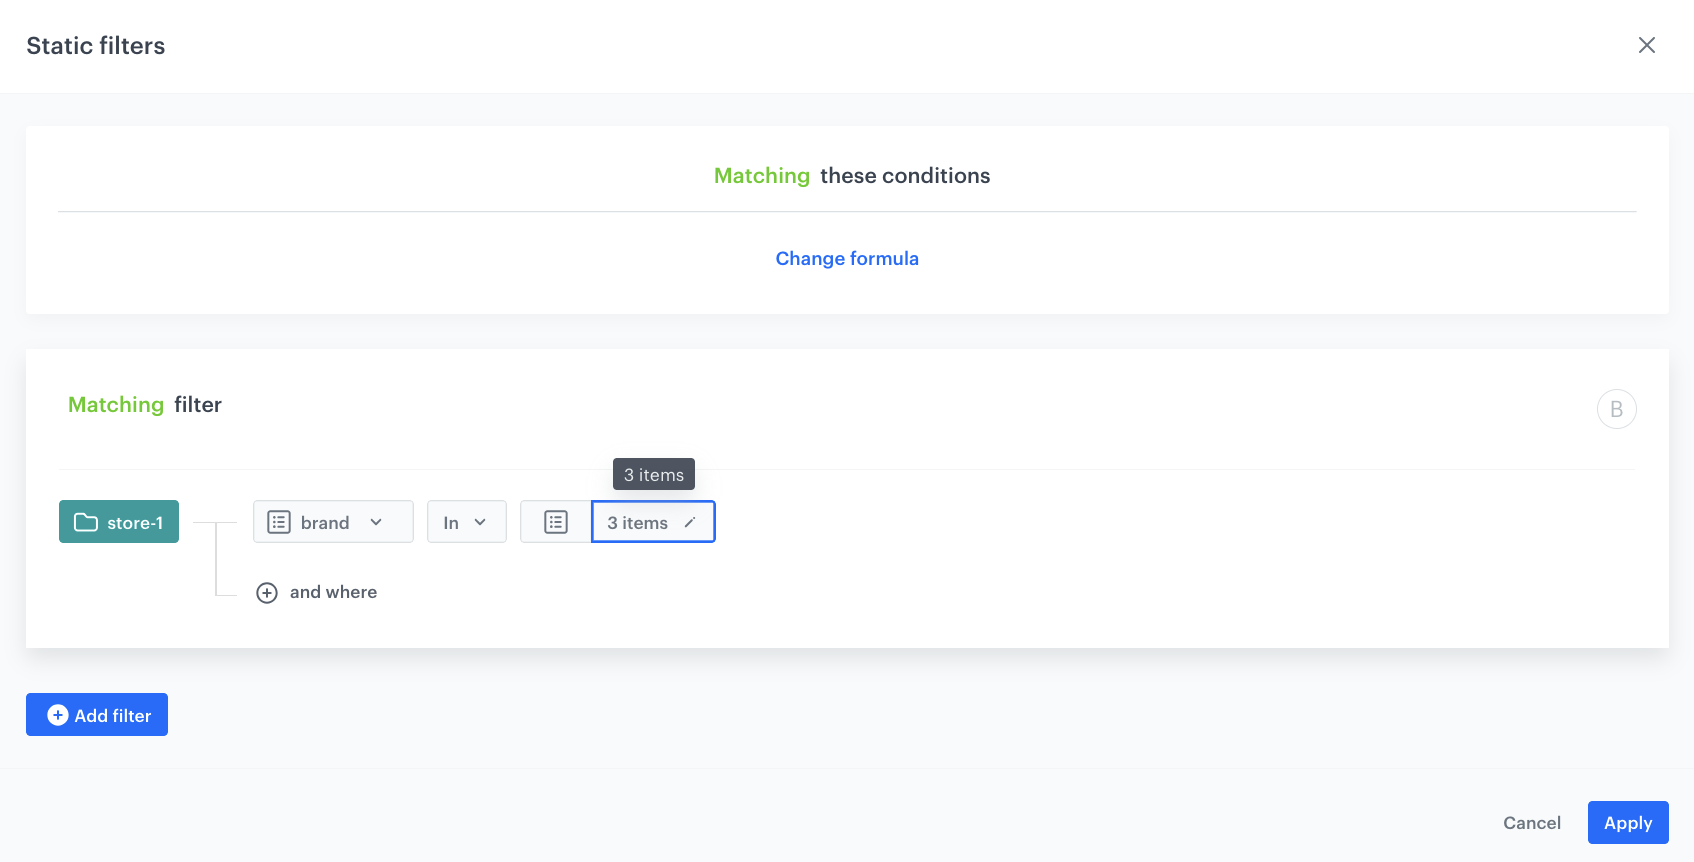
Configuration of the static filter - Optionally, define Elastic filters.
- Click Apply.
- Click Apply.
- In the top right corner, click Save.
Create a landing page
In this part of the process, you will create a landing page with personalized recommendations created in the previous step.
- Go to
 Experience Hub > Landing Page > Create new.
 - Enter the name of the campaign.
Define content
- In the Content section, click Create message.
- From the list of template folders, select the Predefined templates folder.
Result: You are redirected to the list of predefined templates. - Select the QR Code Scanner template.
Result: You are redirected to the code editor. The form in the Config tab is pre-filled with default values, which you can modify to suit your business needs. - In the Main Recommendation ID field, enter the ID of recommendations you created as a part of previous step.
- Modify Buttons, Hero, Footer and other sections, and appearance of your landing page, including fonts, colors, and backgrounds, to ensure it matches your branding.
- After you make changes to the template, you can check the preview.
- Click the Preview Contexts button on the upper left side.
- Enter the ID of a customer.
- Click Apply.
- If the template is ready, click Use in communication in the upper right corner.
Define schedule settings
- In the Schedule section, click Define.
- Select the timezone.
- Select the time when the landing page will be active - in this case, choose the start and end date.
- Click Apply
Define the SEO settings
In this part of the process you may define technical details concerning search engine optimization and increase the chances of placing high in search results.
Set up the URL
In this part of the process, you will define the URL to your landing page.
Adjust optional settings
- In the HTTP headers section, you can add custom HTTP headers to your landing page. In the Key and Value fields, enter a header and its value, respectively.
- In the Customize section:
- you can add CSS and scripts to your landing page
- you can define the URLs to external sources or paste the snippets
- in the JS section under the Advanced options option, to enable additional tracking on your landing page, you can paste the tracking code.
Save your campaign
- After you make changes to the campaign, you can check the preview. Click the Preview button on the upper right side.
- When your landing page is ready you can Save it as a draft or directly click Publish.
- Generate a QR code using any reliable online QR code generator. Use the link for the landing page created before.
Create an in-app campaign
In this part of the process, you will create an in-app campaign, which uses the resize feature, meaning it is displayed continuously in the app as a top or bottom bar, allowing quick and seamless access to the QR code scanner without additional steps. We will use a predefined template for the QR code scanner, so there is no need to create a template from scratch.
- Go to Experience Hub > In-app messages > Create new
- Enter a meaningful name for the in-app campaign.
Define the audience
- In the Audience section, click Define.
- Select the Everyone tab.
- Click Apply.
Define content
- In the Content section click Define.
- Click Create message and from the list of template folders, select Predefined templates.
- Select QR code scanner.
Result: You are redirected to the code editor.
You can edit the template in two ways, by editing the code of the template (add inserts, add variables) and/or by filling out the form in the Config tab. In this use case, we will use the capabilities of the predefined Config tab.
Edit form in the Config tab
The Config tab already has default values filled in. You can keep them or change them to fit your business needs.
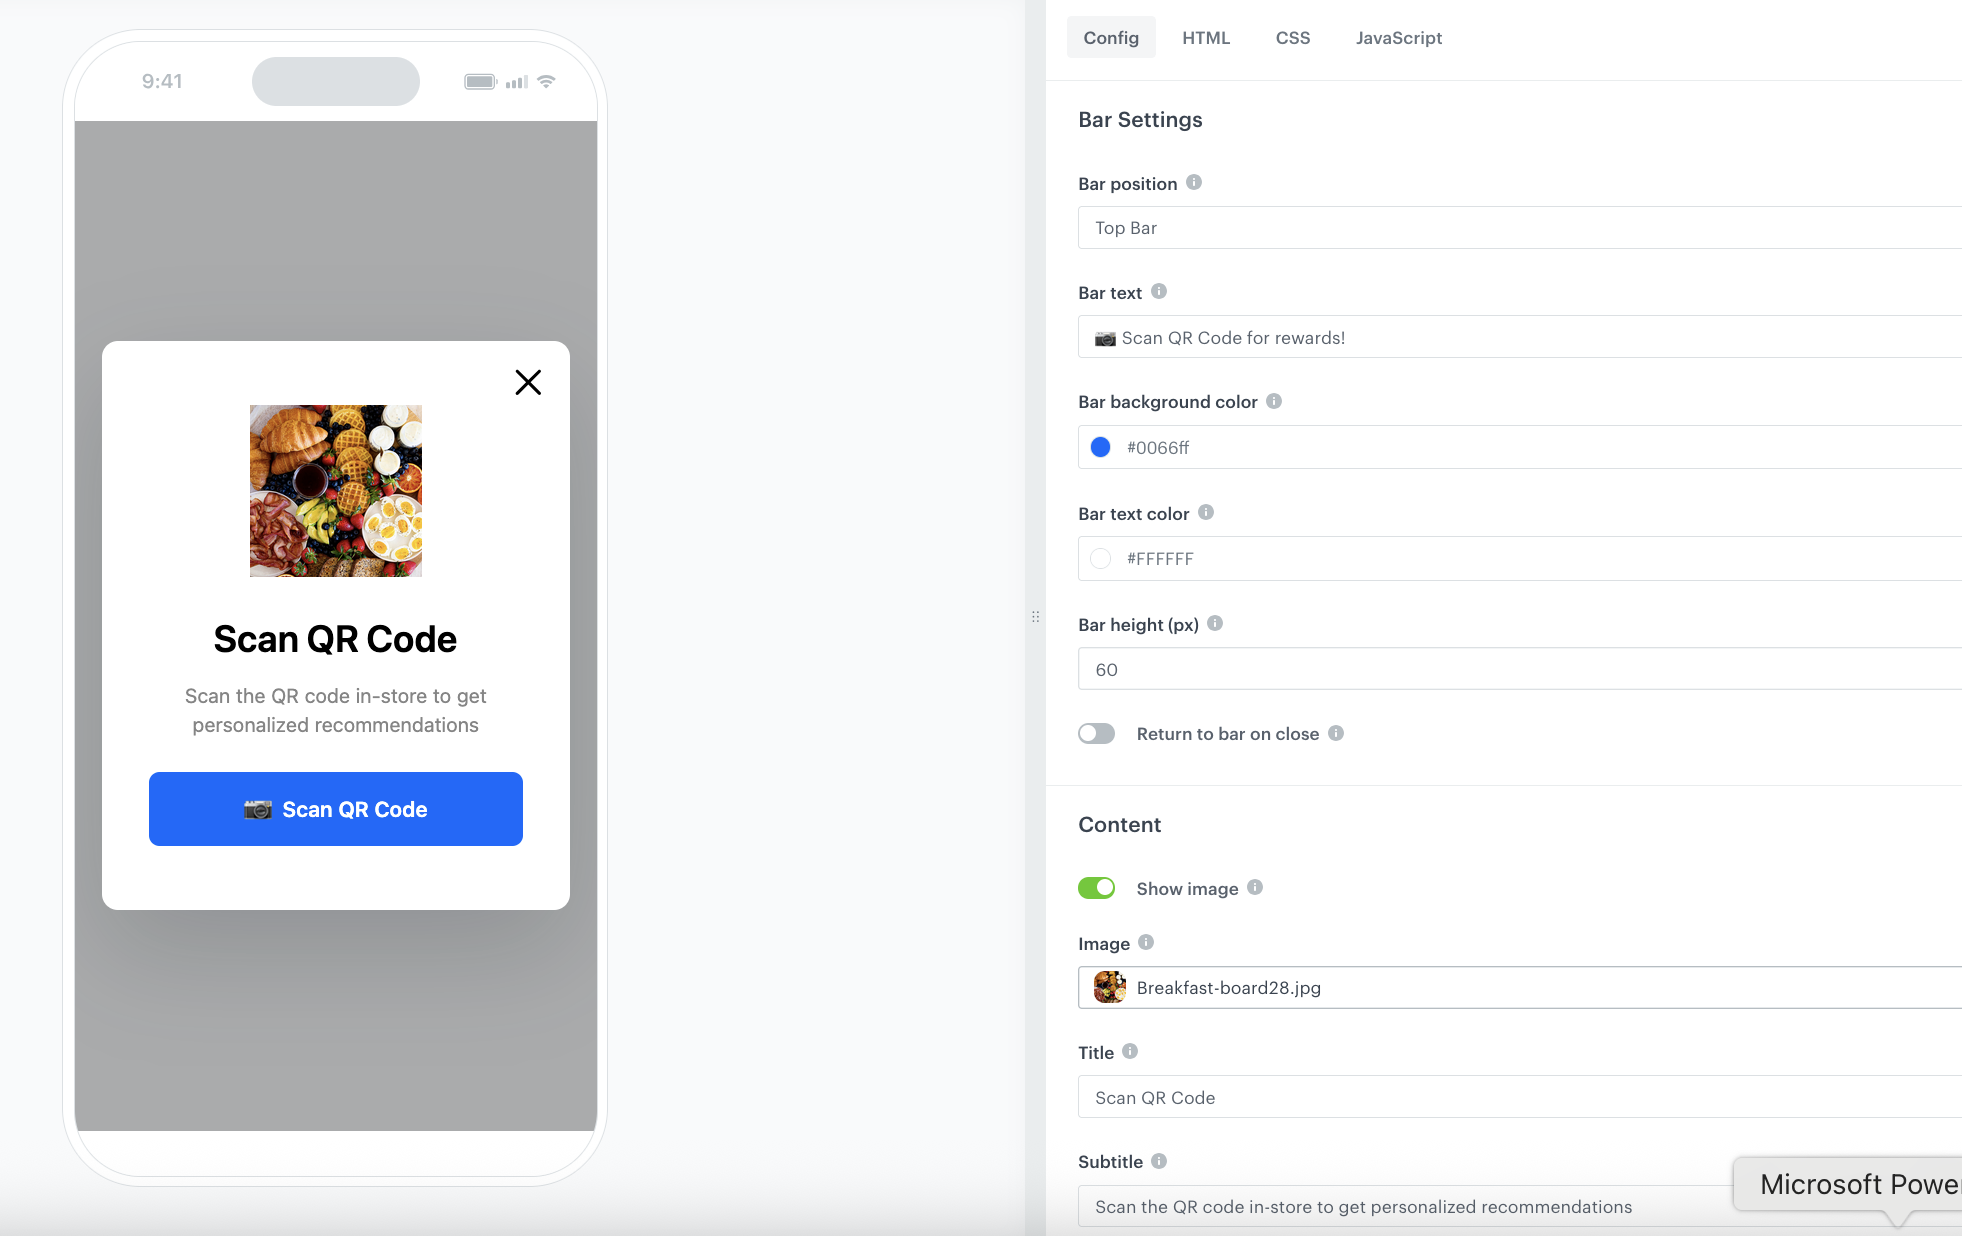
- In the Bar settings section set up the copy and style of the first banner. Choose the bar position (top or bottom bar).
- In the Content section change the main title, subtitle and image.
- In the Button section change the icon text, and style of the main button.
- Fill the Style field, to personalize the visual of the in-app scanner.
- Set up the Message section to personalize the success and the error message.
- If you want to make it more personalized, you can use HTML tab to add changes directly in the code of the template.
After you make changes to the template, you can check the preview.
- Click the Preview button on the upper left side.
- Enter the ID of a customer or a product.
- Click Apply.
Considering that the in-app is very interactive, the preview in the platform may not be enough to test the in-app performance. That's why we suggest checking how this campaign displays altogether directly in the mobile app.
- If the template is ready, in the upper right corner, click Save this template > Save as.
On the pop-up:
- In the Template name field, enter the name of the template.
- From the Template folder dropdown list, select the folder where the template will be saved.
- Confirm by clicking Apply.
- Click Next to continue the process of configuring the in-app campaign.
- Click Apply to save your content changes.
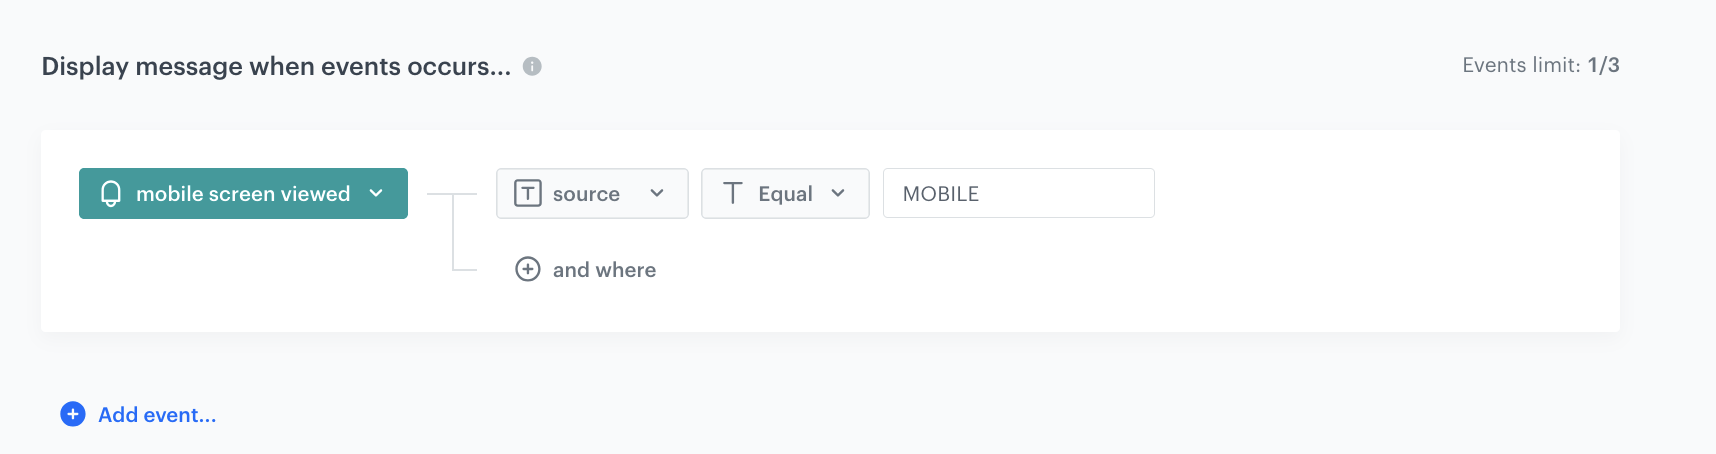
Select events that trigger the in-app message display
In this part of the process, define the event that triggers the display of the in-app message. In this, case it will be visible for all users, immediately after opening the application.
- In the Trigger events section, click Define.
- Select Add event and from the dropdown list, choose
screen.viewevent. - Click the + where button and select
source. - As the logical operator, select Equals.
- As the value add MOBILE.
- Click Apply.
Schedule the message and configure display settings
As the final part of the process, you need to set the schedule, display settings configuration, capping, priority of the message among other in-app messages.
- In the Schedule section:
- Click Define.
- Choose Run immediately option.
- Click Apply.
- In the Display settings section:
- Click Define.
- Define the Delay display as 0 and Priority index as 1.
- Click Apply.
- Optionally, you can define the UTM parameters in the UTM & URL parameters section. Otherwise, click Skip step.
- Optionally, you can add the custom parameters in the Additional parameters section. Otherwise, click Skip step.
- To start your campaign, click Activate.
What's next
After launching the campaign, when the user taps the in-app message, the device camera will automatically open and the QR scanning mode will be activated. Once the QR code is successfully scanned, the user will be redirected to the dedicated landing page created for this campaign.
The system will automatically append the user’s UUID to the landing page link, allowing the platform to identify the customer. Based on this unique identifier, the AI engine will generate personalized product recommendations tailored specifically to that individual.
As a result, each user will see a unique, personalized product view on the landing page — no two users will see the same product set.
Check the use case set up on the Synerise Demo workspace
You can check the configuration of the campaign components directly in Synerise Demo workspace:
If you’re our partner or client, you already have automatic access to the Synerise Demo workspace (1590), where you can explore all the configured elements of this use case and copy them to your workspace.
If you’re not a partner or client yet, we encourage you to fill out the contact form to schedule a meeting with our representatives. They’ll be happy to show you how our demo works and discuss how you can apply this use case in your business.