In online retail, timing and relevance are key when presenting promotions. Shoppers often browse multiple sections of a website but don’t always convert immediately. By leveraging the last visited main category, businesses can deliver contextually relevant promotions that feel timely and personalized.
This use case illustrates how to dynamically display a promotion related to the last main category visited by the user — for example, if the customer recently viewed items from "Electronics", a banner or content block can highlight current deals or featured products from that specific category. This approach increases the chance of re-engagement and encourages return visits or immediate conversions by matching promotional content to current user interest.
In this use case, we return personalized promotions based on the last visited main category by the user. However, the same configuration logic can be easily adapted to display category-specific promotions directly on each category page.
To do this, you simply skip the use of segments and aggregates related to browsing history and instead implement static personalization rules per category. For example, on the “Electronics” category page, you display promotions tailored specifically to electronics products. This approach allows for consistent and relevant promotional messaging across the entire website structure.
Prerequisites
- Import your product feed to catalog.
- Integrate Synerise promotions.
- Implement transaction events using API.
Process
- Create an aggregate which returns the last visited category.
- Create a segmentation for each category.
- Create a promotion for each category.
- Create a dynamic content with the personalized promotions.
Create an aggregate
In this part of the process, create an aggregate that will return the category that the user last visited.
- Go to
 Behavioral Data Hub > Live Aggregates > Create aggregate.
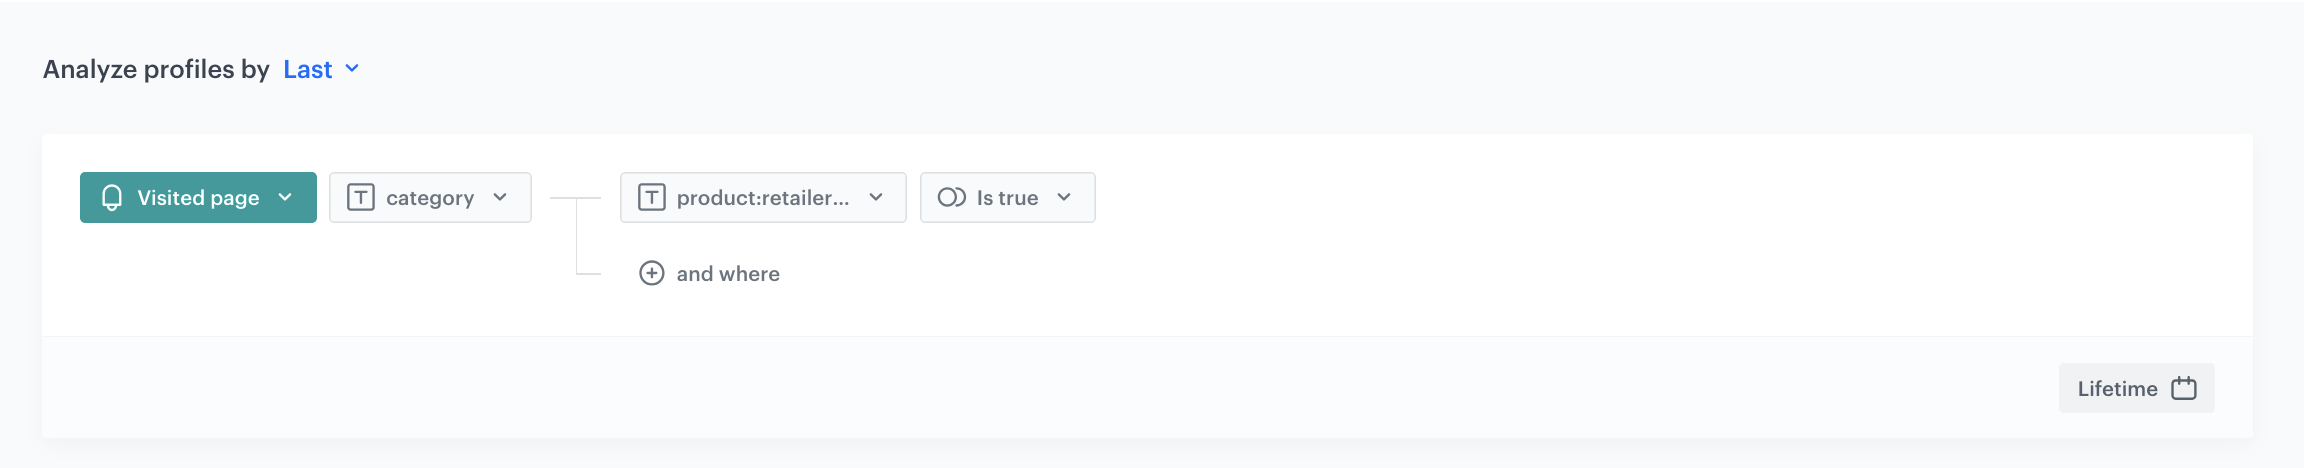
 - As the aggregate type, select Profile.
- Enter the name of the aggregate.
- Click Analyze profiles by and select Last.
- From the Choose event dropdown list, select the
page.visitevent. - As the event parameter, select category.
- Add the value product:retailer_part_no.
- As the value add Is true.
- Set the period from which the aggregate will analyze the results to Lifetime.
- Save the aggregate.
Create a segmentation
Create a segmentation for each category on your page. It will group the users based on the specific category being the last one they visited.
- Go to
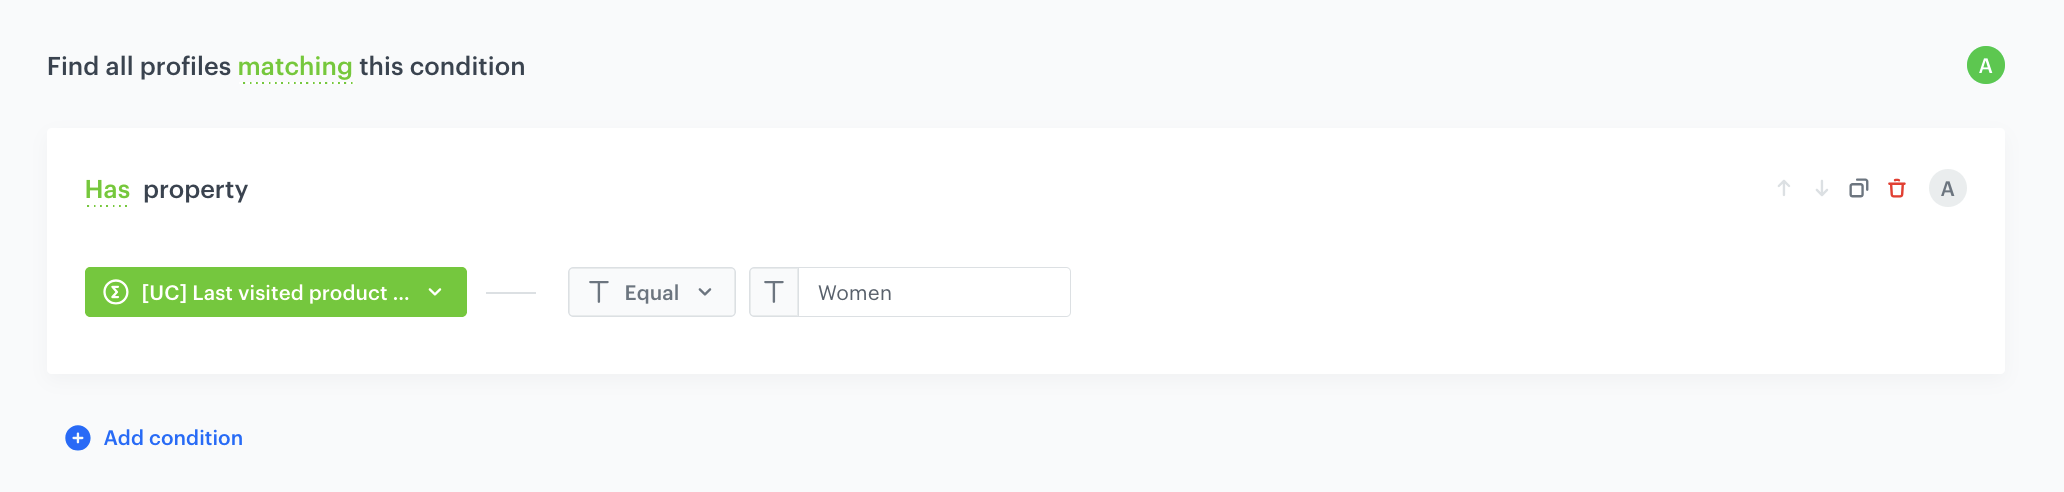
 Decision Hub > Segmentations > New segmentation.
 - Enter the name of the segmentation.
- From the Choose filter dropdown list, select the aggregate you created.
- As the logical operator, select Equal.
- Next to the logical operator, in the text field enter the name of the specific category.
Configuration of the segmentation
Duplicate the segmenaton, and repeat this step as many times as you have categories on your website, changing only the name of the category.
Create a promotion
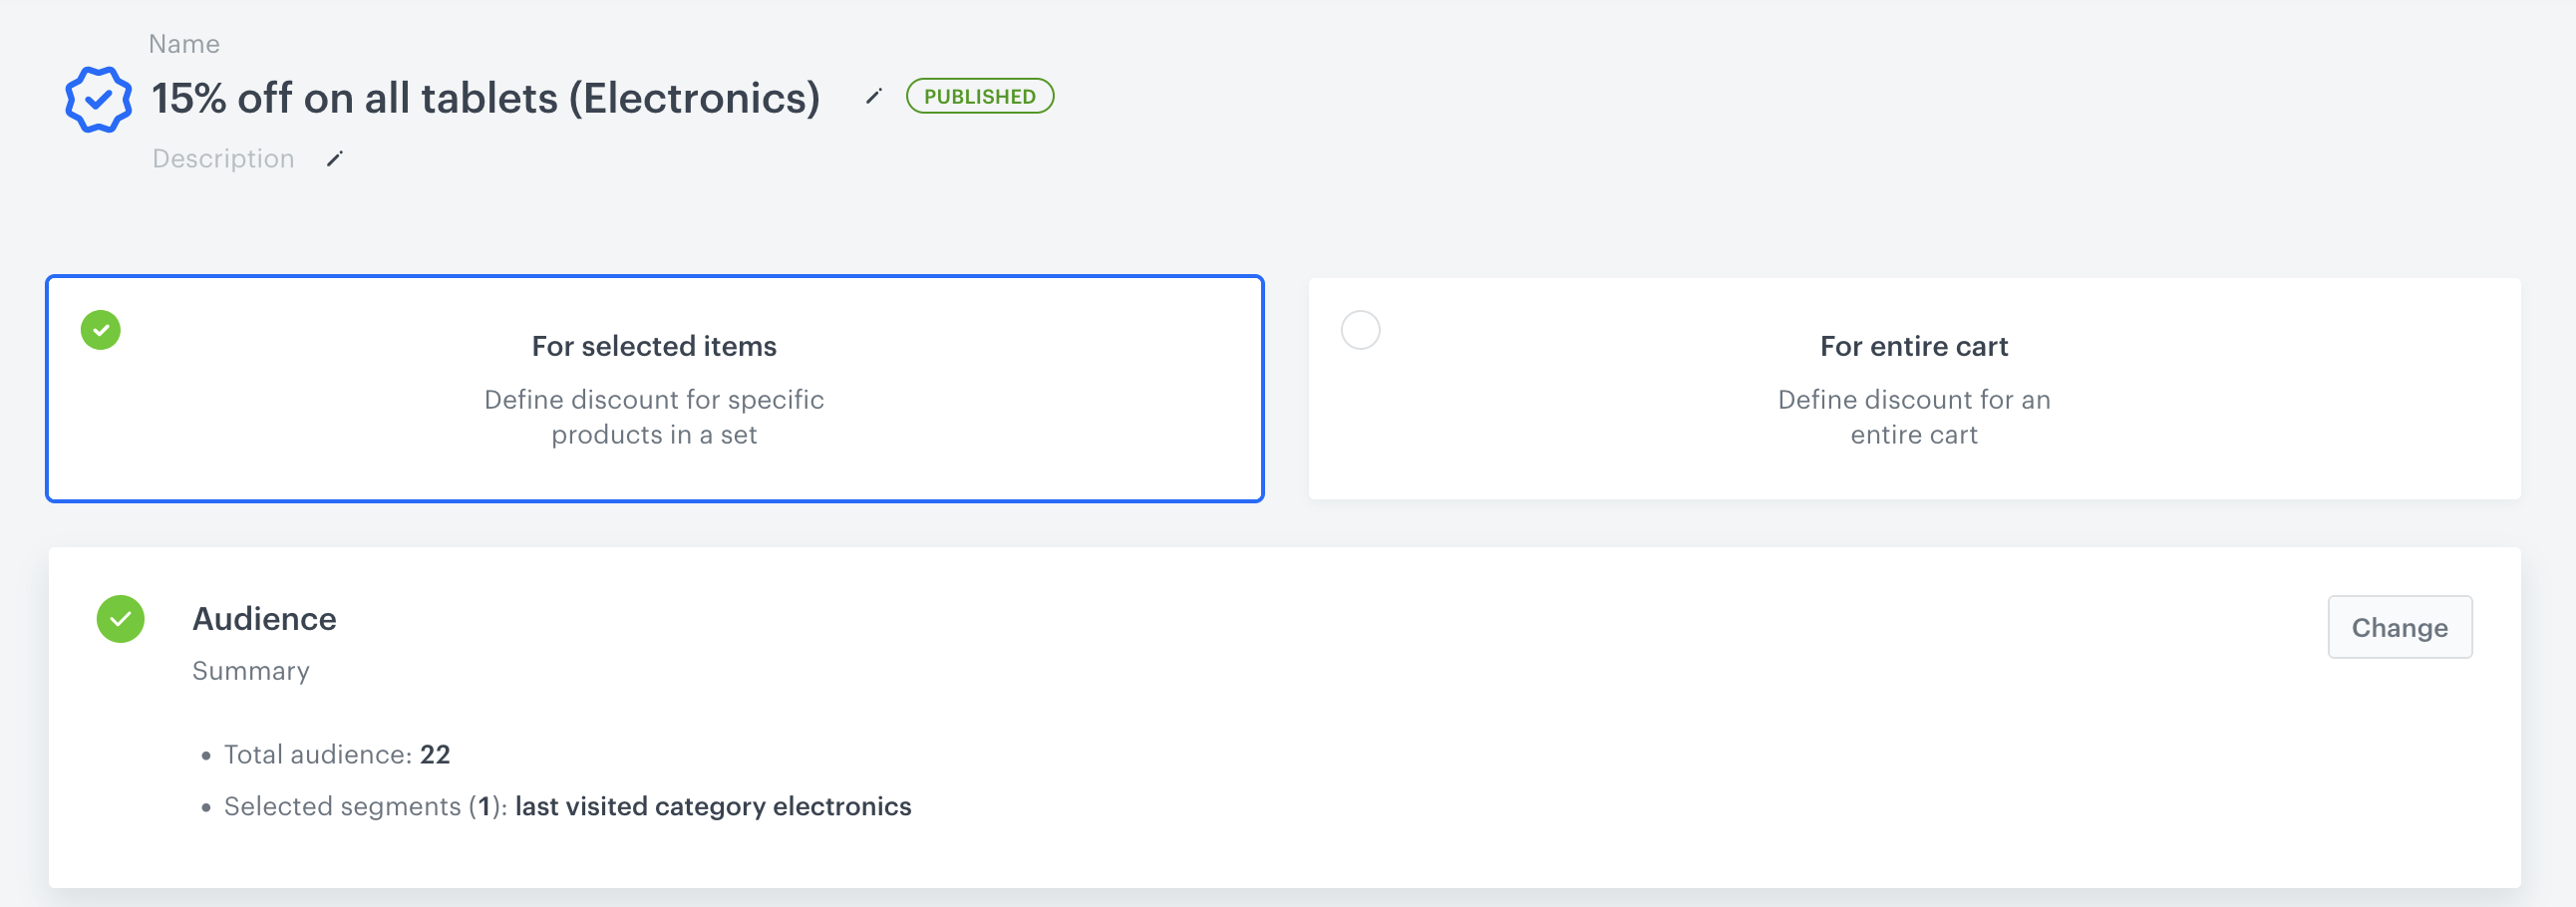
In this step, create set of promotions for each category on the website. It will be good, if all of them will be connected to categories choosen in the segmentation. In this way we will have minimum 1 promo for each form choosen categories. What is more aeach of them will be marked with a special tag to distinguish them from other promotions.
You can create a promotion with the following scopes:
- For selected items - you can select items to which you want to apply a discount
- For entire basket - you can reduce the value of the whole shopping cart if its value matches the fixed price limit
- In the Audience section, choose the segmentation. This way you make sure that, for example, the promotion for Electronics is only visible on the main page to users for whom Electronics was the last visited category.
Configuration of the the audience of the promotion - Include all necessary promotional elements such as the product image, promotion name, description, and any other details required for displaying the promotion on the landing page. This ensures a clear presentation of the promotion to the customer, enhancing their engagement and understanding of the offer.
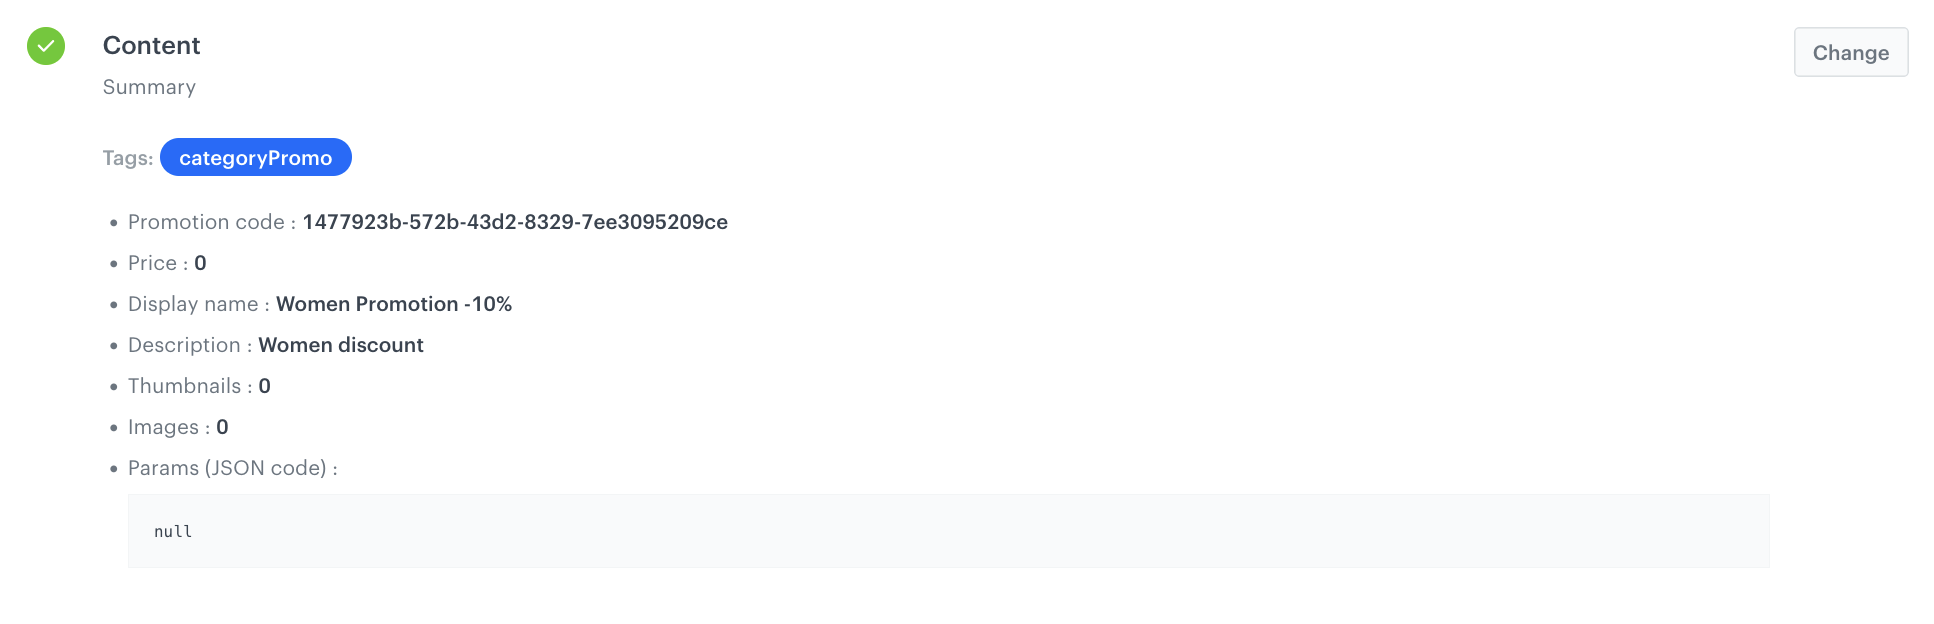
- In Content section add informaton about promotion and its details. Also add there a tag of your choice. The selection of the promotions of the dynamic content will be narrowed down to those labeled with this tag. In our case they can be tagged as CategoryPromo.
- In the Items section, select the specific products or categories to which the promotion should apply.
- In the Types & Limits section, define the logic of the promotion — for example, whether it’s a fixed discount, a percentage-based reduction, or a special offer limited to a certain number of uses. This configuration determines how the promotion behaves and under what conditions it is applied.
Make sure that all necessary promotional elements are included in the content, such as the product image, name, description, and any other details required for displaying the promotion on the landing page. Including all key elements ensures that the promotion is presented clearly and effectively to the customer, enhancing their engagement and understanding of the offer.
Alternatively, if you already created promotions in an external service, you can import them to Synerise.
Create a dynamic content
You can display the promotions on your home page (or category page) by using dynamic content.
- Go to Experience Hub > Dynamic content > Create new
- Enter the name of the dynamic content.
- Choose the Insert Object type.
As the audience, select New Audience.
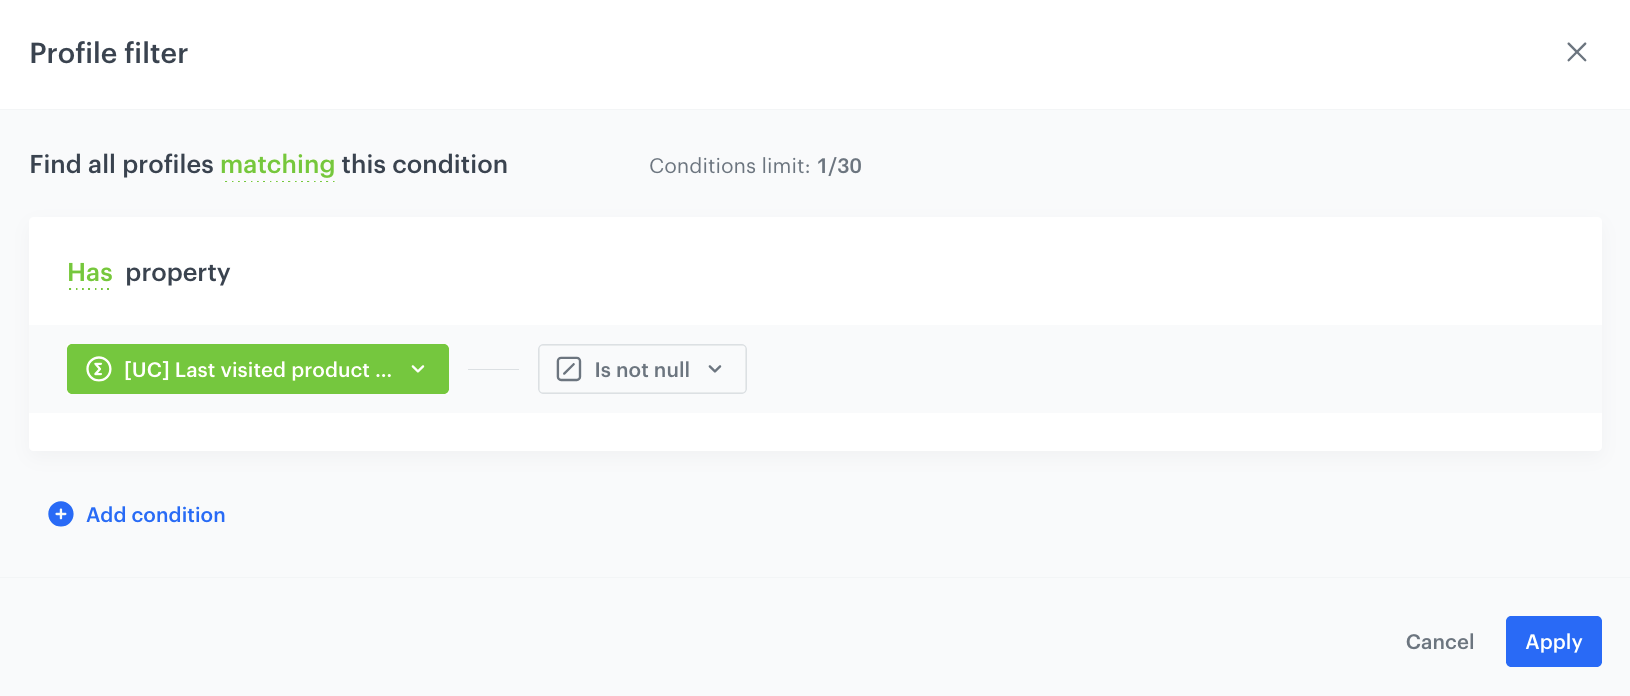
- Click Define conditions.
- Click Add condition and choose the aggregate, created in the previous step.
- As the operator choose Is not null. In this way, the campaign will be visible only for users who have any value in the aggregate, so they have visited any category previously.
- Confirm by clicking Apply.
Configuration of the the dc - In the body of the dynamic content, use the promotion snippet.
Read more about how to use snippets here.
Configuration of the the snippet - Click the snippet widget, providing quick access to a variety of useful code sections.
- Select a category of snippets: Profiles promotions and add them to the template.
- In the template editor add CSS and/or HTML to the dynamic content.
Be cautious when using the default Profile’s Promotions insert, as it may display more promotions than intended for the current campaign. To maintain control over the display, use tags specifically designated for the promotions in this use case
- In this step, we will customize the snippet by including a line that limits the selection of promotions to those from the current campaign. In case you need to add more personalized options - read more about inserts here.
- Add tagNames=["XXX"] to the code in the place presented below in the example code. Remember to add the name of the tag created earlier in the place of XXX.
{%- set getFields=["code"] -%} {%- promotions fields=getFields tagNames=["categoryPromo"] -%} {%- for item in promotions_result -%} {{ item }}{%- endfor -%} {%- endpromotions -%} - Define the rest of the settings.
Check the use case set up on the Synerise Demo workspace
You can check the aggregate, segmentation and promotion configuration directly in Synerise Demo workspace.
If you’re our partner or client, you already have automatic access to the Synerise Demo workspace (1590), where you can explore all the configured elements of this use case and copy them to your workspace.
If you’re not a partner or client yet, we encourage you to fill out the contact form to schedule a meeting with our representatives. They’ll be happy to show you how our demo works and discuss how you can apply this use case in your business.