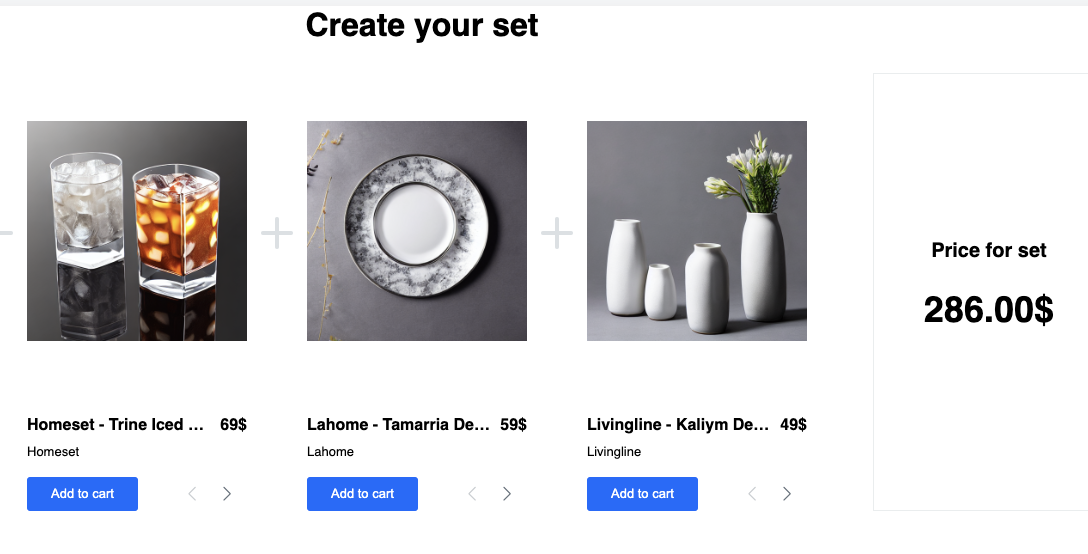
To enhance the shopping experience and increase the average order value, we can use product sets to recommend complementary accessories alongside a main product. With our ready-made template, setting up these sets becomes much easier. The template is based on a single recommendation campaign that allows you to configure multiple slots, each representing a different category of products. Each slot can be customized with specific settings, such as the number of displayed products, price ranges, colors, and other relevant attributes. This enables a highly personalized shopping experience, tailored to individual user preferences.
This use case describes the process of implementing three accessory categories: glasses, plates, and vases, when a user visits the Glasses category. The recommendations will be dynamically adjusted based on the user’s behavior and preferences. Customers will have the flexibility to purchase the full set with a single click or manually select individual items from each category. This approach not only simplifies the decision-making process for customers but also drives higher engagement and conversions by presenting well-matched product combinations.
Prerequisites
-
- Color, brand and additional attributes in the product feed – as custom attributes
- Tracking code on your website.
Implemented OG tags:
- product:retailer_part_no which is the same as <g:id> in the product feed
- og:category which is also the same as <g:product_type> in the product feed - We recommend that your website has the add to cart function that can be implemented in JavaScript, using the product IDs from the product feed.
This use case only explains how to create the campaign and adjust the template, and it is important to set up your e-commerce system to handle the "Add to Cart" button correctly for adding selected products or the entire set to the shopping cart. Additionally, the template allows you to apply a discount to the full set (either as a percentage or a fixed value), visible in the product set view. However, integrating this discount at checkout requires specific technical setup on your end, depending on your e-commerce system, and our template ensures the discount is accurately calculated and displayed.
Process
In this use case, you will go through the following steps:
Preparation of AI recommendation
- Go to
 AI Hub > (AI Recommendations) Models > Add recommendation.
 - Enter the name of the recommendation (it is only visible on the list of recommendations).
- In the Type & items feed section, click Define.
- From the Items Feed dropdown list, select a product feed for which the model training is completed.
To use the selected item feed for a given recommendation type, the model that drives the recommendation type works must be trained using the selected item feed. If the recommendation type is not available yet for the recommendation type, you can check the model training status. To learn more about it, read the "Model status" article.
- Click Select model and on the pop-up, select Personalized.
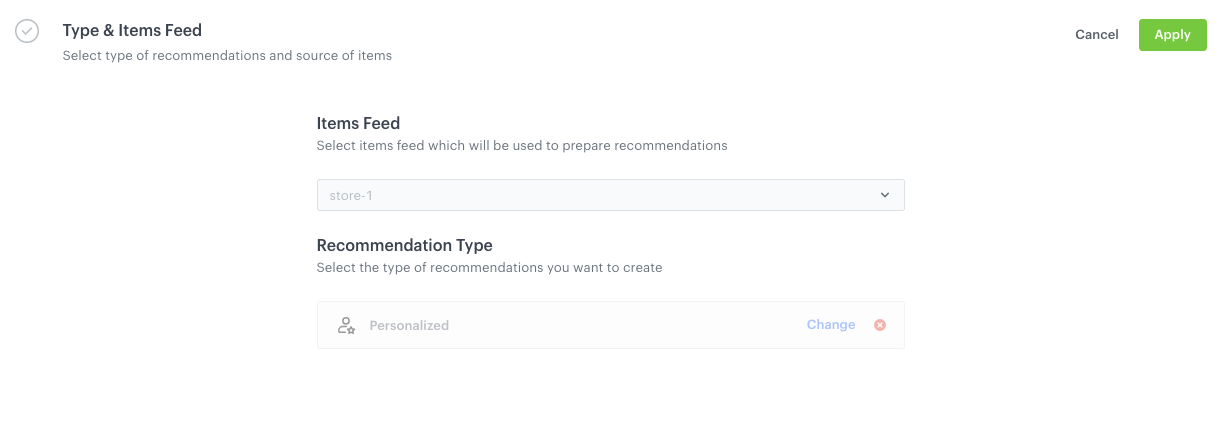
Configuraion of the catalog and recommendation type section - Confirm by clicking Apply.
In the Items section, click Define.
Define the minimum and the maximum number of products displayed in the slot according to your needs.
Learn more about the recommendation settings.
In Static filters, set the following parameters:
category- and choose the category from which products should be presented.- additionally, you can use different filters based on your business needs.
- Click Add slot and repeat steps b-d. In step d, select different category.
- Confirm by clicking Apply.
- Optionally, you can define the settings in the Slots and items ordering, Boosting, and Additional settings sections.
- Save the recommendation by clicking the Save button in the upper right corner.
Preparation of dynamic content
When you finish configuring your AI recommendation, it’s time to display the recommendation results (product sets) on the website. You can do it using our pre-defined template available on the Demo Profile. The template is ready to use.
To fully use the recommendation, you must:
- set up your e-commerce system to handle the add to cart actions and handle adding multiple items to the cart simultaneously
- configure applying the discount on the checkout process. The template ensures only correct display and calculation of the discount.
- Go to
 Experience Hub > Dynamic content > Create new. Choose Insert type of campaign.
 - Add meaningful name to your campaign.
- In the Audience section, select the recipients of the dynamic content.
- In the Content section, select Create message, then go to the Use Cases folder or just type the name of the template in the search box: Product Sets
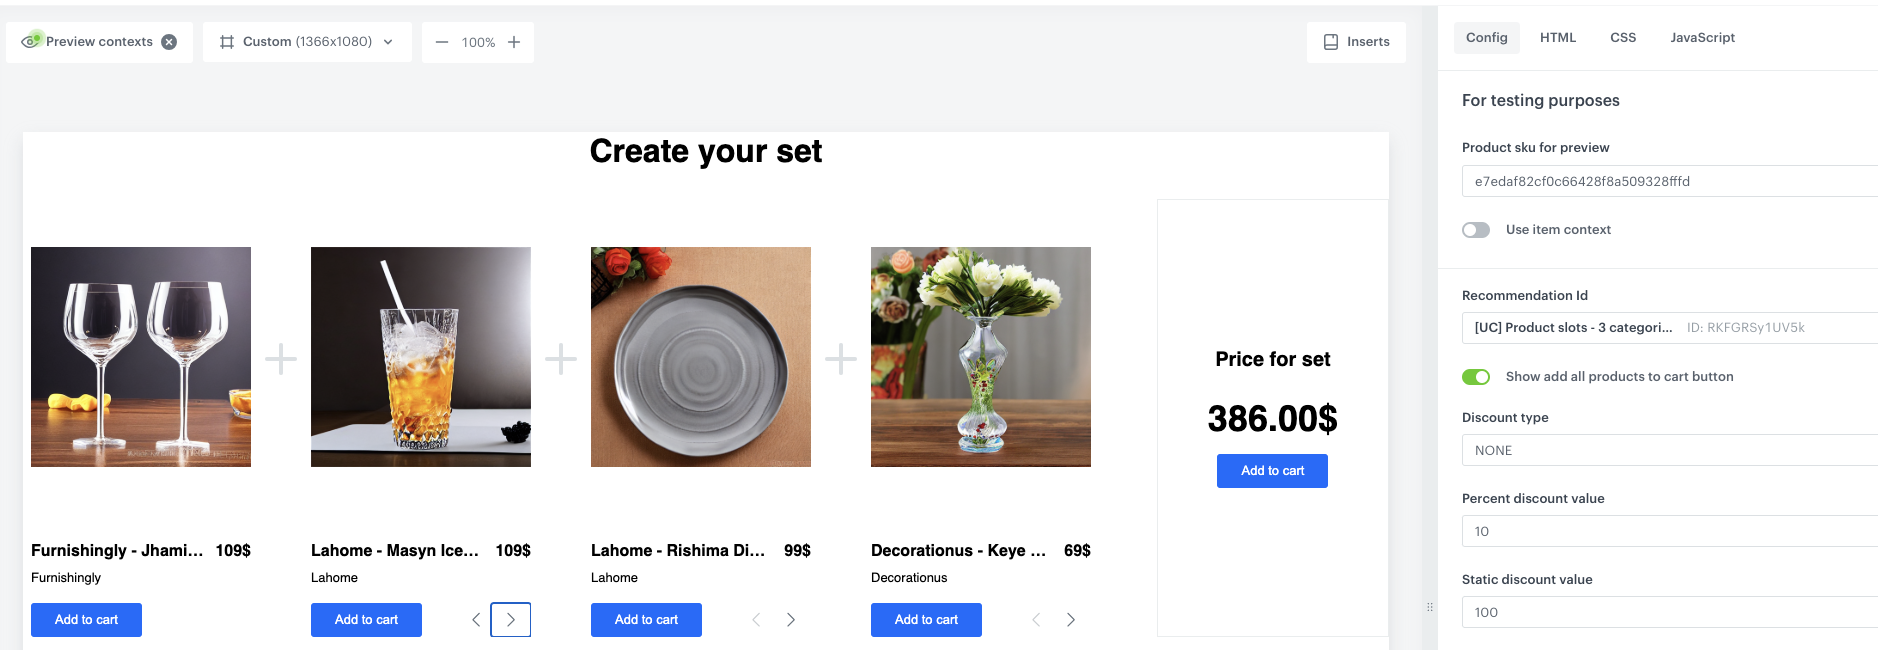
- In the Config tab:
- In the Product sku for preview field, enter example product sku, that helps you see which products are displayed in the product set for this specific SKU.
- In Recommendation Id, add the ID of recommendation campaign created in the previous step.
- If you want to give the user chance to add all the products together as a set, enable Show add all products to cart button .
- If you want to apply discount, from the Discount type dropdown list, choose the discount type. The recommendation display reflects the item value after applying the promotion; however, the implementation of the discount during the checkout process is your responsibility.
- In the upper right corner, click Use in communication.
- Specify the CSS selector where you want to insert recommendations.
- Click Apply.
- In the Schedule section define the period when the dynamic content is active.
- In Display settings, define the circumstances when the dynamic content will be triggered and the URLs on which it will be displayed. In this case, the dynamic content will be displayed on the URLs with the Glasses category.
- In the upper right corner, click Activate.
Check the use case set up on the Synerise Demo workspace
In the Synerise Demo workspace, you can check:
If you’re our partner or client, you already have automatic access to the Synerise Demo workspace (1590), where you can explore all the configured elements of this use case and copy them to your workspace.
If you’re not a partner or client yet, we encourage you to fill out the contact form to schedule a meeting with our representatives. They’ll be happy to show you how our demo works and discuss how you can apply this use case in your business.
Read more
Learn how to build AI recommendations