Web push with survey
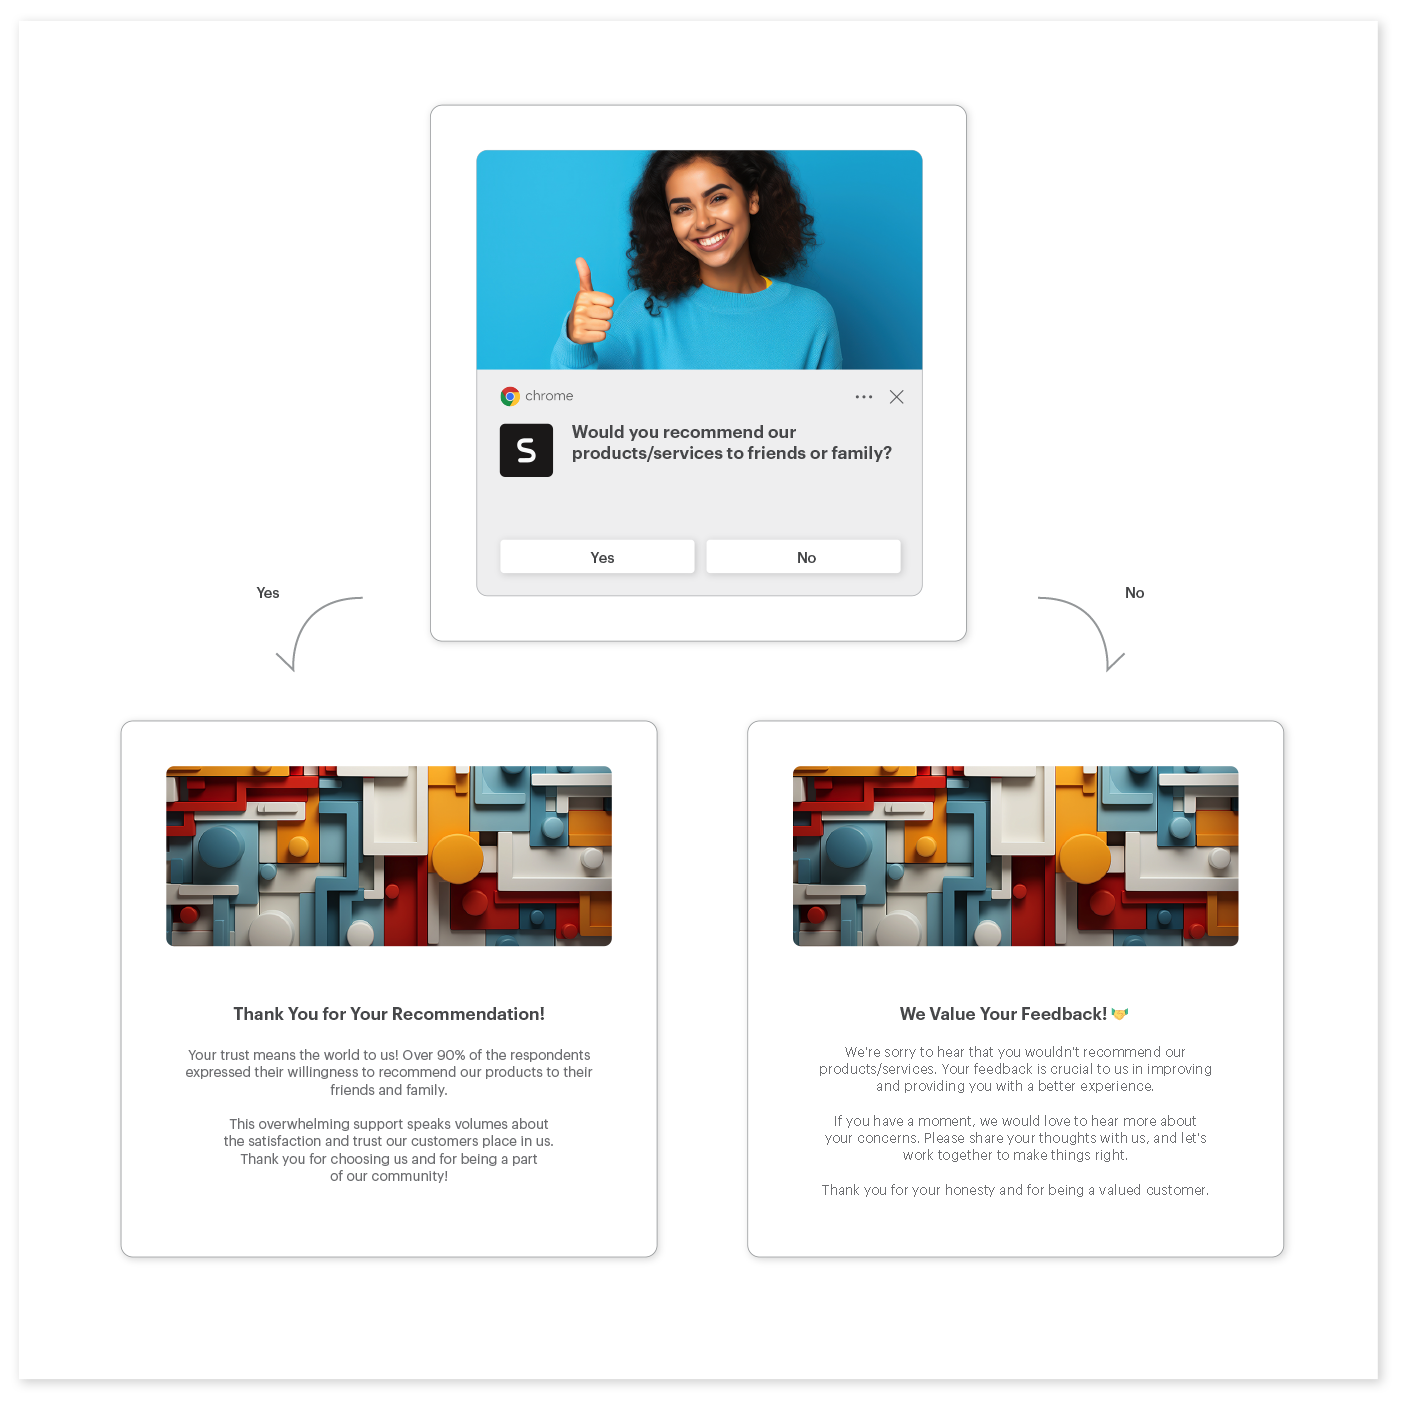
This scenario involves creating a web push notification with a simple survey shown to customers right after completing a purchase. The survey asks for a simple YES or NO response. Depending on the choice made and the cumulative responses for each option, customers will be navigated to a page that will feature a tailored message, crafted through Dynamic Content based on the survey outcomes. When customers click on a button on this page, it will record an event on their profile, which can be leveraged for analyzing performance and enhancing future customer targeting.
The detailed logic behind the web push created in this use case:
- Survey Question: “Would you recommend our products/services to friends or family?”
- User Response Options:
- YES
- NO
- Outcome based on User Response and Overall Survey Results:
NO Response:
- Redirects a user to a webpage with dynamic content.
- Encourages users with negative experiences to contact customer service. Aims to gather feedback for improving the customer experience.
YES Response:
- Redirects a user to a webpage with dynamic content.
- Displays either:
- Survey results if the percentage of YES responses is higher than x% (in our case it’s 80%).
- A message thanking them for recommending the company’s products/services to friends and family.
This setup ensures a tailored response based on the user’s feedback and overall survey trends.
This is only an exemplary scenario. You can customize the logic and content according to your specific business needs and goals.

Prerequisites
- Configure web push notifications
- Implement SDK to a website
- Implement transaction events using SDK or API.
Process
- Create a web push template.
- Create a workflow to send a webpush.
- Create metrics counting the number of responses of each available option (different buttons).
- Create Dynamic Content campaign.
Create a web push template
- Go to
 Experience Hub > Web Push.
 - Click Template icon.
- In the upper right corner, click the New template button.
- Enter the name of the web push template.
- In the Title field, enter the headline of the notification. It’s recommended to not exceed 50 characters, however, the displayed number of characters depends on the browser.
- In the Message field, enter the main text of the notification.
Recommended: Up to 100 characters. If the message is too long, the rest of it is replaced with ellipsis (...). - In the Destination URL field, enter the address to which a customer is redirected after clicking the notification.
- In the Icon URL (optional) field, you can enter the URL of the icon you uploaded previously to the Files section in the Data Modeling Hub module.
- To get the URL of the icon, go to
 Data Modeling Hub > Files.
 - Find the icon on the list.
- Hover the mouse cursor over the icon on the list.
- Click Copy URL.
- Paste the URL in the Icon field.
- To get the URL of the icon, go to
- In the Image URL field, enter the URL of the image you uploaded previously to the Files section in the Data Modeling Hub module. Image requirements are listed at the top of the article.
- To get the URL of the image, go to
 Data Modeling Hub > Files.
 - Find the image on the list.
- Hover the mouse cursor over the image on the list.
- Click Copy URL.
- Paste the URL in the Image field.
- To get the URL of the image, go to
- If you want the web push to remain visible until the recipient clicks or closes it, switch the Require an action toggle on.
Important: The “requireInteraction” functionality used by this toggle is not supported by some browsers. For more details, go to https://developer.mozilla.org/en-US/docs/Web/API/Notification/requireInteraction#browser_compatibility. - To configure action buttons for your template, switch the Action Buttons toggle on.
- In the Button text field, enter the text that will appear on the button.
- In the Button URL field, enter the address to which a customer is redirected after clicking the button.
- To add the second action button, click Add button and follow steps a-b.
- For saving the template in a folder of your choice, click Save as button and select the desired folder.
In this scenario, we have two buttons labeled “YES” and “NO.” Each button corresponds to a specific URL link:
- Clicking the “YES” button will redirect to:
https://demoshop.synerise.com/survey?answer=yes - Clicking the “NO” button will redirect to:
https://demoshop.synerise.com/survey?answer=no
These links will be employed later in the Dynamic Content (DC) configuration when choosing where to display the DC.
Preview the template
- To check the preview of the template for a particular customer or a product, click the Preview context button on the upper left side.
- Enter the ID of a customer.
- Click Apply.
Result: You see the preview of the template for the particular customer. - To test the notification template in your browser, click Show notification on the upper right side.
Result: You get a browser request to receive notifications. - Agree to receive notifications.
Result: A web push notification is displayed.
Create a workflow
The workflow will be triggered by the transaction.charge event. The delay is set to 10 minutes, after this time customer will receive a web push.
- Go to
 Automation > Workflows > New workflow.
 - Enter the name of the workflow.
Define the trigger node
- As the first node, add the Profile Event. In the settings of the node, select the transaction.charge event.
- Click Apply.
Configure the Delay node
- Add the Delay node. In the node settings:
- In the Delay field, type
10. - From the Unit dropdown list, choose Minute.
- In the Delay field, type
- Click Apply.
Configure the Send Web Push node
- Add the Send Web Push node. In the node settings:
- In the Content section, from the Webpush template dropdown, select the template you created in the previous step.
- In the Schedule section, set the Webpush lifespan (TTL) according to your business needs.
- You can describe campaigns with additional parameters.
- Click Apply.
Add the finishing node
- Add the End node to the Send Web Push node.
- In the upper right corner, click Save & Run.

Create metrics
In this step, create two metrics - one for each button - to count the number of responses for each button option. The results of these metrics will be used in the next part of the process to determine the logic for the content displayed in the Dynamic Content.
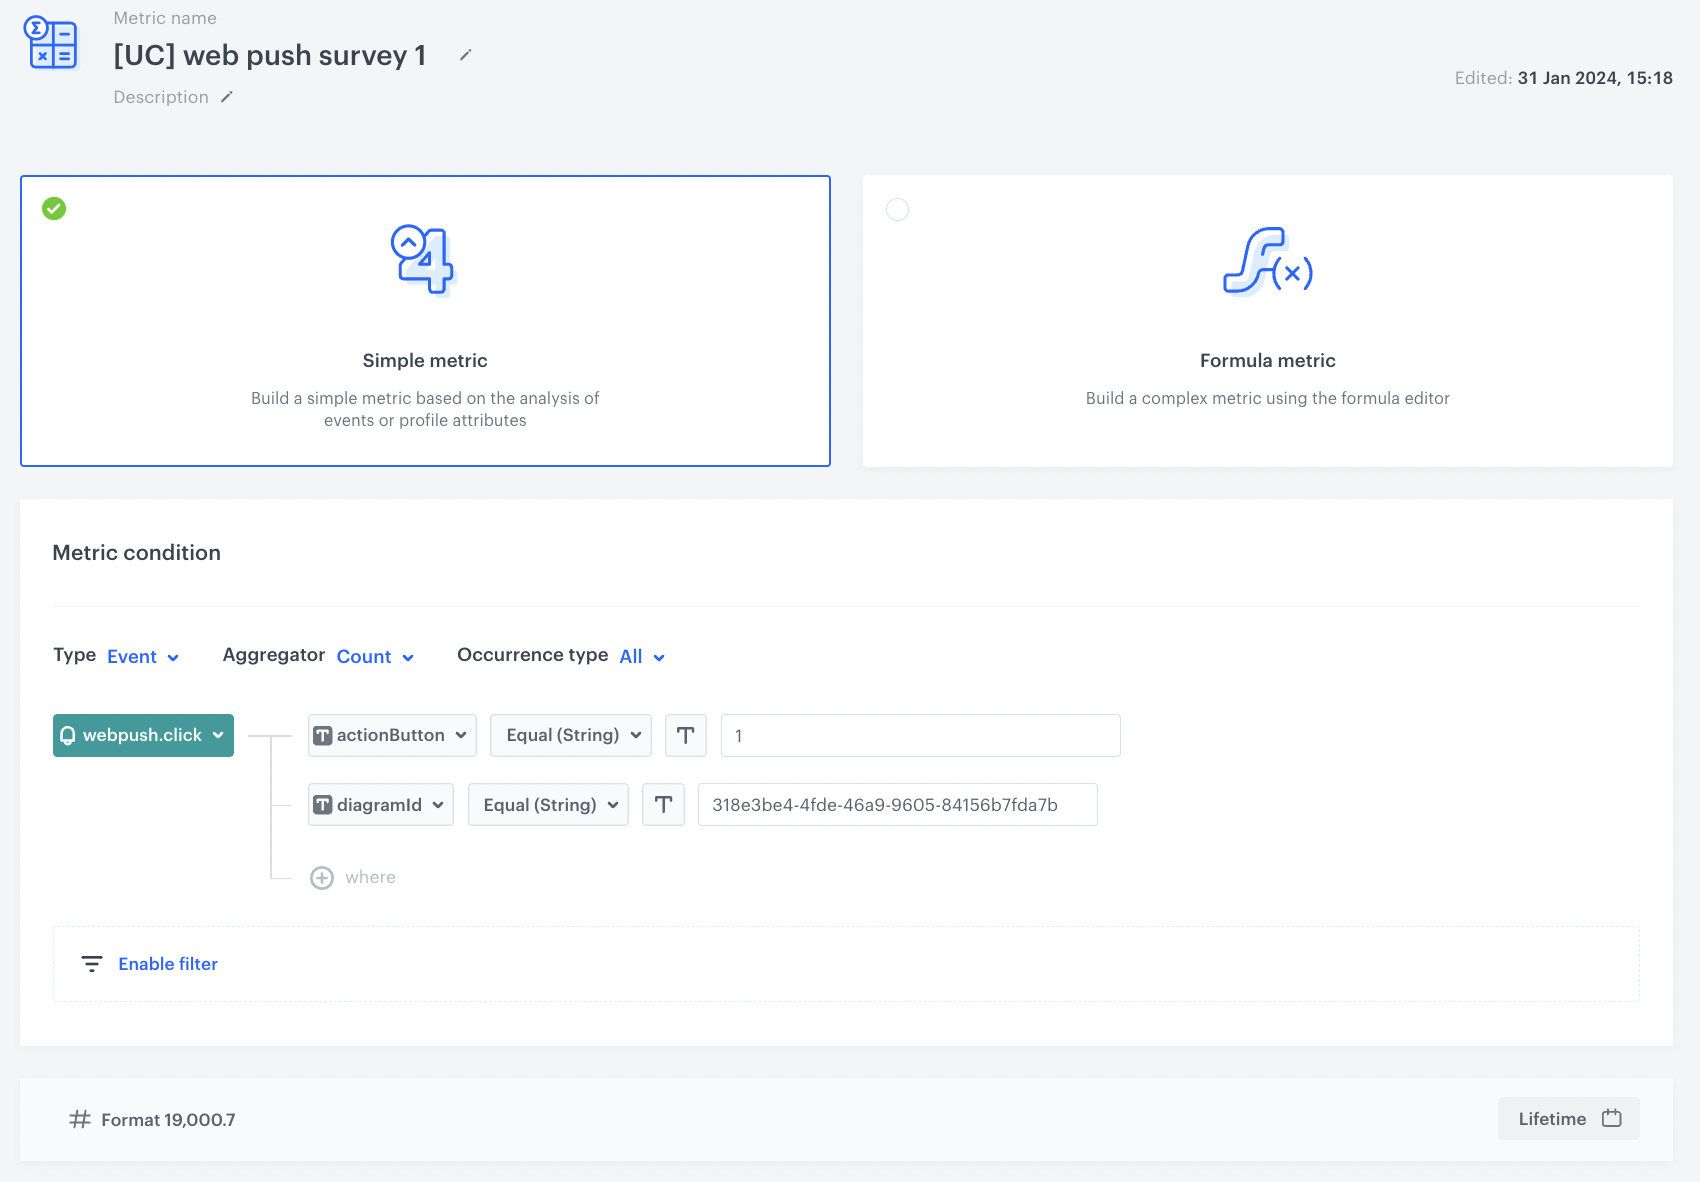
Create a metric for the first button (YES)
- Go to
 Analytics > Metrics > New metric.
 - Enter the name of the metric.
- As a metric kind, select Simple metric.
- As the type, set Event.
- As the aggregator, set Count.
- As the occurrence type, set All.
- From the Choose event dropdown list, select
webpush.click. - Click + Where button.
Result: The Choose parameter button appears. - From the Choose parameter dropdown list, choose
actionButton. - From the Choose operator dropdown list, select Equal (String).
- In the text field, type
1(meaning the first button). - Click + Where button.
Result: The Choose parameter button appears. - From the Choose parameter dropdown list, choose
diagramId. - From the Choose operator dropdown list, select Equal (String).
- In the text field, type the ID of the diagram that you created earlier in the process. Diagram ID is another word for Workflow ID. To find your Workflow ID, you need to navigate to Automation > Workflows. Then find the workflow whose ID you need and click on the three dots located on the right side of it. After clicking the three dots, move to the section that displays the ID and click on it. This action will copy the ID for you.
- Using the date picker in the lower-right corner, set the time range to Lifetime. Confirm your choice with the Apply button.
- Click Save.

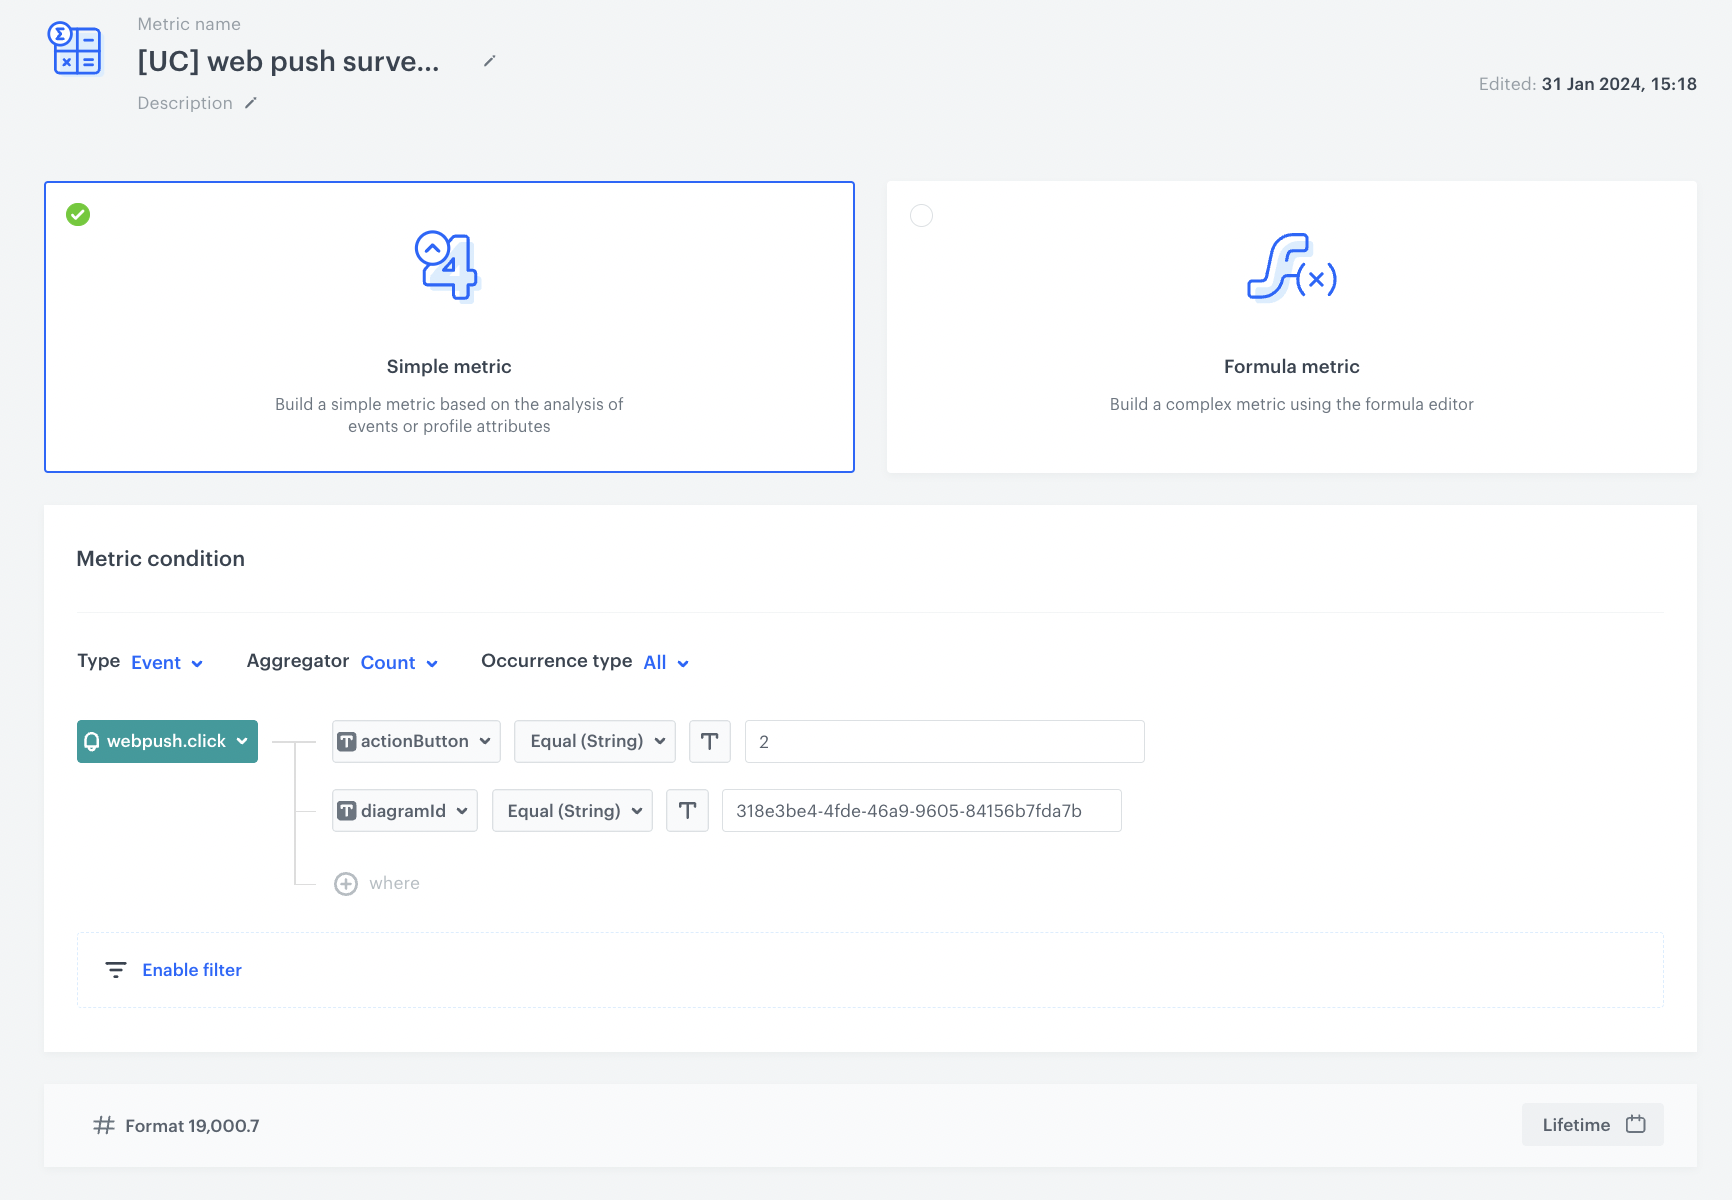
Create a metric for the second button (NO)
- Go to
 Analytics > Metrics > New metric.
 - Enter the name of the metric.
- As a metric kind, select Simple metric.
- As the type, set Event.
- As the aggregator, set Count.
- As the occurrence type, set All.
- From the Choose event dropdown list, select
webpush.click. - Click + Where button.
Result: The Choose parameter button appears. - From the Choose parameter dropdown list, choose
actionButton. - From the Choose operator dropdown list, select Equal (String).
- In the text field, type
2(meaning the second button). - Click + Where button.
Result: The Choose parameter button appears. - From the Choose parameter dropdown list, choose
diagramId. - From the Choose operator dropdown list, select Equal (String).
- In the text field, type the ID of the diagram that you created earlier in the process.
Diagram ID is another word for Workflow ID. To find your Workflow ID, you need to navigate to Automation > Workflows. Then find the workflow whose ID you need and click on the three dots located on the right side of it. After clicking the three dots, move to the section that displays the ID and click on it. This action will copy the ID for you. - Using the date picker in the lower-right corner, set the time range to Lifetime. Confirm your choice with the Apply button.
- Click Save.

Create dynamic content campaign
Set up a single dynamic content campaign to showcase relevant content based on the button chosen and the number of responses received for each option. Three different copies are utilized for distinct scenarios:
Scenario 1: NO response
Scenario 2: YES response with a rate of over 80% - in this scenario we will also display the exact percentage of customers that responded this way.
Scenario 3: YES response with a rate lower than 80%
In this case, we’re using a predefined template and customizing it according to our communication requirements. The logic determining the dynamic content change for each scenario will be outlined in the Jinjava code within the dynamic content template.
- Go to
 Experience Hub > Dynamic content > Create new.
 - Enter the name of the dynamic content.
- Choose the Web layer type.
- As the audience, select Everyone.
Define content
-
In the Content section, click Define.
-
In the Content tab, click Create Message.
-
From the list of template folders, select a folder with the predefined Web layer templates.
-
Select the template that you can further tailor to your communication needs.
Result: You are redirected to the template builder. -
Customize the template layout according to your needs.
-
Add a HTML block to display specific content to customers upon clicking a web push button. In this block, you will configure the content logic. Below is a sample Jinjava used to cover the three scenarios mentioned in the description of this part of the process.
Check Jinjava example(function() { const urlYES = 'https://demoshop.synerise.com/survey?answer=yes'; const urlNO = 'https://demoshop.synerise.com/survey?answer=no'; let currentUrl = window.location.href; let title = document.querySelector('.survey_title') let paragraph = document.querySelector('.survey_paragraph') if(currentUrl.includes(urlYES)){ title.innerText = `Thank You for Your Recommendation! 🌟` paragraph.innerHTML = ` {%- set metricYESValue = '{%- metrics -%} 3308b4d2-7624-42f8-9929-024b564c0ea4 {%- endmetrics -%}' -%} {%- set metricNOValue = '{%- metrics -%} b173efa8-b172-4073-aa4c-f87d6ef16185 {%- endmetrics -%}' -%} {%- if (metricYESValue|int / (metricYESValue|int + metricNOValue|int) * 100) >= 80 -%} Your trust means the world to us! Over <span class="survey_percentAnswered">{{(metricYESValue|int / (metricYESValue|int + metricNOValue|int) * 100)|int}}%</span> of the respondents expressed their willingness to recommend our products to their friends and family. This overwhelming support speaks volumes about the satisfaction and trust our customers place in us. Thank you for choosing us and for being a part of our community! {%- else -%} Your trust means the world to us! We're thrilled to hear that you would recommend our products/services to your friends and family. It's our constant endeavor to provide you with the best quality and service, and your positive feedback reinforces our commitment to excellence. {%- endif -%} ` } else { title.innerText = `We Value Your Feedback! 🤝` paragraph.innerText = `We're sorry to hear that you wouldn't recommend our products/services. Your feedback is crucial to us in improving and providing you with a better experience. If you have a moment, we would love to hear more about your concerns. Please share your thoughts with us, and let's work together to make things right. Thank you for your honesty and for being a valued customer. ` } })() -
After you make changes to the template, you can check the preview.
- Click the Preview Contexts button on the upper left side.
- Enter the ID of a customer and define the product context.
- Click Apply.
-
If the template is ready, in the upper right corner click Save this template > Save as.
-
On the popup:
- In the Template name field, enter the name of the template.
- From the Template folder dropdown list, select the folder where the template will be saved.
- Confirm by clicking Apply.
-
To continue the process of configuring the dynamic content campaign, click Next.
-
To save your content changes, click Apply.
Define schedule and display settings
- In the Schedule section, click Define and set the time when the message will be active.
- In the Display Settings section, click Define.
- Set the conditions for when the dynamic content should appear. Optionally, you can also define the Advanced options. In our case, we will define the frequency of dynamic content to be displayed to Once per day and only on specific pages we’ve chosen, linked to each button. You can also choose which type of device displays the dynamic content. Additionally, we’ll use the Stop display feature to make sure the dynamic content is shown to a user just once.
- Click Apply.
- Optionally, you can define the UTM parameters for your dynamic content campaign.
- Click Activate.
Check the use case set up on the Synerise Demo workspace
You can check the configuration of each step from this use case in our Synerise Demo workspace:
If you’re our partner or client, you already have automatic access to the Synerise Demo workspace (1590), where you can explore all the configured elements of this use case and copy them to your workspace.
If you’re not a partner or client yet, we encourage you to fill out the contact form to schedule a meeting with our representatives. They’ll be happy to show you how our demo works and discuss how you can apply this use case in your business.