Engaging loyalty program users right after they join is crucial to turn a new signup into an active customer. One effective approach is to assign a welcome promotion right after they join. If they don’t use it within the specific time, you send a reminder email to nudge them. If they do use the promotion, you reward them with a second incentive — an instant bonus, automatically assigned.
This automated sequence keeps new users engaged, increases the chance of repeated purchases, and builds stronger loyalty through timely and relevant communication.
In this specific use case, we will implement an automated process for managing a welcome promotion and follow-up bonus for loyalty program users.
- When a user joins the loyalty program, they are automatically assigned a welcome promotion (20% discount).
- The promotion can only be used once.
- If the user does not use the promotion in 7 days, they will receive a reminder email.
- If the user uses the welcome promotion and made a transaction in 7 days, a new promotion (called instant bonus) is assigned automatically.
- If the instant bonus will not be used, one reminder will be sent.
Prerequisites
- Add product Feed.
- Implement transaction events.
- Create an email account.
- Integrate Synerise promotions and create first promotions in Synerise.
- Implement the custom event which sends information to Synerise about joining a loyalty program (for example
client.register). Such an event should be sent each time the the user will join the loyalty program.
Process
In this use case, you will go through the following steps:
- Create a welcome promotion segmentation.
- Create an instant bonus promotion segmentation.
- Create a welcome promotion for new members of the loyalty program.
- Create instant bonus promotion for loyalty member users who used the welcome promotion in the last 14 days.
- Create a workflow to manage the process of sending:
- welcome promotions,
- reminder if the user does not use the promotion in the specific time,
- the bonus for those who used the welcome promotion.
Create welcome promotion segmentation
In this part of the process, create a segmentation which will be used as a target of the first welcome promotion.
- Go to
 Decision Hub > Segmentation > New Segmentation.
 - Enter the name of segmentation.
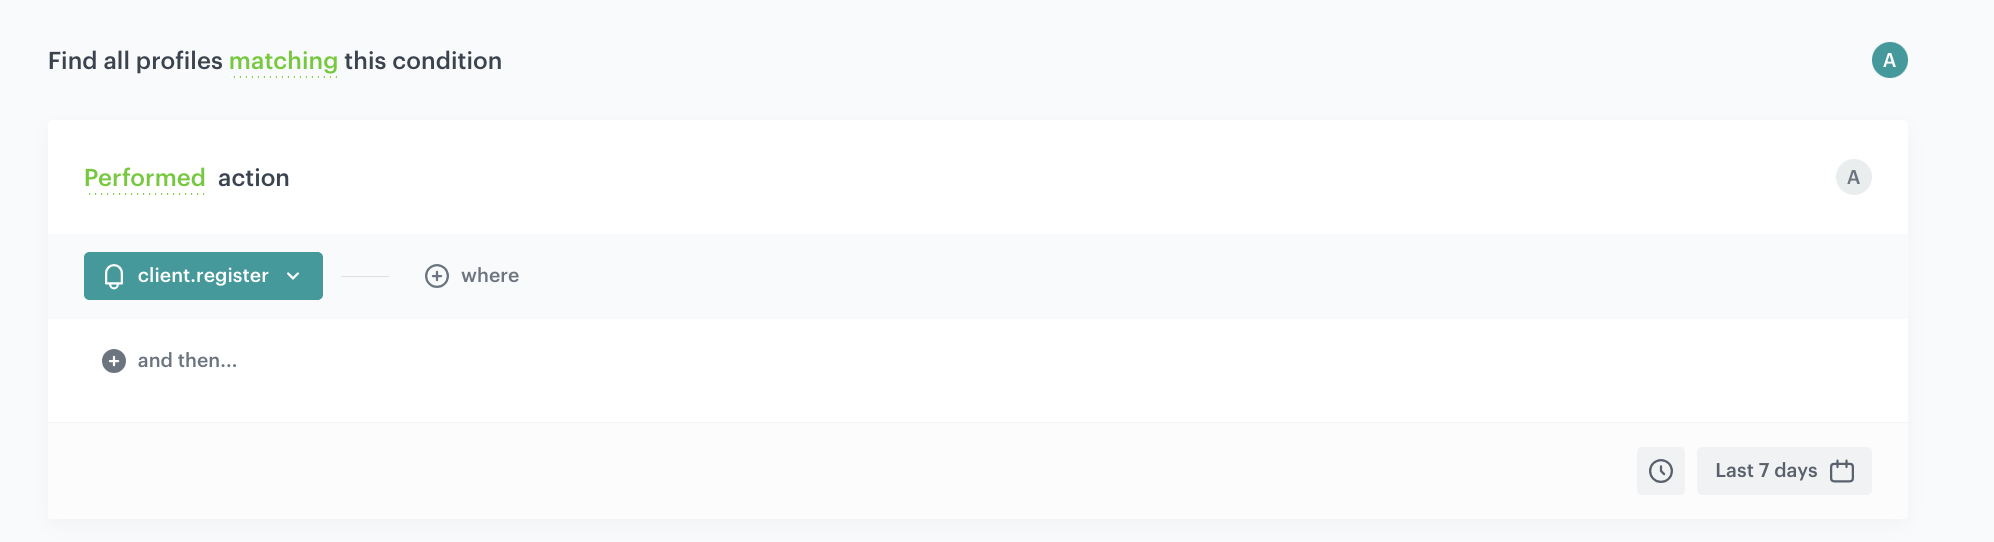
- On the canvas, click Add condition.
- From the dropdown list, select the event client.register.
- If we want to set a time limit for the promotion's validity, we can set the time range e.g. last 14 days
- Click Save.
Create instant bonus promotion segmentation
In this part of the process, create a segmentation which will be used as a target of the instant bonus promotion.
- Go to Decision Hub > Segmentation > New Segmentation.
- Enter the name of segmentation.
- On the canvas, click Add condition.
- From the dropdown list, select the event client.removePoints.
- Choose from the attributes parameter promotionUuid.
- As the value set up the ID of the welcome promotion.
- If we want to set a time limit for the promotion's validity, we can set the time range e.g. last 14 days
- Click Save.
Remember to change the name and choose the unique name of the promotion which you will create in the next step, for example, Instant bonus promotion.

Create welcome promotion
In this part of the process, you create a promotion assigned to users immediately after joining the loyalty program.
- Go to
 AI Hub > Regular Promotions > Add promotion.
 - Select the For selected items option.
- As the name of the promotion choose the same name as you have added to the segmentation, created in the previous step.
- In the Audience section of the promotion, select the segmentation created in this step. Your promotion will be activated only for this group of customers, for whom the event with the code of this promotion will be generated. Confirm your selection, by clicking Apply.
- In the Content section, define the name, description, and an image of the promotion. Confirm the settings by clicking Apply.
Save the promotion code from this section because it will be used later in the workflow.
- Choose the Single type of promotion.
- In the Limit per profile field, enter
1to make sure that this discount can be used only once. In Type & limits section:
- As Discount type, choose Percentage.
- As the value, enter
20, and click Apply.
- In the Schedule section, define the distribution period.
- In Items section, choose the main product catalog with all products a customer can buy with this discount. If you want to narrow down the list of categories a customer can choose from, use one of the options presented below (Selected items/Filtered items).
- In Exclude items section, you can exclude a specific product or categories for which the discount is not active.
- To apply all changes and run the promotion, click Publish.
Create instant bonus promotion
Create an instant bonus promotion for loyalty members who used the welcome promotion within the last 14 days. This promotion will be sent 14 days after the first promotion was sent.
- Go to AI Hub > Regular Promotions > Add promotion.
- Select the For selected items option.
- As the name of the promotion choose the same name as you have added to the segmentation, created in the previous step.
- In the Audience section of the promotion, select the segmentation created in this step. Your promotion will be activated only for this group of customers, for whom the event with the code of this promotion will be generated. Confirm your selection, by clicking Apply.
- In the Content section, define the name, description, and an image of the promotion. Confirm the settings by clicking Apply.
Save the promotion code from this section because it will be used later in the workflow.
- Choose the Single type of promotion.
- In the Limit per profile field, enter
1to make sure that this discount can be used only once. In Type & limits section:
- As a Discount type, choose Percentage.
- As the value, enter
10, and click Apply.
- In the Schedule section, define the distribution period.
- In Items section, choose the main product catalog with all products a customer can buy with this discount. If you want to narrow down the list of categories a customer can choose from, use one of the options presented below (Selected items/Filtered items).
- In Exclude items section, you can exclude a specific product or categories for which the discount is not active.
- To apply all changes and run the promotion, click Publish.
Create a workflow
Create a workflow to manage the entire process: assigning the welcome promotion, sending a reminder if it’s not used, and assigning the instant bonus. This workflow monitors promotion usage and controls the timing of follow-up communications and actions.
Profile event node
- Go to Automation Hub > Workflows > New workflow.
- Enter the name of the workflow.
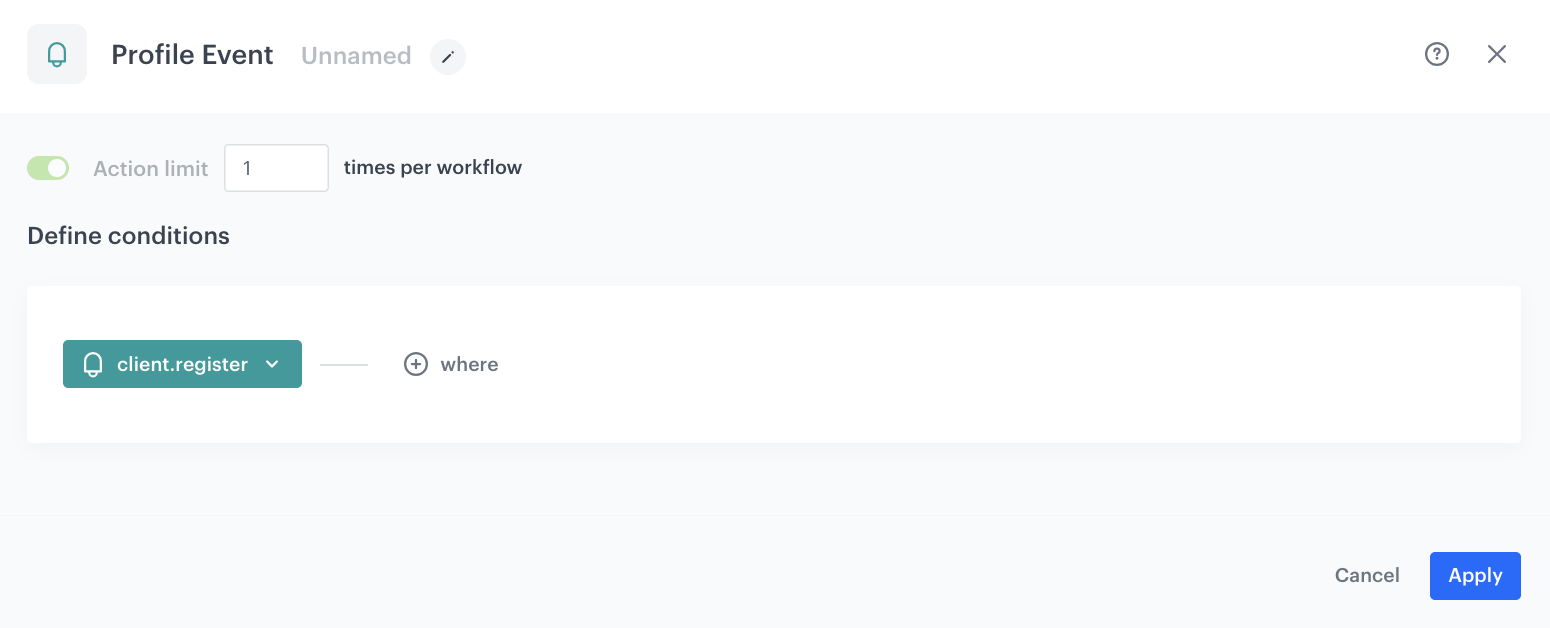
- As the first node of the workflow, add Profile event node, and choose the parameter/event which signifies joining the loyalty program. In our case, it will be the
client.registerevent.
Add the Send Email node
- Add the Send Email node. In the node settings:
- In the Sender details section, choose the email account from which the email will be sent.
- In the Content section, type the Subject and from the Template dropdown, select or directly create a short welcoming message for a new members in loyalty program.
- Click Apply to save your changes.
Configure the Event Filter node
This node lets a customer check if promotion has been used in the last 7 days. This setting is just an example and can be configured according to your business needs.
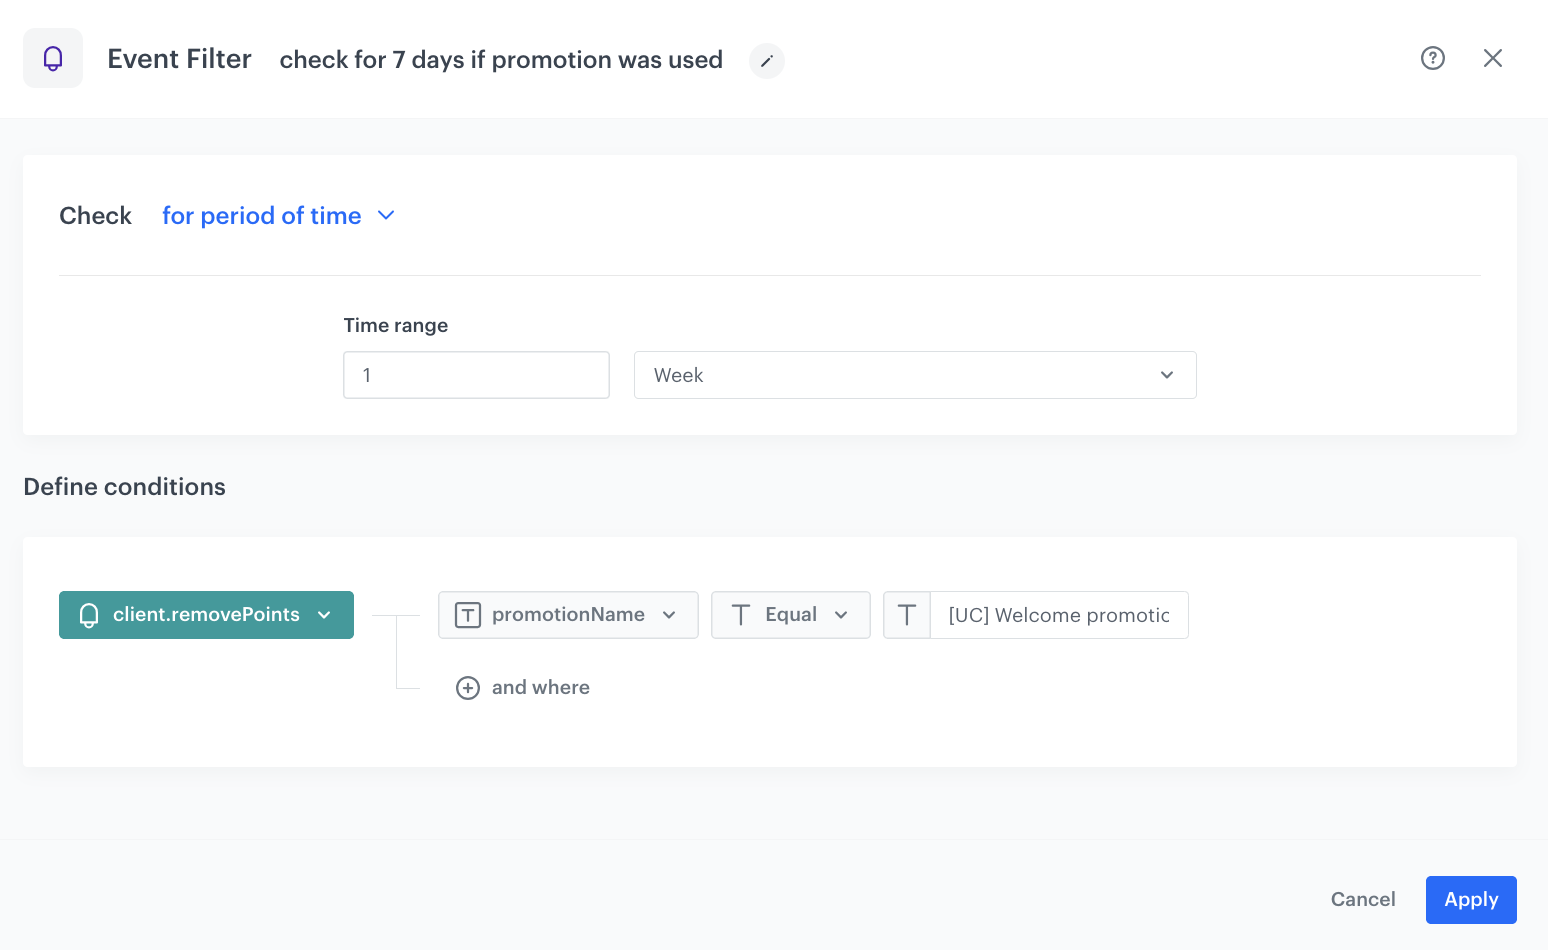
- As the next node, add Event Filter. In the configuration of the node:
- In the Check field, from the dropdown menu choose for period of time.
- Set the time range. In our case, it is 1 week.
- In the Define conditions field, from the Choose event dropdown menu, choose
client.removePointsevent. - As a parameter choose promotionName and use the exact name of the promotion crested in the previous step.
- Confirm by clicking Apply.
Send Email node
- Add the Send Email node to the Not matched path. In the node settings:
- In the Sender details section, choose the email account from which the email will be sent.
- In the Content section, type the Subject and from the Template dropdown, select or directly create a message with the reminder about promotion. The email will be send only to users with this promotion assigned.
- Click Apply to save your changes.
Configure the Event Filter node
This node lets a customer check if promotion has been used in the last 7 days.
- As the next node, add Event Filter.
- You can duplicate the exact settings of the Event Filter node, created earlier
Merge Paths
To the Not matched path from the second Event filter node and to the Matched path from the first Event filter node add Merged path node.
Add Send email node with the instant bonus promotion
- Add the Send Email node. In the node settings:
- In the Sender details section, choose the email account from which the email will be sent.
- In the Content section, type the Subject and from the Template dropdown, select or directly create a message with the link to instant bonus promotion.
- Click Apply to save your changes.
- Additionally you can add another Event Filter to check if the instant bonus result in using the promotion or not. If not - you can send email reminder once again.
Configure the Event Filter node
This node lets a customer check if instant bonus promotion has been used in the last 7 days.
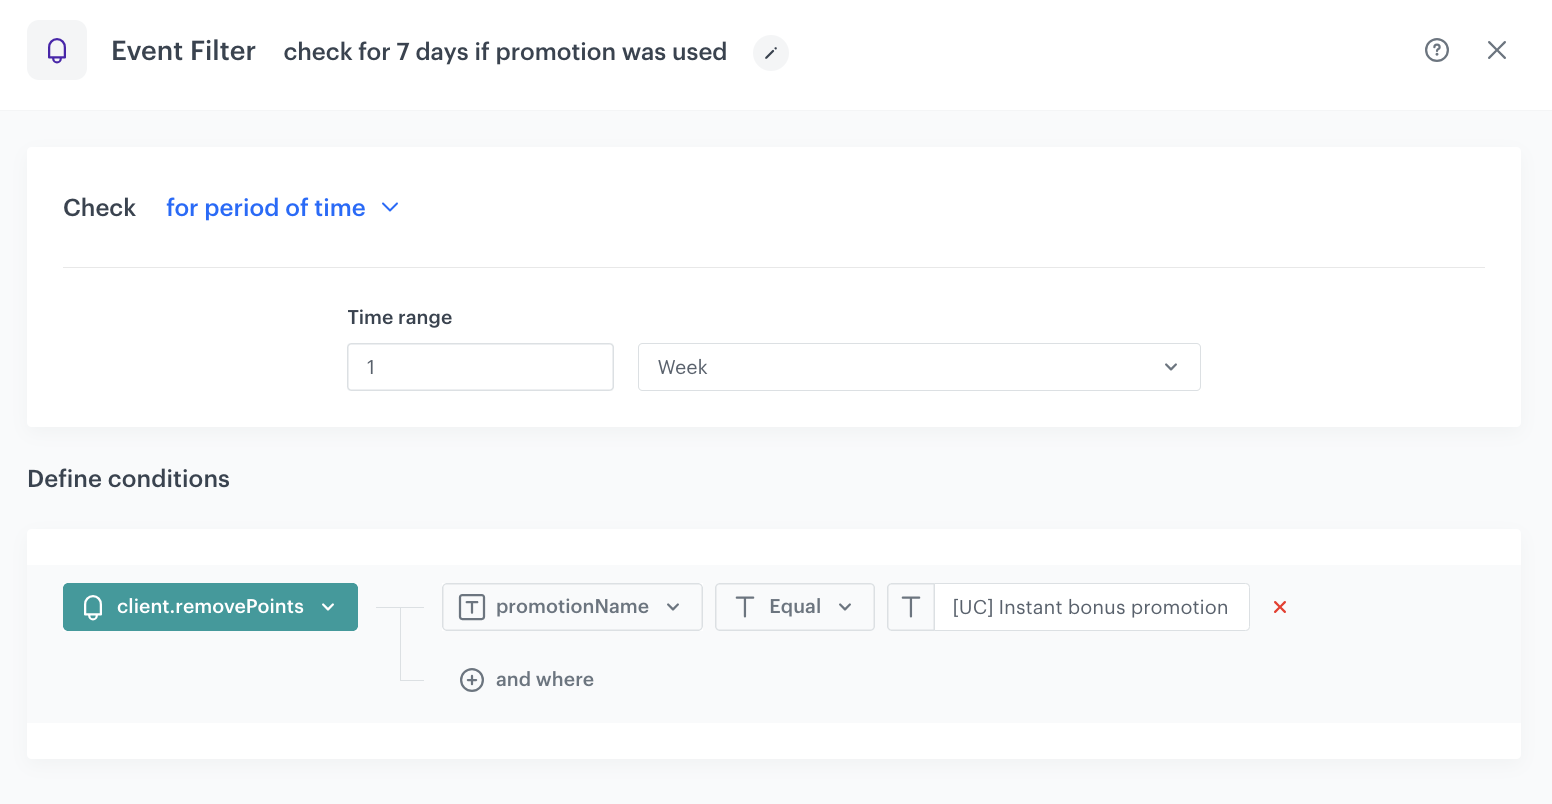
- As the next node, add Event Filter. In the configuration of the node:
- In the Check field, from the dropdown menu choose for period of time.
- Set the time range. In our case, it is 1 week.
- In the Define conditions field, from the Choose event dropdown menu, choose
client.removePointsevent. - As a parameter choose promotionName and use the exact name of the promotion crested in the previous step.
- Confirm by clicking Apply.
Add Send email node with the instant bonus promotion
- Add the Send Email node to the Not matched path. In the node settings:
- In the Sender details section, choose the email account from which the email will be sent.
- In the Content section, type the Subject and from the Template dropdown, select or directly create a message with the link to instant bonus promotion.
- Click Apply to save your changes.
- Additionally you can add another Event Filter to check if the instant bonus result in using the promotion or not. If not - you can send email reminder once again.
Final settings
- Set the capping for the workflow to make sure that entrance to the process will be available once for every user (choose very distant date for example, once in 1000 months).
- Confirm the settings by clicking Apply.
- Add the End node to finish the workflow.
- Click Save & Run.

Check the use case set up on the Synerise Demo workspace
In the Synerise Demo workspace, you can check:
- Segmentation for welcome message
- Segmentation for instant bonus
- Promotion with welcome message
- Promotion with instant bonus
- Workflow
If you’re our partner or client, you already have automatic access to the Synerise Demo workspace (1590), where you can explore all the configured elements of this use case and copy them to your workspace.
If you’re not a partner or client yet, we encourage you to fill out the contact form to schedule a meeting with our representatives. They’ll be happy to show you how our demo works and discuss how you can apply this use case in your business.