We recommend creating the tracking code with the creator, as described in this article. However, if you're looking for the legacy method or need to edit an existing tracking code without the creator, see Advanced tracking code settings.
What is Synerise Web SDK
Synerise Web SDK (Software Development Kit) is a JavaScript library that allows you to integrate Synerise on your website. This library (SDK) is responsible for data exchange between Synerise and the website into which it is implemented. Thanks to the SDK, we not only send data (events) but also download data to show dynamic content campaigns. The SDK is also responsible for customer identification, which means that SDK assigns a UUID for anonymous users on your website, if they already have a UUID, it recognizes them.
If the visitor's User Agent matches any of those used by Googlebot, the SDK doesn't initialize. This means that Googlebot's page crawling visits don't generate any Dynamic Content, events, or Profiles.
How to implement Synerise Web SDK?
By adding a tracking code into the source code of your website.
What can the tracking code do?
The tracking code's permissions are designed to be restrictive, so the code can be included in the source code of your website without risk to your infrastructure or the personal data of your visitors.
It enables the following features:
- You can display Dynamic Content on the page.
Profile data, such as name or date of birth, can be added to the Dynamic Content with Jinjava inserts.
Only the data of the profile whose UUID is stored in the cookies can be used. - You can send events.
By default, page.visit events are tracked automatically.
Other events can be sent with declarative tracking. - You can identify users on your website.
When a visitor enters your site for the first time or after clearing their cookies, the SDK generates a random UUID and an anonymous profile is created. If that user becomes recognized (for example, by sending a login form), it may be merged with an existing recognized profile. - Events sent by SDK requests can modify profiles if you allow it.
To edit the list of events which can modify profile data, see Event authentication settings. - The tracker key (part of the tracking code) can be used to authenticate customer-oriented requests to the Recommendations and Search APIs. This can be used to generate personalized recommendation and search results.
- You can use all methods provided by Synerise SDK.
You can also:
- send form data.
By default, sending form data with the SDK requires JWT authentication. If you want to change that, follow the instructions in "Sending form data with JS SDK".
- send transaction events.
- send the status of newsletter agreements.
The code can't be used to:
- Access the details or settings of your workspace.
- Authenticate API requests, except for recommendation and search results.
- Explicitly request personal data of customers.
The SDK identifies the visitor by their UUID from the cookies. It can't access the visitor's Synerise profile directly (personal data from the profile can be displayed with Dynamic Content) or access the data of other profiles.
Prerequisites
- If you use a custom tracking domain, prepare DNS entries for it. See Custom tracking domain.
- Add the following domains to the allowlist in your Content Security Policy:
*.synerise.com*.snrcdn.net*.snrbox.com- If you use a custom tracking domain, you can skip this entry.*.snrlink-page.comfcm.googleapis.com- This is only required for Web Push.
Creating a tracking code
- Go to
 Settings > Tracking Codes > Add tracking code.
Result: The tracking code creation form opens.
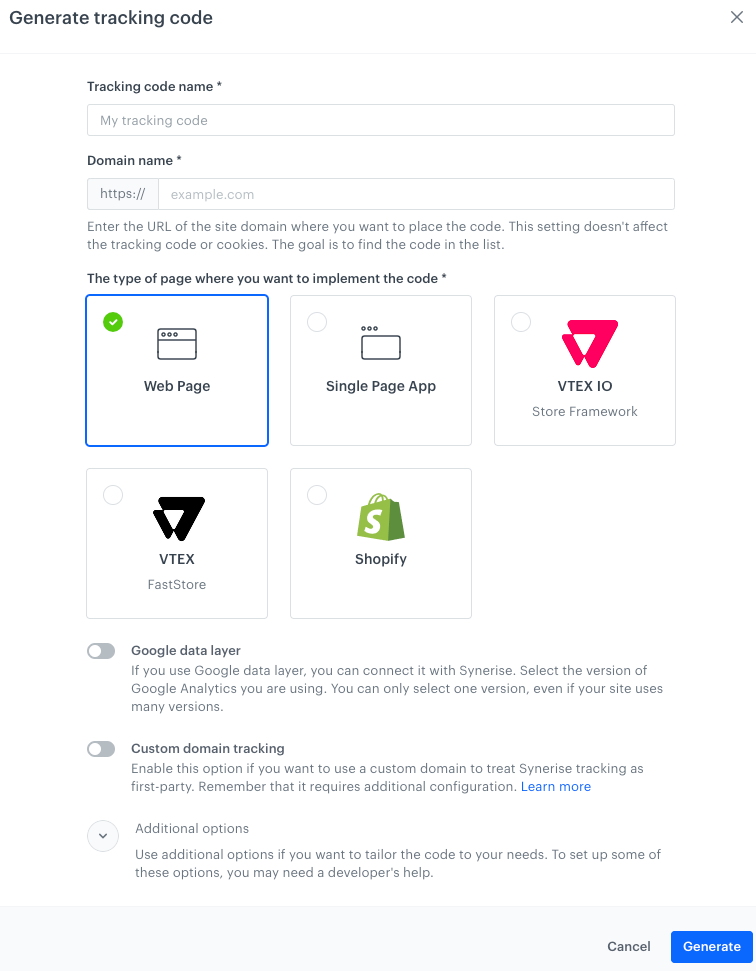
Tracking code creation form - In Tracking code name, enter the name.
It's used for identifying the code on the list of tracking codes. - In Domain name, enter the domain where the code will be used. This setting doesn't affect tracking or cookies - its purpose is to identify the code.
- Select the type of page where you want to implement the code.
If you choose Single Page App, you will need to manually implement page visit events and dynamic content after you include the tracking code in the page. This is described further in the article.
- If you use Google data layer, enable the toggle and select the version.
If your site uses multiple versions, you can only choose one for use with Synerise tracking. - If you use a custom tracking domain, enable Custom domain tracking and enter the domain in the field that appears.
Using a custom tracking domain requires additional configuration. See Custom tracking domain.
This completes the basic settings.
- If you don't need additional settings, continue to Adding the tracking code to your site.
- If you need additional settings, continue to Additional options.
Additional options
If you want to manually add these options to an existing tracking code, see Advanced tracking code settings.
- Expand Additional options.
- Configure the settings that you need:
Custom cookie expiration time
By default, cookies expire after 400 days. To change the expiration time, enable the toggle and enter the period.
Override cookie domain
If you use several subdomains, they generate cookies with their own domain. To declare a specific domain instead, enable the toggle and enter the domain.
Disable automatic tracking of page visits
You can disable automatic collection of page.visit events. You can re-implement the events by using the SDK methods.
For Single-Page Applications, this option is always enabled.
Custom service worker scope
If you use Synerise Web push notifications and need to set a custom service worker scope (registration path), enable the toggle and enter the path.
Customizing metadata
You can add <meta> tags (for example, OG tags) to the website or modify existing ones. The new values are added to page.visit events. They can also be used with other features based on metadata, such as communication, recommendations, personalization, and so on. To add the metadata, enable the toggle and paste JS code inside the function (metadata) function.
If you chose Shopify as the page type, a piece of Jinjava required for the integration is already added to the metadata and this option can't be disabled.
Example:
function (metadata) { // DO NOT REMOVE
    metadata.size = 8;
    metadata.isExample = true;
    metadata['og:title'] = 'Sneakers';
    metadata['product:retailer_part_no'] = '1a4d3380-04d1';
    return metadata; // DO NOT REMOVE
    }                // DO NOT REMOVE
Syntax usage:
- If the name of the meta key doesn't contain special characters, use the
metadata.keyName = 'keyValue'syntax. - If the name of the meta key contains special characters, use the
metadata['key_name'] = 'keyValue'syntax. - Up to 20 meta parameters can be returned.
- The following value types are allowed:
- string
- number
- boolean
- array
Manage some Synerise features
You can turn off Web push notifications and/or Dynamic Content by disabling the toggles.
The feature or features will be disabled entirely for this tracking code and can't be restored with SDK methods.
Adding the tracking code to your site
- After you complete the configuration, click Generate.
Result: The tracking code is generated and displayed.
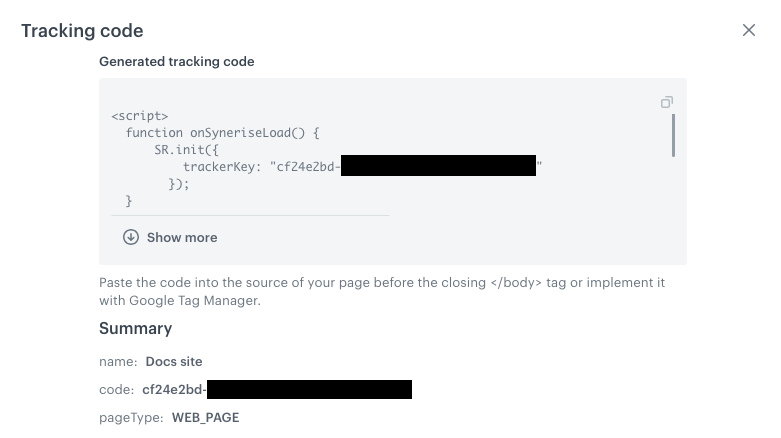
An example generated tracking code for a Web page Continue depending on the selected page type:
- Copy the tracking code.
- Paste the code into your website, before the closing
</body>tag.
You can use Google Tag Manager to do this (when using a custom tracking domain this is not recommended). - If you enabled the custom tracking domain, make sure it's added to the DNS and API methods as described in Custom tracking domain.
- Re-enable page visit tracking and Dynamic Content retrieval by implementing the following methods in the page:
SR.event.pageVisit()
    .then(function () {
        SR.dynamicContent.get();
})
Page visits and dynamic content retrieval must be implemented according to the following rules:
- og:tags must be loaded first, regardless of the method that is used to load them.
- page visits and dynamic content must be requested whenever the page is loaded, reloaded, and when the view changes.
You can use Google Tag Manager to implement the methods. To do so, trigger
SR.event.pageVisit();andSR.dynamicContent.get();methods on events that indicate a page or DOM being loaded.SR.initis only called when DOM is loaded.For VTEX, 2 variants of the tracking code are generated.
- Add the codes to the VTEX pages as described in Integration for stores using Store Framework.
- If you enabled the custom tracking domain, make sure it's added to the DNS and API methods as described in Custom tracking domain.
For Shopify, 2 variants of the tracking code are generated.
- Add the tracking code to the Shopify page according to the Shopify integration instructions.
- If you enabled the custom tracking domain, make sure it's added to the DNS and API methods as described in Custom tracking domain.
Nonce for Content Security Policies
Nonce (number used once) is a content attribute which can be used by Content Security Policies (CSPs) to determine if an element should be allowed. If a script doesn't have a nonce value that matches the one expected by the CSP, the script can't execute.
You can add the nonce to the Synerise SDK initialization script:
SR.init({
  trackerKey: "VALUE",
  nonce: "VALUE"
});
The tracking code and any scripts that the SDK adds to the page (for example, in Dynamic Content) will have the nonce value that you add to SR.init
You must generate the value of the nonce yourself and make sure it matches the one expected by the CSP.
For more details on nonce and implementing it, see MDN Web Docs.