Create rules
About
Rules are an extension of the features available in the AI Search Engine. The rules provide IF - THEN logic that lets you influence the search results. This way you can manage the behavior of the search engine by telling it to promote specific products, replace the query or a word in the query or remove a word from it in specific circumstances. Despite the many possibilities of altering the search performance, no code is required to set up the rules.
Structure
The process of configuring rules consists of three steps:
- Defining the target audience of the rule.
- Defining the conditions. The rule is only applied when all conditions are met.
Click for video tutorial
-
Rules that respond to customers’ queries - Rules can modify your customer’s queries and apply consequences if the query matches the condition of the rule. You can select among 4 query conditions:
- is - The phrase in the condition and the search phrase entered by customer must be identical.
- contains - The search phrase must include the phrase in the condition, but can also contain other phrases.
- starts with - The search phrase must start with the phrase in the condition.
- ends with - The search phrase must end with the phrase in the condition.
-
Rules that respond to a context - If a condition of the rule has only a context defined, then the search results will be modified according to the defined consequences. It happens only if the context exactly matches a value in the
contextparameter of a customer’s search.More information about context- The context can be any string. For example, you can use it to differentiate searches made on a mobile device from those made on desktop.
- Context is sent as a parameter with the search query.
- Example of use: To make search results on mobile devices more accurate, you can promote results for smartphone chargers and cases instead of displaying chargers and cases for laptops on the top of search results.
- To configure a context-based rule, you must:
- Assign
contextsearch parameter to customer searches. - Create the rule in the application or through the API.
- Assign
-
Rules that apply only when the customer applies particular filters to the search (text filters or a range of numbers).
Important: This condition can only be set if filterable or facetable search attributes are defined.More information about filter-dependent rules- Exact: the customer’s search filters must be exactly the same as this condition filter.
- Contains Profile’s Filters: this condition filter must contain all the customer’s search filters (but can also contain other filters).
- In Profile’s Filters: the customer’s search filter must contain all of this condition filter (but can also contain other filters)
- Any: at least one of the customer’s search filters must match a value from this condition filter.
Example:
- The customer’s filters are
color = green OR red OR white - The condition filter value is
color = green, red.
The result is:
- Exact: does not match, the sets are different. The rule is not applied.
- Contains Customer’s Filters: does not match, some customer filters are not included in the condition filters. The rule is not applied.
- In Customer’s Filters: matches,
greenand"red"are included ingreen OR red OR white. The rule is applied. - Any: matches, there is at least one common element. The rule is applied.
-
Rules that apply for all queries. For example, filter the results of every query to those that have the value of the
onlineattribute set to true.
-
- Defining the consequences. The search engine adapts its behavior according to the consequences associated with a condition. You can select from the following consequences:
Click for video tutorial
Requirements
AI Search engine must be implemented and configured.
Creating rules
-
Go to
 AI Search > Indexes.
 -
Select an index from the list.
-
Go to the Rules section.
-
On the right side of the screen, click Add new.
Result: A new window opens. -
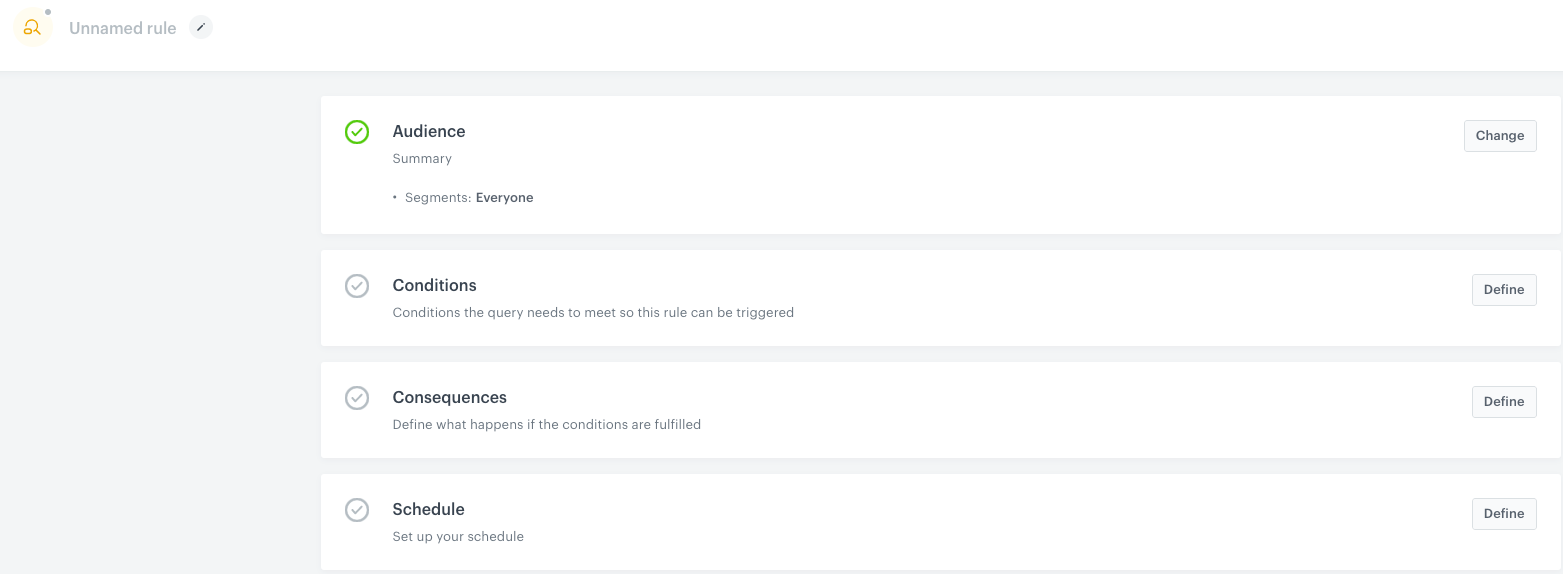
To define the profiles for whom you want to apply the rule, in the Audience section, click Define.
- Select one of the following options:
- Everyone - The rule will apply to all profiles in your database.
- Segments - The rule will apply to profiles in the selected segmentations.
Important: You can use up to 10 various segmentations in all query rules in one index. When you use the same segmentation in several rules, it counts as 1 towards this limit.
- Follow the instructions depending on the option you selected:
No further configuration in this section is needed. Confirm your choice by clicking Apply.
- Select one of the following options:
-
To adjust the query conditions, in the Conditions section, click Define.
- In the Query tab, to define the method of checking the query, choose one condition.
- Click Add phrase.
- Enter a phrase. You can do it in two ways:
- In text field, type a word (or a phrase) in a singular form.
- Next to the text field, click the
 button. From the dropdown list select a facet (a product attribute) and its value (it can be a phrase). It is different from defining an exact query; you can define which attribute in general the query rule should look out for. For example, if you choose brand as the facet, the query rule will apply its consequence whenever any brand name is detected in the query.
- If you want to add more phrases, repeat steps b and c.
- In the Context tab, to define only the environment of the search (without query phrases), in the Define query context enter the context.
- In the Filters tab, define the filters that must be used by the customer in order for the rule to activate:
- Click Add filter.
- From the Attribute drop-down list, select the attribute.
- From the Filter match drop-down list, select the matching logic.
- Select the values that must match the logic:
- If the attribute is text-type, select the value or values from the dropdown list.
- If the attribute is a number, enter a value or range.
- To add more filters, click Add filter again.
If you add multiple filters, they must all be met.
- Confirm the settings by clicking the Apply button.
-
To define how the search engine reacts to the defined conditions, in the Consequences section, click Define.
Full list of consequences and instructions in the “Consequences” section.- Click Add consequence.
- From the dropdown list, select a consequence.
- Fill in the settings of the selected consequence.
- To add more consequences, click Add consequence and repeat steps b and c.
If you add multiple consequences, they are all applied. For example:- if the first consequence is “promote item A” and the other is “replace word”, the result is “promote item A AND replace word”.
- if one of the consequences is “Show no results”, the search will show no results regardless of any other consequences added before or after “Show no results”.
- Confirm by clicking Apply.
-
To define when the query rule applies, in the Schedule section, click Define.
- To launch query rules immediately, click Active immediately.
- To schedule the rules at specific time, click Scheduled.
- Enter the start date.
- Enter the end date.
- Select the time zone.
- Confirm by clicking Apply.
-
To complete working on the query rule, you can either:
- Save it as a draft by clicking Finish later.
- To save and activate it, click Publish.
Consequences
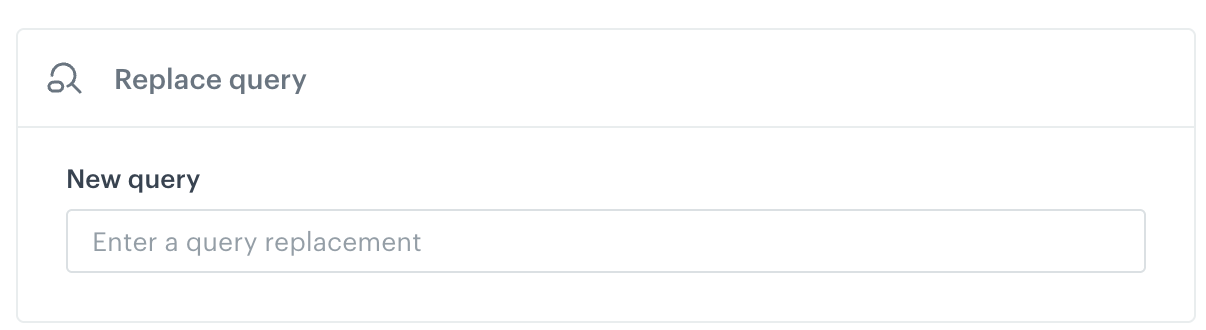
Replace query
The entire query typed by a user will be replaced with the query you provide. In the New query field, enter the query for which the results will be displayed, which will replace the original query.
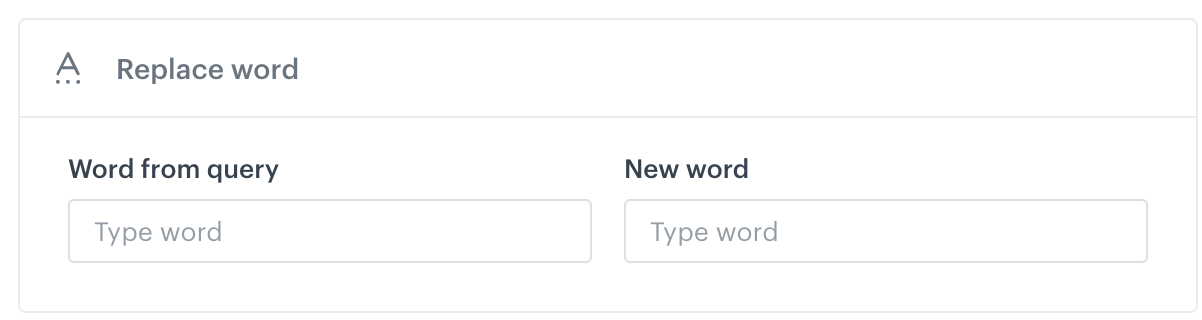
Replace word
A selected word from the query, if it occurs, is replaced with the word you indicate.
- In the Word from query field, enter the word from the query you want to replace.
- In the New word field, enter the word with which the original word from the query will be replaced.
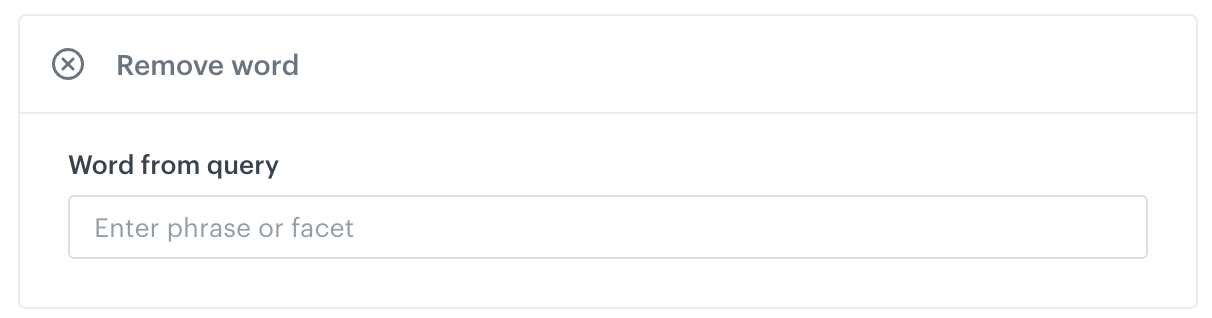
Remove word
A selected word from the query, if it occurs, is removed.
In the Word from query field, enter the word you want to delete from the query.
Pin items
A selected item or items will be placed higher in the search results. This consequence lets you pin items which were not returned in search results.
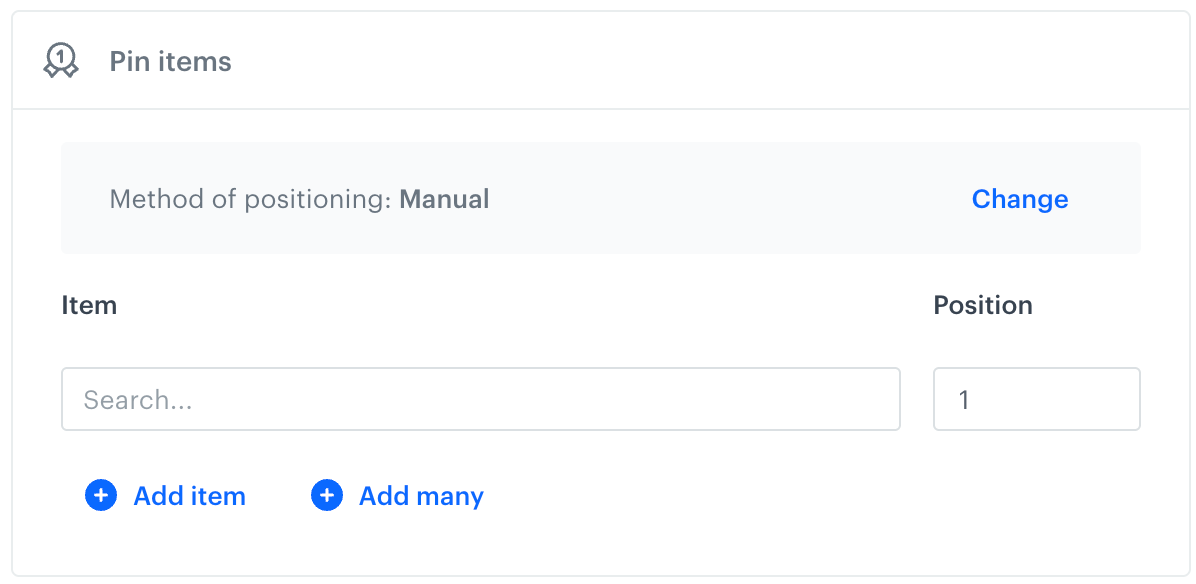
- In the Item field, from the dropdown list, select the item you want to promote.
- To:
- add a next item, click Add item and repeat step 1.
- add multiple items, click Add many.
Result: A pop-up appears.- In the Add items field, provide item IDs separated by
; - Confirm your choice by clicking Add.
- Confirm by clicking Apply.
- In the Add items field, provide item IDs separated by
- If you want to change the method of positioning to other than manual, click Change.
By default, the Manual method is selected, which means you define the position of each item one by one.- if you want to define several positions per each item, select Custom.
Result: A pop-up appears.- In the Position field, provide the position numbers (at any order, but you can use only positions between 1 to 50). The first position number you provide is assigned to the first item on the list as presented below:
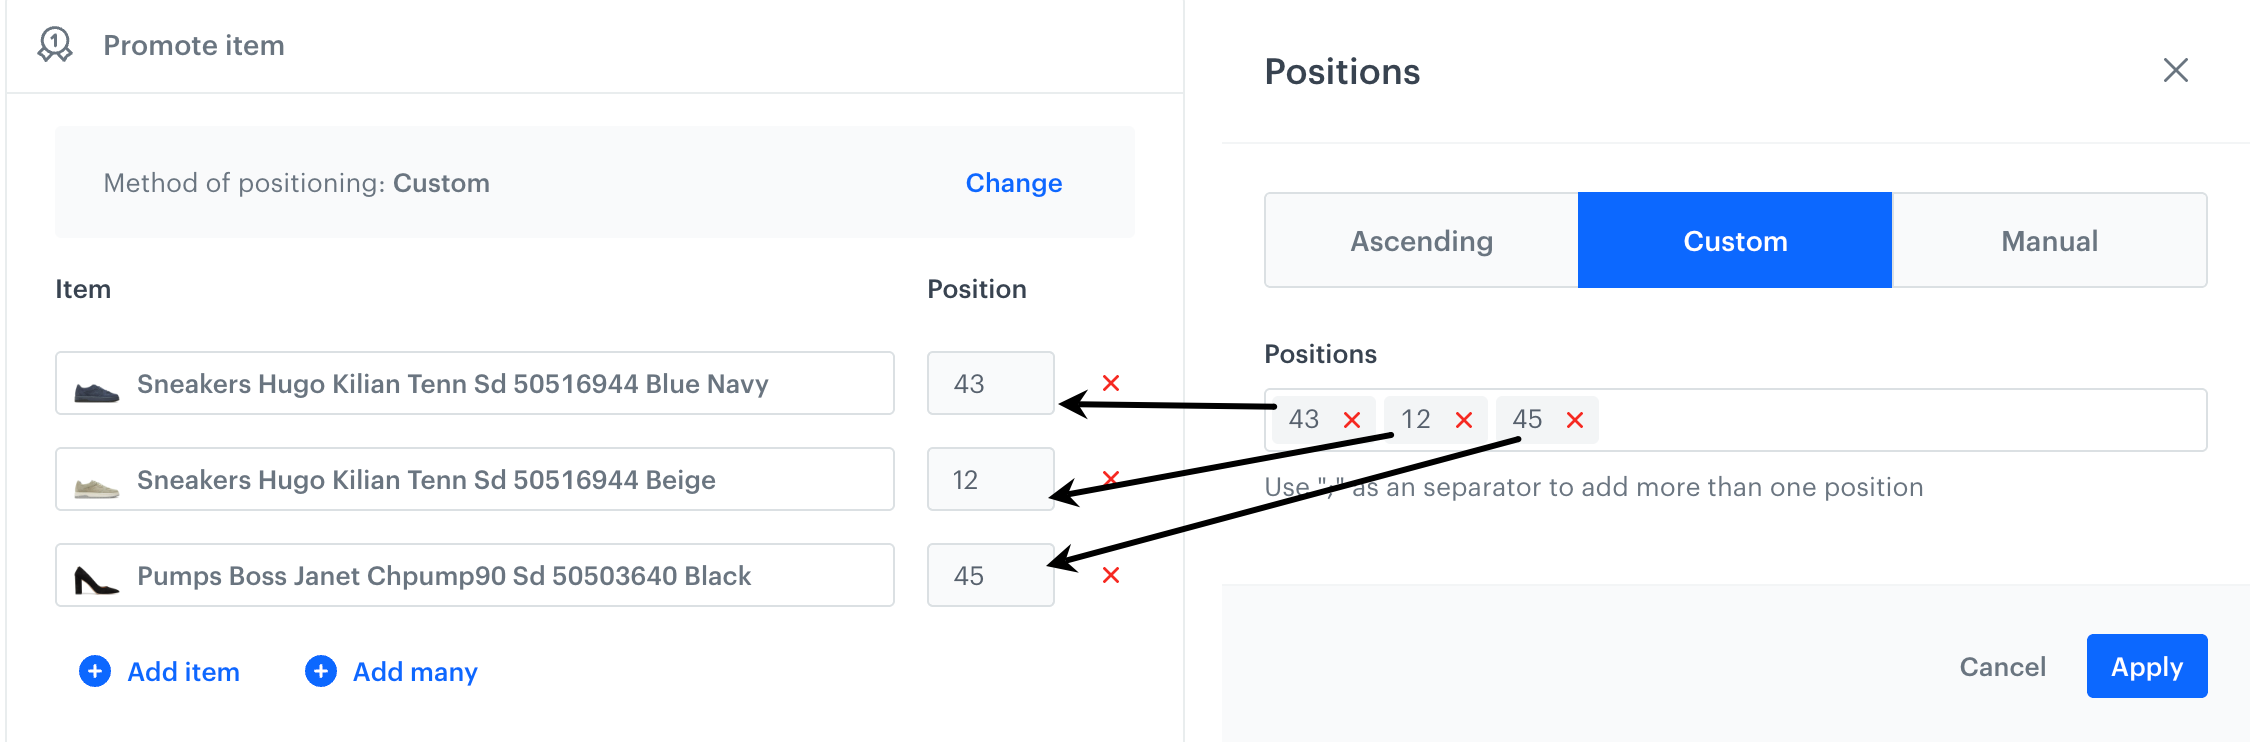
On the right side, you assign positions to items selected on the left side of the screen
- In the Position field, provide the position numbers (at any order, but you can use only positions between 1 to 50). The first position number you provide is assigned to the first item on the list as presented below:
- if you want to define the item positions in ascending order, select Ascending.
Result: A pop-up appears.- In the Starting position field, enter the position which will be assigned to the first item on the list.
- In the Gap field, enter the number which will define the position gap between each item you selected. For example:
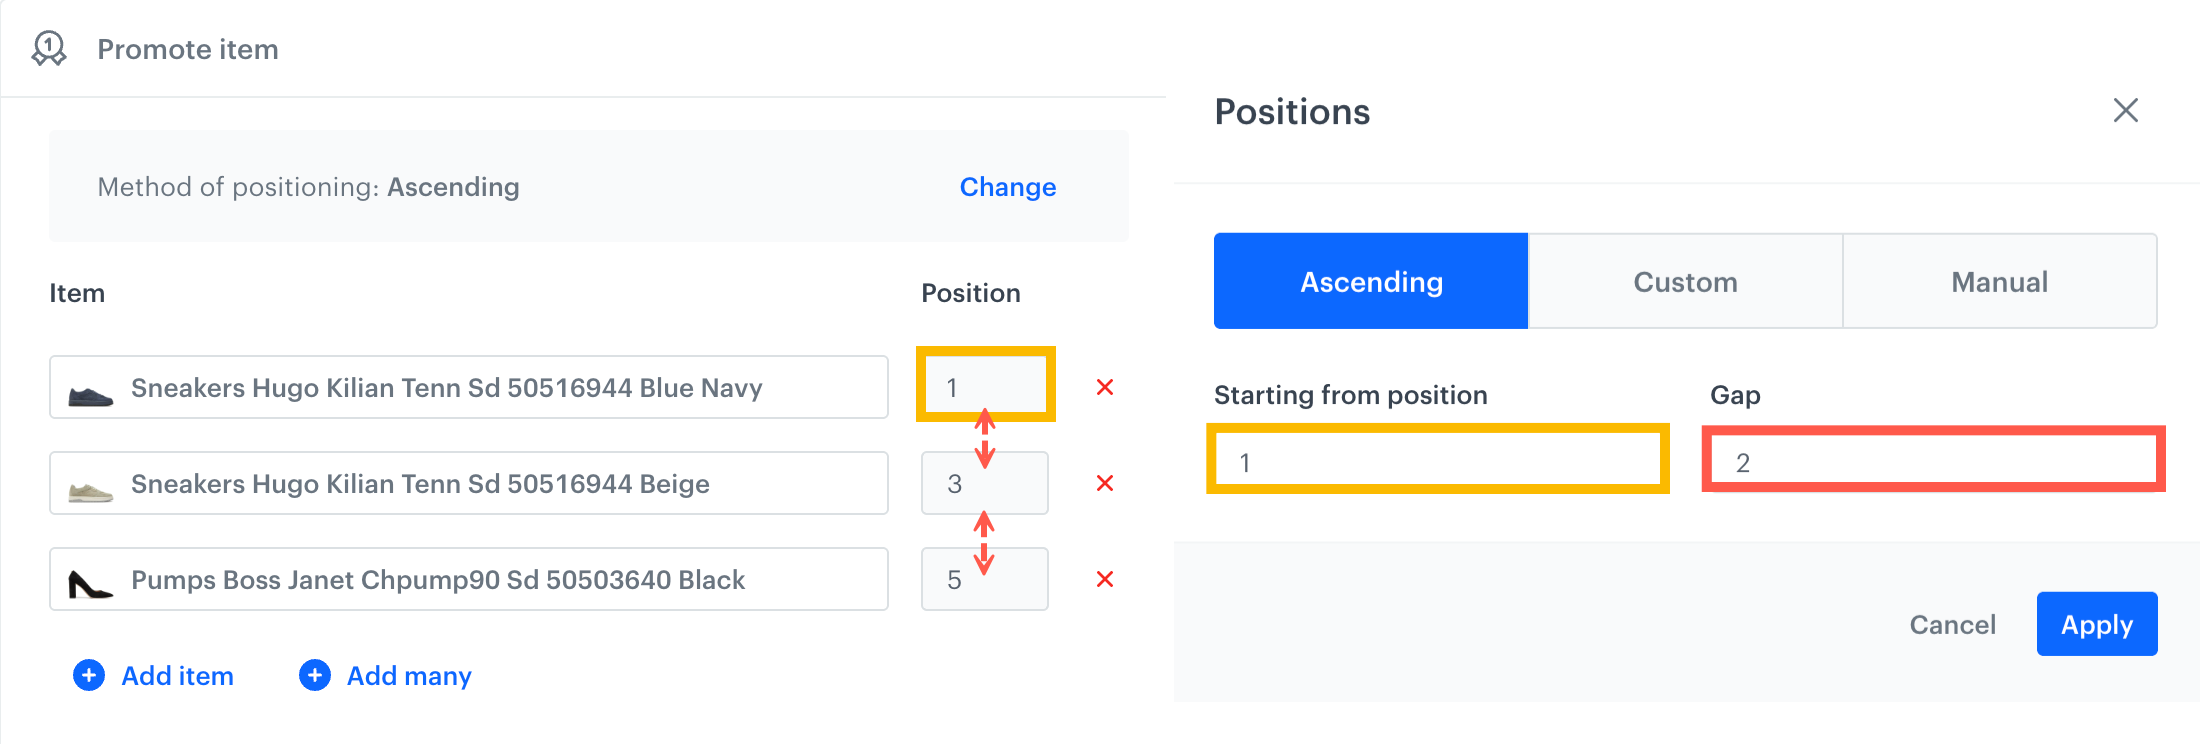
On the right side, you define starting position (values marked with a yellow rectangles on both screens) and the gap between positions (marked with a red rectangle and red arrows) - Confirm by clicking Apply.
- if you want to define several positions per each item, select Custom.
Pin items by attribute
Selected items returned in the search results will be placed at the top based on the chosen attribute. You can specify the number of items to pin.
- If more items than the specified number qualify for pinning, the overall item ranking will determine which items are pinned.
- If fewer items than specified qualify, only those eligible will be pinned.
- If no items meet the conditions, the search results are returned unchanged.
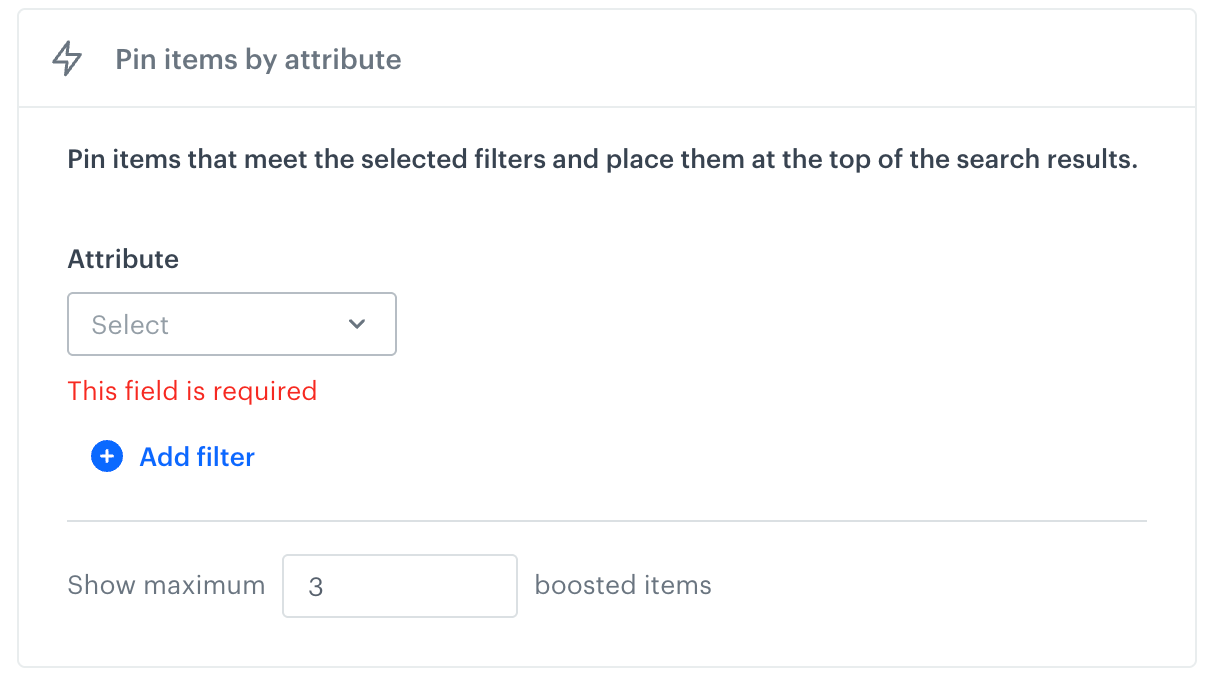
- From the Attributes dropdown list, select the item attribute to use to pin the items.
- From the middle dropdown list, select the logical operator.
- As the value, you can provide a static value, an aggregate, or an expression.
- To add more filters, click Add filter and repeat all steps.
- In the Show maximum… input, provide the number of items which will be pinned.
Hide item
A selected item or items will be excluded from the search results.
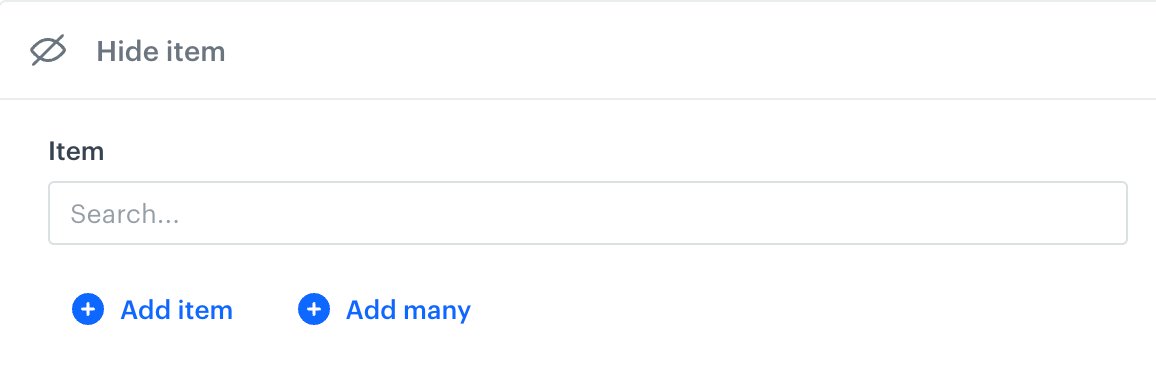
- To add batch of items, click Add many.
Result: A pop-up appears.
- On the pop-up, in the Add items field, enter the IDs of the excluded items, separated by
; - Confirm your choice by clicking Add.
- Confirm by clicking Apply.
- On the pop-up, in the Add items field, enter the IDs of the excluded items, separated by
- To add a single item, in the Item field, search for the item you want to hide, by providing its name or other identifier.
Result: A dropdown list appears.- From the dropdown list, select the item.
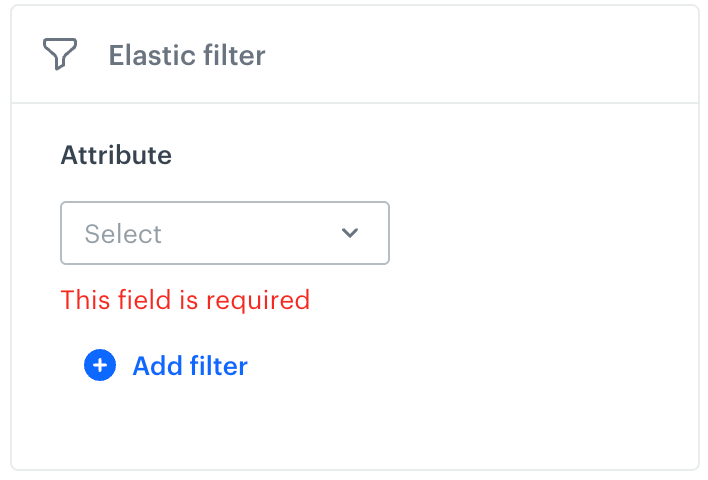
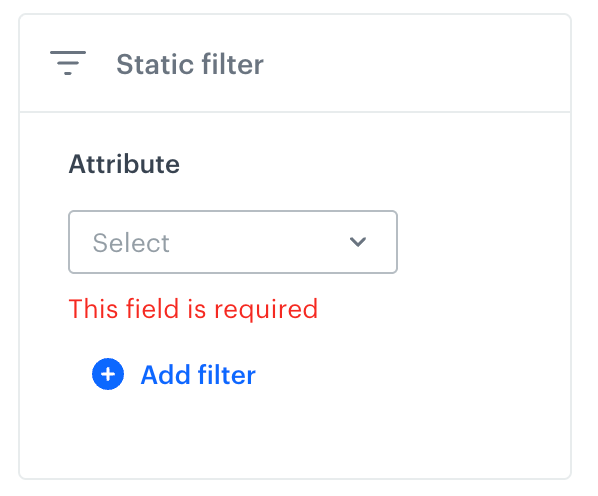
Filters
Filter consequence types:
- Elastic filter - Filters the search results to move items that meet the filter conditions higher in the results. If no items meet the filter conditions, the search results are returned unchanged.
- Static filter - Filters the search results to display only the items from the search response that meet the conditions you provide. If no item from search results meet the conditions, then the list of results will be empty.
Additional information
- Attribute values can be strings, numbers, date (the
createdattribute which lets you filter items based on the date of adding the item to the feed), or dynamic values: expression results or aggregate results. - You can apply a maximum of two dynamic conditions (a condition is dynamic when it contains an aggregate or expression) in total across all consequences of a query rule, meaning if two are used in one consequence, none can be added in others.
- If two or more rules match a given phrase and use dynamic values, up to two dynamic values from the winning rule are applied according to precedence logic.
- The scope of attributes for filtering is defined in the Filterable and Facetable attributes section in the index settings. If you want to use an attribute to a filter in query rules, remember to add it to both.
Important: When setting up a filter in a Query Rule, 500 distinct attribute values are returned. If there are more distinct values for an attribute and the desired value does not appear in the dropdown menu, you can input the value manually.
Instructions
- From the Attribute dropdown list, select item attribute which you want to use for filtering.
- From the dropdown list, define the logical operator (for example, In, Not in. Depending on the value type of the attribute, the range of logical operators differs).
- By clicking the icon, select the value type of the attribute (string, number, date/relative date, aggregate, expression).
- In the field, provide the value.
- To add more filters, click Add filter and repeat all steps.
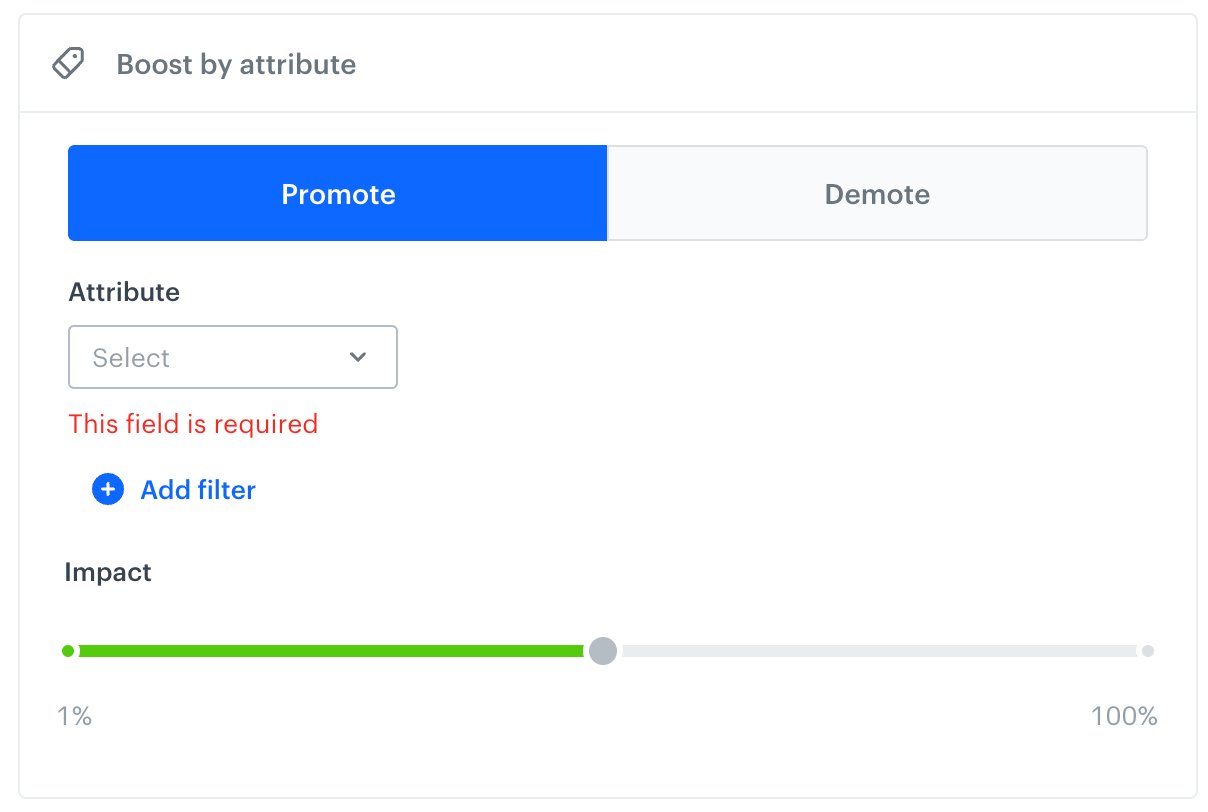
Boost by attribute
When a customer uses a particular word or phrase in a search query, this consequence lets you:
- boost the importance of an item attribute (such as brand), so the items with these attributes are more likely to occur in the search results.
- demote the importance of an item attribute (such category), so the items with that attribute are less likely to occur in the search results.
- Select one of the following tabs:
- to display items higher in results, select Promote.
- to display items lower in results, select Demote.
- From the Attribute dropdown list, select the item attribute which you want to use for filtering.
You can use thecreatedattribute which lets you boost the items based on the date of adding an item to the feed. - From the dropdown list, define the logical operator (for example, In, Not in. Depending on the value type of the attribute, the range of logical operators differs).
- By clicking the icon, select the value type of the attribute (string, number, date/relative date, aggregate, expression).
- In the field, provide the value.
- To add more filters, click Add filter and repeat all steps.
Return no results
The search list will be empty.
No configuration is required for this option.
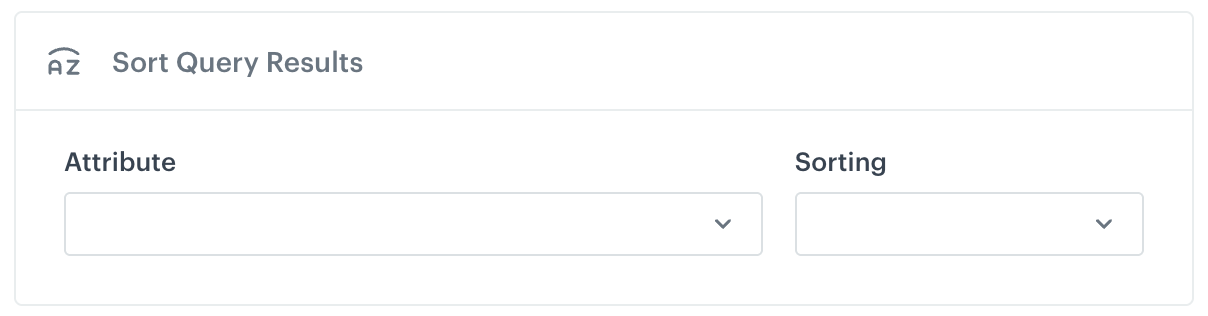
Sort query results
You can organize search results according to the value of a specific item attribute in an ascending or descending order. Make sure to select attributes with values that can be put in order (like numbers).
- From the Attribute dropdown list, select an item attribute which will be used for sorting.
For example, you can select the price attribute, so you can organize search results from cheapest to most expensive. - From the Sorting dropdown list, select the order in which items will be sorteed:
- Ascending - Items are organized from the lowest to the highest value of the attribute.
- Descending - Items are organized from the highest to the lowest value of the attribute.
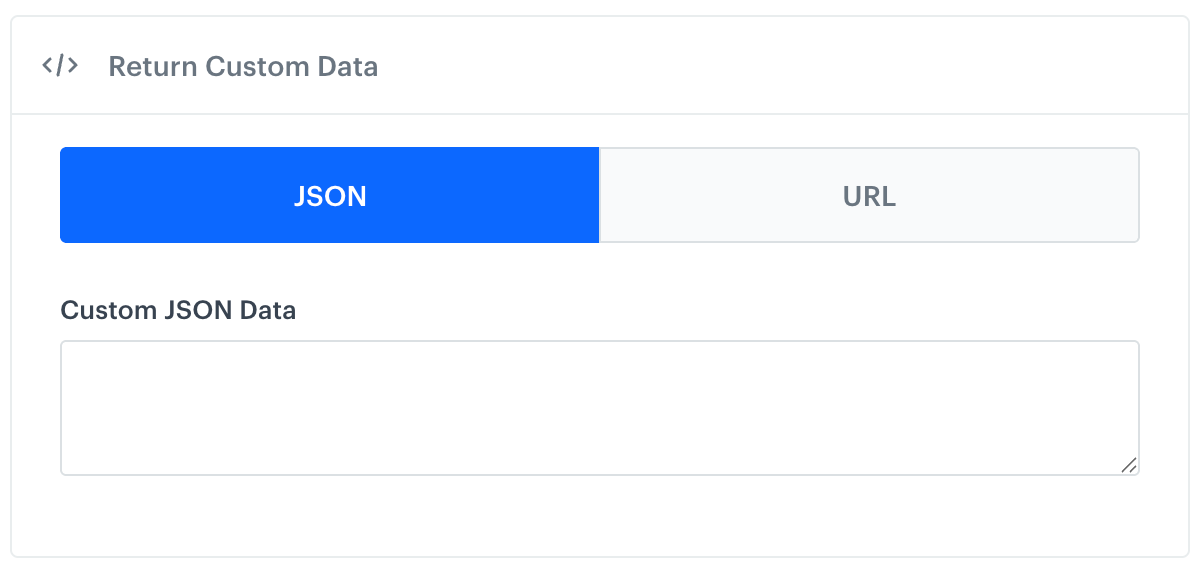
Return custom data
This is a possibility to return any custom data as a query rule consequence. The custom data is in JSON format and is located in the extras part of the search response object. You can also input a URL instead of a JSON.
Example: If a query contains forbidden word, return customData equal to:
    {
        "custom404": "custom404.com",
        "forbidden-word": "forbidden word used"
    }
Multiple query rules
Query rule conflicts
When creating multiple rules, it is possible that their settings might cause a conflict. A conflict emerges in a situation when two query rules should be activated by the same phrase and their consequences are mutually exclusive. The result managing system resolves such conflicts according to the following rules, in order of importance:
- Position: The earliest match wins (i.e. closest to the beginning of the query string).
- Match length: The longest match wins (in terms of the number of words from the query string).
- The way in which the condition matches the query, ordered from highest importance:
Is>Starts with>Ends with>Has. - Rule ID: If there are still conflicts after all other criteria have been applied, the system takes the smallest
ruleIDin lexicographical order. In practice, this means the rule that was created first wins. This final tie-breaker rule is guaranteed to break every tie and usually occurs only when rules are duplicated.
Essentially, rules are applied from the beginning of the query string to its end.
Matching filters in multiple query rules
When two or more query rule conditions are met and their consequences include filters, for example:
- Query Rule 1: If phrase is
Shoe, filter query results to category = “Men > Shoes” - Query Rule 2: If phrase is
Shoe, filter query results to category = “Women > Shoes”
You can choose the logical operator to combine those filters in the settings of your index. You can find detailed instructions in the “Defining dependency among filters in multiple query rules” section.
Examples
Promoting a new item
When you introduce a new item in your offer, there isn’t much interaction with it at first, compared to items that were available earlier. By default, the item is at the end of the list of results. You can change this behavior and promote the item, which moves it towards the first positions in the list.
For example, if you introduced a new Xbrand shoe model, you can set the following rule:
if query = Xbrand promote new Xbrand model to first position
When the brand appears in search, filter results only to that brand
Another case where query rules come in handy is filtering your search results. For example, you can set a rule
if query contains CoolBrand filter to brand = CoolBrand.
This way, all results will be narrowed down only to the CoolBrand products.
If you want to apply such a filter for all brands, you can use facets in the following way:
if query contains {brand} filter to {brand}.
This will always filter the results to the brand in the query, if a brand is detected in it.
Replace phone with smartphone
Assumptions:
- You offer items from brand XYZ in many categories (vacuum cleaners, lightbulbs, and so on).
- You offer phones from other brands, but not XYZ.
- You offer smartphones from brand XYZ.
If you want the query “XYZ phone” to search only for smartphones, you can set the following rule:
if query is "XYZ phone" OR "phone XYZ" replace "phone" with "smartphone"
Why synonyms (another possibility in search settings) are not a solution here?
Setting up a synonym would globally alter the way the search engine looks for items, it would treat “phone” and “smartphone” as equivalents. In this case we only want to manipulate the query if it contains a specific brand.
Hiding items
Sometimes you want to hide items that the search engine would consider relevant, however from a business perspective don’t make sense.
For example, you have an item in your feed whose title is red t-shirt with white sneaker and we would like to hide this item from the search results because for some search queries it would match the query but from a business perspective it doesn’t make sense to show the item.
In such case, we can create a rule which hides the item with this title from search results:
if query equals "sneaker" or "sneakers", hide item which "title" is "red t-shirt with white sneaker".
Filtering results by price range
You can also filter the results by range attributes. A good example is for filtering within a price range. If a customer is looking for cheap books, you can set a rule:
if query is "cheap books" filter results to 'price' less than "10$".
Combining consequences
Sometimes you will need more than one consequence to achieve your business case. You can add multiple consequences to one condition when setting up a rule. (Xbrand smartphone – change to ULT093model, filter to Xbrand, promote latest model)
For example let’s take a customer query “Xbrand smartphone”. You might want to change the query to make it more relevant to your items, filter the results to Xbrand products and promote the newly released ULT093 model. You can set a rule:
if query is "Xbrand smartphone" change query to "ULT093model" and filter to 'brand' equal to "Xbrand" and promote item "ULT093" to first position.