This ABX test is designed to help optimize discount offers for customers with low predicted purchase probability from specific category — a segment that requires more strategic effort to convert.
Using our prediction model, customers are divided into three groups:
- High probability to buy
- Medium probability to buy
- Low probability to buy
Instead of offering discounts to everyone, the focus here is on the medium-intent group, where the real challenge lies. This segment is targeted with multiple variants of a campaign for specific product category (like electronics in our case) to determine which incentive, if any, drives the highest engagement and conversion:
- 5% discount
- 10% discount
- 15% discount
- No discount (control group)
The results help you fine-tune your strategy by understanding which discount level justifies the cost of acquisition in this sensitive segment. This leads to smarter spending on incentives and a higher return on your promotional efforts.
Prerequisites
To implement this use case, perform the following steps in the given order:
- Create an email account.
- Prepare email templates.
- Create voucher pools with different discounts. In our example: 15%, 10% and 5% for
Electronicscategory.
Process
- Create a Propensity prediction that produces the 5-point score (results will be later grouped using 3-point score labels).
- Create a segmentation.
- Create a workflow.
Create a Propensity prediction
In this part of the process, you will create a propensity prediction to purchase any product from the electronics category for the audience of recognized customers (assigned with the email attribute and with a page visit event within the last 30 days).
Synerise allows you to run the predictions also for anonymous visitors. If you need to prepare scenario for other segment - like anonymous visitors - you can define the conditions while preparing the segment.
Select the model type
- Go to
 AI Hub > (AI Predictions) Models > New prediction.
 - On the pop-up, select the Create from scratch option.
- Select Propensity.
- Name your prediction.
Select customers to be analyzed
Select the audience for whom you want to prepare a prediction.
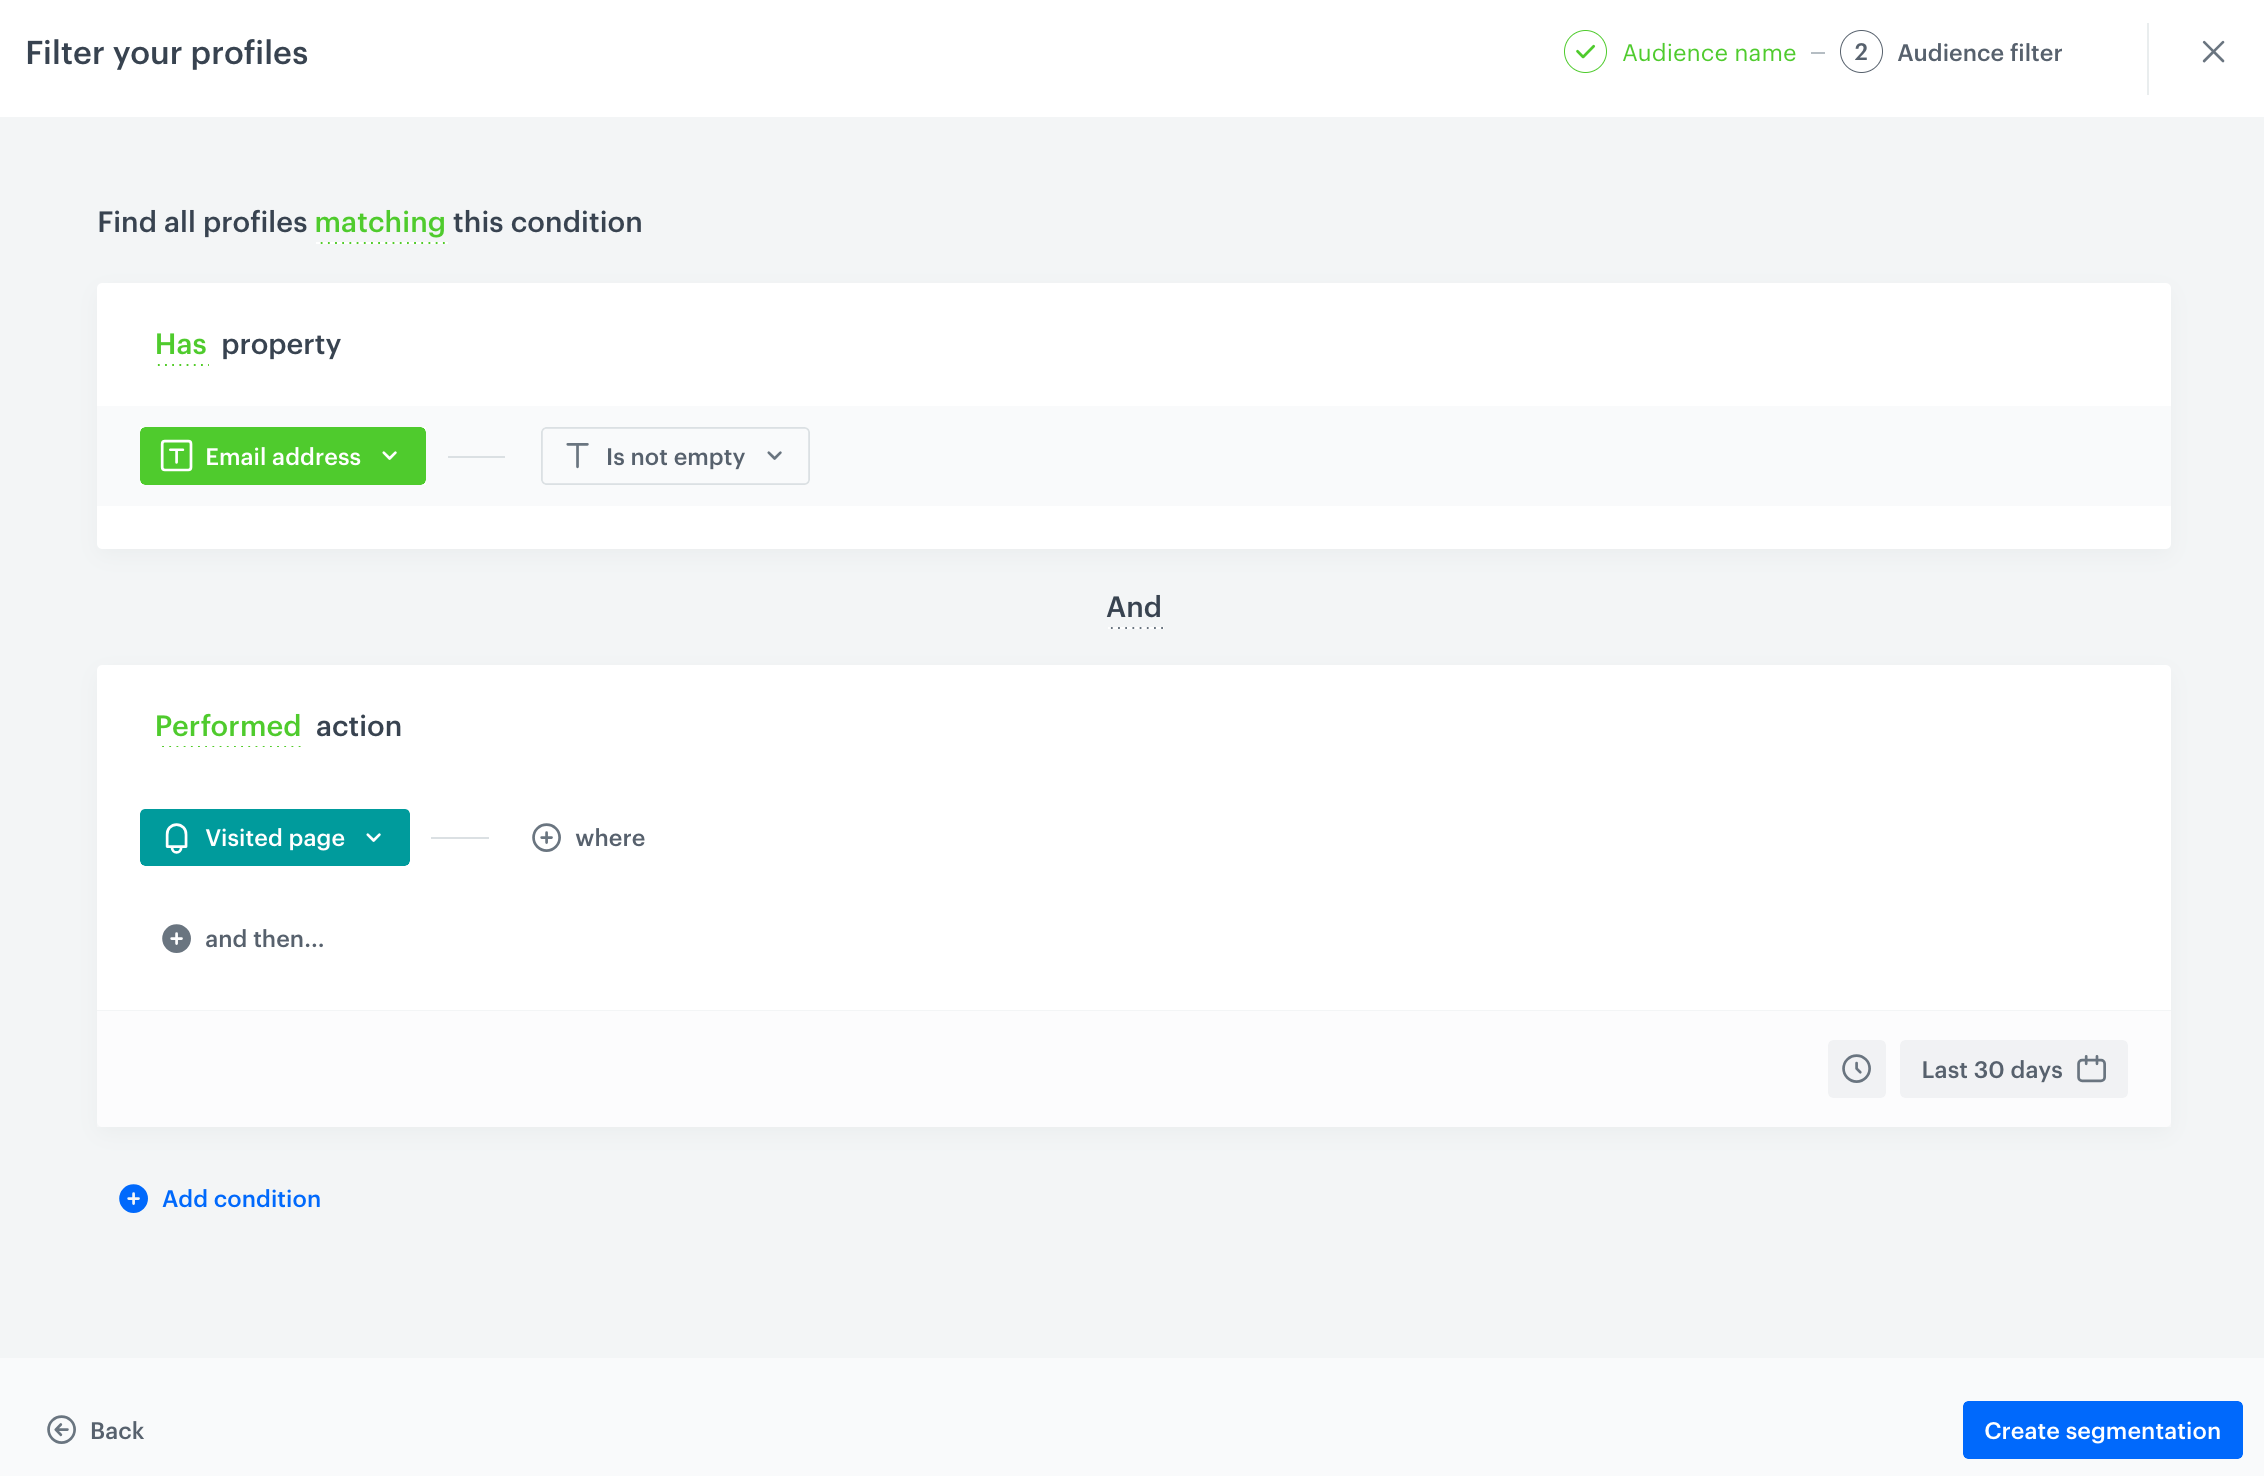
- In the Audience section, click Define.
- Click Choose segmentation.
- On the dropdown list, click Create new.
- In the Segmentation name field, enter a meaningful name of the segmentation.
- Click Next step.
- Click Add condition:
- From the dropdown list, select the
emailattribute. - From the Choose operator dropdown list, select String and Is not empty (this operation will work on Recognized visitors only, as the email field in anonymous visitors has special handling policy).
- From the dropdown list, select the
- Once again click Add condition:
- From the dropdown list, select the
Visited pageevent. - In the calendar in the bottom right corner, leave Last 30 days.
- From the dropdown list, select the
- Save the segmentation by clicking Create segmentation.
- Click Apply.
Define the item
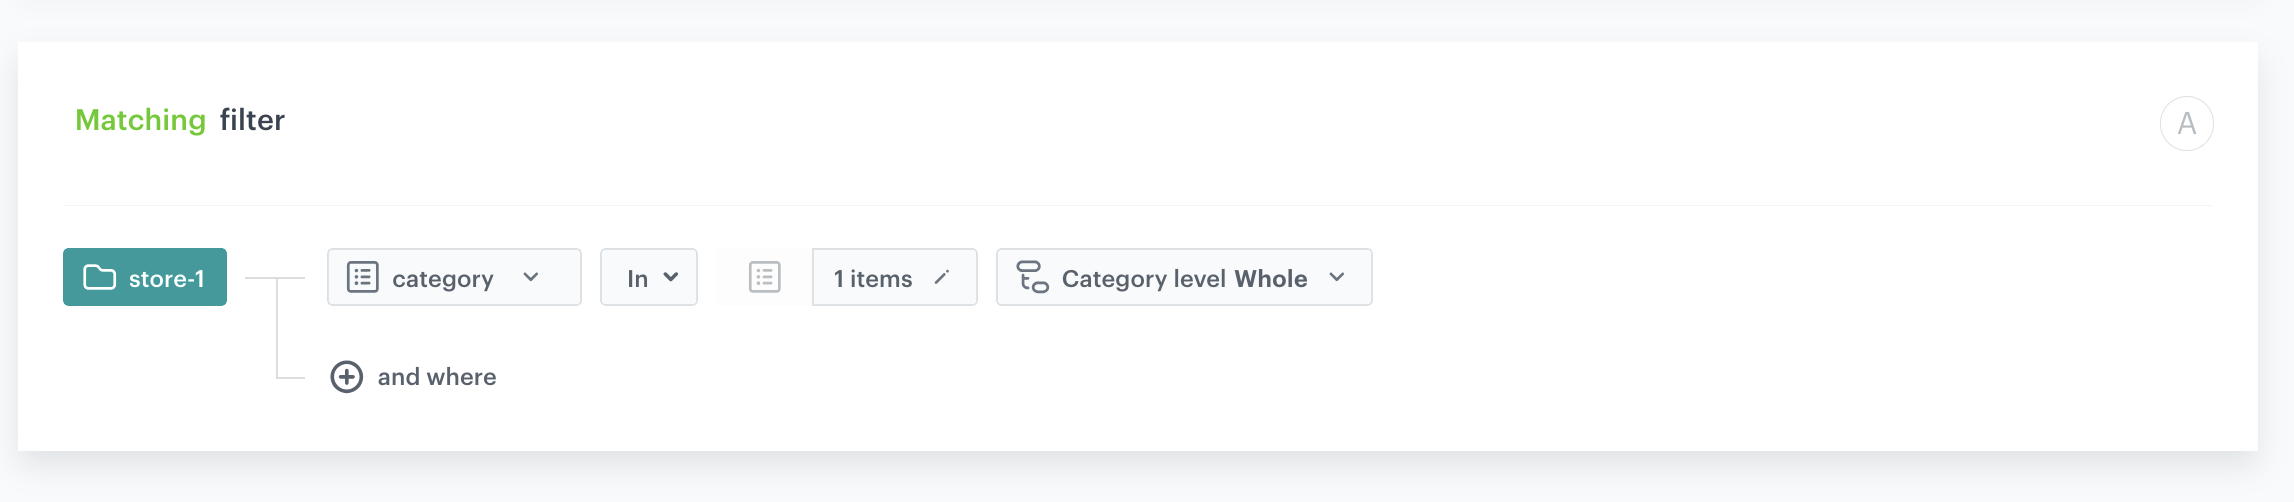
In this section, you define the product category for which you want to calculate the prediction, in our case it's the electronics category. This is done by creating a filter that matches the product category in the catalog.
- In the Item selection section, click Define.
- Click Choose item feed.
- Select the catalog that contains the items you want to make the prediction for.
Result: The Item filter section appears. - Click Define item filter.
- From the Select value dropdown list, select the
categoryattribute. - As the logical operator, select In.
- Click Select value and add
0items. Result: An Array values pop-up appears. - Use the search field to add the desired product category. In our case:
root catalog> default category>electronics. - Click Add.
- Click Apply.
- Click Save.
- Save the item feed configuration by clicking Apply.
Additional settings and saving
Configure the additional settings (or leave them at default) and click Save & Calculate. In our case we choose the 5-point probability scale: very high, high, medium, low, very low.
Result:
After the calculation is complete a snr.propensity.score event is saved in the profiles of each customer in the audience. The event data includes detailed results of the prediction. Based on the snr.propensity.score event, you can create segmentations of customers with different propensity.
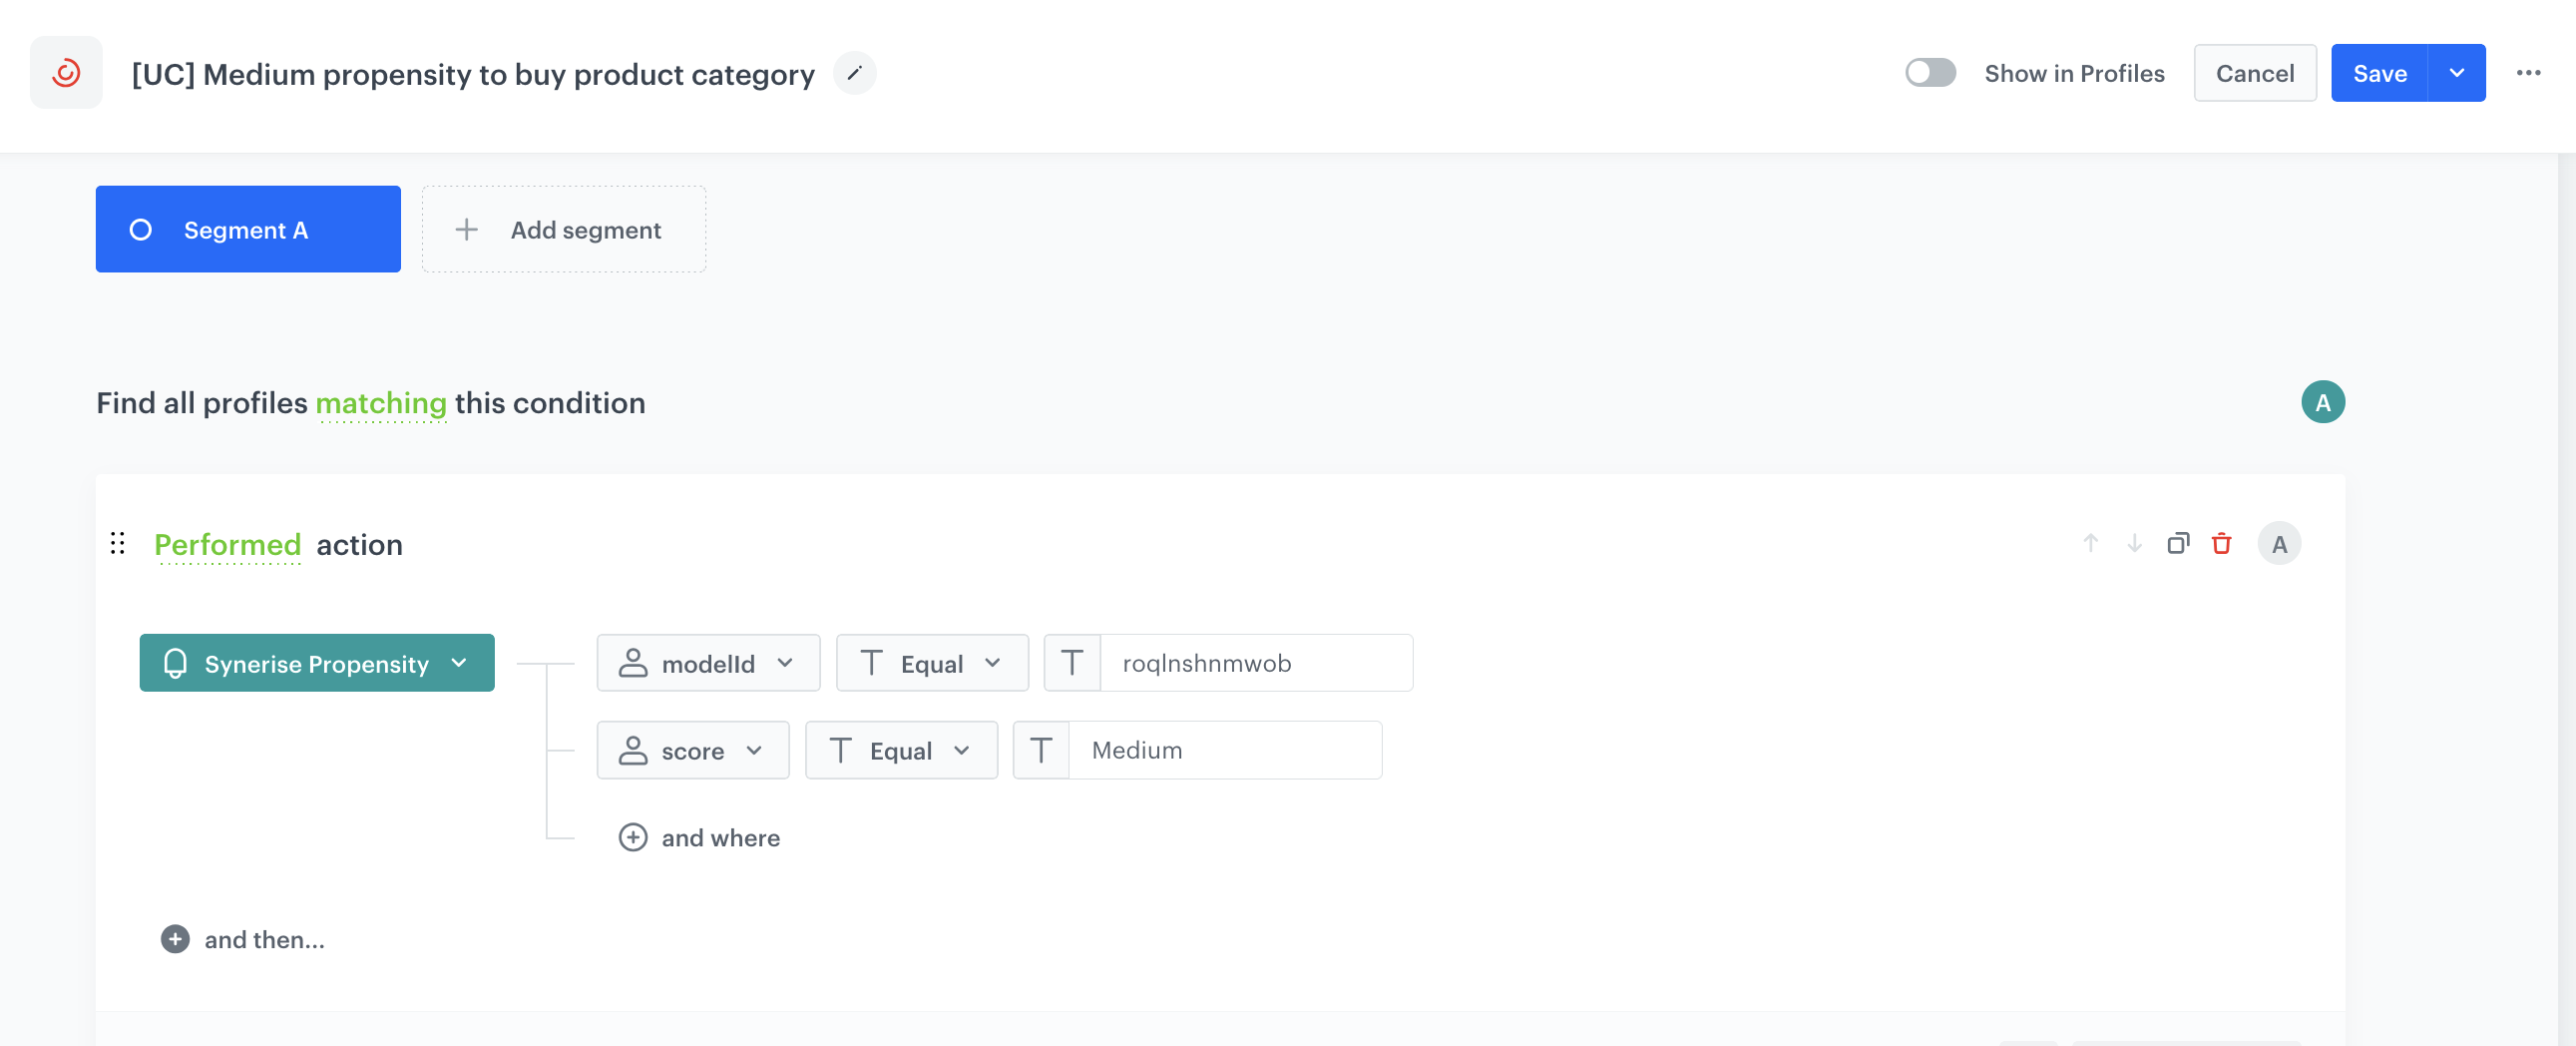
Create a segmentation
Based on the snr.propensity.score event, create a segmentation of customers with medium propensity to purchase any item from the product - electronics category.
- Go to
 Decision Hub > Segmentations > New segmentation.
 - Enter the name of the segmentation.
- Click Add condition.
- Select the
snr.propensity.scoreevent. - Click + where.
- As the event parameter, select
modelId(available in the parameters of thesnr.propensity.scoreevent).
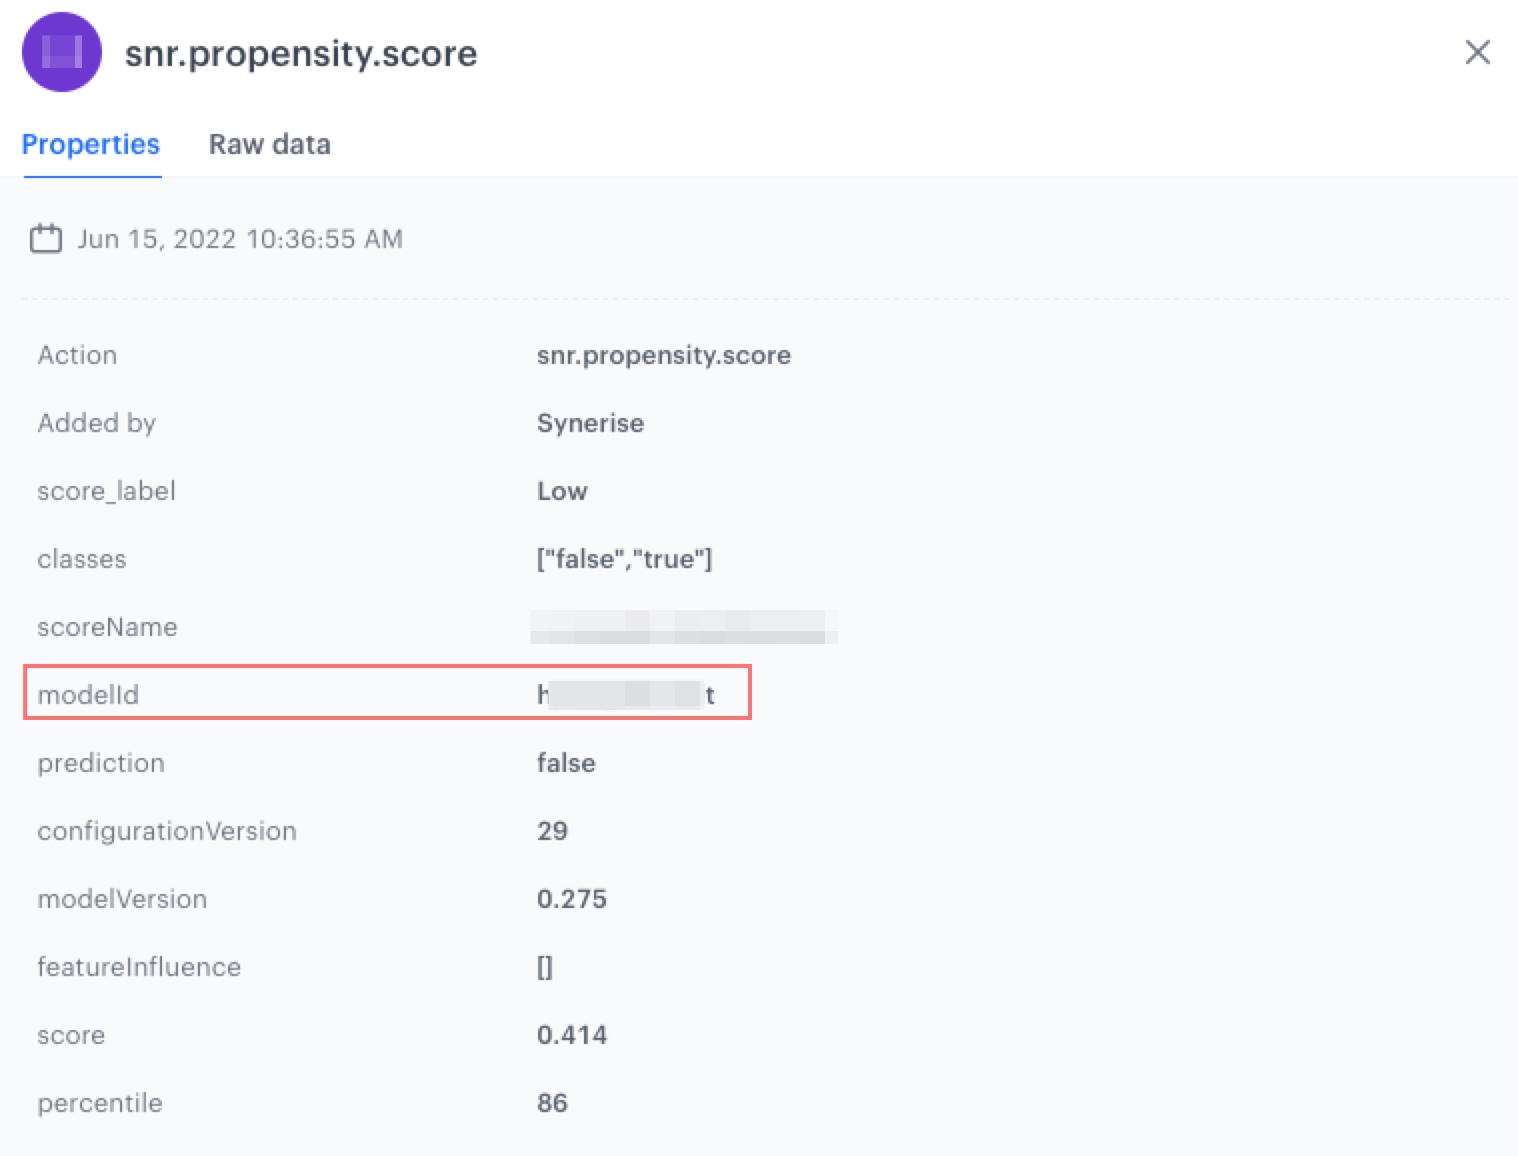
Properties of the snr.propenisty.score event - As the logical operator, select Equal.
- In the text field, enter the value of the
modelIdparameter. - Click + and where.
- As the event parameter, select
score_label. - As the logical operator, select Equal.
- In the text field, enter
Medium. - Set the date range according to your buisness needs.
- Click Save.
For other scenarios using 5 point label scale you can group very low & low and very high & high propensity scores usingcontainoperator accordingly. This way you can create 3 point label scale.
Create a workflow
As the final part of the process, create a workflow that sends an email with a voucher code to customers with the medium propensity to buy items from the electronics category. We will use the A/B/X tests to send the different vouchers to different groups of users. This way, we will be able to check the effectiveness of incentives of a different level.
- Go to
 Automation Hub > Workflows > New workflow.
 - Enter the name of the workflow.
Choose the segmentation of customers
- As the first node of the workflow, add Audience. In the node settings:
- In the Define audience section, select the segmentation you created in the previous step, click Apply to confirm.
- Confirm by clicking Apply.
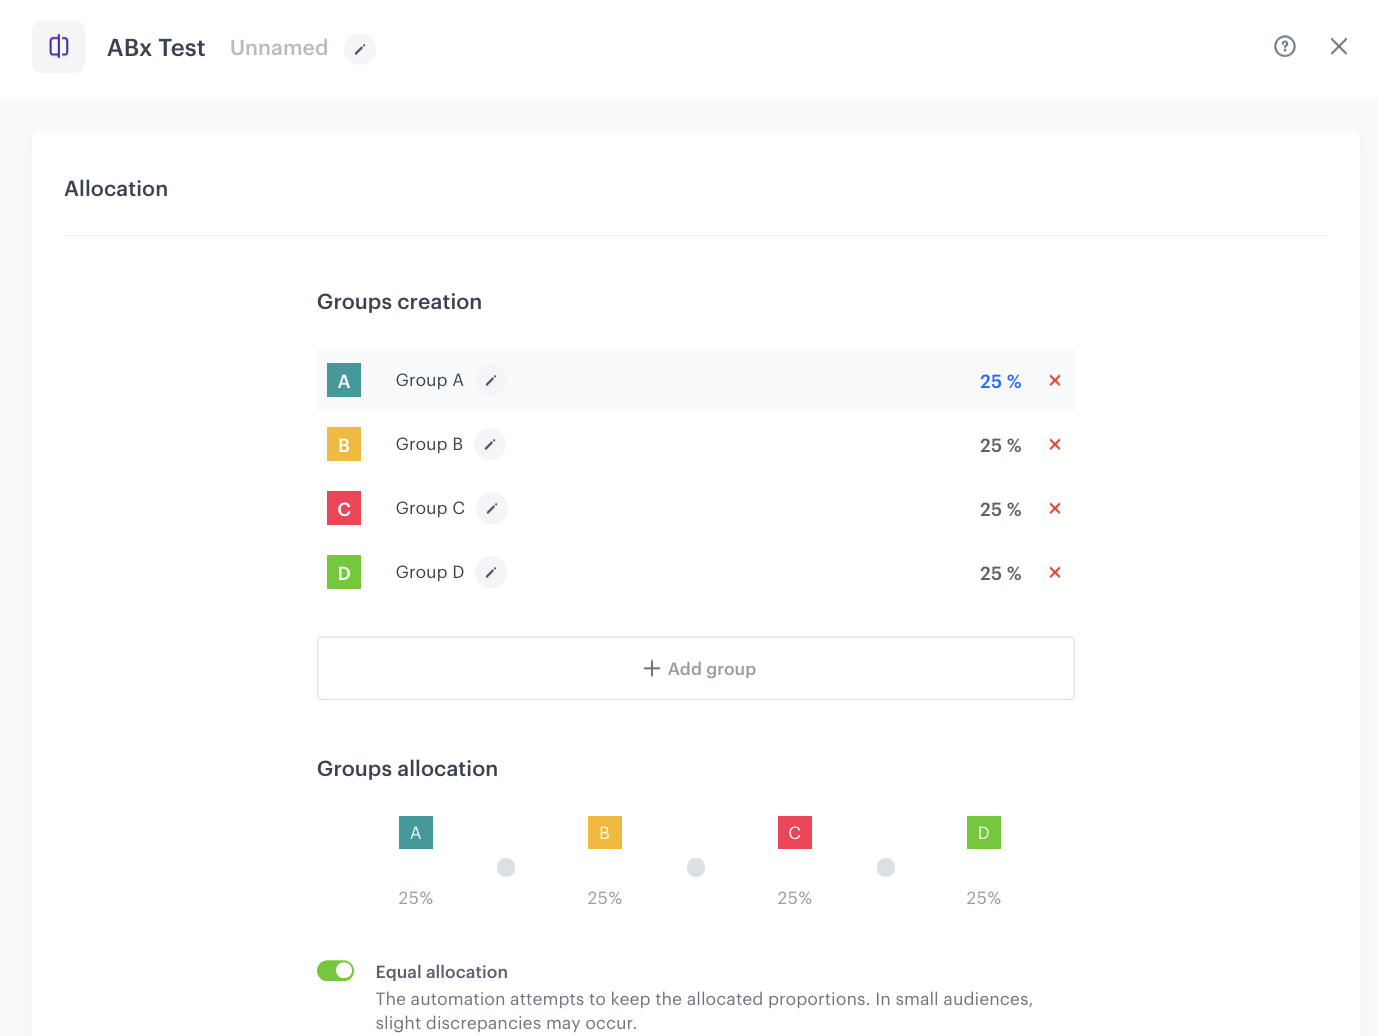
Add the ABx Test node
- Add the ABx Test node.
- Click Add group to create 4 groups of customers.
By default, we have the group A and B with an equal 50/50 division - you can add another group here, and de-select the Equal allocation option if you want an unequal division. In our example, 4 groups are created.
- Group A: 25% of the database
- Group B: 25% of the database
- Group C: 25% of the database
- Group D: 25% of the database
- Enable the Generate a variant assignment event option. As a result, Synerise will record which test variant a given customer was assigned to, which later allows you to analyze results and build segments based on that assignment.
- To save your changes, click Apply.
Add the Send Email node
Add the Send Email node to 3 of the 4 groups in our workflow.
- Add the Send Email node. In the node settings:
- In the Sender details section, choose the email account from which the email will be sent.
- In the Content section, type the Subject and from the Template dropdown, select the template you created as part of the prerequsites. In the email editor, click the Inserts button and from the dropdown list, select Pools. Find one of the pools you created as a part of prerequisites and click it. Then copy its code and paste to the email template.
- In the UTM & URL parameters section, you can define the UTM parameters added to the links included in the email.
- In the Additional parameters section, you can optionally describe campaigns with additional parameters.
- Click Apply.
- Repeat the all steps in the two following Send Email nodes. Change the voucher pool ID in the content of the email template.
- Add the End node to the last group of customers. By doing this, you will exclude this audience segment from receiving any communications, allowing you to determine how many of them make purchases without any incentives.
Add the finishing node and set capping
- Add the End node after each Send Email node.
- In the upper right corner, click Set Capping and define the limit of workflows.
- In the upper right corner, click Save & Run.

The final workflow
What's next
Once your ABX workflow is live, it’s important to go beyond campaign delivery and take a closer look at the actual effectiveness of each variant.
To support this analysis, make sure you enabled the Generate a variant assignment event option in the ABx Test node when building the workflow. This guarantees that Synerise will generate an automation.abTestVariantAssigned event, for each customer who passes through this node.
With these events in place, you can now build four segments representing the groups who received different incentives:
- automation.abTestVariantAssigned → variantName = A (10% discount)
- automation.abTestVariantAssigned → variantName = B (15% discount)
- automation.abTestVariantAssigned → variantName = C (20% discount)
- automation.abTestVariantAssigned → variantName = X (no discount – control group)
- Go to Decision Hub > Segmentations > New segmentation.
- Enter the name of the segmentation.
- Click Add condition.
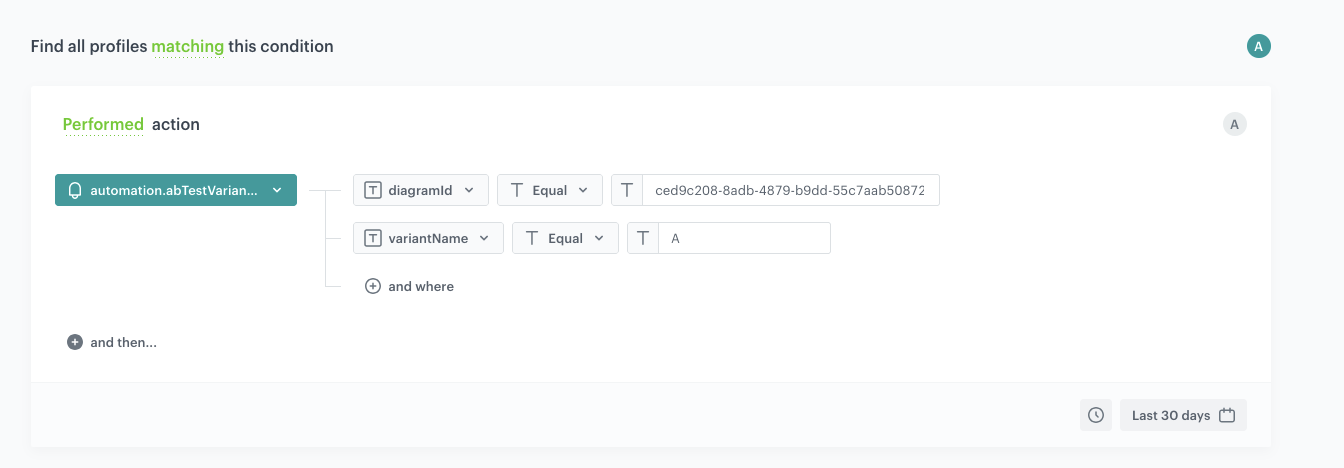
- From the dropdown list, select the
automation.abTestVariantAssignedevent. - Add the following conditions to the event:
- diagramId – This parameter allows you to differentiate between multiple ABX tests running in your environment. The ID is the part of the URL that comes after /automation-diagram/, for example: ced9c208-8adb-4879-b9dd-55c7aab50872 in the URL
https://app.synerise.com/automations/workflows/automation-diagram/ced9c208-8adb-4879-b9dd-55c7aab50872. - variantName – This is the actual test group the user was assigned to: A → 15% discount B → 10% discount C → 5% discount D → No discount
- Using the date picker in the lower-right corner, set the time range based on your business needs. Confirm by clicking Apply.
- Save the segmentation.
- Create the next segmentation. Repeat the steps.
Once you’ve created these segments, you can analyze your results. You can for example compare performance metrics such as:
- Open Rate (OR)
- Click-Through Rate (CTR)
- Conversions (transaction.charge) etc.
You can also take the analysis a step further by comparing test results across different predictive groups. For example, do users from the "Low probability" group respond better to incentives than those who were originally scored as "High probability"? This can reveal whether your discounting strategy should be personalized not only by behavior but also by predicted intent.
This layered analysis will help you understand not just which discount works best overall, but which incentive works best for which type of customer — and whether offering anything at all is even necessary in certain segments.
This scenario assumes using the entire audience for the campaign and analyzing the results. If we want to run an A/B test and, after a defined period, send out the discount value that brings the highest benefits, we need to reserve X% of the audience for that final send. The winning discount will be selected based on performance metrics, using a metric filter.
Check the use case set up on the Synerise Demo workspace
You can check the configuration of the following objects in the Synerise Demo workspace:
If you’re our partner or client, you already have automatic access to the Synerise Demo workspace (1590), where you can explore all the configured elements of this use case and copy them to your workspace.
If you’re not a partner or client yet, we encourage you to fill out the contact form to schedule a meeting with our representatives. They’ll be happy to show you how our demo works and discuss how you can apply this use case in your business.