Presenting accurate and up-to-date product content across channels often requires combining product catalog data with dynamically generated recommendations.
Brickworks allows you to define a product template that can pull product attributes directly from your catalog and extend it with AI-based similar products.
In this use case, you will create a schema enabling templates to return:
- dynamic product information coming from a Synerise catalog
- dynamically computed similar products based on an AI recommendation model
Additionally, this schema will serve as an in-app template derived from a template available in the Synerise Demo workspace (ID: 1590) and will be displayed directly within the application.
The goal is to enable an in-app view that appears when a user adds a product to their favorites from that product’s page (triggered by the product.addToFavorite event). This view will display the selected product alongside AI-generated recommendations of similar items.
Prerequisites
- Import a product feed to Synerise. You can find instructions here.
- Implement a tracking code into your website.
- Configure AI engine.
- Configure an item catalog for recommendations. Enable similar items recommendations.
- Implement the transaction events using SDK or API.
- Implement a custom event for adding a product to favorites, which will be available in the customer profile.
In this example, the event is called
product.addToFavorite.
Implement custom events in your mobile application or website.
Process
In this use case, you will go through the following steps:
- Create an AI recommendatons with similar products.
- Create a schema with similar AI recommendations.
- Create the record.
- Create an in-app campaign based on the brickworks schema.
Create an AI recommendations
In this part of the process, you will configure a similar items recommendation with context. This recommendation will later act as a reusable data source inside the schema, so any component that uses the schema will automatically access consistent recommendations.
- Go to
 AI Hub > (AI Recommendations) Models > Add recommendation.
 - Enter the name of the recommendation (it is only visible on the list of recommendation).
- In the Type & Items feed section, click Define.
- From the Items Feed dropdown list, as an item feed, select an item catalog which you configured as a part of prerequisites.
- In the Type section, choose the Similar items recommendation type.
- Confirm the settings by clicking Apply.
- In the Items section, click Define.
- Define the minimum and maximum number of items that will be recommended to the customer in each slot.
- Optionally, define Static filters and Elastic filters.
- Confirm by clicking Apply.
- Optionally, you can define the Boosting factors.
- In the right upper corner, click Save.
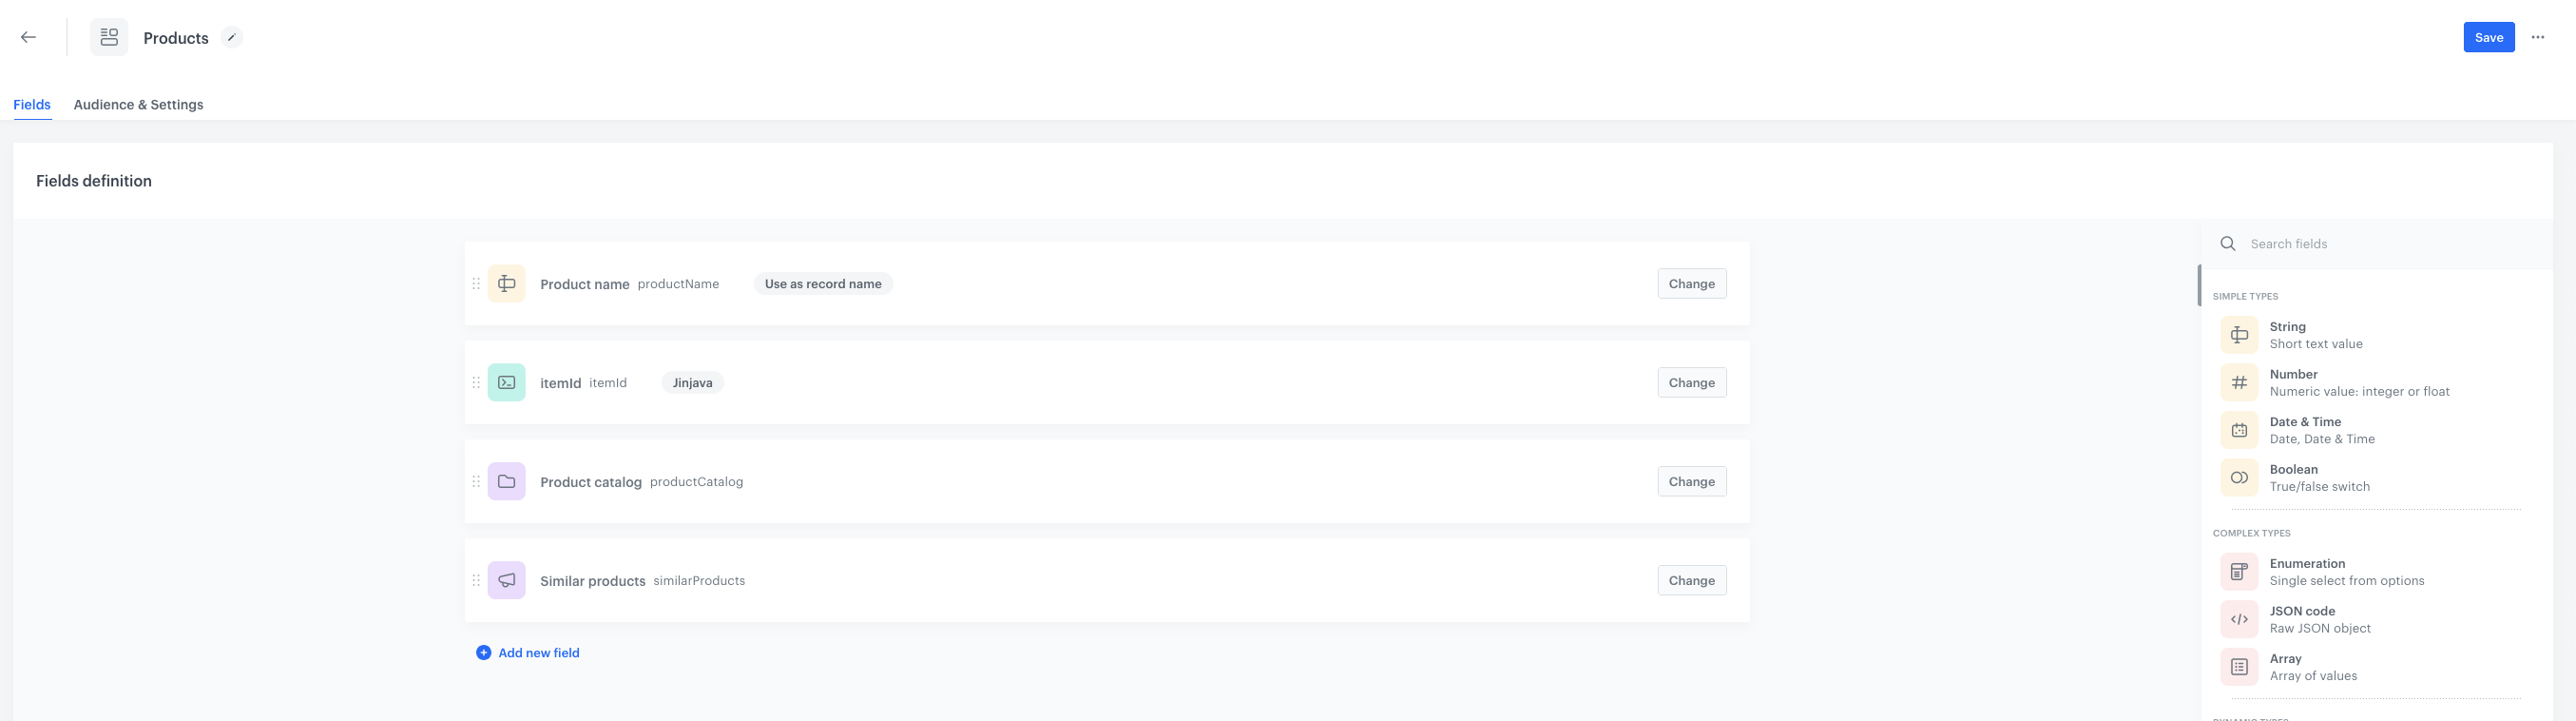
Create a schema
In this section, you will create a Brickworks schema with fields for product information and AI recommendations. The schema acts as a structured container for all data that will later be displayed to users in different channels. By defining fields here, you create a single place where product-related information is stored, updated, and reused across templates, campaigns, and runtime contexts.
- Go to Data Modeling Hub > Schemas > New schema.
- Choose Simple Schema.
- Enter a name for the schema, in Display name for example Product template. API names value is pre-filled with the value from Display name. The value in this field is the unique identifier used to reference this schema in API requests.
- Optionally, fill in the Description field.
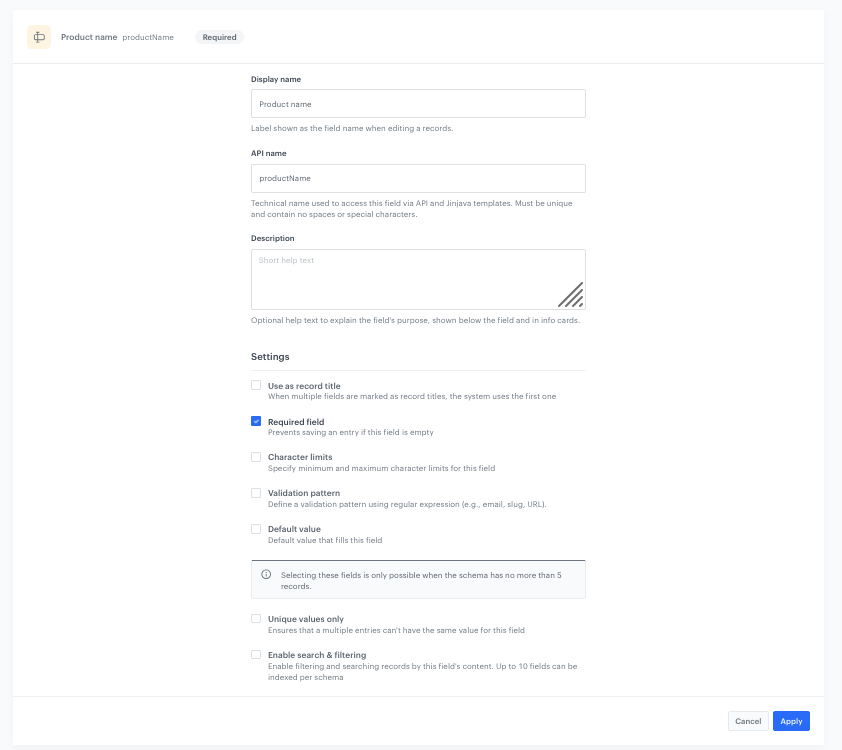
Add Product Name
- Click Add new field and choose String
- Complete the fields:
- Add Display name for the field in our case
Product name. - API name will be pre-filled automatically.
- Add Display name for the field in our case
- Set the field as Required by selecting the Required field checbox.
- To save your changes, click Apply.
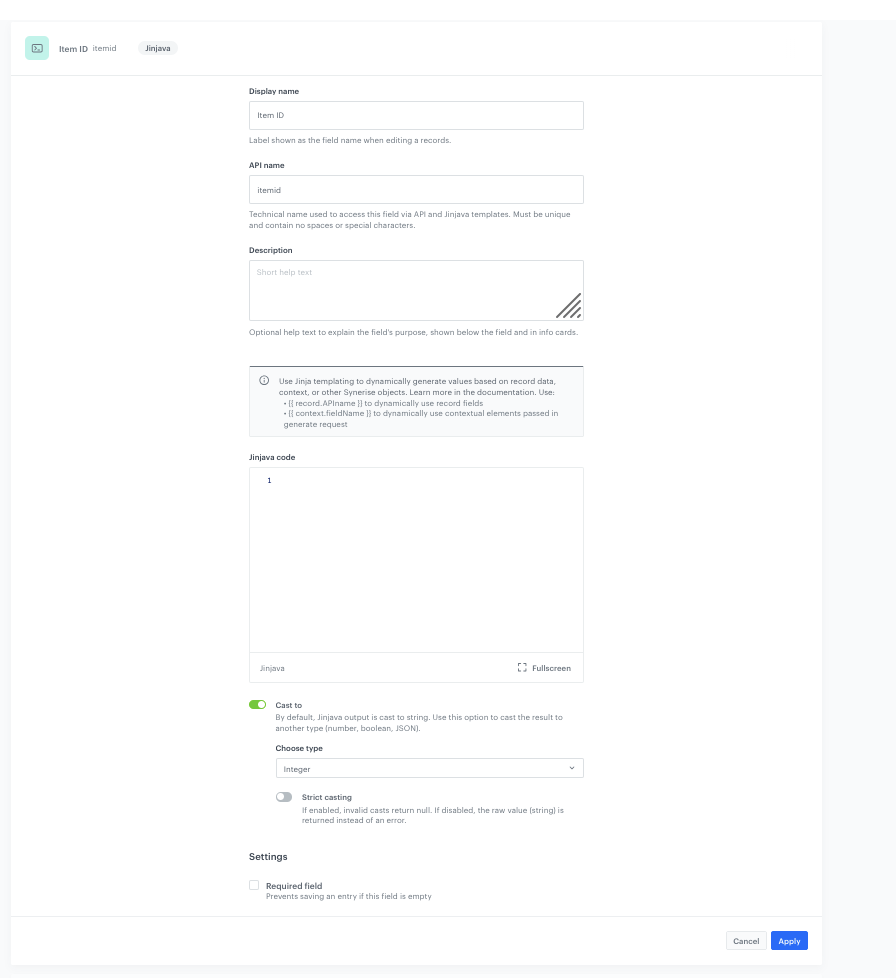
Add Item ID
- Click Add new field and choose Jinjava code
- Complete the fields:
- Add the Display name for the field in our case
Item ID. - The API name will be pre-filled automatically.
- Add the Display name for the field in our case
- Check the Cast to field. By default, Jinjava output is cast to string. Use this option to cast the result to another type (number, boolean, JSON).
- Choose type as the
Integer. - To save your changes, click Apply .
Add Product Catalog
- Click Add new field and choose Catalog.
- Complete the fields:
- Add the Display name for the field in our case
Product Catalog. - The API name will be pre-filled automatically.
- Add the Display name for the field in our case
- From the catalogs list, choose the catalog with the product feed which you imported as a part of prerequisites
- Optionally you can enter the primary key used to identify items in the catalog (string or JINJAVA). In this case it will be Jinjava primary key with the value:
{{ record.itemid }}. - Click Apply to save your changes.
Add the AI Recommendations
- Click Add new field and choose AI Recommendations
- Complete the fields:
- Add the Display name for the field in our case
Similar Products. - The API name will be pre-filled automatically.
- Add the Display name for the field in our case
- Choose from the list AI Recommendations created in the previous step
- Enter the Product context - Item ID passed as context for recommendations. In pur case it will be Jinjava primary key with the value:
{{ record.itemid }}. It is required in similar/complementary campaigns. Optional in personalized ones. - To save your changes, click Apply.
Set up the Audience & Settings
- Click the Audience & Settings tab.
- In the Audience section, click Define.
- Choose the schema recipients, in our case, choose Everyone.
- Click Apply.
- In the upper-right corner, click Save.
Create the record
Creating a record means adding the data to the schema. It means that you fill out schema fields with the actual values. This step fills the structure you created earlier with real data that will be rendered to the user. Anything you enter here becomes the source of truth for templates, recommendations, and dynamic elements across your communication channels. By storing product-specific information inside the record, you ensure that all in-app messages, PDP blocks, or emails referencing this schema always draw from the same, consistent data set.
- Go to Data Modeling Hub > Data collection > Select schema.
- Choose schema created in the previous part of the process.
- Click Add record.
- Add a name for the reocrd.
- Add a slug for the reocrd. Slug is a unique, URL-friendly version of the name. It usually contains only lowercase letters, numbers, and hyphens. In our case it will be
dynamic. - As an itemId add
{{ context.itemid }}. - Click Publish to publish your record.
Previewing records
After saving the record either as a draft (in case of records created based on versioned schemas) or publishing it (in case of both schema types), you can preview the record for the context of a selected user. This context-driven approach enables your records to adapt dynamically based on the requesting application, user session, or any external factors you define.
- Go to Data Modeling Hub > Data collections.
- In the header, from *Select schema dropdown list, select the schema created previously.
- Find the record which you want to preview.
- Enter the record configuration.
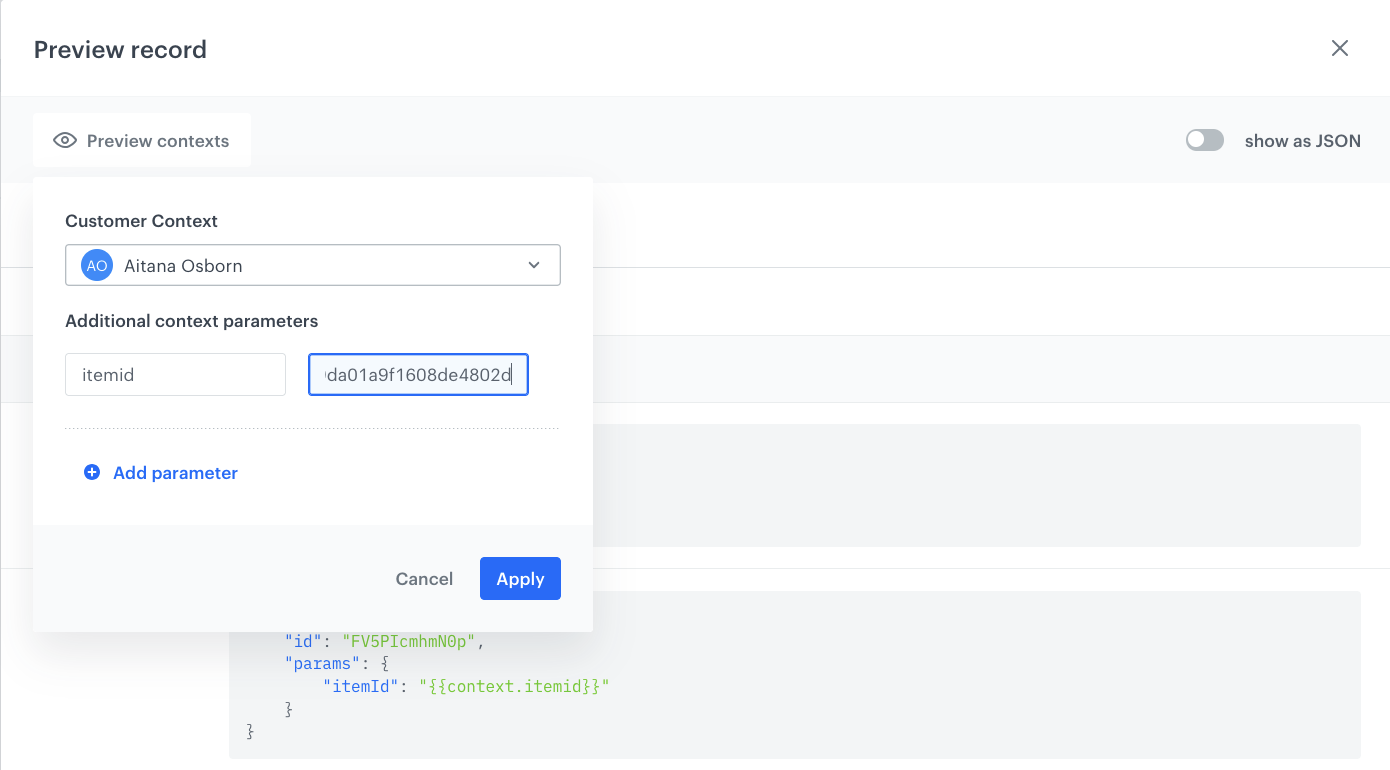
- Click the Preview context.
- From the dropdown list, find a profile for whom you want to generate record preview. This means the same record can render completely differently depending on the context you provide.
- Click Add parameter and choose the parameter from your catalog you want to preview, in our case it will be
itemid. As the value of this field add the example itemid value for exemplary product.
Brickworks configuration
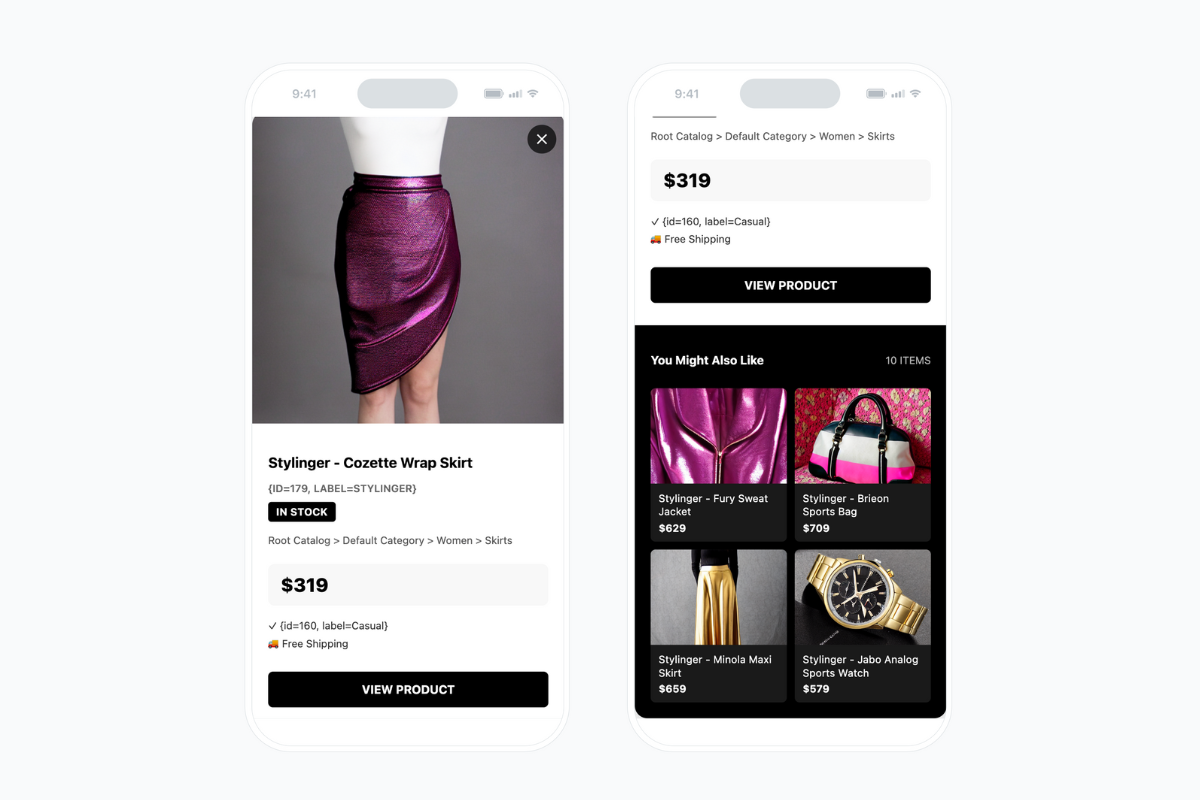
Result: You will see the dynamic preview with the data about the specific product from your catalog.
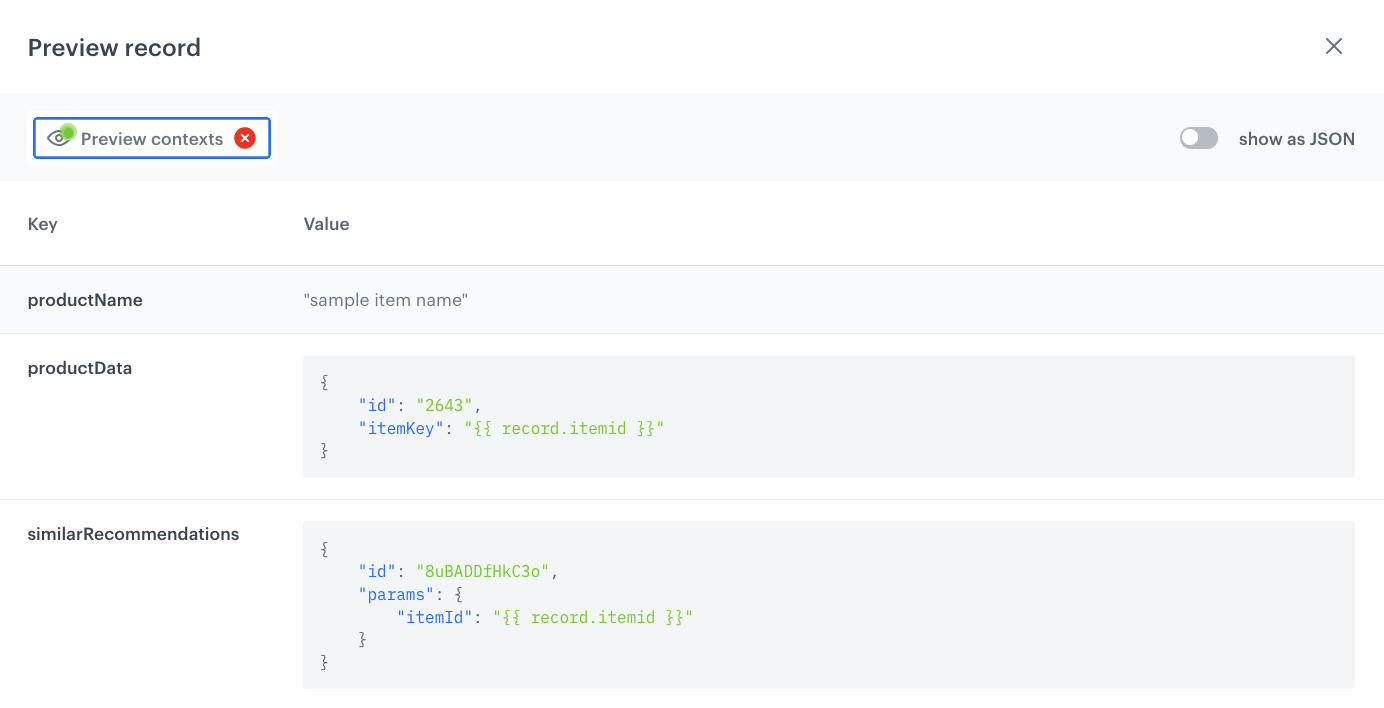
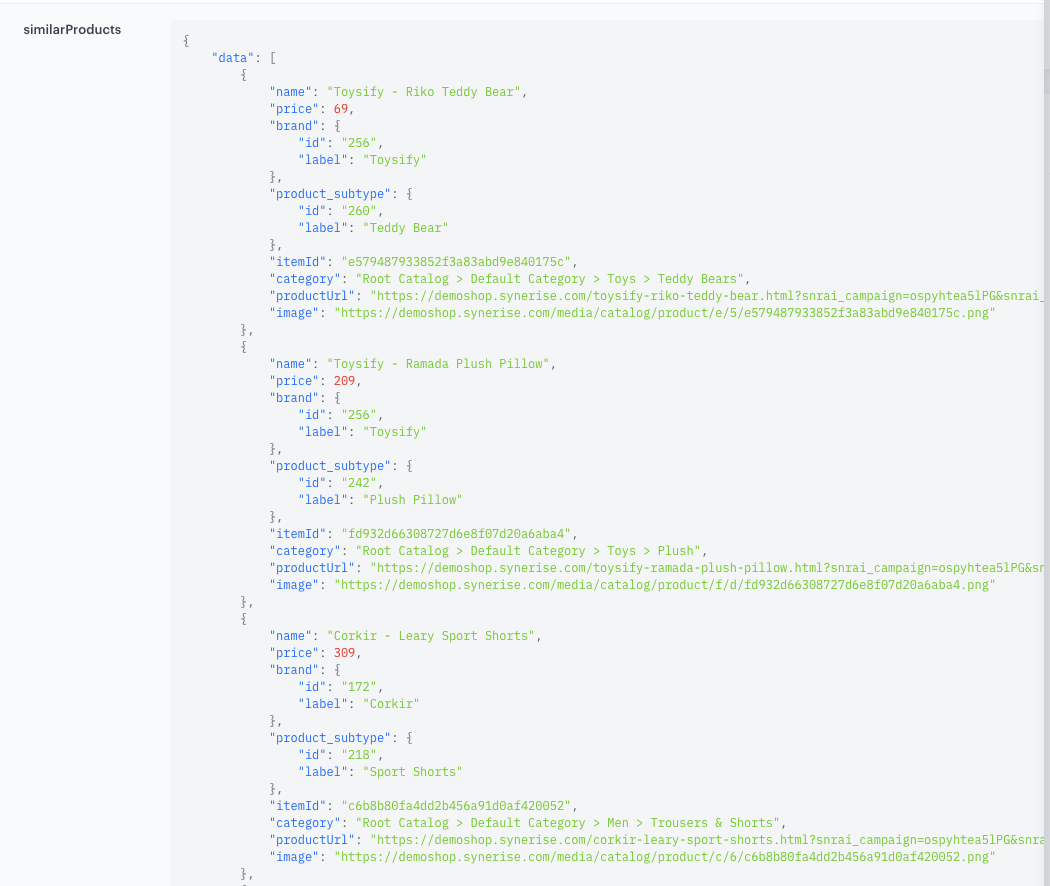
What is more you can see what similar recommendations will be generated for this specific product for the choosen user.
Create an in-app campaign
In this part of the process, you create an in-app campaign triggered by the product.addTofFavorite event. We will use a template available on the Demo Workspace (1590), so there is no need to create a template from scratch, you can copy the template to your workspace and use it.
- Go to
 Experience Hub > In-app messages> Create in-app.
 - Enter the name of the in-app.
Define the audience
As the first step, define the target group of customers for the in-app message.
- In the Audience section, click Define.
- Click Everyone.
- To save the audience, click Apply.
Define content
In this part of the process, you will create the content of the in-app message that will appear in the mobile application with the help of ready-made template.
- In the Content section, click Define.
- Click Create message.
We’re using a ready-made template available in the 1590 Synerise Demo workspace. You can use this template as a base and copy it into your own workspace.
Result: You are redirected to the code editor.
You can edit the template in two ways, by editing the code of the template add snippets, add variables and/or by filling out the form in the Config tab. In this use case, we will use the capabilities of the predefined Config tab.
Edit form in the Config tab
The form in the Config tab is already filled in with default values. You can keep them or change them to fit your business needs.
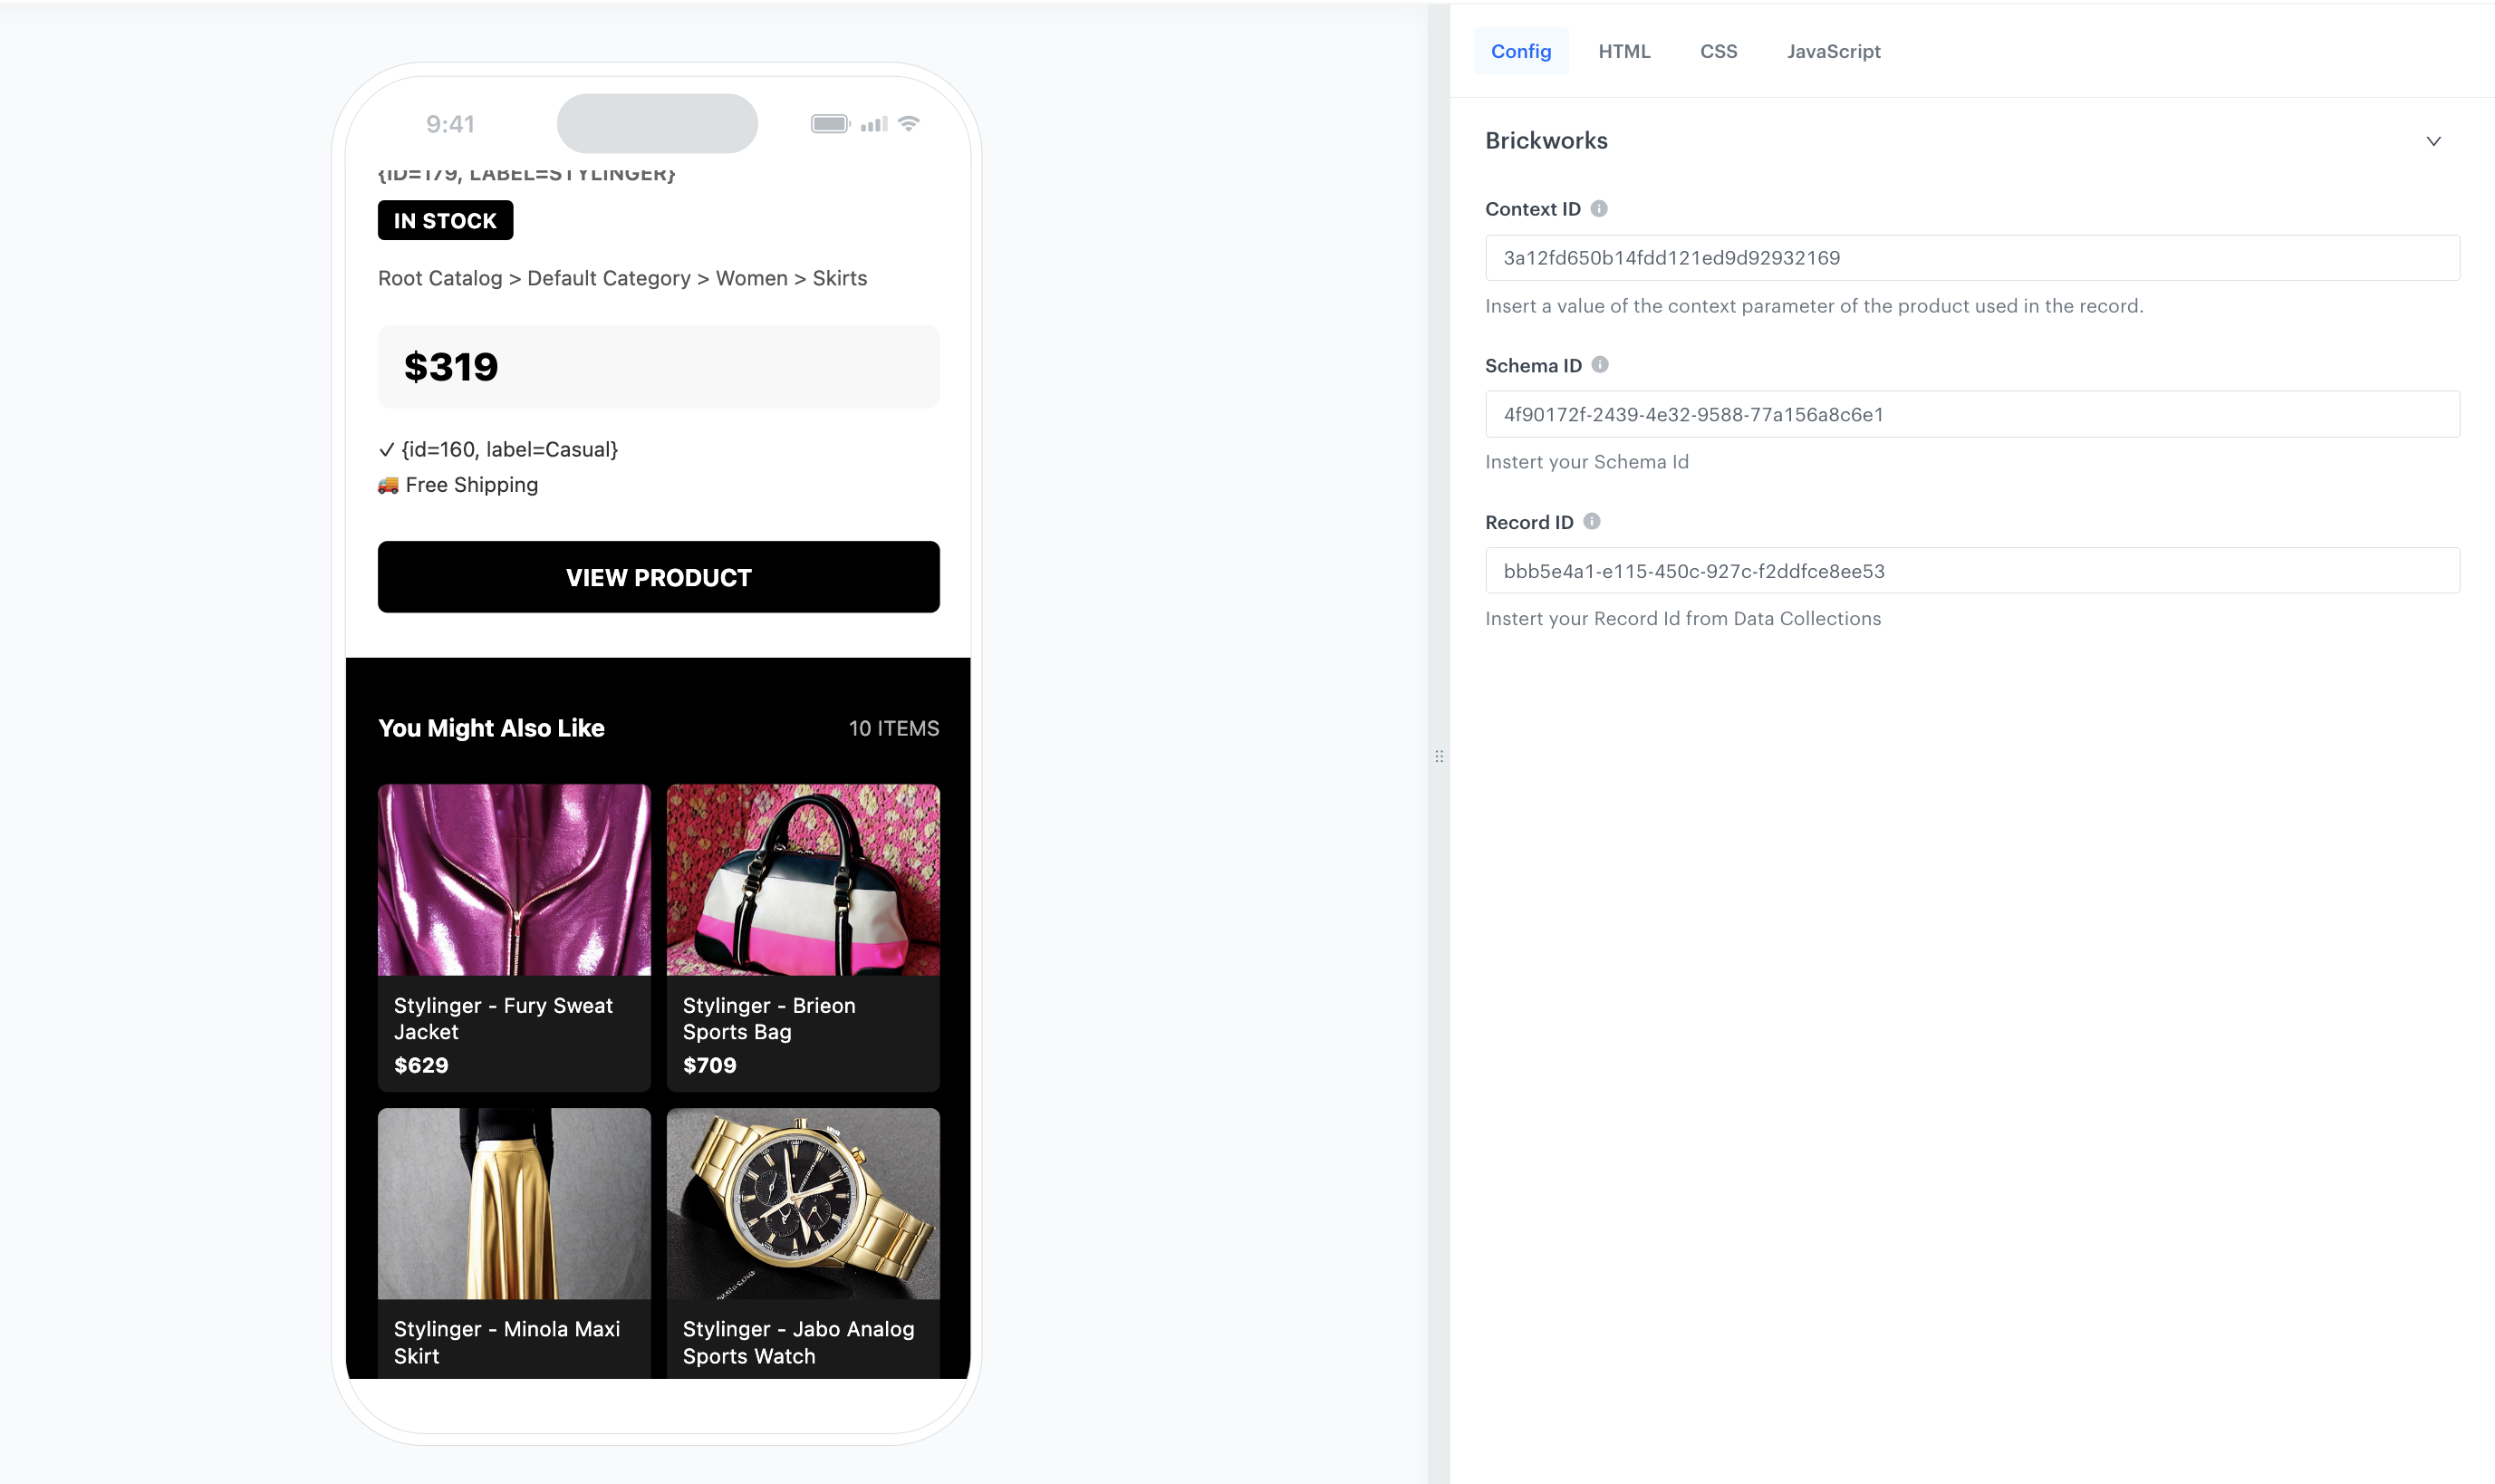
- To the Schema ID field, add the ID of the schema created as the part of prerequisites.
You can find schema ID in the URL of the schema. - To the Record ID field, add the ID of the record created as the part of prerequisites.
You can find the record ID in the URL of the record. - To the ContextID field, insert a value of the context parameter of the product used in the record. In our case it will be an example itemid for example:
e579487933852f3a83abd9e840175c. - You can optionally edit the copy and design of the template.
After you make changes to the template, you can check the preview.
- Click the Preview button on the upper left side.
- Enter the ID of a customer.
- Click Apply.
Considering that the in-app is very interactive, the preview in the platform may not be enough to test the in-app performance. That’s why we suggest checking the preview directly in the mobile app.
- If the template is ready, in the upper right corner click Save this template > Save as.
On the pop-up:
- In the Template name field, enter the name of the template.
- From the Template folder dropdown list, select the folder where the template will be saved.
- Confirm by clicking Apply.
- To continue the process of configuring the in-app campaign, click Next.
- To save your content changes, click Apply.
Select events that trigger the in-app message display
In this part of the process, you will define the event triggering the display of the in-app message.
- In the Trigger events section, click Define.
- Select Add event and from the dropdown list, choose
product.addTofFavoriteevent. - Click the + where button and select
mobile. - As the logical operator, select Exists.
- Click Apply.
Schedule the message and configure display settings
As the final part of the process, you will set the display settings of the in-app message such as schedule, capping, priority of the message among other in-app messages.
- In the Schedule section, click Define and set the time when the message will be active.
- In the Display Settings section, click Change.
- Define the Delay display, Priority index and enable the Frequency limit toggle to manage the frequency of in-app message display in the application.
In our case, we want to display the message to the customer a maximum of 1 time in period of 7 days.
You can additionally enable the Capping limit toggle to limit the amount of time the in-app message can be displayed to a user in general.
- Click Apply.
- Optionally, you can define the UTM parameters and additional parameters for your in-app campaign.
- Click Activate.
What's next
After defining this schema, you can reuse the template across other placements as needed. It can be applied not only in PDP blocks, emails, or in-app views, but also in any additional surfaces supported by your setup—for example homepage modules, product carousels, or campaign-specific placements. This allows you to keep product data consistent while still generating similar items dynamically.
Check the use case set up on the Synerise Demo workspace
In Synerise Demo workspace, you can check the configuration of:
If you’re our partner or client, you already have automatic access to the Synerise Demo workspace (1590), where you can explore all the configured elements of this use case and copy them to your workspace.
If you’re not a partner or client yet, we encourage you to fill out the contact form to schedule a meeting with our representatives. They’ll be happy to show you how our demo works and discuss how you can apply this use case in your business.