In this use case, we will walk you through implementation of Earn & Burn model within your loyalty program, where customers can see their current point balance and exchange the points for available rewards directly from their profile. Customers will only see the rewards that are currently available and stay within the range of their available points.
To follow this process, it’s important that you’ve already implemented the foundation of your loyalty program, where customers earn points for money they spent. If you haven’t yet, start with our Loyalty Programs: Basics article.
In the next steps, we’ll show how to use the point balance to:
- display the current points balance for each customer,
- configure a promotion to become a reward,
- display available rewards,
- activate a promotion (reward),
- redeem the promotion after it is used.
In this use case, we’ll show how to implement each part of this Earn & Burn process using the Synerise platform interface and Synerise API.

Prerequisites
- Get familiar with how documents work in Synerise, as creating a document is a key part of the procedure in this use case.
- Integrate mechanism for awarding loyalty points.
For example, you can award loyalty points after a transaction. In such case, create an expression that counts how many loyalty points are assigned to a customer for a transaction. Once you prepare the expression, please contact Support Team to configure materialization of loyalty points. After such configuration, every time loyalty points are assigned to a customer, thepoints.loyaltyevent will be generated in a customer’s profile with information about the number of loyalty points they received after a transaction (thepointsparameter).
Learn more about events in the Events documentation.
- Integrate Synerise promotions and create first promotions in Synerise.
- Use the points balance as a condition for displaying targeted promotions (for example, show only to users who have more than 500 points) which will be important in this specific case.
Process
Points Balance:
- Create an aggregate which counts the number of points gained by customer.
- Create an aggregate which counts the number of points used for activating the promotion.
- Create an expression which returns points balance
- Display points balance
Retrieve, activate and redeem promotions:
- Configure a promotion to become a reward
- Retrieve all available promotions through API.
- Activate promotions.
- Redeem promotions - (burn promotions).
Points balance
Create an aggregate counting the number of points
In this part of the process, you will create an aggregate which counts the total number of points received by a user in a loyalty program.
- Go to
 Behavioral Data Hub > Live Aggregates > Create aggregate.
 - As the aggregate type, select Profile.
- Enter the name of the aggregate.
- Click Analyze profiles by and select Sum.
- From the Choose event dropdown list, select the points.loyalty event.
- As the event parameter, select points.
- Set the date filter to Lifetime.
- Click Save.

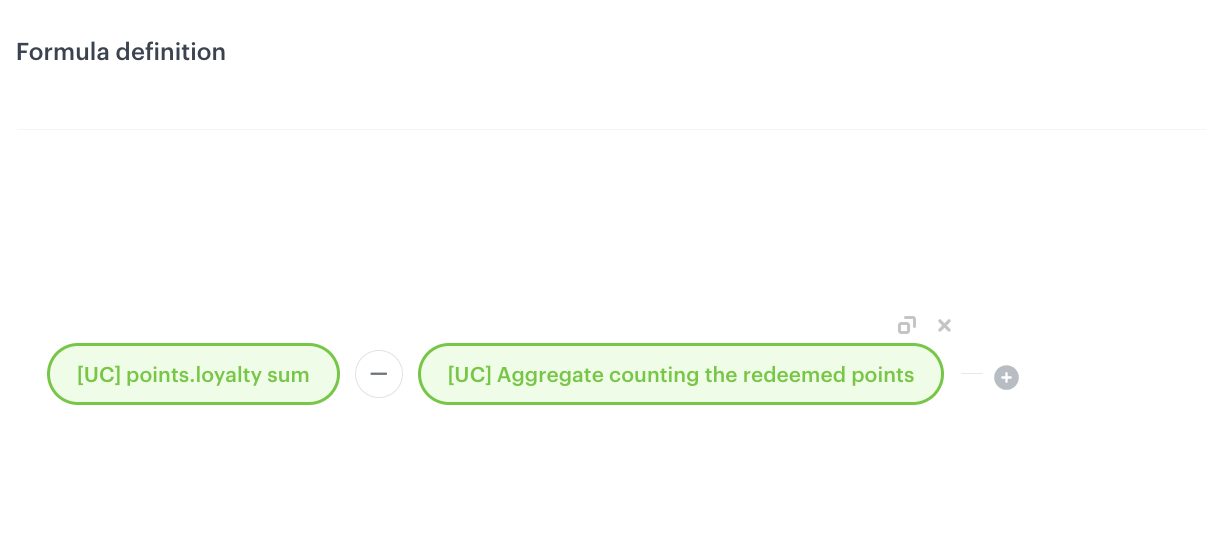
Create an aggregate counting the redeemed points
In this part of the process, you will create an aggregate which returns the number of points which were redeemed.
- Go to Behavioral Data Hub > Live Aggregates > Create aggregate.
- As the aggregate type, select Profile.
- Enter the name of the aggregate.
- Click Analyze profiles by and select Sum.
- From the Choose event dropdown list, select the client.activatePromotion event.
- As the event parameter, select promotionrequireRedeemedPoints.
- Set the date filter to Lifetime.
- Click Save.

Create an expression which returns points balance
Create an expression that calculates the current points balance. This expression allows you to dynamically track the total number of loyalty points each customer currently holds.
The described expression configuration is just an example. You can define additional conditions according to your business specifications and requirements. Such additional conditions can be, for example, taking into account points burned or considering points added additionally for completing some other extra activity. It all depends on how your loyalty program is implemented.
For more advanced scenarios with loyalty points, check out Transfer loyalty points between customers describing the process of configuring the transfer of loyalty points between customers.
- Go to Behavioral Data Hub > Expressions > New expression.
- Enter a meaningful name of the expression.
- Leave the expression type at default (Attribute).
- Build the formula of the expression.
- Click the Select node.
- From the dropdown list, select Profile.
- Click the unnamed node that appeared on the canvas.
- Scroll down the page and click Choose attribute.
- From the dropdown list, select the aggregate counting the number of points that you created earlier.
- Click + and from the dropdown list, select Profile.
- Click the unnamed node that appeared on the canvas.
- Scroll down the page and click Choose attribute.
- From the dropdown list, select the aggregate counting the number of redeemed points that you created earlier.
- Add - sign between the both elements.
- Save the expression.
The configuration of the expression
Display points balance
To display the current loyalty points balance for a customer in a mobile application or on a website, you can retrieve the value of the expression which returns points balance in a document and then retrieve this document through API. To do so, follow instructions in this section:
Create a document with an expression
- In the Synerise platform, go to Data Modeling Hub > Documents > Add document.
- Configure the settings in the Audience and Configuration sections, according to the instructions in the "Procedure" section.
- In Body include the following expression reference:
{
  "PointsBalance": "{% expression %} 4f7c6cfd-4016-4873-963c-56dec3450576 {% endexpression %}"
}
This value of the PointsBalance parameter will dynamically show the points value for the specific customer when the document is accessed in a context of a customer. Replace the ID of the expression with the ID of the expression from the previous step - you can find on the list of expressions by clicking the ![]() icon
icon
Retrieve the document in profile context (API)
To get the value of PointBalance for a specific customer, use the generateDocumentWithProfileContext method through API.
This method renders the document based on the actual profile data.
Request (example using email as identifier):
curl --location 'https://api.geb.synerise.com/schema-service/v2/documents/{DOCUMENT_UUID}/generate/by/email' \
--header 'Authorization: Bearer {token}' \
--header 'content-type: application/json' \
--data-raw '{
    "identifierValue": "customer@email.com"
}
Replace:
{DOCUMENT_UUID}with the UUID of your document (you can find it by entering the configuration form of the document - it will be in the final part of the URL).customer@email.comwith the customer’s identifier (email, clientId, etc.).- If you're using Azure instead of Google Cloud Platform, use this link for curl:
https://api.synerise.com/schema-service/v2/documents/{DOCUMENT_UUID}/generate/by/email
Example response will look like this:
{
    "uuid": "caaa1b1d-eb1e-4cdc-a8c3-9294e6bd9d19",
    "slug": "expression-get",
    "schema": "loyalty",
    "content": {
        "PointsBalance": "1000"
    }
}
Connect the expression to promotions
If you want to enable the ability to connect the expression to promotions, we recommend contacting the Service Desk at Synerise to request activation of the rewards module. This is required to use expressions in promotion logic.
If you prefer to proceed independently, you can follow the optional instructions below.
Connect the expression to promotions
To make this expression usable in other areas (for example, for filtering available promotions for the user), you must add the expression to the workspace settings. The expression field should contain the UUID of the expression used to calculate points.balance.
Use the PUT `/v4/promotions/settings` endpoint to configure which expression should be used globally in promotion logic. Use this endpoint: `https://hub.synerise.com/api-reference/loyalty-and-engagement#tag/Promotion-settings/operation/endpointSettingsUpdateSettingsPUT`.
curl --request PUT \ --url https://api.synerise.com/v4/promotions/settings \ --header 'content-type: application/json' \ --data '{"expression": "8e30707e-988c-498c-a88e-47375a3dcfb5"}'Remember to change the ID of the expression used in the previous step.
Response example:
{ "data": { "expression": "b98a5d47-3e44-4ced-8867-c43f783f1b02", "promotionListSettings": { "where": { "status": [ "ACTIVE" ] } } } }Configure a promotion to become a reward
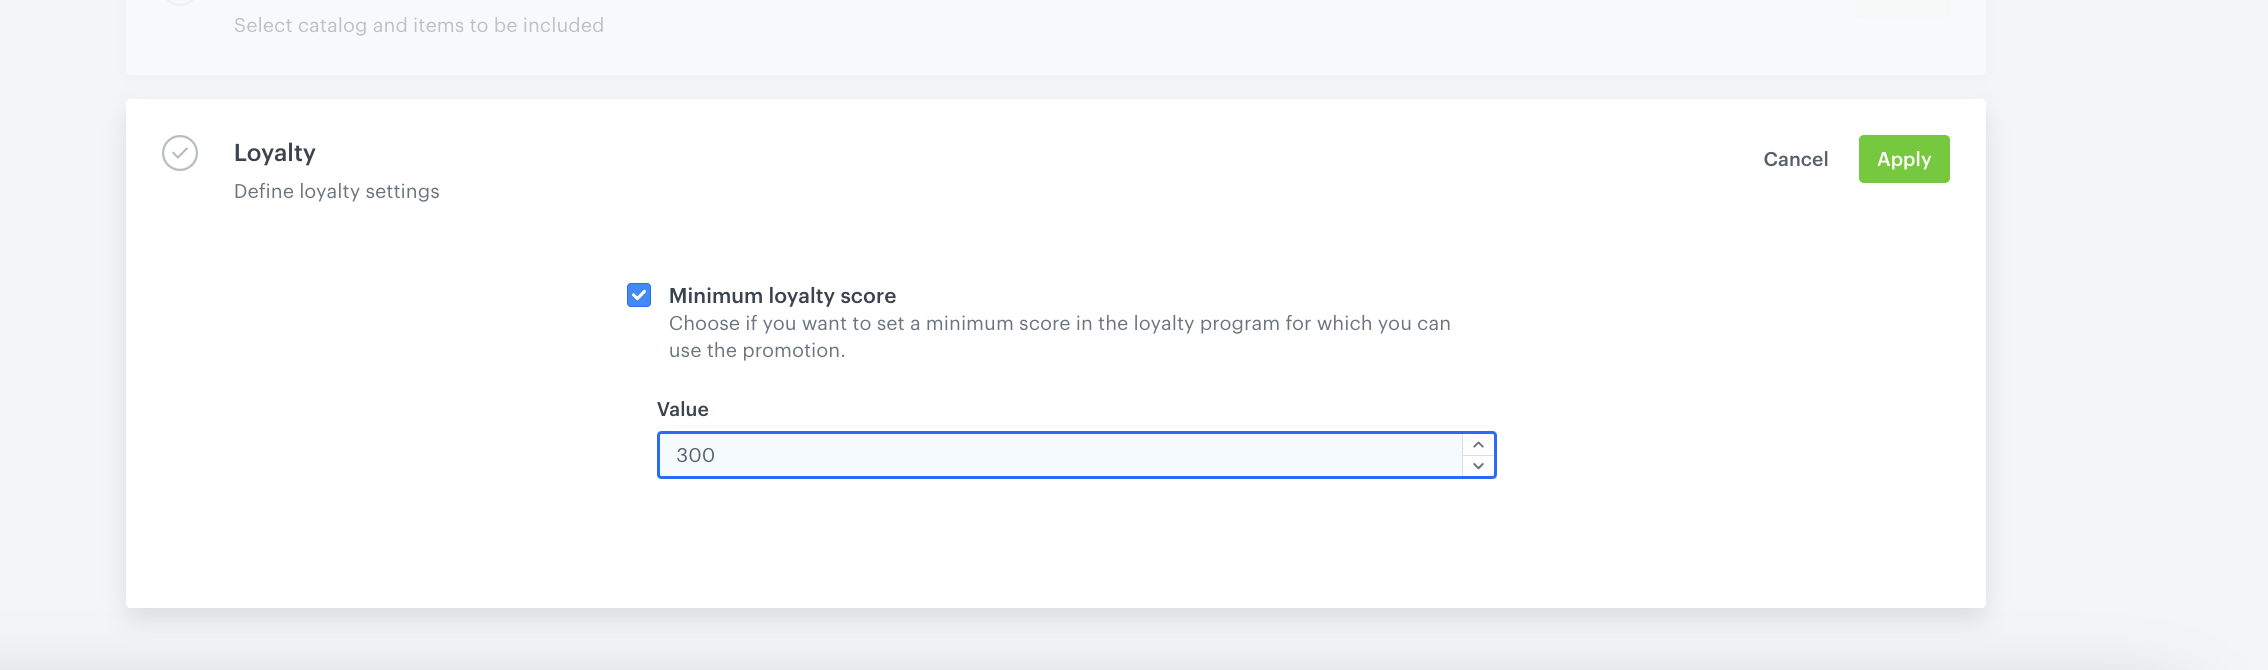
If you want to configure a promotion into a loyalty-based reward, you can configure it to be available only to customers who have collected a specific number of loyalty points. Follow the steps below to set up this condition.
- In the configuration of Promotion - in the Loyalty section, click Change.
- If you want to enable the promotion only to customers who gathered a certain number of loyalty points, perform the following actions:
- Select the Minimum loyalty score checkbox.
- In the Value field, enter the number of required points.
- Click Apply.
Retrieve all available promotions through API
In this part of the process, we’ll show you how to retrieve a list of promotions that are available to a specific customer based on audience targeting and publication status — using the Synerise API.
Use the “Get all client promotions” endpoint
When a user enters your website (or a mobile app) you can call the following endpoint to check if any promotions are assigned to them using the Get a Profile's promotions as Workspace (v2) method.
An examplary cURL:
curl --location 'https://api.geb.synerise.com/v4/promotions/v2/promotion/get-for-client/email/name.surname@synerise.com' \
--header 'Authorization: Bearer token’
This API returns only the promotions that meet these two conditions:
- The promotion is published
- The user is included in the audience segment of the promotion
Example response (simplified):Replace the email with the actual customer's identifier. You can also use other types of identifiers, such ascustom_identifyoruuid.
[
{
  "uuid": "promo-1-id",
  "name": "10% off on accessories",
  "requireRedeemedPoints": 500,
  "status": "ACTIVE",
  "segmentUuid": "abc-123",
  ...
},
{
  "uuid": "promo-2-id",
  "name": "Free shipping",
  "requireRedeemedPoints": 0,
  ...
}
]
This does not check if the customer has enough points.
This endpoint only confirms promotion eligibility based on: - Targeting (segment)
- Publication (is the promotion active?)
To optionally show if user has enough points to use the specific promotion, use the requireRedeemedPoints parameter in the response. Compare it with the user's PointsBalance, obtained as described in step 1. Based on that comparison, you can:
- Show or hide promotions,
- Mark unavailable ones as "locked",
- Display a personalized message, for example: "You need 200 more points".
Note: You don’t need to modify the request.
The
requireRedeemedPointsvalue is returned as part of each promotion in the response — simply compare it with the user’s CurrentBalance to determine which promotions they can afford.
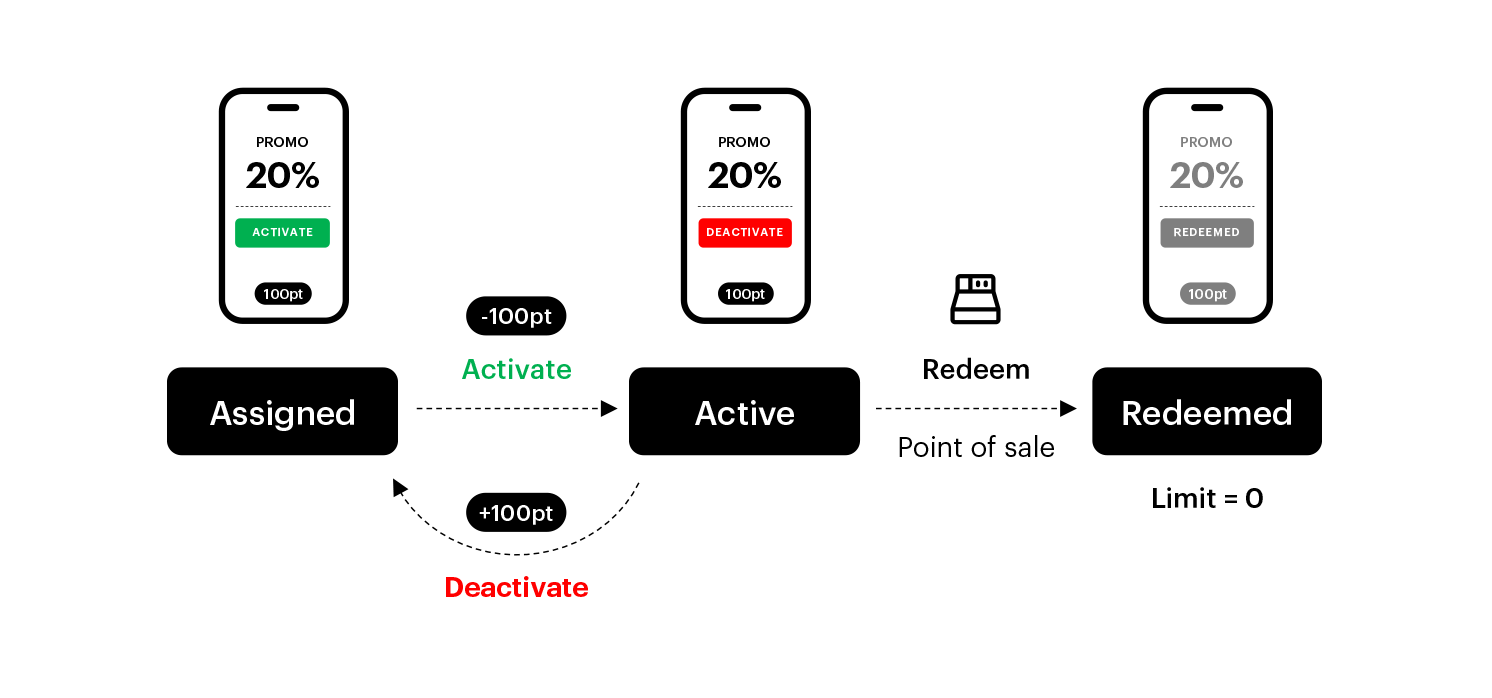
Activate promotions
After a customer selects a promotion they wish to use from the previously retrieved list, the next step is activating the selected promotion for them using the API. Activation ensures the promotion is reserved for the customer along with the required number of points, if applicable. Depending on the promotion's configuration, this process may trigger a client.removePoints event, indicating that loyalty points have been deducted from the customer's balance. This signifies that the promotion has been fully used and is now unavailable for the customer. Unless explicitly configured otherwise, the promotion cannot be reused.
Make an API call to activate the promotion
Use the ActivateAPromotionAsProfile method to activate a promotion for a customer. You must provide their identifier (such as email or custom_identify), and the code of the promotion you want to activate. Check the cURL to request to activate promotion:
curl --location 'https://api.geb.synerise.com/v4/promotions/promotion/activate-for-client/email/name.surname@synerise.com' \
--header 'Api-Version: 4.4' \
--header 'content-type: application/json' \
--header 'Authorization: Bearer {token}' \
--data '{
  "key": "code",
  "value": "promotion_code"
}'
The value field should contain the promotion code, which you get from the previous step.
Depending on the customer’s eligibility and points balance, the response will look as follows:
{
  "message": "You don't have required amount of points"
}
This means the customer tried to activate a promotion that requires more points than they currently have.
If the request is valid and the user has enough points, the promotion will be successfully activated. In this case - if we receive the 200 status it means that:
- The customer had enough loyalty points
- The promotion was available and matched to the customer
- The promotion has now been activated specifically for this customer
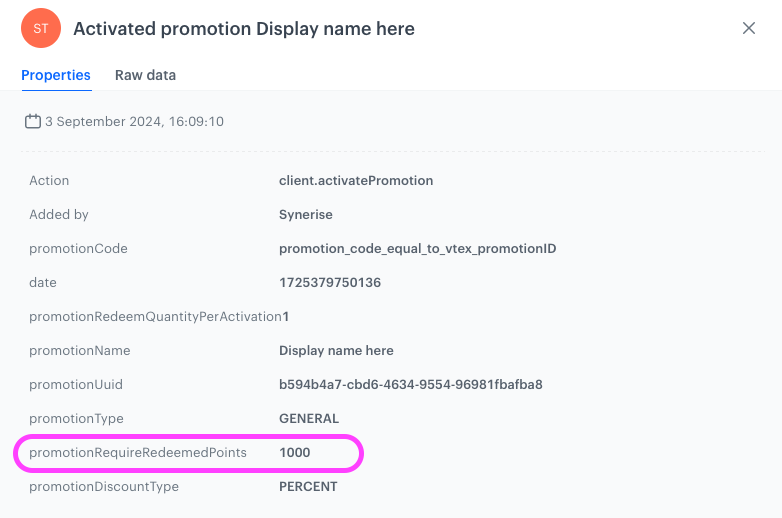
The client.activatePromotion event will appear on the activity list on the profile card. This event contains info about:
- the promotion code,
- the number of points that were used (defined in
requireRedeemedPoints), - the timestamp of activation and so on.
Using an expression to calculate points balance, it will automatically subtract the redeemed points from the customer’s available balance. The updated balance is always accurate and can be reused in real time across all channels.
Redeem promotions
After a promotion has been activated, and the user actually uses it, the final step is to mark the promotion as redeemed in Synerise. This is known as burning the promotion, and it helps track usage, prevent multiple redemptions, and close the promotion lifecycle.
Make the API call to redeem the promotion
Once the customer confirms usage, call the following endpoint: https://hub.synerise.com/api-reference/loyalty-and-engagement#tag/Promotions/operation/RedeemAPromotion
curl --location 'https://api.geb.synerise.com/v4/promotions/promotion/redeem' \
--header 'Accept: application/json' \
--header 'Content-Type: application/json' \
--header 'Api-Version: 4.4' \
--header 'Authorization: Bearer {TOKEN}' \
--data-raw '{
  "code": "promotion_code_equal_to_vtex_promotionID",
  "clientKey": "email",
  "clientKeyValue": "name.surname@synerise.com"
}'
The code should be the promotion code the customer activated earlier Use either email or clientId as clientKey, depending on your setup.
If the promotion is properly redeemed, the API will return a 201 status with a success message:
{
  "message": "Promotion redeemed successfully"
}
Once redemption is confirmed, a promotion redemption event is automatically added to the customer’s profile in Synerise as client.removePoints.
This event confirms that the promotion has been fully used and is now closed from the customer’s perspective — it cannot be used again unless configured otherwise.
Check the use case set up on the Synerise Demo workspace
You can check the configuration of each step directly in the Synerise Demo workspace:
- Aggregate which counts the number of points gained by customer.
- Aggregate which counts the number of points used for activating the promotion.
- Expression with the points balance
If you’re our partner or client, you already have automatic access to the Synerise Demo workspace (1590), where you can explore all the configured elements of this use case and copy them to your workspace.
If you’re not a partner or client yet, we encourage you to fill out the contact form to schedule a meeting with our representatives. They’ll be happy to show you how our demo works and discuss how you can apply this use case in your business.