Managing campaigns with priorities and weekly contact limit
When multiple campaigns are running within a single week, a customer may qualify for more than the desired number of messages. Without proper control, this leads to over-communication and a poor customer experience.
This use case describes how to orchestrate five weekly campaigns across three priority levels while enforcing a maximum of three messages per customer per week. The mechanism ensures that the highest-priority campaigns are always delivered first (as long as the weekly limit allows), and lower-priority campaigns only go out if the weekly contact limit has not yet been reached.
The example in this use case uses five campaigns and a limit of three messages per week, but both values are fully configurable. You can adjust the number of campaigns, priority levels, and the weekly cap to match your business needs.
This use case focuses on the mobile push channel, but the same logic and architecture can be applied to other communication channels such as email, SMS, or web push.
The key principles of this approach are:
- Each campaign has an assigned priority level (high, medium, or low).
- Each campaign has a specific scheduled send date and time within the week.
- The system runs cyclically (every hour) and checks whether the current moment matches a campaign’s planned send time.
- Before sending, the system verifies how many messages the customer has already received and how many higher-priority campaigns the customer still qualifies for.
- Once the weekly limit is reached, all remaining campaigns are blocked for that customer.
This approach separates the scheduling logic (when a campaign should go out) from the priority logic (which campaigns are most important), and combines both with a hard weekly cap.
Prerequisites
- Implement tracking code on your website.
- Implement Synerise SDK in your mobile app.
- Configure mobile push as a communication channel.
- Define the criteria used to qualify customers for each campaign. These can be based on behavioral events, customer attributes, segmentation rules, or any combination of conditions available in Synerise. The first step of this process involves creating segmentations that define the audience for each campaign.
- Create a mobile push template that will be used later in workflows.
Process
In this use case, you will go through the following steps:
- Create individual campaign segmentations — one per campaign, defining who qualifies.
- Create expressions — for current timestamp comparison and counting higher-priority campaign eligibility.
- Create workflows — one per priority group, running cyclically and sending mobile pushes when conditions are met. These must be created before aggregates so that you have the diagram IDs needed in the next step.
- Create aggregates for counting sent pushes — to track how many messages each customer has already received per priority level and in total.
- Create priority-level segmentations with split audience — one per priority group, combining campaign eligibility, send-time matching, and contact-limit checks.
Create individual campaign segmentations
Create five separate segmentations, one for each campaign planned for the week. Each segmentation defines the audience that qualifies for a given campaign. The conditions can be based on any criteria available in Synerise — behavioral events, customer attributes, transactional data, or other segmentation rules.
In this example, the five campaigns and their priority assignments are:
- Campaign A (high priority): customers who recently made a high-value purchase (for example, order total above 500) — targeting premium buyers with an exclusive loyalty offer
- Campaign B (high priority): customers who abandoned their cart in the last 7 days — a recovery campaign with a time-limited discount
- Campaign C (medium priority): customers who browsed a specific product category more than 3 times without purchasing — a nudge campaign with personalized recommendations
- Campaign D (medium priority): customers who haven’t made a purchase in the last 30 days but were active on the website — a re-engagement campaign
- Campaign E (low priority): customers who signed up for the newsletter in the last 14 days — a welcome series follow-up
The priority labels used throughout this use case are: high (priority 1), medium (priority 2), and low (priority 3).
The segmentation conditions and business scenarios presented here are only illustrative examples. In practice, they can be freely defined and adjusted based on user behavior, available data, and any additional parameters relevant to your setup. You can tailor these conditions to reflect your specific business logic, campaign goals, and communication strategy.
The number of values returned by expressions (for example, 0, 1, or 2 for a two-campaign priority level) is specific to this example and depends on how many campaigns you assign to each priority level in your setup.
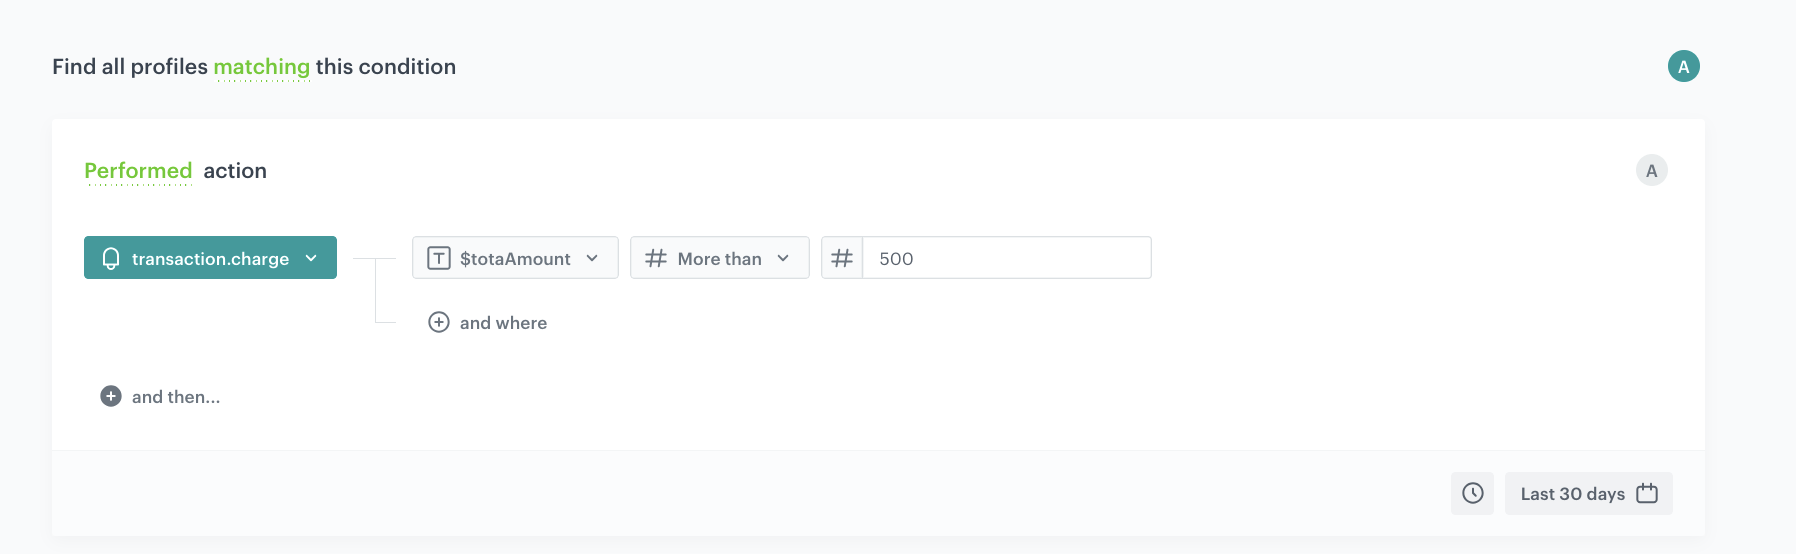
Create Campaign A segmentation
- Go to
 Decision Hub > Segmentations > New segmentation.
 - Enter the name of the segmentation, for example
Campaign A - high priority. - Click Add condition.
- From the dropdown list, select the
transaction.chargeevent. - Click the + where button, from the Choose parameter dropdown menu, choose
$totalAmount. - From the Choose operator dropdown, choose More than.
- In the next field, type the value
500. - Using the date picker in the lower-right corner, set the time range to Last 30 days. Confirm by clicking Apply.
- Save the segmentation.
Create Campaign B segmentation
- Go to Decision Hub > Segmentations > New segmentation.
- Enter the name of the segmentation, for example
Campaign B - high priority. - Click Add condition.
- Define the conditions that identify customers who qualify for this campaign (for example, customers who performed the
product.addToCartevent but did not complete a purchase within the last 7 days). - Using the date picker in the lower-right corner, set the appropriate time range. Confirm by clicking Apply.
- Save the segmentation.
Create Campaign C segmentation
- Go to Decision Hub > Segmentations > New segmentation.
- Enter the name of the segmentation, for example
Campaign C - medium priority. - Click Add condition.
- Define the conditions that identify customers who qualify for this campaign (for example, customers who visited a specific product category page more than 3 times without purchasing).
- Using the date picker in the lower-right corner, set the appropriate time range. Confirm by clicking Apply.
- Save the segmentation.
Create Campaign D segmentation
- Go to Decision Hub > Segmentations > New segmentation.
- Enter the name of the segmentation, for example
Campaign D - medium priority. - Click Add condition.
- Define the conditions that identify customers who qualify for this campaign (for example, customers who were active on the website but haven’t purchased in the last 30 days).
- Using the date picker in the lower-right corner, set the appropriate time range. Confirm by clicking Apply.
- Save the segmentation.
Create Campaign E segmentation
- Go to Decision Hub > Segmentations > New segmentation.
- Enter the name of the segmentation, for example
Campaign E - low priority. - Click Add condition.
- Define the conditions that identify customers who qualify for this campaign (for example, customers who signed up for the newsletter in the last 14 days).
- Using the date picker in the lower-right corner, set the appropriate time range. Confirm by clicking Apply.
- Save the segmentation.
Create expressions
Expressions are central to this use case. They provide real-time computed values used inside segmentation conditions. You will create the following expressions:
- Current timestamp expression — returns the current date and hour so the system can match it against each campaign’s planned send time.
- High priority campaign count expression — counts how many high priority campaigns the customer qualifies for (used in medium priority segmentations).
- Medium priority campaign count expression — counts how many medium priority campaigns the customer qualifies for.
- Combined high + medium priority campaign count expression — sums the two above expressions (used in low priority segmentations).
Create the current timestamp expression
This expression returns the current date and hour in the format yyyy-mm-ddThh, which allows the system to compare the current moment against each campaign’s scheduled send time. The first 13 characters of the timestamp are used so that when the workflow runs every hour, it matches exactly the planned send hour.
- Go to Behavioral Data Hub > Expressions > New expression.
- Enter the name, for example
Now (yyyy-mm-dd hh). - Set the expression type to Attribute.
- In the Formula definition section, build the formula using the
Regexpfunction. - Then add function
Now. - Add the
Constantpattern to extract the first 13 characters of the current timestamp, adding it as the value:^.{13}. - Save the expression.
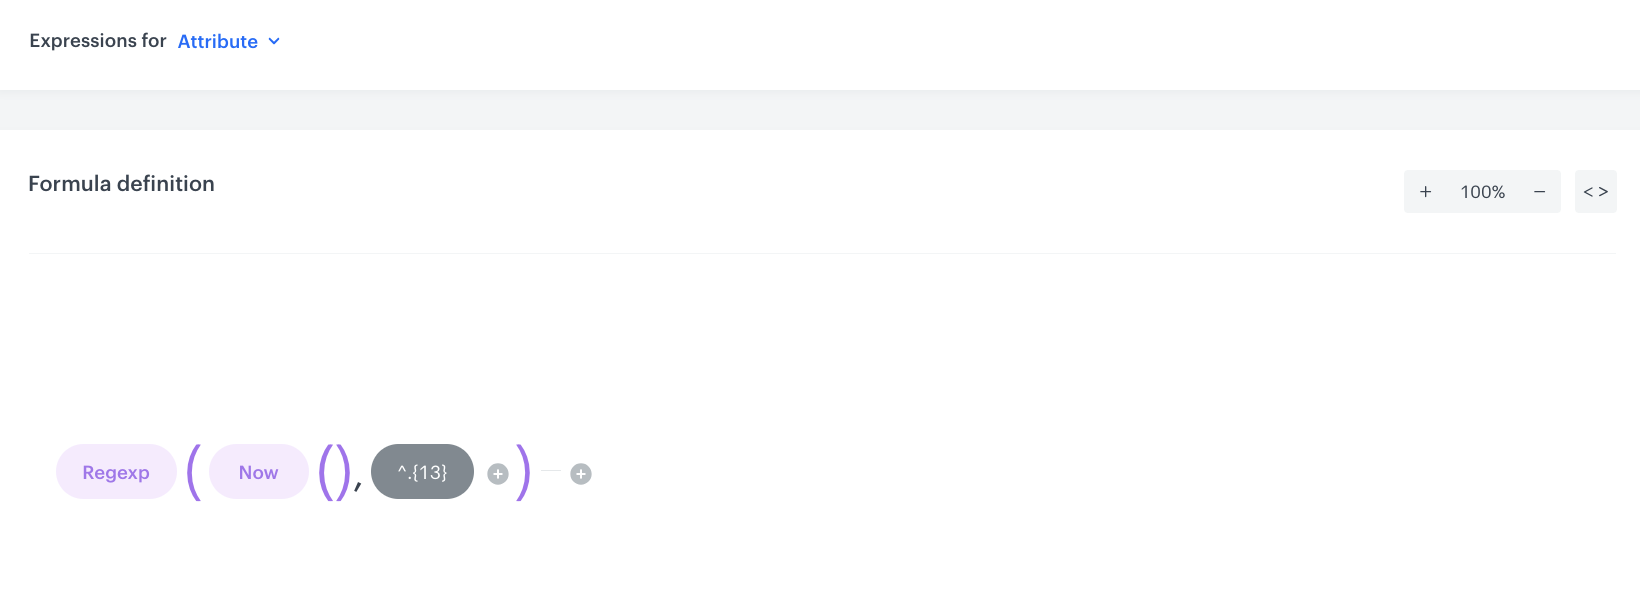
^.{13} extracts the first 13 characters of the current timestamp, which corresponds to the date and hour portion (for example, 2026-04-30T08). This expression is shared across all segmentation conditions and ensures that each segment (group within a segmentation) only returns customers at the exact planned hour of a campaign’s send time. Every segmentation references this same expression, which means that it acts as an alternative schedule — the segmentation only becomes active when the current timestamp matches the planned send date and hour.Create the high priority campaign count expression
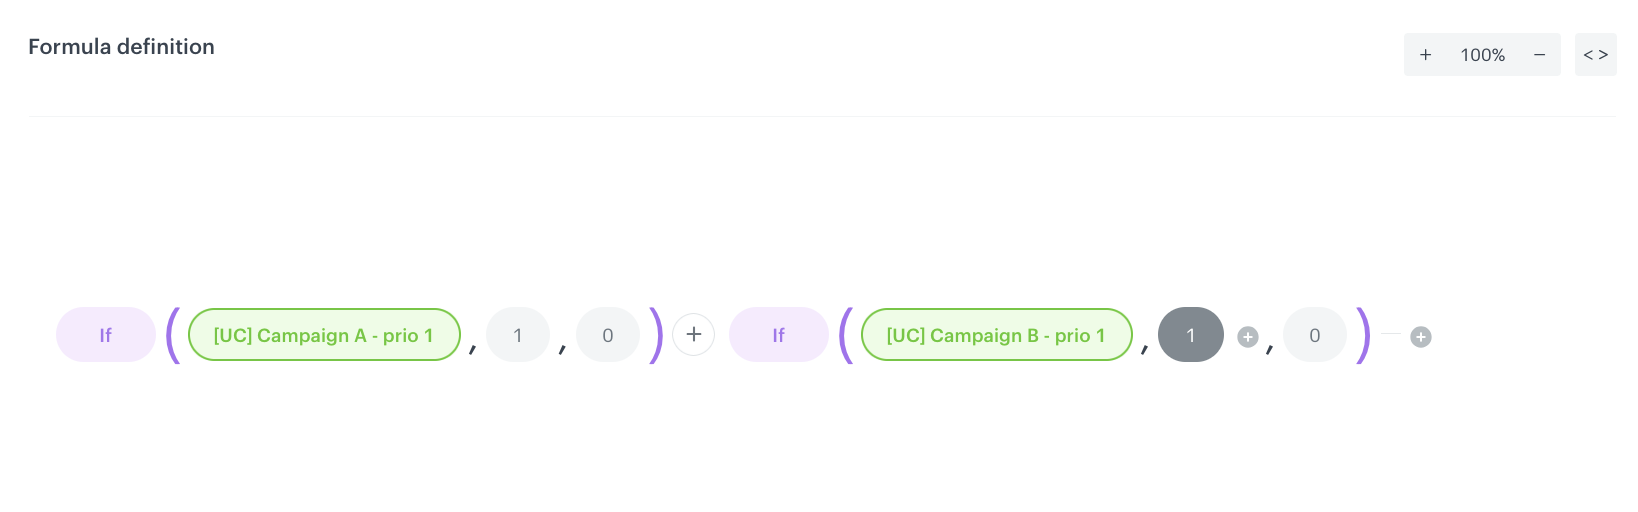
This expression calculates how many high priority campaigns the customer qualifies for. It checks whether the customer belongs to the Campaign A segmentation and the Campaign B segmentation, and sums the results. The output for this specific case is a number (0, 1, or 2) representing the potential number of high priority messages the customer may receive.
- Go to Behavioral Data Hub > Expressions > New expression.
- Enter the name, for example
How many high priority campaigns user qualifies for. - Set the expression type to Attribute.
- Build the formula to check membership in the Campaign A and Campaign B segmentations and return the sum.
- Save the expression.
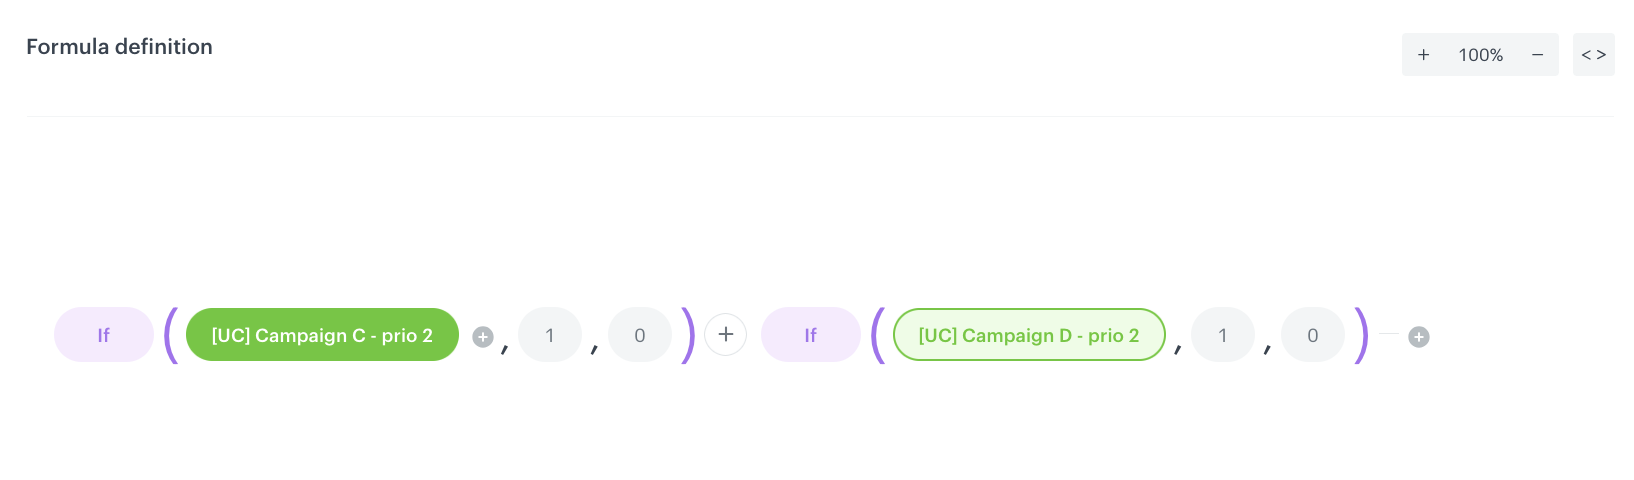
Create the medium priority campaign count expression
This expression calculates how many medium priority campaigns the customer qualifies for. It checks whether the customer belongs to the Campaign C segmentation and the Campaign D segmentation, and sums the results. The output for this specific case is a number (0, 1, or 2) representing the potential number of medium priority messages the customer may receive.
- Go to Behavioral Data Hub > Expressions > New expression.
- Enter the name, for example
How many medium priority campaigns user qualifies for. - Set the expression type to Attribute.
- Build the formula to check membership in the Campaign C and Campaign D segmentations and return the sum. Build it in the same way as the previous expression, replacing the high priority segmentations with medium priority ones.
- Save the expression.
Create the combined high and medium priority campaign count expression
This expression calculates how many campaigns the customer qualifies for across both high and medium priority levels. It sums the results of the high priority campaign count expression and the medium priority campaign count expression. The output is used in low priority segmentations to determine the remaining contact slots.
- Go to Behavioral Data Hub > Expressions > New expression.
- Enter the name, for example
How many high + medium priority campaigns user qualifies for. - Set the expression type to Attribute.
- Build the formula as a sum of the two previously created expressions: the high priority campaign count expression and the medium priority campaign count expression, as presented on the screen below.
- Save the expression.

Create workflows
Create three workflows — one for each priority level. Each workflow uses the corresponding split audience segmentation (which you will create in a later step) and runs cyclically every hour. When the current hour matches a campaign’s scheduled send time and all conditions are met, the mobile push is sent.
Workflows must be created before the aggregates because the aggregates need the diagram IDs of these workflows to correctly scope the push count. At this stage, create each workflow with its schedule and structure (Audience node, Send Mobile Push nodes, and End nodes). You can leave the split audience segmentation reference empty or use a placeholder — you will update it after creating the priority-level segmentations with split audience in a later step.
After saving each workflow, note the diagram ID from the workflow URL (the part after /automation-diagram/). You will need these IDs in the next step when configuring the aggregates.
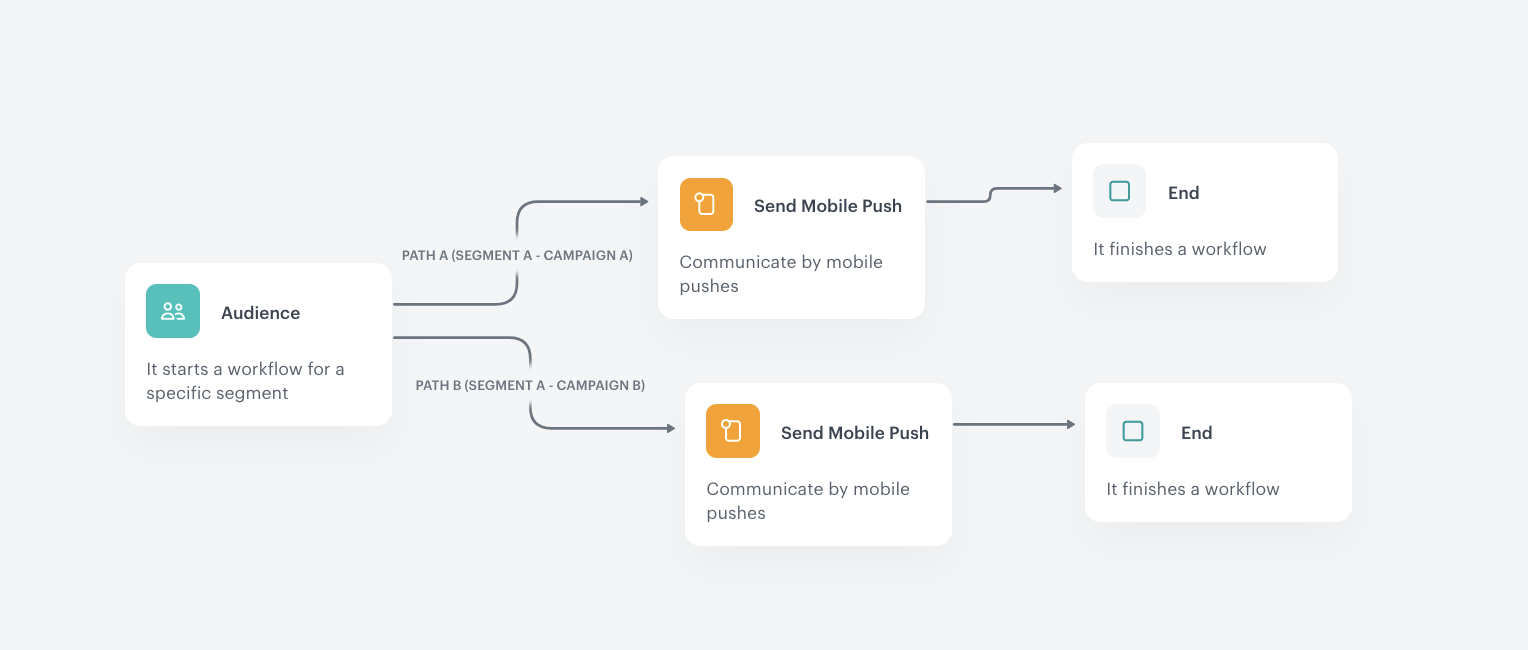
Create the workflow for high priority campaigns
- Go to
 Automation Hub > Workflows > New workflow.
 - Enter the name of the workflow, for example
Split audience - high priority.
Define the Audience trigger node
- Start the workflow with the Audience node. In the configuration:
- Set the Action limit to
1times per workflow. - In the Schedule section, select Repeat runs.
- Select the timezone, for example
Europe/Warsaw (Central European Standard Time) UTC+01:00. - Set the interval type to Interval.
- Set the interval to
1 Hour. - Set the Begin at date to the start of the campaign week.
- In the Audience section, select Split audience.
- Select the
Split audience - high prioritysegmentation (you will create this segmentation in a later step — for now, you can leave this field empty or use a placeholder and update it later). - Map Segment A to Path A (Campaign A).
- Map Segment B to Path B (Campaign B).
- Set the Action limit to
- Click Apply.
Configure Path A (Campaign A)
- On Path A (Segment A), add the Send Mobile Push node.
- Configure the mobile push message content for Campaign A according to your business needs.
- Add the End node after the Send Mobile Push node.
Configure Path B (Campaign B)
-
On Path B (Segment B), add the Send Mobile Push node.
-
Configure the mobile push message content for Campaign B.
-
Add the End node.
-
In the upper right corner, click Save & Run.
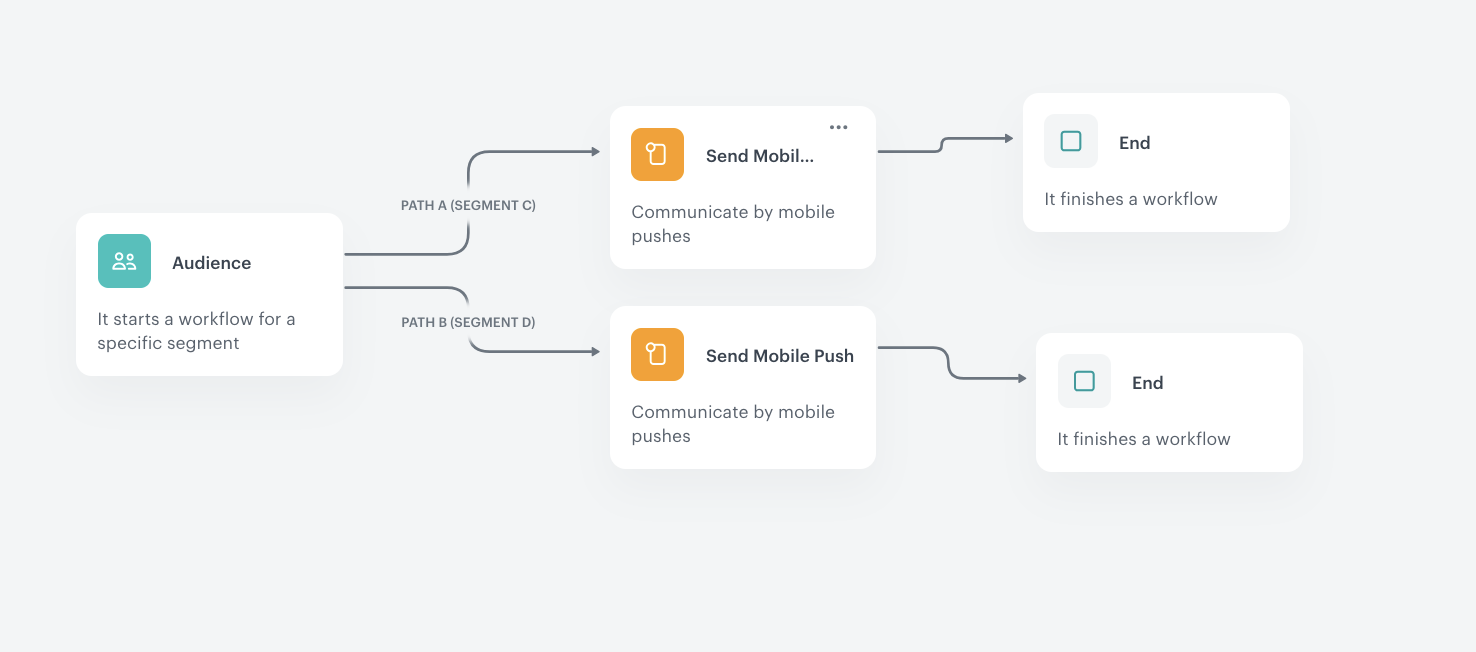
Create the workflow for medium priority campaigns
- Go to Automation Hub > Workflows > New workflow.
- Enter the name, for example
Split audience - medium priority. - Configure the Audience node with the same settings as the high priority workflow:
- Action limit:
1 - Repeat runs at an interval of
1 Hour - Begin at: the start of the campaign week
- Split audience using the
Split audience - medium prioritysegmentation (to be created in a later step) - Map Segment C → Path A, Segment D → Path B
- Action limit:
- On each path, add a Send Mobile Push node followed by an End node.
- Click Save & Run.
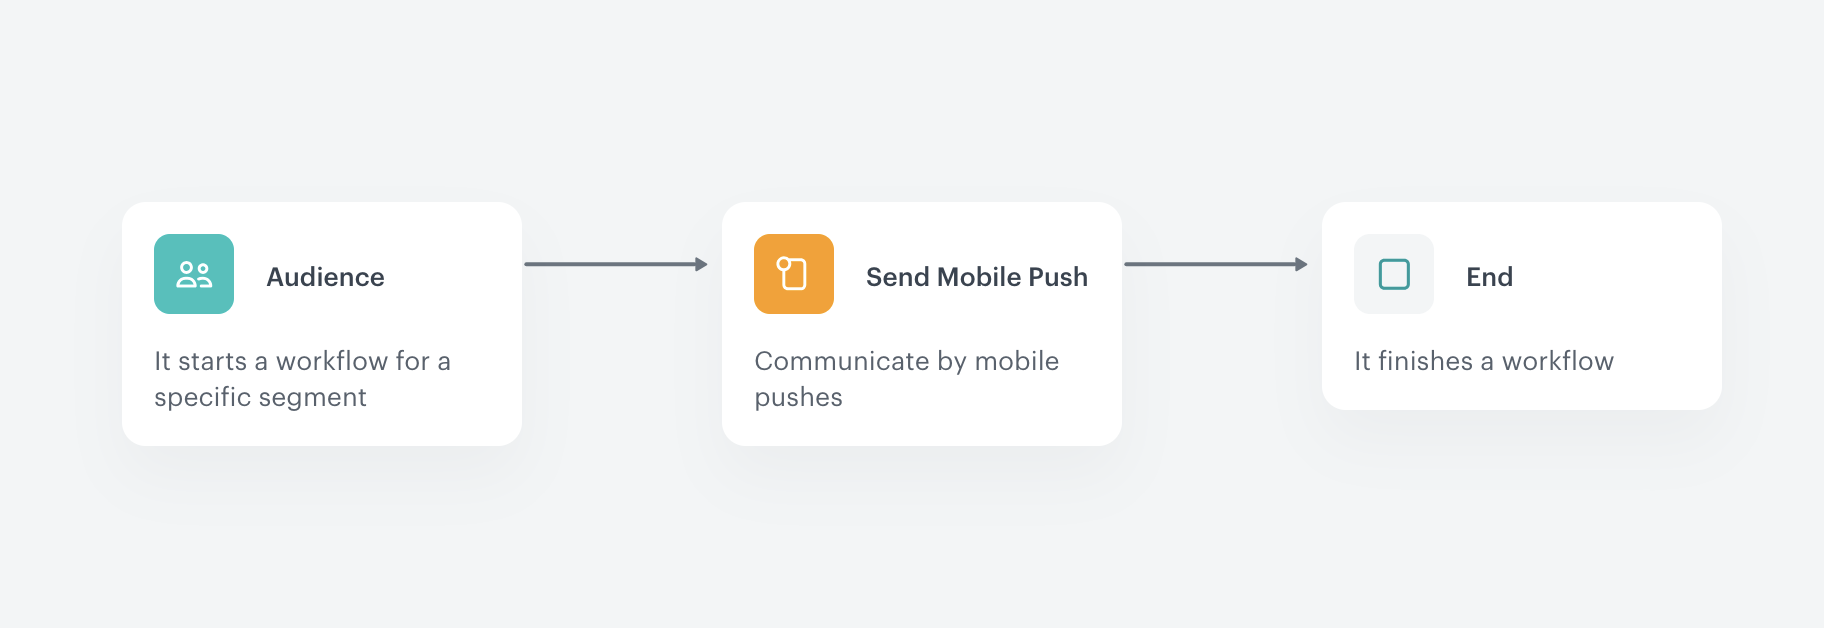
Create the workflow for low priority campaigns
- Go to Automation Hub > Workflows > New workflow.
- Enter the name, for example
Split audience - low priority. - Configure the Audience node with the same settings:
- Action limit:
1 - Repeat runs at an interval of
1 Hour - Begin at: the start of the campaign week
- Select the
Split audience - low prioritysegmentation (to be created in a later step)
- Action limit:
- Add a Send Mobile Push node followed by an End node.
- Click Save & Run.
Now (yyyy-mm-dd hh) expression is compared against the planned send timestamp, the segment will only return customers at the exact hour the campaign is scheduled. At all other hours, the segment will be empty and no messages will be sent.Create aggregates for counting sent pushes
To enforce the weekly contact limit, you need aggregates that count how many push notifications have already been sent to each customer. You will create three aggregates — one scoped to the high priority workflow, one scoped to the medium priority workflow, and one that counts all pushes sent across all campaign workflows.
Each aggregate is based on the push.send event and uses the diagramId parameter to scope the count to the relevant workflow. The diagramId is the unique identifier of a workflow and can be found in the URL when viewing the workflow in the Automation Hub (the part of the URL that comes after /automation-diagram/).
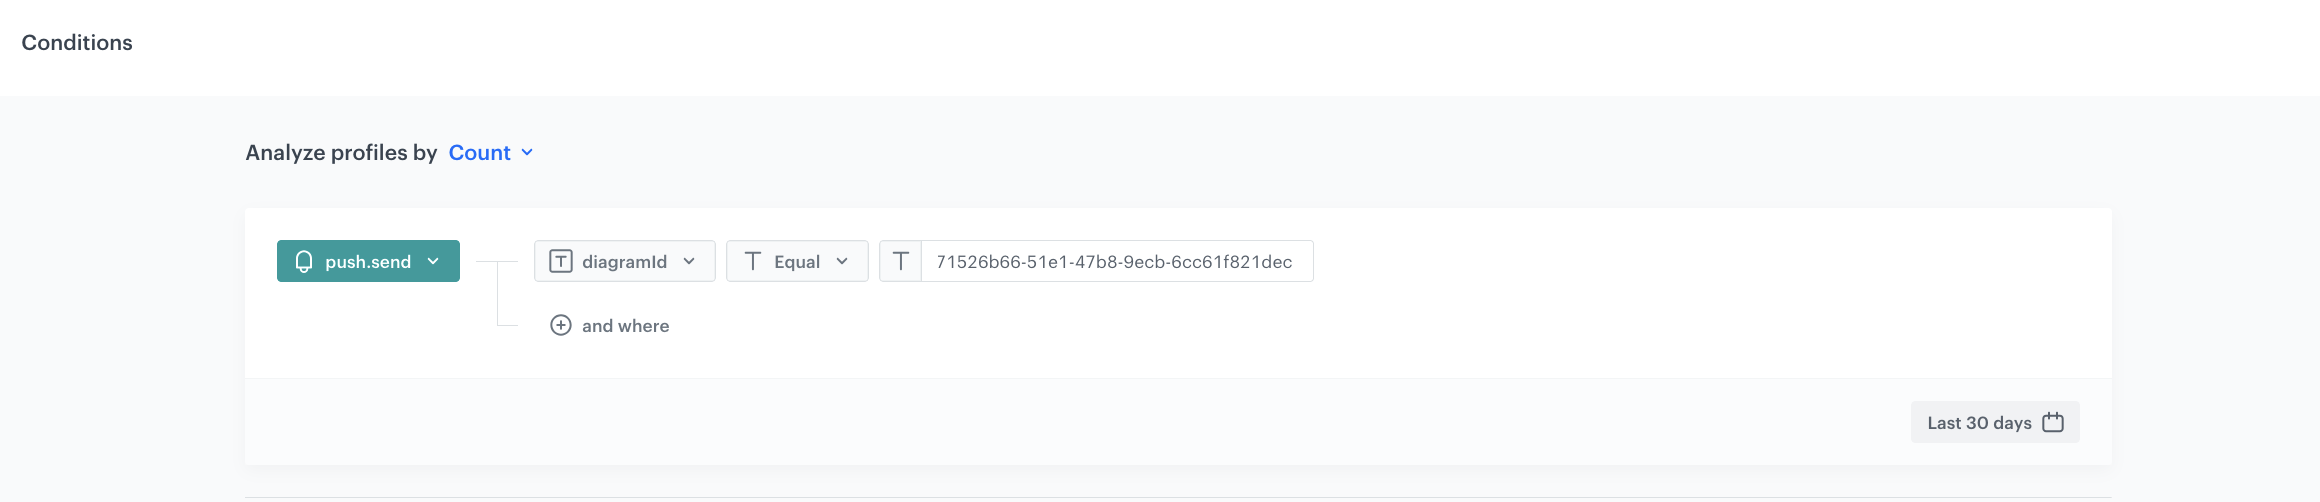
Create the aggregate for high priority sent pushes
This aggregate counts how many push notifications were sent to a customer from the high priority workflow.
- Go to Behavioral Data Hub > Live Aggregates > Create aggregate.
- As the aggregate type, select Profile.
- Enter the name of the aggregate, for example
Number of sent pushes - high priority. - Click Analyze profiles by and select Count.
- From the Choose event dropdown list, select the
push.sendevent. - Click the + where button.
- From the Choose parameter dropdown list, select diagramId.
- From the Choose operator dropdown list, select Equal.
- In the value field, enter the diagram ID of the high priority workflow (for example,
71526b66-51e1-47b8-9ecb-6cc61f821dec). You can find this ID in the URL of the workflow in the Automation Hub. - Define the period to Last 30 days.
- Save the aggregate.
Create the aggregate for medium priority sent pushes
This aggregate counts how many push notifications were sent to a customer from the medium priority workflow. The configuration is identical to the high priority aggregate, but uses the diagram ID of the medium priority workflow.
- Go to Behavioral Data Hub > Live Aggregates > Create aggregate.
- As the aggregate type, select Profile.
- Enter the name of the aggregate, for example
Number of sent pushes - medium priority. - Click Analyze profiles by and select Count.
- From the Choose event dropdown list, select the
push.sendevent. - Click the + where button.
- From the Choose parameter dropdown list, select diagramId.
- From the Choose operator dropdown list, select Equal.
- In the value field, enter the diagram ID of the medium priority workflow.
- Define the period to Last 30 days.
- Save the aggregate.
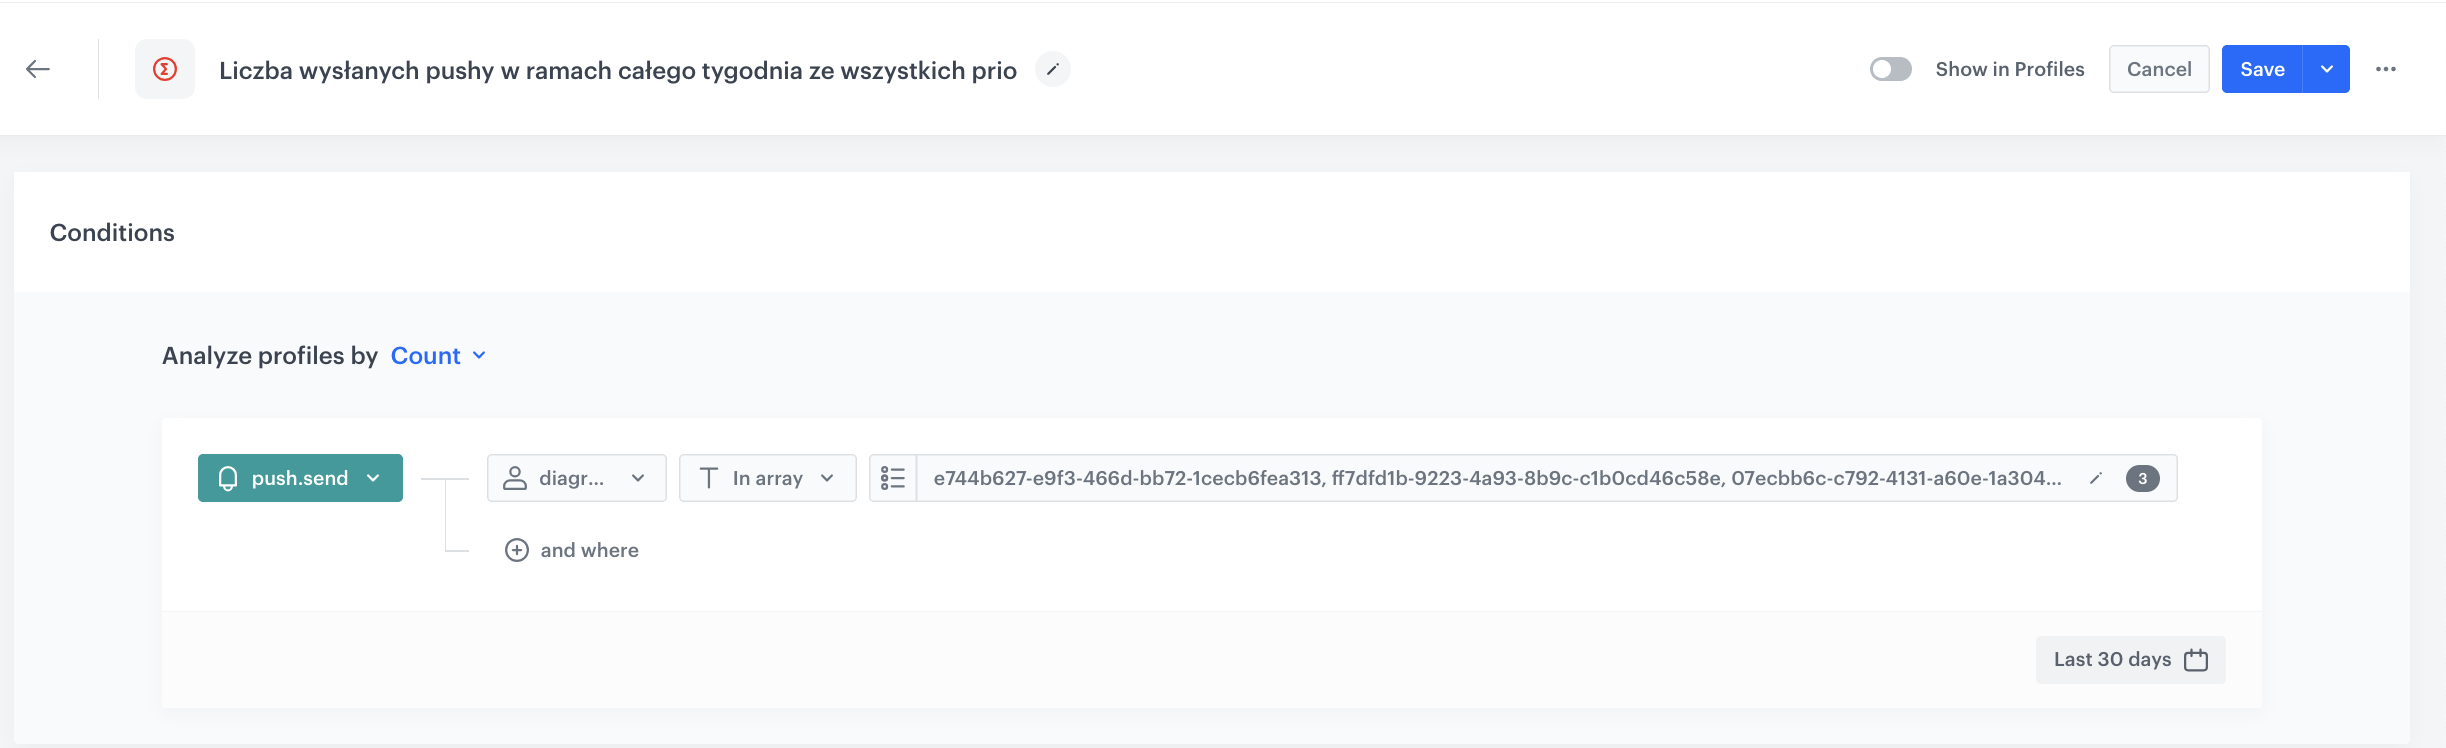
Create the aggregate for all sent pushes
This aggregate counts how many push notifications were sent to a customer across all campaign workflows combined. Unlike the per-priority aggregates, this one uses the In array operator to match against the diagram IDs of all three priority workflows at once.
- Go to Behavioral Data Hub > Live Aggregates > Create aggregate.
- As the aggregate type, select Profile.
- Enter the name of the aggregate, for example
Number of sent pushes - all. - Click Analyze profiles by and select Count.
- From the Choose event dropdown list, select the
push.sendevent. - Click the + where button.
- From the Choose parameter dropdown list, select diagramId.
- From the Choose operator dropdown list, select In array.
- In the value field, enter the diagram IDs of all three priority workflows (the high priority workflow ID, the medium priority workflow ID, and the low priority workflow ID).
- Define the period to Last 30 days.
- Save the aggregate.
push.send event is automatically generated by Synerise when a mobile push notification is sent through a workflow. The diagramId parameter identifies the specific workflow (diagram) that triggered the send.Create priority-level segmentations with split audience
Create three segmentations — one per priority level — that combine campaign eligibility, scheduled send-time matching, and weekly contact-limit enforcement. Each segmentation uses the split audience feature to create separate segments (groups within a segmentation) for each campaign within the priority level.
In the examples below, all campaigns are planned within a single week (Monday through Friday). The specific dates used here are illustrative — adjust them to match your actual campaign week.
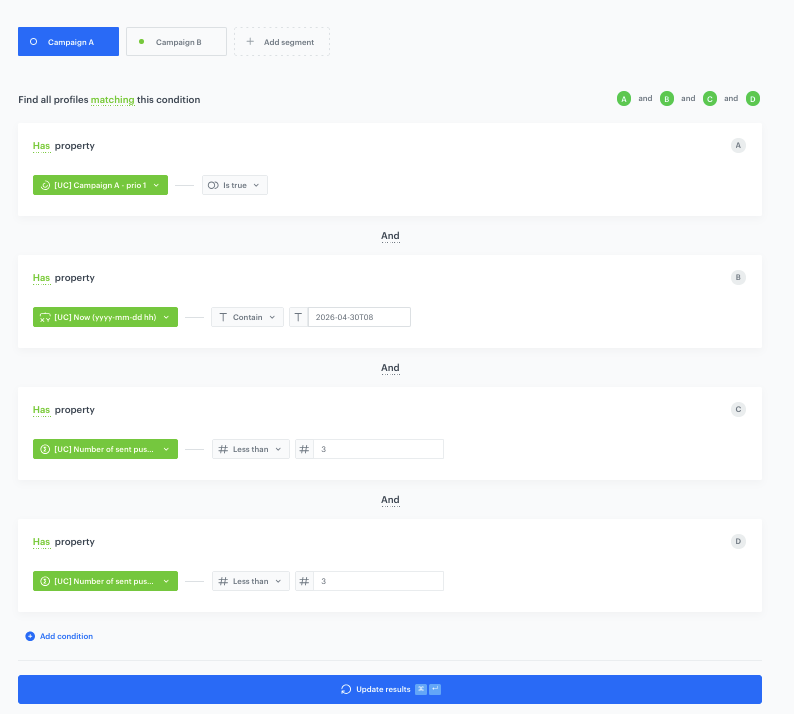
Create the high priority split audience segmentation
This segmentation contains two segments — one for Campaign A and one for Campaign B. Since high priority is the highest level, these campaigns are sent as long as the scheduled time matches and the weekly limit has not been exceeded. No checks against higher-priority campaigns are needed.
- Go to Decision Hub > Segmentations > New segmentation.
- Enter the name, for example
Split audience - high priority.
Configure Segment A (Campaign A)
- In the first segment, add the following conditions connected by the AND operator:
- Condition A — Has property:
Campaign A - high prioritysegmentation Is true. This checks if the customer qualifies for Campaign A. - Condition B — Has property:
Now (yyyy-mm-dd hh)expression Contain the value representing Campaign A’s planned send date and hour (for example,2026-04-15T10). This ensures the campaign only triggers at the exact scheduled hour. - Condition C — Has property:
Number of sent pushes - high priorityaggregate Less than3. This enforces the weekly contact limit within the high priority workflow. - Condition D — Has property:
Number of sent pushes - allaggregate Less than3. This enforces the overall weekly contact limit.
- Condition A — Has property:
- Click Apply.
Configure Segment B (Campaign B)
- Click Add segment and add the following conditions connected by the AND operator:
- Condition A — Has property:
Campaign B - high prioritysegmentation Is true. - Condition B — Has property:
Now (yyyy-mm-dd hh)expression Contain the value representing Campaign B’s planned send date and hour (for example,2026-04-16T10). - Condition C — Has property:
Number of sent pushes - allaggregate Less than3. - Condition D — Has property:
Number of sent pushes - high priorityaggregate Less than3.
- Condition A — Has property:
- Save the segmentation.
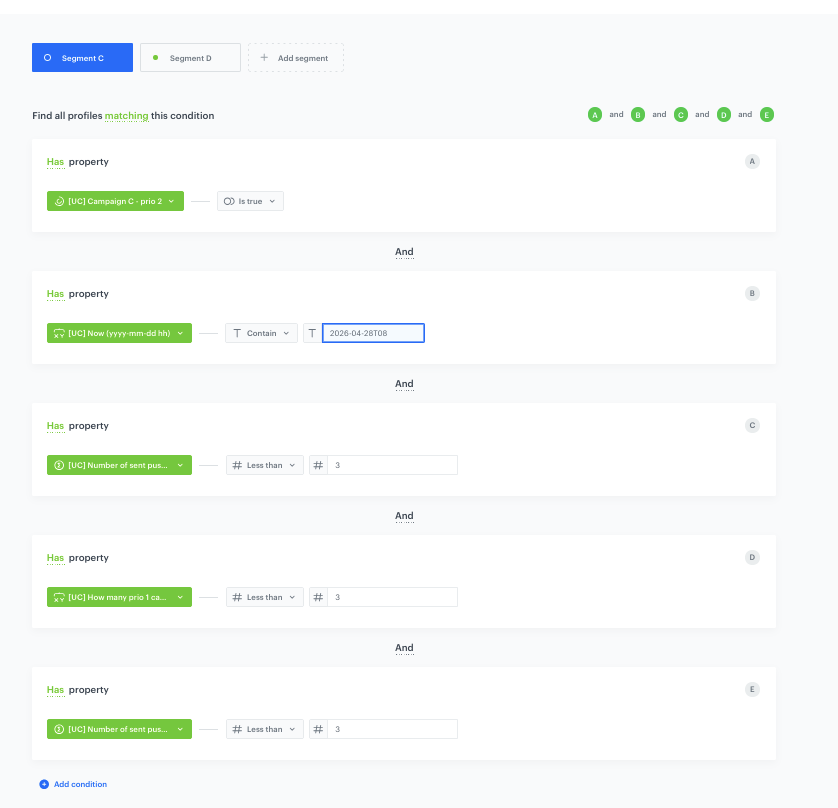
Create the medium priority split audience segmentation
This segmentation contains two segments — one for Campaign C and one for Campaign D. In addition to the send-time and contact-limit checks, each segment includes a condition that verifies how many high priority campaigns the customer qualifies for. This prevents medium priority campaigns from consuming contact slots that should be reserved for higher-priority ones.
- Go to Decision Hub > Segmentations > New segmentation.
- Enter the name, for example
Split audience - medium priority.
Configure Segment A (Campaign C)
- In the first segment, add the following conditions connected by the AND operator:
- Condition A — Has property:
Campaign C - medium prioritysegmentation Is true. - Condition B — Has property:
Now (yyyy-mm-dd hh)expression Contain the value representing Campaign C’s planned send date and hour (for example,2026-04-13T09). - Condition C — Has property:
Number of sent pushes - allaggregate Less than3. - Condition D — Has property:
How many high priority campaigns user qualifies forexpression Less than3. This ensures that the total number of potential high priority sends plus this send would not exceed the weekly limit. - Condition E — Has property:
Number of sent pushes - high priorityaggregate Less than3.
- Condition A — Has property:
- Click Apply.
Configure Segment B (Campaign D)
- Click Add segment and add the following conditions connected by the AND operator:
- Condition A — Has property:
Campaign D - medium prioritysegmentation Is true. - Condition B — Has property:
Now (yyyy-mm-dd hh)expression Contain the value representing Campaign D’s planned send date and hour (for example,2026-04-13T14). - Condition C — Has property:
Number of sent pushes - allaggregate Less than3. - Condition D — Has property:
How many high priority campaigns user qualifies forexpression Less than3. - Condition E — Has property:
Number of sent pushes - high priorityaggregate Less than3.
- Condition A — Has property:
- Save the segmentation.
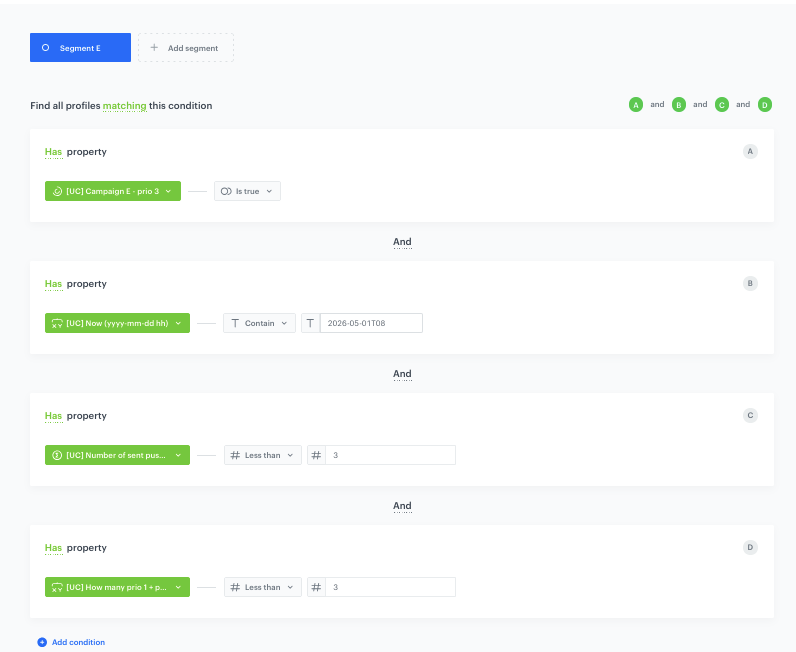
Create the low priority split audience segmentation
This segmentation contains one segment for Campaign E. It includes the broadest set of checks — verifying the weekly limit and counting how many campaigns the customer qualifies for across both high and medium priority levels.
- Go to Decision Hub > Segmentations > New segmentation.
- Enter the name, for example
Split audience - low priority.
Configure Segment A (Campaign E)
- In the first segment, add the following conditions connected by the AND operator:
- Condition A — Has property:
Campaign E - low prioritysegmentation Is true. - Condition B — Has property:
Now (yyyy-mm-dd hh)expression Contain the value representing Campaign E’s planned send date and hour (for example,2026-04-14T10). - Condition C — Has property:
Number of sent pushes - allaggregate Less than3. - Condition D — Has property:
How many high + medium priority campaigns user qualifies forexpression Less than3. This ensures that the combined potential sends from higher priorities plus this send would not exceed the weekly limit.
- Condition A — Has property:
- Save the segmentation.
How the priority logic works in practice
Consider the following example scenario where high priority campaigns are scheduled later in the week than medium and low priority ones. This demonstrates how the slot reservation mechanism ensures that lower-priority campaigns do not consume contact slots that are reserved for higher-priority campaigns — regardless of chronological order.
- A customer qualifies for all five campaigns: Campaign A (high priority), Campaign B (high priority), Campaign C (medium priority), Campaign D (medium priority), and Campaign E (low priority).
- The weekly contact limit is 3 messages.
- Campaign C is scheduled for Monday at 09:00, Campaign D for Monday at 14:00, Campaign E for Tuesday at 10:00, Campaign A for Wednesday at 10:00, and Campaign B for Thursday at 10:00.
The system processes the campaigns as follows:
-
Monday at 09:00 — Campaign C (medium priority). The medium priority workflow runs. The customer qualifies for Campaign C and the time matches. Before sending, the system checks the expressions: the customer qualifies for 2 high priority campaigns (A and B). This means 2 of the 3 weekly slots are reserved for high priority. Only 1 slot remains available for medium priority. Since no medium priority pushes have been sent yet, Campaign C is sent. Push count becomes 1.
-
Monday at 14:00 — Campaign D (medium priority). The medium priority workflow runs again. The customer qualifies for Campaign D and the time matches. However, the system checks: the customer still qualifies for 2 high priority campaigns (A and B are not yet sent but are planned). Since 1 medium priority campaign was already sent and only 1 slot was available for this priority level (3 total minus 2 reserved for high), Campaign D is blocked.
-
Tuesday at 10:00 — Campaign E (low priority). The low priority workflow runs. The customer qualifies for Campaign E and the time matches. The system checks how many campaigns the customer qualifies for across high and medium priority: 2 (high) + 2 (medium) = 4, but the weekly limit is 3. In practice, 1 push has already been sent and 2 slots are reserved for high priority. No remaining capacity exists for low priority. Campaign E is blocked.
-
Wednesday at 10:00 — Campaign A (high priority). The high priority workflow runs. The customer qualifies for Campaign A, the time matches, and the overall push count is 1 (below 3). No additional reservation checks are needed at the highest priority level. Campaign A is sent. Push count becomes 2.
-
Thursday at 10:00 — Campaign B (high priority). The high priority workflow runs again. The customer qualifies for Campaign B, the time matches, and the push count is 2 (below 3). Campaign B is sent. Push count becomes 3.
Result: The customer received 3 messages — Campaign C (medium), Campaign A (high), and Campaign B (high). Despite Campaigns A and B being scheduled later in the week, their slots were reserved from the beginning. Campaign D (medium) and Campaign E (low) were correctly blocked because the remaining weekly capacity was already allocated to higher-priority campaigns.
This mechanism ensures that high priority campaigns are always delivered as long as the weekly limit allows, medium priority campaigns are sent only when there is remaining capacity after accounting for higher-priority reservations, and low priority campaigns fill any leftover slots.
The expressions that count potential higher-priority campaign eligibility effectively reserve contact slots for higher-priority campaigns. This means that regardless of how campaigns are distributed across the week, lower-priority campaigns will not consume slots that could be needed by higher-priority ones — even if the higher-priority campaigns are scheduled later in the week.
However, keep in mind that within a single priority level, if you have more campaigns than the weekly limit allows, only the first campaigns (in chronological order) will be sent. For example, if you assign 5 campaigns to high priority with a weekly limit of 3, only the first 3 scheduled campaigns will go out.
Check the use case set up on the Synerise Demo workspace
You can check the configuration of each step directly in the Synerise Demo workspace:
Individual campaign segmentations:
- Campaign A - high priority
- Campaign B - high priority
- Campaign C - medium priority
- Campaign D - medium priority
- Campaign E - low priority
Priority-level split audience segmentations:
Aggregates:
- Number of sent pushes - high priority
- Number of sent pushes - medium priority
- Number of sent pushes - all
Expressions:
- Now (yyyy-mm-dd hh)
- High priority campaign count
- Medium priority campaign count
- High + medium priority campaign count
Workflows:
If you’re our partner or client, you already have automatic access to the Synerise Demo workspace (1590), where you can explore all the configured elements of this use case and copy them to your workspace.
If you’re not a partner or client yet, we encourage you to fill out the contact form to schedule a meeting with our representatives. They’ll be happy to show you how our demo works and discuss how you can apply this use case in your business.