Abandoned cart landing page with similar recommendations
Recovering abandoned carts is essential for maximizing revenue and strengthening customer retention. By leveraging customer behavior data, businesses can create a personalized shopping experience that encourages customers to complete their purchases. This approach becomes even more effective when combined with product recommendations, offering alternatives with similar features. A well-designed landing page that displays both abandoned items and similar products can significantly enhance the user experience and drive higher conversion rates by guiding customers toward products they are more likely to buy.
This use case demonstrates how to integrate a dynamic product listing into a dedicated landing page and send a mobile communication redirection to it. It presents products customer abandoned in their cart and recommendations for similar products. The purpose is to offer customers a wider selection of items with similar features. The landing page will be built using predefined templates, making it easier to customize the project to meet your business needs.
Prerequisites
To be able to implement this use case, you must:
- Implement mobile pushes in your mobile application: iOS, Android.
- Import an item catalog for recommendations and configure AI engine. Enable Similar recommendations.
- Implement the transaction events using SDK or API.
- Implement the
cart.statusevent, which stores the current status of the cart in the form of an event on the customer’s card. The event has to be sent to Synerise after every change in the cart status. - Collect product.addToCart event.
Process
To create a landing page with similar products recommendations, perform the steps in the following order:
- Create an aggregate returning products customer abandoned in their cart.
- Create an AI recommendation that will be used in the landing page template.
- Create a landing page.
- Create a mobile push notification with a link to the landing page.
- Create a workflow sending a mobile push.
Create an aggregate
In this part of the process, create an aggregate that retrieves the list of products from the abandoned cart. These products will be displayed in the template and the aggregate result will serve as context for the recommendations.
- Go to
 Analytics > Aggregates > New aggregate.
 - Enter the name of the aggregate.
- As the type of the aggregate, select Last.
- From the Choose event dropdown list, select the
cart.statusevent. - As the event parameter, select products.
- Set the analyzed period to Lifetime.
- Save the aggregate.

Create an AI Recommendation
In this part of the process, you will configure a similar items recommendation with context of items customers abandoned in their carts. This recommendation will be later used in the landing page.
- Go to
 Communication > Recommendations > Add recommendation.
 - Enter the name of the recommendation (it is only visible on the list of recommendation).
- In the Type & Items feed section, click Define.
- From the Items Feed dropdown list, select an item feed.
- In the Type section, choose the Similar items recommendation type.
- Confirm the settings by clicking Apply.
- In the Items section, click Define.
- Define the minimum and maximum number of items that will be recommended to the customer in each slot.
- Optionally, define Static filters and Elastic filters.
- Confirm by clicking Apply.
- Optionally, you can define the Boosting factors.
- In the Additional settings section click Define.
- Enable the Item context from analytics (aggregate, expression) switch.
- From the dropdown list select the aggregate you created in the previous step.
- Click Apply.
- In the right upper corner, click Save.
Create a landing page
In this part of the process, you will create a landing page. We will use a predefined template for the abandoned cart landing page with similar recommendations, so there is no need to create a template from scratch.
- Go to
 Communication > Landing Page > Create new.
 - In the Content section, click Define.
- From the list of template folders, select Predefined templates.
- Select the Abandoned cart template.
Result: You are redirected to the code editor.
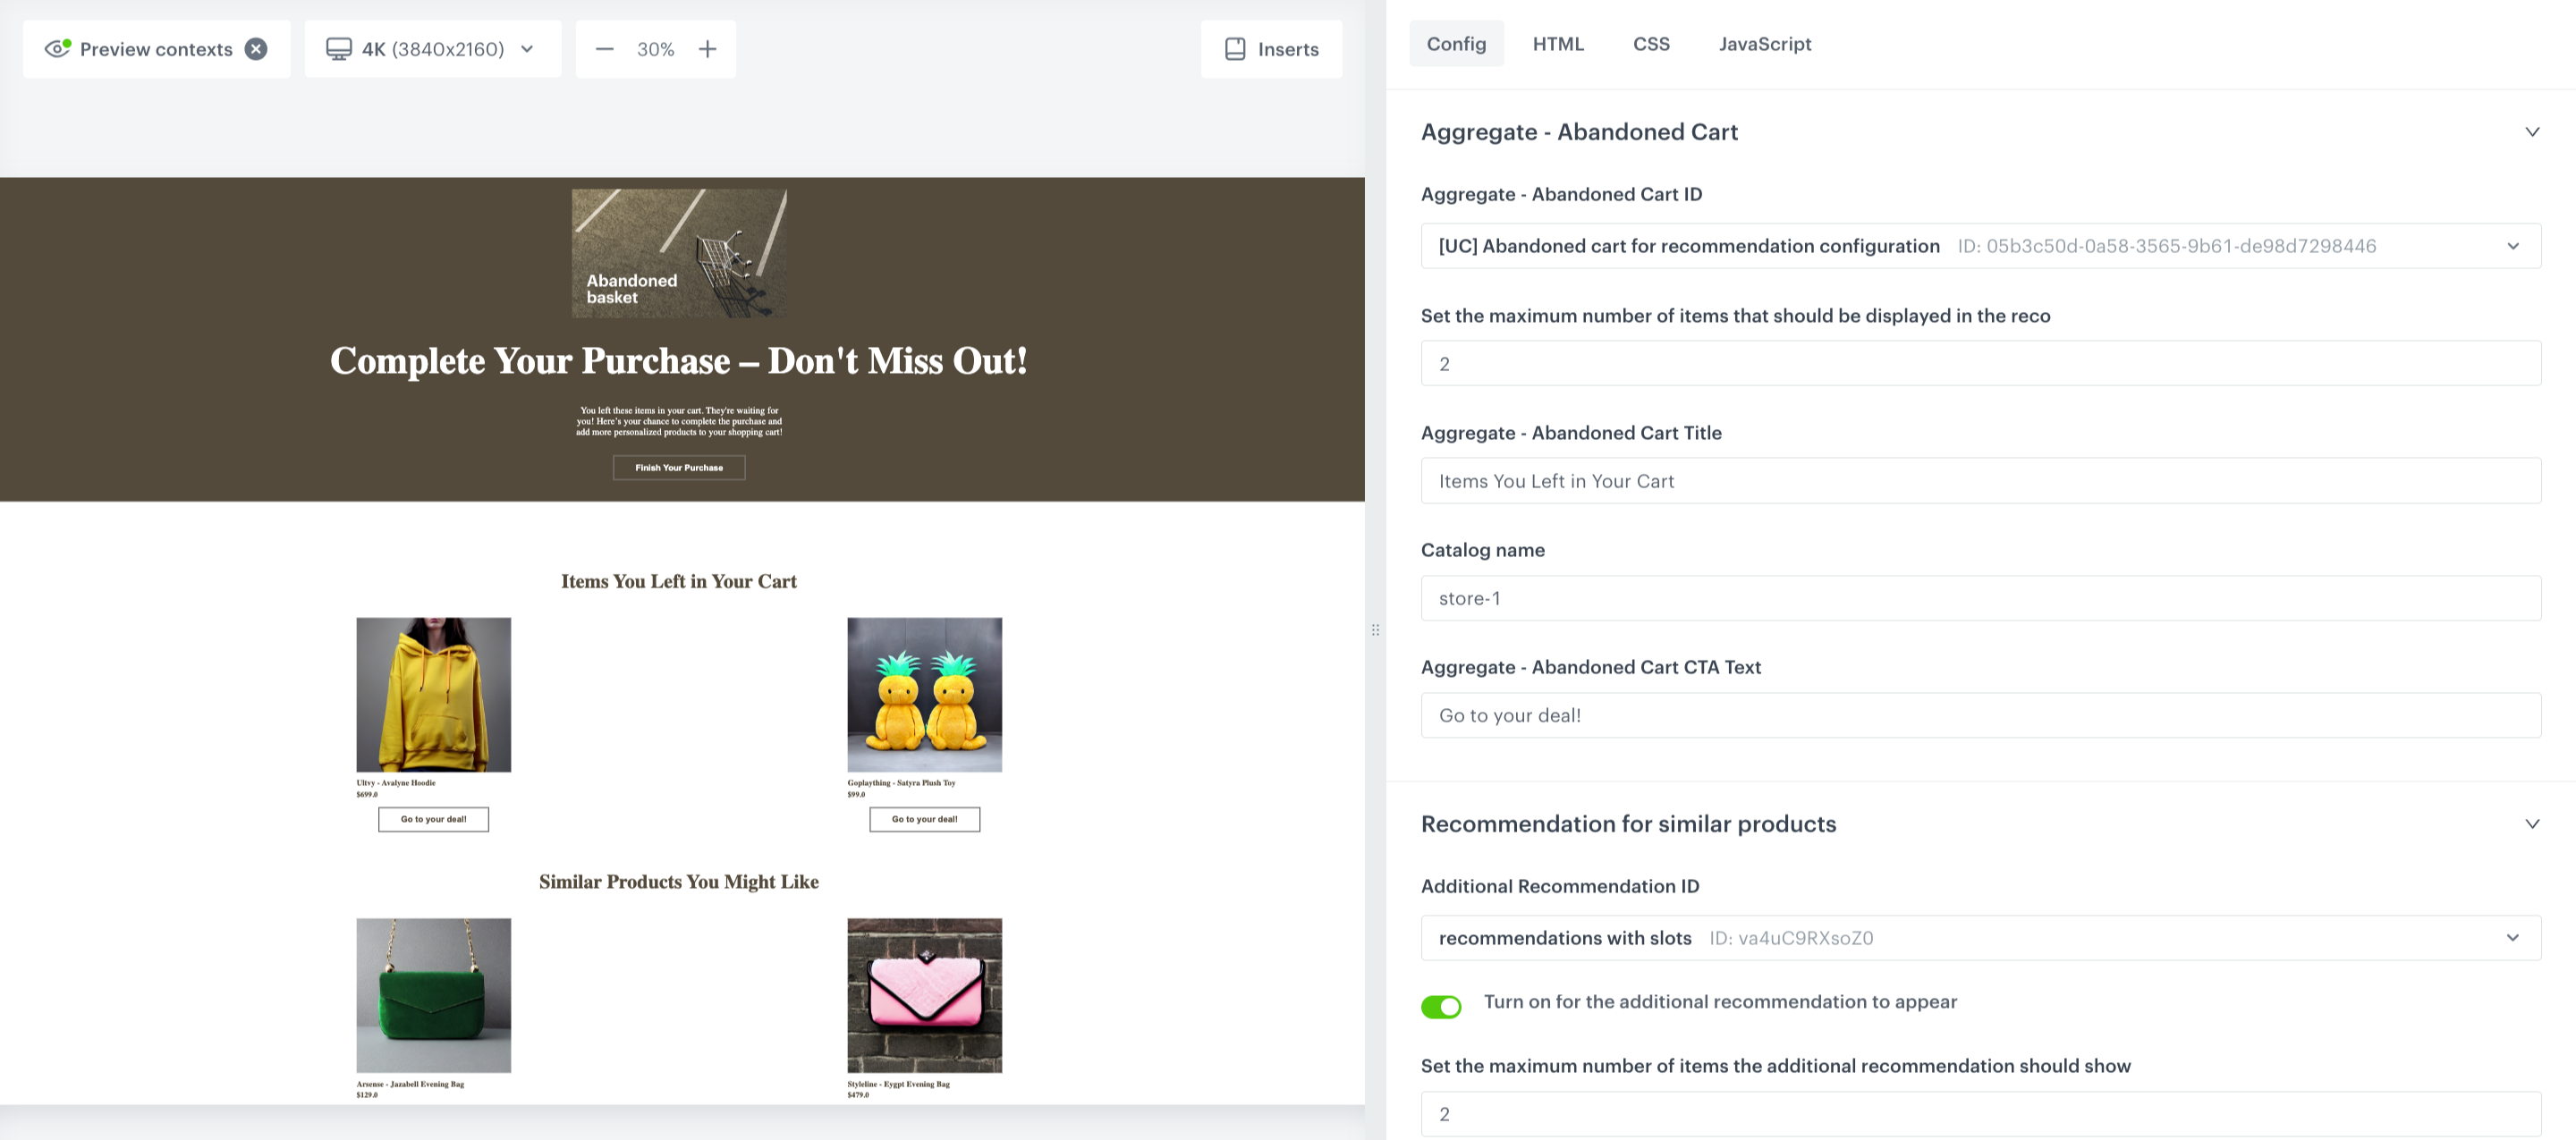
Edit form in the Config tab
The form in the Config tab is pre-filled with default values, which you can modify to suit your business needs.
-
In the Aggregate - Abandoned Cart ID, provide a unique identifier for the aggregate that retrieves the list of products from the abandoned cart. Provide the ID of the aggregate you prepared in the previous step. You can find it by typing its name or ID in the search box.
-
From Set the maximum number of items, select the maximum number of items displayed in the abandoned cart section.
-
In the Aggregate - Abandoned Cart Title, you can customize the title for the section with products from the abandoned cart.
-
In Catalog name, enter the name of the item catalog.
-
In Aggregate - Abandoned Cart CTA Text, you can customize the text for the Call to Action button that will appear in the abandoned cart section.
-
To display similar recommendations enable the Turn on for the additional recommendation to appear toggle.
-
In Additional Recommendation ID, provide a unique identifier for the recommendation. Provide the ID of the recommendation you prepared in the previous step. You can find it by typing its name or ID in the search box.
-
- From Set the maximum number of items, select the maximum number of items to be displayed for similar products recommendation section.
-
In Additional Recommendation Title, you can customize the title for the section with recommendation for similar products.
-
In Additional Recommendation CTA Text, you can customize the text for the Call to Action button that will appear in the recommendation section.
-
Optionally, you can add an additional recommendation in the Additional Recommendation section. You can specify a title, unique ID, and set the maximum number of items to be shown in this secondary recommendation section.
-
In Hero Header, you can type the header you want to display on your landing page.
-
In Hero Image, you can provide the link to the main image.
-
In Hero Paragraph, you can customize the message that will appear beneath the title.
-
In Hero Button Text, you can insert the text that will be displayed on the main CTA (Call to Action) button in the Hero section.
-
Optionally, you can adjust the style of the landing page in the Hero, Footer, General and Main sections.
-
After you make changes to the template, you can check the preview.
- Click the Preview Contexts button on the upper left side.
- Enter the ID of a customer.
- Click Apply.

Edit form in the Config tab -
If the template is ready, click Use in communication.
Additionally, the template also includes extra features such as:
- The ability to add a stroke to the Header in the Hero section;
- A switch that allows you to toggle between having a button border;
- An option to put the Header First in the Hero Section (Column Look);
- An option for your Hero Section to have a Background Image.
Define schedule settings
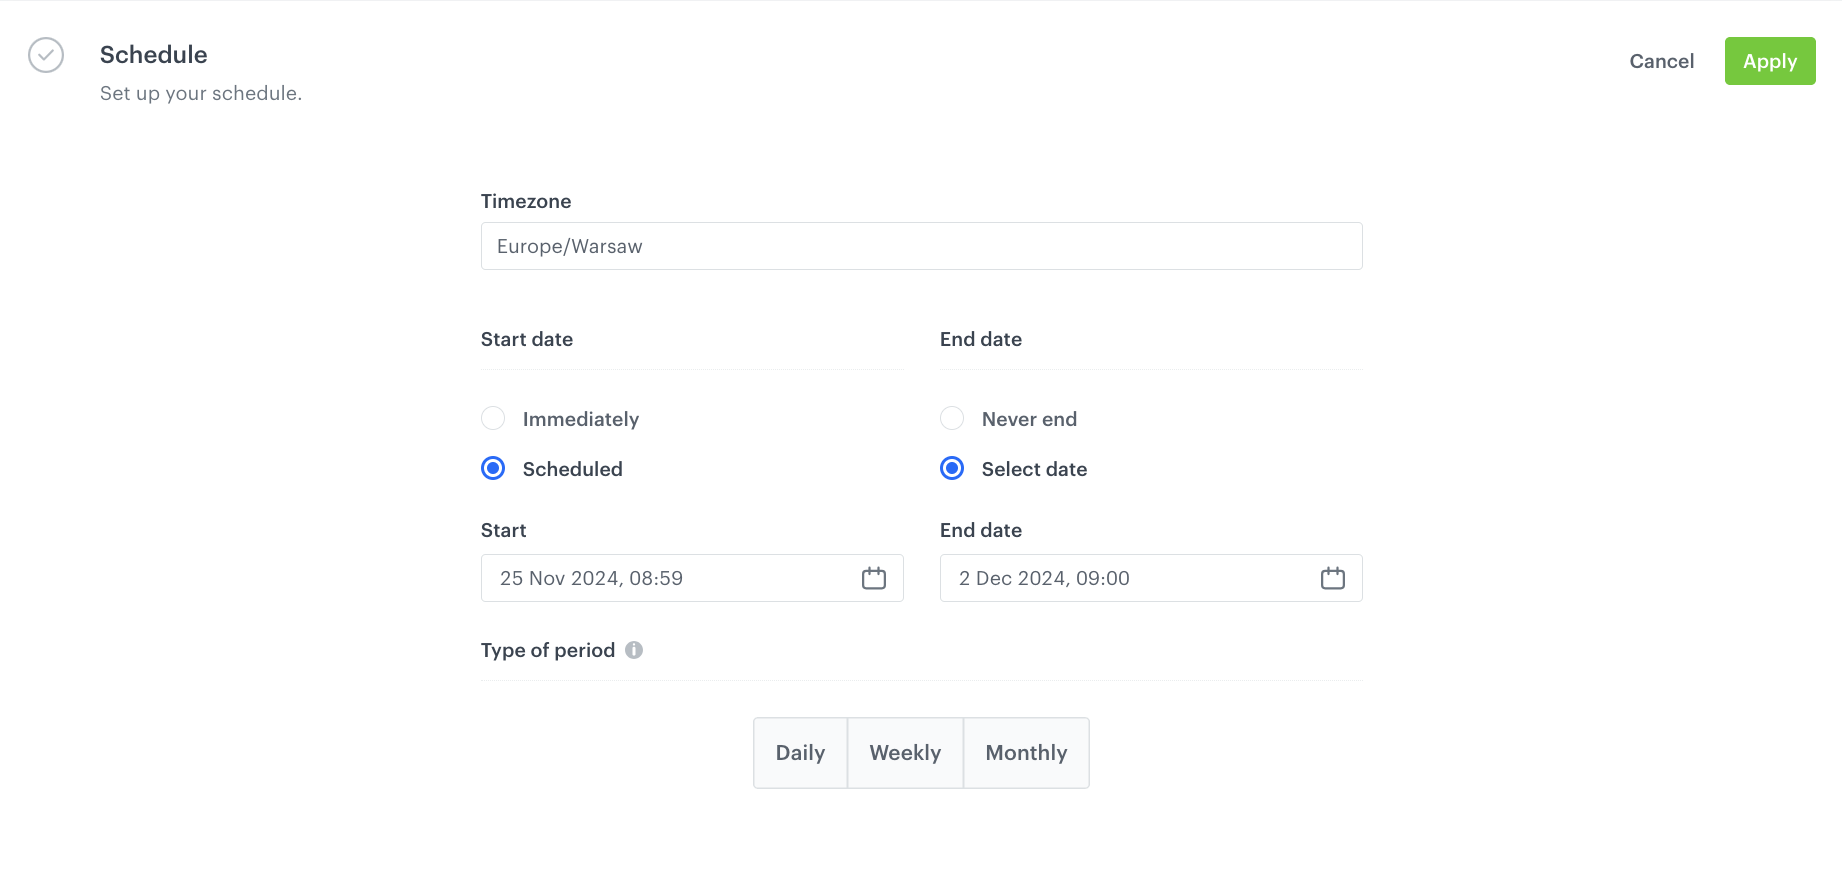
- In the Schedule section, click Define.
- Select the timezone.
- Select the time when the landing page will be active according to your business needs.
- Click Apply

Define the SEO settings
In this part of the process you can define technical details concerning search engine optimization and increase the chances of placing high in search results.
Set up the URL
In this part of the process, you will define the URL to your landing page.
- From the Domain dropdown list, select the address of your landing page.
- Optionally, if you want to add a part to the address after the domain, in Nice URL provide this part, for example,
dresses-and-skirts(don’t use a slash, it is added automatically). - In URL for redirecting users when the landing expires (optional) enter the URL to which you will redirect users after the landing page expires.
- Optionally, in Fallback URL enter the URL to which users will be redirected if your landing page is unavailable due to errors (for example, when it can’t be rendered due to Jinjava syntax error). If you leave this field empty, users will be redirected to a generic error page.
- In URL preview, you are provided with a final link to your landing page. The preview is in real time, so if you fill a domain or URL, you get the preview of the address simultaneously.
- Confirm the settings by clicking Apply.
Adjust optional settings
- In the HTTP headers section, you can add custom HTTP headers to your landing page. In the Key and Value fields, enter a header and its value, respectively.
- In the Customize section:
- you can add CSS and scripts to your landing page
- you can define the URLs to external sources or paste the snippets
- in the JS section under the Advanced options option, to enable tracking users on your landing page, you can paste the tracking code.
Save your campaign
- After you make changes to the campaign, you can check the preview. Click the Preview button on the upper right side.
- When your landing page is ready you can Save it as a draft or directly click Publish.
Create a mobile push notification
In this part of the process, create an mobile push with link to the landing page. You can use a predefined template or create your own template from scratch.
-
Go to Communication > Mobile > Templates.
-
You can use the template from the folder or create your own one using the mobile push code editor. Click New Template > Simple Push.
-
Create your mobile push in the code editor, and place there the link to the landing page created in the previous step. For more information on creating a simple mobile push, visit our User Guide.
Note:To ensure that the landing page content is personalized and rendered specifically for the customer who is being redirected, you must pass the UUID of the customer in the link. This can be done by adding
snrs_clparameter in the URL in the following ways:- by adding manually the Jinjava insert that retrieves UUID to the link, for example:
https://your.landingpage.com?snrs_cl={{customer.uuid}} - by inserting the link using
{% preparelink %}YOUR_LANDING_PAGE_URL{% endpreparelink %}tags which automatically adds thesnrs_clparameter to the link.
You can read more about customer context in landing pages in “Establishing customer context” section.
- by adding manually the Jinjava insert that retrieves UUID to the link, for example:
-
Save your template.
Create a workflow
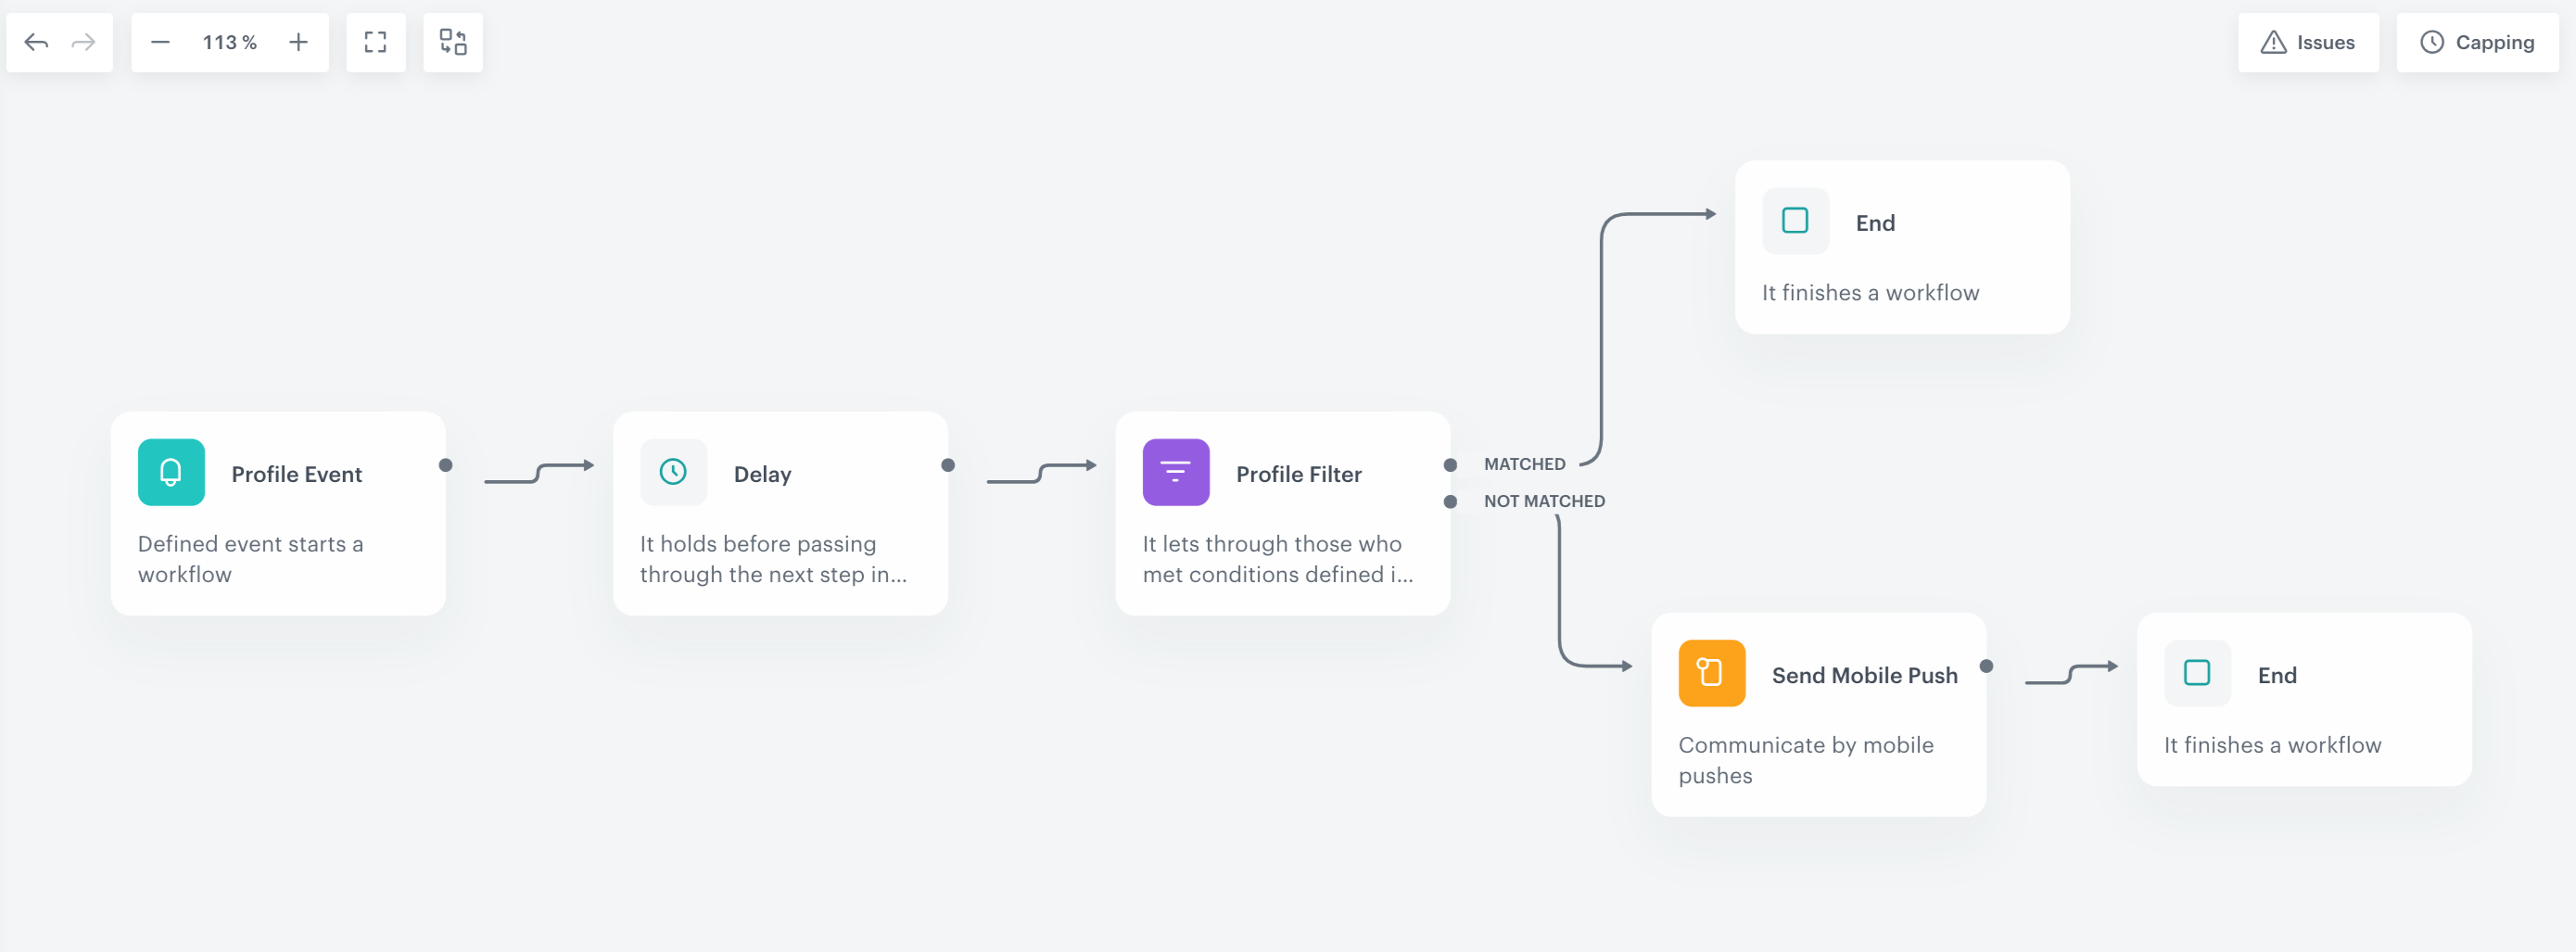
In this part of the process, you will create the workflow which sends a mobile push. The workflow will be triggered by the product.AddToCart event. The delay is defined up to 1 day. If a customer does not make a transaction within one day, we will send a mobile push with link to the abandoned cart landing page with similar product recommendations.
- Go to
 Automation > Workflows > New workflow.
 - Enter the name of the workflow.
Define the trigger node
At this stage, we will configure the conditions that launch the workflow. As a trigger, we will use the product.addToCart event.
- As the first node of the workflow, add Profile Event. In the configuration of the node:
- From the Choose event dropdown menu, choose the product.addToCart event.
- Confirm by clicking Apply.
Configure the Delay node
- Click Then and add the Delay node. In the node settings:
- In the Delay field, type
1. - From the dropdown list, choose Day.
- In the Delay field, type
- Click Apply.
Define the Profile Filter node
As the next node, choose Profile Filter to check if a customer have made a transaction in the last 24 hours.
- Click Then and add the Profile Filter node. In the node settings:
- From the Choose filter dropdown, select the
transaction.chargeevent. - Set the date range to the last 1440 minutes.
Important: Use 1440 minutes instead of 1 day – use smaller granulation, as in this case 1 day would take the time from current hour till the midnight, so such an analysis would not take into consideration all customers who meet the meet the filter conditions.
- From the Choose filter dropdown, select the
- Click Apply.
Define the Send Mobile Push
- To the Not matched path, add the Send Mobile Push node. In the node settings:
- In the Mobile push type section, choose Simple push.
- In the Content section, choose the template you prepared in the previous step.
- In the Additional parameters section, you can optionally assign parameters, which will be added to every event generated by this communication.
- In the Test section, you can optionally send a test mobile push.
- Click Apply.
Add the finishing nodes and set capping
- Add the End nodes after Send Mobile Push node and to the Matched path after the Profile Filter node.
- In the upper right corner, click Set Capping and define the limit of workflows a profile can start:
- Set Limit to 1.
- Set Time to 30 days.
- Confirm by clicking Save.
- In the upper right corner, click Save & Run.

Check the use case set up on the Synerise Demo workspace
You can check the configuration of every element of this process directly in Synerise Demo workspace:
- Aggregate that returns the list of products from the abandoned cart.
- Similar Recommendation
- Landing page with abandoned cart similar recommendations.
- Workflow sending a mobile push with the link to the landing page.
If you’re our partner or client, you already have automatic access to the Synerise Demo workspace (1590), where you can explore all the configured elements of this use case and copy them to your workspace.
If you’re not a partner or client yet, we encourage you to fill out the contact form to schedule a meeting with our representatives. They’ll be happy to show you how our demo works and discuss how you can apply this use case in your business.