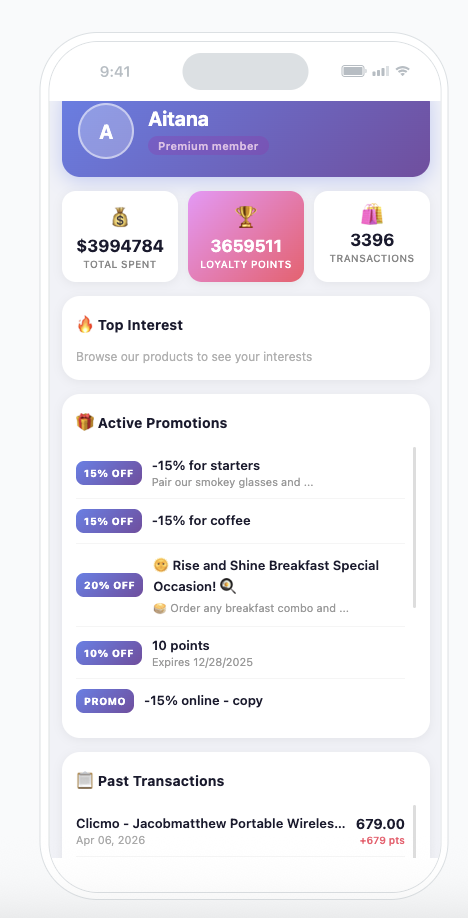
User Intelligence Panel with real-time profile data in an in-app message
Customers expect personalized, data-driven experiences that reflect their real activity and status. Instead of building separate dashboards or static profile pages, you can use Brickworks to create a single, structured data model that dynamically assembles customer profile information and serves it directly inside an in-app message.
In this use case, you will build a User Intelligence Panel — a self-updating profile view displayed as an in-app message in a mobile application. The panel aggregates the following data for each customer in real time:
- First name
- Loyalty level (derived from an expression based on loyalty points thresholds)
- Total transaction value
- Total loyalty points (earned minus expired)
- Number of transactions
- Top visited product categories
- Active promotions assigned to the customer (fetched dynamically via an External Source)
- Historical transaction list with product names, amounts, dates, and loyalty points earned
Each customer sees a personalized version of the panel based on their own behavioral and transactional data. Every new purchase or interaction automatically updates what is displayed.
This approach eliminates the need for custom frontend-backend integrations by leveraging Brickworks as the single source of truth for the profile UI.
Prerequisites
- Implement Synerise SDK in your mobile app.
- Implement the transaction events using SDK or API.
- Implement tracking code on your website.
- Have a loyalty program configured in Synerise with loyalty points earning and expiration logic, including the
points.loyaltyevent. Check this use case - Have promotions configured and assigned to customers.
- Create API keys with permissions required for the Promotions API (used in the External Source configuration for the Brickworks schema).
Process
In this use case, you will go through the following steps:
- Create aggregates for loyalty points to compute earned and expired points.
- Create aggregates for transaction and behavioral data.
- Create expressions to compute loyalty points balance and loyalty level.
- Create segmentations for loyalty tiers that define thresholds for each loyalty level.
- Create additional aggregates for transaction history to power the transaction list in the panel.
- Create a Brickworks schema that defines the data structure.
- Create a record that binds schema fields to actual data sources.
- Create an in-app campaign that renders the panel using the Brickworks schema.
Create aggregates for loyalty points
In this part of the process, you will create two aggregates based on the points.loyalty event. These aggregates are later used in the expression that calculates the customer’s net loyalty points balance, and in segmentations that determine the loyalty tier.
Aggregate for earned loyalty points sum
This aggregate sums all loyalty points ever earned by the customer.
- Go to
 Behavioral Data Hub > Live Aggregates > Create aggregate.
 - As the aggregate type, select Profile.
- Enter the name of the aggregate, for example
[UC] loyalty points sum. - Click Analyze profiles by and select Sum.
- From the Choose event dropdown list, select the
points.loyaltyevent. - As the event parameter, select
points. - Define the period to Lifetime.
- Save the aggregate.

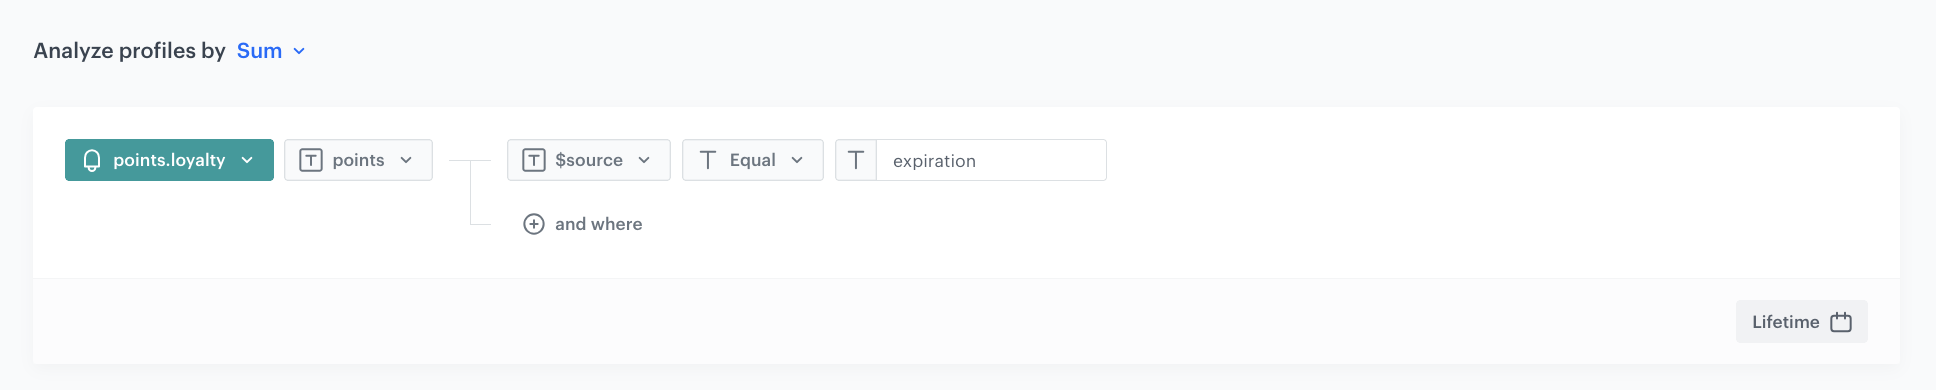
Aggregate for expired loyalty points
This aggregate sums only the loyalty points that have expired.
- Go to Behavioral Data Hub > Live Aggregates > Create aggregate.
- As the aggregate type, select Profile.
- Enter the name of the aggregate, for example
[UC] expired loyalty points. - Click Analyze profiles by and select Sum.
- From the Choose event dropdown list, select the
points.loyaltyevent. - As the event parameter, select
points. - Click the + where button and add the condition:
$sourceEqualexpiration. - Define the period to Lifetime.
- Save the aggregate.
Create aggregates for transaction and behavioral data
In this part of the process, you will create aggregates that supply transaction and browsing data to the Brickworks schema fields.
Aggregate for sum of transactions
This aggregate calculates the total monetary value of all customer transactions.
- Go to Behavioral Data Hub > Live Aggregates > Create aggregate.
- As the aggregate type, select Profile.
- Enter the name of the aggregate, for example
[UC] Sum of transactions. - Click Analyze profiles by and select Sum.
- From the Choose event dropdown list, select the
transaction.chargeevent. - As the event parameter, select
$totalAmount. - Define the period to Lifetime.
- Save the aggregate.

Aggregate for number of transactions
This aggregate counts the total number of transactions for each customer.
- Go to Behavioral Data Hub > Live Aggregates > Create aggregate.
- As the aggregate type, select Profile.
- Enter the name of the aggregate, for example
[UC] Number of transactions. - Click Analyze profiles by and select Count.
- From the Choose event dropdown list, select the
transaction.chargeevent. - Define the period to Lifetime.
- Save the aggregate.

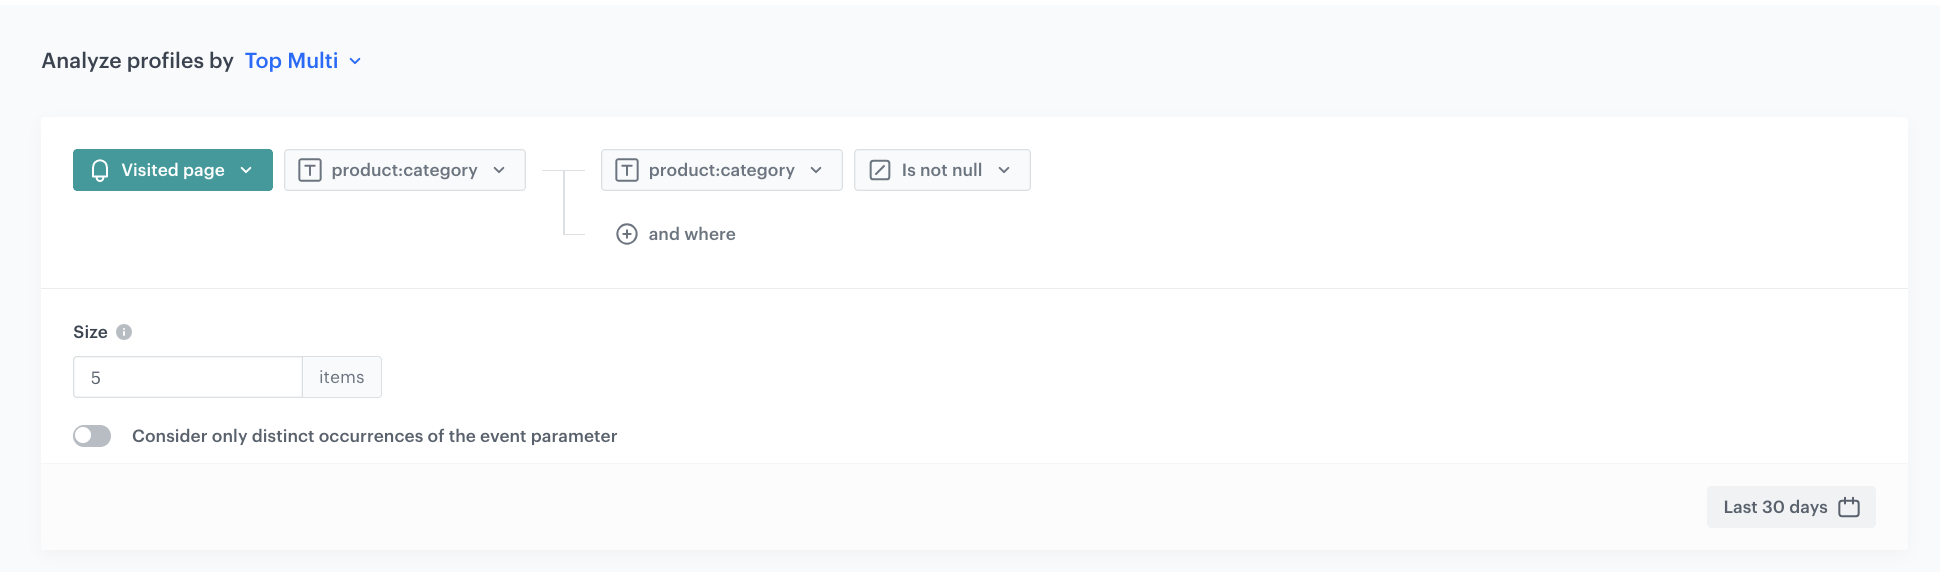
Aggregate for top 5 visited categories
This aggregate returns the most frequently visited product categories for each customer.
- Go to Behavioral Data Hub > Live Aggregates > Create aggregate.
- As the aggregate type, select Profile.
- Enter the name of the aggregate, for example
[UC] Top 5 visited categories. - Click Analyze profiles by and select Top Multi.
- From the Choose event dropdown list, select the
page.visitevent. - As the event parameter, select
product:category. - Click the + where button and add the condition that
product:categoryis not null. - In the Size field, enter
5. - Define the period to the Last 30 days.
- Save the aggregate.
Create expressions
In this part of the process, you will create expressions that compute derived values used in the Brickworks schema.
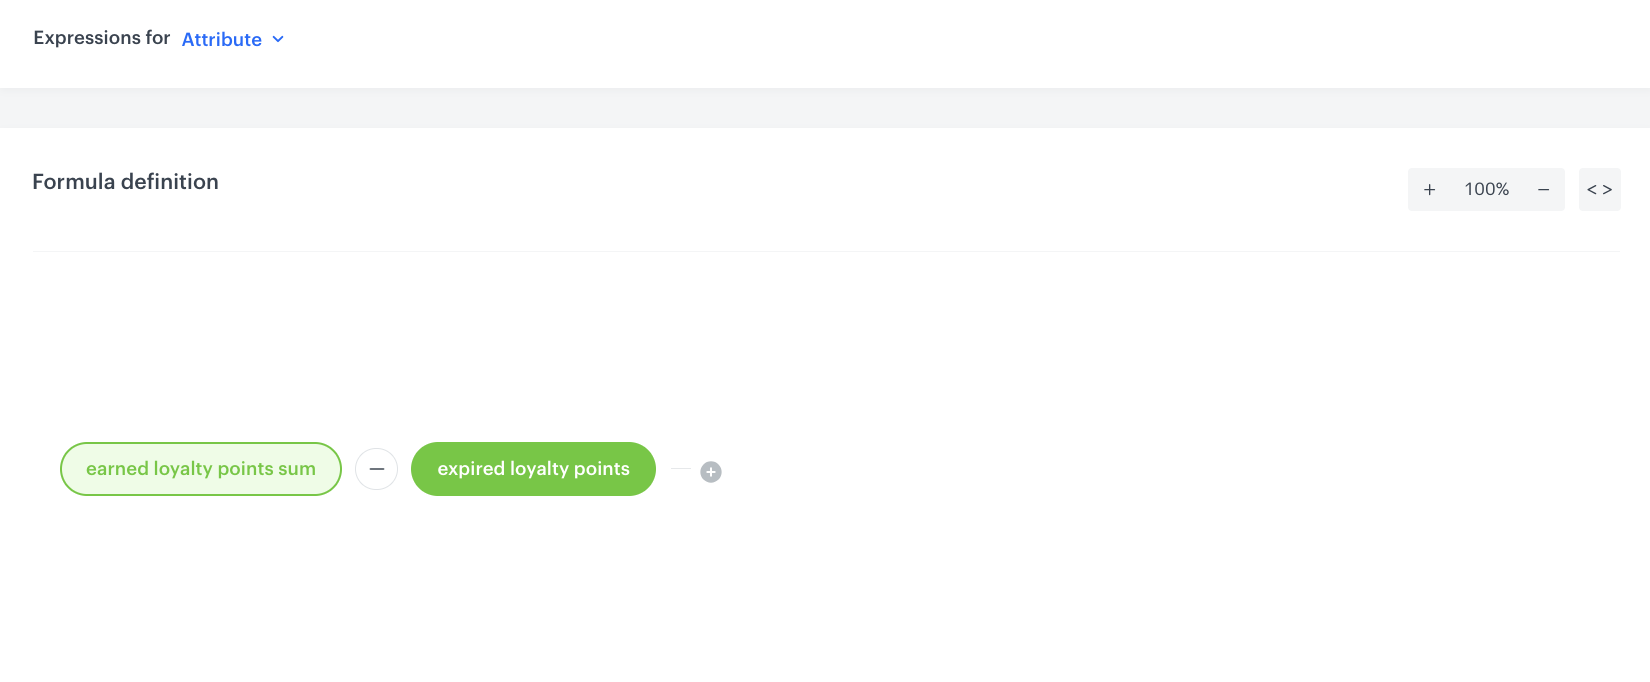
Expression for loyalty points
This expression calculates the customer’s current net loyalty points balance by subtracting expired points from the total earned points.
-
Go to
Behavioral Data Hub > Expressions > New expression. -
Enter the name of the expression, for example
[UC] Loyalty points. -
Set Expressions for to Attribute.
-
Enable Show in profile card if you want the result visible on customer profiles.
-
In the Formula definition, define the formula as:
earned loyalty points summinusexpired loyalty points
where the first operand references the
[UC] loyalty points sumaggregate and the second references the[UC] expired loyalty pointsaggregate, both created in the previous step. -
Click Publish.
Expression for loyalty level
This will expression determine the customer’s loyalty tier based on the segmentations.
Create segmentations for loyalty tiers
In this part of the process, you will create segmentations that define the loyalty point thresholds for each tier.
The loyalty tiers in this example are based on the following point thresholds:
| Tier | Condition |
|---|---|
| Base | Loyalty points sum ≤ 1 |
| Silver | Loyalty points sum > 1 AND < 4,000 |
| Gold | Loyalty points sum ≥ 4,000 AND < 10,000 |
| Premium | Loyalty points sum ≥ 10,000 |
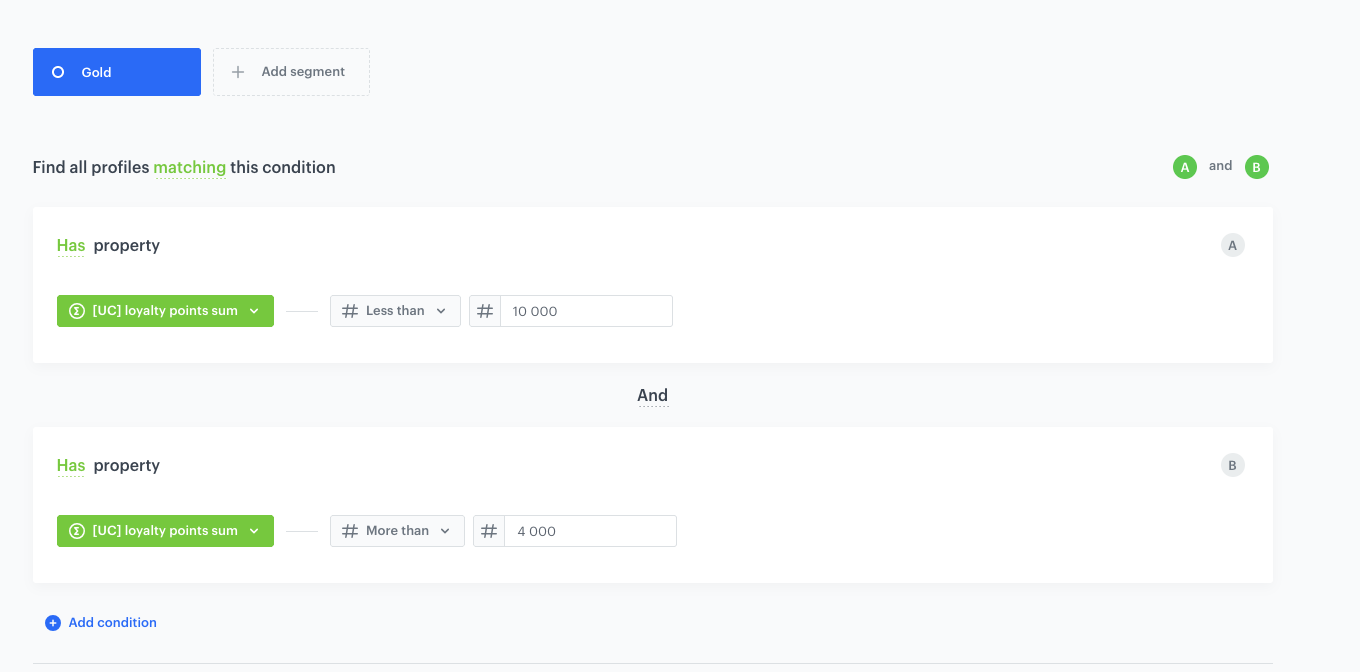
Segmentation for Gold loyalty level
This example shows how to configure a loyalty tier segmentation. The remaining tiers follow the same pattern with different thresholds.
- Go to Decision Hub > Segmentations > New segmentation.
- Enter the name of the segmentation, for example
[UC] Loyalty level - Gold. - Name the segment
Gold. - Click Add condition.
- From the dropdown list, select Has property.
- Choose the
[UC] loyalty points sumexpression. - From the Choose operator dropdown, select Less than and enter the value
10 000. - Click Add condition.
- Again select Has property and choose the
[UC] loyalty points sumexpression. - From the Choose operator dropdown, select More than and enter the value
4 000. - Connect these conditions with the And operator.
- Save the segmentation.
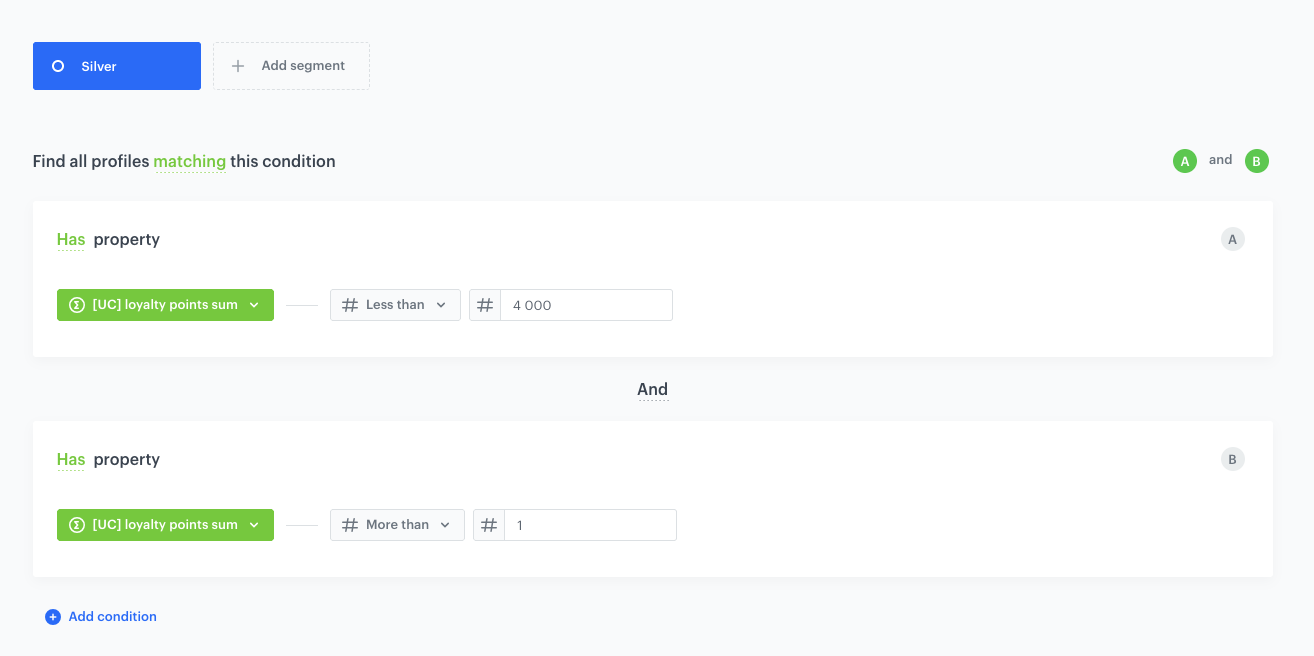
Remaining loyalty tier segmentations
Create the remaining segmentations following the same approach as above, adjusting the thresholds:
- [UC] Loyalty level - Silver:
[UC] loyalty points sumMore than1AND[UC] loyalty points sumLess than4 000.
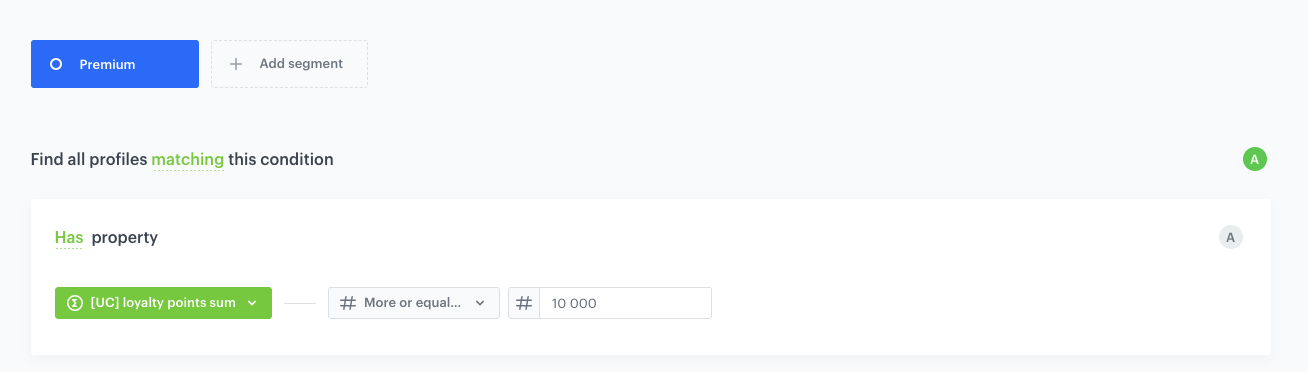
- [UC] Loyalty level - Premium:
[UC] loyalty points sumMore or equal to10 000.
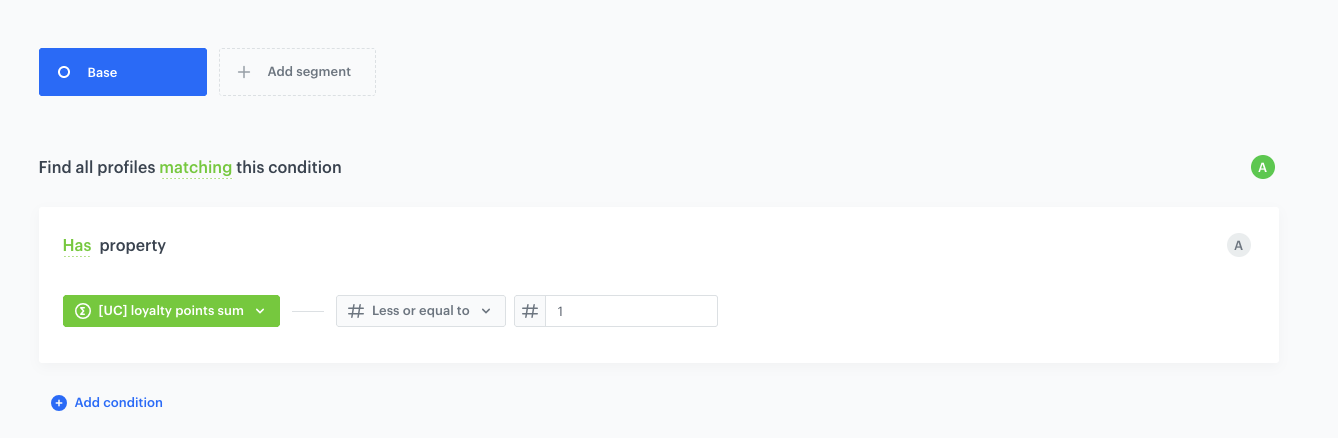
- [UC] Loyalty level - Base:
[UC] loyalty points sumLess or equal to1.
Create Expression with Loyalty Tiers
For this expression use segmentation created in the previous step.
-
Go to
Behavioral Data Hub > Expressions > New expression. -
Enter the name of the expression, for example
[UC] Loyalty level. -
Set Expressions for to Attribute.
-
Enable Show in profile card if desired.
-
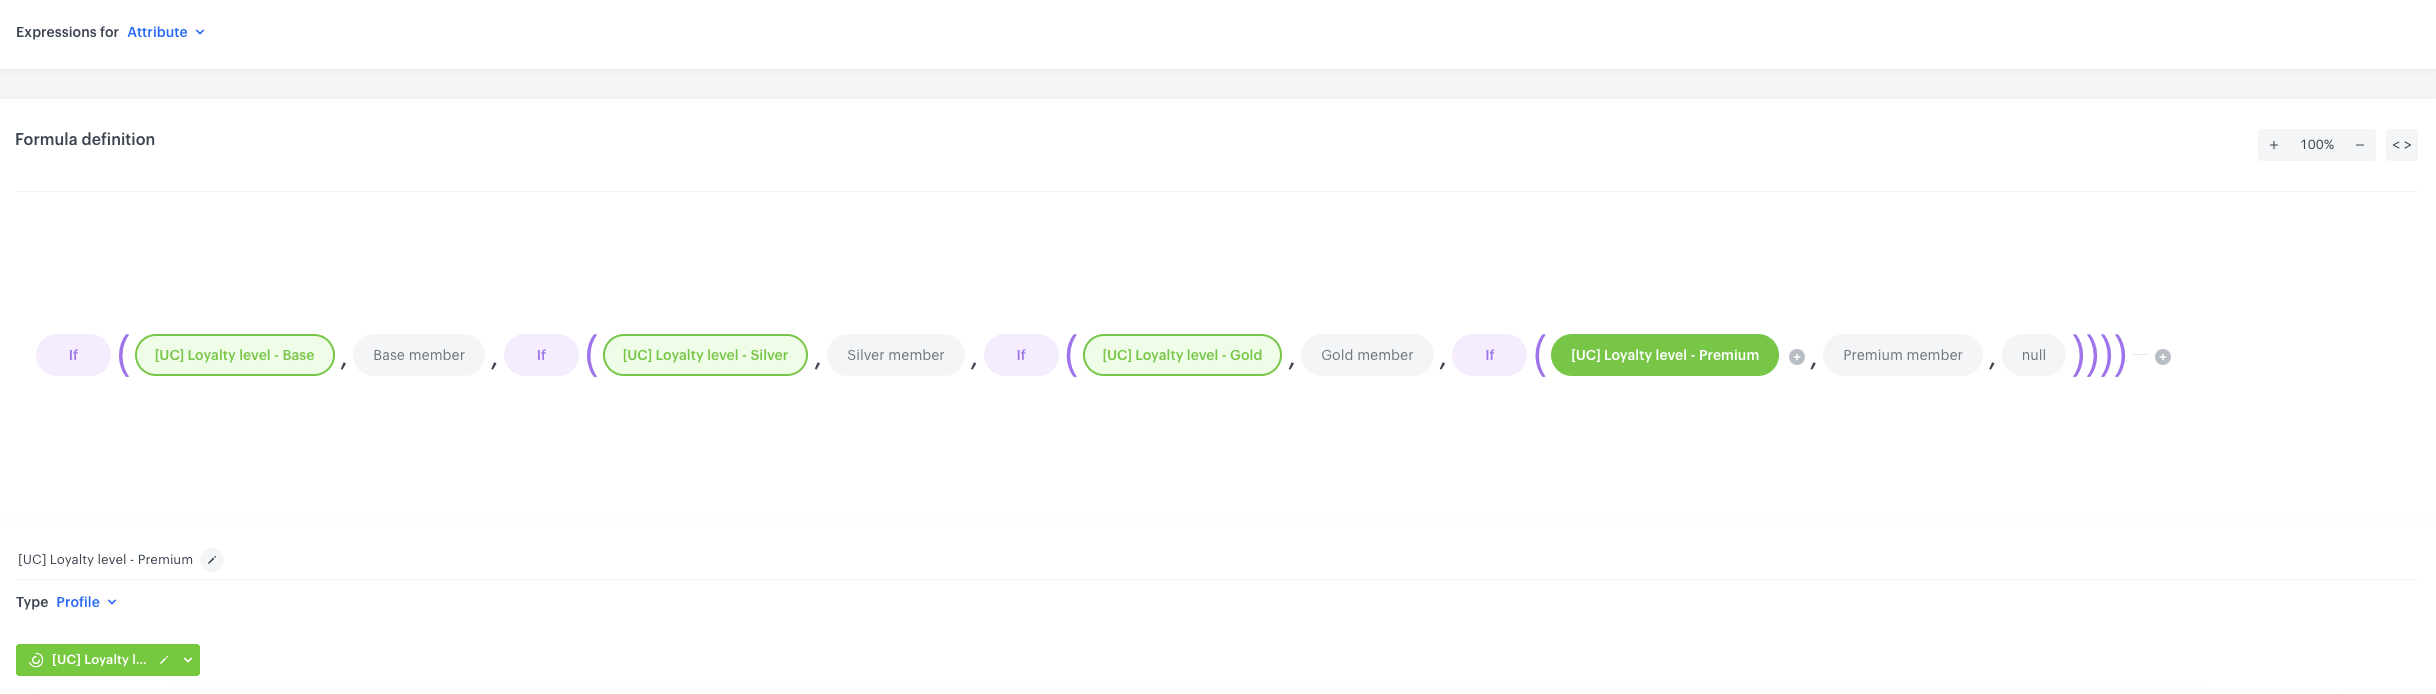
In the Formula definition, build a conditional formula using the following logic:
- If
[UC] Loyalty level - Base→ returnBase member - If
[UC] Loyalty level - Silver→ returnSilver member - If
[UC] Loyalty level - Gold→ returnGold member - If
[UC] Loyalty level - Premium→ returnPremium member - Otherwise → return
null
Each condition references the corresponding segmentation created in the next step.
- If
-
Click Publish.
Create aggregates for transaction history
The transaction history section of the panel requires six additional aggregates that are referenced inside a Jinjava code field in the Brickworks schema. Each aggregate collects a specific dimension of transaction data so it can be combined into a structured JSON list.
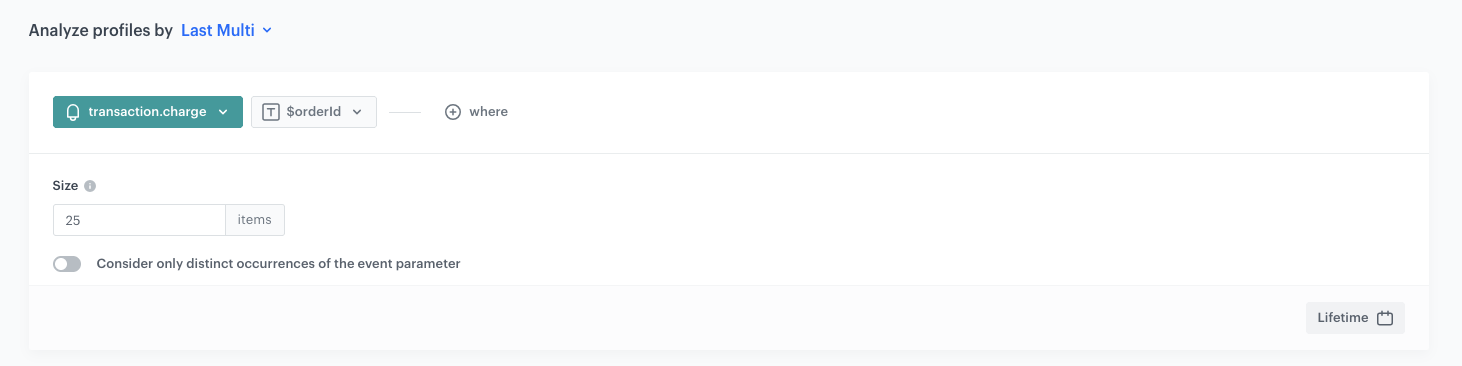
Aggregate for transaction IDs
Collects the order IDs of the customer’s transactions.
- Go to Behavioral Data Hub > Live Aggregates > Create aggregate.
- As the aggregate type, select Profile.
- Enter the name of the aggregate, for example
[UC] Transaction IDs. - Click Analyze profiles by and select Last Multi.
- From the Choose event dropdown list, select the
transaction.chargeevent. - As the event parameter, select
$orderId. - In the Size field, enter
25. - Define the period to Lifetime.
- Save the aggregate.
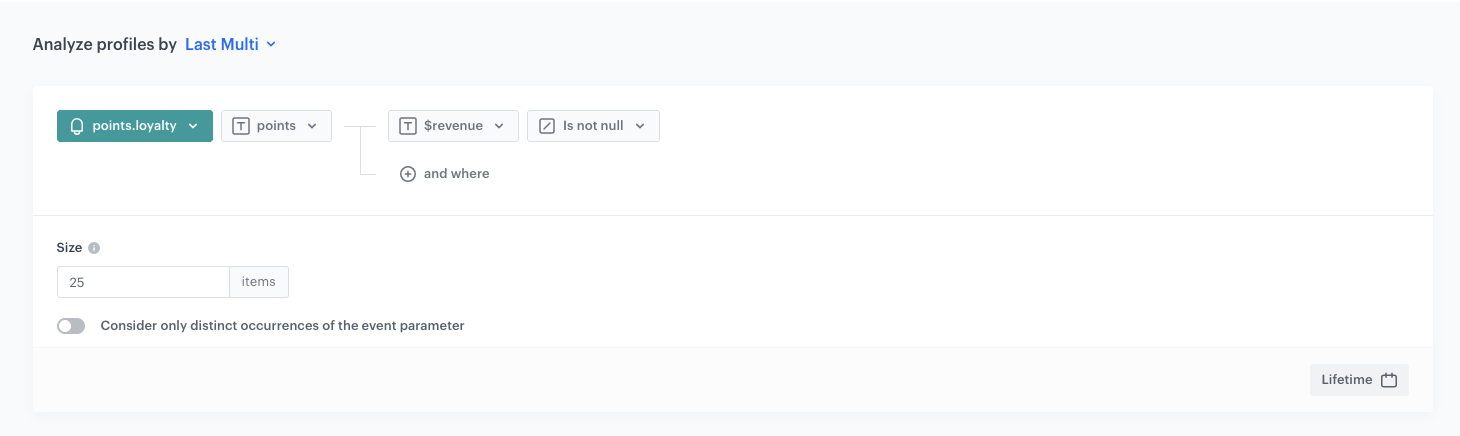
Aggregate for transaction loyalty points
Collects the loyalty points associated with each transaction.
- Go to Behavioral Data Hub > Live Aggregates > Create aggregate.
- As the aggregate type, select Profile.
- Enter the name of the aggregate, for example
[UC] Transaction loyalty points. - Click Analyze profiles by and select Last Multi.
- From the Choose event dropdown list, select the
points.loyaltyevent. - As the event parameter, select
points. - Click the + where button and add the condition:
$revenueIs not null. - In the Size field, enter
25. - Define the period to Lifetime.
- Save the aggregate.
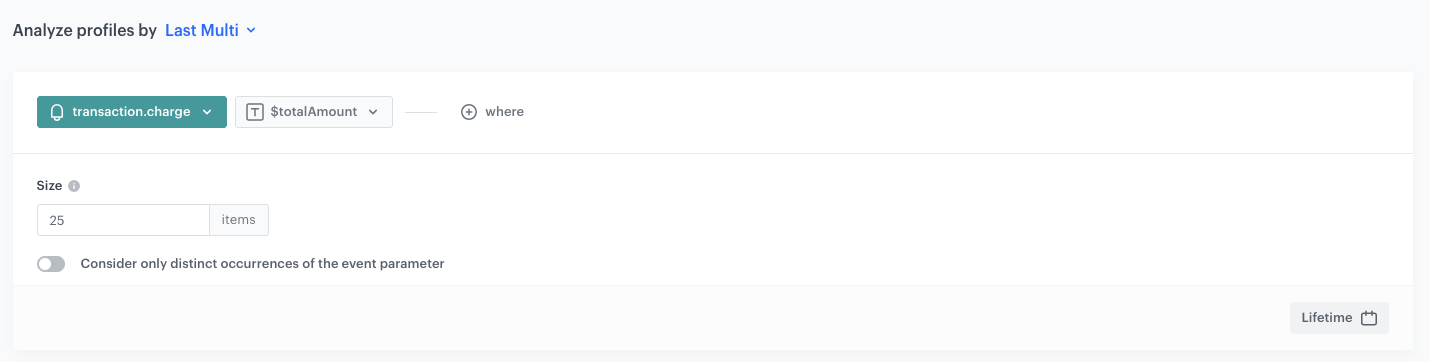
Aggregate for transaction amounts
Collects the monetary amount of each transaction.
- Go to Behavioral Data Hub > Live Aggregates > Create aggregate.
- As the aggregate type, select Profile.
- Enter the name of the aggregate, for example
[UC] Transaction amounts. - Click Analyze profiles by and select Last Multi.
- From the Choose event dropdown list, select the
transaction.chargeevent. - As the event parameter, select
$totalAmount. - In the Size field, enter
25. - Define the period to Lifetime.
- Save the aggregate.
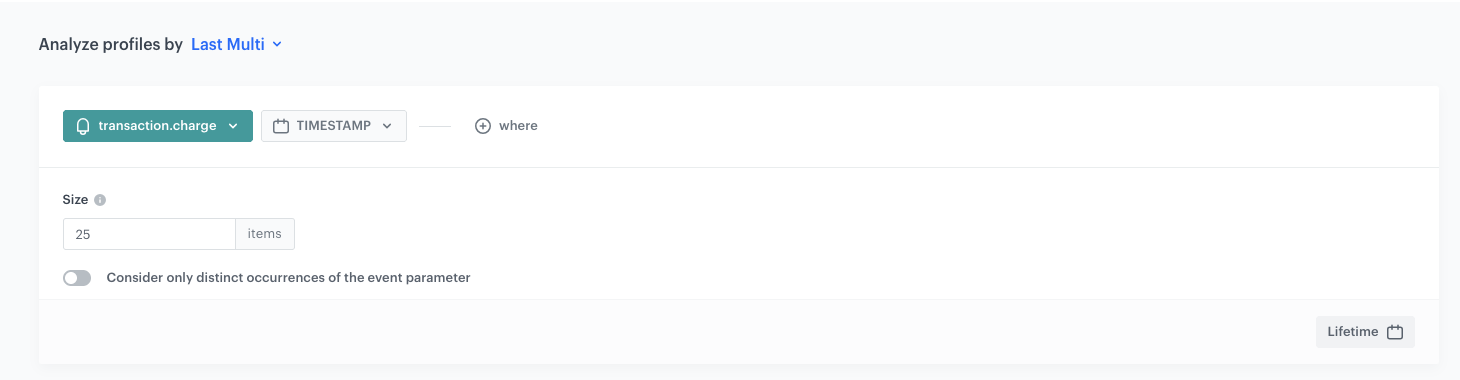
Aggregate for transaction dates
Collects the timestamps of each transaction.
- Go to Behavioral Data Hub > Live Aggregates > Create aggregate.
- As the aggregate type, select Profile.
- Enter the name of the aggregate, for example
[UC] Transaction dates. - Click Analyze profiles by and select Last Multi.
- From the Choose event dropdown list, select the
transaction.chargeevent. - As the event parameter, select
TIMESTAMP. - In the Size field, enter
25. - Define the period to Lifetime.
- Save the aggregate.
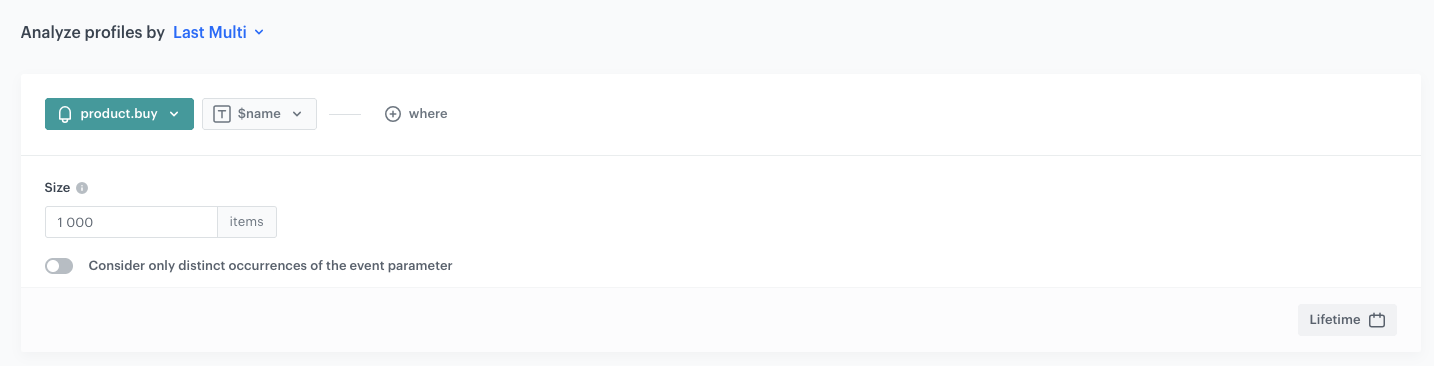
Aggregate for product names from transactions
Collects the product names from individual bought items.
- Go to Behavioral Data Hub > Live Aggregates > Create aggregate.
- As the aggregate type, select Profile.
- Enter the name of the aggregate, for example
[UC] Transaction product names. - Click Analyze profiles by and select Last Multi.
- From the Choose event dropdown list, select the
product.buyevent. - As the event parameter, select
$name. - In the Size field, enter
1 000. - Define the period to Lifetime.
- Save the aggregate.
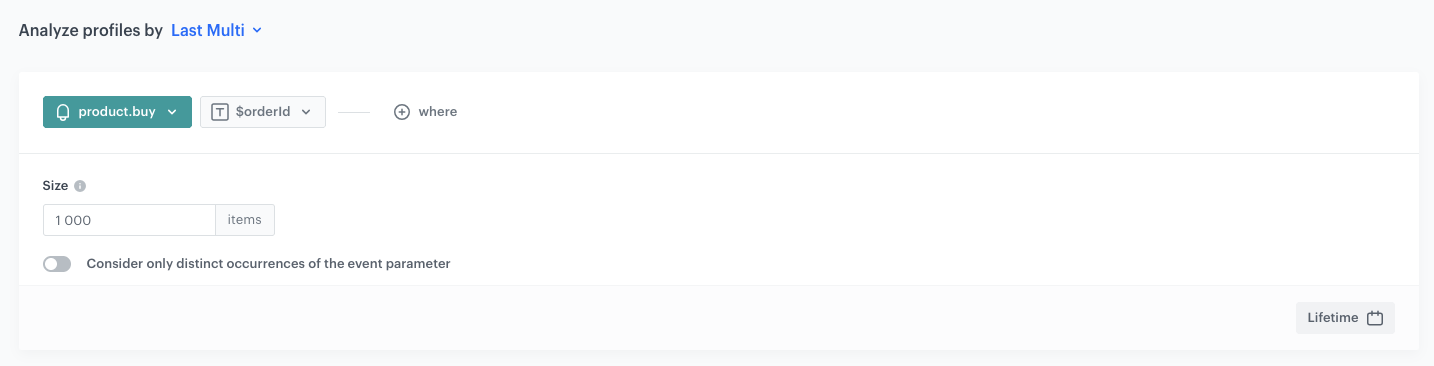
Aggregate for order IDs from product buy events
Collects the order IDs associated with each product buy event, so products can be grouped by transaction.
- Go to Behavioral Data Hub > Live Aggregates > Create aggregate.
- As the aggregate type, select Profile.
- Enter the name of the aggregate, for example
[UC] Product buy order IDs. - Click Analyze profiles by and select Last Multi.
- From the Choose event dropdown list, select the
product.buyevent. - As the event parameter, select
$orderId. - In the Size field, enter
1 000. - Define the period to Lifetime.
- Save the aggregate.
Create a Brickworks schema
In this part of the process, you will create a Brickworks Simple schema that defines the structure of the User Intelligence Panel. The schema specifies the field names, types, and configuration options. The actual binding of fields to data sources (expressions, aggregates, profile attributes) happens at the record level, where values are resolved via API at generation time for the requesting customer.
- Go to Data Modeling Hub > Brickworks > New schema.
- Choose Simple Schema.
- Enter the Display name, for example
User Intelligence Panel. - Optionally, add a description.
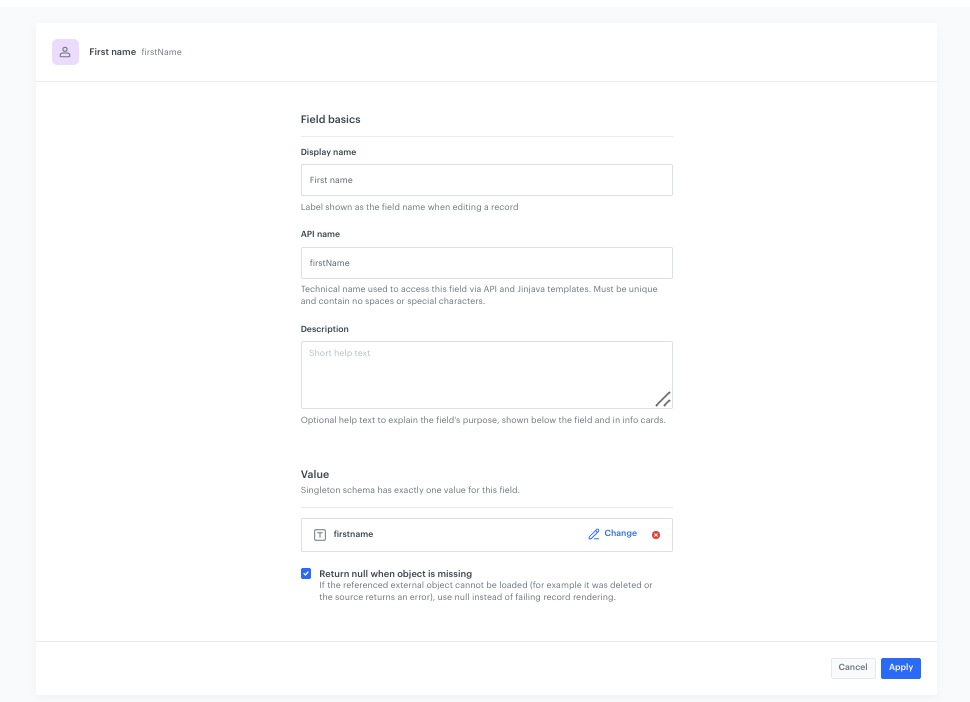
Add First name field
- Click Add new field and choose the appropriate field type.
- In the Field basics section, complete the fields:
- Display name:
First name - API name:
firstName
- Display name:
- In the Configuration section, enable the Return null when object is missing checkbox.
- In the Validation section, enable the Required field checkbox.
- Click Apply.
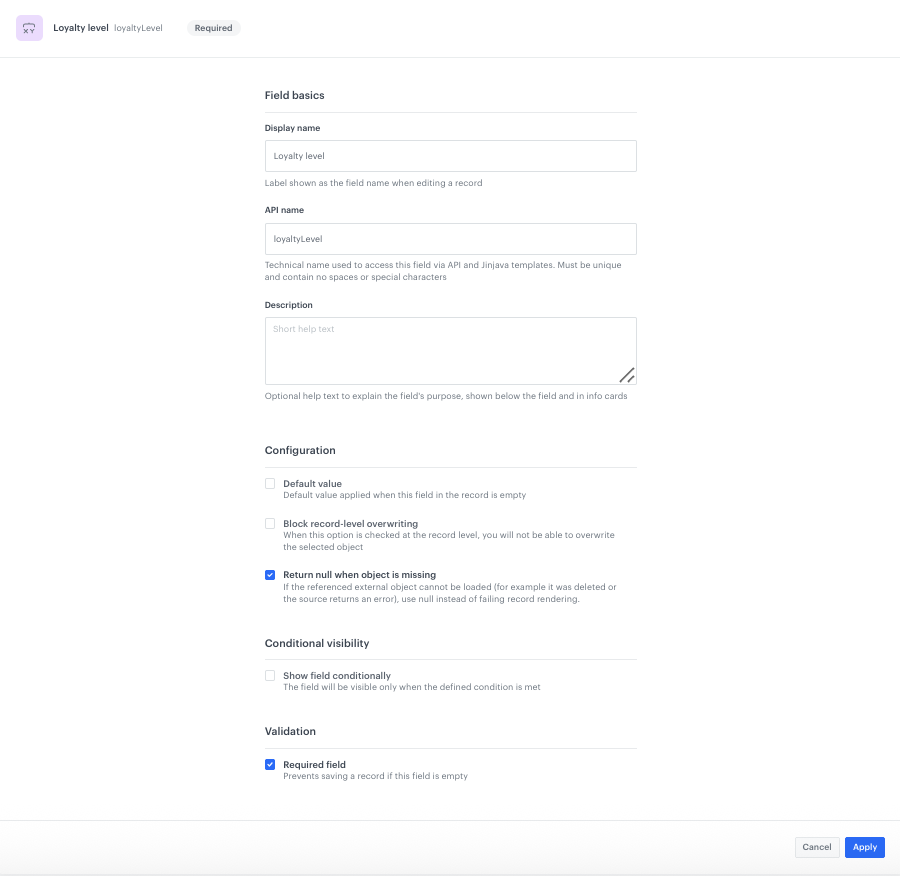
Add Loyalty level field
- Click Add new field and choose the appropriate field type.
- In the Field basics section, complete the fields:
- Display name:
Loyalty level - API name:
loyaltyLevel
- Display name:
- In the Configuration section, enable the Return null when object is missing checkbox.
- In the Validation section, enable the Required field checkbox.
- Click Apply.
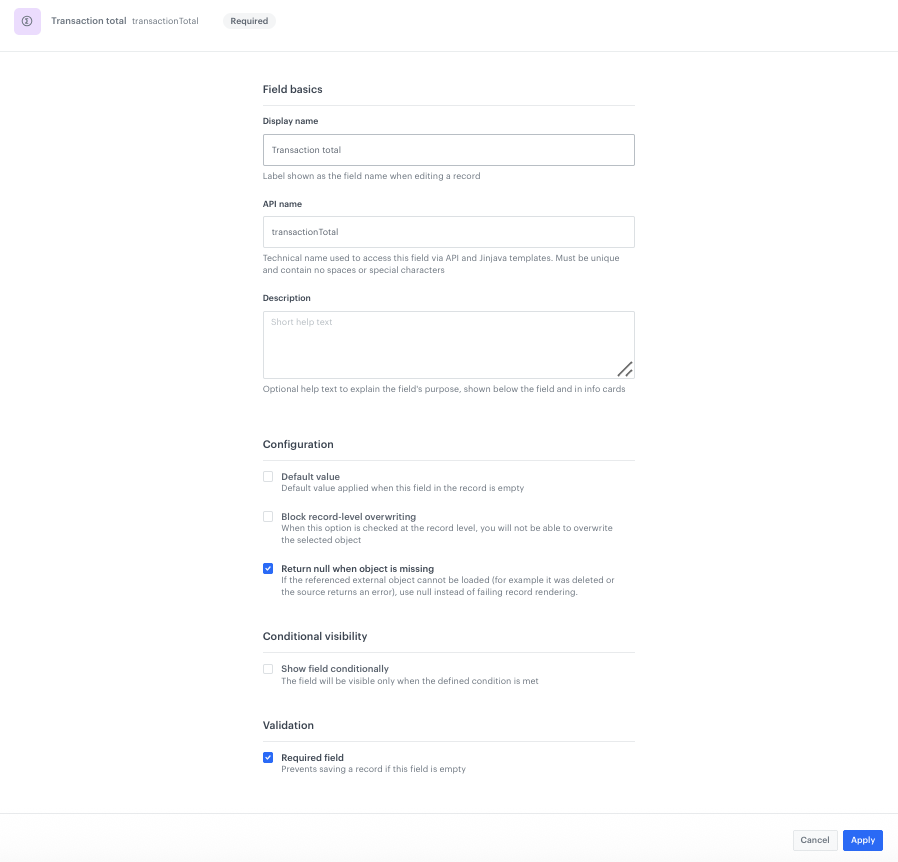
Add Transaction total field
- Click Add new field and choose the appropriate field type.
- In the Field basics section, complete the fields:
- Display name:
Transaction total - API name:
transactionTotal
- Display name:
- In the Configuration section, enable the Return null when object is missing checkbox.
- In the Validation section, enable the Required field checkbox.
- Click Apply.
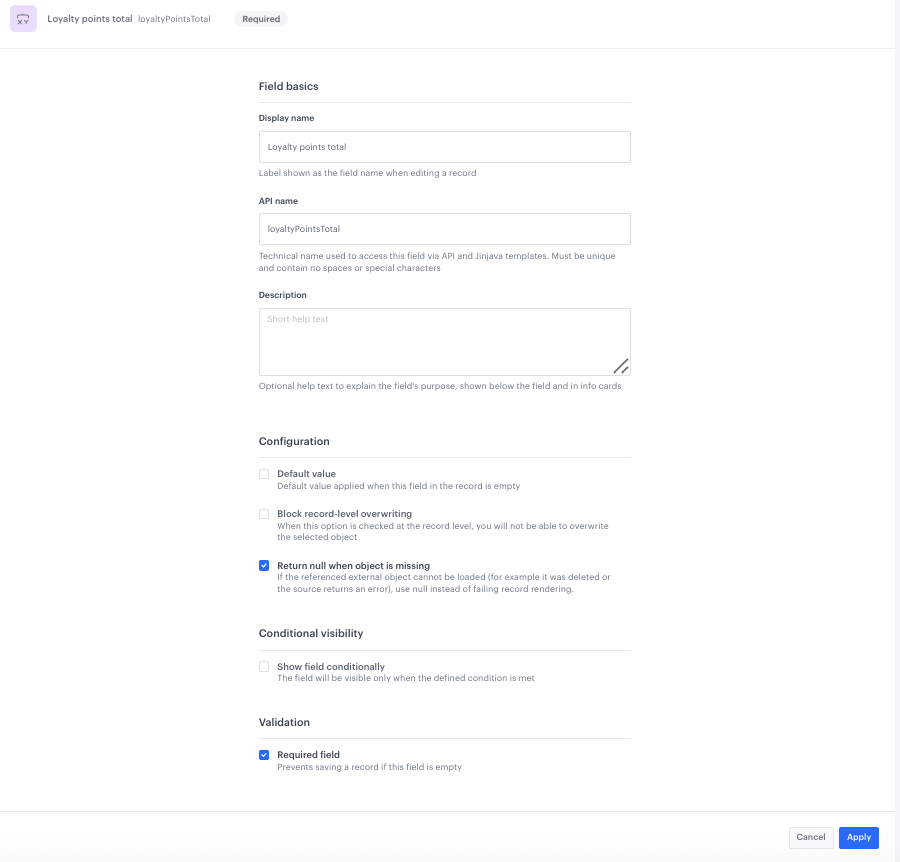
Add Loyalty points total field
- Click Add new field and choose the appropriate field type.
- In the Field basics section, complete the fields:
- Display name:
Loyalty points total - API name:
loyaltyPointsTotal
- Display name:
- In the Configuration section, enable the Return null when object is missing checkbox.
- In the Validation section, enable the Required field checkbox.
- Click Apply.
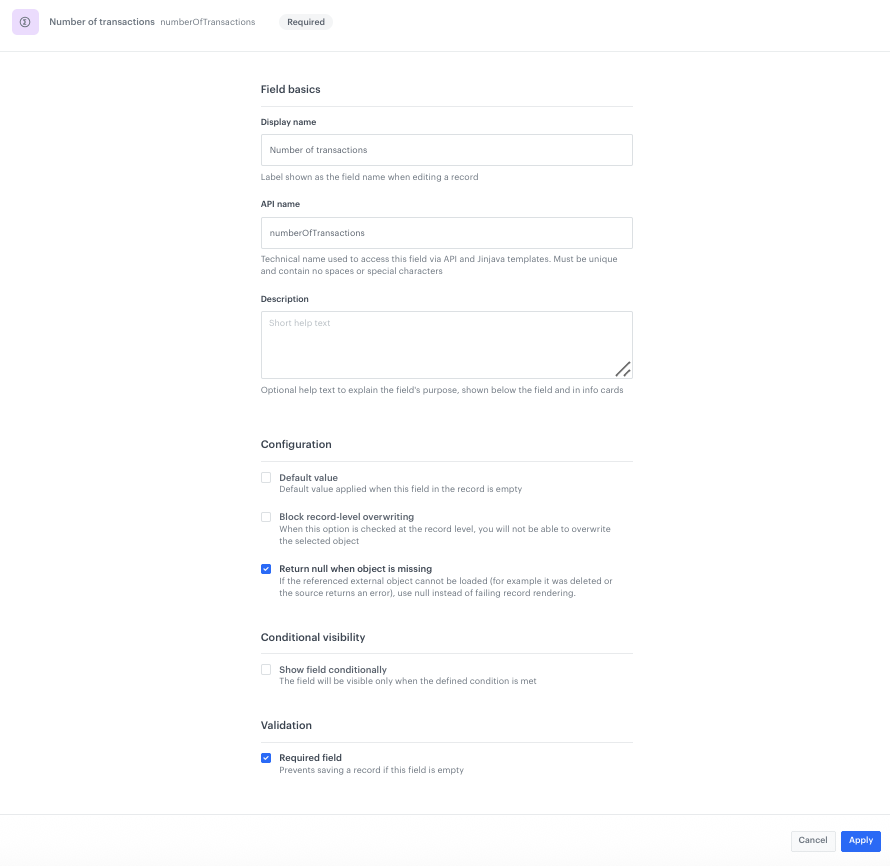
Add Number of transactions field
- Click Add new field and choose the appropriate field type.
- In the Field basics section, complete the fields:
- Display name:
Number of transactions - API name:
numberOfTransactions
- Display name:
- In the Configuration section, enable the Return null when object is missing checkbox.
- In the Validation section, enable the Required field checkbox.
- Click Apply.
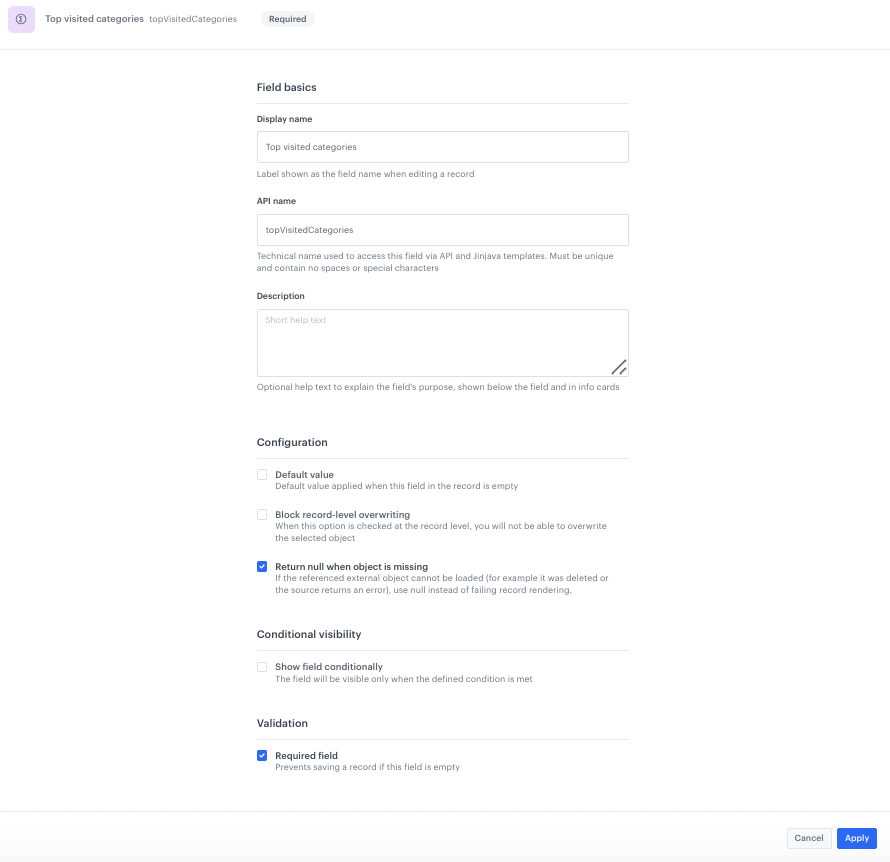
Add Top visited categories field
- Click Add new field and choose the appropriate field type.
- In the Field basics section, complete the fields:
- Display name:
Top visited categories - API name:
topVisitedCategories
- Display name:
- In the Configuration section, enable the Return null when object is missing checkbox.
- In the Validation section, enable the Required field checkbox.
- Click Apply.
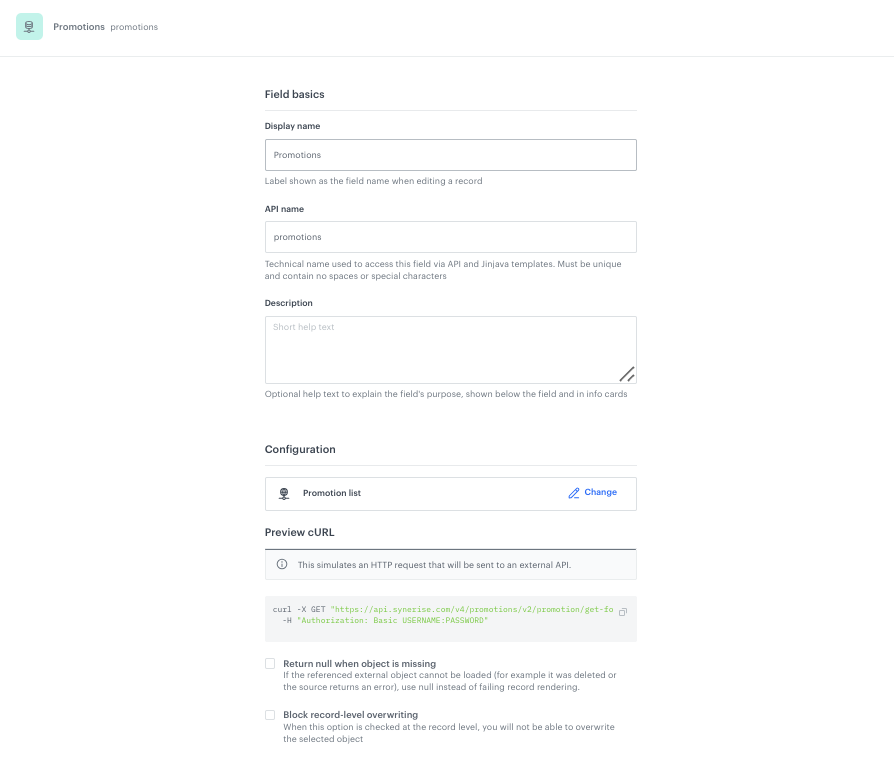
Add Promotions field
This field uses the External Source type to dynamically fetch the customer’s active promotions from the Synerise Promotions API. Unlike other fields in the schema which only define a name and configuration, this field includes a data source configuration directly — it specifies an HTTP request that will be executed at generation time to retrieve the current list of promotions assigned to the customer.
- Click Add new field and choose External Data > Promotion list.
- In the Field basics section, complete the fields:
- Display name:
Promotions - API name:
promotions
- Display name:
- In the Configuration section, the field is preconfigured as a Promotion list. The Preview cURL section shows the HTTP request that will be sent:
curl -X GET "https://api.synerise.com/v4/promotions/v2/promotion/get-for-client/clientId/{{customer.id}}?status=ACTIVE,ASSIGNED&fields=code,name,expireAt,discountType,discountValue,uuid,description" \ -H "Authorization: Basic USERNAME:PASSWORD" - Click Apply.
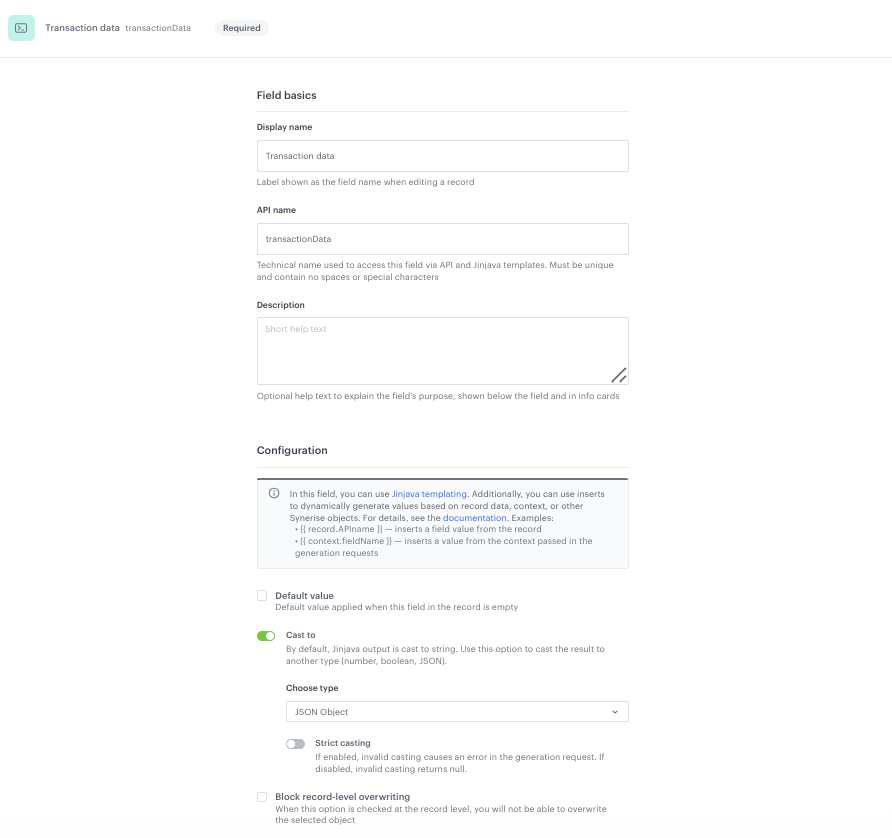
Add Transaction data field
This field uses Jinjava code that is executed at generation time. Inside the Jinjava code, six aggregates created in the transaction history step are called directly by their hashes using the {% aggregate HASH %} syntax. These aggregates are not configured as separate fields in the schema — they exist only inside this Jinjava code, which combines their results into a single structured JSON output.
- Click Add new field and choose Jinjava code.
- In the Field basics section, complete the fields:
- Display name:
Transaction data - API name:
transactionData
- Display name:
- In the Configuration section:
- Enable the Cast to toggle and select JSON Object as the type.
- In the Validation section, enable the Required field checkbox.
- In the Jinjava code editor, paste the following code. Replace the aggregate hashes with the hashes of the aggregates you created in the transaction history step:
{% set txn_ids = [] %}{% set txn_points = [] %}{% set txn_amounts = [] %}{% set txn_dates = [] %}{% set buy_names = [] %}{% set buy_order_ids = [] %}{% aggregate TRANSACTION_IDS_AGGREGATE_HASH %}{%- for res in aggregate_result -%}{% do txn_ids.append(res) %}{%- endfor -%}{% endaggregate %}{% aggregate TRANSACTION_POINTS_AGGREGATE_HASH %}{%- for res in aggregate_result -%}{% do txn_points.append(res) %}{%- endfor -%}{% endaggregate %}{% aggregate TRANSACTION_AMOUNTS_AGGREGATE_HASH %}{%- for res in aggregate_result -%}{% do txn_amounts.append(res) %}{%- endfor -%}{% endaggregate %}{% aggregate TRANSACTION_DATES_AGGREGATE_HASH %}{%- for res in aggregate_result -%}{% set splitDate = res|split(':') %}{% set splitDateLength = splitDate|length %}{% set finalDate = splitDate[0:splitDateLength-1]|join(':') ~ splitDate[splitDateLength-1] %}{% set finalDateFormatted = datetimeformat(finalDate|strtotime("yyyy-MM-dd'T'HH:mm:ss.SSSZ"), '%b %d, %Y') %}{% do txn_dates.append(finalDateFormatted) %}{%- endfor -%}{% endaggregate %}{% aggregate PRODUCT_NAMES_AGGREGATE_HASH %}{%- for res in aggregate_result -%}{% do buy_names.append(res) %}{%- endfor -%}{% endaggregate %}{% aggregate PRODUCT_ORDER_IDS_AGGREGATE_HASH %}{%- for res in aggregate_result -%}{% do buy_order_ids.append(res) %}{%- endfor -%}{% endaggregate %}{% set orders = [] %}{% for i in range(txn_ids | length) %}{% set order_id = txn_ids[i] %}{% set products = [] %}{% for j in range(buy_order_ids | length) %}{% if buy_order_ids[j] == order_id %}{% set _ = products.append(buy_names[j]) %}{% endif %}{% endfor %}{% set _ = orders.append({'orderId': order_id,'date': txn_dates[i],'amount': txn_amounts[i],'loyaltyPoints': txn_points[i],'products': products}) %}{% endfor %}{{ orders | reverse | tojson }}
- Click Apply.
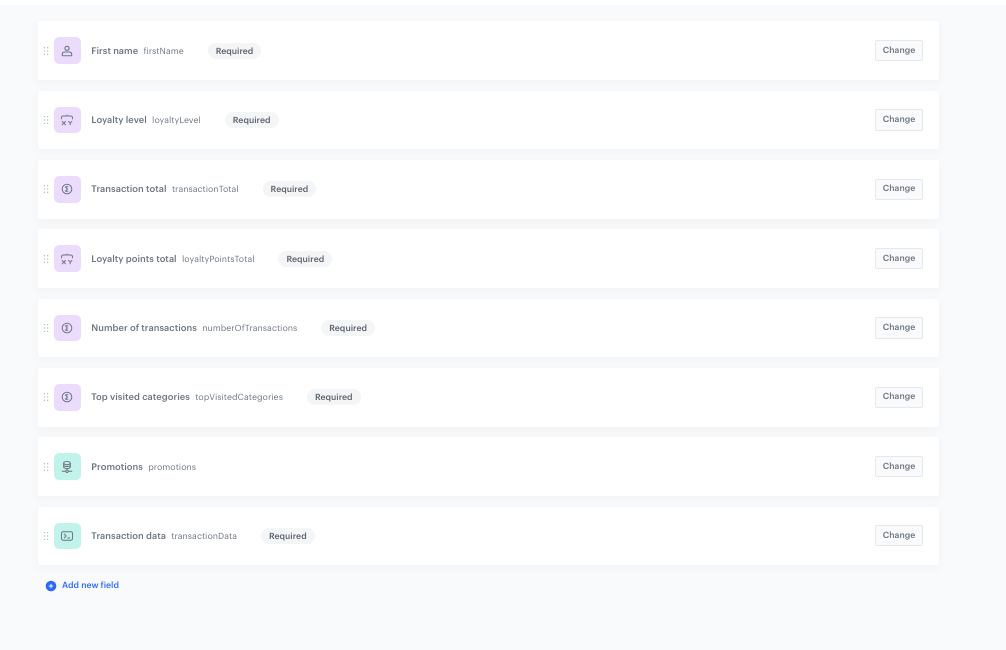
Overview of the complete schema
After adding all fields, the schema should contain the following fields:
Set up the Audience & Settings
- Click the Audience & Settings tab.
- In the Audience section, click Define.
- Choose Everyone.
- Click Apply.
- In the upper-right corner, click Save.
Create the record
Creating a record means filling the schema structure with actual data source bindings. In a Simple schema, the record is where you assign concrete expressions, aggregates, and profile attributes to the fields defined in the schema. When the in-app message is displayed, the Brickworks engine uses the record configuration to resolve all field values via API in real time for the requesting customer.
- Go to Data Modeling Hub > Data collections > Select schema.
- Choose the schema created in the previous step.
- Click Add record.
- Add a name for the record, for example
User Intelligence Panel. - Add a slug for the record. Slug is a unique, URL-friendly version of the name containing only lowercase letters, numbers, and hyphens. For example:
user-intelligence-panel. - Fill in the field values by assigning the appropriate data sources to each field:
- First name → select the
firstnameprofile attribute - Loyalty level → select the
[UC] Loyalty levelexpression - Transaction total → select the
[UC] Sum of transactionsexpression - Loyalty points total → select the
[UC] Loyalty pointsexpression - Number of transactions → select the
[UC] Number of transactionsexpression - Top visited categories → select the
[UC] Top 5 visited categoriesaggregate - Promotions → pre-configured via External Source (Promotion list) at the schema level
- Transaction data → pre-configured via Jinjava code at the schema level
- First name → select the
- Click Publish to publish your record.
{% brickworksgeneratevar %} tag.Create an in-app campaign
In this part of the process, you will create an in-app campaign that renders the User Intelligence Panel using data from the Brickworks schema.
- Go to
 Experience Hub > In-app messages > Create in-app.
 - Enter the name of the in-app message.
Define the audience
- In the Audience section, click Define.
- Click Everyone (or define a specific segment according to your needs).
- Click Apply.
Define content
- In the Content section, click Define.
- Click Create message.
- In the code editor, paste the in-app template code provided below.
The template uses the {% brickworksgeneratevar %} tag to fetch all schema fields for the current customer and renders the profile panel with sections for stats, top interests, dynamically loaded promotions, and past transactions.
{% brickworksgeneratevar schemaId=SCHEMA_ID recordId=RECORD_ID %}
<div class="profile-container">
<button id="close-btn" onclick="SRInApp.close()">×</button>
<div class="profile-header">
<div class="avatar">{{ brickworks_result.firstName|default('P')|truncate(1, true, '') }}</div>
<div class="header-info">
<h1 class="user-name">{{ brickworks_result.firstName|default('Profile') }}</h1>
<span class="member-badge {{ brickworks_result.loyaltyLevel | lower | replace(' ', '-') }}">{{ brickworks_result.loyaltyLevel }}</span>
</div>
</div>
<div class="stats-row">
<div class="stat-card">
<div class="stat-icon">💰</div>
<div class="stat-value">${{ brickworks_result.transactionTotal|default('0') }}</div>
<div class="stat-label">Total Spent</div>
</div>
<div class="stat-card highlight">
<div class="stat-icon">🏆</div>
<div class="stat-value">{{ brickworks_result.loyaltyPointsTotal|default('0') }}</div>
<div class="stat-label">Loyalty Points</div>
</div>
<div class="stat-card">
<div class="stat-icon">🛍</div>
<div class="stat-value">{{ brickworks_result.numberOfTransactions|default('0') }}</div>
<div class="stat-label">Transactions</div>
</div>
</div>
{% set topVisitedCategories = brickworks_result.topVisitedCategories %}
<div class="section-card">
<div class="section-title">🔥 Top Interest</div>
<div class="interest-bar">
{%- if topVisitedCategories|length > 0 -%}
{%- for category in topVisitedCategories -%}
{% set splitCategory = category[0]|split('Default Category > ') %}
<div class="interest-item">
<span class="interest-label">{{ splitCategory[1] }}</span>
</div>
{%- endfor -%}
{%- else -%}
<p class="empty-message">Browse our products to see your interests</p>
{%- endif -%}
</div>
</div>
<div class="section-card">
<div class="section-title">🎁 Active Promotions</div>
<div class="promo-list">
{%- if brickworks_result.promotions.data|length > 0 -%}
{%- for promo in brickworks_result.promotions.data -%}
<div class="promo-item">
<div class="promo-badge">{%- if promo.discountType != "NONE" -%}{{ promo.discountValue }}{%- endif -%}{%- if promo.discountType == "PERCENT" -%}% OFF{%- elif promo.discountType == "AMOUNT" -%}$ OFF{%- else -%}PROMO{%- endif -%}</div>
<div class="promo-info">
<div class="promo-name">{{ promo.name }}</div>
<div class="promo-exp">{{ promo.description|truncate(35) }}</div>
</div>
</div>
{%- endfor -%}
{%- else -%}
<p class="empty-message">There are no promotions available for you</p>
{%- endif -%}
</div>
</div>
<div class="section-card">
<div class="section-title">📋 Past Transactions</div>
<div class="transactions-list">
{%- if brickworks_result.transactionData|length > 0 -%}
{%- for transaction in brickworks_result.transactionData -%}
<div class="tx-item">
<div class="tx-info">
<div class="tx-name">{{ transaction.products | join(', ') }}</div>
<div class="tx-date">{{ transaction.date }}</div>
</div>
<div class="tx-right">
<div class="tx-amount">{{ transaction.amount }}</div>
<div class="tx-points">+{{ transaction.loyaltyPoints }} pts</div>
</div>
</div>
{%- endfor -%}
{%- else -%}
<p class="empty-message">You haven't made any transactions yet</p>
{%- endif -%}
</div>
</div>
</div>
{% endbrickworksgeneratevar %}
SCHEMA_ID and RECORD_ID with the actual IDs of your Brickworks schema and record. You can find the schema ID and the record ID in the URL when viewing them in the Synerise platform.- Add the appropriate CSS styles to the template to style the profile panel (avatar, stats row, section cards, transaction list, promotion badges, and so on).
- If the template is ready, in the upper right corner click Save this template > Save as.
- On the pop-up, enter the template name and select the folder. Confirm by clicking Apply.
- To continue configuring the in-app campaign, click Next.
- Click Apply.
Select events that trigger the in-app message display
Define which event triggers the display of the User Intelligence Panel. For example, you can display it when the customer opens a specific section of the application or taps a profile button.
- In the Trigger events section, click Define.
- Select Add event and from the dropdown list, choose the appropriate event (for example,
screen.viewwith a parameter matching your profile screen). - Configure the event parameters according to your application’s navigation structure.
- Click Apply.
Schedule the message and configure display settings
- In the Schedule section, click Define and set the time when the message will be active.
- In the Display Settings section, click Change.
- Define the Delay display, Priority index, and enable the Frequency limit toggle to manage the frequency of display according to your business needs.
- Click Apply.
- Optionally, define UTM parameters and additional parameters.
- Click Activate.
Check the use case set up on the Synerise Demo workspace
You can check the configuration of each step directly in the Synerise Demo workspace:
- Aggregate - loyalty points sum
- Aggregate - expired loyalty points
- Aggregate - Sum of transactions
- Aggregate - Number of transactions
- Aggregate - Top 5 visited categories
- Expression - Loyalty points
- Expression - Loyalty level
- Segmentation - Gold loyalty level
- Brickworks schema
- In-app campaign
If you’re our partner or client, you already have automatic access to the Synerise Demo workspace (1590), where you can explore all the configured elements of this use case and copy them to your workspace.
If you’re not a partner or client yet, we encourage you to fill out the contact form to schedule a meeting with our representatives. They’ll be happy to show you how our demo works and discuss how you can apply this use case in your business.