Creating a record means adding the data to the schema. Practically, it means that you fill out schema fields. A group of such schema records forms a data collection and after saving, you can find them in ![]() Data Modeling Hub > Data collections for a particular schema.
Data Modeling Hub > Data collections for a particular schema.
This article explains how to create a record in the Synerise platform. The scope of the article includes instructions on:
- Creating a record.
- Selecting a schema to which the record will be added.
- Filling out the configuration form based on the selected schema.
- Saving or publishing the record.
- Previewing record results.
Important notes
Before creating a record, see Record usage guidelines.
Creating records
In this part of the process, you will add a record to the schema output as explained in the Creating a schema article.
Procedure
- Go to
 Data Modeling Hub > Data collections.
 - In the header, from Select schema dropdown list, select the Products schema created according to the instructions in the Creating a schema.
- In the upper-right corner, click New record.
Result: A configuration form opens.
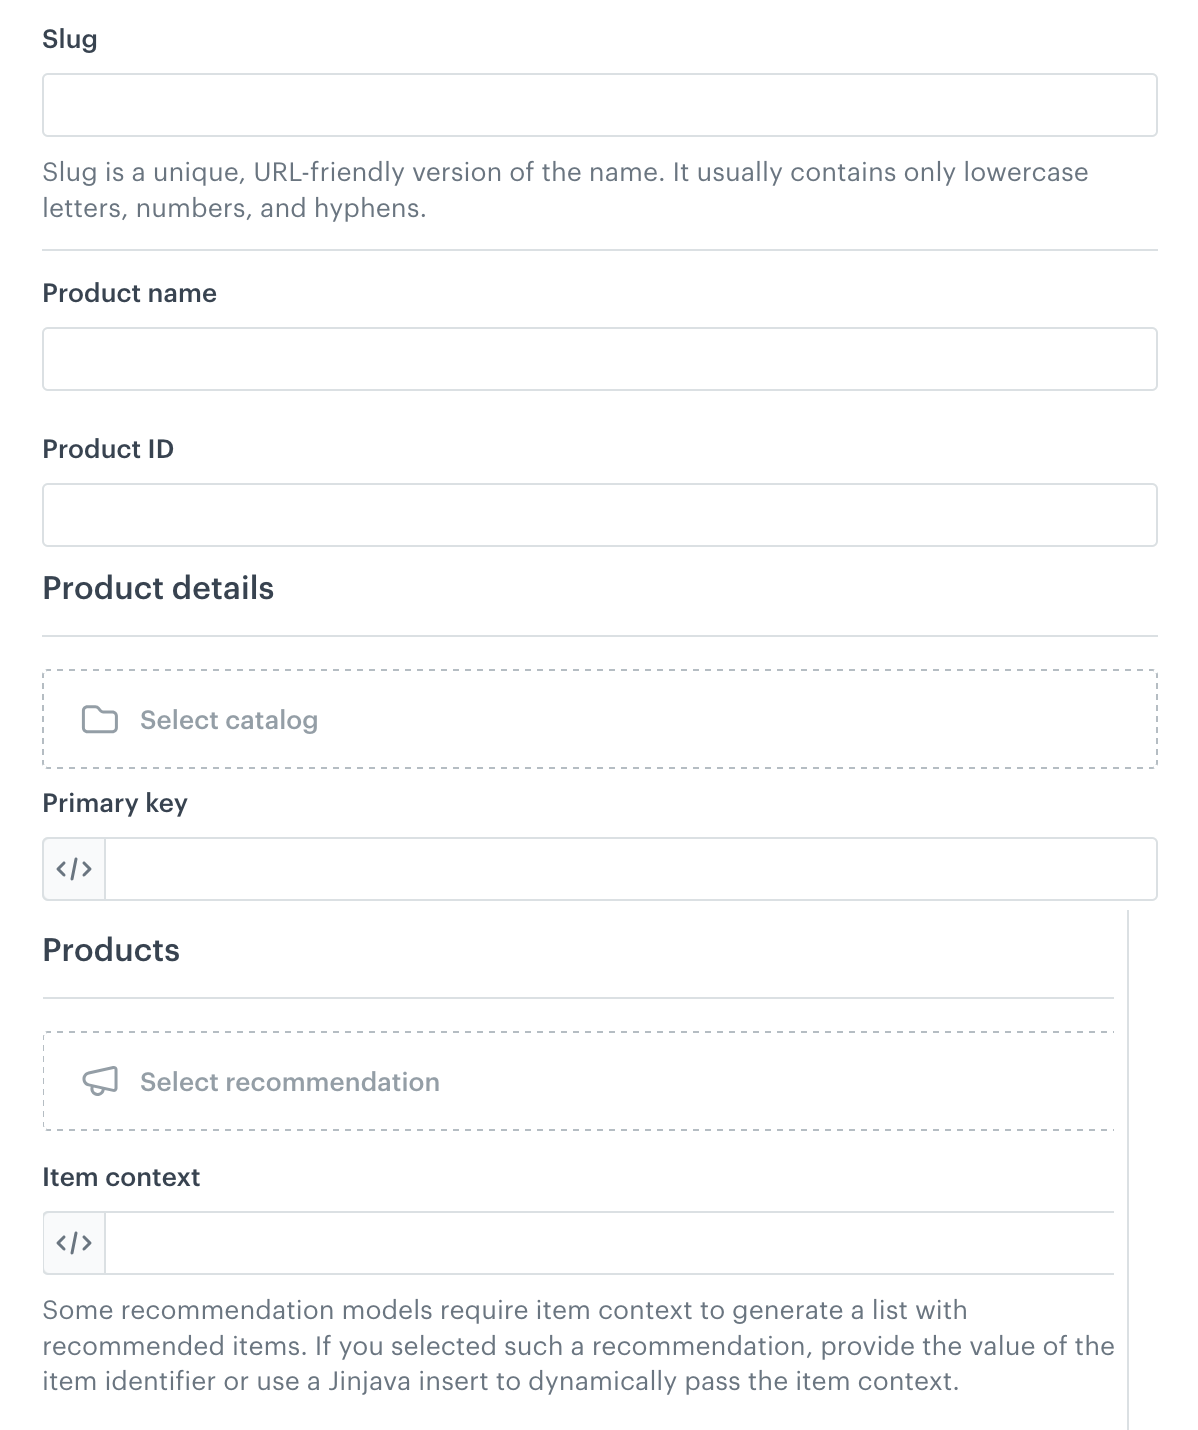
A view of a record made on the basis of the schema described in the Creating a schema article - simple schema variant - In Slug, enter a URL-friendly, human-readable string, used to uniquely identify a record. Slug is used as a record identifier when generating objects based on the record.
A slug can only contain letters (uppercase or lowercase), digits, underscores, or hyphens; however, it cannot begin with an underscore and must contain at least one character. Fill out the schema fields:
- In Product name, provide the name of the product based on which similar recommendations will be returned.
- In Product ID, provide the product identifier of the product.
- In Product details:
- Select the catalog from which you want to pull item details.
- In Primary key, enter an item identifier in one of the following ways:
- A static value.
This will be used every time. - A Jinjava insert:
{{ context.itemIdInCatalog }}
This requires the value to be sent while generating content from the record. - A Jinjava insert:
{{ record.productId }}
This pulls the ID from the Product ID field. For inserts, the record is identified by its API name.
- A static value.
- In Products:
- Select the recommendation which will be used to generate recommendations.
- In Item context, provide the ID of the item which will be the recommendation context in one of the following ways:
- A static value.
This will be used every time. - A Jinjava insert:
{{ context.recommendationContextItemId }}
This requires the value to be sent while generating content from the record. - A Jinjava insert:
{{ record.productId }}
This pulls the ID from the Product ID field. For inserts, the record is identified by its API name.
- A static value.
Saving as a draft
This option is only available for records in managed schemas.
If you want to save your progress, you can save it as a draft. Draft records remain private and will not be visible publicly. Additionally, attempting to generate an object based on the record’s slug while it is a draft will result in an error.
To save a record as a draft, in the upper right corner, click Save as draft. The record will be saved in ![]() Data Modeling Hub > Data collections for the Products schema.
Data Modeling Hub > Data collections for the Products schema.
Previewing records
You can preview the record by providing context data (if required). The preview works for all types of schemas (Singleton schemas are treated like records).
If your records include dynamic values, they will not be rendered until you select the context needed to obtain them.
- Go to Data Modeling Hub > Data collections.
- In the header, from Select schema dropdown list, select the Products schema.
- Find the record which you want to preview.
- Enter the record configuration.
- Click Preview.
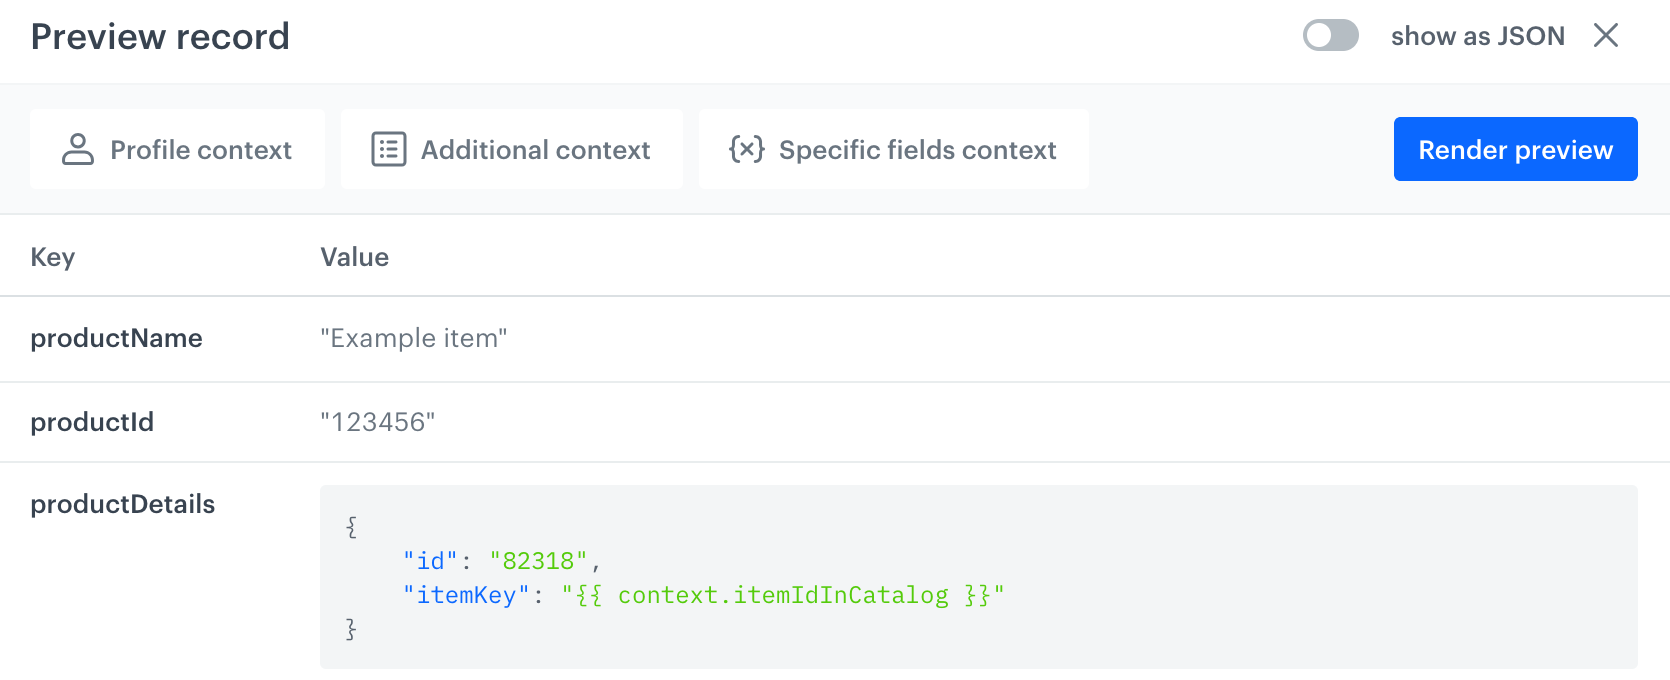
- In the view that opens, add context for the preview:
To generate the preview, you only need to fill in the contexts that are required by the record. For example, if the record doesn't include any references to profile attributes, you can ignore the profile context.- On the Profile context tab, select the profile whose data will be used to generate the preview.
- On the Additional context tab, enter data for
{{ context.* }}inserts.
For example, if you used the{{ context.itemIdInCatalog }}when creating the record, in Key (Name of the property) enteritemIdInCatalogand in Type & Default value, provide the value.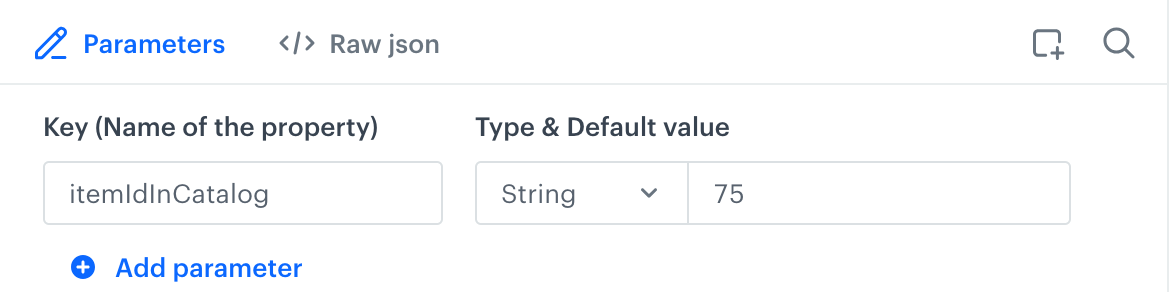
Providing a value for the {{ context.itemIdInCatalog }} insert - On the Specific fields context tab, provide additional data for fields that need it. This is only used for recommendation and relation fields.
In this example, you can select the products field (identified by API name instead of display name) and provide more information to the recommendation engine. You can find the explanation of these parameters in the API reference.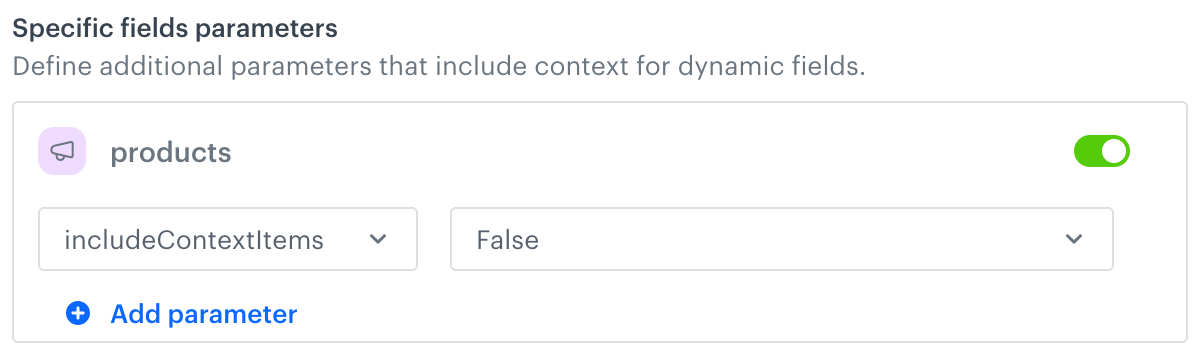
Providing extra details to a Recommendation field
Publishing options
Scheduling publication
This option lets you delay publishing the record and/or schedule publication within specific time windows (for example, daily between 1 and 4 P.M. over a two-week period).
- Click the Settings tab.
- On the Schedule section, click Define.
- Select one of the following tabs:
- Run immediately - to publish the record immediately without the end date.
- Scheduled - to publish the record at the defined date with the expiration date. In the configuration, in Start date and End date, specify the beginning and end of the period during which the record will be published.
- From the Timezone dropdown list, select the timezone according to which the schedule calendar will apply.
- If you want to set the time windows in which the record will be in the published status, enable the Set time windows option.
- Use Daily, Weekly, and Monthly tabs to define the frequency of publishing the record.
- After selecting a tab, define the time window by choosing the start time on the left and the end time on the right. Click the clock icon to select the time.
The record status outside the defined time window has the scheduled status. - Confirm by clicking Apply.
Result: The publication of the record is scheduled.
Publishing immediately
This option lets you immediately publish the record. Optionally, you can publish the record within specific time windows (for example, daily between 1 and 4 P.M. over a two-week period).
- Click the Run immediately tab.
- If you want to set the time windows in which the record will be in the published status, enable the Set time windows option.
- Use Daily, Weekly, and Monthly tabs to define the frequency of publishing the record.
- After selecting a tab, define the time window by choosing the start time on the left and the end time on the right. Click the clock icon to select the time.
The record status outside the defined time window has the scheduled status. - Confirm by clicking Apply.
Next steps
As the next step, proceed to generating an object with record results in a distribution channel of your choice.