Creating documents
A document lets you inject an object with a specific content into a mobile application dedicated for the specific audiences.
Assigning groups
-
In terms of organizing documents, you create groups (categories) and assign documents to them, so you can later manage documents in a convenient way.
-
If you are using documents in a screen view campaign, you can select them one by one from the list of documents or you can select a document group to include all documents assigned to a selected group.
-
When you add new documents to the group and this group is selected in an active screen view campaign, these new documents will appear automatically within this campaign.
Assigning priority
-
A priority defines the order of displaying documents in a mobile application. Use numbers from 1 to 99 to define priority, where 1 is the highest.
-
What if there are two documents for the same audiences that have the same priority? Which one will be first?
If a profile matches the conditions of both documents, then the date of creation will take precedence here - the profile will be displayed the document with the latest date of creation.
Nesting documents in other documents
- You can use other documents in the content of a document.
- Due to optimization, documents whose audience is a segmentation or segmentations can’t be nested inside documents whose audience is also segmentation or segmentations.
Editing documents
You can edit a document only when it has the following statuses: Paused and Draft
Requirements
A complete set of requirements is available at this link.
Procedure
Define the recipients
- Go to
 Data Modeling Hub > Documents > Add document.
 - In the Audience section, click Define.
- Select one of the options:
- Everyone - the document will be visible to all application users.
- Segment - select an existing segmentation of application users who will see the contents of the document in the application.
- New audience - create a segmentation of application users who will see the contents of the document in the application.
- Confirm the settings in the Audience section by clicking Apply.
Important: If the audience of the document is more than one segmentation and one of the segmentation returns0results, then the whole audience is0. In such circumstances, such a document will not be visible when active.
Define the contents of the document
-
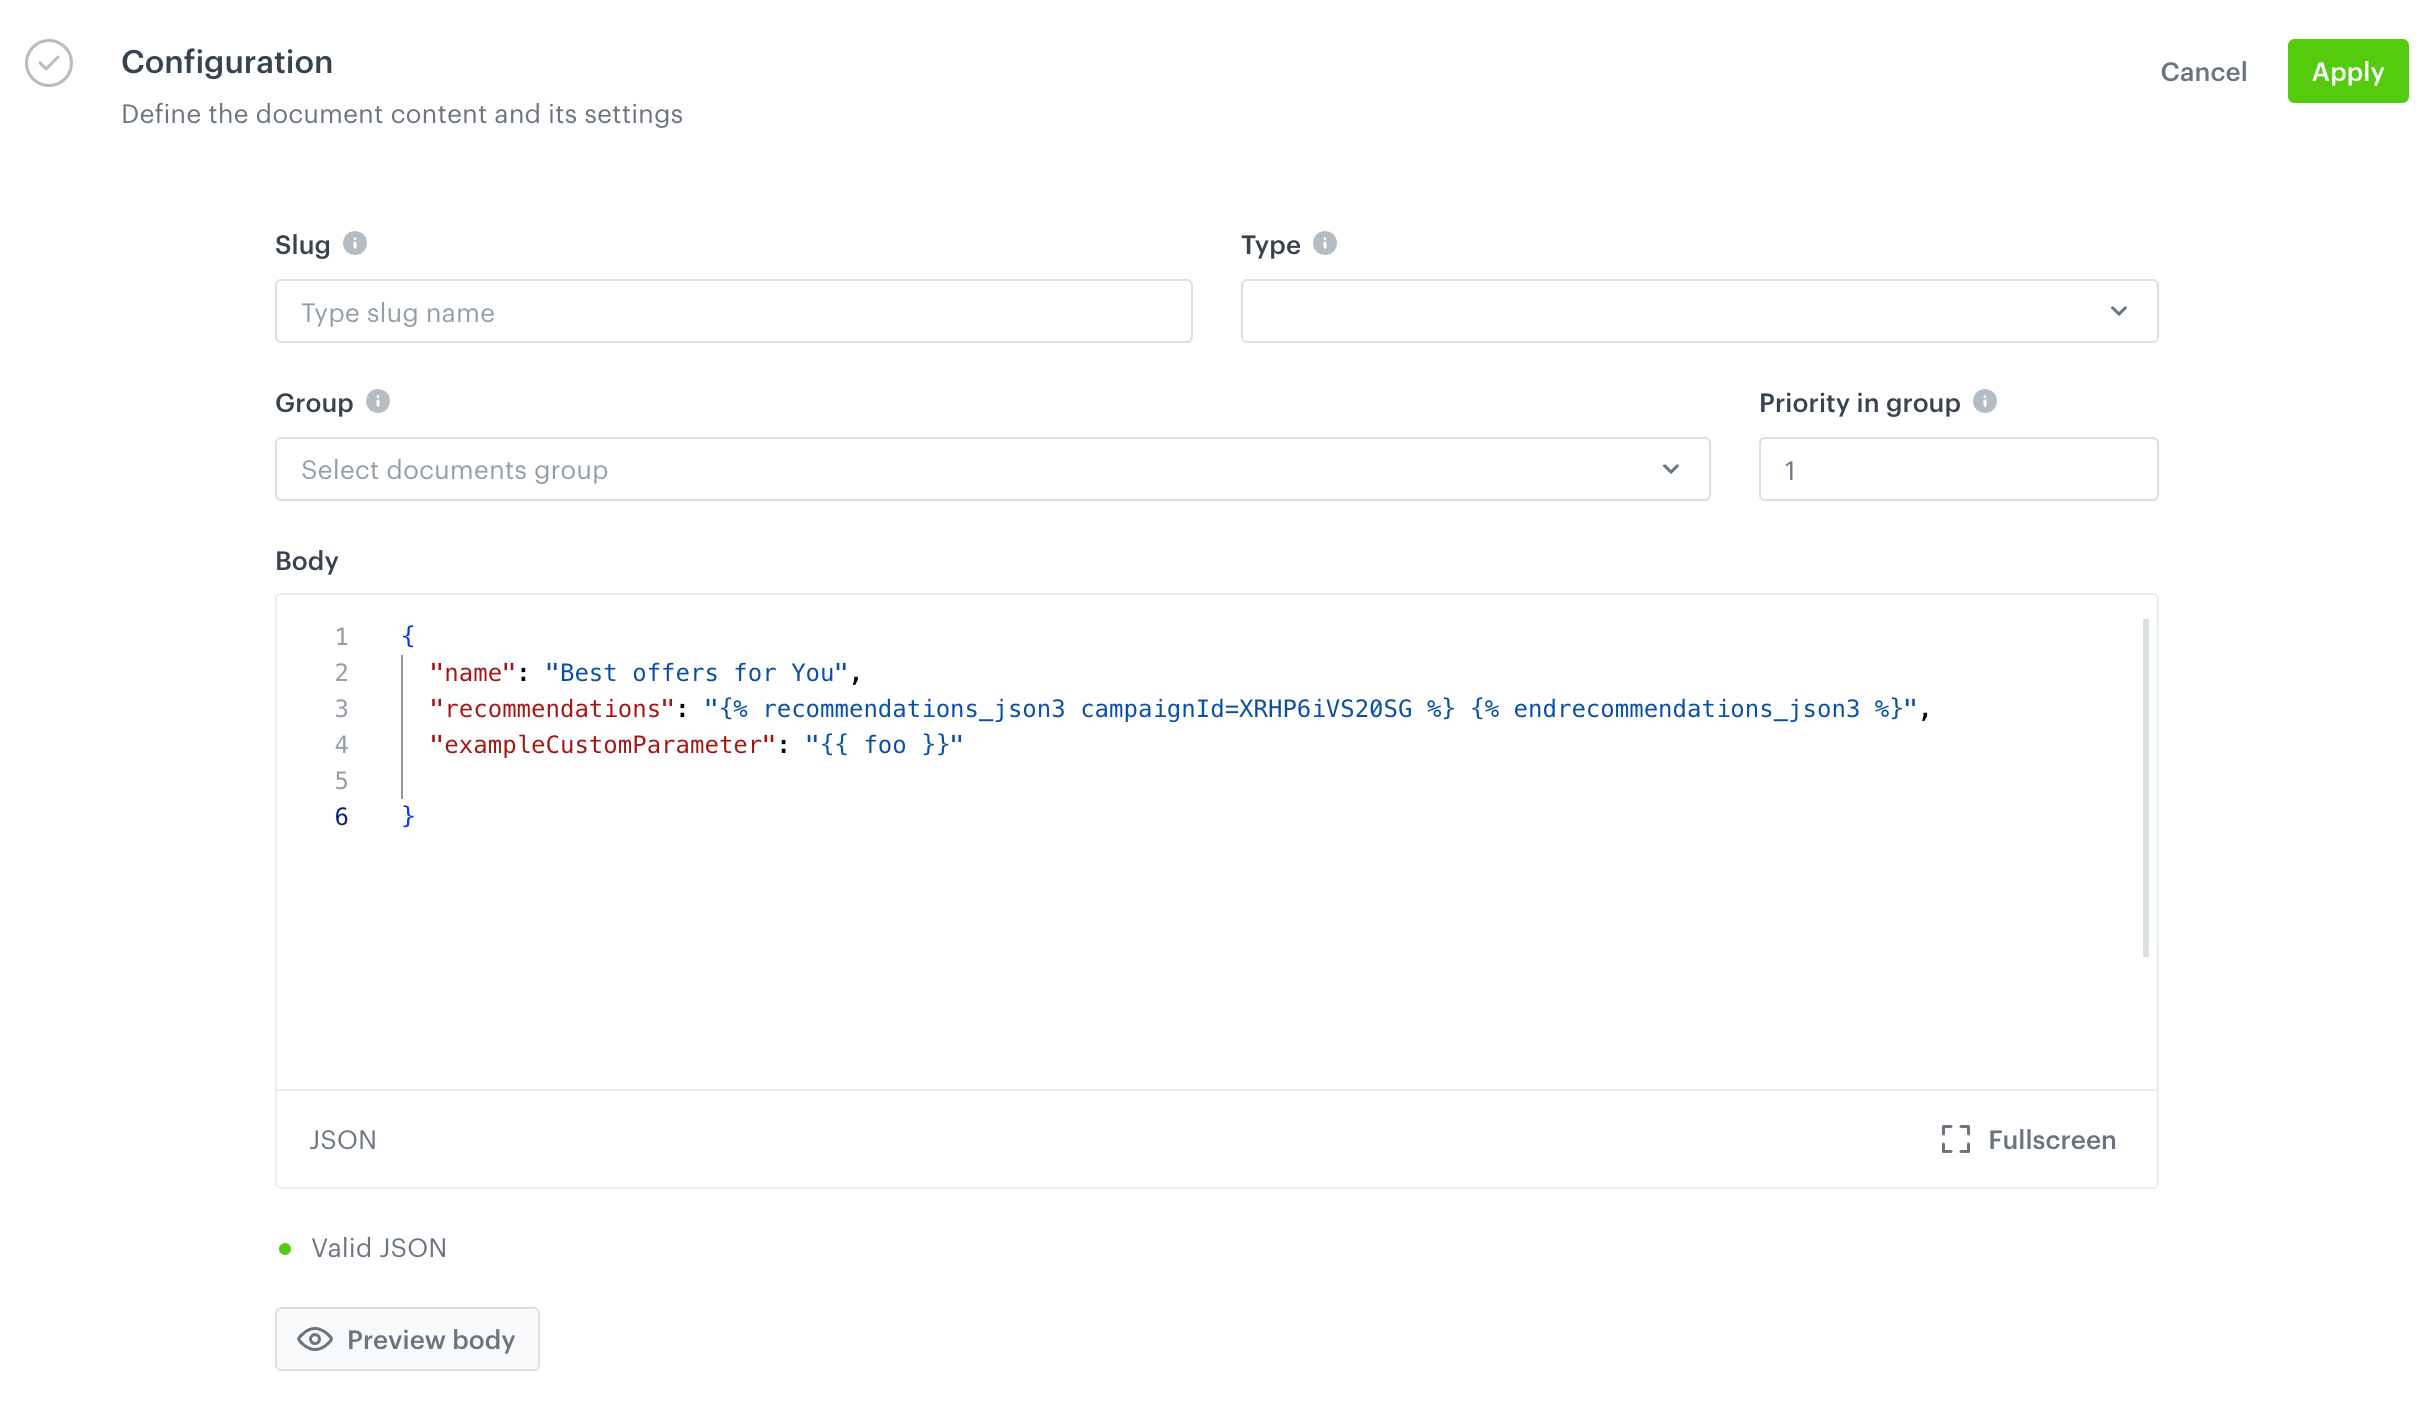
In the Configuration section, click Define.
-
In the Slug field, enter a unique identifier for the document (for example,
autumn-collection). When you refer to this particular document in another document, you must use the value of the slug, like in the example below.Click here to see exampleThe example presents contents of a document that refers to two other documents with the following slugs:
welcome, andautumn-collection.{ "sections": [ "{% document welcome %}", "{% document autumn-collection %}" ], "type": "sections-list" } -
In the Priority field, define the order in which the document will be displayed. You can use numbers from 1 to 99, where 1 is the highest (this document will be returned first) and 99 is the lowest.
-
From the Group dropdown list, select the name of the group to which the document will be assigned. If there is no group to which you can assign a document, at the bottom of the dropdown list, click Add group.
Tip: You can select documents for a screen view campaign by selecting groups. -
From the Type dropdown list, select the type of the document. You can define the purpose of the value of this field (for example, you can use this value here to indicate the way of processing of the content). This field is mandatory. To define a new type, at the bottom of the dropdown list, click Add type.
-
In the Body section, define the content of the document. Below you can find an example that contains an AI recommendation created in Synerise, a context item (required for some recommendation types) and the name that will display above the frame with the recommendations:
{
  "name": "Best offers for You",
  "itemId": "7892348432",
  "recommendations": "{% recommendations_json3 campaignId=XRHP6iVS20SG %} {% endrecommendations_json3 %}",
  "exampleCustomParameter": "{{ foo }}"
}

A blank configuration form of a document -
Preview body
- Optionally, you can preview the body of the document for a specific customer.
-
Click Preview body.

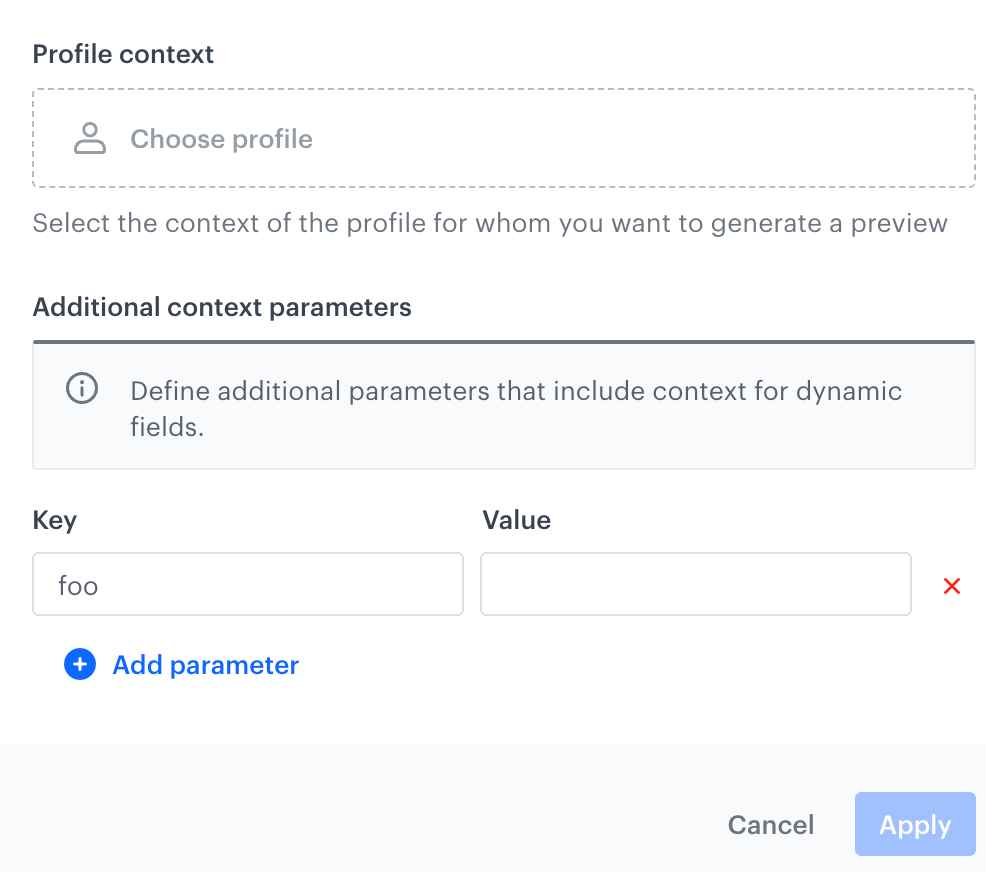
A form for defining a profile for whom the preview will be generated and additional parameters from the request body -
On the pop-up, click Choose profile.
-
From the dropdown list, select a profile for whom you want to generate the preview of the document body.
-
In the Additional context parameters section, provide values for non-profile variables.
Variables are automatically detected and the Key column is filled out (as presented in Figure 2,foowas detected in the request body as non-profile variable). You must provide all keys of additional context parameters, otherwise the preview won’t be generated. -
Confirm by clicking Apply.
-
Schedule document display
- Confirm the settings in the Configuration section by clicking Apply.
- In the Schedule section, click Define.
- To display the document immediately after the activation, click the Run immediately section.
- To schedule the display of the document at a future date, click Scheduled.
- For both options, you can set time windows (the Set time windows option) during which the content of the document will be visible in the mobile application.
- Confirm the settings in the Schedule section.
- To save the document for activation according to the schedule, in the upper right corner, click Activate.
Examples of use
Embedding content through the API
Define a piece of application that shows a defined type of content (in this example, it is a promotion) retrieved through the API. As an effect, the users of the application are provided with a specific promotion with a defined background color.
slug: promo-api
{
  "content-type": "promotions",
  "background-color": "#123123",
  "title": "Promotions",
  "action": {
          "data-schema": "promotions",
          "uri": "https://api.snrapi.com/schema-service/proxy/promotions?type=GENERAL&sort=requireRedeemedPoints,asc"
  }
}
Embedding content through the SDK
Instead of using API endpoints, you can pass information about the SDK method you want to use and define the parameters of the method. Example below shows a call to the Client.getPromotions() method:
slug: promo-sdk
{
  "content-type": "promotions",
  "background-color": "#123123",
  "title": "Promotions",
  "action": {
		"method": "Client.getPromotions",
        "type": "GENERAL",
        "sort": "requireRedeemedPoints,asc"
  }
}
Inserting content
You can also insert the details of a specific promotion and select the fields that will be sent back to your application.
slug: daily-promo
{
  "content-type": "promotion",
  "background-color": "#123321",
  "title": "Offer of the day",
  "promotion": "{% promotion fields=uuid,name,discountType,discountValue,code,params,tags,type,price,images,description,expireAt %} 3a3750b0-c00b-4c57-9c5f-d55652b417a0 {% endpromotion %}"
}Using tags to retrieve content
The following example shows the retrieval of promotions from the Synerise API by means of tags.
- Create tags in Data Modeling Hub > Tags.
- Create a document with (a
tagNamesargument in the uri):
slug: club
{
  "content-type": "promotions",
  "background-color": "#123123",
  "description": "Club offers",
  "title": "Special offers only for club members",
  "action": {
          "data-schema": "promotions",
		  "uri": "https://{SYNERISE_API_BASE_PATH}/v4/promotions/promotion/get-for-client?type=GENERAL&tagNames=club"
  }
}Final effect
The final effect of what has been done so far is a single slug: main. The application users are provided with the content of each document referred to in the article when the document slug: main is retrieved.
slug: main
{
	"sections": [
		{
			"content": {
				"color": "#ffffff",
				"description": "Hello to our interactive documents demo",
				"text": "bold"
			},
			"schema": "intro",
			"slug": "welcome",
			"uuid": "33f6fcd0-96e0-43f8-be40-0da733112c5f"
		},
		{
			"content": {
				"action": {
					"data-schema": "promotions",
					"uri": "https://api.snrapi.com/schema-service/proxy/promotions?tagNames=autumn-collection"
				},
				"section-background-color": "#123123",
				"section-title": "Autumn Collection",
				"section-type": "promotions"
			},
			"schema": "promotions",
			"slug": "autumn-collection",
			"uuid": "5b722719-66af-4c8f-a9ca-9e026d8157b2"
		},
		{
			"content": {
				"action": {
					"method": "ContentWidget",
					"slug": "recommendations"
				},
				"background-color": "#ffffff",
				"section-type": "content-widget",
				"title": "Best offers for you"
			},
			"schema": "content-widget",
			"slug": "content-widget",
			"uuid": "360dbd79-1972-40f0-bd48-db28c7b8c3a2"
		},
		{
			"content": {
				"action": {
					"data-schema": "promotions",
					"uri": "https://{SYNERISE_API_BASE_PATH}/v4/promotions/promotion/get-for-client?type=GENERAL&tagNames=club"
				},
				"background-color": "#123123",
				"content-type": "promotions",
				"description": "Club offers",
				"title": "Special offers only for club members"
			},
			"schema": "promotions",
			"slug": "club",
			"uuid": "98f92187-603b-4c61-a45c-73cfe555fb06"
		},
		{
			"content": {
				"background-color": "#123321",
				"content-type": "promotion",
				"promotion": {
					"code": "apple-promo",
					"description": "Apple products 10% cheaper !!!",
					"discountType": "PERCENT",
					"discountValue": -10,
					"expireAt": "2029-12-26T23:59:59.000Z",
					"images": [
						{
							"type": "image",
							"url": "https://www.snrcdn.net/upload/f2afa4d4d7af216196047d1f7f0613f22a50a8c8/default/origin/1537188695830-el-mbppro.png"
						},
						{
							"type": "image",
							"url": "https://www.snrcdn.net/upload/f2afa4d4d7af216196047d1f7f0613f22a50a8c8/default/origin/1537188692254-el-iphx.png"
						},
						{
							"type": "image",
							"url": "https://www.snrcdn.net/upload/f2afa4d4d7af216196047d1f7f0613f22a50a8c8/default/origin/1537188683527-el-ipadpro.png"
						}
					],
					"name": "Apple products 10% cheaper",
					"params": null,
					"price": 0,
					"tags": null,
					"type": "MEMBERS_ONLY",
					"uuid": "3a3750b0-c00b-4c57-9c5f-d55652b417a0"
				},
				"title": "Offer of the day"
			},
			"schema": "promotion",
			"slug": "daily-promo",
			"uuid": "2a45411a-f615-4aec-a303-8a772974621f"
		},
		{
			"content": {
				"action": {
					"data-schema": "promotions",
					"uri": "https://api.snrapi.com/schema-service/proxy/promotions?type=GENERAL&sort=requireRedeemedPoints,asc"
				},
				"background-color": "#123123",
				"content-type": "promotions",
				"title": "Promotions"
			},
			"schema": "promotions",
			"slug": "promo-api",
			"uuid": "11357ed3-94a2-4844-a8ce-c1ae119f25ab"
		},
		{
			"content": {
				"action": {
					"method": "Client.getPromotions",
					"sort": "requireRedeemedPoints,asc",
					"type": "GENERAL"
				},
				"background-color": "#123123",
				"content-type": "promotions",
				"title": "Promotions"
			},
			"schema": "promotions",
			"slug": "promo-sdk",
			"uuid": "2836dab5-249b-4884-9bc5-c375960048eb"
		}
	],
	"type": "sections-list"
}