The Upload Profiles to Custom Audience node lets you export a data file with profiles from Synerise and upload it in bulk to a Custom Audience in Facebook. Use it in workflows that retrieve large segments of profiles (hundreds of thousands to millions) and sync them with Facebook on a recurring schedule.
TIP: To update a single profile's presence in a Custom Audience as part of a real-time, event-triggered workflow, use the Add Profiles to Custom Audience node instead.
A typical workflow looks like this:
Scheduled Run → Get Profiles → Data Transformation → Upload Profiles to Custom Audience → End
Key benefits
- Built for volume - Large audiences are uploaded as lists, not profile by profile, so full-segment refreshes complete faster and at a fraction of the API cost of sending profiles one by one.
- No engineering work - You can configure the node directly in the workflow builder, with no custom scripts, middleware, or developer tickets required.
- Always-fresh audiences - Scheduled runs keep Facebook audiences aligned with your current Synerise segmentation, so targeting and suppression lists reflect the real customer state.
Prerequisites
- Generate the system user access token in Facebook; as the
scopevalue, selectads_management. - Create a Custom Audience in Facebook. Save the ID of the Custom Audience in the notepad.
Data requirements
The file that reaches this node must contain a column named exactly matchingId, which holds the value profiles are matched on in Facebook (an email address or a phone number).
NOTE: Values in the matchingId column are automatically trimmed, lowercased, and hashed with SHA-256 before the upload. This normalization does not reformat phone numbers - if you select Phone as the identifier type, make sure the numbers already meet Facebook's format requirements (for example, they include the country code) before they reach this node.
Because the Get Profiles node exports attributes under their original names, the file rarely contains a matchingId column by default. Add a Data Transformation node between Get Profiles and this node, and use the Rename Columns node to rename the column that holds the identifier (for example, Email) to matchingId.
TIP: In the same transformation rule, use the Handle incomplete data section on the Rename Columns node and select Skip row if error occurred to exclude profiles with a missing or empty identifier before they reach this node.
Node configuration
- Click the node.
- Click Select connection.
- Select an existing connection from the list, or create a new one - see Create a connection below.
Create a connection
Generate an access token which allows you to send a request (upload a file with profiles from Synerise to Facebook).
- Click Add connection.
On the Setup connection pop-up:
In the Connection name field, enter a name for the connection.
- In the Access token field, enter the app access token you generated in Facebook.
NOTE: You can read more about access tokens in Facebook documentation.
- Click Create.
Result: A connection is created and selected.
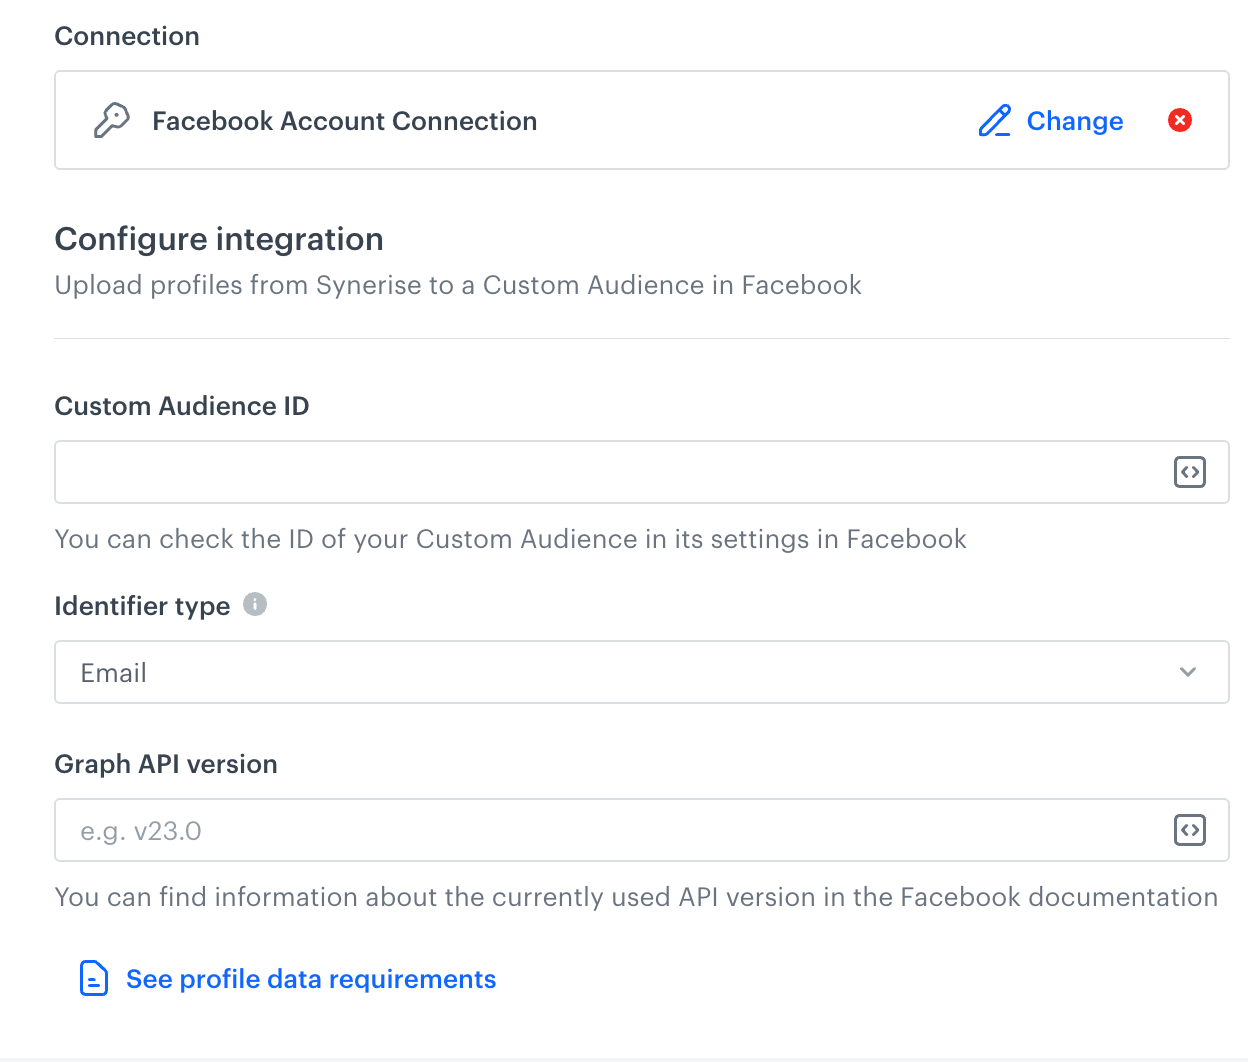
Define the integration settings
In this part of the configuration process, you select the ID of the Custom Audience to which you upload profiles from Synerise, the type of identifier profiles are matched on, and the API version of Facebook.
 icon accept
 - In the Custom Audience ID field, enter the ID of the Custom Audience. You can find the ID in the settings of the Custom Audience in Facebook.
- From the Identifier type dropdown list, select the type of identifier stored in the
matchingIdcolumn - Email or Phone. - In the Graph API version field, enter the currently used version of the Facebook API.
- Confirm by clicking Apply.
Result: When the workflow runs, profile data from the file are uploaded to the selected Custom Audience in Facebook. This is a business-level operation — since no single profile is the actor of the workflow, no activity event is generated for uploaded profiles. The outcome of the run, including any rows skipped due to a missing or invalidmatchingIdvalue, is available in the Transformation logs tab of the workflow.
Example of use
This example describes a workflow that exports a segment of customers with an assigned email address and uploads them to a Custom Audience in Facebook on a recurring schedule.
Prepare a transformation rule
- Create a transformation rule.
- As the first node, add Data Input. Upload a file sample with the same column names the Get Profiles node will export. For example:
Email
john.doe@example.com
jane.smith@example.com
Add a Rename Columns node. In the configuration:
- Select the
Emailcolumn. - Under Edit values by, select Replacing and enter
matchingIdas the new column name. - In the Handle incomplete data section, select Skip row if error occurred.
- Select the
- As the last node, add Data Output.
- Save and publish the transformation.
Build the workflow
- Start the workflow with a Scheduled Run node. Set the desired recurring schedule.
- Add a Get Profiles node. Select the segmentation of customers, and select the email address attribute under Attributes values.
- Add a Data Transformation node. Select the transformation rule you created above.
- Add a Facebook > Upload Profiles to Custom Audience node. Configure the node according to the instructions above:
- Select or create a connection.
- Enter the Custom Audience ID.
- From Identifier type, select Email.
- Enter the Graph API version.
- Add an End node.