This use case presents a different approach to price drop campaigns by separating the logic into two independent automations. Instead of processing all conditions and communication in a single workflow, the first automation is responsible for detecting price drops and generating enriched events, while the second handles communication based on these events.
This approach improves performance, simplifies logic, and gives more control over campaign execution.
Additionally, the campaign introduces product prioritization. Products are selected based on user intent in the following order:
- Adding product to cart
- Adding product to favorites
- Visiting the product in the mobile app
- Visiting the product on the website
As a result, users receive communication about the most relevant discounted products and the copy of the email is prepared based on the type of activity of the customer (adding to cart, adding to favorites, and so on).
The key advantages of this approach include:
- Separation of concerns: The event generation workflow handles all data collection and price comparison logic, while the communication workflow only handles routing and sending.
- Snippet-based logic: All product validation, price comparison, and exclusion logic is contained in a reusable snippet referenced in the Generate Event node.
- Built-in exclusion mechanism: Products that have already been communicated to a customer are excluded from subsequent sends, ensuring the campaign spreads across multiple days and intent categories.
While this use case focuses on the email communication channel, the event generation workflow is designed to also serve as a foundation for other channels. The generatedresults.priceDropevent contains both email and push data, so you can build a companion mobile push workflow using the same event without modifying the detection logic. See the What's next section for details.
Prerequisites
- Implement a tracking code on your website.
- Create an item catalog containing information on the actual price of products (including the
effectivePriceandavailabilityattributes). It is recommended to use a feed-based catalog, as it contains the most up-to-date product data including current prices and availability. - Create an email template to be used in the price drop campaign. You can use a single template across all priority paths and dynamically change its content based on the interaction type. Alternatively, you can create separate templates for each journey (cart, favorites, visited) for more granular control and analytics.
- Ensure user marketing consent attribute (email - e.g.
newsletter_agreement) is available. - Integrate transaction events.
- Create and set up your email account.
Implement a custom event
results.priceDropand register it in Data Modeling Hub > Events before use. The event must include the following parameters:eventdata— containing product SKUs, counts, and exclusion data generated by the snippet.newsletterAgreement— email marketing consent status.
Optionally, you can add extra parameters (such as loyalty program membership) to support further personalization in your email templates.
Process
In this use case, you will go through the following steps:
- Create aggregates required for product collection and exclusion logic.
- Create the snippet with price drop detection logic.
- Create the workflow for detecting price drops and generating events.
- Create the workflow for sending email communications based on product intent.
Create aggregates
Several aggregates are needed to support the event generation logic. These aggregates collect product SKUs and prices from different interaction types, handle exclusions of already-purchased products, and feed into the snippet that runs inside the Generate Event node.
The aggregates are organized into the following groups:
- Shared aggregates — purchase history, removal history, and global exclusion data.
- Favorites aggregates — products added to favorites.
- Cart aggregates — products added to cart.
- Mobile app viewed aggregates — products viewed in the mobile app.
- Desktop website viewed aggregates — products visited on the website.
All aggregates in this use case use a default period of 30 days. This value can be adjusted to match your business needs and the event retention configured in your workspace. Longer periods capture more product interactions but may include outdated price data; shorter periods keep the data fresh but may miss older interactions.
Shared aggregates
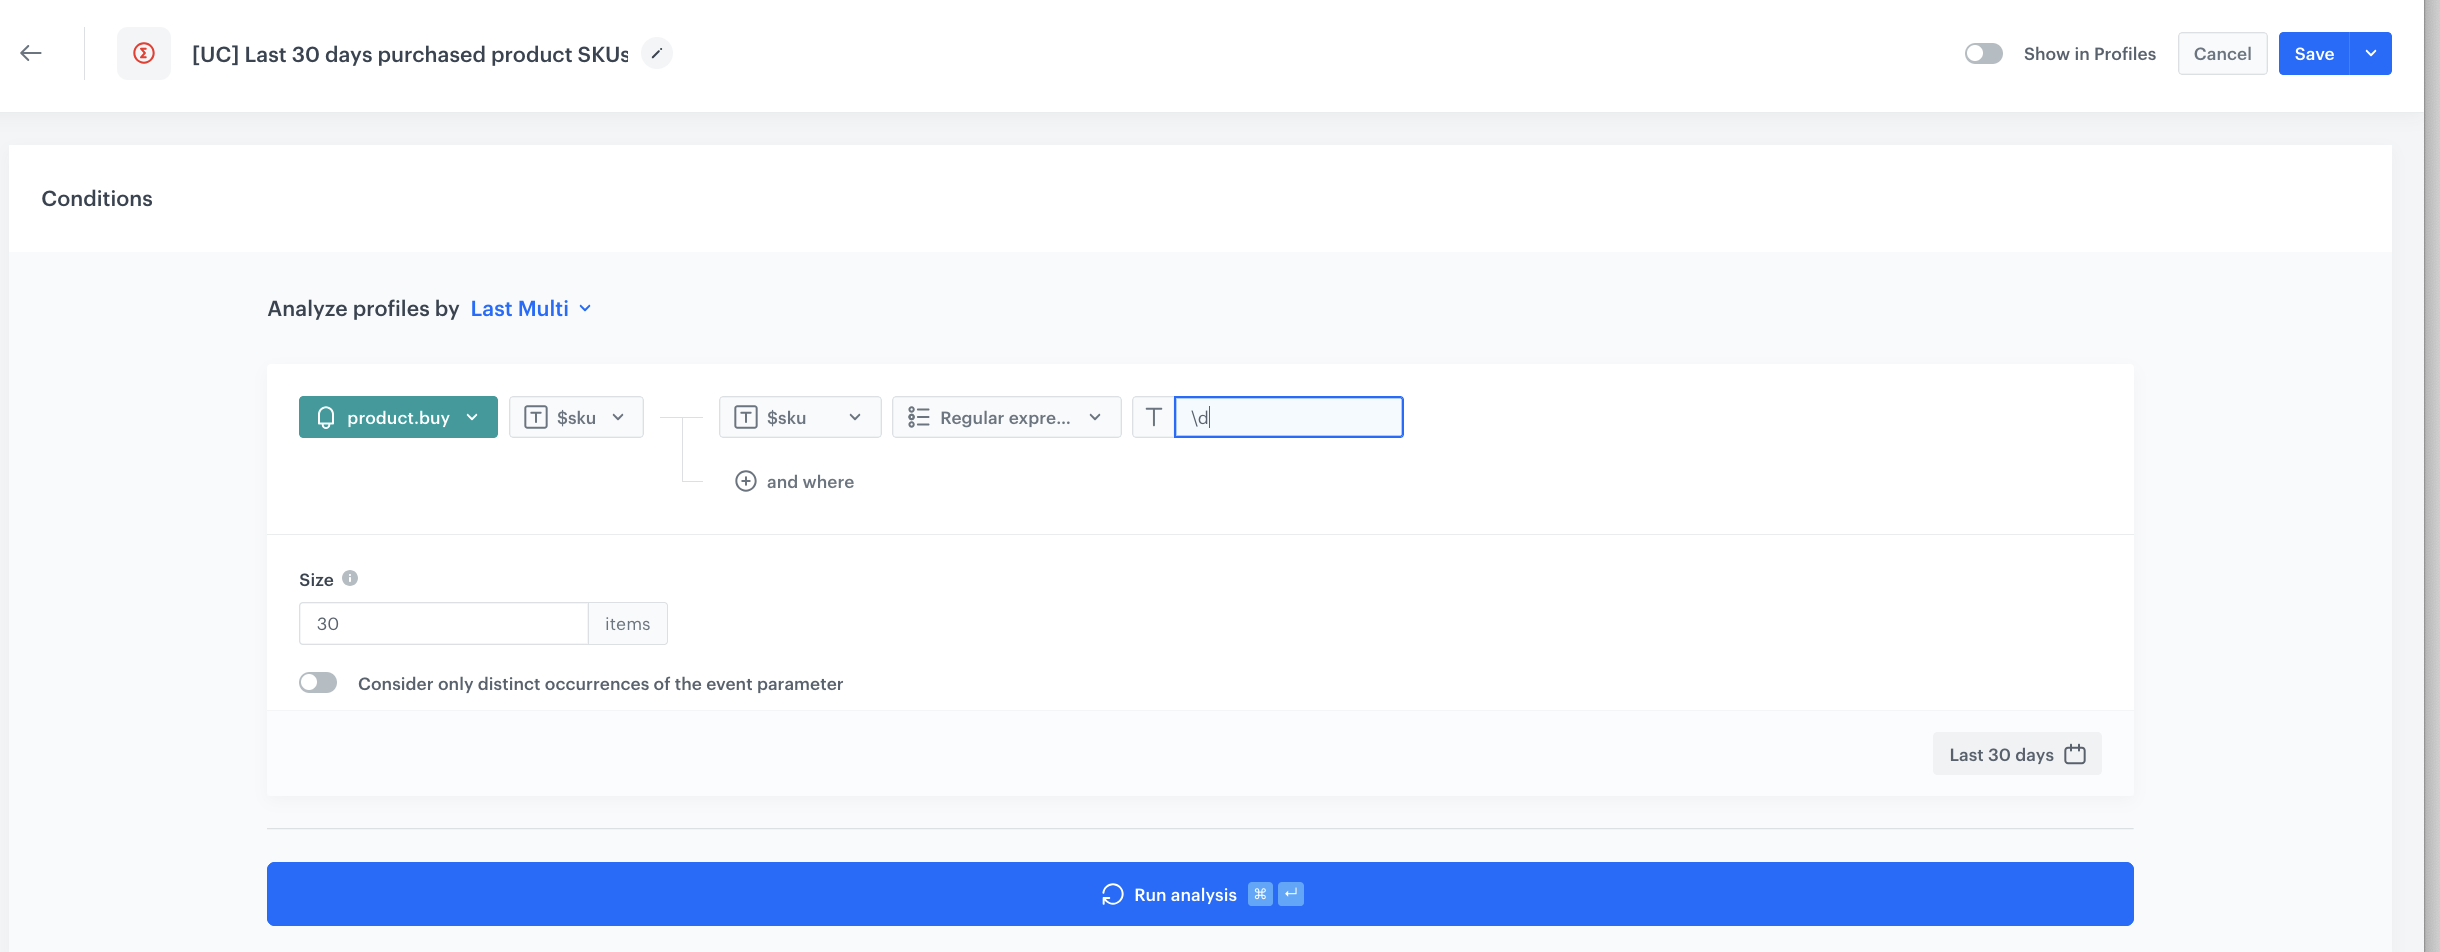
Aggregate collecting recently purchased product SKUs
This aggregate collects SKUs of products the customer has purchased recently. It is used as a "Not in array" filter in other aggregates to exclude products the customer has already bought — there is no need to notify them about a price drop on something they already own.
- Go to
 Behavioral Data Hub > Live Aggregates > Create aggregate.
 - As the aggregate type, select Profile.
- Enter the name of the aggregate, for example
Last 30 days purchased product SKUs. - Click Analyze profiles by and select Last Multi and size: 30.
- From the Choose event dropdown list, select the Bought product event.
- As the event parameter, select $sku.
- Click the + where button:
- From the Choose parameter dropdown list, select the $sku parameter.
- From the Choose operator dropdown list, select Is not empty.
- Define the period to the last 30 days.
- Save the aggregate.
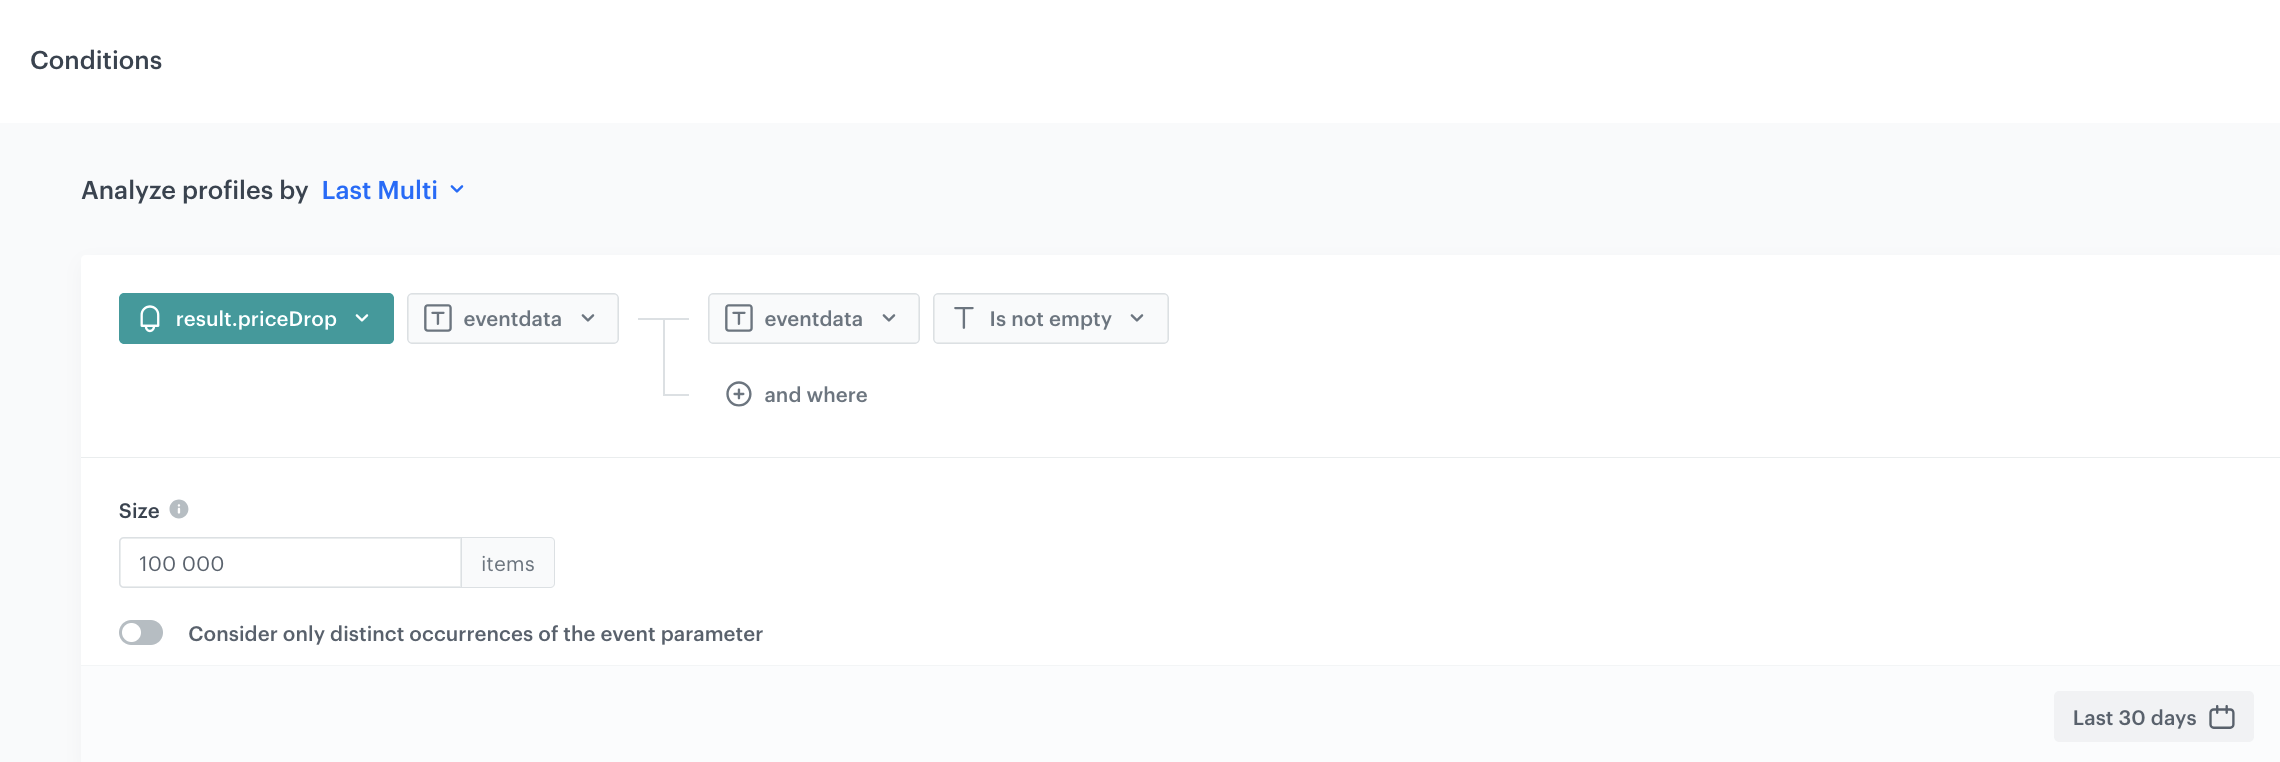
Aggregate collecting previous price drop event data (global exclusion)
This aggregate analyzes eventdata from previous results.priceDrop events. The snippet parses the excluded field from this data to prevent sending the same products again in subsequent campaign runs.
The key behavior here is that a product is only added to the exclusion list when it has been actually communicated to the customer. The fact that a results.priceDrop event was generated on a given day does not automatically mean the customer received a message — if no products had a price drop, the event will be empty and no exclusion occurs. This ensures that users are not blocked from future campaigns unnecessarily.
The aggregate uses a period setting (default: 30 days) which lets you control how long a product remains excluded after being communicated. After this period expires, the product becomes eligible again.
- Go to
 Behavioral Data Hub > Live Aggregates > Create aggregate.
 - As the aggregate type, select Profile.
- Enter the name of the aggregate, for example
Last price drop event data. - Click Analyze profiles by and select Last Multi and size: 100 000.
- From the Choose event dropdown list, select the results.priceDrop event.
- As the event parameter, select eventdata.
- Click the + where button:
- From the Choose parameter dropdown list, select the eventdata parameter.
- From the Choose operator dropdown list, select Is not empty.
- Define the period to the last 30 days.
- Save the aggregate.
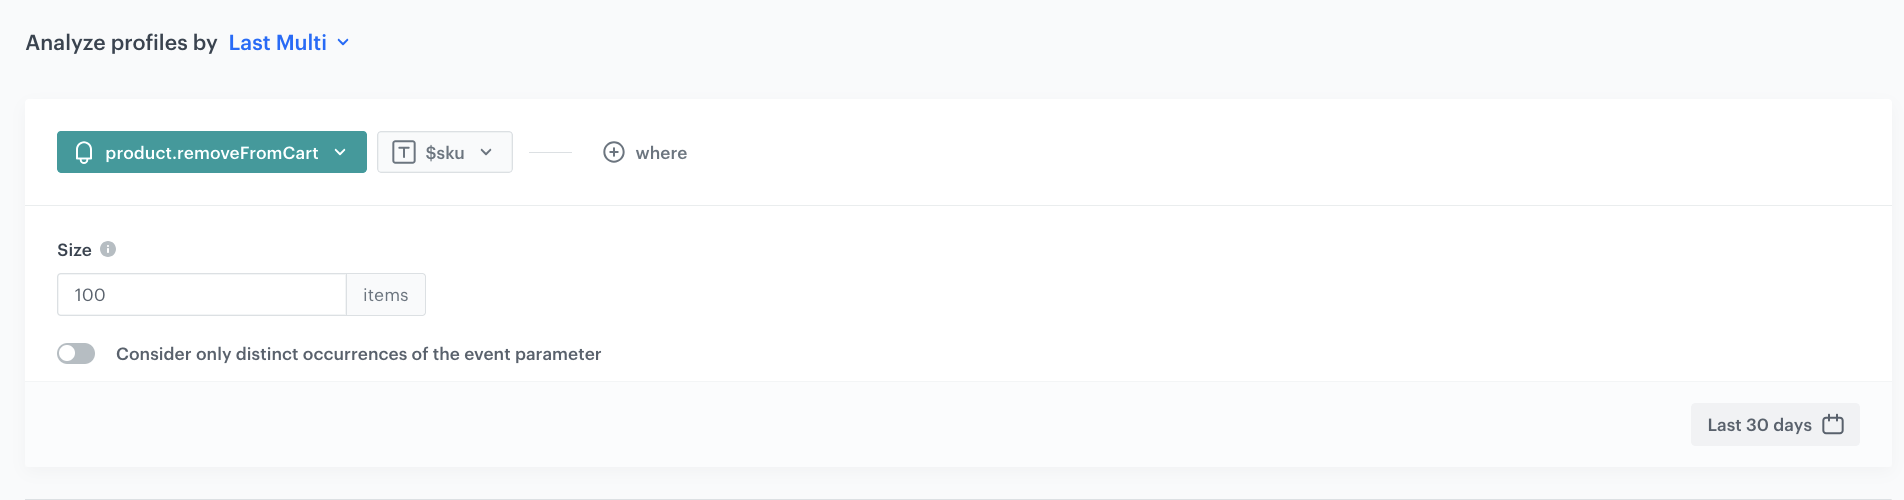
Aggregate collecting products removed from cart
This aggregate collects SKUs of all products the customer has removed from their cart. It is used as an exclusion filter in the cart SKU aggregate to ensure that products intentionally removed from the cart are not included in the price drop communication.
- Go to Behavioral Data Hub > Live Aggregates > Create aggregate.
- As the aggregate type, select Profile.
- Enter the name of the aggregate, for example
Remove from cart all. - Click Analyze profiles by and select Last Multi and size: 100.
- From the Choose event dropdown list, select the
product.removeFromCartevent. - As the event parameter, select $sku.
- Define the period to the last 30 days.
- Save the aggregate.
Favorites aggregates
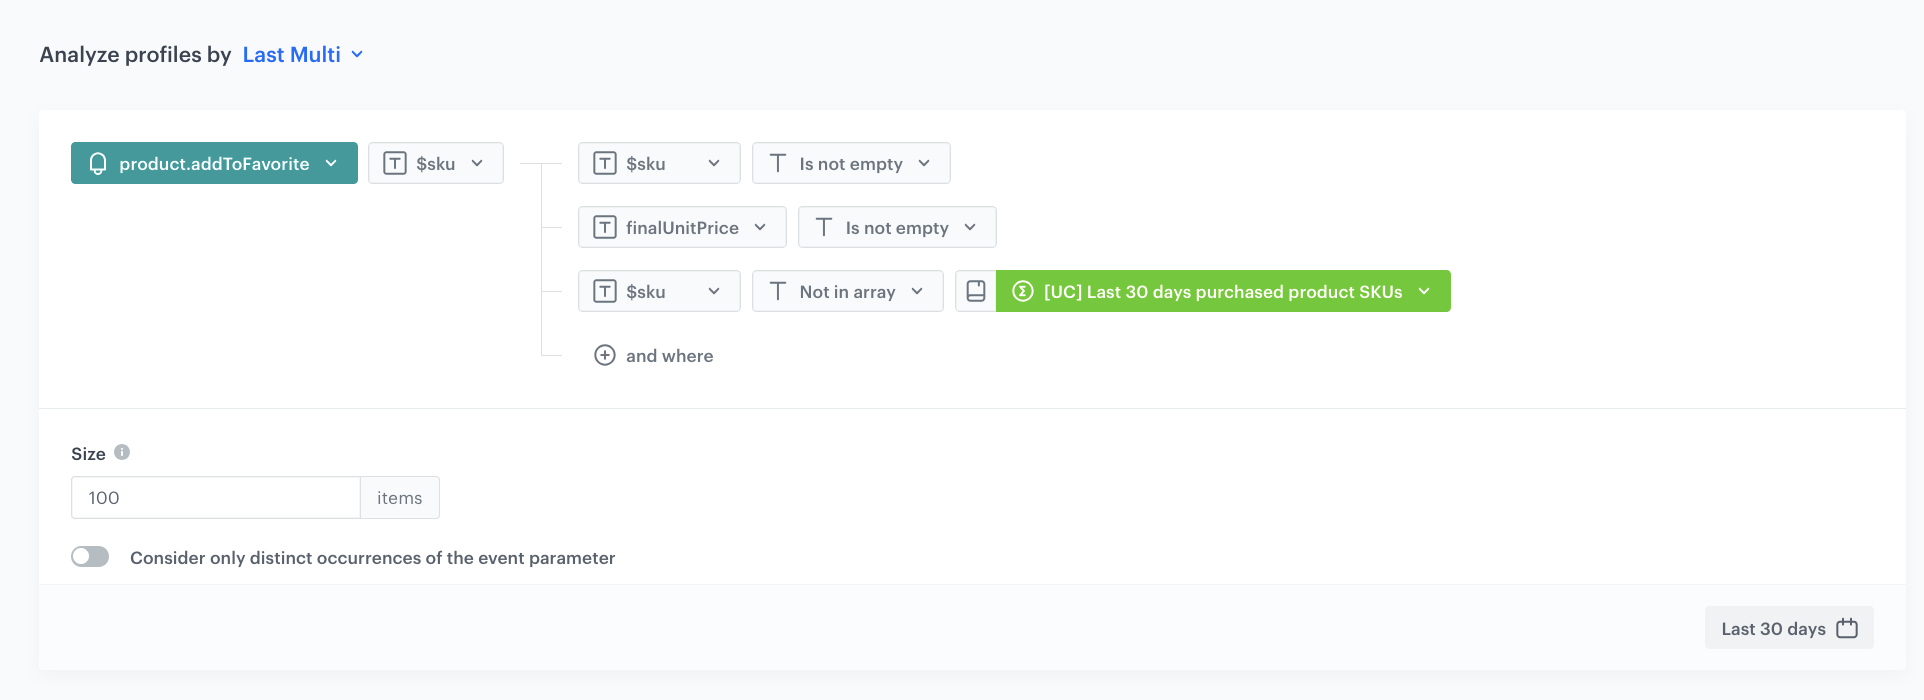
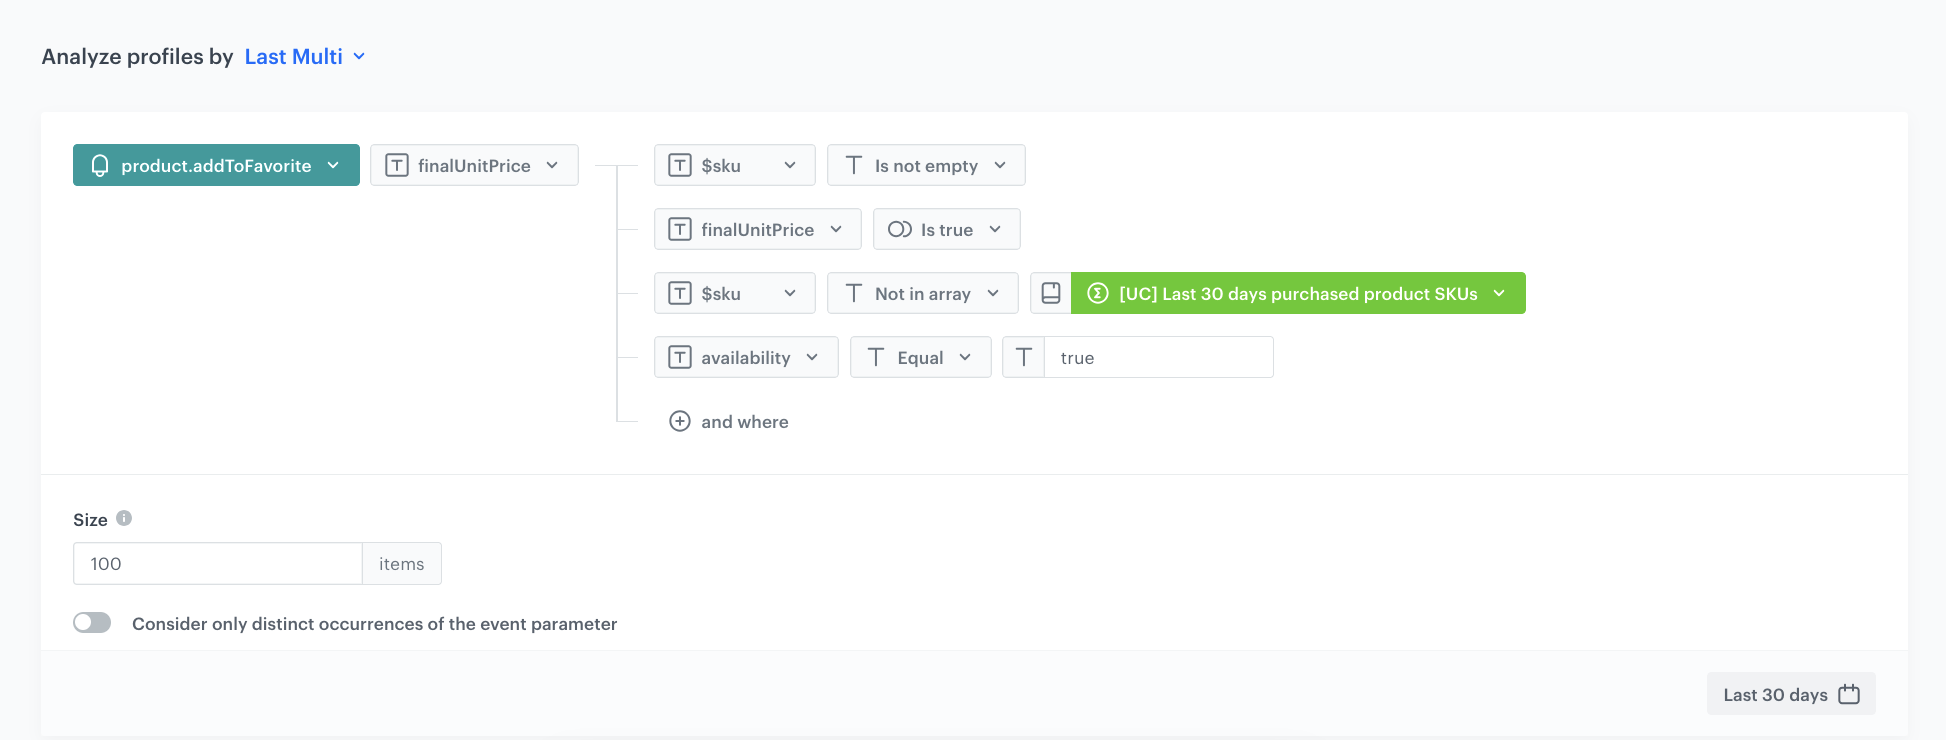
Aggregate collecting favorite product SKUs
This aggregate collects SKUs of products added to favorites that have not been purchased recently.
- Go to Behavioral Data Hub > Live Aggregates > Create aggregate.
- As the aggregate type, select Profile.
- Enter the name of the aggregate, for example
Favorite products with lower price - SKUs. - Click Analyze profiles by and select Last Multi and size: 1000.
- From the Choose event dropdown list, select the product.addToFavorite event.
- As the event parameter, select $sku.
- Click the + where button and add the following conditions:
$skuIs not empty — ensures the SKU parameter exists.finalUnitPriceIs not empty — ensures the price parameter exists.$skuNot in array → select the aggregate Last 30 days purchased product SKUs. This excludes products that the customer has already bought.
- Define the period to the last 30 days.
- Save the aggregate.
Aggregate collecting favorite product prices
This aggregate collects the prices (finalUnitPrice) recorded at the time when products were added to favorites. These prices are later compared with current catalog prices in the snippet to detect price drops.
- Go to Behavioral Data Hub > Live Aggregates > Create aggregate.
- As the aggregate type, select Profile.
- Enter the name of the aggregate, for example
Favorite products with lower price - prices. - Click Analyze profiles by and select Last Multi and size: 1000.
- From the Choose event dropdown list, select the product.addToFavorite event.
- As the event parameter, select finalUnitPrice.
- Click the + where button and add the same conditions as in the SKU aggregate:
$skuIs not empty.finalUnitPriceIs not empty.$skuNot in array → select the aggregate Last 30 days purchased product SKUs.
- Define the period to the last 30 days.
- Save the aggregate.
It is critical that the conditions defined in the SKU and price aggregates for each interaction type are identical. The snippet pairs SKUs with prices by array index, so any mismatch in filtering conditions would cause incorrect price comparisons.
Cart aggregates
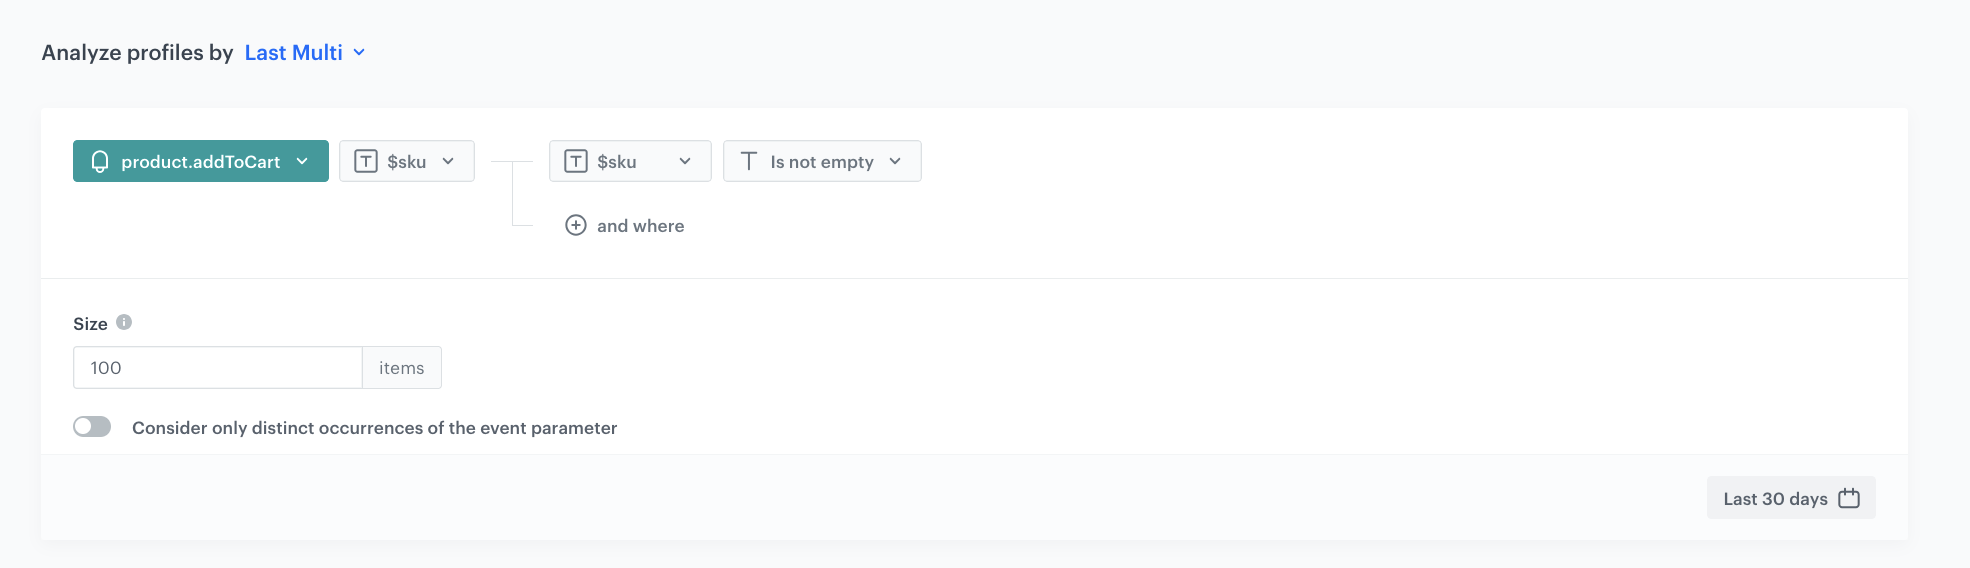
Aggregate collecting cart product SKUs
This aggregate collects SKUs of products added to cart that have not been removed from cart or recently purchased.
- Go to Behavioral Data Hub > Live Aggregates > Create aggregate.
- As the aggregate type, select Profile.
- Enter the name of the aggregate, for example
Cart products with lower price - SKUs. - Click Analyze profiles by and select Last Multi and size: 1000.
- From the Choose event dropdown list, select the product.addToCart event.
- As the event parameter, select $sku.
- Click the + where button and add the following conditions:
$skuIs not empty — ensures the SKU value exists.
- Define the period to the last 30 days.
- Save the aggregate.
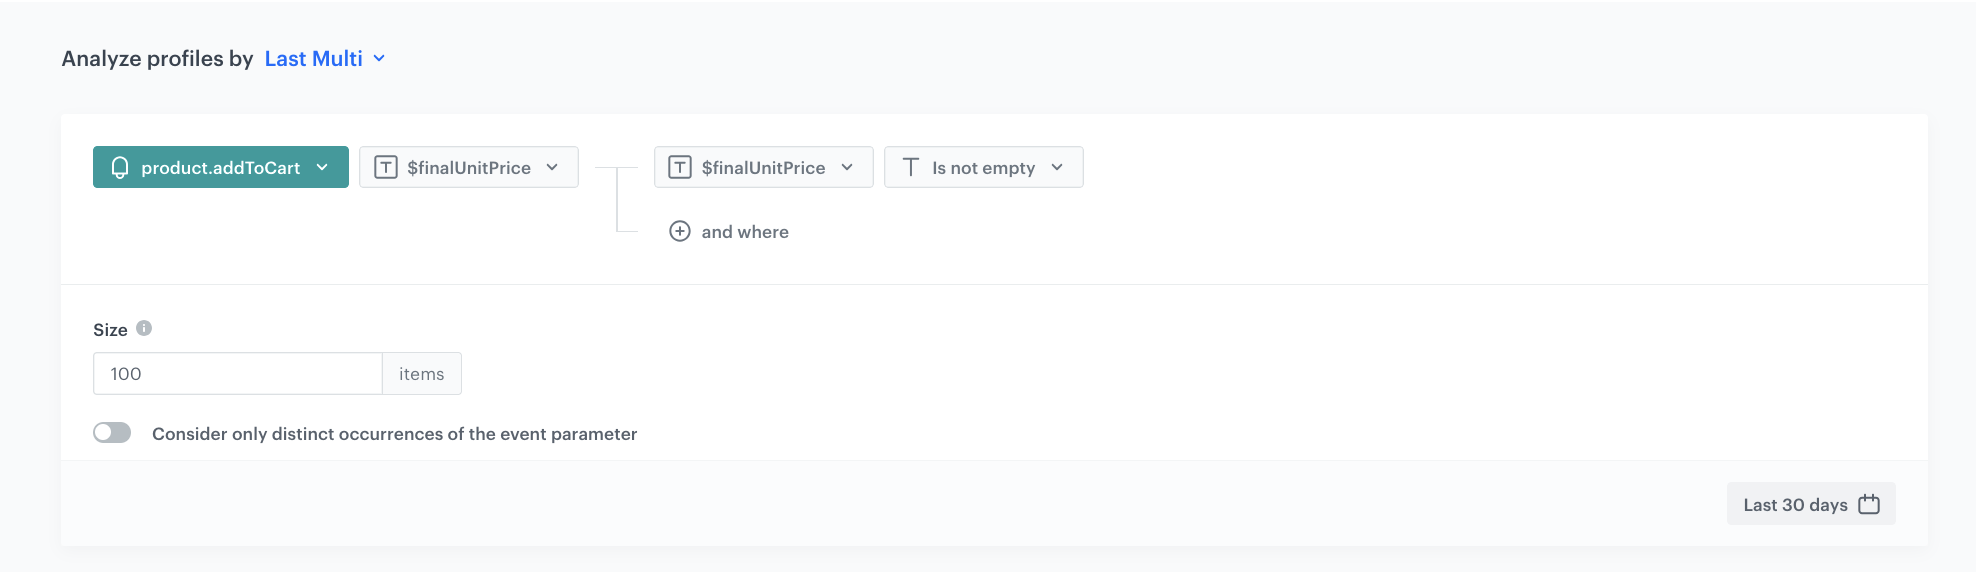
Aggregate collecting cart product prices
This aggregate collects the prices recorded at the time when products were added to cart.
- Go to Behavioral Data Hub > Live Aggregates > Create aggregate.
- As the aggregate type, select Profile.
- Enter the name of the aggregate, for example
Cart products with lower price - prices. - Click Analyze profiles by and select Last Multi and size: 1000.
- From the Choose event dropdown list, select the product.addToCart event.
- As the event parameter, select $finalUnitPrice.
- Click the + where button and add the following conditions:
$finalUnitPriceIs not empty — ensures the price value exists.
- Define the period to the last 30 days.
- Save the aggregate.
Mobile app viewed aggregates
The mobile app viewed aggregates use the product.view event and the sku parameter, while the desktop website viewed aggregates use the page.visit event and product:retailer_part_no. This difference reflects how product views are tracked on each platform. Make sure to use the correct event and parameter names for your implementation.
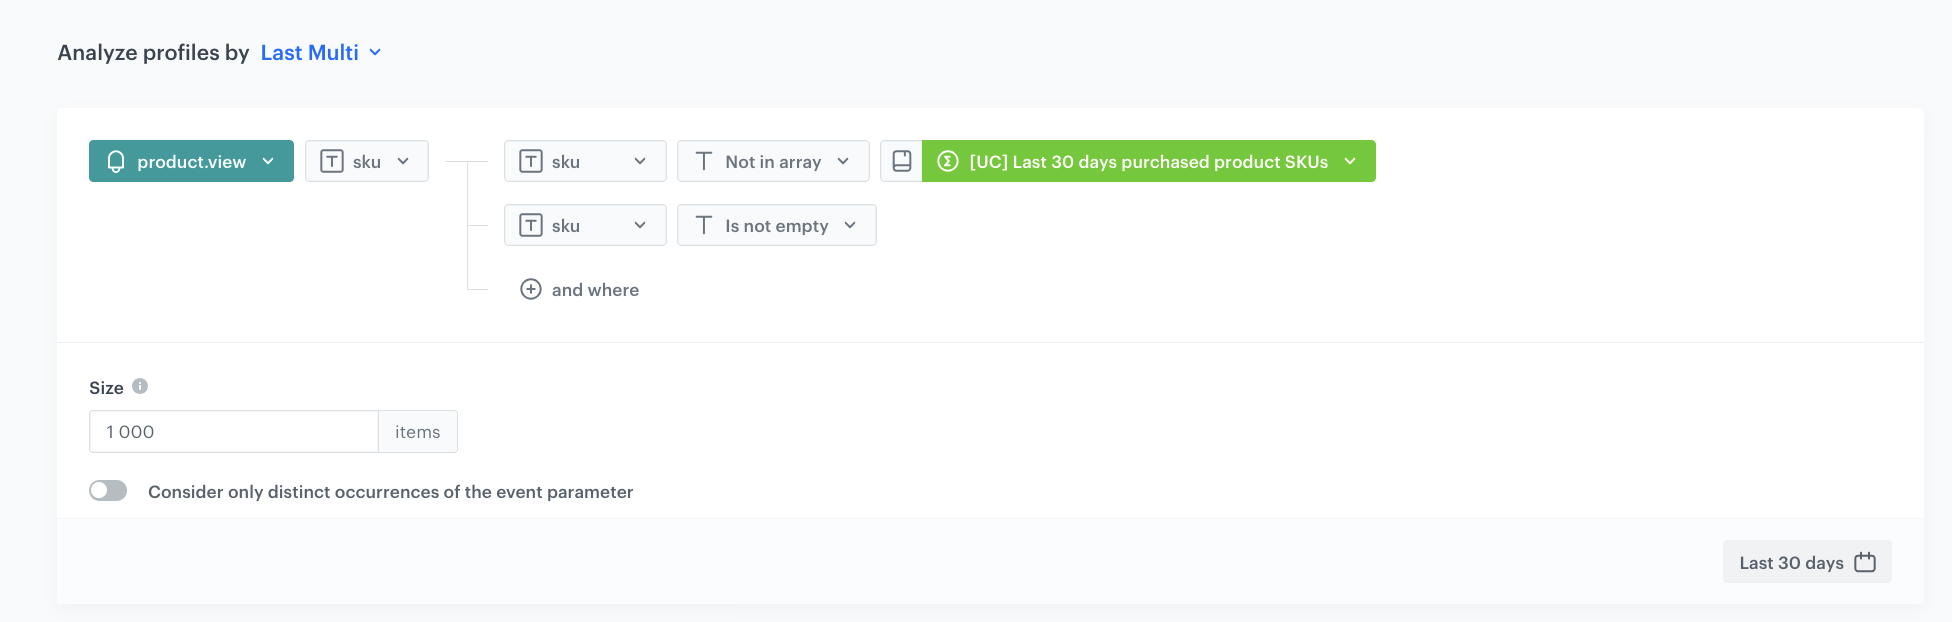
Aggregate collecting mobile app viewed product SKUs
This aggregate collects SKUs of products viewed in the mobile app that have not been recently purchased.
- Go to Behavioral Data Hub > Live Aggregates > Create aggregate.
- As the aggregate type, select Profile.
- Enter the name of the aggregate, for example
Mobile app viewed products - SKUs. - Click Analyze profiles by and select Last Multi and size: 1000.
- From the Choose event dropdown list, select the product.view event.
- As the event parameter, select sku.
- Click the + where button and add the following conditions:
skuIs not empty — ensures the SKU parameter exists.skuNot in array → select the aggregate Last 30 days purchased product SKUs. This excludes products the customer has already bought.
- Define the period to the last 30 days.
- Save the aggregate.
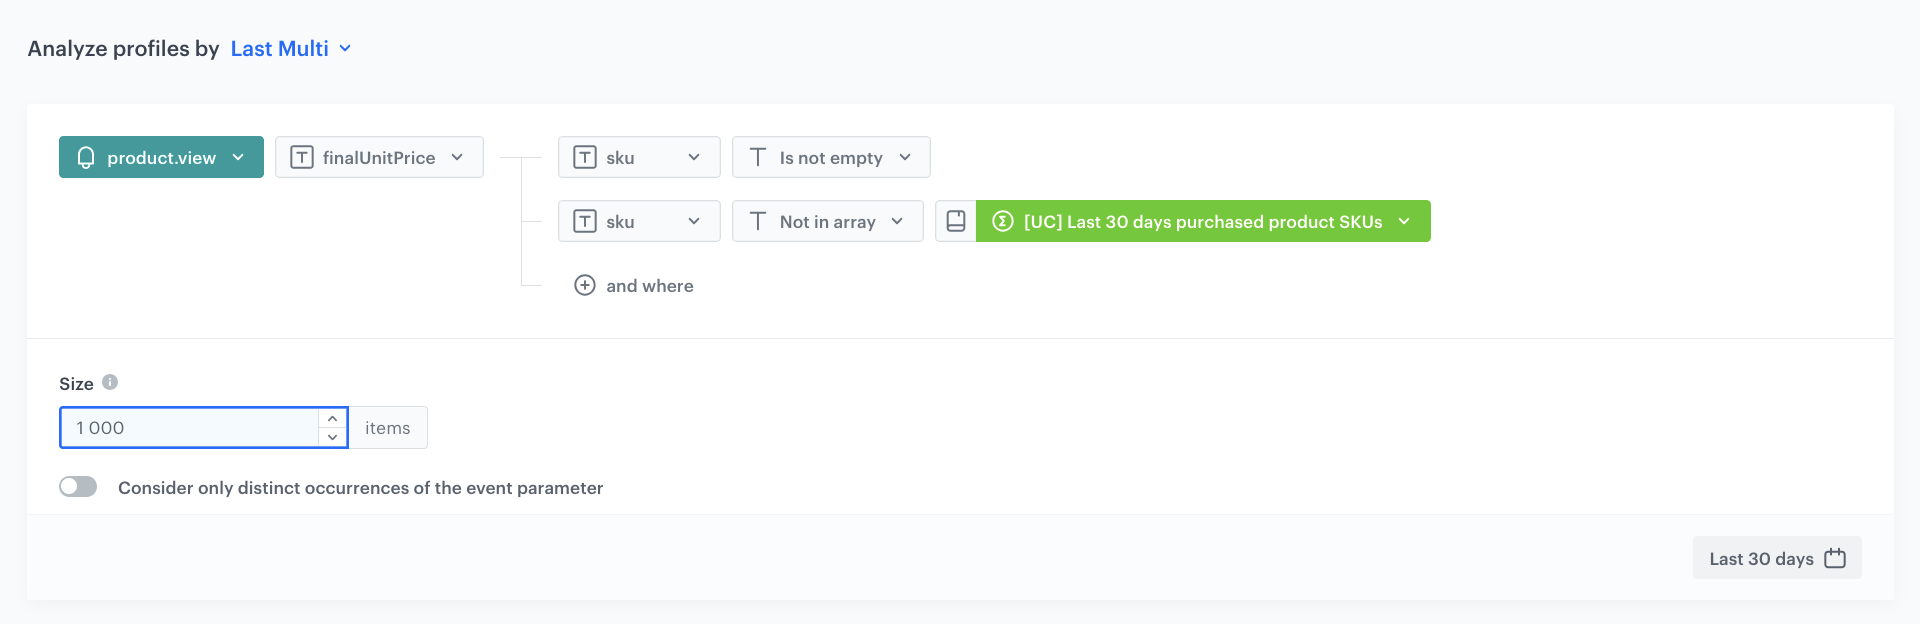
Aggregate collecting mobile app viewed product prices
This aggregate collects the prices (finalUnitPrice) recorded at the time when products were viewed in the mobile app.
- Go to Behavioral Data Hub > Live Aggregates > Create aggregate.
- As the aggregate type, select Profile.
- Enter the name of the aggregate, for example
Mobile app viewed products - prices. - Click Analyze profiles by and select Last Multi and size: 1000.
- From the Choose event dropdown list, select the product.view event.
- As the event parameter, select finalUnitPrice.
- Click the + where button and add the following conditions:
skuIs not empty.skuNot in array → select the aggregate Last 30 days purchased product SKUs.
- Define the period to the last 30 days.
- Save the aggregate.
Desktop website viewed aggregates
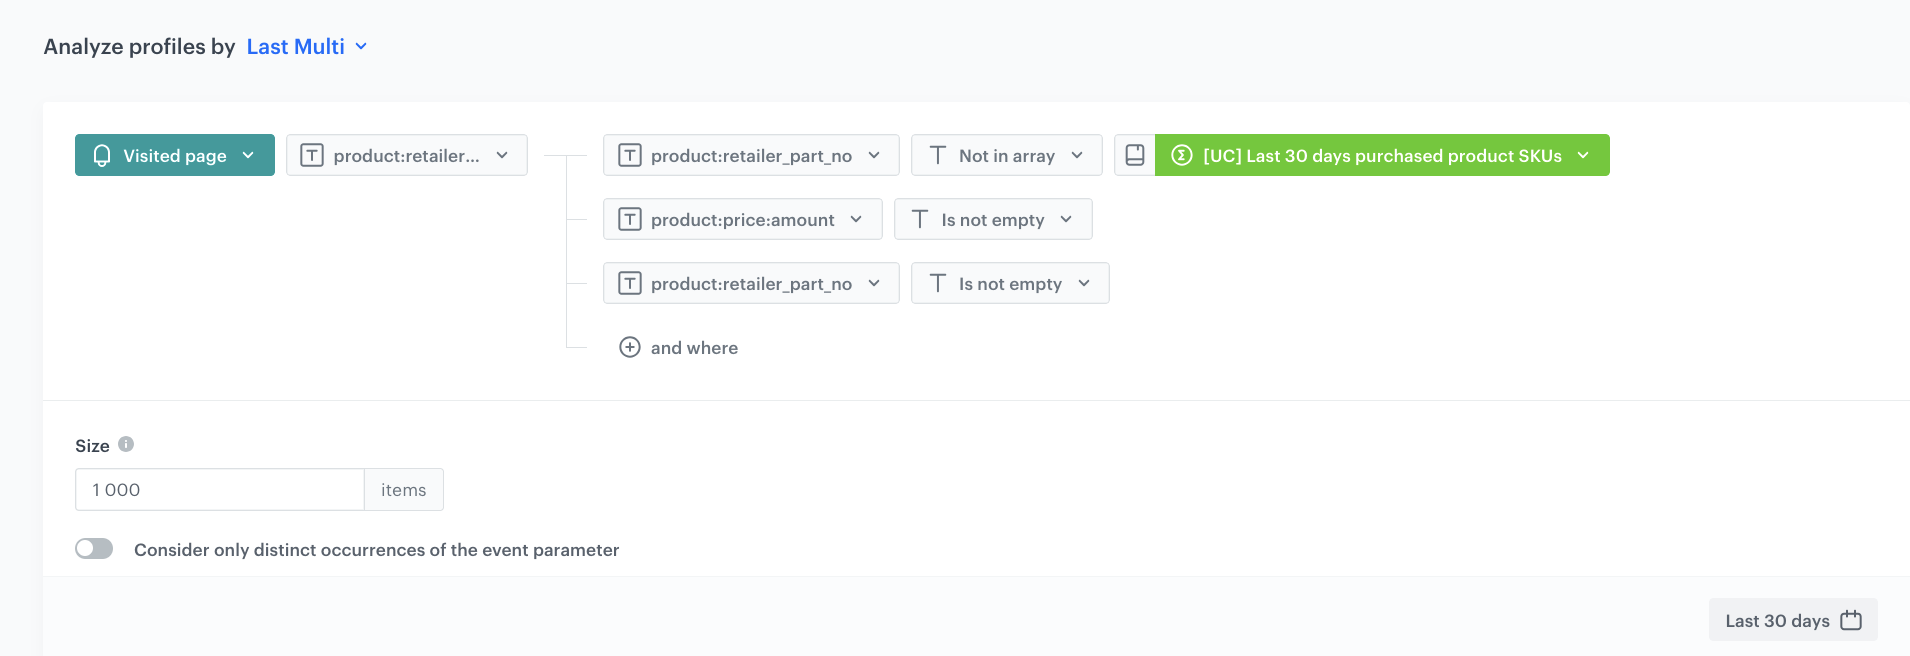
Aggregate collecting desktop website viewed product SKUs
This aggregate collects product:retailer_part_no values of products visited on the website that have not been recently purchased.
- Go to Behavioral Data Hub > Live Aggregates > Create aggregate.
- As the aggregate type, select Profile.
- Enter the name of the aggregate, for example
Desktop website viewed products - SKUs. - Click Analyze profiles by and select Last Multi and size: 1000.
- From the Choose event dropdown list, select the
page.visitevent. - As the event parameter, select product:retailer_part_no.
- Click the + where button and add the following conditions:
product:retailer_part_noIs not empty — ensures the product ID exists.product:retailer_part_noNot in array → select the aggregate Last 30 days purchased product SKUs. This excludes products the customer has already bought.product:price:amountIs not empty — ensures the price parameter exists.
- Define the period to the last 30 days.
- Save the aggregate.
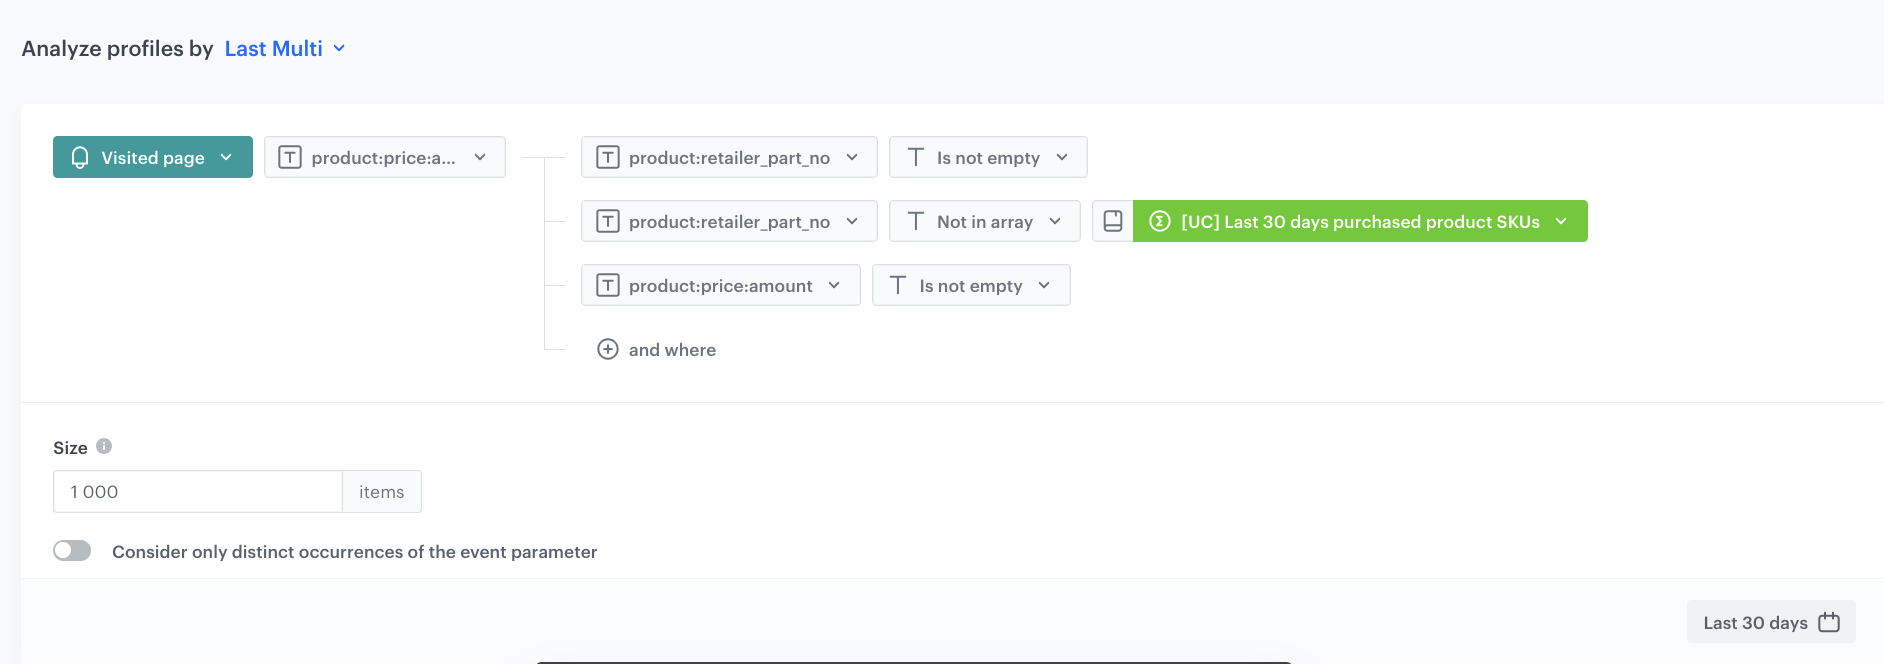
Aggregate collecting desktop website viewed product prices
This aggregate collects the prices (product:price:amount) recorded at the time when products were visited on the website.
- Go to Behavioral Data Hub > Live Aggregates > Create aggregate.
- As the aggregate type, select Profile.
- Enter the name of the aggregate, for example
Desktop website viewed products - prices. - Click Analyze profiles by and select Last Multi and size: 1000.
- From the Choose event dropdown list, select the
page.visitevent. - As the event parameter, select product:price:amount.
- Click the + where button and add the following conditions:
product:retailer_part_noIs not empty.product:retailer_part_noNot in array → select the aggregate Last 30 days purchased product SKUs.product:price:amountIs not empty.
- Define the period to the last 30 days.
- Save the aggregate.
Create the snippet with price drop detection logic
The snippet is the core of this use case. It is stored in Data Modeling Hub > Snippets and referenced by its hash in the Generate Event node.
Create the snippet
- Go to
 Data Modeling Hub > Snippets > Add snippet.
 - Enter the name of the snippet, for example
Price drop detection logic. - Paste the following Jinjava code:
{%- set final_objects_for_alert=[] -%}
{%- set added_objects=[] -%}
{%- set last_add_fav_skus=[] -%}
{%- set last_add_fav_prices=[] -%}
{%- aggregate 1227553d-114a-3c19-b618-6c3afc9d7a32 -%}
{%- for items in aggregate_result -%}
{%- do last_add_fav_skus.append(items) -%}
{%- endfor -%}
{%- endaggregate -%}
{%- aggregate 1227553d-114a-3c19-b618-6c3afc9d7a32 -%}
{%- for price in aggregate_result -%}
{%- do last_add_fav_prices.append(price) -%}
{%- endfor -%}
{%- endaggregate -%}
{%- for added in last_add_fav_skus -%}
{%- do added_objects.append({'sku': added, 'price': last_add_fav_prices[loop.index0]}) -%}
{%- endfor -%}
{%- set final_price_alert_fav_skus=[] -%}
{%- for item in added_objects -%}
{%- catalogitemv2.(item.sku) allowEmpty=True -%}
{%- set object = catalog_result -%}
{%- if object.availability == 'true' -%}
{%- set _catalog_price = catalog_result.get('effectivePrice') -%}
{%- set catalog_price = _catalog_price | float -%}
{%- set item_price = item.price|float -%}
{%- set is_discounted = item_price > catalog_price -%}
{%- if is_discounted -%}
{%- do final_price_alert_fav_skus.append(item) -%}
{%- endif -%}
{%- endif -%}
{%- endcatalogitemv2 -%}
{%- endfor -%}
{%- set added_objects=[] -%}
{%- set last_add_fav_skus=[] -%}
{%- set last_add_fav_prices=[] -%}
{%- aggregate 34f469d8-f83d-32e5-b0e1-10f73b0a0179 -%}
{%- for items in aggregate_result -%}
{%- do last_add_fav_skus.append(items) -%}
{%- endfor -%}
{%- endaggregate -%}
{%- aggregate 4148b6aa-4488-39d1-81b8-a29ed5b23424 -%}
{%- for price in aggregate_result -%}
{%- do last_add_fav_prices.append(price) -%}
{%- endfor -%}
{%- endaggregate -%}
{%- for added in last_add_fav_skus -%}
{%- do added_objects.append({'sku': added, 'price': last_add_fav_prices[loop.index0]}) -%}
{%- endfor -%}
{%- set final_price_alert_cart_skus=[] -%}
{%- for item in added_objects -%}
{%- catalogitemv2.(item.sku) allowEmpty=True -%}
{%- set object = catalog_result -%}
{%- if object.availability == 'true' -%}
    {%- set _catalog_price = catalog_result.get('effectivePrice') -%}
    {%- set catalog_price = _catalog_price | float -%}
    {%- set item_price = item.price|float -%}
    {%- set is_discounted = item_price > catalog_price -%}
    {%- if is_discounted -%}
    {%- do final_price_alert_cart_skus.append(item) -%}
    {%- endif -%}
{%- endif -%}
{%- endcatalogitemv2 -%}
{%- endfor -%}
{%- set added_objects=[] -%}
{%- set last_add_fav_skus=[] -%}
{%- set last_add_fav_prices=[] -%}
{%- aggregate 51d1daac-8483-351f-ae01-ea0b5455fba0 -%}
{%- for items in aggregate_result -%}
{%- do last_add_fav_skus.append(items) -%}
{%- endfor -%}
{%- endaggregate -%}
{%- aggregate 51d1daac-8483-351f-ae01-ea0b5455fba0 -%}
{%- for price in aggregate_result -%}
{%- do last_add_fav_prices.append(price) -%}
{%- endfor -%}
{%- endaggregate -%}
{%- for added in last_add_fav_skus -%}
{%- do added_objects.append({'sku': added, 'price': last_add_fav_prices[loop.index0]}) -%}
{%- endfor -%}
{%- set final_price_alert_desktop_skus=[] -%}
{%- for item in added_objects -%}
{%- catalogitemv2.(item.sku) allowEmpty=True -%}
{%- set object = catalog_result -%}
{%- if object.availability == 'true' -%}
    {%- set _catalog_price = catalog_result.get('effectivePrice') -%}
    {%- set catalog_price = _catalog_price | float -%}
    {%- set item_price = item.price|float -%}
    {%- set is_discounted = item_price > catalog_price -%}
    {%- if is_discounted -%}
    {%- do final_price_alert_desktop_skus.append(item) -%}
    {%- endif -%}
{%- endif -%}
{%- endcatalogitemv2 -%}
{%- endfor -%}
{%- set added_objects=[] -%}
{%- set last_add_fav_skus=[] -%}
{%- set last_add_fav_prices=[] -%}
{%- aggregate adb929ff-f56c-37d6-b5d8-61d88449d2e1 -%}
{%- for items in aggregate_result -%}
{%- do last_add_fav_skus.append(items) -%}
{%- endfor -%}
{%- endaggregate -%}
{%- aggregate adb929ff-f56c-37d6-b5d8-61d88449d2e1 -%}
{%- for price in aggregate_result -%}
{%- do last_add_fav_prices.append(price) -%}
{%- endfor -%}
{%- endaggregate -%}
{%- for added in last_add_fav_skus -%}
{%- do added_objects.append({'sku': added, 'price': last_add_fav_prices[loop.index0]}) -%}
{%- endfor -%}
{%- set final_price_alert_mobile_skus=[] -%}
{%- for item in added_objects -%}
{%- catalogitemv2.(item.sku) allowEmpty=True -%}
{%- set object = catalog_result -%}
{%- if object.availability == 'true' -%}
    {%- set _catalog_price = catalog_result.get('effectivePrice') -%}
    {%- set catalog_price = _catalog_price | float -%}
    {%- set item_price = item.price|float -%}
    {%- set is_discounted = item_price > catalog_price -%}
    {%- if is_discounted -%}
    {%- do final_price_alert_mobile_skus.append(item) -%}
    {%- endif -%}
{%- endif -%}
{%- endcatalogitemv2 -%}
{%- endfor -%}
{%- set seen = [] -%}
{%- set excluded = [] -%}
{%- aggregate b5fc6392-65f1-32d3-9ed1-a41f209ea4c5 -%}
{%- for result in aggregate_result -%}
{%- set raw = result|string -%}
{%- set split1 = raw|split('excluded=[') -%}
{%- if split1|length > 1 -%}
    {%- set inside = split1[1]|split(']') -%}
    {%- for item in inside[0]|split(', ') -%}
    {%- set trimmed = item|trim -%}
    {%- if trimmed != '' and (trimmed in excluded == false) -%}
        {%- do excluded.append(trimmed) -%}
    {%- endif -%}
    {%- endfor -%}
{%- endif -%}
{%- endfor -%}
{%- endaggregate -%}
{%- set filtered_cart = [] -%}
{%- for item in final_price_alert_cart_skus -%}
{%- if item.sku != '' and (item.sku in excluded == false) and (item.sku in seen == false) -%}
{%- do filtered_cart.append(item.sku) -%}
{%- do seen.append(item.sku) -%}
{%- endif -%}
{%- endfor -%}
{%- set filtered_fav = [] -%}
{%- for item in final_price_alert_fav_skus -%}
{%- if item.sku != '' and (item.sku in excluded == false) and (item.sku in seen == false) -%}
{%- do filtered_fav.append(item.sku) -%}
{%- do seen.append(item.sku) -%}
{%- endif -%}
{%- endfor -%}
{%- set filtered_viewMobile = [] -%}
{%- for item in final_price_alert_mobile_skus -%}
{%- if item.sku != '' and (item.sku in excluded == false) and (item.sku in seen == false) -%}
{%- do filtered_viewMobile.append(item.sku) -%}
{%- do seen.append(item.sku) -%}
{%- endif -%}
{%- endfor -%}
{%- set filtered_viewWeb = [] -%}
{%- for item in final_price_alert_desktop_skus -%}
{%- if item.sku != '' and (item.sku in excluded == false) and (item.sku in seen == false) -%}
{%- do filtered_viewWeb.append(item.sku) -%}
{%- do seen.append(item.sku) -%}
{%- endif -%}
{%- endfor -%}
{%- set new_excluded = [] -%}
{%- if filtered_cart|length > 0 -%}
{%- set new_excluded = filtered_cart -%}
{%- elif filtered_fav|length > 0 -%}
{%- set new_excluded = filtered_fav -%}
{%- elif filtered_viewMobile|length > 0 -%}
{%- set new_excluded = filtered_viewMobile -%}
{%- elif filtered_viewWeb|length > 0 -%}
{%- set new_excluded = filtered_viewWeb -%}
{%- endif -%}
{%- set finalObj = {'emailCartSku': filtered_cart,'emailCartCount': filtered_cart|length,'emailFavSku': filtered_fav,'emailFavCount': filtered_fav|length,'emailViewMobileSku': filtered_viewMobile,'emailViewMobileCount': filtered_viewMobile|length,'emailViewWebSku': filtered_viewWeb,'emailViewWebCount': filtered_viewWeb|length,'excluded': new_excluded} -%}{{ finalObj }}
Before using this snippet, you must:
- Go to config and replace boxes in the config with the actual aggregates you created in the previous steps.
- Replace
YOUR_CATALOG_NAMEwith the name of your item catalog (for example,AI Feed - default).
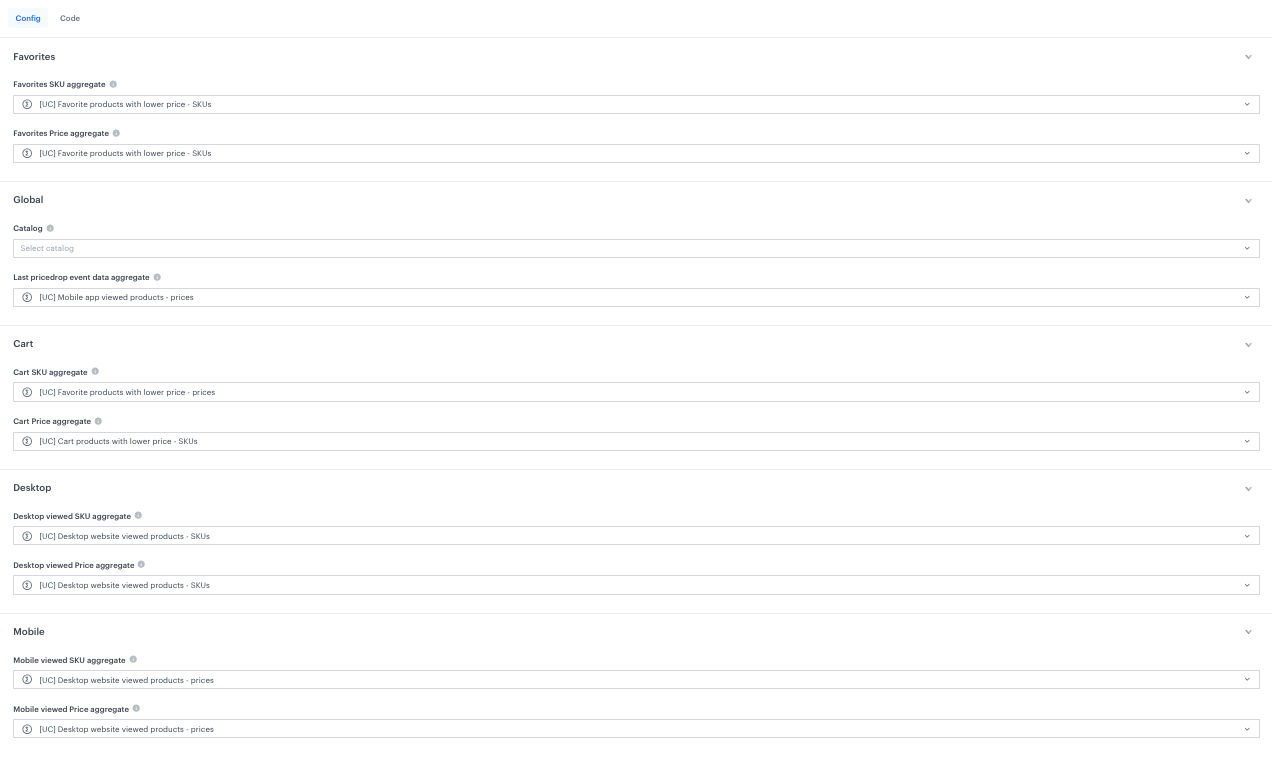
- Save the snippet for use in the Generate Event node.
How the snippet works
The snippet processes each interaction type in sequence using a repeating pattern. For each type, it:
- Loads two parallel arrays from aggregates — SKUs and prices — for products the user interacted with.
- Builds product objects combining SKU and price.
- Looks up each product in the catalog using
catalogitemv2. It checks two things:- Is the product still available (
availability == 'true')? - Is the current catalog price (
effectivePrice) lower than the price recorded at the time of user interaction? Only products passing both checks qualify as price-dropped.
- Is the product still available (
After processing all four interaction types, the snippet enters the global filtering and exclusion phase:
- Loads previous exclusions from the most recent
results.priceDropevent'seventdataparameter. It parses theexcluded=[...]field to get a list of SKUs that were already communicated. Filters each category by removing:
- Products from the previous exclusion list.
- Products already present in a higher-priority category (via the
seenlist), so the same SKU never appears in two categories.
- Determines the new exclusion list: Only products from the highest-priority non-empty category are added to
excluded. This ensures the next campaign run skips these products and moves to the next priority level.
The snippet also generates single-SKU fields per category (e.g.pushCartSku,pushFavSku) which are not used in this email workflow but can be consumed by a companion push workflow.
- Prepares push variants: For each category, takes only the last (most recent) product for push notifications (max 1 per category). These are included in the event data for use in a potential mobile push workflow.
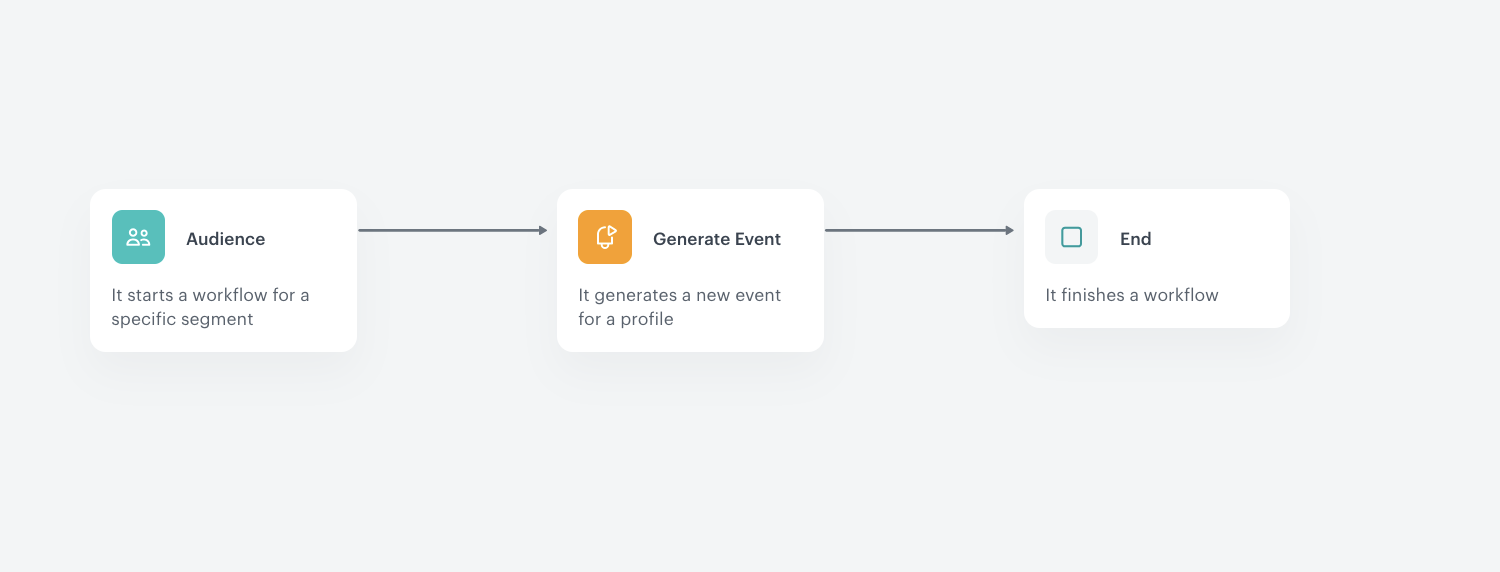
Create the workflow for detecting price drops
This workflow is responsible for selecting the target audience, running the snippet that detects price drops across all interaction types, and generating an enriched event that contains all the necessary data for the communication workflow.
By using a snippet in the Generate Event node, this approach offloads logic from aggregates and email templates, resulting in better optimization and simpler template design.
- Go to Automation Hub > Workflows > New workflow.
- Enter the name of the workflow.
Define the Audience trigger node
The audience conditions described below are an example configuration. You should adjust the specific events, time ranges, and consent conditions to match your business requirements and campaign frequency.
Start the workflow with the Audience node. In the configuration of the node:
- Set the Repeat runs option to repeatable and configure the desired interval (for example, once a day or once a week).
- Select the time zone.
- In the Audience section, choose New audience.
- Click Define conditions.
- Add the following conditions connected by the OR operator:
- From the Choose filter dropdown list, select the
page.visitevent. - From the Choose filter dropdown list, select the
product.addToFavoriteevent. - From the Choose filter dropdown list, select the
product.addToCartevent. - From the Choose filter dropdown list, select the
product.viewevent.
- From the Choose filter dropdown list, select the
- Add an AND condition to ensure the user has not already received a price drop email recently:
- From the Choose filter dropdown list, select the
message.sendevent. - Change Performed to Not performed.
- Click the + where button, select the diagramId parameter, set Equal to the diagram ID of the email communication workflow.
- Set the time range according to your desired sending frequency (for example, last 7 days).
- From the Choose filter dropdown list, select the
- Add an AND condition to ensure the user has marketing consent:
- From the Choose filter dropdown list, select the newsletter_agreement attribute.
- Set the operator to Equal and the value to
enabled.
- Confirm by clicking Apply.
The exclusion condition based on
message.sendwith a specificdiagramIdensures that only users who have actually received a price drop email are excluded from the next run. This is more precise than excluding based on theresults.priceDropevent, because the event is generated for all qualifying users — even those for whom no products had a price drop. Using event-based exclusion would unnecessarily block those users from entering the campaign on subsequent days.
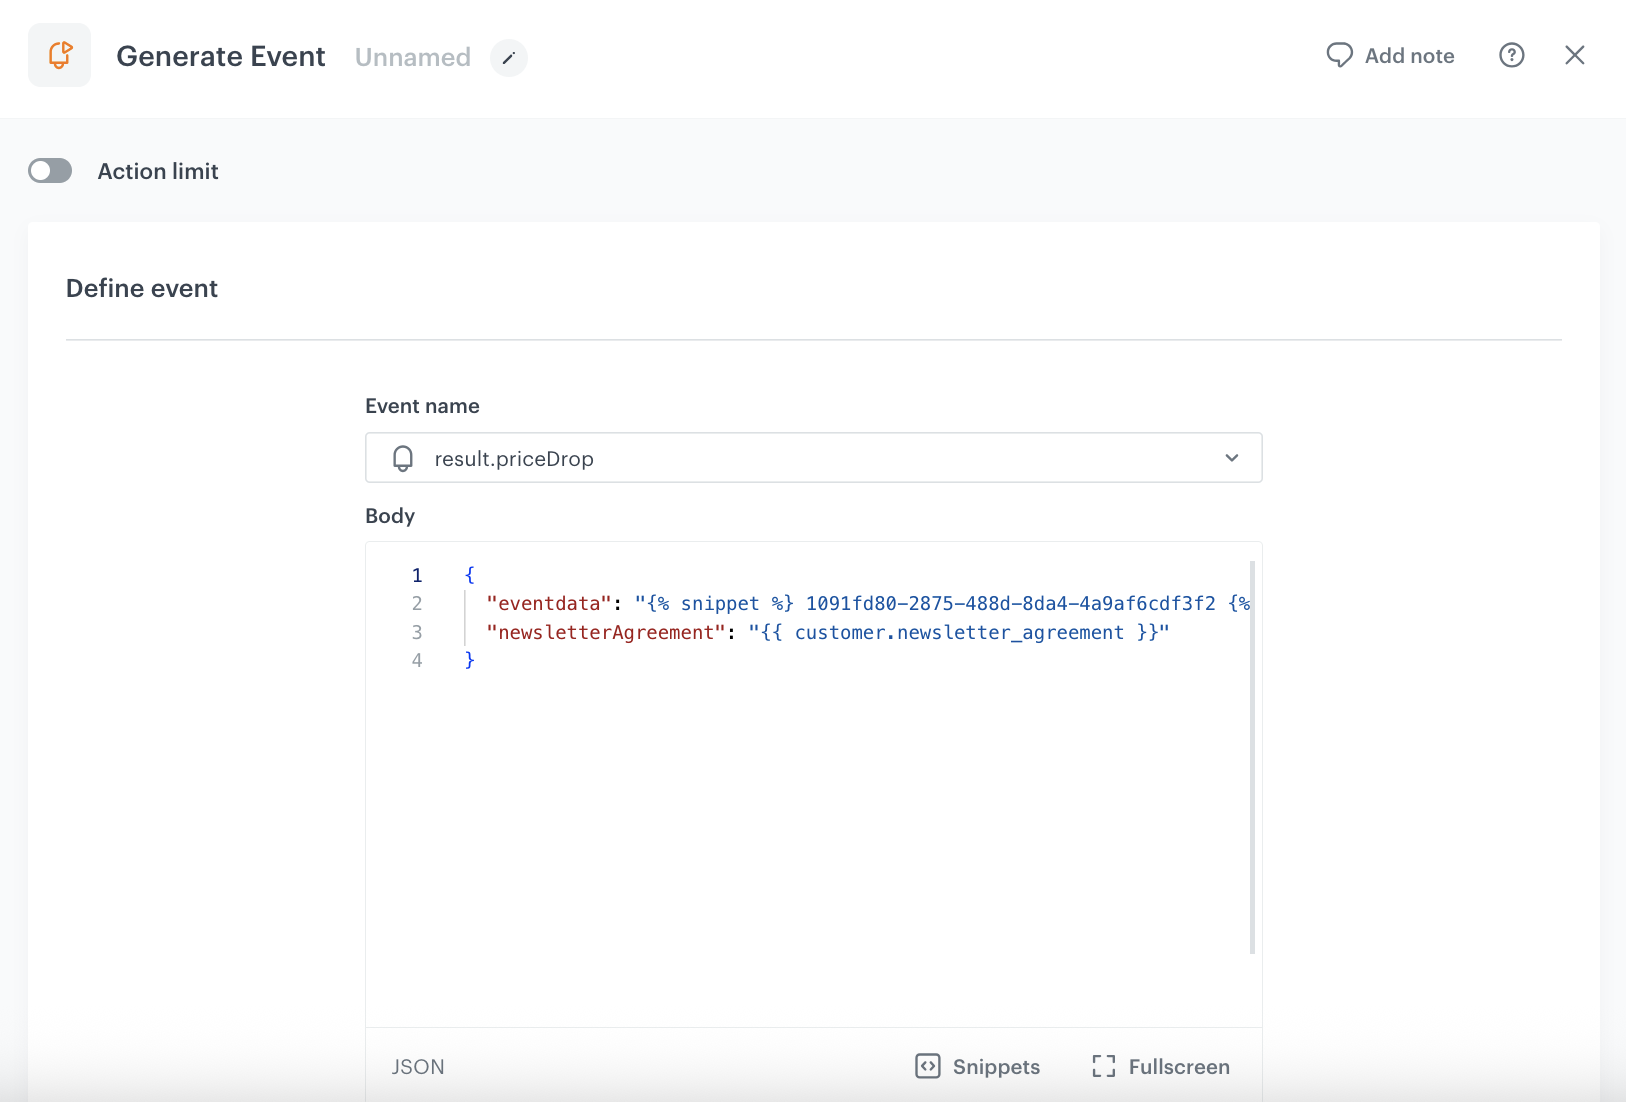
Configure the Generate Event node
This node generates a results.priceDrop event on each customer's profile. The event contains all the data needed by the communication workflow, including discounted product SKUs grouped by interaction type, product counts for each category, and the user's email consent status.
Add the Generate Event node. In the configuration of the node:
In the Event name field, enter
results.priceDrop.- In the Body section, enter the following structure:
{
      "eventdata": "{% snippet %} SNIPPET_HASH {% endsnippet %}",
      "newsletterAgreement": "{{ customer.newsletter_agreement }}",
        }
Where:
eventdata— references the snippet created in the previous step. ReplaceSNIPPET_HASHwith the actual snippet hash.newsletterAgreement— captures the user's email consent status at the time of event generation.
Optionally, you can add extra parameters to support further personalization in your email templates, such as loyalty program membership or customer tier.
The
eventdataparameter will be populated by the snippet. Below is an example of the generated output (the actual number of SKUs depends on each user's activity and which products have had a price drop):emailCartSku=[SKU1,SKU2], emailCartCount=2, emailFavSku=[SKU3], emailFavCount=1, emailViewMobileSku=[SKU4], emailViewMobileCount=1, emailViewWebSku=[SKU5,SKU6,SKU7], emailViewWebCount=3, pushCartSku=[SKU1], pushCartCount=1, pushFavSku=[SKU3], pushFavCount=1, pushViewMobileSku=[SKU4], pushViewMobileCount=1, pushViewWebSku=[SKU5], pushViewWebCount=1, excluded=[SKU1,SKU2]In this example,
emailCartSkuis the highest-priority non-empty category (the "winning" category), so theexcludedlist contains only the cart SKUs (SKU1,SKU2). Products from other categories (favorites, mobile viewed, web viewed) are not excluded yet and will be eligible for communication on subsequent days.The key fields in
eventdataare:emailCartSku/emailCartCount— SKUs and count of discounted cart products.emailFavSku/emailFavCount— SKUs and count of discounted favorite products.emailViewMobileSku/emailViewMobileCount— SKUs and count of discounted products viewed in the mobile app.emailViewWebSku/emailViewWebCount— SKUs and count of discounted products viewed on the website.excluded— list of product SKUs from the winning priority category, to be excluded from future sends.
- Confirm by clicking Apply.
Add the finishing node
- Add the End node with Finish other paths enabled.
- In the upper right corner, click Save & Run.
Create the workflow for sending email communications
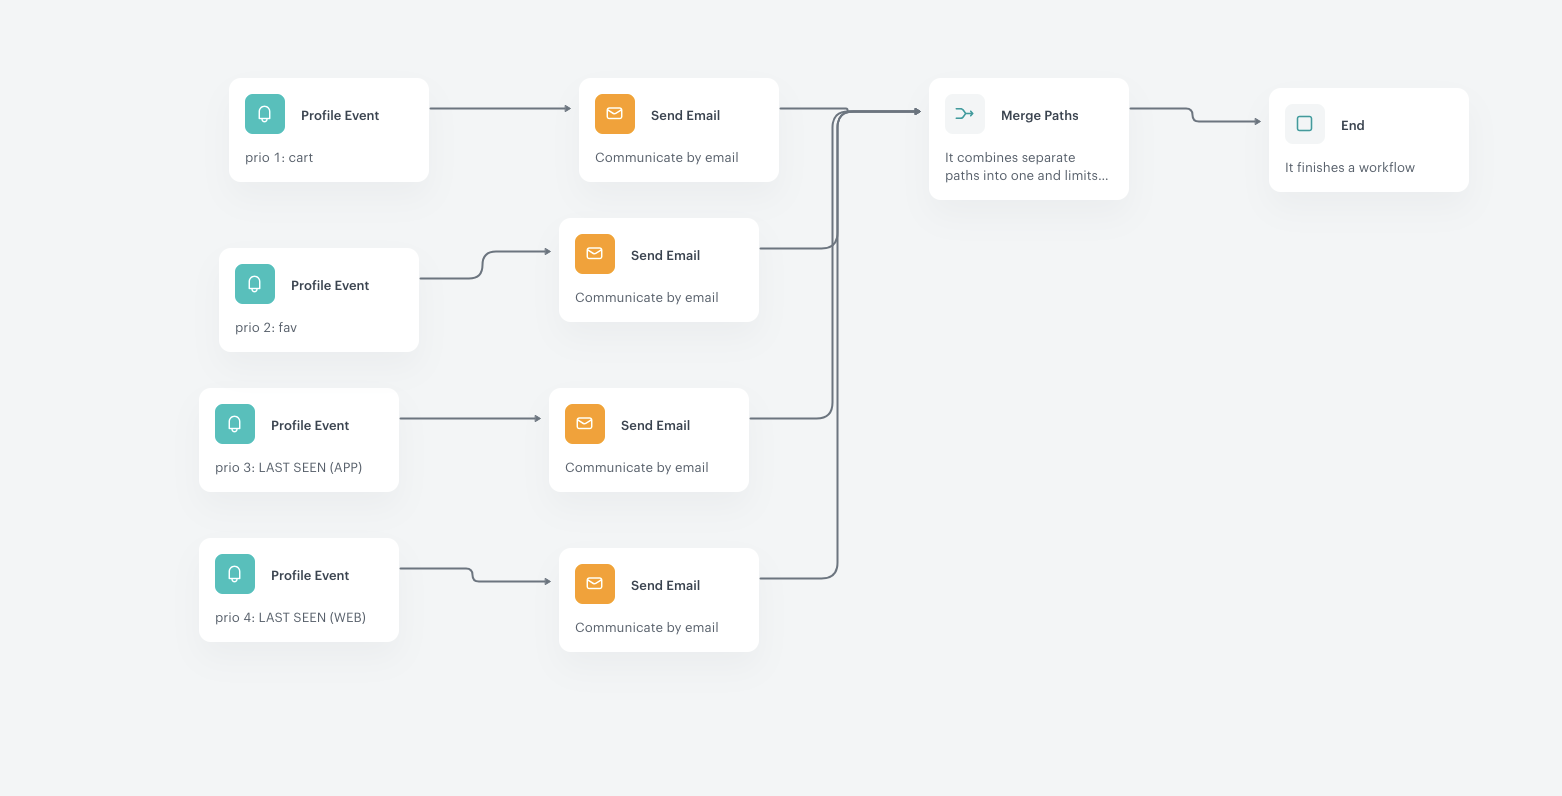
This workflow listens for the results.priceDrop event generated by the first workflow and routes customers into different email communication paths based on product intent priority. It uses four parallel Profile Event trigger paths, each checking the eventdata parameter for the relevant product count:
- Priority 1: Cart — Send Email. Triggers when the number of cart products with a price drop is greater than 0.
- Priority 2: Favorites — Send Email. Triggers when cart count equals 0, but favorites count is greater than 0.
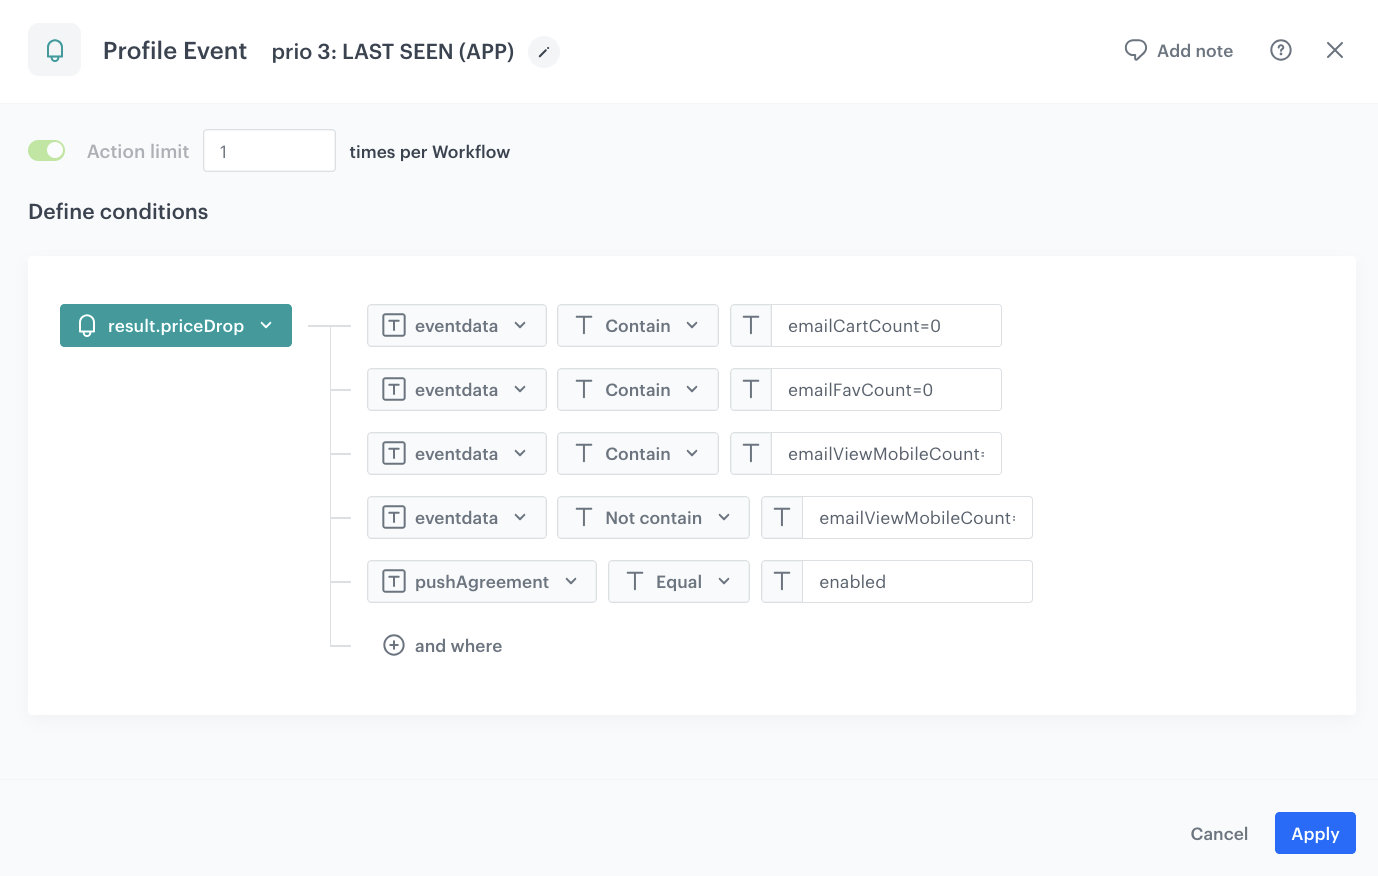
- Priority 3: Last seen in mobile app — Send Email. Triggers when cart and favorites counts equal 0, but mobile app viewed count is greater than 0.
- Priority 4: Last seen on website — Send Email. Triggers when cart, favorites, and mobile app counts all equal 0, but website viewed count is greater than 0.
The prioritization ensures that on a given day, a user enters only one path — the highest-priority one with available products. On subsequent days, the exclusion mechanism removes already-communicated products, causing the user to fall through to the next priority level.
Example over multiple days:
- Day 1: User has 4 cart products with a price drop and 4 favorite products with a price drop → enters the Cart path (highest priority), receives email with cart products. These products are added to the exclusion list. The communication about favorite products is skipped due to priority and waits for the next opportunity.
- Day 2: Cart products already excluded → system checks favorites. User has 4 favorite products, but 3 overlap with already-excluded cart products → receives email with 1 remaining favorite product.
- Day 3: Cart and favorites exhausted → system checks mobile app viewed products → email sent with viewed products if any have a price drop.
Using the same email template across all four paths with dynamic content is a recommended approach. You can pass additional parameters (such as the scenario name) to the template, which allows you to differentiate copy in the template itself and also track in analytics which scenario performs best. An additional benefit of using a single dynamic template is that when you need to make changes, you update it in one place instead of maintaining four separate templates.
Working with event data in email templates
All four email paths in this workflow use the eventdata parameter from the results.priceDrop event to dynamically populate product content. In each Send Email node, you can access the relevant SKU list from the event context using event parameter reuse.
Since eventdata is a structured string, you need to parse it in the template to extract the SKU list for the appropriate interaction type. For example, for the cart path you would extract the emailCartSku field, for the favorites path the emailFavSku field, and so on. Once you have the SKU list, you can iterate over it, look up each product in the catalog, and display the product name, image, current price, and link.
- Go to Automation Hub > Workflows > New workflow.
- Enter the name of the workflow.
Configure the Profile Event trigger for cart path (Priority 1)
- As the first trigger path, add a Profile Event node and name it
prio 1: CART. In the configuration of the node:- Enable Action limit and set it to 1 time per Workflow.
- From the Choose event dropdown menu, choose the
results.priceDropevent. - Click the + where button and add the following conditions:
newsletterAgreementEqualenabledeventdataContainemailCartCount=eventdataNot containemailCartCount=0
- Confirm by clicking Apply.
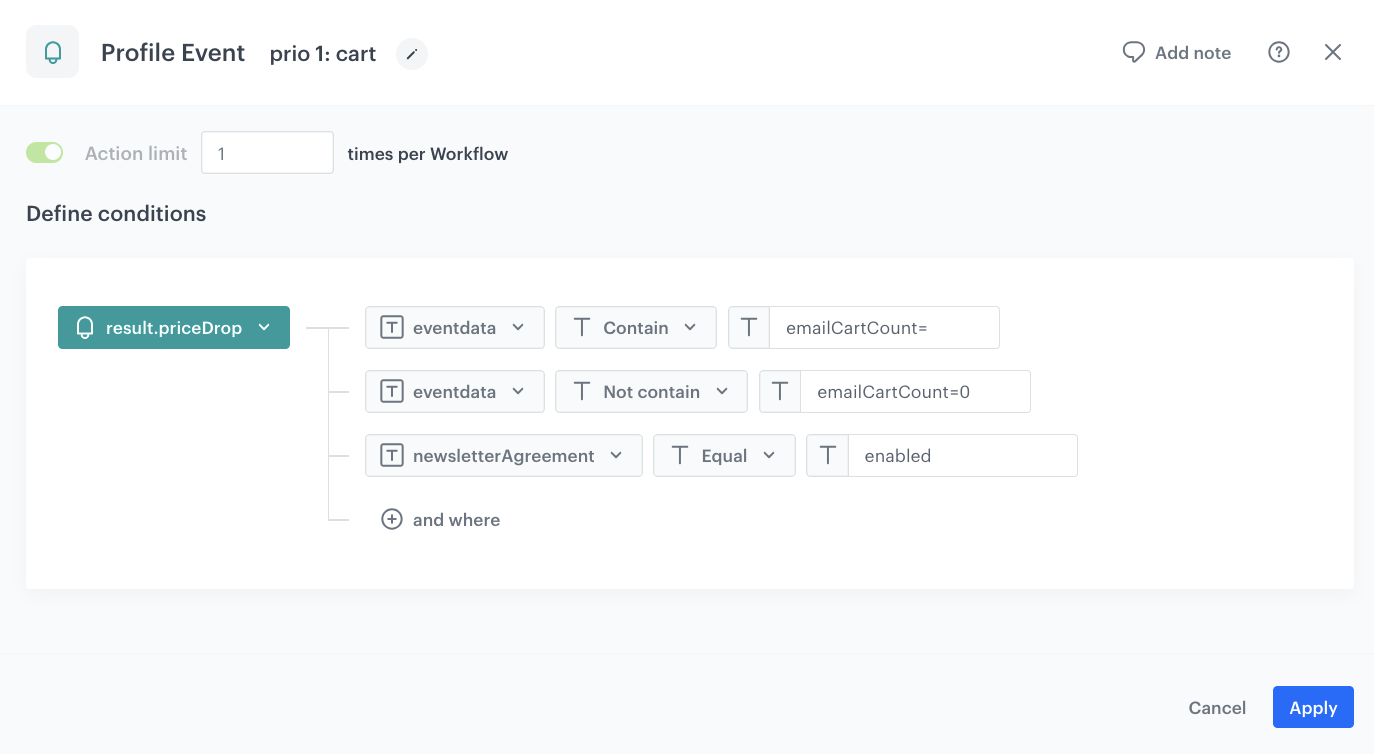
The combination of Contain emailCartCount= and Not contain emailCartCount=0 effectively checks that the cart product count exists and is greater than zero. This pattern is used consistently across all paths.
The newsletterAgreement Equal enabled condition acts as a safety check to ensure that only users with valid email consent enter the path, even if the audience node has already filtered for consent. This prevents edge cases where consent might have changed between audience evaluation and event generation.
Add Send Email for cart path
- Add the Send Email node.
- Select the email template prepared for the price drop campaign.
- Confirm by clicking Apply.
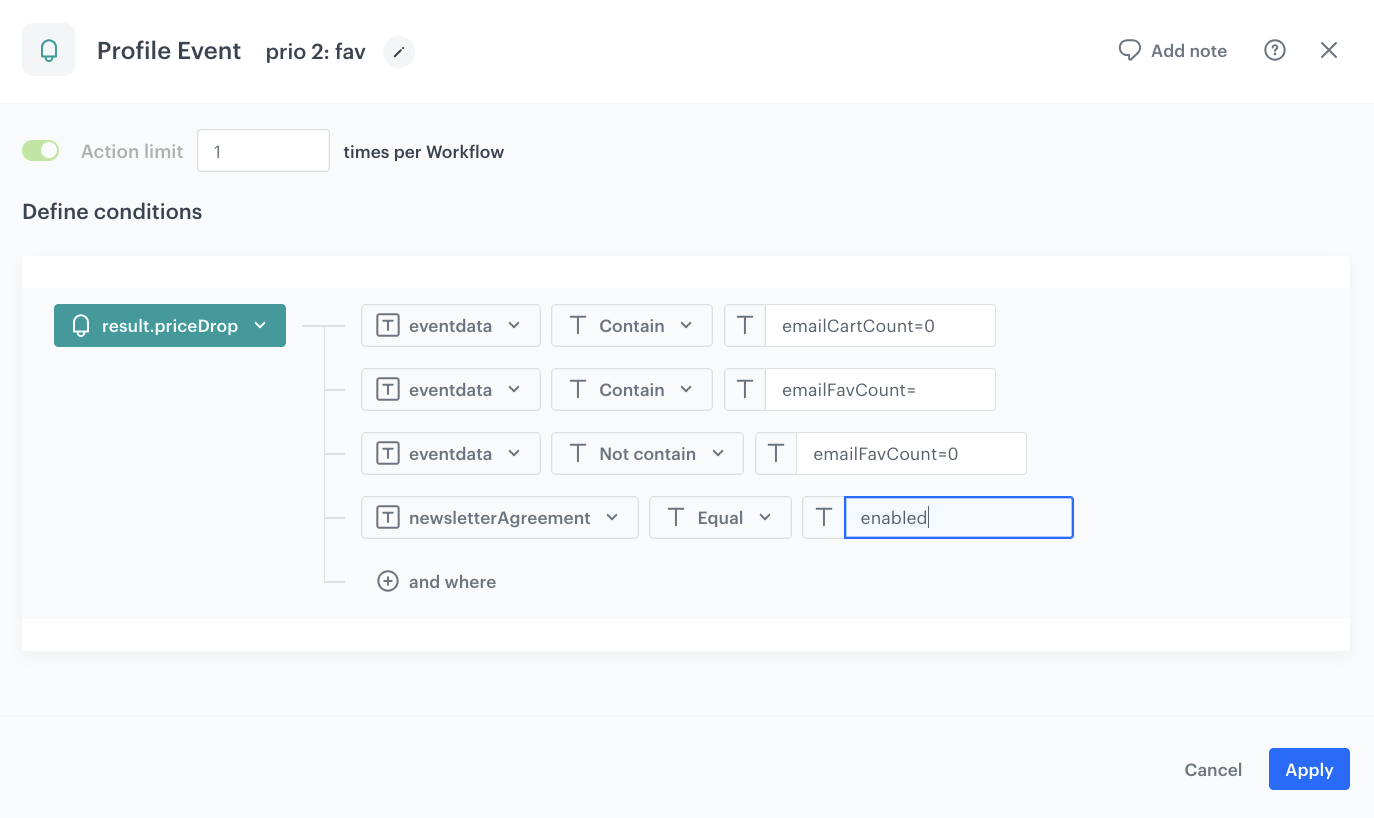
Configure the Profile Event trigger for favorites path (Priority 2)
- Add a second Profile Event node and name it
prio 2: FAV. In the configuration of the node:- Enable Action limit and set it to 1 time per Workflow.
- From the Choose event dropdown menu, choose the
results.priceDropevent. - Click the + where button and add the following conditions:
newsletterAgreementEqualenabledeventdataContainemailCartCount=0— ensures the cart path was not applicable (cart is empty).eventdataContainemailFavCount=eventdataNot containemailFavCount=0
- Confirm by clicking Apply.
Add Send Email for favorites path
- Add the Send Email node.
- Select the email template prepared for the price drop campaign.
- Confirm by clicking Apply.
Configure the Profile Event trigger for mobile app viewed path (Priority 3)
- Add a third Profile Event node and name it
prio 3: LAST SEEN (APP). In the configuration of the node:- Enable Action limit and set it to 1 time per Workflow.
- From the Choose event dropdown menu, choose the
results.priceDropevent. - Click the + where button and add the following conditions:
newsletterAgreementEqualenabledeventdataContainemailCartCount=0— cart is empty.eventdataContainemailFavCount=0— favorites are empty.eventdataContainemailViewMobileCount=eventdataNot containemailViewMobileCount=0
- Confirm by clicking Apply.
Add Send Email for mobile app viewed path
- Add the Send Email node.
- Select the email template prepared for the price drop campaign.
- Confirm by clicking Apply.
Configure the Profile Event trigger for website viewed path (Priority 4)
- Add a fourth Profile Event node and name it
prio 4: LAST SEEN (WEB). In the configuration of the node:- Enable Action limit and set it to 1 time per Workflow.
- From the Choose event dropdown menu, choose the
results.priceDropevent. - Click the + where button and add the following conditions:
newsletterAgreementEqualenabledeventdataContainemailCartCount=0— cart is empty.eventdataContainemailFavCount=0— favorites are empty.eventdataContainemailViewMobileCount=0— mobile app viewed is empty.eventdataContainemailViewWebCount=eventdataNot containemailViewWebCount=0
- Confirm by clicking Apply.
Add Send Email for website viewed path
- Add the Send Email node.
- Select the email template prepared for the price drop campaign.
- Confirm by clicking Apply.
Add the Merge Paths and finishing node
- Connect all four paths to a Merge Paths node. This node combines separate paths into one and limits further processing, ensuring a customer only receives one email per workflow execution.
- Add the End node.
- In the upper right corner, click Save & Run.
What's next
A companion workflow for mobile push notifications can be built using the same results.priceDrop event. The key differences from the email workflow described above are:
- Event generation: Add a
newsletterPushparameter to the Generate Event body:"newsletterPush": "{{ customer.receive_push_messages }}|{{ customer.snrs_has_mobile_push_devices }}". This captures push consent and device token status in the event so the push workflow can check them without querying the customer profile. - Communication channel: Replace Send Email nodes with Send Mobile Push nodes in all paths.
- Consent condition: In each Profile Event trigger, change the consent check from
newsletterAgreementEqualenabledtonewsletterPushEqualtrue|true. The valuetrue|trueverifies two things: the firsttrueconfirms the user has granted push marketing consent (receive_push_messages), and the secondtrueconfirms they have an active mobile push device token (snrs_has_mobile_push_devices). Both conditions must be met for a push notification to be delivered. - Product data: The
results.priceDropevent already contains push-specific SKUs in dedicated parameters (pushCartSku,pushFavSku,pushViewMobileSku,pushViewWebSku) — each limited to a single product — so you can reference them directly in your push notification template via event parameter reuse, just like in the email template.
This means you only need to add one parameter to the event generation workflow — the snippet and all aggregates remain unchanged.
Check the use case set up on the Synerise Demo workspace
You can check the configuration of each step directly in the Synerise Demo workspace:
Workflows:
Expressions:
Shared aggregates:
Favorites aggregates:
Cart aggregates:
Mobile app viewed aggregates:
Desktop website viewed aggregates:
If you’re our partner or client, you already have automatic access to the Synerise Demo workspace (1590), where you can explore all the configured elements of this use case and copy them to your workspace.
If you’re not a partner or client yet, we encourage you to fill out the contact form to schedule a meeting with our representatives. They’ll be happy to show you how our demo works and discuss how you can apply this use case in your business.