Adding interactive elements to your website is an effective way to capture attention and encourage users to engage with your brand. A gamified “Spin the Wheel” experience introduces an element of chance and reward, making promotional campaigns more engaging and memorable.
In this use case, you will create a Spin the Wheel promotional pop-up triggered by a bottom bar on the website. Instead of displaying the pop-up automatically, the interaction is initiated by the user, which makes the experience less intrusive and more intentional.
What makes this scenario different is the use of Brickworks to manage reward configuration. Each wheel segment is defined as a structured record containing properties such as label, color, probability, and assigned voucher pool. This approach separates presentation from data, making it easier to update rewards, adjust probabilities, and scale the campaign without modifying the main dynamic content.
As a result, you can deliver a flexible and maintainable gamified experience in which users spin the wheel to receive a discount code that can be redeemed during checkout.
Before implementing this use case in a production environment, please review local regulations related to promotional lotteries and games of chance. We recommend consulting your legal or compliance team to confirm all requirements. Any additional formalities, such as preparing terms and conditions or submitting the promotion to the relevant tax or regulatory authorities, remain the responsibility of the implementing company.

Prerequisites
- Implement a tracking code on your website.
- Create an API Key with basic authentication and permissions connected with the vouchers such as
VOUCHERS_ITEM_LIST_BY_POOL_READ(used in the External Source configuration for the Brickworks schema). - Create separate code pools for each prize on the wheel.
Process
In this use case, you will go through the following steps:
- Create a HTTPS connection. The external source uses this connection to get data from the the voucher API.
- Create an external source that will be used by Brickworks schema to get up-to-date informations about vouchers.
- Create a main dynamic content that customer will interact with.
- For each reward create a dedicated dynamic content.
- Create a Brickworks schema that defines the data structure for wheel rewards.
- Create records that store individual reward definitions (text, colors, probabilities, voucher pools) and bind schema fields to actual data.
- Adjust the snippet that pulls Brickworks records at render time and exposes them to the main dynamic content, where they are used by JavaScript to render the wheel and apply reward logic.
Create a HTTPS connection
In this part of the process, you will create HTTPS connection with Synerise.
- Go to Settings > Connections > New connection.
- Choose HTTPS.
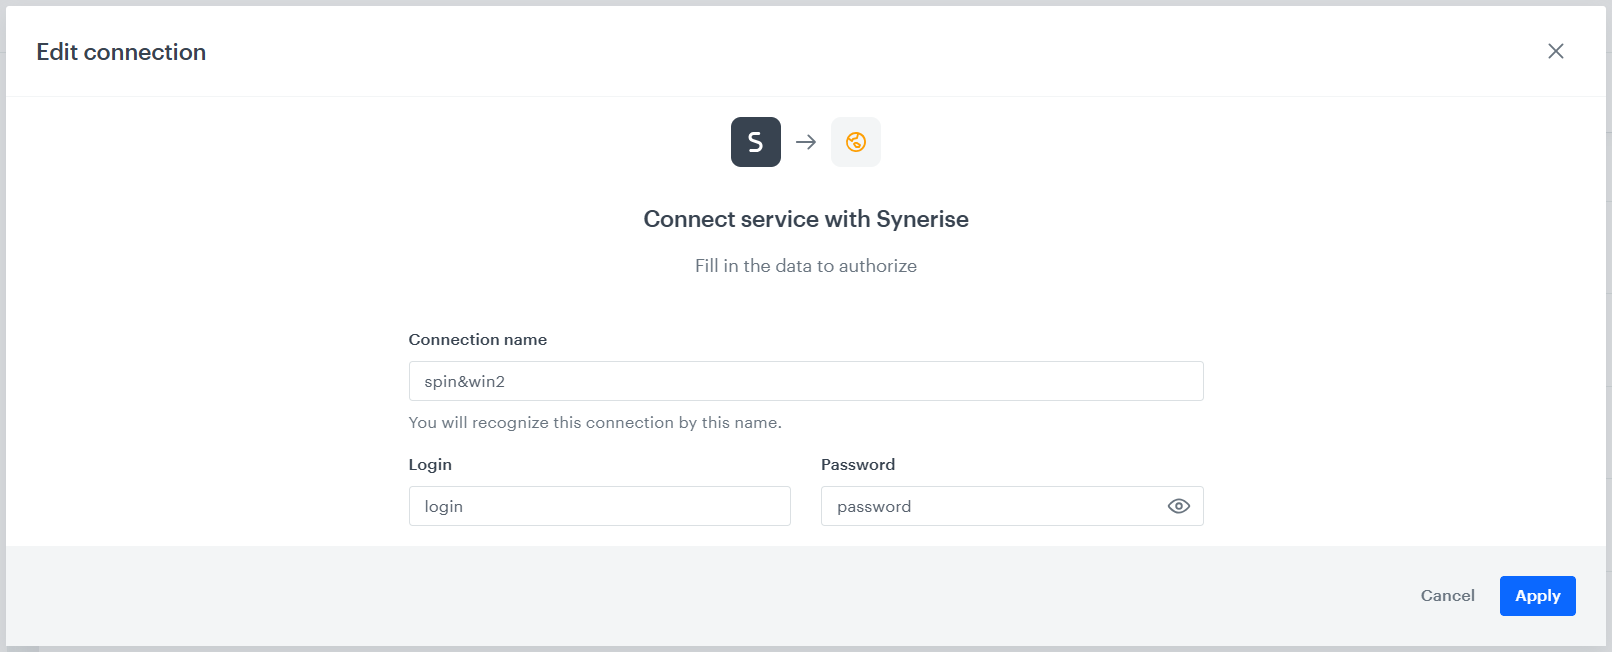
- Choose Login & Password.
- Complete the fields:
- Connection name
- Login
- Password
- Click Apply.
Create an external source
In this part of the process, you will create an external source that connects to API and lets you get up-to-date information about number of active and assigned vouchers per voucher pool.
Responses are cached for 60 seconds. This is a platform-level TTL you can not change.
- Go to Data Modeling Hub > External Sources > New external source.
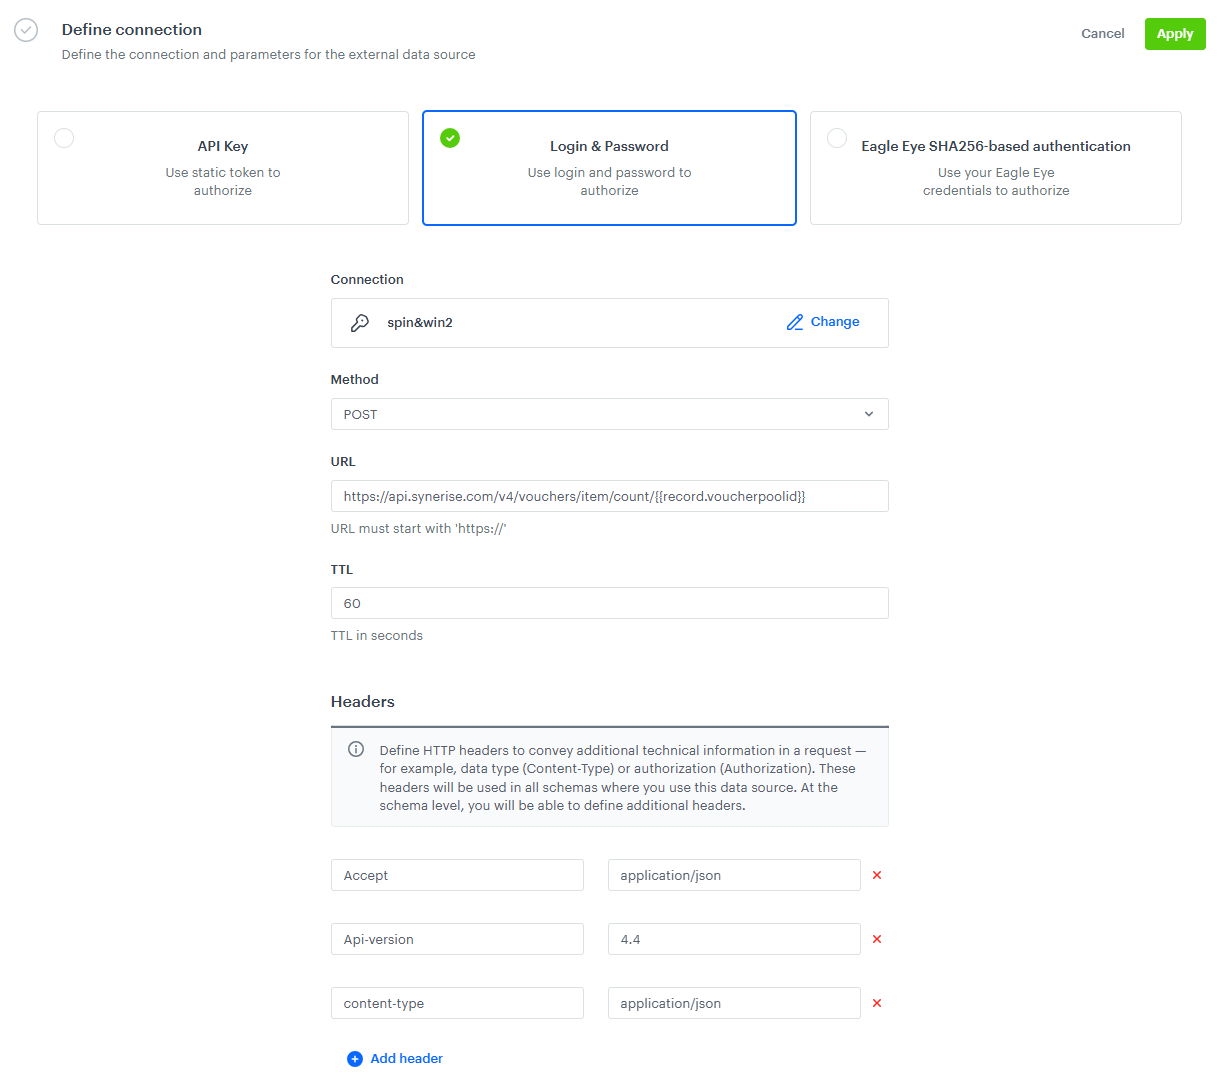
- Select the method of authorization as Login & Password.
- Select a connection you created in HTTPS connection step.
- From the Method dropdown list, select POST.
- In URL, provide the endpoint adress:
https://api.synerise.com/v4/vouchers/item/count/{{record.voucherpoolid}} - In TTL field enter
60. In the Headers section, by clicking Add header three times define such request headers:
- In the key field, enter Accept and provide the
application/jsonas the value - In the next key field, enter Api-version and provide the
4.4as the value - In the last key field, enter content-type and provide the
application/jsonas the value
- In the key field, enter Accept and provide the
Create a main dynamic content
Create a dynamic content that will be displayed to all website visitors. You can use a ready-made template available on the Synerise Demo workspace.
- Go to Experience Hub > Dynamic Content > Create new.
- Enter the name of the content.
- Choose the Insert object type.
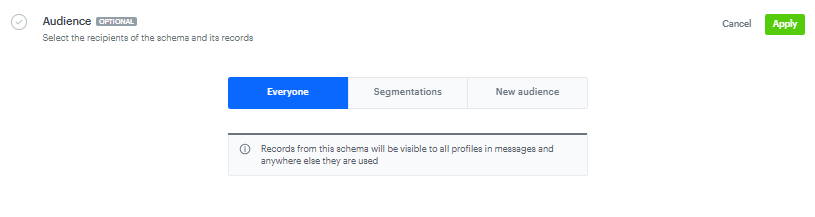
Define audience
- To select the recipients of the dynamic content, on the Audience tab, click Define.
- Select Everyone.
- Click Apply.
Define content
In the next step, you will create the dynamic content with the help of a ready-made template.
- In the Content section, click Define.
- Click Create message and from the list of template folders, select Spin the Wheel.
- Select the [UC] Spin&win template.
Result: You are redirected to the code editor. - Edit the template according to your needs.

DC template - After customizing your dynamic content, click Save.
- Set an appropriate CSS selector to define the placement of the banner that releases the pop-up. The correct selector depends on your website’s structure, so make sure to reference an element that ensures the bar is displayed in the intended position.
- Click Apply.
Define schedule and display settings
As the final part of the section, you will define the display settings of the dynamic content such as schedule, triggers, and delay.
- In the Schedule section, click Define and set the time when the dynamic content will be active.
- Click Apply.
- In the Display Settings section, click Define. If you want the banner to be displayed to all users continuously across the website upon landing, keep the default settings.
- Click Apply.
- Optionally, you can define the UTM parameters and additional parameters for your dynamic content.
- Click Activate.
Create a dynamic content for each prize
In this part of the process, you will create dynamic content templates that will be assigned to different voucher pools. They will be later needed in Brickworks schema. This time you will use Jinjava insert.
- Go to Experience Hub > Dynamic Content > Create new.
- Enter the name of the content.
- Choose the Insert object type.
Define audience
- To select the recipients of the dynamic content, on the Audience tab, click Define.
- Select Everyone.
- Click Apply.
Define content
In the next step, you will create the dynamic content with the Jinjava tag for vouchers.
- In the Content section, click Define.
- Click Create message and then New template.
- Select the Code editor type.
Result: You are redirected to the code editor. - Enter this code in the HTML tab replacing
pool-uuidwith those from your voucher pools:
{% vouchervar id=pool-uuid %}
  {{ voucher_result }}
{% endvouchervar %}

- After customizing your dynamic content, save the changes by clicking on Use in communication button.
- Set CSS selector to
#synSpinPromoCodeand its location toInner. Those settings define the placement of the prize that can be claimed through modal showed after spin. The correct selector depends on your main dynamic content template’s structure, so make sure to reference an element that ensures the result is displayed in the intended position. - Click Apply.
Define schedule and display settings
As the final part of the section, you will define the display settings of the dynamic content such as schedule, triggers, and delay.
Make sure that all dynamic content templates have the same schedule options as it is required for use case to work correctly.
- In the Schedule section, click Define and set the time when the campaign will be active.
- Click Apply.
- In the Display Settings section, click Define. If you want the banner to be displayed to all users continuously across the website upon landing, keep the default settings.
- Click Apply.
- Optionally, you can define the UTM parameters and additional parameters for your dynamic content.
- Click Activate.
Repeat this step for each voucher pool that should be included in the wheel.
Create a Brickworks schema
In this step of the process, you will create a Brickworks simple schema that defines the structure of the spin&win. The schema specifies the field names, types, and configuration options.
- Go to Data Modeling Hub > Schemas > New Schema.
- Choose Simple Schema.
- Enter the Display name, for example
spin&win. - In API name field enter
spinWin. - Optionally, add a description.
Add id field
- Click Add new field and choose the String field type.
- In the Field basics section, complete the fields:
- Display name:
id - API name:
id
- Display name:
- In the Validation section, enable the Required field checkbox.
- In the Advanced section, enable the Unique values only checkbox.
- Click Apply.

Add displayColor field
- Click Add new field and choose the String field type.
- In the Field basics section, complete the fields:
- Display name:
displayColor - API name:
displaycolor
- Display name:
- In the Validation section, enable the Required field checkbox.
- Click Apply.

Add displayText field
- Click Add new field and choose the String field type.
- In the Field basics section, complete the fields:
- Display name:
displayText - API name:
displaytext
- Display name:
- In the Validation section, enable the Required field checkbox.
- Click Apply.

Add probability field
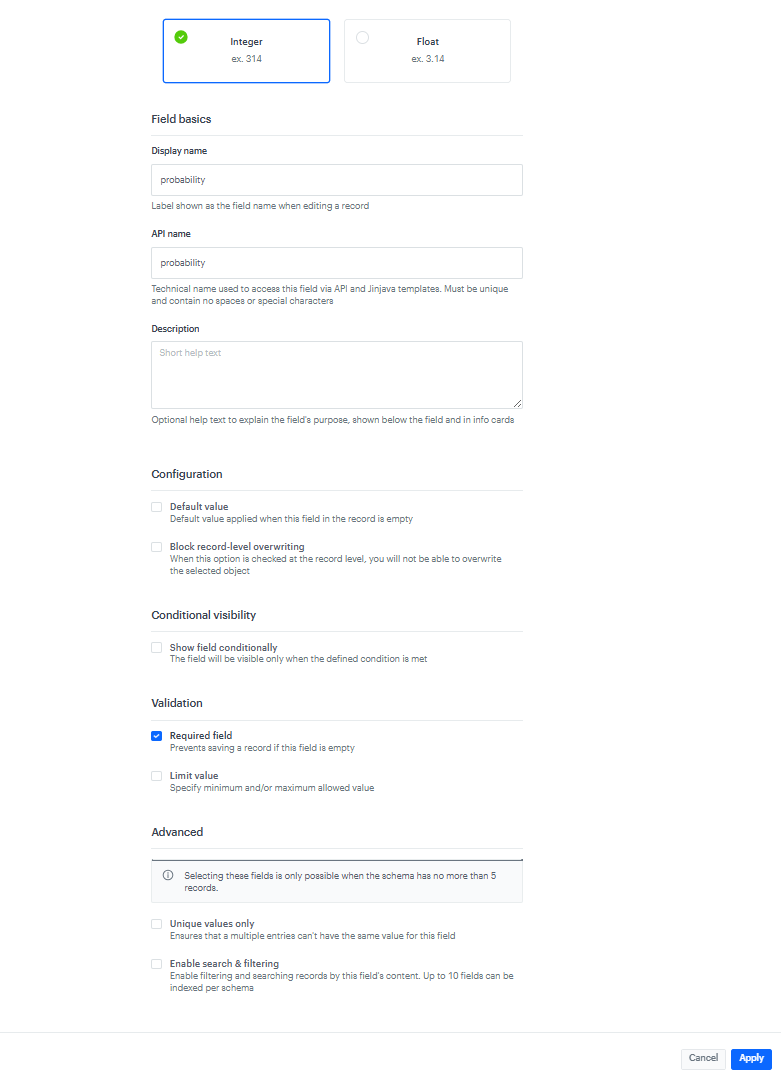
- Click Add new field and choose the Number field type.
- Select Integer.
- In the Field basics section, complete the fields:
- Display name:
probability - API name:
probability
- Display name:
- In the Validation section, enable the Required field checkbox.
- Click Apply.
Add winChance field
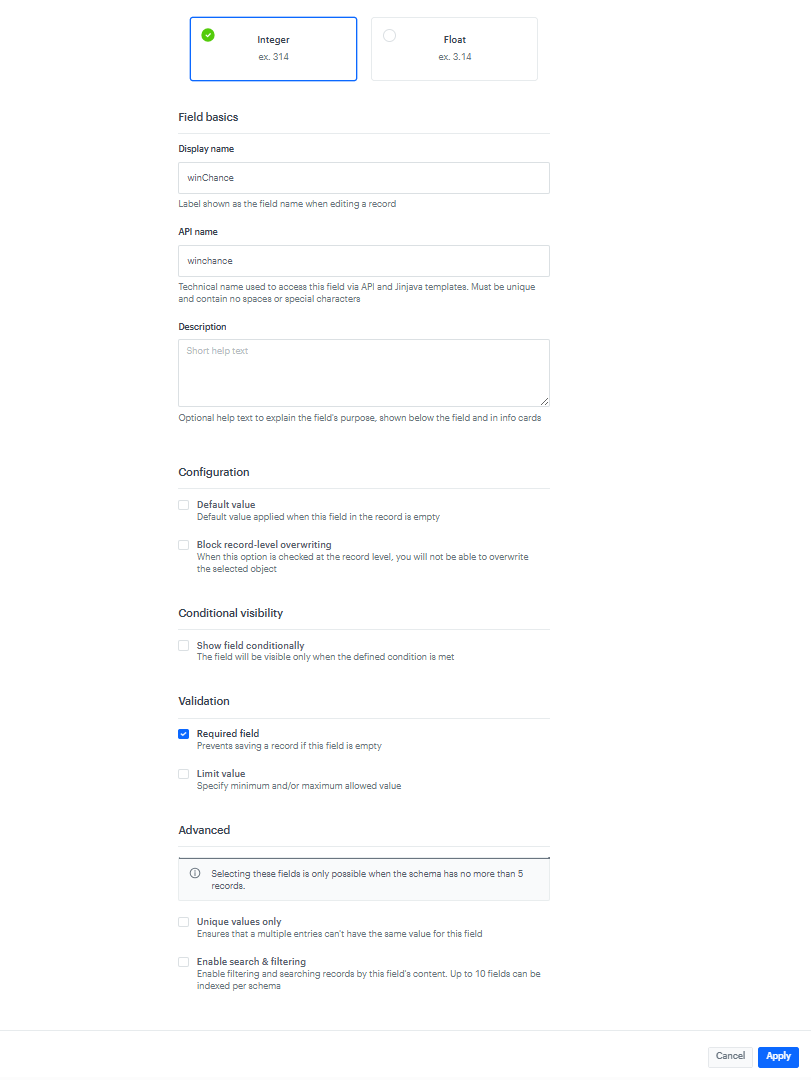
- Click Add new field and choose the Number field type.
- Select Integer.
- In the Field basics section, complete the fields:
- Display name:
winChance - API name:
winchance
- Display name:
- In the Validation section, enable the Required field checkbox.
- Click Apply.
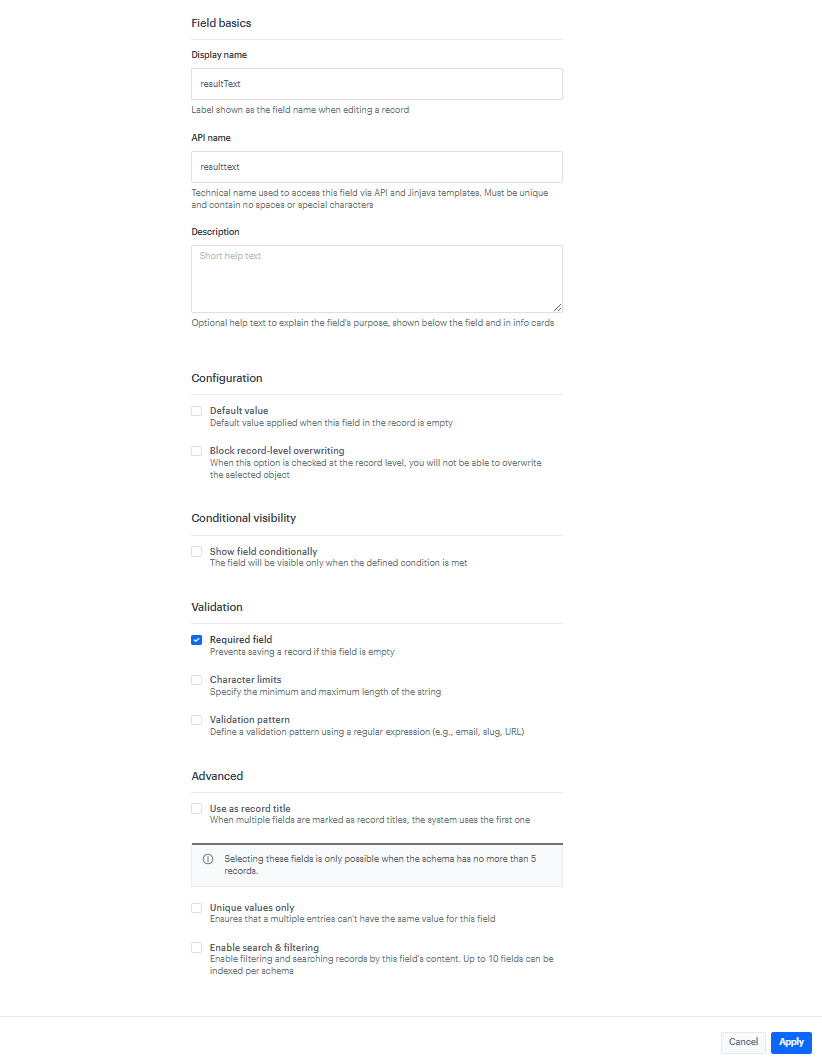
Add resultText field
- Click Add new field and choose the String field type.
- In the Field basics section, complete the fields:
- Display name:
resultText - API name:
resulttext
- Display name:
- In the Validation section, enable the Required field checkbox.
- Click Apply.
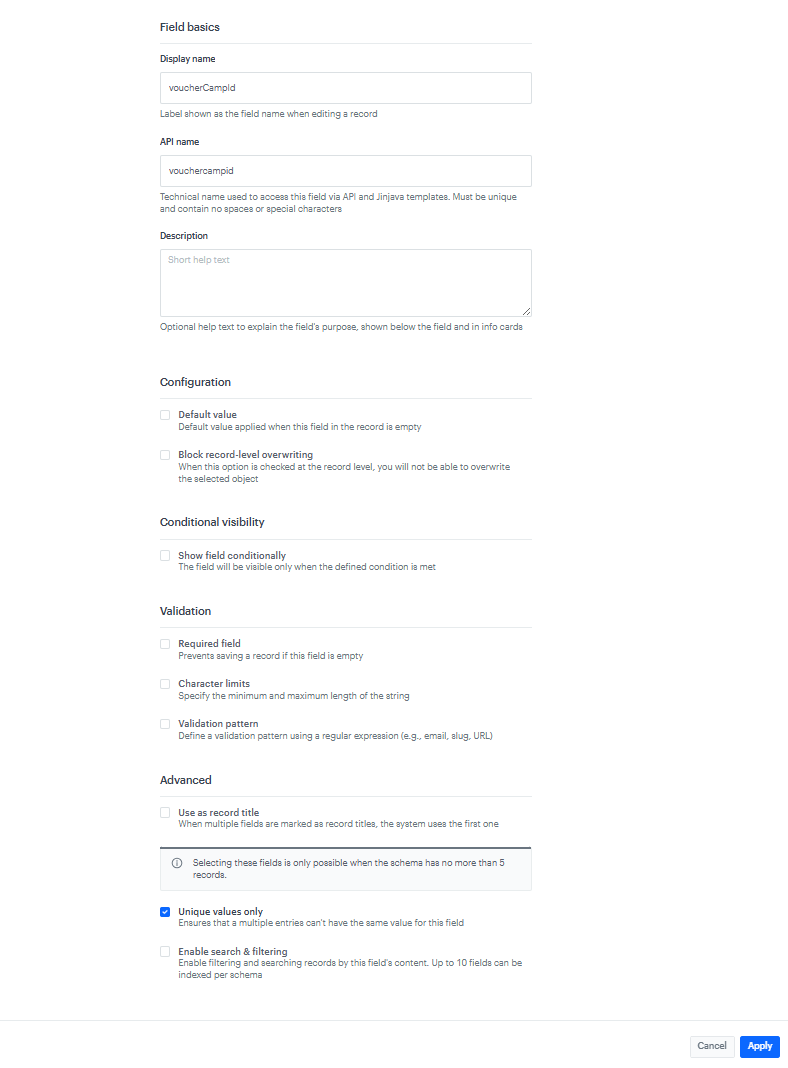
Add voucherCampId field
- Click Add new field and choose the String field type.
- In the Field basics section, complete the fields:
- Display name:
voucherCampId - API name:
vouchercampid
- Display name:
- In the Advanced section, enable the Unique values only checkbox.
- Click Apply.
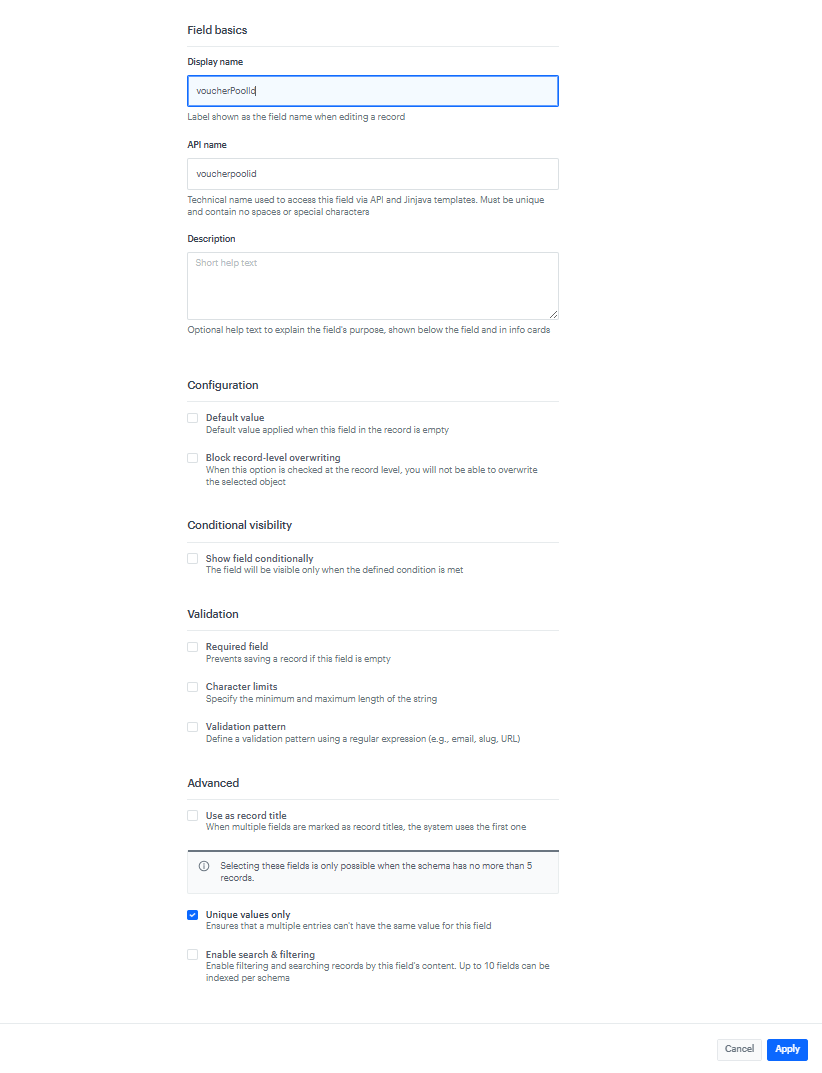
Add voucherPoolId field
- Click Add new field and choose the String field type.
- In the Field basics section, complete the fields:
- Display name:
voucherPoolId - API name:
voucherpoolid
- Display name:
- In the Advanced section, enable the Unique values only checkbox.
- Click Apply.
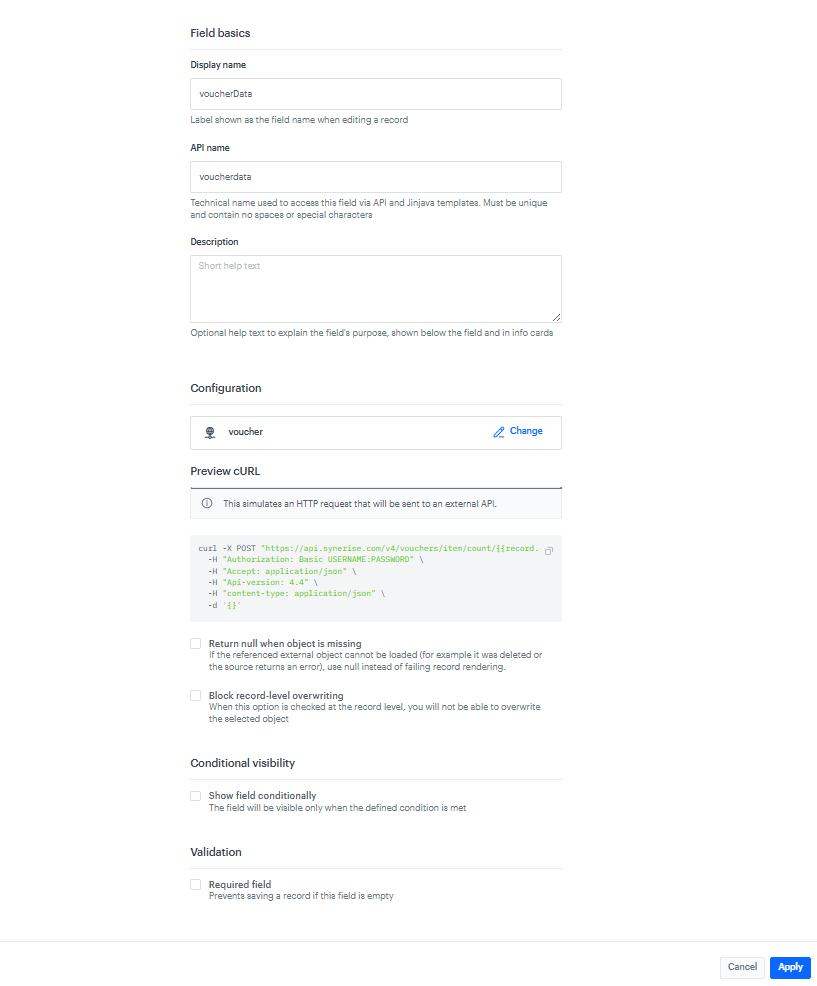
Add voucherData field
- Click Add new field and choose the External Data field type.
- In the Field basics section, complete the fields:
- Display name:
voucherData - API name:
voucherdata
- Display name:
- In the Configuration section, select an external source you made at the beginning of the process.
- Click Apply.
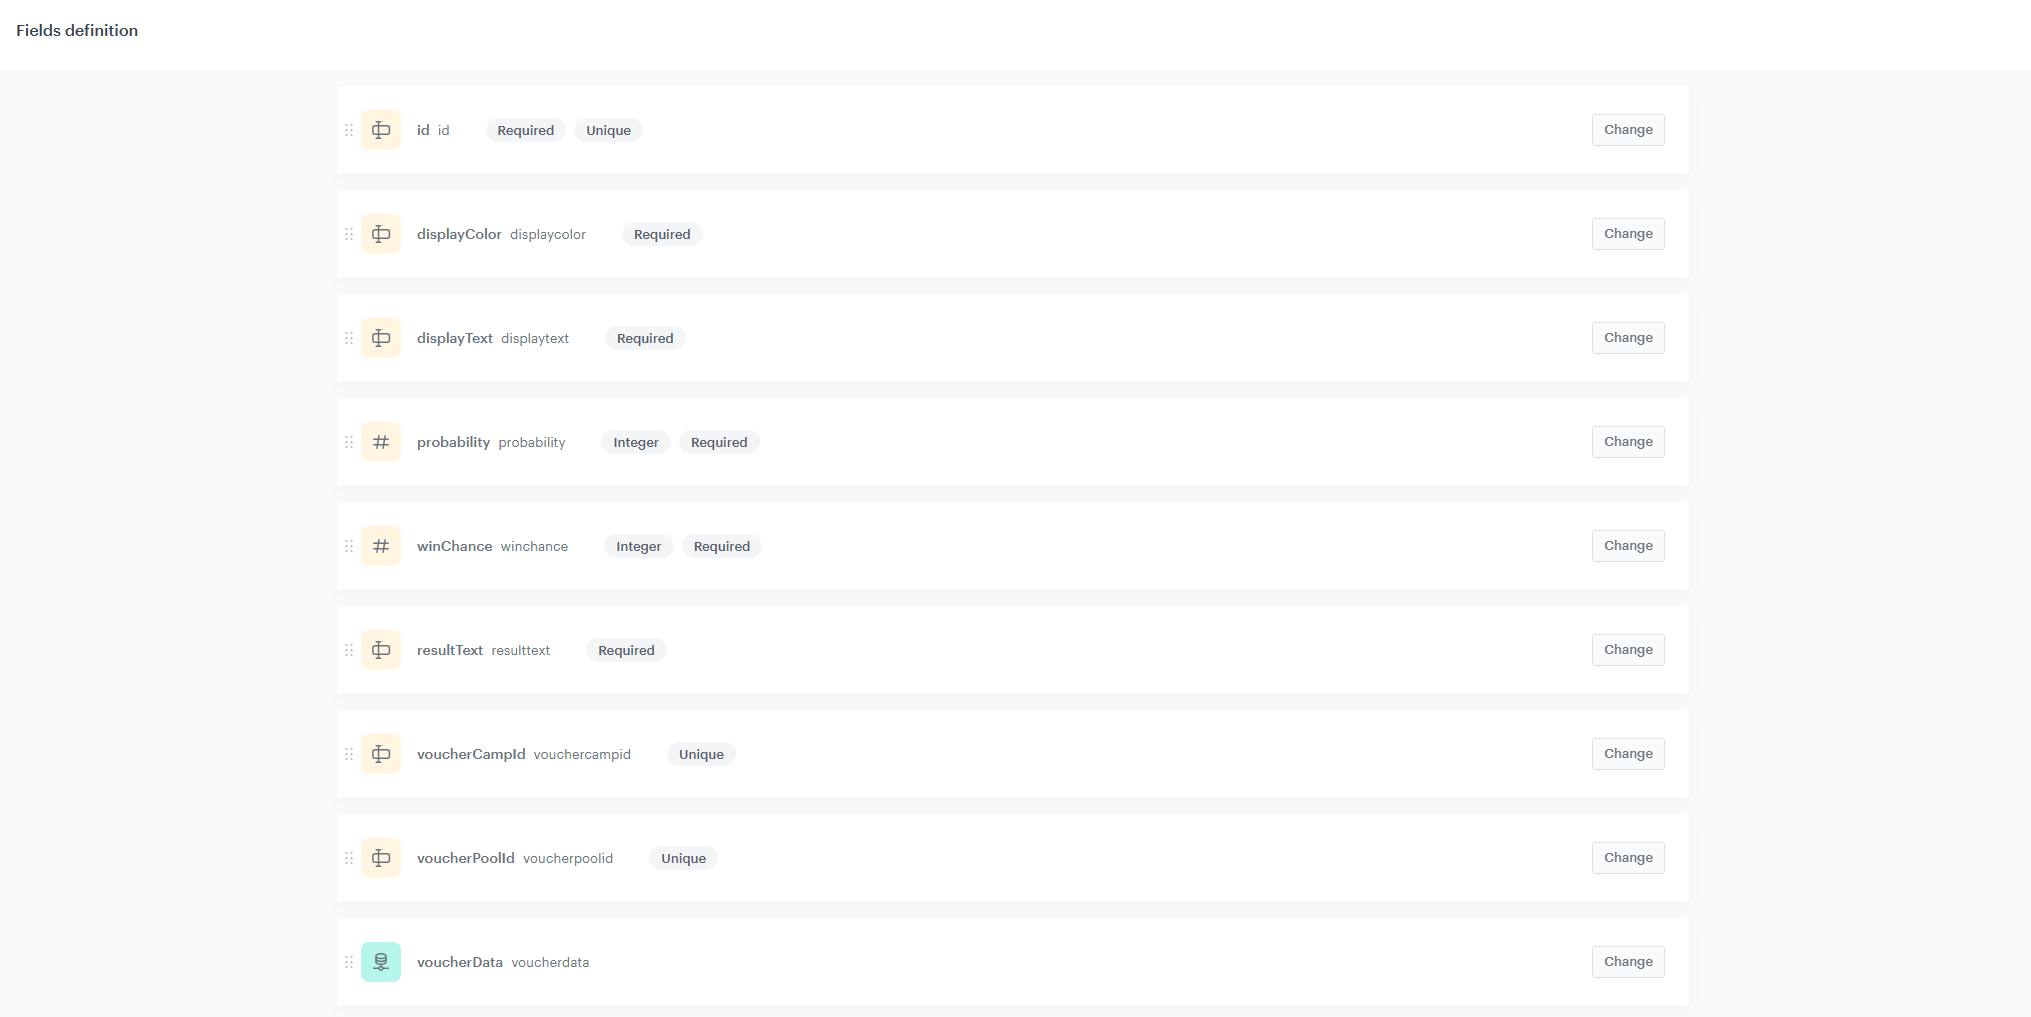
Overview of the complete schema
After adding all fields, the schema should contain the following fields:
Set up the Audience & Settings
- Click the Audience & Settings tab.
- In the Audience section, click Define.
- Choose Everyone.
- Click Apply.
- In the upper-right corner, click Save.
Create records
In this part of the process you will define the prizes that will be displayed on the wheel.
- Go to Data Modeling Hub > Records.
- Click Select schema and choose Brickworks schema you created in previous step.
- Click New record.
- Add a name for the record, for example
reward1. - Add a slug for the record. Slug is a unique, URL-friendly version of the name containing only lowercase letters, numbers, and hyphens. For example:
reward-1. Fill in the field values by assigning the appropriate data to each field:
id → provide unique reward identifier, for exaple
reward1.- displayColor → provide hex color of the segment, for example:
#47002c. - displayText → provide text that will be displayed on the wheel segment, for example:
5% OFF. - probability → provide relative weight for segment selection, for example:
35.
Total probability weight of all prizes must sum up to 100. More details on how the algorithm works are provided in the snippet.
- winChance → provide percentage chance of acually winning once the wheel land on that segment (in scale from 0 to 100), for example:
98. - resultText → provide text shown in the result modal, for example:
You won 5% off your next purchase!. - voucherCampId → provide dynamic content ID that assigns the voucher.
- voucherPoolId → provide voucher pool's ID inside dynamic content pointed by voucherCampId.
- Click Publish to publish your record.
After publishing the record, note the schema ID and record ID from the URL. You will need these IDs in the snippet template to reference the Brickworks data via the{% brickworksgeneratevar %}tag, which is later used in the main dynamic content (in its JavaScript layer) to load reward data at render time.
Repeat this step for each prize that should be included in the wheel.
Adjust the snippet template
To conclude this process, adjust the snippet template to your needs. This snippet pulls reward data from Brickworks at render time and is used directly in the main dynamic content, where it acts as a single source of truth for reward configuration, probability rules, and real‑time voucher availability, keeping the campaign logic centralized and easy to maintain.
- Go to Data Modeling Hub > Snippets.
- Select the spin&win-config & analytics snippet.
- Go to the Code tab.
- Add one block per reward, swapping
SCHEMA_IDandRECORD_IDfor each Brickworkd schema record from its URL:
{% brickworksgeneratevar schemaId=SCHEMA_ID recordId=RECORD_ID %}
    {% do entries.append(
        "{id: \"" ~ brickworks_result.id ~ "\", displayText: \"" ~ brickworks_result.displaytext ~ "\", remaining: " ~ (brickworks_result.voucherdata.data.activeCount - brickworks_result.voucherdata.data.assignedCount) ~ ", displayColor: \"" ~ brickworks_result.displaycolor ~ "\", winChance: " ~ brickworks_result.winchance ~ ", probability: " ~ brickworks_result.probability ~ ", voucherPoolId: \"" ~ brickworks_result.vouchercampid ~ "\",timestamp: \"" ~ brickworks_result.voucherdata.data.countAt ~ "\", resultText: \"" ~ brickworks_result.resulttext ~ "\"}"
    ) %}
{% endbrickworksgeneratevar %}
- Click Save.
Check the use case set up on the Synerise Demo workspace
You can check the configuration of each step directly in Synerise Demo workspace:
- External Source
- Dynamic Content- main template
- Dynamic Content - templates assigned to vouchers
- Brickworks schema - fields definition
- Brickworks schema - records
- Snippet
If you’re our partner or client, you already have automatic access to the Synerise Demo workspace (1590), where you can explore all the configured elements of this use case and copy them to your workspace.
If you’re not a partner or client yet, we encourage you to fill out the contact form to schedule a meeting with our representatives. They’ll be happy to show you how our demo works and discuss how you can apply this use case in your business.