A segmentation is a group of customers who share the same features. You can use it as a target for your marketing activities.
As features, you can use customer attributes (such as name, location, birthdate, marketing agreements), aggregates, expressions, and other segmentations you created in your workspace.
In the process of creating a segmentation, you can define sub-groups known as segments. Each of segments can have their own specific conditions. By using multiple segments, you can categorize your customers based on various factors such as their average order value, the product categories they browse, or how frequently they make purchases.
Additionally, you can use funnels in segmentations to group customers whose activity history (their actions and your actions towards them, such as sending messages) includes specific events. You can then filter those events by their parameters.
Segmentation, expression, and aggregate definitions are cached for 20 minutes after a node with the analysis is activated in a journey.
When another journey in the Automation Hub requests a result of the same analysis in that period, the cached definition is used to calculate the results. This means that if you edit a segmentation, aggregate, or expression used in a workflow, it takes 20 minutes for the new version to start being used in journeys.
This includes definitions of segmentations, expressions, and aggregates nested in other analyses and used in Inserts.
Cloning segmentations
If you use several workspaces and you would like to copy segmentations between them, you can use the cloning feature to do so.
Requirements
You need to have customers in the database. You can:
- acquire them by website tracking
- acquire them through a mobile application
- import them using a dedicated feature in the Synerise portal or using API.
Creating segmentations
- Go to
 Decision Hub > Segmentations > Create new.
 - Enter the name of the segmentation.
- If you want your segmentation to be visible in the profile card of the customers who belong to this segmentation, enable the Show in Profiles option on.
- Create a segmentation as described further in this article.
- To complete the process, click the Save button. When you save the segmentation, you can find it on the list of segmentations under the given name.
Defining conditions
The first step is to define conditions that customers must meet in order to be included in a segment. These conditions can be based on customer attributes (Has property) or events and their parameters (Perfomed action).
If you add multiple conditions, you can specify the relationship between them as AND or OR. Additionally, event-based conditions can be limited to a specific time period.
Selecting an activity
- To select a customer activity or an activity towards a customer, click Add condition.
- From the Events tab, select an event.
- To set additional conditions for the event, click + where and from the dropdown list select an event parameter you want to filter by.
- Use the logical operators to set the type of condition.
- Define the value that will be used as the filter according to the logical operator.
If the value is a string or dynamic key, it can't be longer than 21000 characters. If it's an array, it can't be larger than 65000 items, and items can't be longer than 21000 characters each. - By default, the system analyzes the last 30 days, but you can define your own time period by clicking the calendar icon in the lower right corner in the condition.
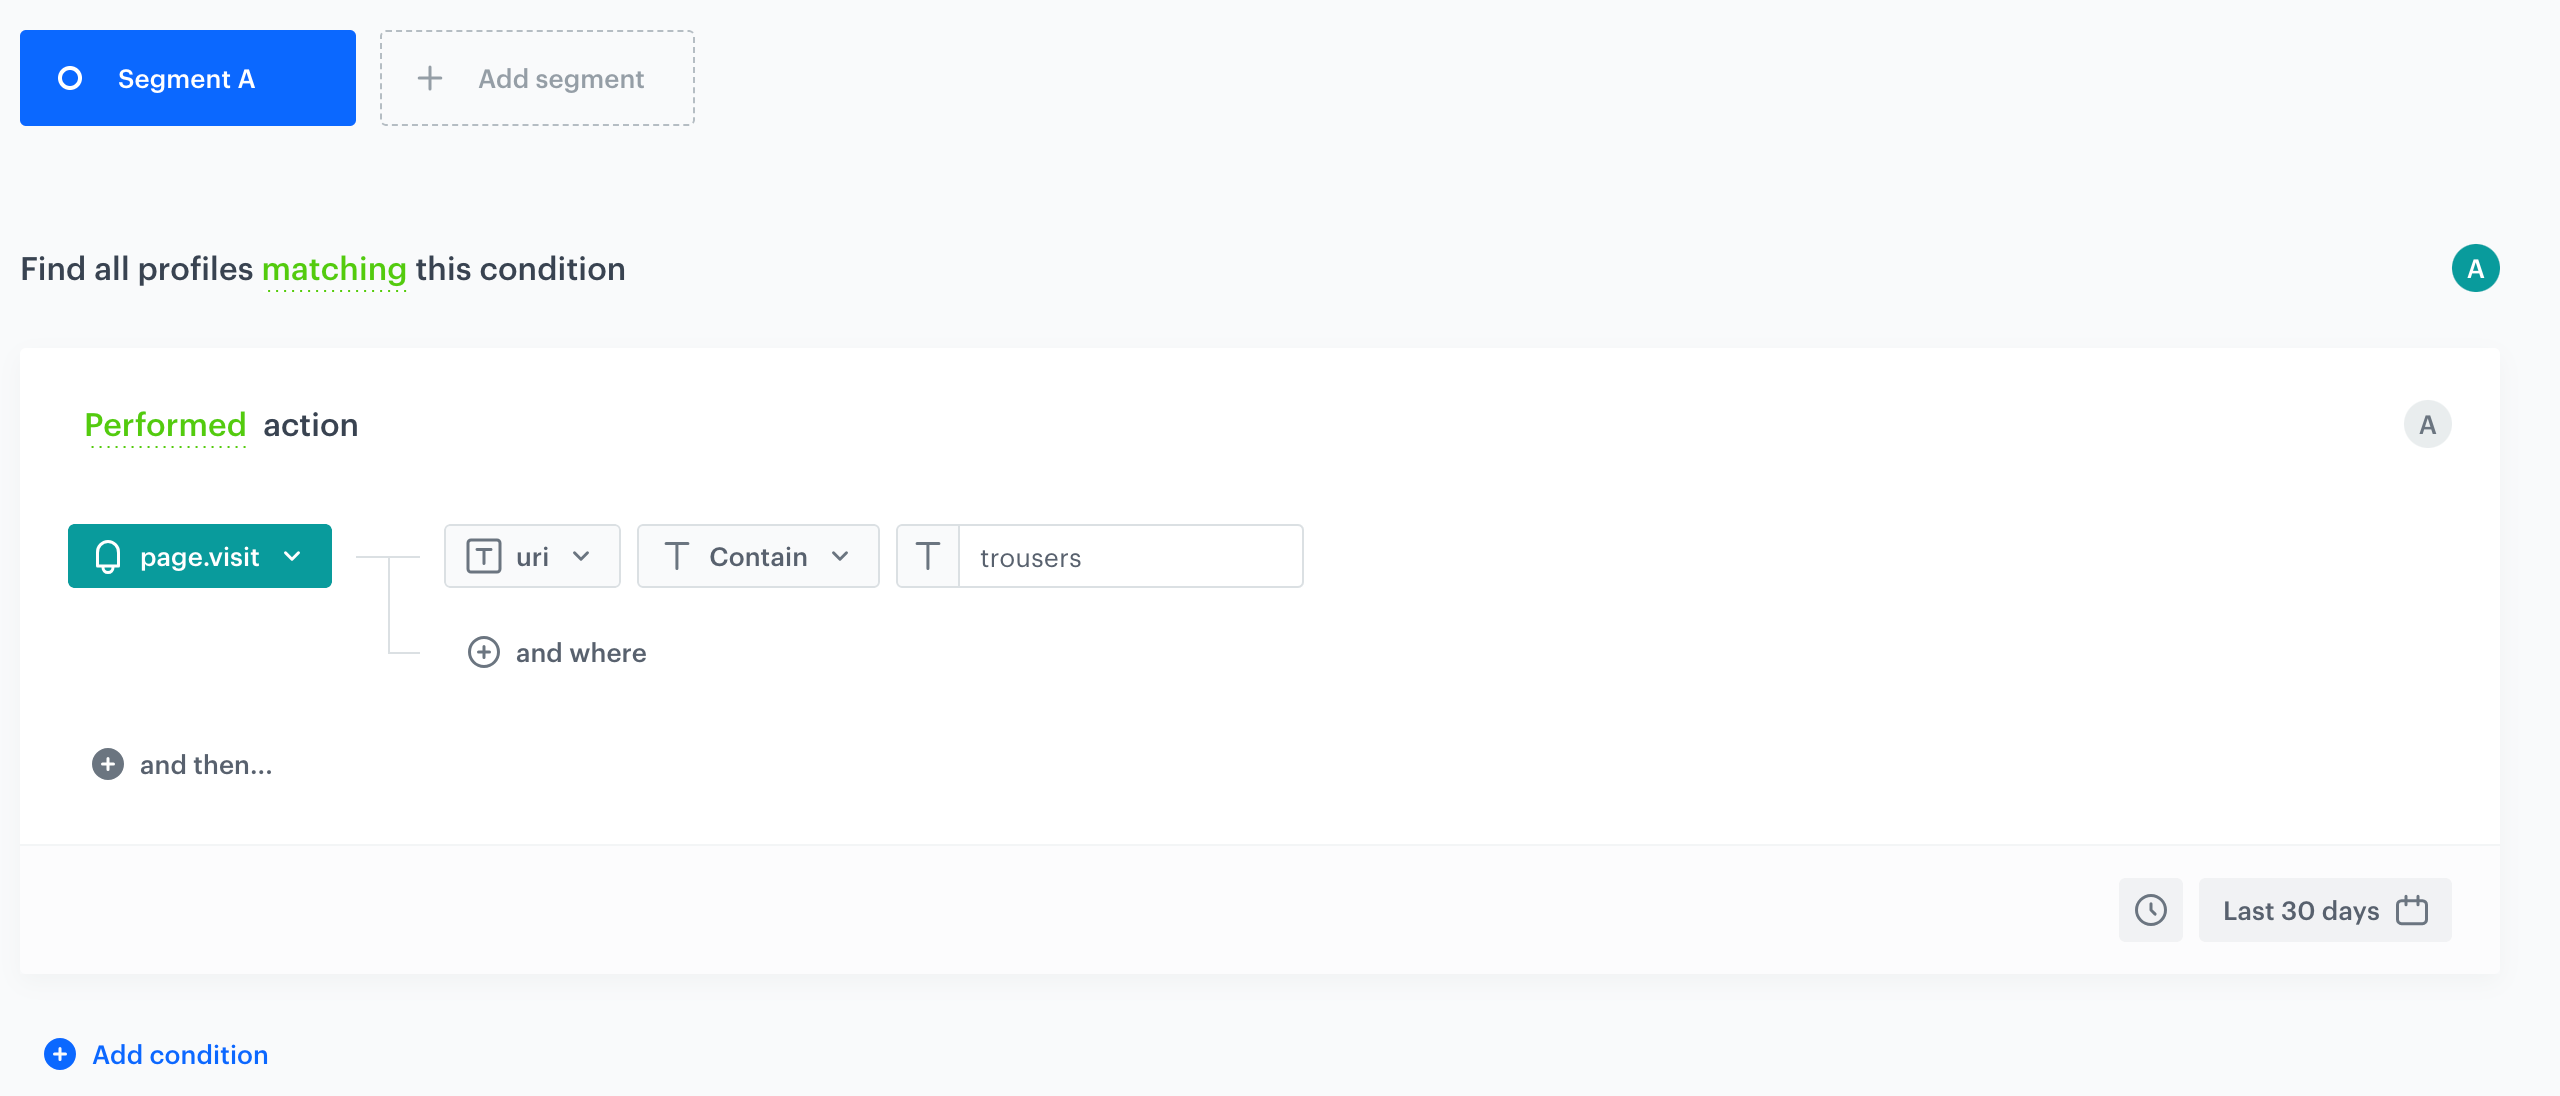
Segmentation of customers who in last 30 days visited website whose URL contain a a `trousers` word
Selecting a profile attribute
You can use the following attributes of a profile:
- Tags - You can organize your customers according to the tags you assigned them.
- Attributes - This group of customer features can be found in the profile card. You can use basic customer information such as first name, email, gender, marketing agreement, size, favorite color, and organize your customers according to values of these attributes.
- Segmentations - You can use other segmentations in the conditions, for example, you can exclude customers who belong to a particular segmentation.
- Aggregates - Aggregates are calculated in the context of individual customers, using them in segmentation conditions lets you analyze values of non-standard and dynamic customer attributes (such as the quantity of purchased items or a list of the customer's last 10 visited product categories), enabling you to categorize customers based on your specific business requirements.
You can read Customers' preferred communication channel to understand how aggregates have been used in a segmentation to organize customers by their preferred communication channel.
- Expressions - Similarly to aggregates, expressions are calculated in the context of individual customers. Using them in segmentation conditions lets you analyze values of non-standard and dynamic customer attributes. You can also use event expressions for advanced analysis of events (for example, you can create a custom parameter for a
product.buyevent that contains the total volume of purchased item, so you can use this custom parameter to organize customers according to the volume of items they purchased). - Specials - This catalog contain the
Client_IDparameter which is a unique customer identifier.
You can read Segment creation based on quantiles use case to understand how you can use Client_ID parameter in a segmentation.
- To select an attribute to be used as a condition, click Add condition.
- Select the Profiles tab.
- From the list, select a category of attributes from which you want to select a value.
- Use the search box to find the attribute.
- Use the logical operators to set the type of condition.
- Define the value that will be used as the filter according to the logical operator.
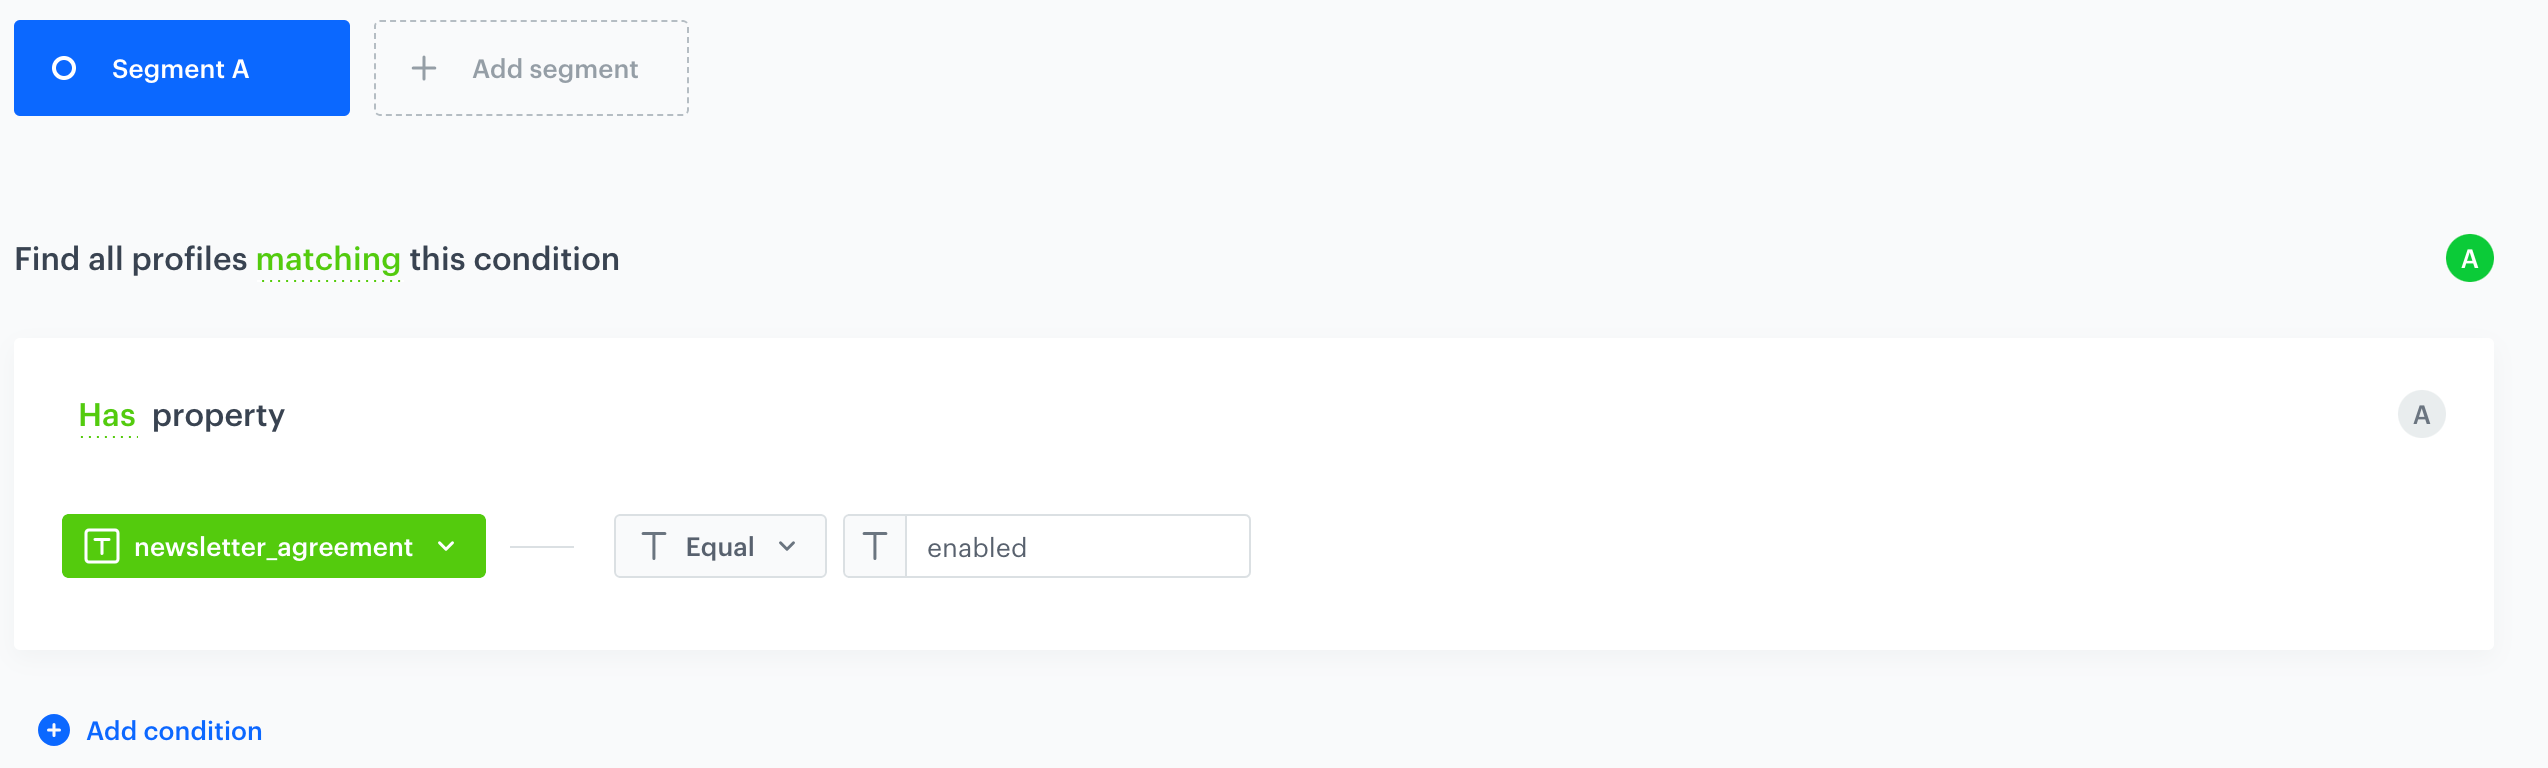
Including customers who agreed to receive newsletters
Combining conditions
You can add more conditions and mix conditions based on attributes and events. The relationship between the conditions can be expressed by AND or OR logical operators. The more conditions you add, the more complicated it gets, read through The logic of segmentation to find out how the conditions are interpreted, especially if there are more than two.
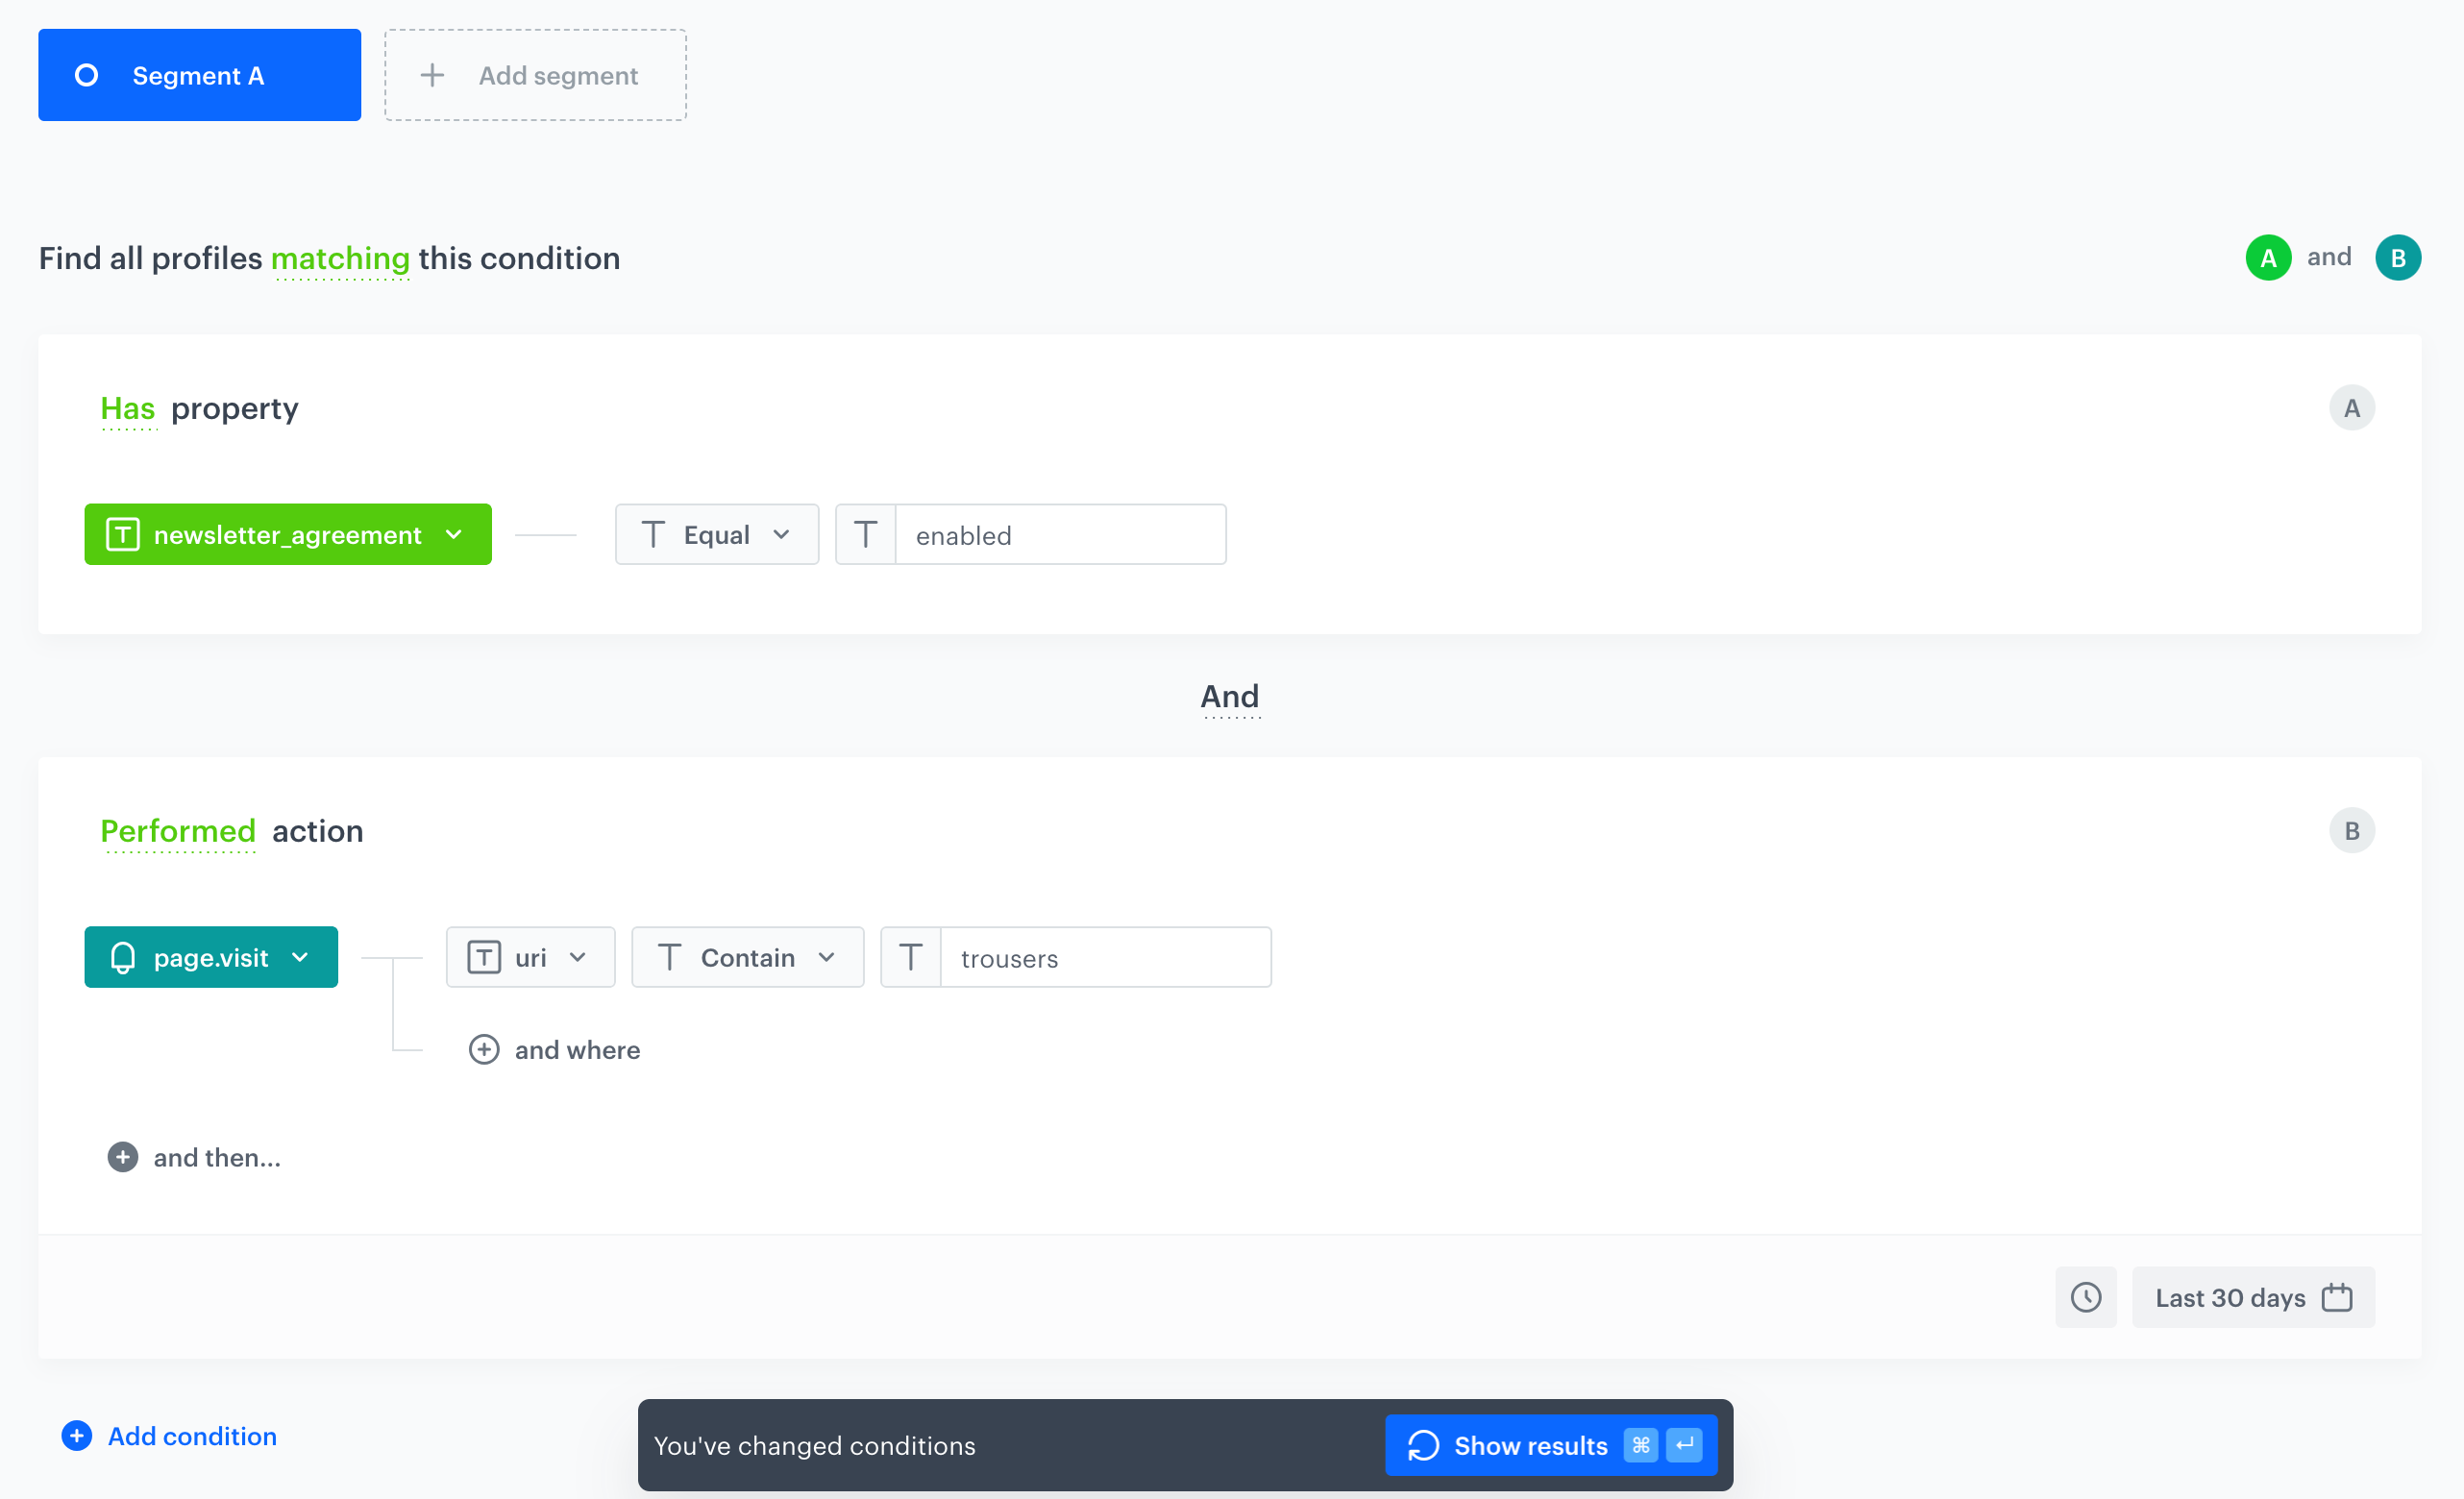
trousers in URLDefining funnels within conditions
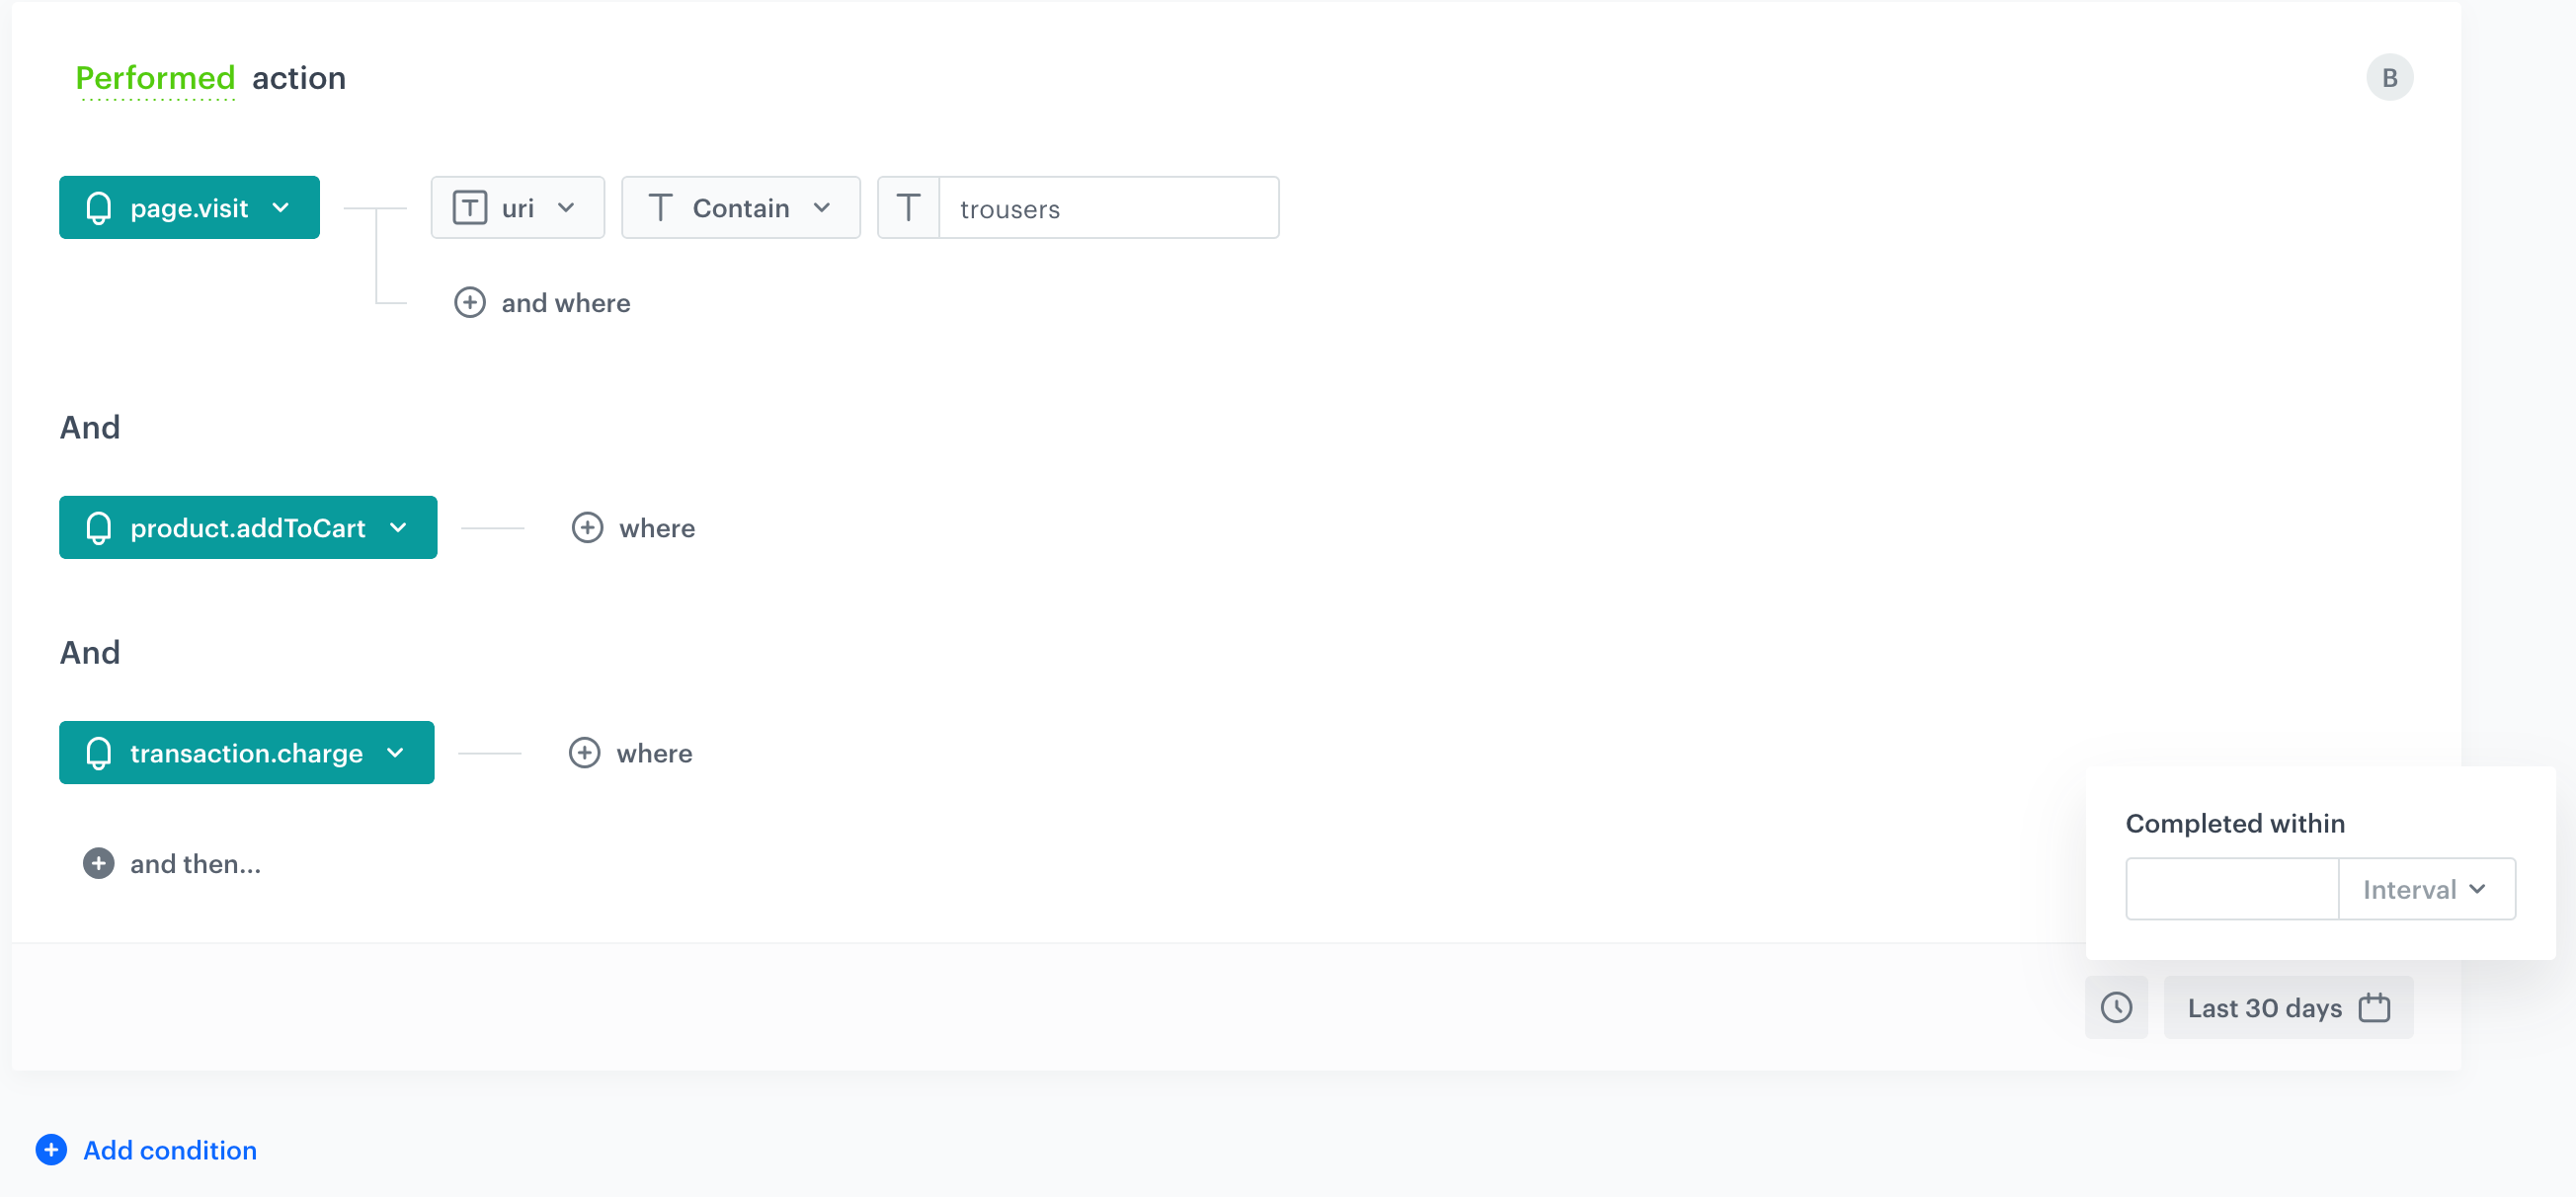
While defining a condition or conditions based on an event, instead of that one event, you can define a sequence of steps (events) a customer must go through to meet the conditions. The order of these steps is crucial, with the top event representing the first step in the funnel.
Optionally, you can set a time limit during which these steps must be completed in the specified order.
- After adding Performed action condition, add a next step to the condition by clicking and then....
- From the dropdown list, select an event. Optionally, you can define additional conditions for the event's parameters.
- To impose the time limit on performing these steps:
- Next to the calendar, click the clock icon.
- Define the time within which a customer must perform these steps to be included in the segmentation. Time is counted from the occurrence of the first step in the sequence.
Excluding
By default, when creating a segmentation, the conditions you define include customers if they have certain attributes or have performed specific actions. However, you can reverse the logic and exclude those customers instead.
You can do it in the following ways:
- In the Find all profiles matching this condition sentence, click the matching word to change it to not matching.

A segmentation includes customers whose first name doesn't contain `A` letter - Click Has in Has property to change it to Does not have property

A segmentation includes customers whose first name doesn't contain `A` letter
Adding segments
When creating a segmentation, you can create sub-groups called segments. Each segment can have its own set of conditions. By using multiple segments, you can divide your customers based on factors such as their average order value, the product categories they have visited, or how frequently they make purchases.
- You can create another segment by clicking the Add segment button.
- Repeat the steps described in Defining conditions and/or Defining funnels within conditions.
Multi match
By default, when a segmentation contains multiple segments, customers are included only in the first segment whose conditions they meet. Enabling the Multi match option allows customers who satisfy conditions for multiple segments to appear in all matching segments—but only in the segmentation preview results.
The Multi match option impacts only the segmentation preview and is ignored in communication and other business uses.
Multi match example
Let's group customers according to the source of page visits to your website in the last 30 days. The following customers visited your website from the following sources:
| Source of visit | Mobile | Desktop |
|---|---|---|
| John Doe | ||
| Anne Taylor | ||
| Sharon Smith |
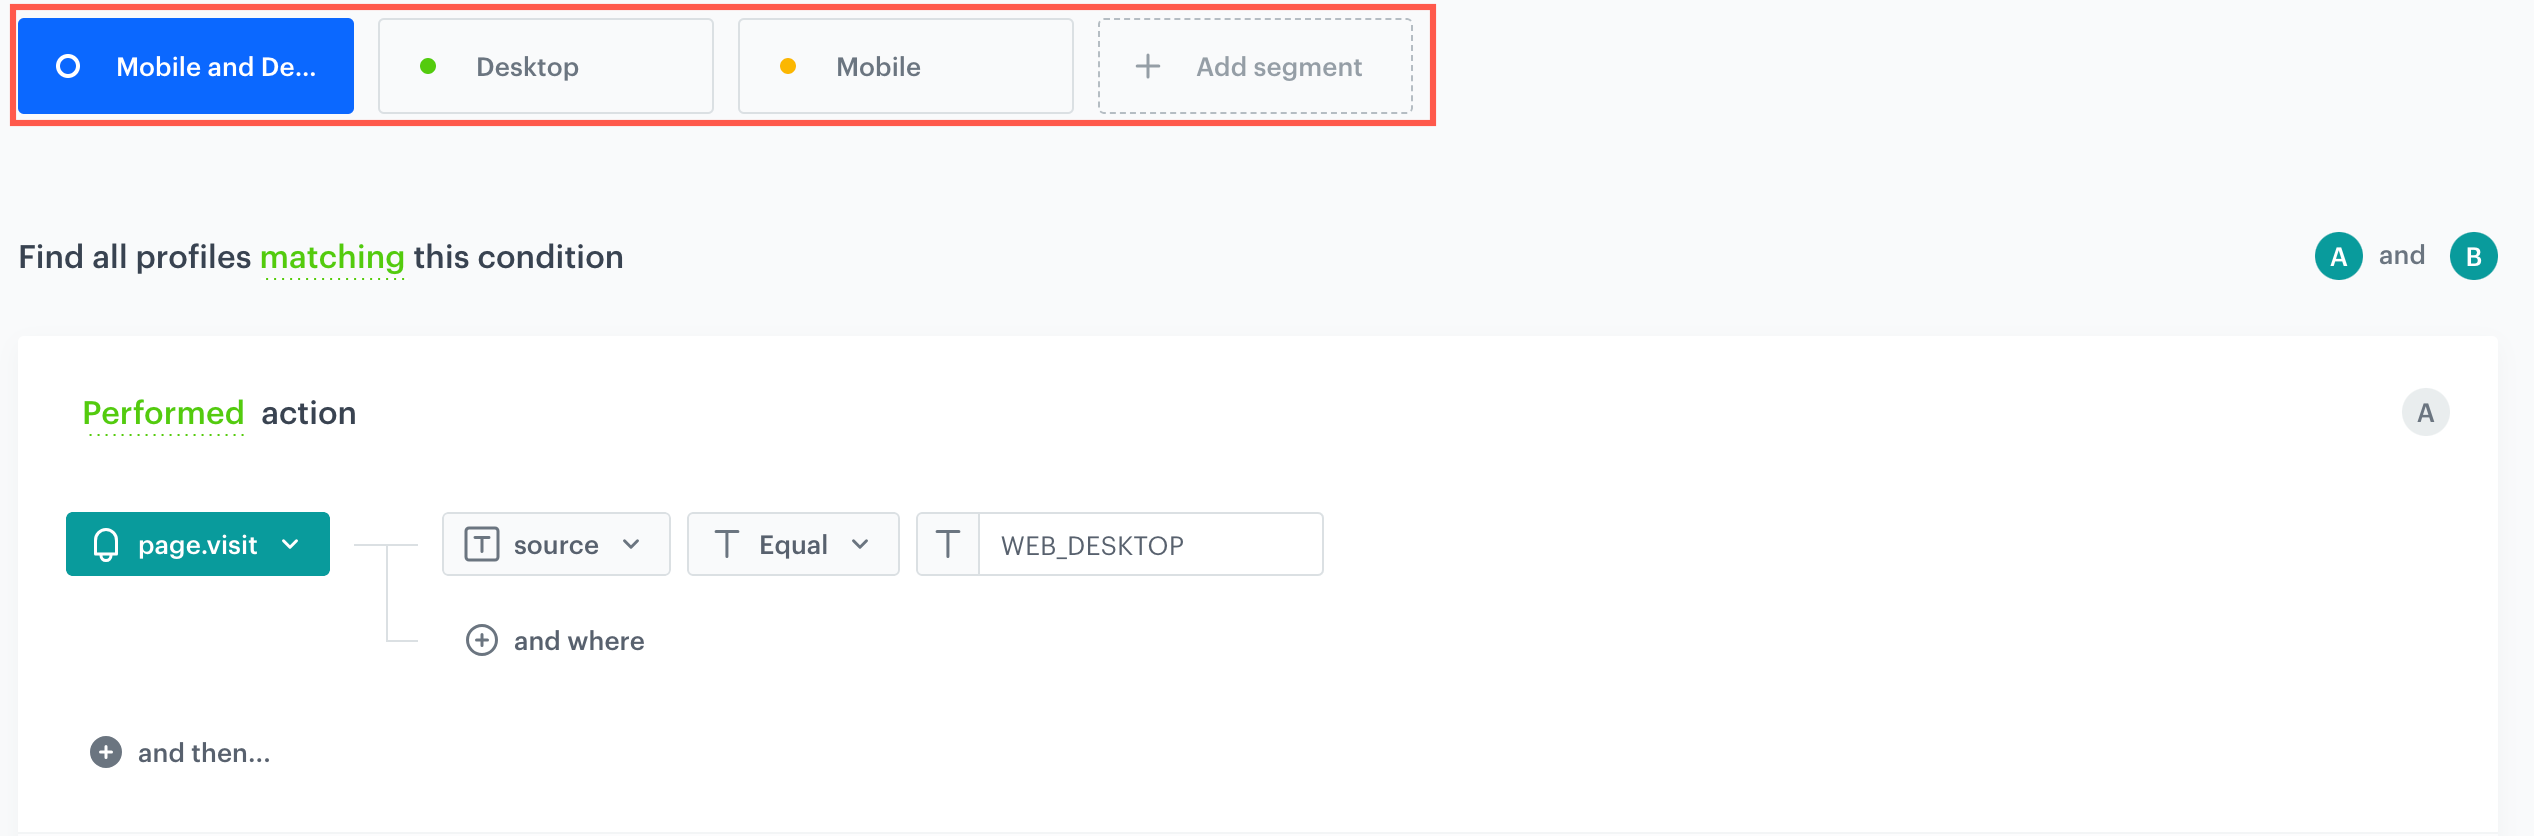
The conditions of the segmentation will contain three segments:
- Segment that includes customers who visited website from both mobile and desktop (Mobile and Desktop)
- Segment that includes customers who visited website from desktop (Desktop)
Segment that includes who visited website from mobile (Mobile)
More details about this example are available in Check distribution of sources of traffic on a website.
You can also become familiar with use cases which uses multiple segments, below you can find several examples of many available in the use case library:
The results for the segmentation will be as follows:
- disabled multi-match option: John Doe who visited your website both from desktop and mobile is included only in the segment which groups customers who visited the website from both device types. However, he is not included in segments that contain customers who visited website from only one device type, although he meets the requirements of the remaining two segments.
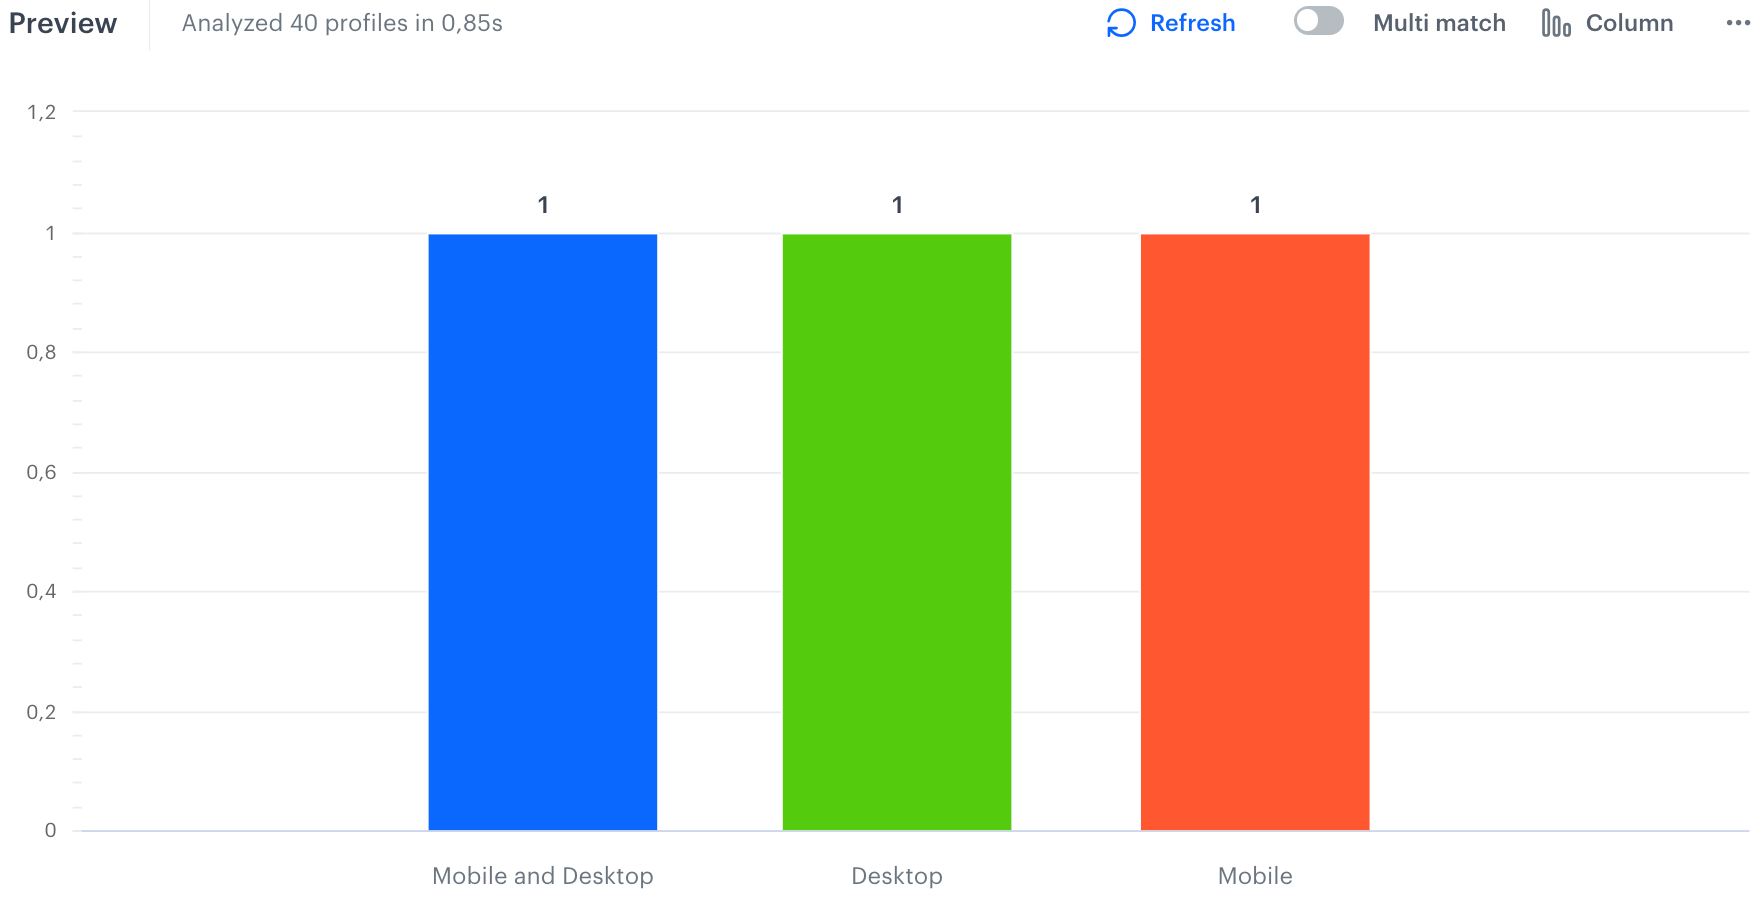
Results for disabled multi-match option - enabled multi-match option: John Doe is also included in segments that contain customers who visited the website from only one type of device.
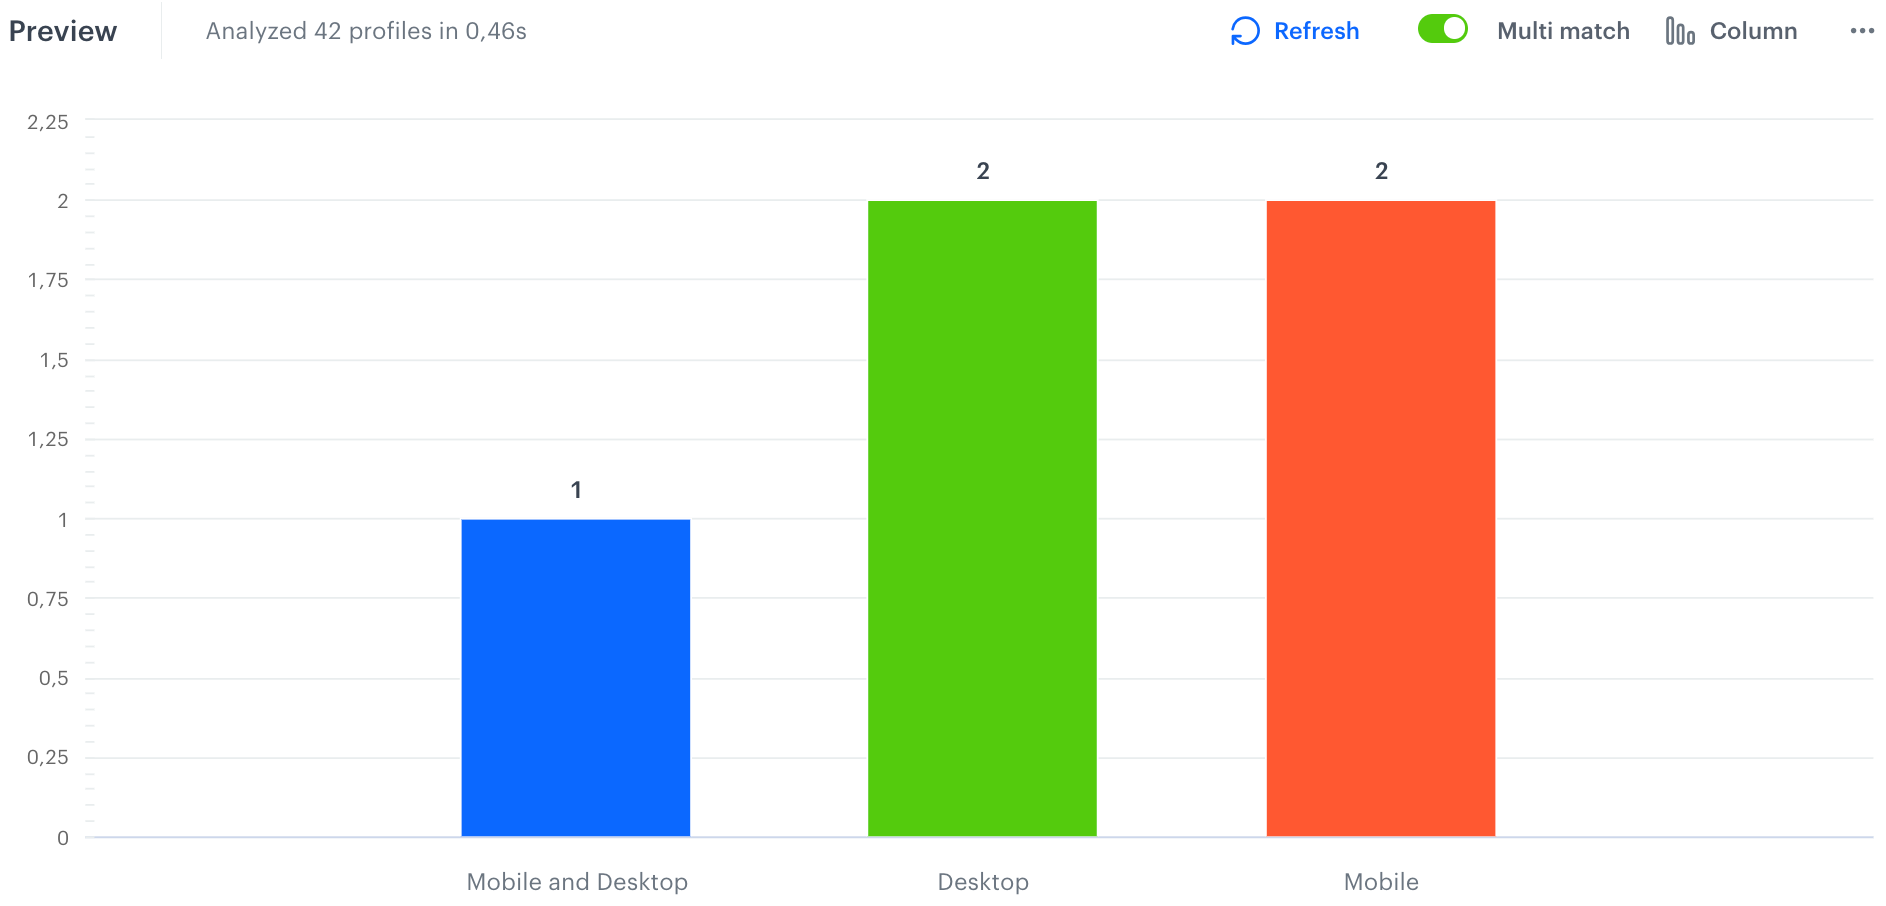
Results for enabled multi-match option