This feature is in a public preview mode.
This article explains how to mark the same profiles across a workspace group. If you want to save segmentation results to an attribute assigned to profiles and keep record of segmentation result changes within one workspace, see Sharing segmentation results.
Sharing segmentations lets you save the results of segmentations as membership attributes — a true or false value — in a group of workspaces.
When you share segmentation results across a group of workspaces, a membership attribute is created, and the same profiles from the segmentation are tagged with this attribute in every workspace within the group. This is useful if one profile interacts with different brands in your workspace group. You can use this to make your campaigns more efficient and avoid contacting the same profile multiple times.
Besides creating the membership attribute, the system updates the attribute on a set schedule—either every 6 hours or once a day. During each update, it checks the source segmentation(s) for any changes and only updates the profiles that have changed since the last run. This way, the process runs regularly but only works on profiles that need updating.
Generated events and attributes
- Membership attributes - One for each segmentation selected. The attribute is created during the first synchronization and then regularly updated. These are visible on the profile card, and you can find all membership attributes in your workspace under Behavioral Data Hub > Attributes.
profile.updatedevents:- Generated on both the source and target workspaces.
- Occur once per synchronization process.
- For every profile update:
- On the first run, all profiles that are members of at least one shared segmentation are updated.
- On subsequent runs, only profiles with changes in membership for at least one shared segmentation are updated.
- If multiple membership attributes for a profile are updated, these are batched together and a single event is generated.
profile.MembershipAttributeUpdatedevents:- Every change or creation of membership attribute generates the event on the current workspace or target workspace(s).
- On the first synchronization run, all profiles that are members of at least one shared segmentation will be generated the events.
- On subsequent runs, an event is generated for every change in membership attributes for profiles in at least one shared segmentation.
These attributes and events help you keep your segmentation data accurate and up to date, making it easier to target your profiles well. They also let you analyze how often profiles are added or removed from a shared segmentation.
Prerequisites
- You must be assigned have a user role which lets you share segmentations.
- Review and understand the limits.
Sharing modes
You can share segmentations to the following locations:
- Single Workspace Sync - The segmentation results will be saved to an attribute (on the currently used workspace) which will be assigned to the profiles who meet segmentation conditions. The value of this attribute will be updated through the synchronization process. This can help you keep record of segmentation result changes within one workspace.
- Multi Workspace Sync - The segmentation results will be saved to an attribute which will be assigned to the profiles across the group of workspaces. This is a way of marking the same profiles in the workspace group.
Synchronization frequency
The synchronization process can be scheduled differently depending on the scope.
| Synchronization Type | Frequency | Time Window | Synchronization location | Effect |
|---|---|---|---|---|
| Workspace Sync - 1h | Every hour | Every hour | Current workspace | Membership attributes created from selected segmentations are updated every hour. The first synchronization is performed immediately after activating the process. |
| Workspace Sync - 6h | Every 6 hours | Every 6 hours | Current workspace | Membership attributes created from selected segmentations are updated every 6 hours. The first synchronization is performed immediately after activating the process. |
| Workspace Sync - daily | Daily | Once a day at a random time between 4 A.M. and 6 A.M. | Current workspace | Membership attributes created from selected segmentations are updated once a day. |
| Group Sync - 1h | Every hour | Every hour | Workspace group | Membership attributes created from selected segmentations are updated every hour across all workspaces in a group. The first synchronization is performed immediately after activating the process. |
| Group Sync - 6h | Every 6 hours | Every 6 hours | Workspace group | Membership attributes created from selected segmentations are updated every 6 hours across all workspaces in a group. The first synchronization is performed immediately after activating the process. |
| Group Sync - daily | Daily | Once a day at a random time between 4 A.M. and 6 A.M. | Workspace group | Membership attributes created from selected segmentations are updated once a day across all workspaces in a group. |
Start sharing and synchronizing
- Go to
 Decision Hub > Segmentations.
 - On the top bar on the segmentation list, click Share as.
Result: A pop-up appears. - On the pop-up, click Multi Workspace Sync.
- From the Process frequency dropdown list, select how often membership attributes will be synchronized.
- Daily - The process will start once a day at a random time between 4 A.M. and 6 A.M.
- Every 6 hours - The process will start every 6 hours.
- Click Go to sharing process.
- On the pop-up, select the segmentations whose results will be shared and synchronized to a workspace group. The results will be saved as membership attributes.
- Become familiar with the summary of the configured process:
- The number of unique profiles that meet the criteria of at least one selected segmentation and have the specified profile ID. Each profile is counted only once, even if it appears in multiple segmentations. Become familiar with limits.
- The list of attributes which will be created and/or synchronized.
- The workspace group in which the membership attributes with the segmentation results will be created and updated.
- To start the process, click Apply.
- Confirm by clicking Yes, start.
Result: If you selected the 6-hour frequency, then the first synchronization job starts immediately. Otherwise, the synchronization will occur according to the schedule.
What's next
Checking synchronization status
Sharing segmentation results (to one workspace and multiple workspaces) is an ongoing process that not only creates membership attributes but also updates their values at the frequency set during the sharing process.
The synchronization status and logs can be accessed in ![]() Behavioral Data Hub > Membership Attributes Sync
Behavioral Data Hub > Membership Attributes Sync
The Membership Attribute Sync section contains logs for sharing processes initiated from the workspace you are currently logged in to - there is no central location to view all synchronizations across workspaces. It's especially important for users who use multibrand workspaces.
Example
Suppose there are three workspaces—Workspace A, Workspace B, and Workspace C—grouped together in a workspace group. You create a segmentation called "VIP Customers" in Workspace A and share its segmentation results across the workspace group. Membership attributes with true/false values will be created in all workspaces of the group based on this segmentation.
If you are logged into Workspace B and want to view the logs of this sharing process, you need to access them in Workspace A, the source workspace where the segmentation "VIP Customers" was originally created. Logs for the sharing process will not be available in Workspace B or Workspace C.
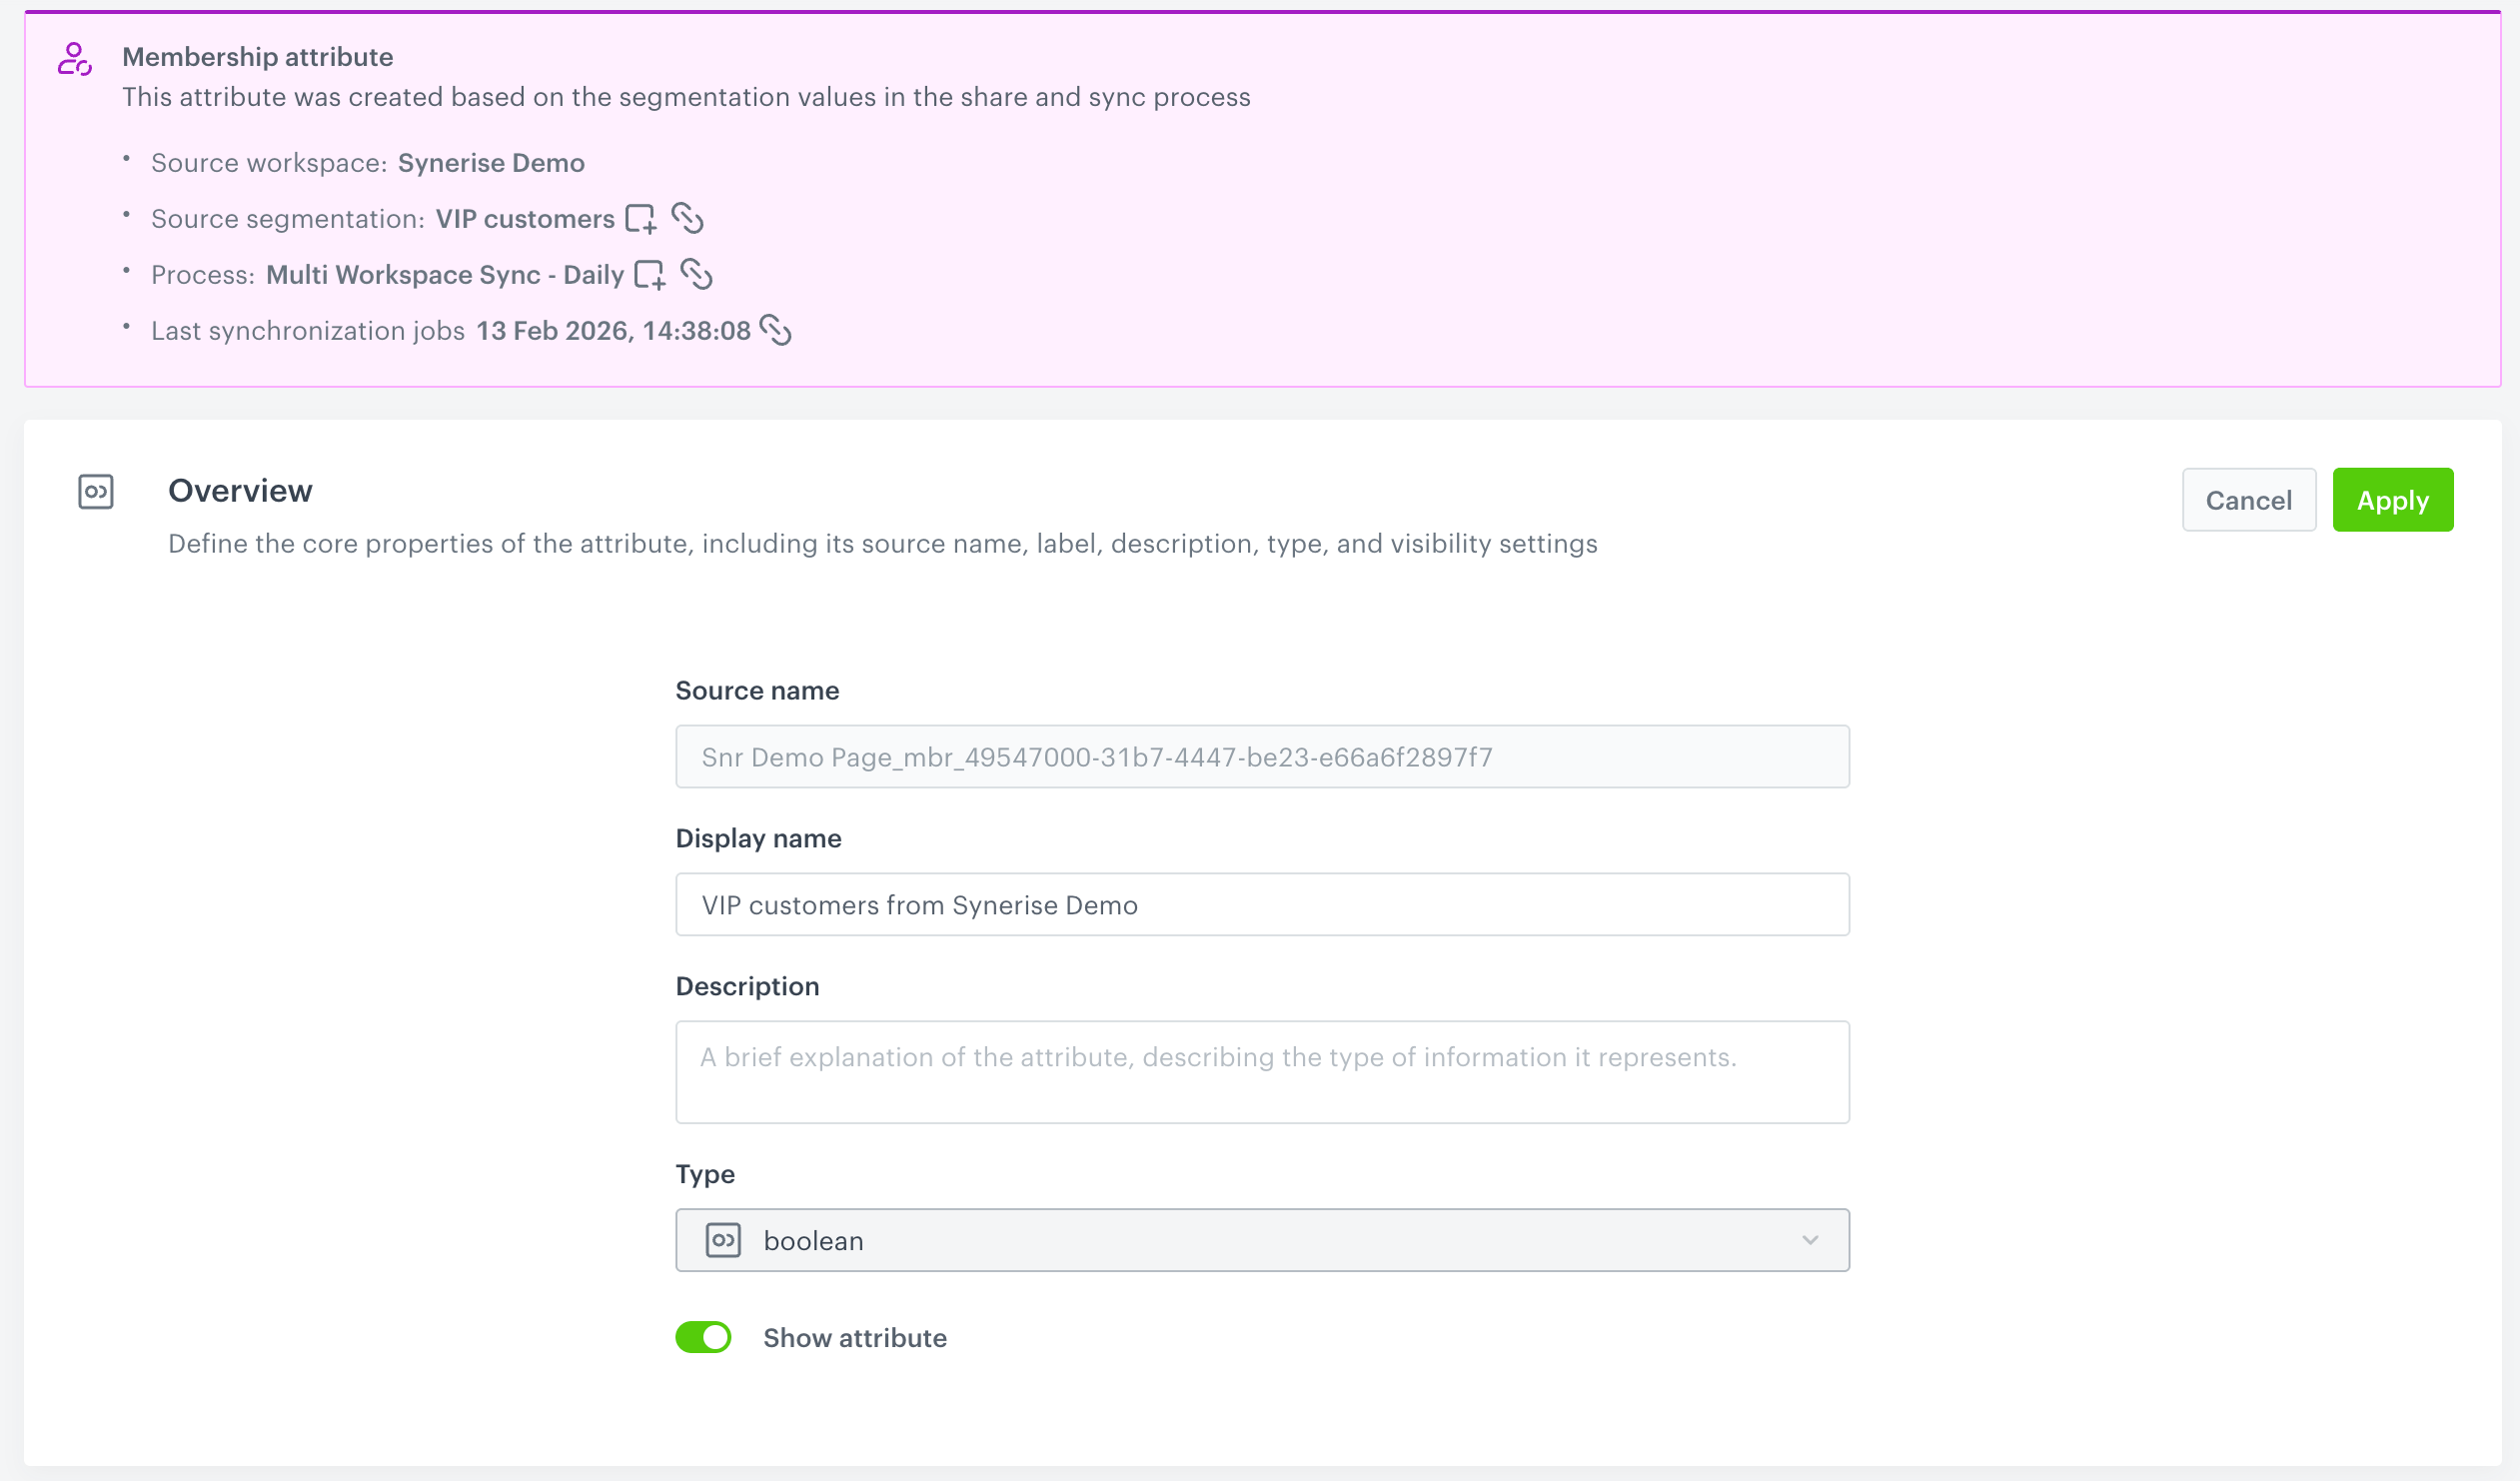
To find the source workspace, open the details of the membership attribute. This information will include the workspace from which the synchronization for the attribute was started.
Job stages
Regardless of the synchronization mode (to one workspace or many workspaces) synchronization takes three steps:
- Fetching segmentations - Collecting groups of data based on specific criteria.
- Attribute mapping - Linking data fields from the source to the correct fields in the destination
- Queueing for materialization - Adding tasks to a waiting list to be processed and finalized.
Job statuses
You can monitor synchronization job statuses for each step and download job files for debugging purposes. Job statuses include:
- Success – Job completed successfully.
- Processing – Job is currently in progress.
- Warning – Job completed with partial success, some issues may need attention.
- Failed – Job ended with failure.
Managing synchronization processes
You can only add or remove segmentations from active processes. Other changes require creating a synchronization process.
- Go to
 Behavioral Data Hub > Membership Attributes Sync.
 - Select the Processes tabs.
- Open the details of a synchronization process.
- Add or remove segmentations from the process.
- Confirm changes by clicking Apply.
Result: The synchronization process with the change is launched immediately. Other jobs will be performed as scheduled through the Process frequency option.
I want to edit a synchronization process
- Frequency and location cannot be edited for existing processes
To change the frequency or sharing location, you must create a new synchronization process. Segmentations can be added or removed from existing processes
Changes will take effect:- immediately for synchronizations scheduled every 6 hours - subsequent runs will be performed according to the schedule.
- on the next scheduled run for daily synchronizations.
- Stopping synchronizations
To stop synchronizing, remove segmentations from the process.
I want to manage membership attributes in a workspace
- Previewing attribute details
- Changing display name and attribute description
- Changing attribute visibility across filters
How do I know if my segmentation based on membership attributes is fresh?
Go to the details of the membership attribute based on which your segmentation is created, open its details, and check Last synchronization jobs.
I want to analyze how profiles joined and left segmentations
The analysis will be based on the profile.updated event, which captures changes to membership attributes. Since the state of a membership attribute indicates whether a profile belongs to the segmentation it was created from, analyzing the profile.updated event ensures reliable results.
- Create a formula metric which will deduct the count of
profile.updatedevents with the membership attribute value set to true from the count ofprofile.updatedevents with the membership attribute value set to false.- Go to Decision Hub > Metrics > New metric.
- Select Formula metric.
- Select Event.
- Select
profile.updated. - Click + where.
- From the dropdown list, select the attribute with the name of a membership attribute.
- Set the condition to
is true.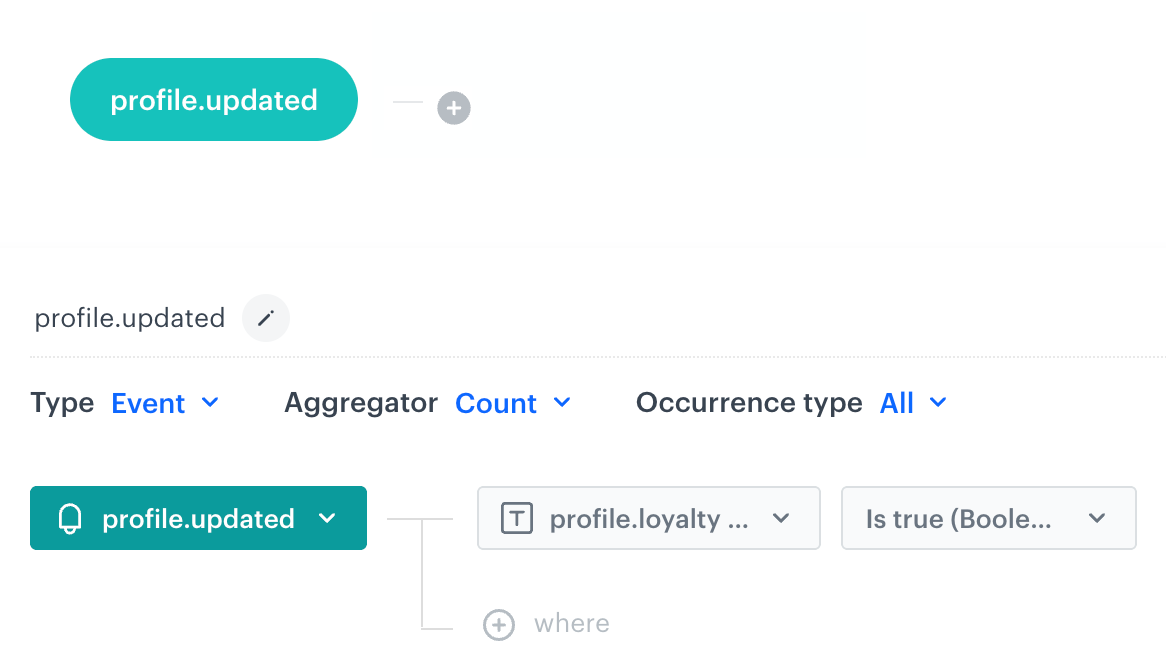
The first part of the formula - a profile.updated event with the parameter that signifies a membership attribute set to true - Create the second part of the operation:
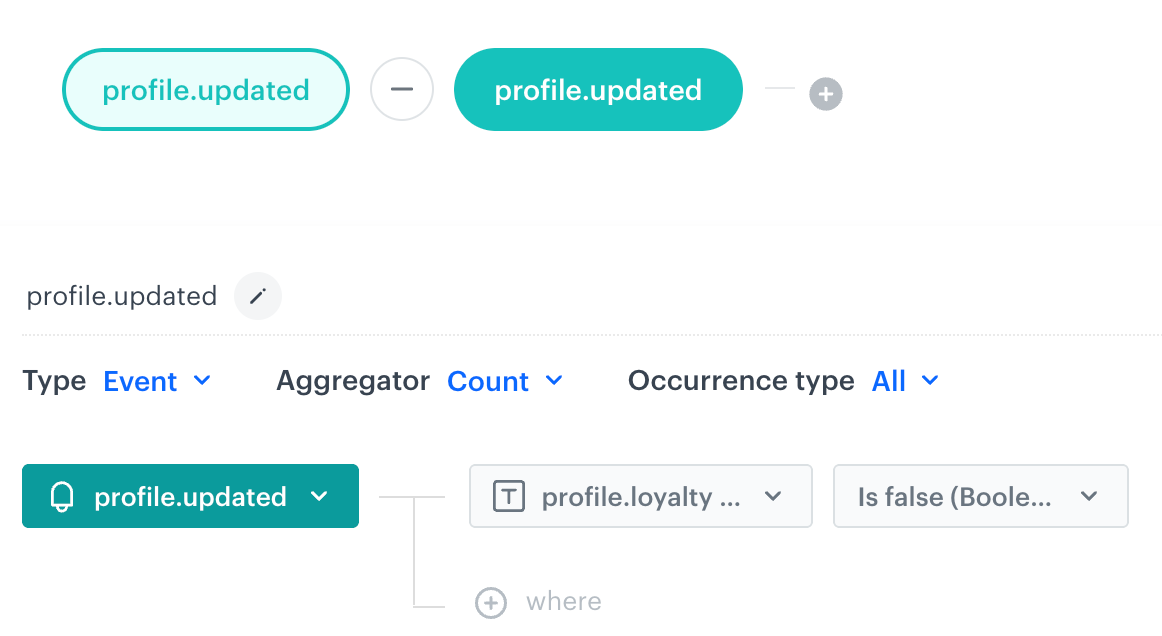
The first part of the formula - a profile.updated event with the parameter that signifies a membership attribute set to false - Save the metric.
- Go to
- Create a histogram on the basis of the metric you created.
- Go to Decision Hub > Histograms > New histogram.
- Select the metric you created in the previous step.
- Save the histogram.
- Go to
- Create a dashboard which displays the histogram results.
- Go to Decision Hub > Dashboards > Add dashboard.
- Click the
 icon on the dashboard.
 - Select the histogram you created in the previous step.
- Click the histogram widget which has been added to the dashboard.
- On the right panel, select the Style tab.
- Select the following visualization type:
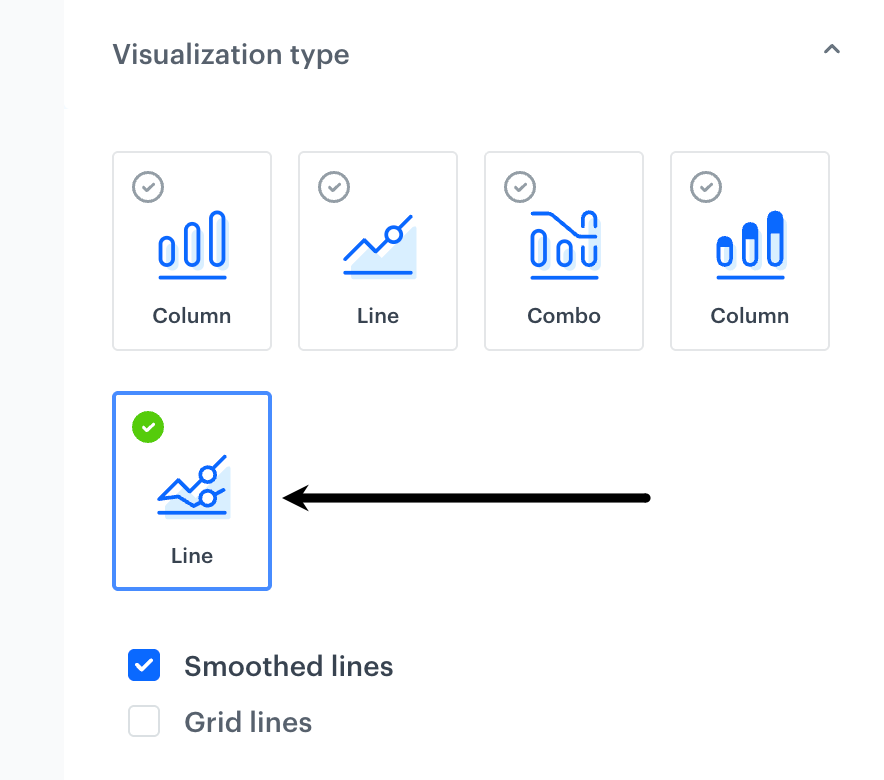
The Style tab of the histogram widget in the settings of the dashboard
- Go to