# Synerise
> Synerise is an AI-driven behavioral data and customer data platform (CDP).
> It enables businesses to collect, unify, and act on customer data across web, mobile, and offline channels.
## Overview
Synerise provides:
- **Customer data unification** — Merges behavioral data from all channels into unified customer profiles
- **AI-powered personalization** — Recommendations, search, predictions (churn, LTV, purchase likelihood)
- **Marketing automation** — Workflow builder with event-triggered scenarios
- **Omnichannel campaigns** — Email, SMS, mobile push, web push, WhatsApp, in-app, dynamic content
- **Loyalty programs** — Points, vouchers, promotions, gamification, tiers
- **Real-time analytics** — Dashboards, segmentations, funnels, trends, aggregates
## API Servers
| Environment | Base URL |
|---|---|
| Microsoft Azure EU | `https://api.synerise.com` |
| Microsoft Azure USA | `https://api.azu.synerise.com` |
| Google Cloud Platform | `https://api.geb.synerise.com` |
## Authentication
Synerise uses three authentication methods:
### JWT (Bearer Token) — Primary method
Include in header: `Authorization: Bearer {JWT}`
- Generated by login endpoints
- Uses RS512 algorithm
- Public key: `https://api.synerise.com/v4/public.pem`
- Refresh before expiry via `auth/refresh` endpoints
### Tracker Key — For web/recommendation requests
Include as query parameter: `?token={tracker_key}`
- Same key as used in website tracking code
- Used for recommendations, search, and tracker-scoped endpoints
### Basic Auth — For server-to-server
Include in header: `Authorization: Basic base64({workspaceGuid}:{apiKey})`
- Must be enabled per API key in workspace settings
- No token expiration, no refresh needed
## Authorization Flows
### Profile (Client) login — for end users
Token validity: 60 minutes (default)
```
POST /sauth/v3/auth/login/client
Body: { "apiKey": "...", "identityProvider": "SYNERISE", "password": "...", "uuid": "..." }
→ Returns JWT
```
Anonymous login (no credentials):
```
POST /sauth/v3/auth/login/client/anonymous
Body: { "apiKey": "...", "deviceId": "...", "uuid": "..." }
→ Returns JWT
```
### Workspace login — for server-to-server / M2M
Token validity: 60 minutes (default)
```
POST /uauth/v2/auth/login/profile
Body: { "apiKey": "01234abc-1234-5678-9abc-def012345678" }
→ Returns JWT
```
### User login — for Synerise portal users
Multi-step: login → MFA → select workspace
```
POST /uauth/auth/login/user
Body: { "username": "user@company.com", "password": "..." }
→ Returns JWT + mfaMethods
POST /uauth/auth/login/user/profile/{workspaceGuid}
Header: Authorization: Bearer {JWT from step 1}
→ Returns workspace-scoped JWT
```
## API Consumer Scopes
Each endpoint specifies which consumer types can call it:
| Scope | Description |
|---|---|
| Workspace (Business Profile) | Server-to-server integrations using workspace API keys |
| Synerise User | Portal users logged into the Synerise application |
| Profile (Client) | End-user/customer authenticated via profile login |
| Anonymous Profile | Unauthenticated end-user with UUID only |
| Web SDK Tracker | Requests authenticated via tracker key |
| Organization | Organization-level access (contact support) |
## Permission System
Endpoints require specific permissions assigned to API keys or user roles.
**Permission format:** `{SERVICE}_{RESOURCE}_{ACTION}` (e.g., `API_CUSTOM_EVENTS_CREATE`, `ANALYTICS_BACKEND_AGGREGATES_READ`)
**Permission groups** map to the Synerise access management UI:
- `analytics`, `analytics_aggregates`, `analytics_trends`
- `assets_catalogs`, `assets_search`, `assets_schema_builder`, `assets_brickworks`
- `automation_2_journeys`
- `campaigns_promotions`, `campaigns_recommendations`, `campaigns_personalised_promotions`
- `client_detail`, `client_management`, `client_activities`, `client_tags`
- `settings_users`, `settings_customers_iam`, `settings_export`
- `templates`
Special values:
- `NO_TOKEN` — No authentication required
- `ROLE_USER` / `ROLE_PREAUTHORIZED_USER` — Role-based check (portal users)
## Key Concepts
| Term | Definition |
|---|---|
| **Profile** | End-user/customer record. Called "client" in API. Has a UUID. |
| **UUID** | Unique identifier per profile. Stored in cookies (web) or SDK (mobile). |
| **Event** | Recorded action with `action` name and `params`, attributed to a profile. |
| **Workspace** | Organizational container for a company's data and campaigns. Formerly "Business Profile". |
| **Catalog** | Collection of item/product data for recommendations, search, promotions. |
| **Document** | Structured data object stored in Synerise (Schema Builder). |
| **IQL** | Items Query Language — filtering language for search/recommendation requests. |
| **Jinjava** | Templating engine (Jinja2-based) for personalizing content across channels. |
| **Aggregate** | Computed metric from event/profile data for segmentation and personalization. |
| **Expression** | Formula-based calculation on profile/event data for analytics. |
| **Voucher Pool** | Collection of unique voucher codes assignable to profiles. |
| **Dynamic Content** | Personalized content displayed on websites/apps via campaigns. |
## Platform Modules
| Module | Purpose |
|---|---|
| **AI Hub** | Recommendations, AI search, predictions (churn, LTV, propensity) |
| **Automation Hub** | Workflow/scenario builder for automated processes |
| **Behavioral Data Hub** | CRM, profile management |
| **Data Modeling Hub** | Events, catalogs, documents, schema builder |
| **Decision Hub** | Analytics dashboards, metrics, segmentations |
| **Experience Hub** | Campaign management (email, SMS, push, dynamic content) |
| **Settings** | Workspace configuration, IAM, API keys, tracking codes |
## SDKs
- **Web SDK** — JavaScript tracking code for websites. Handles UUID management, event tracking, dynamic content.
- **Android SDK** — Native Android. Auto event tracking, push notifications, in-app messages, recommendations.
- **iOS SDK** — Native iOS. Same capabilities as Android.
- **React Native SDK** — Cross-platform. Manual event triggers required.
- **Flutter SDK** — Cross-platform with Huawei support.
## Common Request Patterns
### Required Headers
- `Authorization: Bearer {JWT}` — on most endpoints
- `Content-Type: application/json` — for request bodies
- `Api-Version: 4.4` — required on `/v4/*` endpoints
### Pagination
Two patterns:
1. **Page-based:** `?page=1&limit=100` (page is 1-indexed, max limit often 1000)
2. **Cursor-based:** `?pageToken={token}` — next/previous tokens returned in response
### Profile Identifiers
Profiles can be identified by: `id` (numeric), `uuid`, `email`, or `custom_identify`.
Use path parameter `identifierType` to specify which one.
### Error Response Format
```json
{
"error": "Bad Request",
"status": 400,
"message": "Description of the problem",
"path": "/path_of_the_endpoint",
"errors": [
{ "code": 120, "field": "exampleField", "message": "details" }
]
}
```
Common status codes: 200 (success), 202 (accepted/async), 400 (validation), 401 (unauthorized), 403 (forbidden), 404 (not found), 429 (rate limited).
### Rate Limiting
HTTP 429 is returned when rate limits are exceeded. No specific limits are published — use batch endpoints where available and implement exponential backoff.
## Best Practices
- **API keys:** Keep secret. Workspace keys for server-to-server ONLY. Never embed in client apps.
- **Authentication:** Refresh tokens BEFORE expiry. Include space between "Bearer" and token.
- **Headers:** Always include `Api-Version: 4.4` for v4 endpoints. Watch for `X-API-DEPRECATED` response header.
- **HTTPS:** All communication must use TLS 1.2+.
- **Rate limiting:** Implement exponential backoff. Use batch endpoints where available.
- **Profile identification:** Default unique identifier is email (configurable to customId).
- **Events:** Use `POST /v4/events/batch` for sending multiple events efficiently.
- **Web SDK CSP:** Allowlist `*.synerise.com`, `*.snrcdn.net`, `*.snrbox.com`, `*.snrlink-page.com`.
- **Deprecation:** Check `X-API-DEPRECATED` header. Migrate away from deprecated endpoints promptly.
## API Categories (730 endpoints)
Authorization, Data Management (Events, AI Events), Profile Management, Analytics (Aggregates, Funnels, Segmentations, Trends, Metrics, Reports, Expressions, Histograms, Sankeys), AI Recommendations (Campaigns, Configuration), AI Search (Search, Visual Search, Listing, Suggestions, Query Rules, Synonyms, Query Classification), Loyalty (Promotions, Vouchers, Handbills, Points, Settings, Locks), Asset Management (Catalogs, Documents, Screen Views, Templates, Uploader), Campaigns (Workflows), Brickworks (Schemas, Records, External Sources, Content Generation), Settings (Access Control, User Management), Organizations (Consumption).
## Documentation
- [toc.json](/api/toc.json) — Machine-readable table of contents mirroring the live site navigation
- [llms-full.txt](/api/llms-full.txt) — Complete documentation as plain text
- [Full Markdown](/api/docs/llms-full) — All docs as Markdown
- [Single article](/api/docs/{slug}/markdown) — Individual article as Markdown
- [OpenAPI YAML](/api/openapi.yaml) — API specification
- [OpenAPI JSON](/api/openapi.json) — Enriched spec with code samples and permissions
- [API as Markdown](/api/api-reference/markdown) — All endpoints as Markdown
---
# Full Documentation (1205 articles)
---
## Ai 7 Days
### AI Demo
# The 7-day AI Launch Plan
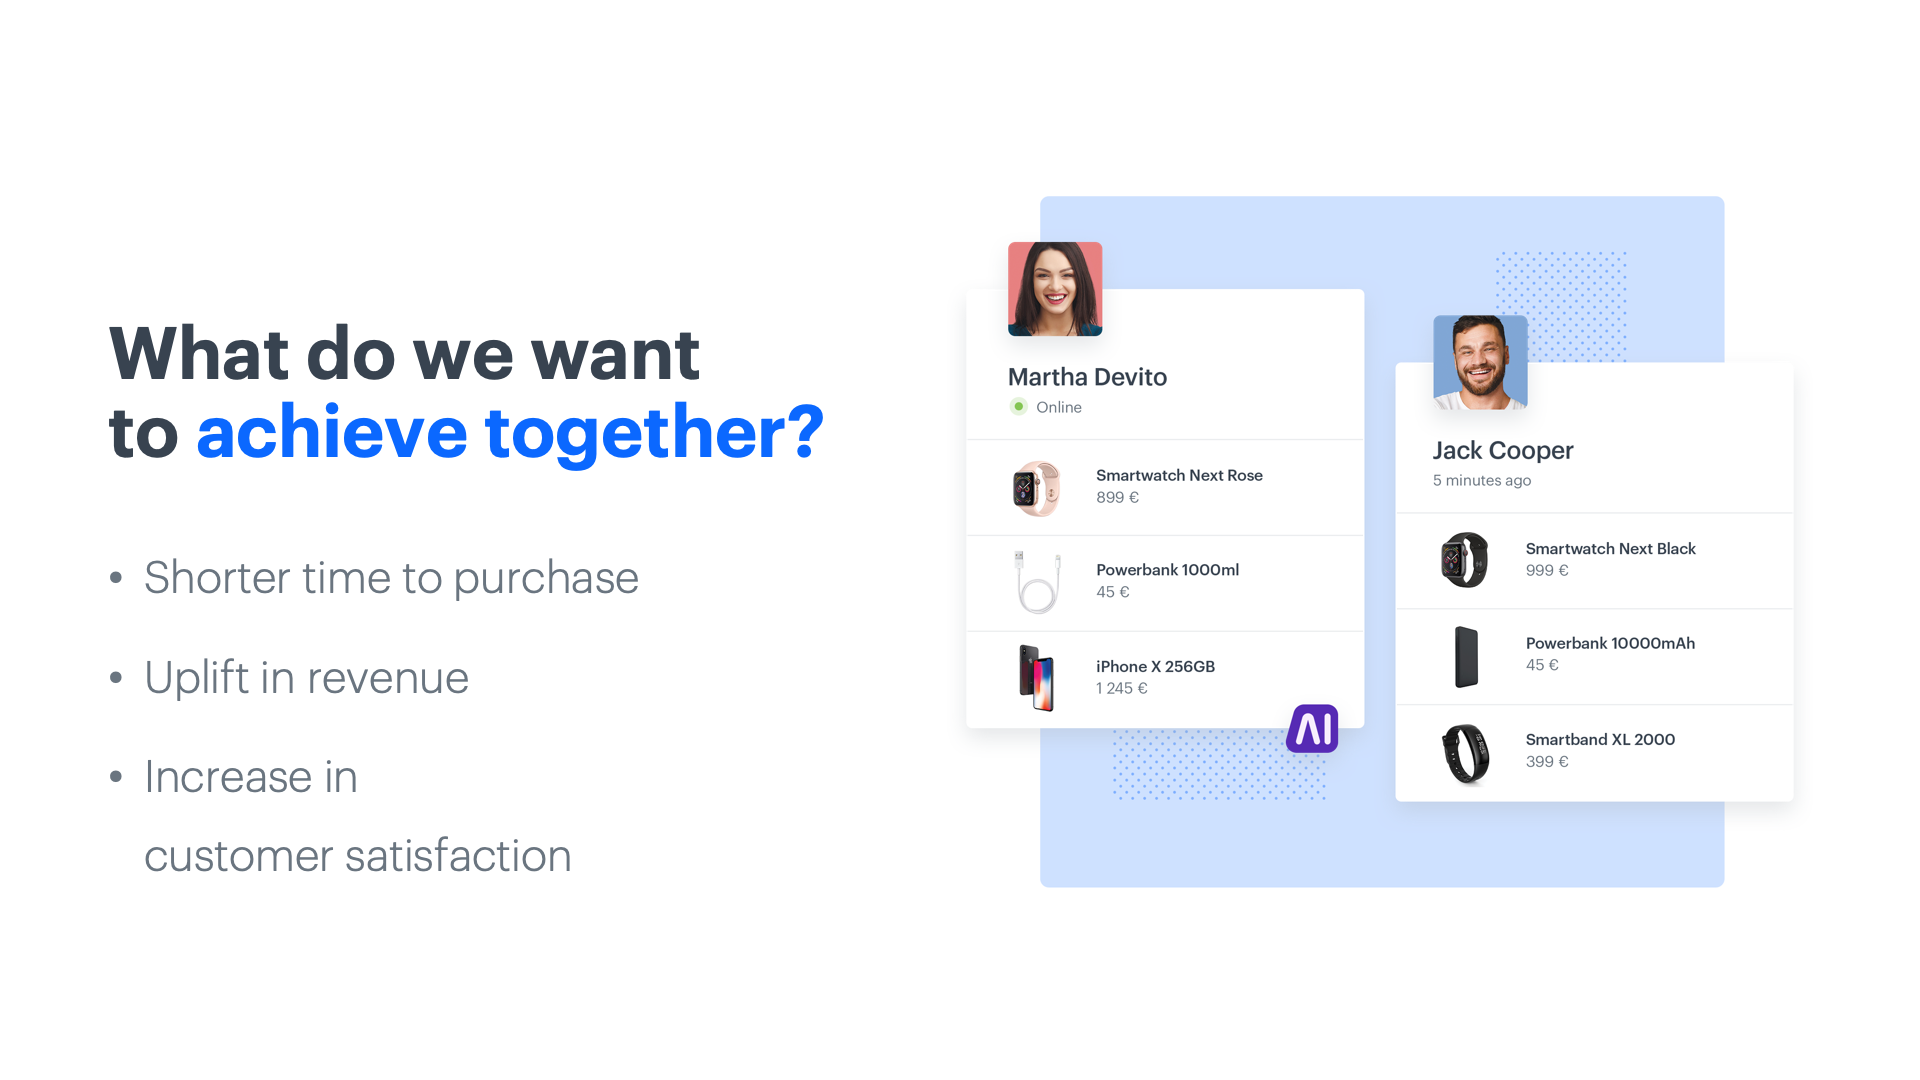
Put the power of AI-driven search, recommendations, and personalization to work in just one week
In the world of ecommerce, every competitive advantage counts. At Synerise, we’re on the leading edge of innovation for the most powerful tool there is for online enterprises—Artificial Intelligence.
AI is a key component of the digital transformation of any business, but has special relevance and benefits for ecommerce. The oceans of data generated every day—every second—by consumers as they move through both online and offline spaces is too much for conventional computing methods to process, analyze and turn into business insights. Only AI-powered algorithms can dive in and separate the signal from the noise, the useful data from the distractions, and deliver real visibility into consumer preferences.
With that information, you can then craft a hyper-personalized customer experience at a scale previously impossible. AI can make sure that every visitor to your site and every returning customer has their own customized path and content, based on information about their behavioral and purchase histories. This kind of tailored marketing message is the shortcut to accelerating progress in the purchase funnel, driving conversions and building customer loyalty.
In short, it’s the path to success.
**Synerise is now offering a simple and easy way to integrate our solutions into your ecommerce operation and see results in just seven days.**
A week from now, your online sales can be transformed into a highly efficient process that delivers exactly what customers are looking for. Your search results, product recommendations and content can be optimized in a way that only algorithms powered by AI can deliver.
A quick implementation and configuration is all that’s separating your online store from joining the businesses that are already using next-generation solutions for delivering the best customer value.
Ready to learn more? Here’s the simple path you can take to start using the power of AI.
## Day 1 - Implementing a product feed
Provide data about your products and customer behavior: prepare a product feed, check og:tags on the website, implement the tracking code and transactional events.
Start with building the foundation with information about your products and setting up the proper events.
[Read more about product feed integration](/use-cases/import-product-feed-to-catalog)
## Day 2 - Training the first models
On the second day, we can start training the first models: similar and visual recommendations based on the product feed. Recognize customers by tagging forms, configure email, sms and web push campaigns to prepare the foundations of the omnichannel experience.
AI algorithms start learning, your customer base is indexed and your automated communication channels are set up and ready for future campaigns using AI.
- [Read more about data requirements](/docs/ai-hub/recommendations-v2/introduction-to-recommendation-campaigns#requirements)
- [Read more about form tagging](/developers/web/event-tracking)
## Day 3 - Implementing the first recommendations
Implement first recommendations on the product page and import historical transaction data.
AI is already at work on your site and brings the first effects but also continues to learn from customer histories.
[Read more about importing your historical transaction](/docs/crm/crm-import)
## Day 4 - Introducing AI search
Train cart and recommendation models, deploy product sets and AI search.
AI goes further, optimizing content displays and recommendations, helping clients to make better decisions and save time.
- [Read more about search implementation](/docs/ai-hub/ai-search)
- [Read more about cross-sell recommendations](/docs/ai-hub/recommendations-v2/recommendation-types#cross-sell-and-cart-recommendations)
- [Read more about cart recommendations](/docs/ai-hub/recommendations-v2/recommendation-types#cross-sell-and-cart-recommendations)
## Day 5 - Training more models
Train more models and refine recommendations.
Now you’re delivering highly precise recommendations and product suggestions. This is the time to optimize ongoing campaigns, implement cart recommendations and new campaigns.
- [Read more about recommendation statistics](/docs/ai-hub/recommendations-v2/recommendation-statistics)
- [Read more about top products recommendations](/docs/ai-hub/recommendations-v2/recommendation-types#top-items)
## Day 6 - Implementing AI in email campaigns
Send automated emails with recommendations and focus on automated messages triggered by specific customer actions.
Your system knows which customers are more likely to respond to certain offers through automated campaigns and you can reach customers with recommendations even when they’re not on your site.
[Read more about e-mail campaigns](/docs/campaign/e-mail)
## Day 7 - Refining personalized recommendations
Perfect personalized recommendations, add personalization to AI Search, apply AI to remarketing.
Now every aspect of your ecommerce is powered by fully trained AI algorithms, you’re delivering highly precise recommendations and product suggestions based on customer behavioral data, which further boosts the accuracy of the AI search engine and remarketing campaigns.
[Read more about personalized recommendations](/docs/ai-hub/recommendations-v2/recommendation-types#personalized)
## Analyze the results
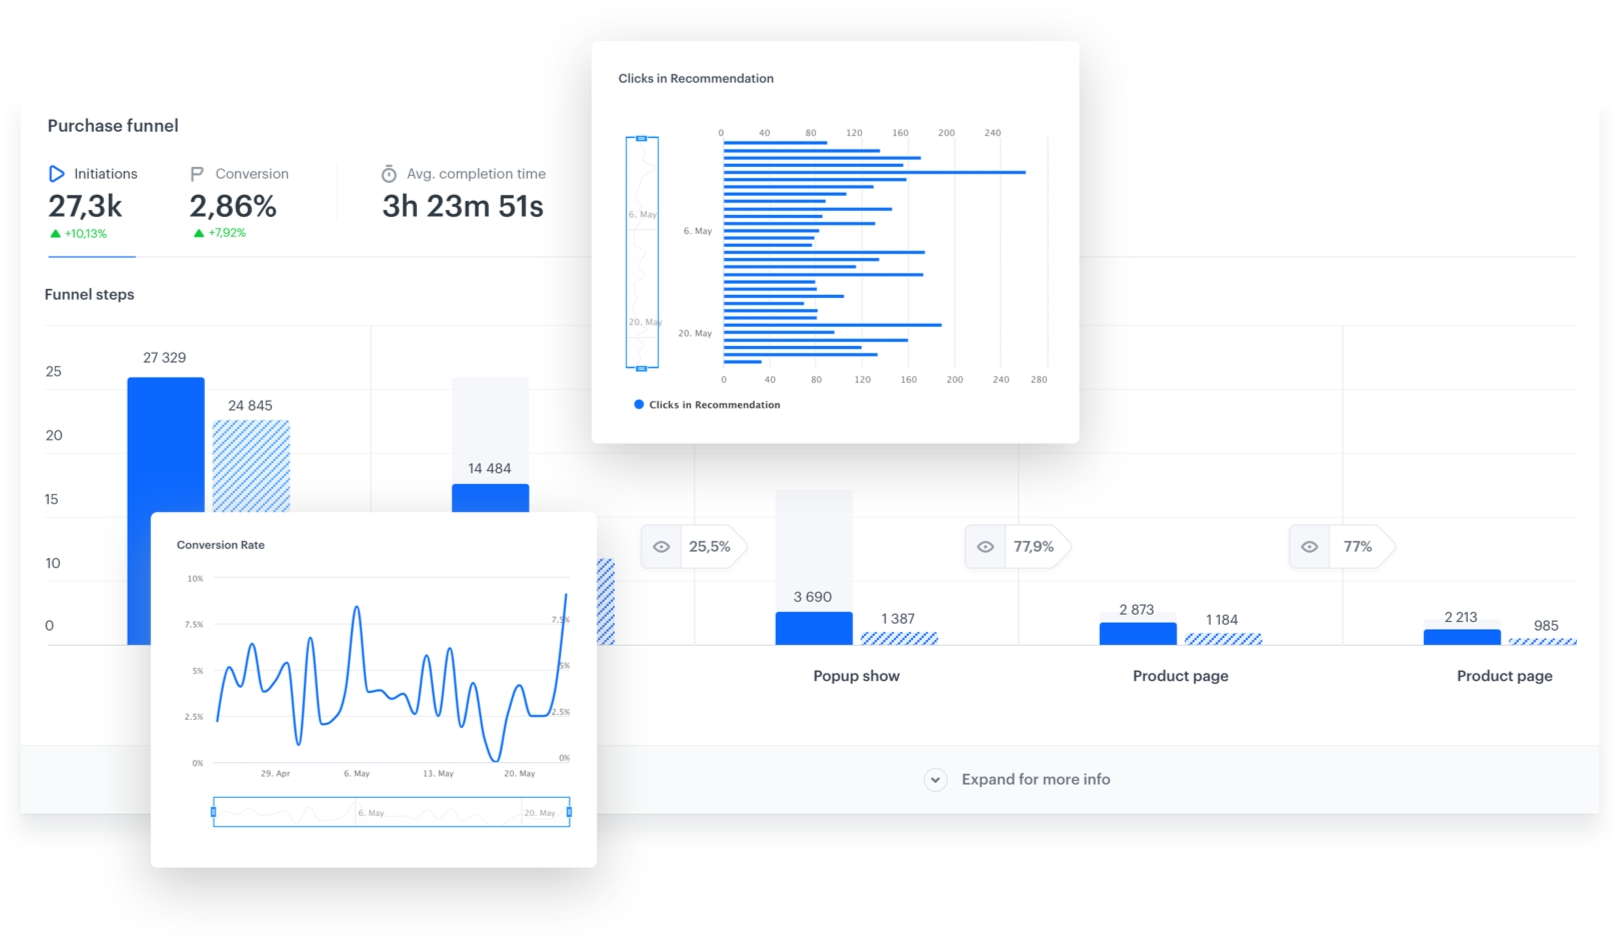
We can’t skip the role of analytics in this 7-day plan. Integration with the AI module and campaign implementation must be supported by an analysis of the effects they bring. This is why it is important to check the results and metrics of individual campaigns, things like impressions, clicks, the quantity of the products bought from recommendations and the number of transactions made. For the best analysis of the effects of the campaign, it is best to use control groups.
## What’s next?
When your Synerise solution is operating at full efficiency, there are a number of use cases that can be deployed to enhance your conversions and revenue.
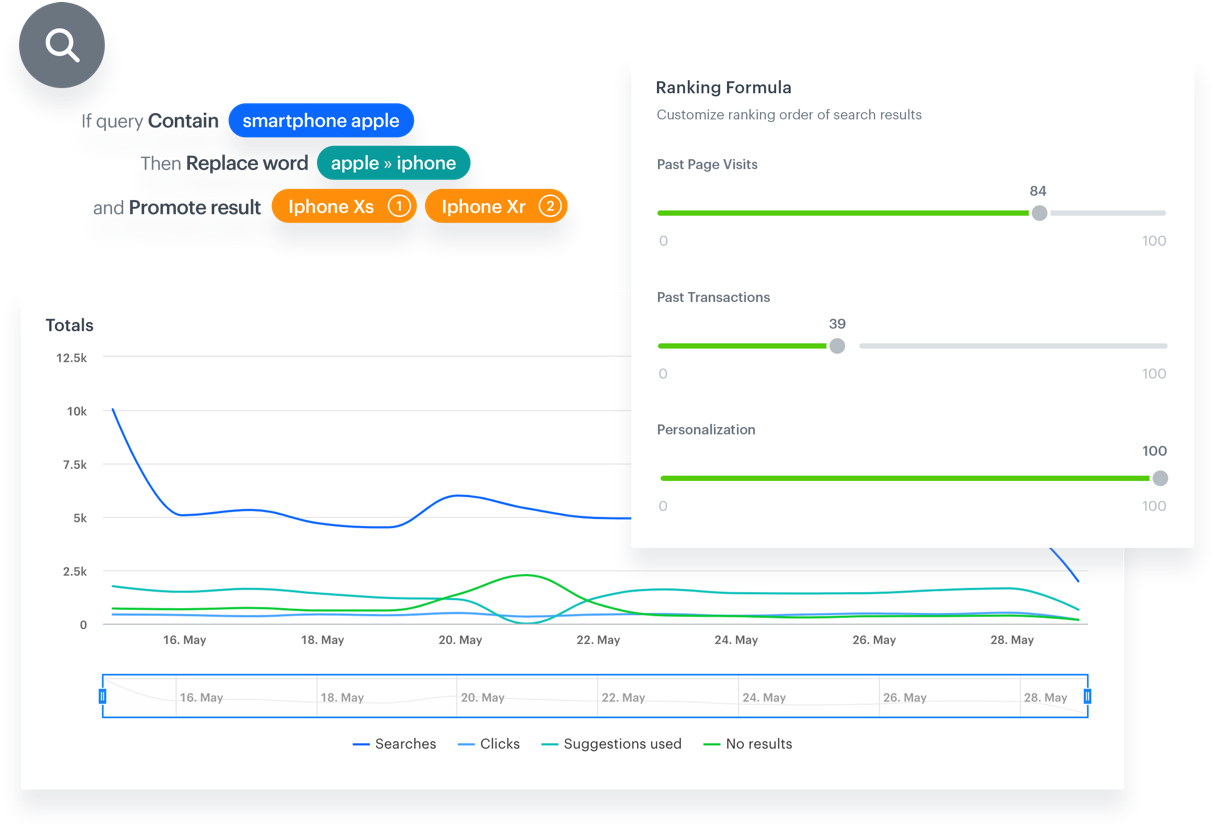
- When a word is misspelled in a search bar, AI can make informed guesses about what the user had in mind and show display the appropriate products.
- Don’t go yet! Automated exited pop-ups can display personalized products based on customer interests.
- Your automated email campaigns can be boosted by recommendations. Send complementary products related to recently-purchased products, or similar to last-seen items.
- Save abandoned carts with reminders and complementary products based on items placed in carts.
- Create dedicated landing pages with personalized offers and send them to customers who left your website without making a purchase.
- Set up product comparisons using AI to help customers make the right choice for them.
- Activate recommendations for visually similar products.
---
## Developers
### SDK Lifecycle
### Synerise Builder
Synerise builder class.
**Declared In:**
`com.synerise.sdk.core.Synerise.Builder`
**Declaration:**
```Java
public static class Builder
```
```Kotlin
static class Builder
```
**Properties:**
| Property | Type | Optional | Default | Description |
| --- | --- | --- | --- | --- |
| **app** | Application | no | - | Application context |
| **apiKey** | String | no | - | Profile API Key (formerly Client). Can be retrieved from Synerise App |
| **applicationId** | String | no | - | Application ID |
| **baseUrl** | String | no | - | Base URL in the SDK. Can be null |
| **syneriseDebugMode** | Boolean | no | - | Debug mode flag |
| **notificationIcon** | int | no | R.drawable.synerise_ic_default_icon | Notification icon |
| **notificationIconColor** | int | no | R.color.syneriseGrayTranslucent | Notification color |
| **channelDefaultName** | String | no | - | Default notification channel name |
| **channelDefaultId** | String | no | - | Default notification channel ID |
| **channelHighPriorityName** | String | no | - | High priority notification channel name |
| **channelHighPriorityId** | String | no | - | High priority notification channel ID |
| **pushListener** | OnRegisterForPushListener | no | - | Push listener |
| **locationListener** | OnLocationUpdateListener | no | - | Location listener |
| **crashHandlingEnabled** | Boolean | no | - | Crash handling flag |
| **hostApplicationType** | HostApplicationType | yes | - | Host application type |
| **hostApplicationSDKPluginVersion** | String | yes | - | Synerise SDK plugin version in the host application |
| **setRequestValidationSalt** | String | yes | - | Synerise Profile salt string for request validation |
| **messagingServiceType** | String | yes | GMS | Use `GMS` for Google Mobile Services or `HMS` for Huawei Mobile Services |
**Initializers:**
Start initializing Synerise SDK with this method.
To get the Workspace API Key (formerly Business) and Profile API Key (formerly Client), sign in to your Synerise account and go to [Settings > API Key](https://app.synerise.com/spa/modules/settings/apikeys/list).
Then, copy or generate a new API Key for the workspace and API Key for profiles.
public static Builder with(Application app, String apiKey, String appId)
---
Use this method to finish the initialization process.
public void build()
---
**Methods:**
This method sets the icon that will be used as the small icon in notifications.
It must be a drawable resource (not a mipmap) due to Android Oreo adaptive icons restrictions.
public Builder notificationIcon(@DrawableRes int notificationIcon)
---
This method sets the notification icon and text color.
`notificationIconColor` must be in ARGB format.
public Builder notificationIconColor(int notificationIconColor)
---
This method enables/disables logcat logs from Synerise SDK.
It is not recommended to use debug mode in the release version of your application.
public Builder syneriseDebugMode(boolean syneriseDebugMode)
---
This method passes info about Users application crashes as dedicated events to the backend.
It is recommended to use `SyneriseCrashHandling`.
public Builder crashHandlingEnabled(boolean exceptionHandlerEnabled)
---
It is important to register your profiles for push messages, so Synerise SDK may ask you to register a profile for push notifications.
This callback is called after the profile signs in, signs up, or deletes the account.
public Builder pushRegistrationRequired(@NonNull OnRegisterForPushListener listener)
---
This callback is called on demand by push notification, so it may be called at any time.
Check out the [sample application](https://github.com/Synerise/android-sdk/blob/master/sample/src/main/java/com/synerise/sdk/sample/App.java) for example usage and remember to send.
public Builder locationUpdateRequired(@NonNull OnLocationUpdateListener listener)
---
You can provide your custom base URL to use your own API.
You can use one of the constants:
**SyneriseApiUrls.SYNERISE_AZ_API_URL** - `https://api.snrapi.com`
**SyneriseApiUrls.SYNERISE_AZU_API_URL** - `https://api.azu.snrapi.com`
**SyneriseApiUrls.SYNERISE_GEB_API_URL** - `https://api.geb.snrapi.com`
public Builder baseUrl(String baseUrl)
---
You can provide your notification channel name.
By default, the channel name is set to your application name.
public Builder notificationDefaultChannelName(@NonNull String name)
---
You can provide your notification channel ID.
public Builder notificationDefaultChannelId(@NonNull String channelId)
---
You can provide your High Priority notification channel name.
From default, channel name is set to ` High Priority`
public Builder notificationHighPriorityChannelName(@NonNull String name)
---
You can provide your High Priority notification channel ID.
public Builder notificationHighPriorityChannelId(@NonNull String channelId)
---
You can set the Synerise SDK host application type.
public Builder hostApplicationType(HostApplicationType type)
---
You can set Synerise the SDK plugin version of the host application.
public Builder hostApplicationSDKPluginVersion(@NonNull String version)
---
---
---
## InitializationConfig
Configuration class for initialization of the SDK.
**Declared In:**
`com.synerise.sdk.core.types.model.InitializationConfig`
**Declaration:**
All the properties above are accessible by using getters.
**Methods:**
There are getters and setters for the above properties.
---
---
## Settings
Class model for settings.
**Declared In:**
`com.synerise.sdk.core.settings.Settings`
**Declaration:**
```Java
public class Settings
```
```Kotlin
class Settings
```
**Properties:**
| Property | Type | Description |
| --- | --- | --- |
| **sdk** | GeneralSettings | [General settings](/developers/mobile-sdk/settings#general) - This group contains options related to the general functioning of mobile SDK |
| **notifications** | NotificationsSettings | [Notifications settings](/developers/mobile-sdk/settings#notifications) - This group contains options related to push notifications |
| **tracker** | TrackerSettings | [Tracker](/developers/mobile-sdk/settings#tracker) - This group contains options related to tracking the customer activities in a mobile application |
| **inAppMessaging** | InAppMessagingSettings | [In-app messaging](/developers/mobile-sdk/settings#in-app-messaging) - This group contains options related to the [in-app messages](/docs/campaign/in-app-messages) feature |
| **injector** | InjectorSettings | [Injector](/developers/mobile-sdk/settings#injector) - This group contains options related to displaying [campaigns](/docs/campaign/Mobile) |
**Note:**
Learn more about settings [here](/developers/mobile-sdk/settings)
---
---
## TrackMode
This enum contains the values which set a mode for tracking component interactions from the `android.widget` package.
**Declared In:**
`com.synerise.sdk.core.types.enums.TrackMode`
**Declaration:**
```Java
public enum TrackMode
```
```Kotlin
public enum TrackMode
```
**Values:**
| Property | Description |
| --- | --- |
| **PLAIN** | Tracks screen-visits. Events are sent when onStart of activities/Fragments is called. |
| **FINE** | Tracks screen-visits and onClick events from components such as Buttons, ImageButtons, RatingBars |
**Methods:**
There are no methods.
---
---
### SDK Lifecycle
## InitializationConfig
**Declared In:**
Headers/SNRInitializationConfig.h
**Inherits from:**
[NSObject](https://developer.apple.com/documentation/objectivec/nsobject)
**Declaration**:
**Properties:**
| Property | Type | Description |
| --- | --- | --- |
| **sdk** | GeneralSettings | [General settings](/developers/mobile-sdk/settings#general) - This group contains options related to the general functioning of mobile SDK |
| **notifications** | NotificationsSettings | [Notifications settings](/developers/mobile-sdk/settings#notifications) - This group contains options related to push notifications |
| **tracker** | TrackerSettings | [Tracker](/developers/mobile-sdk/settings#tracker) - This group contains options related to tracking the customer activities in a mobile application |
| **inAppMessaging** | InAppMessagingSettings | [In-app messaging](/developers/mobile-sdk/settings#in-app-messaging) - This group contains options related to the [in-app messages](/docs/campaign/in-app-messages) feature |
| **injector** | InjectorSettings | [Injector](/developers/mobile-sdk/settings#injector) - This group contains options related to displaying [campaigns](/docs/campaign/Mobile) |
**Note:**
Learn more about settings [here](/developers/mobile-sdk/settings)
---
---
## TrackerAutoTrackMode
**Declared In:**
Headers/SNRTrackerAutoTrackingSettings.h
`eager` mode was removed in SDK version 5.0.0.
**Declaration:**
```Swift
enum TrackerAutoTrackMode: Int {
plain,
fine,
disabled
}
```
### Introduction to Synerise API
# Introduction
Synerise RESTful APIs are a quick and simple way to integrate your existing or future systems with Synerise or benefit from functionalities available within your applications.
## SSL
Synerise API requires connectivity over HTTPS (SSL) and supports the TLS 1.2 protocol (support for newer versions to be added in the near future).
On older configurations, an update may be required, including the update of CA certificate repository.
## Servers
When working with the Synerise API, make sure you're using the correct base URL, depending on the cloud where your workspace is hosted:
- `https://api.synerise.com` for Microsoft Azure EU environment
- `https://api.azu.synerise.com` for Microsoft Azure USA environment
- `https://api.geb.synerise.com` for Google Cloud Platform environment
## API Versioning
Synerise is built with CI/CD (Continuous Integration/Continuous Delivery) principles in mind and we often deploy changes multiple times a day.
We do not have fixed release cycles, but instead features are brought live for you as soon as they are ready.
Such an approach allows us to deliver features, changes, and bug fixes very fast and keeping track of them is possible thanks to our [live changelog](https://changelog.synerise.com).
Thus, as part of our API Contract, we want to ensure that within an API Version:
1. No fields will be deleted or changed in a non-backwards compatible way.
2. We make changes that are additional, such as new fields, new methods, new error messages/codes, or mandatory parameters becoming optional (but, generally speaking, not causing compatibility issues).
Whenever we may need to roll out elements that are not backwards compatible, we will do that as a new API version for the given functional area, so an endpoint that was version 1 is now also available as version 2, with the previous one still being operational.
## Deprecation
Endpoints that already have newer versions send `X-API-DEPRECATED` in the response Headers, giving you time to switch to the new endpoint.
Deprecated API endpoints are also marked visually in the API reference pages.
### Introduction to API Authorization
Synerise uses a number of authentication methods in the API. The available methods depend on the endpoint and the consumer. JSON Web Tokens (JWTs) are the most common.
## API consumer types
Synerise defines different types of API consumers that can receive their own authorization tokens. Each method within our API Reference indicates which types of API Consumers can use them.
### Profile
This is the end user of your website or application - the one who browses pages, purchases items, and so on. In the portal, this is called a profile. In our APIs, the profile is usually called a "client" in endpoint URLs and JSON entity names.
The profile can register and maintain their own account with following methods:
- Synerise RaaS
- Facebook authentication
- OAuth-based authorization
- Sign in with Apple
They can also perform other customer actions, such as redeeming vouchers.
The profile can access and modify only its own data.
### Workspace
The workspace is assigned to a particular company as explained [in these articles](/docs/settings/business-profile).
This consumer can use methods that, for example, create profiles, record profile actions, or manage promotions. When working with the API, you will usually authorize as the workspace.
### User
This is the user who logs in to [the Synerise Portal](https://app.synerise.com/).
A User is an actual person who performs actions in the Synerise Portal interface, but many of those actions can be automated using the API.
Users have access to *Workspaces* or *Organizations* and different levels of permissions within those.
Workspaces used to be called _business profiles_. Many endpoints still use this nomenclature due to backwards compatibility.
## Access control
### Access permissions
Each endpoint requires a permission to access it. These permissions can be defined granularly for users, roles, or API keys, so you have strict control over access to each endpoint. You can also assign groups of permissions.
To find which permission is needed for an endpoint, read the endpoint's description in the [API Reference](https://developers.synerise.com/).
For more information on managing permissions, read [this article](/docs/settings/identity-access-management/permissions).
### IP allowlisting
You can limit access to Synerise to certain IP addresses. For more information, see [IP access control](/developers/api/api-authorization/ip-access).
## JSON Web Tokens
Authentication with [JSON Web Tokens (JWTs)](https://jwt.io/) is available in most of the API endpoints.
The token is generated by one of the `/auth/login/` endpoints depending on the **Consumer Type**, as described further in this article.
You need to include the received token in the `Authorization` header of your requests, with a `Bearer` prefix.
See this simplified example of a call:
```
curl -X GET https://{SYNERISE_API_BASE_PATH}/v4/clients \
-H 'Accept: application/json' \
-H 'Api-Version: 4.4' \
-H 'Authorization: Bearer eyJhbGciOiJSzZXIiL...UFBQUFBSXVPQlFBcHUwd05BZ0FBQUE9PSIsIm5tZSI' \
-H 'Content-Type: application/json'
```
Remember to include a space between `Bearer` and the token.
If you are unauthorized or are using an invalid/expired token, the API returns `HTTP 401 Unauthorized` or `HTTP 403 Forbidden`.
### Token format
Our JWT use the `RS512` hashing algorithm and their payload contains:
- customer/user/profile identification.
- the origin of the token (Synerise, Facebook, Oauth, Apple).
- expiration time of the token.
- **user tokens only:** information about the currently selected workspace and user permissions.
### Token lifetime
By default, the token is valid for **one week**. You can request a refreshed token for the session by using the `/auth/refresh` endpoint **before** the current token expires.
You can also verify your JWT signature by using the public key:
- [Workspaces hosted on Microsoft Azure EU server](https://api.synerise.com/v4/public.pem)
- [Workspaces hosted on Microsoft Azure USA server](https://api.azu.synerise.com/v4/public.pem)
- [Workspaces hosted on Google Cloud Platform](https://api.geb.synerise.com/v4/public.pem)
### Overview
Integrating Synerise Mobile (Android, iOS, React Native, Flutter) SDKs in your mobile application has many benefits, such as:
- **Time-saving and low effort** - The integration is quick, allowing you to get started right away without spending time configuring or managing session tokens. Synerise stores customer tokens (both anonymous and recognized), manages their validity, refreshes and handles the logic of log-ins and log-outs. The integration is quick and you'll be able to secure user's information in no time.
- **Safety guaranteed** - We have a highly secure and encrypted infrastructure: all sensitive data is encrypted in storage and the communication between the servers and the application is encrypted and secured well, which is proven by successfully passed audits.
- **Automatic event tracking** - All customers' activities (events) in a mobile application are tracked in real time and sent in batches to Synerise. This way, you can use the Synerise Decision Hub to analyze the customers' behavior in your mobile app.
There is no auto-tracking option for React Native. To send events to Synerise, you must configure triggers which record and send events to Synerise.
- **Send push notifications** - Integrating your mobile app with Synerise Mobile SDK facilitates push notifications, which you can use to communicate with your customers. All interactions related to push notifications are collected as events, such as: opening a push notification, clicking a link in the notification, rejecting the notification, and so on. Based on [these events](/developers/mobile-sdk/event-tracking#predefined-event-list), you can measure the results of your push notification campaigns in the Synerise Decision Hub.
- **Send in-app messages** - In-app messages allow you to display any creation in a mobile application and implement use cases such as [abandoned cart](/use-cases/abandoned-basket-inapp), [price drop notifications](/use-cases/in-app-price-drop-last-seen-products), sending out discount codes, or implement any information campaign, such as application update. In contrast to push notifications which are sent (pushed) to the app user by Synerise, in-app messages are requested (pulled) by the user’s device through Synerise mobile SDK and they doesn't require a marketing agreement to be displayed.
- **Display recommendations and promotions** - Your mobile app can be a distribution channel where you can display [AI-based recommendations](/docs/ai-hub/recommendations-v2) and [promotions](/docs/ai-hub/personalized-promotions) which you can create in Synerise. Because the SDK keeps the customer context, actions such as fetching a recommendation or a promotion require only one SDK call.
- **Build your application with Synerise Documents** - This feature allows you to build your mobile application based on [documents](/docs/assets/documents) in which you can include [promotions](/docs/ai-hub/personalized-promotions), [recommendations](/docs/ai-hub/recommendations-v2), [dynamic content](/docs/campaign/dynamiccontent) without releasing a new version of your app.
## What's next
---
Proceed to [Installation and configuration](/developers/mobile-sdk/installation-and-configuration).
### Getting started
We recommend creating the tracking code with the creator, as described in this article. However, if you're looking for the legacy method or need to edit an existing tracking code without the creator, see [Advanced tracking code settings](/developers/web/advanced-tracking-code).
## What is Synerise Web SDK
Synerise Web SDK (Software Development Kit) is a JavaScript library that allows you to integrate Synerise on your website. This library (SDK) is responsible for data exchange between Synerise and the website into which it is implemented. Thanks to the SDK, we not only send data ([events](/docs/assets/events)) but also download data to show [dynamic content campaigns](/docs/campaign/dynamiccontent). The SDK is also responsible for customer identification, which means that SDK assigns a UUID for anonymous users on your website, if they already have a UUID, it recognizes them.
If the visitor's User Agent matches any of those used by Googlebot, the SDK doesn't initialize. This means that Googlebot's page crawling visits don't generate any Dynamic Content, events, or Profiles.
### How to implement Synerise Web SDK?
By [adding a tracking code into the source code of your website](#creating-a-tracking-code).
### What can the tracking code do?
The tracking code's permissions are designed to be restrictive, so the code can be included in the source code of your website without risk to your infrastructure or the personal data of your visitors.
It enables the following features:
- You can display [Dynamic Content](/docs/campaign/dynamiccontent) on the page.
Profile data, such as name or date of birth, can be added to the Dynamic Content with Jinjava inserts.
Only the data of the profile whose UUID is stored in the cookies can be used.
- You can send events.
By default, [page.visit](/docs/assets/events/event-reference/web-and-app#pagevisit) events are tracked automatically.
Other events can be sent with [declarative tracking](/developers/web/event-tracking#declarative-tracking-custom-events).
- You can [identify users on your website](/developers/web/user-identification).
When a visitor enters your site for the first time or after clearing their cookies, the SDK generates a random UUID and an anonymous profile is created. If that user becomes recognized (for example, by sending a login form), it may be [merged with an existing recognized profile](/docs/crm/profile-merge).
- Events sent by SDK requests can modify profiles if you allow it.
To edit the list of events which can modify profile data, see [Event authentication settings](/docs/assets/events/event-settings).
- The tracker key (part of the tracking code) can be used to authenticate customer-oriented requests to the [Recommendations](/developers/api/recommendations) and [Search](https://developers.synerise.com/AISearch/) APIs. This can be used to generate personalized recommendation and search results.
- You can use [all methods provided by Synerise SDK](/developers/web/methods-reference).
- You can also:
- [track cart status](/developers/web/cart).
- [send form data](/developers/web/tracking-form-data/tracking-form-data-sdk).
By default, sending form data with the SDK requires [JWT authentication](/developers/web/jwt-auth). If you want to change that, follow the instructions in ["Sending form data with JS SDK"](/developers/web/tracking-form-data/tracking-form-data-sdk).
- [send transaction events](/developers/web/transactions-sdk).
- [send the status of newsletter agreements](/developers/web/newsletter-agreements#javascript-sdk).
The code **can't be used to**:
- Access the details or settings of your workspace.
- Authenticate API requests, except for recommendation and search results.
- Explicitly request personal data of customers.
The SDK identifies the visitor by their UUID from the cookies. It can't access the visitor's Synerise profile directly (personal data from the profile can be displayed with Dynamic Content) or access the data of other profiles.
## Prerequisites
- If you use a custom tracking domain, prepare DNS entries for it. See [Custom tracking domain](/developers/web/first-party-tracking).
- Add the following domains to the allowlist in your Content Security Policy:
- `*.synerise.com`
- `*.snrcdn.net`
- `*.snrbox.com` - If you use a custom tracking domain, you can skip this entry.
- `*.snrlink-page.com`
- `fcm.googleapis.com` - This is only required for Web Push.
## Creating a tracking code
---
1. Go to **Settings > Tracking Codes > Add tracking code**.
**Result**: The tracking code creation form opens.
Tracking code creation form
2. In **Tracking code name**, enter the name.
It's used for identifying the code on the list of tracking codes.
3. In **Domain name**, enter the domain where the code will be used.
This setting **doesn't affect tracking or cookies** - its purpose is to identify the code.
4. Select the type of page where you want to implement the code.
If you choose **Single Page App**, you will need to manually implement page visit events and dynamic content after you include the tracking code in the page. This is described further in the article.
5. If you use Google data layer, enable the toggle and select the version.
If your site uses multiple versions, you can only choose one for use with Synerise tracking.
6. If you use a custom tracking domain, enable **Custom domain tracking** and enter the domain in the field that appears.
Using a custom tracking domain requires additional configuration. See [Custom tracking domain](/developers/web/first-party-tracking).
7. This completes the basic settings.
- If you don't need additional settings, continue to [Adding the tracking code to your site](#adding-the-tracking-code-to-your-site).
- If you need additional settings, continue to [Additional options](#additional-options).
### Additional options
If you want to manually add these options to an existing tracking code, see [Advanced tracking code settings](/developers/web/advanced-tracking-code).
1. Expand **Additional options**.
2. Configure the settings that you need:
#### Custom cookie expiration time
By default, cookies expire after 400 days. To change the expiration time, enable the toggle and enter the period.
#### Override cookie domain
If you use several subdomains, they generate cookies with their own domain. To declare a specific domain instead, enable the toggle and enter the domain.
#### Disable automatic tracking of page visits
You can disable automatic collection of `page.visit` events. You can re-implement the events by using the [SDK methods](/developers/web/event-tracking).
For Single-Page Applications, this option is always enabled.
#### Custom service worker scope
If you use Synerise Web push notifications and need to set a custom service worker scope (registration path), enable the toggle and enter the path.
#### Customizing metadata
You can add `` tags (for example, OG tags) to the website or modify existing ones. The new values are added to `page.visit` events. They can also be used with other features based on metadata, such as communication, recommendations, personalization, and so on. To add the metadata, enable the toggle and paste JS code inside the `function (metadata)` function.
If you chose **Shopify** as the page type, a piece of Jinjava required for the integration is already added to the metadata and this option can't be disabled.
**Example**:
function (metadata) { // DO NOT REMOVE
metadata.size = 8;
metadata.isExample = true;
metadata['og:title'] = 'Sneakers';
metadata['product:retailer_part_no'] = '1a4d3380-04d1';
return metadata; // DO NOT REMOVE
} // DO NOT REMOVE
Syntax usage:
- If the name of the meta key doesn't contain special characters, use the `metadata.keyName = 'keyValue'` syntax.
- If the name of the meta key contains special characters, use the `metadata['key_name'] = 'keyValue'` syntax.
- Up to 20 meta parameters can be returned.
- The following value types are allowed:
- string
- number
- boolean
- array
#### Manage some Synerise features
You can turn off Web push notifications and/or Dynamic Content by disabling the toggles.
The feature or features will be disabled entirely for this tracking code and **can't be restored with SDK methods**.
## Adding the tracking code to your site
1. After you complete the configuration, click **Generate**.
**Result**: The tracking code is generated and displayed.
An example generated tracking code for a Web page
2. Continue depending on the selected page type:
1. Copy the tracking code.
2. Paste the code into your website, before the closing `
` tag.
You can use Google Tag Manager to do this (when using a custom tracking domain this is **not** recommended).
3. If you enabled the custom tracking domain, make sure it's added to the DNS and API methods as described in [Custom tracking domain](/developers/web/first-party-tracking).
 ## Day 1 - Implementing a product feed
Provide data about your products and customer behavior: prepare a product feed, check og:tags on the website, implement the tracking code and transactional events.
Start with building the foundation with information about your products and setting up the proper events.
[Read more about product feed integration](/use-cases/import-product-feed-to-catalog)
## Day 2 - Training the first models
On the second day, we can start training the first models: similar and visual recommendations based on the product feed. Recognize customers by tagging forms, configure email, sms and web push campaigns to prepare the foundations of the omnichannel experience.
AI algorithms start learning, your customer base is indexed and your automated communication channels are set up and ready for future campaigns using AI.
- [Read more about data requirements](/docs/ai-hub/recommendations-v2/introduction-to-recommendation-campaigns#requirements)
- [Read more about form tagging](/developers/web/event-tracking)
## Day 1 - Implementing a product feed
Provide data about your products and customer behavior: prepare a product feed, check og:tags on the website, implement the tracking code and transactional events.
Start with building the foundation with information about your products and setting up the proper events.
[Read more about product feed integration](/use-cases/import-product-feed-to-catalog)
## Day 2 - Training the first models
On the second day, we can start training the first models: similar and visual recommendations based on the product feed. Recognize customers by tagging forms, configure email, sms and web push campaigns to prepare the foundations of the omnichannel experience.
AI algorithms start learning, your customer base is indexed and your automated communication channels are set up and ready for future campaigns using AI.
- [Read more about data requirements](/docs/ai-hub/recommendations-v2/introduction-to-recommendation-campaigns#requirements)
- [Read more about form tagging](/developers/web/event-tracking)
 ## Day 3 - Implementing the first recommendations
Implement first recommendations on the product page and import historical transaction data.
AI is already at work on your site and brings the first effects but also continues to learn from customer histories.
[Read more about importing your historical transaction](/docs/crm/crm-import)
## Day 4 - Introducing AI search
Train cart and recommendation models, deploy product sets and AI search.
AI goes further, optimizing content displays and recommendations, helping clients to make better decisions and save time.
- [Read more about search implementation](/docs/ai-hub/ai-search)
- [Read more about cross-sell recommendations](/docs/ai-hub/recommendations-v2/recommendation-types#cross-sell-and-cart-recommendations)
- [Read more about cart recommendations](/docs/ai-hub/recommendations-v2/recommendation-types#cross-sell-and-cart-recommendations)
## Day 3 - Implementing the first recommendations
Implement first recommendations on the product page and import historical transaction data.
AI is already at work on your site and brings the first effects but also continues to learn from customer histories.
[Read more about importing your historical transaction](/docs/crm/crm-import)
## Day 4 - Introducing AI search
Train cart and recommendation models, deploy product sets and AI search.
AI goes further, optimizing content displays and recommendations, helping clients to make better decisions and save time.
- [Read more about search implementation](/docs/ai-hub/ai-search)
- [Read more about cross-sell recommendations](/docs/ai-hub/recommendations-v2/recommendation-types#cross-sell-and-cart-recommendations)
- [Read more about cart recommendations](/docs/ai-hub/recommendations-v2/recommendation-types#cross-sell-and-cart-recommendations)
 ## Day 5 - Training more models
Train more models and refine recommendations.
Now you’re delivering highly precise recommendations and product suggestions. This is the time to optimize ongoing campaigns, implement cart recommendations and new campaigns.
- [Read more about recommendation statistics](/docs/ai-hub/recommendations-v2/recommendation-statistics)
- [Read more about top products recommendations](/docs/ai-hub/recommendations-v2/recommendation-types#top-items)
## Day 6 - Implementing AI in email campaigns
Send automated emails with recommendations and focus on automated messages triggered by specific customer actions.
Your system knows which customers are more likely to respond to certain offers through automated campaigns and you can reach customers with recommendations even when they’re not on your site.
[Read more about e-mail campaigns](/docs/campaign/e-mail)
## Day 7 - Refining personalized recommendations
Perfect personalized recommendations, add personalization to AI Search, apply AI to remarketing.
Now every aspect of your ecommerce is powered by fully trained AI algorithms, you’re delivering highly precise recommendations and product suggestions based on customer behavioral data, which further boosts the accuracy of the AI search engine and remarketing campaigns.
[Read more about personalized recommendations](/docs/ai-hub/recommendations-v2/recommendation-types#personalized)
## Analyze the results
We can’t skip the role of analytics in this 7-day plan. Integration with the AI module and campaign implementation must be supported by an analysis of the effects they bring. This is why it is important to check the results and metrics of individual campaigns, things like impressions, clicks, the quantity of the products bought from recommendations and the number of transactions made. For the best analysis of the effects of the campaign, it is best to use control groups.
## Day 5 - Training more models
Train more models and refine recommendations.
Now you’re delivering highly precise recommendations and product suggestions. This is the time to optimize ongoing campaigns, implement cart recommendations and new campaigns.
- [Read more about recommendation statistics](/docs/ai-hub/recommendations-v2/recommendation-statistics)
- [Read more about top products recommendations](/docs/ai-hub/recommendations-v2/recommendation-types#top-items)
## Day 6 - Implementing AI in email campaigns
Send automated emails with recommendations and focus on automated messages triggered by specific customer actions.
Your system knows which customers are more likely to respond to certain offers through automated campaigns and you can reach customers with recommendations even when they’re not on your site.
[Read more about e-mail campaigns](/docs/campaign/e-mail)
## Day 7 - Refining personalized recommendations
Perfect personalized recommendations, add personalization to AI Search, apply AI to remarketing.
Now every aspect of your ecommerce is powered by fully trained AI algorithms, you’re delivering highly precise recommendations and product suggestions based on customer behavioral data, which further boosts the accuracy of the AI search engine and remarketing campaigns.
[Read more about personalized recommendations](/docs/ai-hub/recommendations-v2/recommendation-types#personalized)
## Analyze the results
We can’t skip the role of analytics in this 7-day plan. Integration with the AI module and campaign implementation must be supported by an analysis of the effects they bring. This is why it is important to check the results and metrics of individual campaigns, things like impressions, clicks, the quantity of the products bought from recommendations and the number of transactions made. For the best analysis of the effects of the campaign, it is best to use control groups.
 ## What’s next?
When your Synerise solution is operating at full efficiency, there are a number of use cases that can be deployed to enhance your conversions and revenue.
- When a word is misspelled in a search bar, AI can make informed guesses about what the user had in mind and show display the appropriate products.
- Don’t go yet! Automated exited pop-ups can display personalized products based on customer interests.
- Your automated email campaigns can be boosted by recommendations. Send complementary products related to recently-purchased products, or similar to last-seen items.
- Save abandoned carts with reminders and complementary products based on items placed in carts.
- Create dedicated landing pages with personalized offers and send them to customers who left your website without making a purchase.
- Set up product comparisons using AI to help customers make the right choice for them.
- Activate recommendations for visually similar products.
---
## Developers
### SDK Lifecycle
### Synerise Builder
Synerise builder class.
**Declared In:**
`com.synerise.sdk.core.Synerise.Builder`
**Declaration:**
## What’s next?
When your Synerise solution is operating at full efficiency, there are a number of use cases that can be deployed to enhance your conversions and revenue.
- When a word is misspelled in a search bar, AI can make informed guesses about what the user had in mind and show display the appropriate products.
- Don’t go yet! Automated exited pop-ups can display personalized products based on customer interests.
- Your automated email campaigns can be boosted by recommendations. Send complementary products related to recently-purchased products, or similar to last-seen items.
- Save abandoned carts with reminders and complementary products based on items placed in carts.
- Create dedicated landing pages with personalized offers and send them to customers who left your website without making a purchase.
- Set up product comparisons using AI to help customers make the right choice for them.
- Activate recommendations for visually similar products.
---
## Developers
### SDK Lifecycle
### Synerise Builder
Synerise builder class.
**Declared In:**
`com.synerise.sdk.core.Synerise.Builder`
**Declaration:**