This action allows you to send requests from Synerise to external systems. This node can reuse existing outgoing integrations or you can define a custom webhook that is configurable only in a specific workflow and node.
Take a look at how you can integrate with Adform using the Outgoing Integration node.
Node configuration
Select outgoing integration type
- Click on the node.
Select the type of the Outgoing Integration.
- Existing integrations - If you prepared an outgoing integration earlier, you can use this option.
- From the dropdown list, select the outgoing integration prepared earlier.
- Confirm with the Apply button.
- Custom webhook - Use this option if you want to create outgoing integration from scratch.
The following instructions apply to the Custom webhook integration type only - testing requests are available exclusively for this type within the Outgoing Integration node.
- Existing integrations - If you prepared an outgoing integration earlier, you can use this option.
Set up a connection
In this part of the process, you must define how you access your source. By selecting the authentication method and providing the required information, you establish a connection.
- On the pop-up, select the authentication method:
- No authentication - No authentication is required.
Login & Password - This method lets you use basic authentication to authenticate with the remote server.
Click here to see the instructions
- Click Select connection.
- In the connection list:
- If the connection you want to use is in the list, select it and proceed to defining the endpoint.
- If the connection list is empty or you don't see a connection, you must:
- At the top of the dropdown list, click Add connection.
- In the Connection name field, enter the name of your connection (it's visible only in Synerise).
- In the Login field, enter a login.
- In the Password field, enter the password.
- Click Create.
The connection you created can be used later in Workflows and Brickworks external sources.
Custom connection - This method sends an authentication token request before executing the main request defined in the Outgoing integration node settings. The token is fetched when the request data is uncached, then cached according to its TTL, and added to the target request.
Click here to see the instructions
- Click Select connection.
- In the connection list:
- If the connection you want to use is in the list, select it and proceed to Defining the request section in this article.
- If the connection list is empty or you don't see a connection, you must:
At the top of the dropdown list, click Add connection.
- In the Authorization request tab, click Define.
Result:
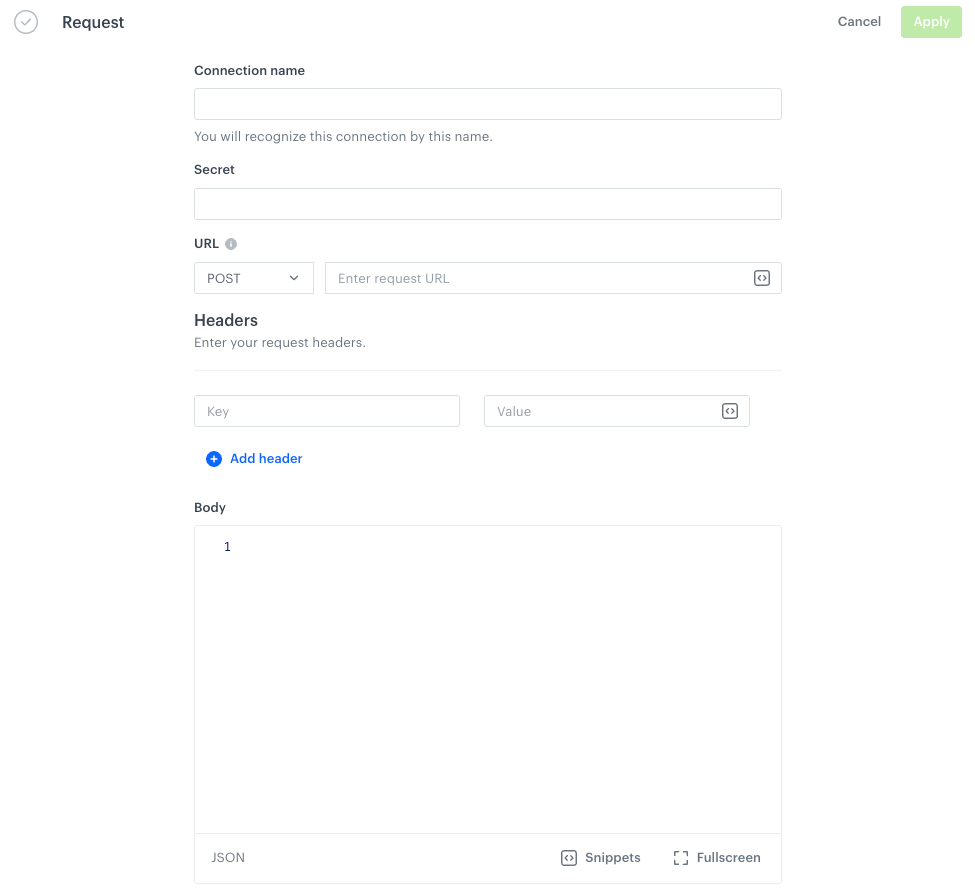
The Request section in the configuration of a custom connection - In the Connection name field, enter the name of your connection (it's visible only on the Select connection dropdown list or on the list of connections in Settings > Connections).
- In Secret, enter a value which is required in the request to obtain a token. This value will be anonymized and displayed as asterisks.
- In the Headers section, add request headers (in the left field, enter the key; in the right, enter its value).
- In the Body field, enter the request body.
For example:
where{ "api-key": "{{secret}}" }{{secret}}retrieves the value of the Secret field to anonymize the token. - Confirm the settings in the Authorization request tab by clicking Apply.
- In the Token placement settings section, click Define.
- Click Retrieve response.
Result:
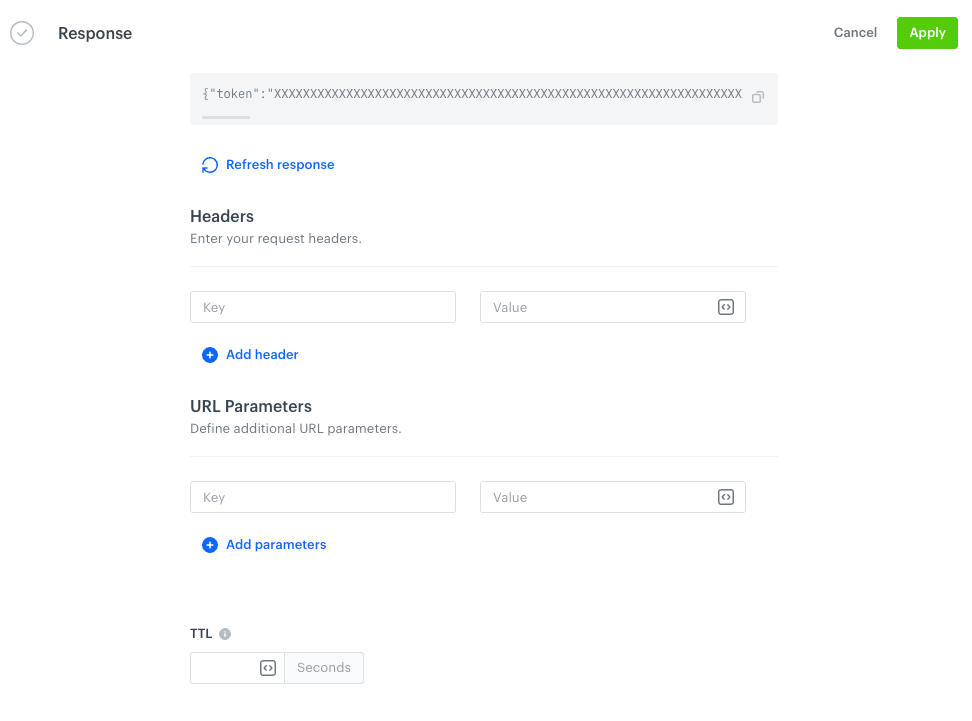
Retrieved token in the Response section in the custom connection configuration form - If you:
- specify the value in the Headers section, the extracted authorization data from the response will be added as a header to the target request.
provide the value in the URL Parameters section, the data will be appended to the target request’s URL as a parameter.
You can use the following values to retrieve values from the response:authResponseBody- a variable that contains the full body of an authentication responseauthResponseStatusCode- a variable that contains the status code of an authentication responseauthResponseHeaders- a variable that contains the headers of an authentication response
For example:
Bearer {{ authResponseBody | fromjson | attr("token") }}
It takes the
JSONresponse body stored inauthResponseBody, parses it into a usable structure, and extracts the value of thetokenfield. Outputs a string like:Bearer "eyJhbGciOiJIUzI1NiIsInR5cCI6IkpXVCJ9..."
- In TTL field, specify the how long the cached response from the external request will be valid.
If you leave this field empty, it's 60 seconds. - Confirm by clicking Apply.
Synerise API key - This method is particularly recommended for the users who use Synerise REST API. It lets you select a connection that includes an API key with the required permissions. This way, the requests to Synerise API are executed by this integration and a JWT is not required as it is generated while sending requests and attached to the request headers.
Click here to see the instructions
- Click Select connection.
- If the connection you want to use is in the list, select it and proceed to defining the endpoint.
- If the connection list is empty or you don't see a connection, you must:
- At the top of the dropdown list, click Add connection.
- In the Connection name field, enter the name of your connection (it's visible only in Synerise).
- From API Key dropdown, select API key you want to use. If you don't see any API Keys on the list, verify if you are assigned with a user role that includes permissions to preview API keys.
- Click Create.
The connection you created can be used later in Workflows and Brickworks external sources.
- If the connection list is empty or you don't see a connection, you must:
OAuth2 Client Credentials - This method lets you use your OAuth2 credentials to authorize.
Click here to see the instructions
- Click Select connection.
- In the connection list:
- If the connection you want to use is in the list, select it and proceed to defining the endpoint.
- If the connection list is empty or you don't see a connection, you must:
- At the top of the dropdown list, click Add connection.
- In the Connection name field, enter the name of your connection (it's visible only in Synerise).
- In the Token endpoint URL field, enter the URL used to obtain an access token from the authorization server.
- In the Client ID field, enter a unique identifier assigned to your application by the service provider.
- In the Client secret field, enter a confidential key issued alongside the Client ID. It is used to securely authenticate your application.
- Optionally, in the Scope field, define the level of access your application is requesting. Scopes specify which actions or data your application can access (for example, read user data, send messages). Refer to the API documentation for the correct scope values.
- Click Create.
The connection you created can be used later in Workflows and Brickworks external sources.
API Key - This method lets you authenticate using an API secret by including it in a header of your choice or in a URL parameter — example outputs:
the authorization header:
Authorization: Bearer [secret]URL parameter:
client_id=[rendered secret].
When you use this connection in the Outgoing Integration node, the token will be automatically added to either the request header or the request URL with every request.Click here to see the instructions
- Click Select connection.
- If the connection you want to use is in the list, select it and proceed to Defining the request section in this article.
- If the connection list is empty or you don't see a connection, you must:
- At the top of the dropdown list, click Add connection.
- In the Connection name field, enter the name of your connection (it's visible only in Synerise).
- In the Secret field, enter an API Key.
- If you:
- specify the value in the Headers section, the API key will be added as a header to the request. For example,
x-api-key: {{secret}}where{{secret}}retrieves the value of the Secret field to anonymize the API key value. - provide the value in the URL Parameters section, the API key will be appended to the request’s URL as a parameter.
- specify the value in the Headers section, the API key will be added as a header to the request. For example,
- Click Create.
The connection you created can be used later in Workflows and Brickworks external sources.
- If the connection list is empty or you don't see a connection, you must:
SHA256-based authentication - This method is recommended exclusively for connecting with Eagle Eye. This method lets you authenticate using the SHA256 algorithm. When a target request is sent, the following headers are added to the request:
X-EES-AUTH-CLIENT-ID – the value is taken from the Client ID field.
X-EES-AUTH-HASH – the value is generated by concatenating the endpoint URI, request body, and client secret, and then hashing the result using SHA256.
Click here to see the instructions
- Click Select connection.
- In the connection list:
- If the connection you want to use is in the list, select it and proceed to Defining the endpoint section in this article.
- If the connection list is empty or you don't see a connection, you must:
- In the Connection name field, enter the name of the connection.
It's used to find the connection on the list. - In Client ID, enter a unique identifier assigned to your application by the service provider.
- In Client secret, enter client secret assigned to your application by the service provider.
- Confirm by clicking Create.
- In the Connection name field, enter the name of the connection.
Define the endpoint
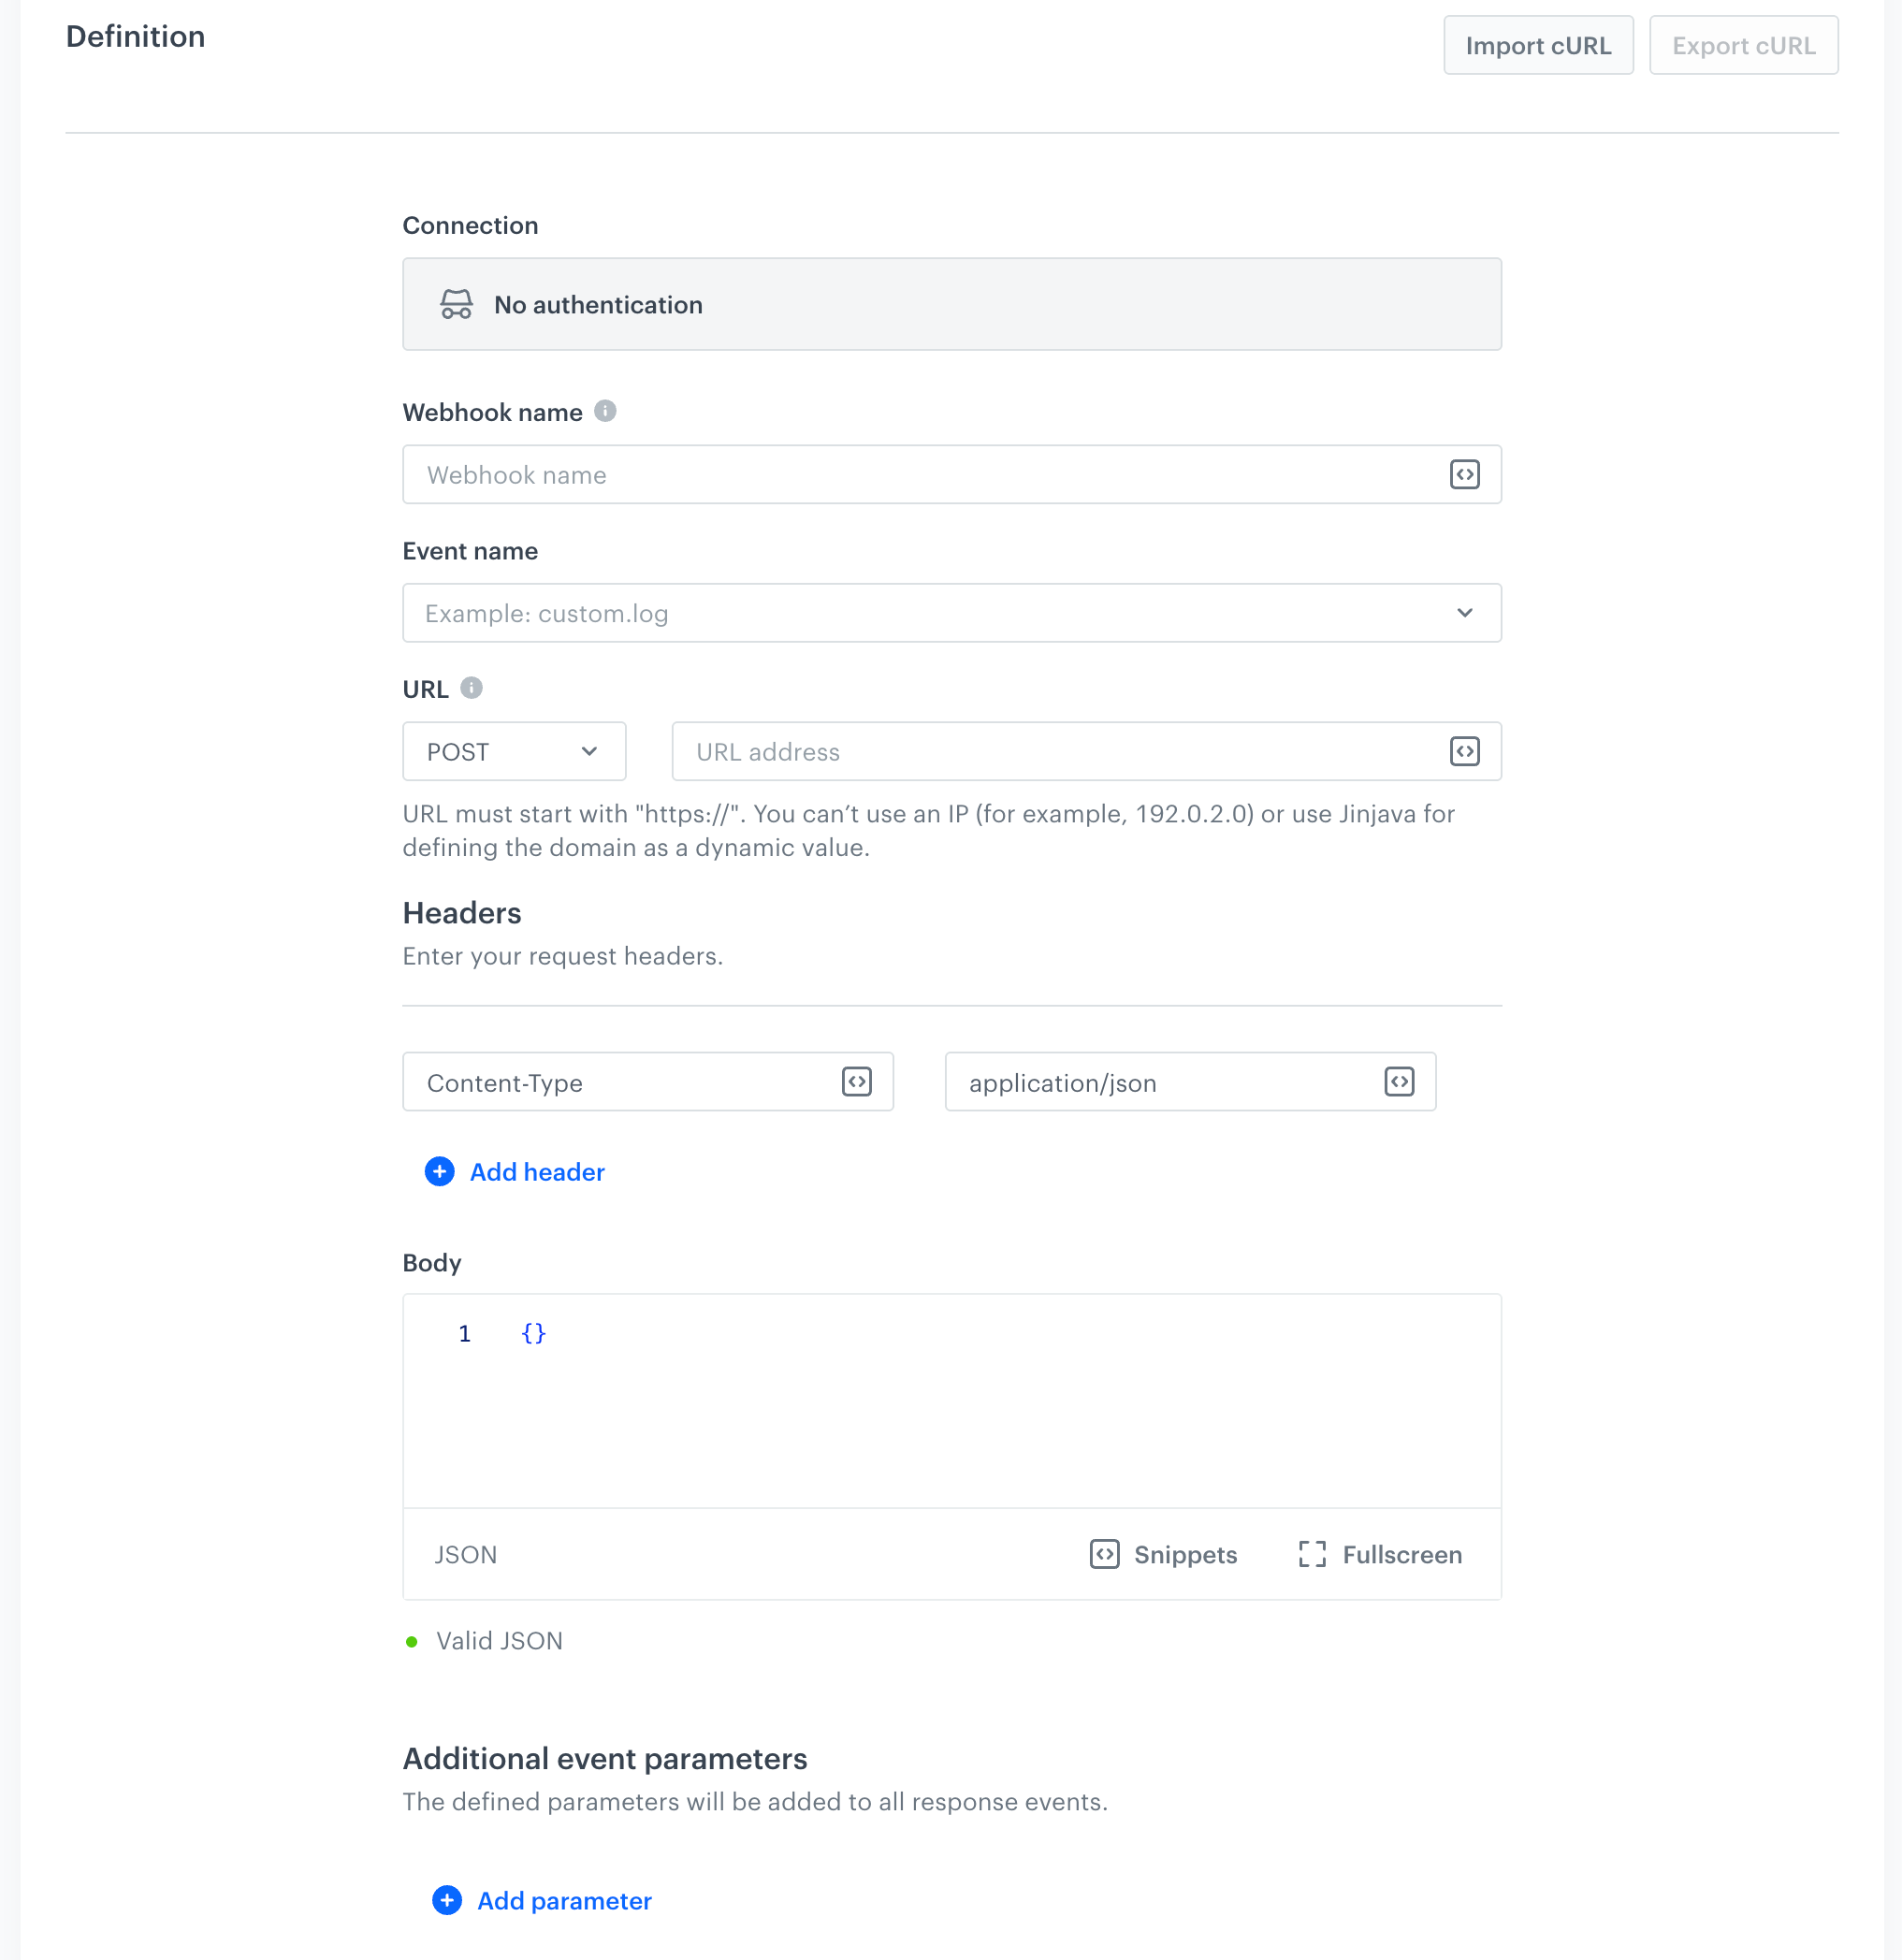
All fields that contain ![]() accept snippets or inserts. If you create a business workflow, profile-related inserts cannot be used.
accept snippets or inserts. If you create a business workflow, profile-related inserts cannot be used.
If you have a cURL command ready, you can use the Import cURL option to populate all fields automatically. See Import and export cURL.
- In the Webhook name field, enter the value that will be displayed in the
nameparameter of the event which will be generated when a request from this node will be executed. Optional, recommended: In the Event name field, choose an action name for the event that will be generated when Synerise receives a response from your selected endpoint. We recommend using a meaningful name instead of the default one.
- from the dropdown list, you can select the name of the event (event action) that will be generated when a request from this node will be executed.
- at the bottom of the dropdown list, you can create a new event using the Create new event option.
Result: A pop-up appears. Fill out the configuration form on the pop-up, according to instructions in step 3 in the Adding event definitions - in the Web application section. - If you leave the field blank, the action defaults to
webhook.response.
- In the URL section, define the HTTP method and enter the URL address to which the data is transmitted.
This field requires a defined domain (for example,https://example.com) and the HTTPS protocol. You can't use an IP (for example,192.0.2.0) or use Jinjava for defining the domain as a dynamic value.
- Optional: Add key-value pairs for headers.
- Optional: In the Body section, enter the body of the request.
If the webhook requests are used in the workflows triggered by an event, they will be processed in real-time. In the case of webhooks used in the workflows triggered by the Audience node, they will be added to a separate queue and the time of processing will depend on load.
Import and export cURL
In the Definition section, you can use the Import cURL and Export cURL buttons to configure the webhook from a cURL command or to generate a cURL based on the current configuration. This is useful when working from API documentation that provides ready-to-use cURL examples, as it eliminates the need to manually re-enter headers, parameters, and body content.
Import
- Click Import cURL.
- In the cURL command field, paste the cURL command.
- Click Import. Result: The URL, HTTP method, headers, body, and parameters in the configuration form are populated based on the pasted command.
- Fill out Webhook name and optionally Event name.
Explanation to the fields is available in the "Define the endpoint" section.
- If the node already contains a configuration, an Overwrite settings? confirmation pop-up appears. Review the Changes list to see which fields will be updated, then to apply the changes, click Yes, overwrite or to keep the current settings, click No, cancel. If the imported command is identical to the current configuration, the Changes list displays No changes.
- The syntax of the pasted command is validated. If it is invalid, an error is displayed and the import is blocked.
Export
This is only possible when the form is filled out.
The exported cURL command contains only data from URL, Headers, and Body. Other fields in the configuration form — such as Additional event parameters — are not part of the outgoing request itself, but supplement it by enriching the response event.
To export the configuration of the webhook, click Export cURL.
Result: A cURL command representing the current webhook configuration is copied to the clipboard.
Custom response event parameters
You can add up to 10 custom parameters in each event that is generated from the response to the request that was sent. This solution allows for even more precise identification of response events, the creation of more detailed analyses and reports, and more accurate error handling.
- To define the custom event parameters, in the Additional event parameters section, click Add parameter.
In the Parameter field, enter the name of the parameter.
- The name must not contain special characters or exceed 128 characters
- The following parameters cannot be sent:
eventUUIDstatusstatusDescriptionuuidclientIddiagramIddiagramNameblockIdblockNamereqnamebody
In the Value field, enter the parameter value.
- The value is always sent as a string when the event's JSON payload is generated. The maximum length of the value is 230 characters.
- You can use dynamic values in the Value field.
- If you want to add more parameters, click Add parameter, and repeat steps 3-4.
Enable timeout events
By default, when an endpoint fails to respond, the workflow stops at the failing node without signalling the problem. You can enable generating an event instead.
- If you want to save a
webhook.timeoutevent when the endpoints fails to respond, enable the Produce timeout event toggle.
Save the configuration
- After finishing the configuration of the node, at the bottom of the pop-up, click Apply.
Test integration
You can run a test request. If the request body contains a dynamic reference to a profile attribute and/or an event data from preceding nodes, then you can define the context using test profile data.
Complete description of the feature is available in Testing outgoing integrations.
- In the Test integration section, click Send test request.
Result: A test request builder opens. If:- a request body contains dynamic references, the request preview appears after you select the context of test profiles and events.
- a request body contains static data, the preview of the body request appears immediately.
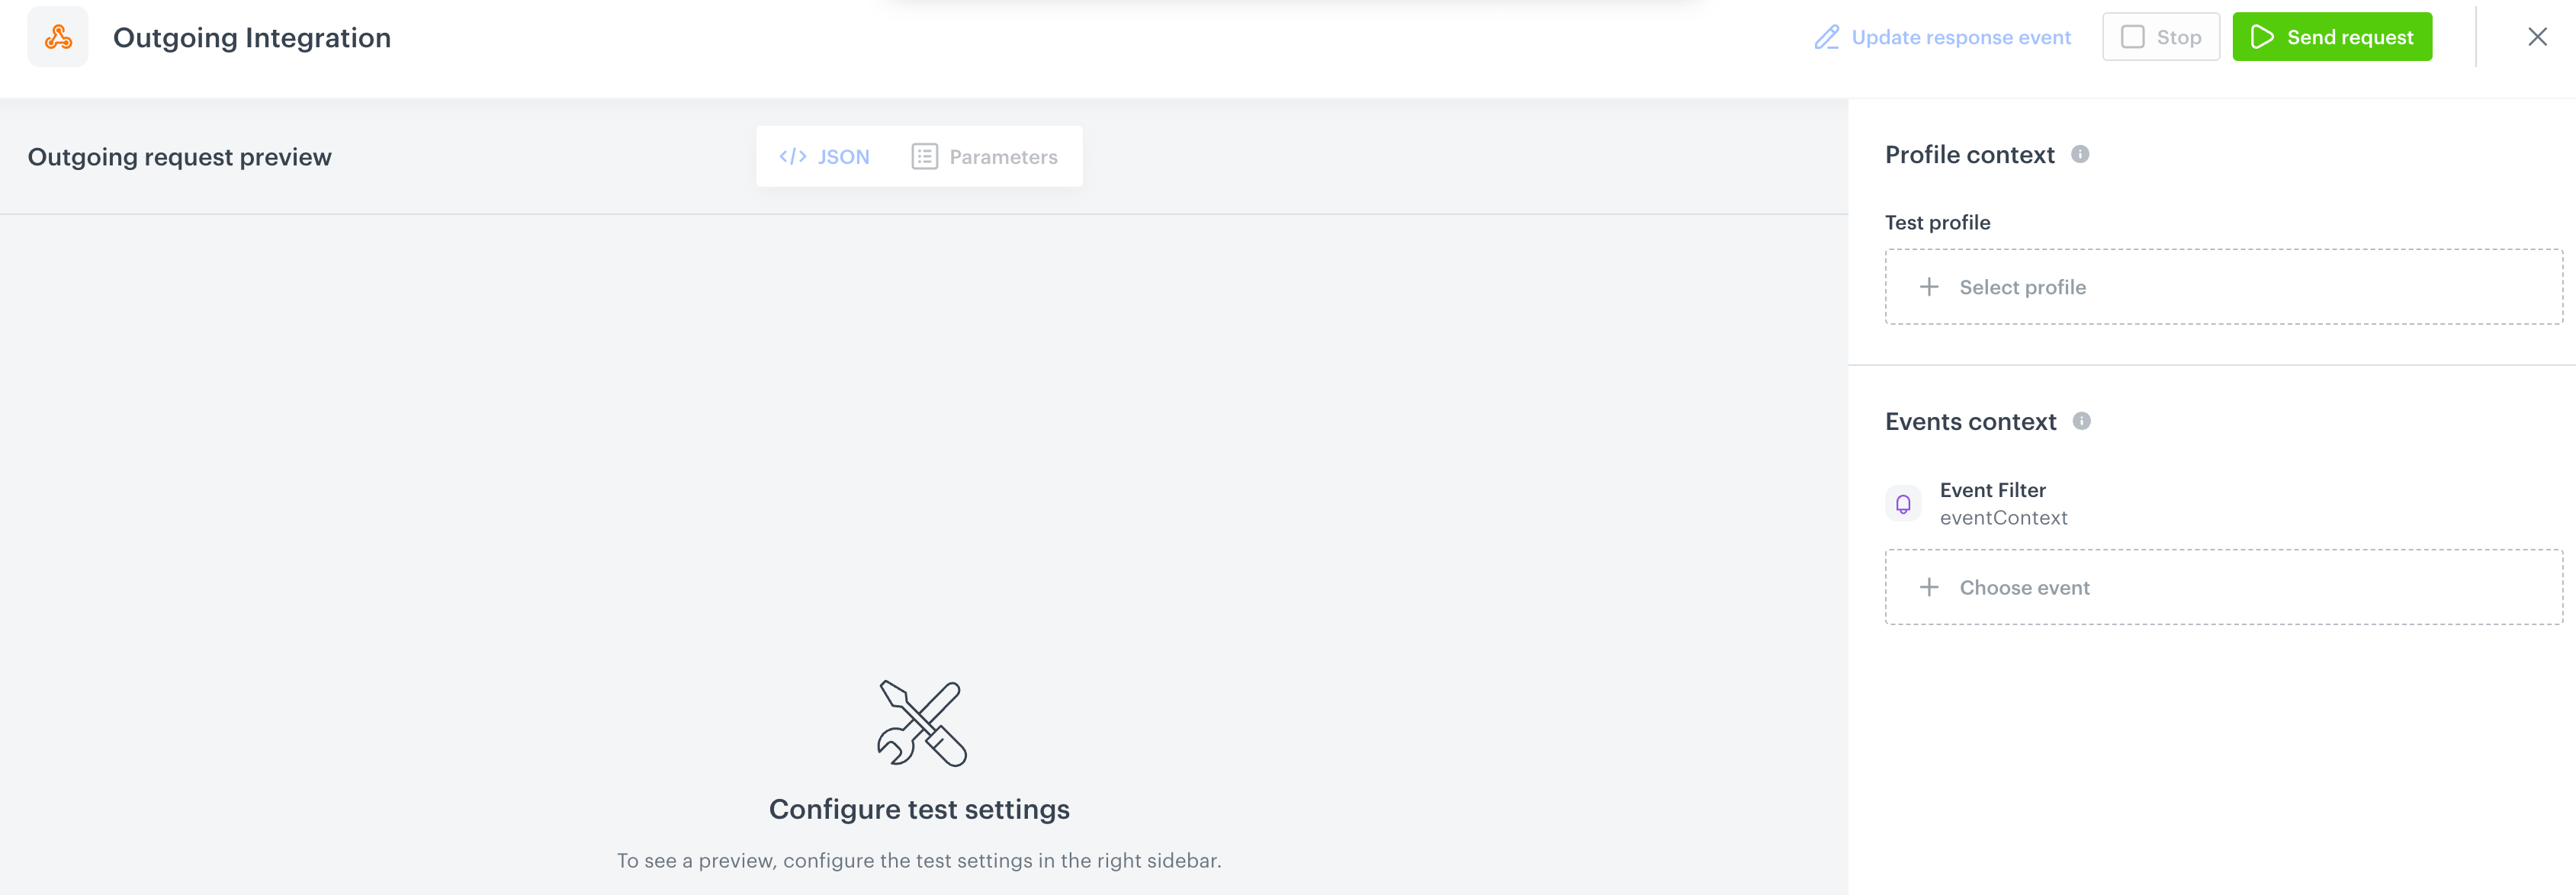
An empty test request builder - If your request contains dynamic references (otherwise, the options aren't available):
- From the Test profile dropdown, select a test profile in the context of whom the test request will be performed.
- From the Event context dropdown list, you can select a particular occurrence of an event whose values/information will be used for the test request.
- Select a test profile.
Result: A history of test profile events appears.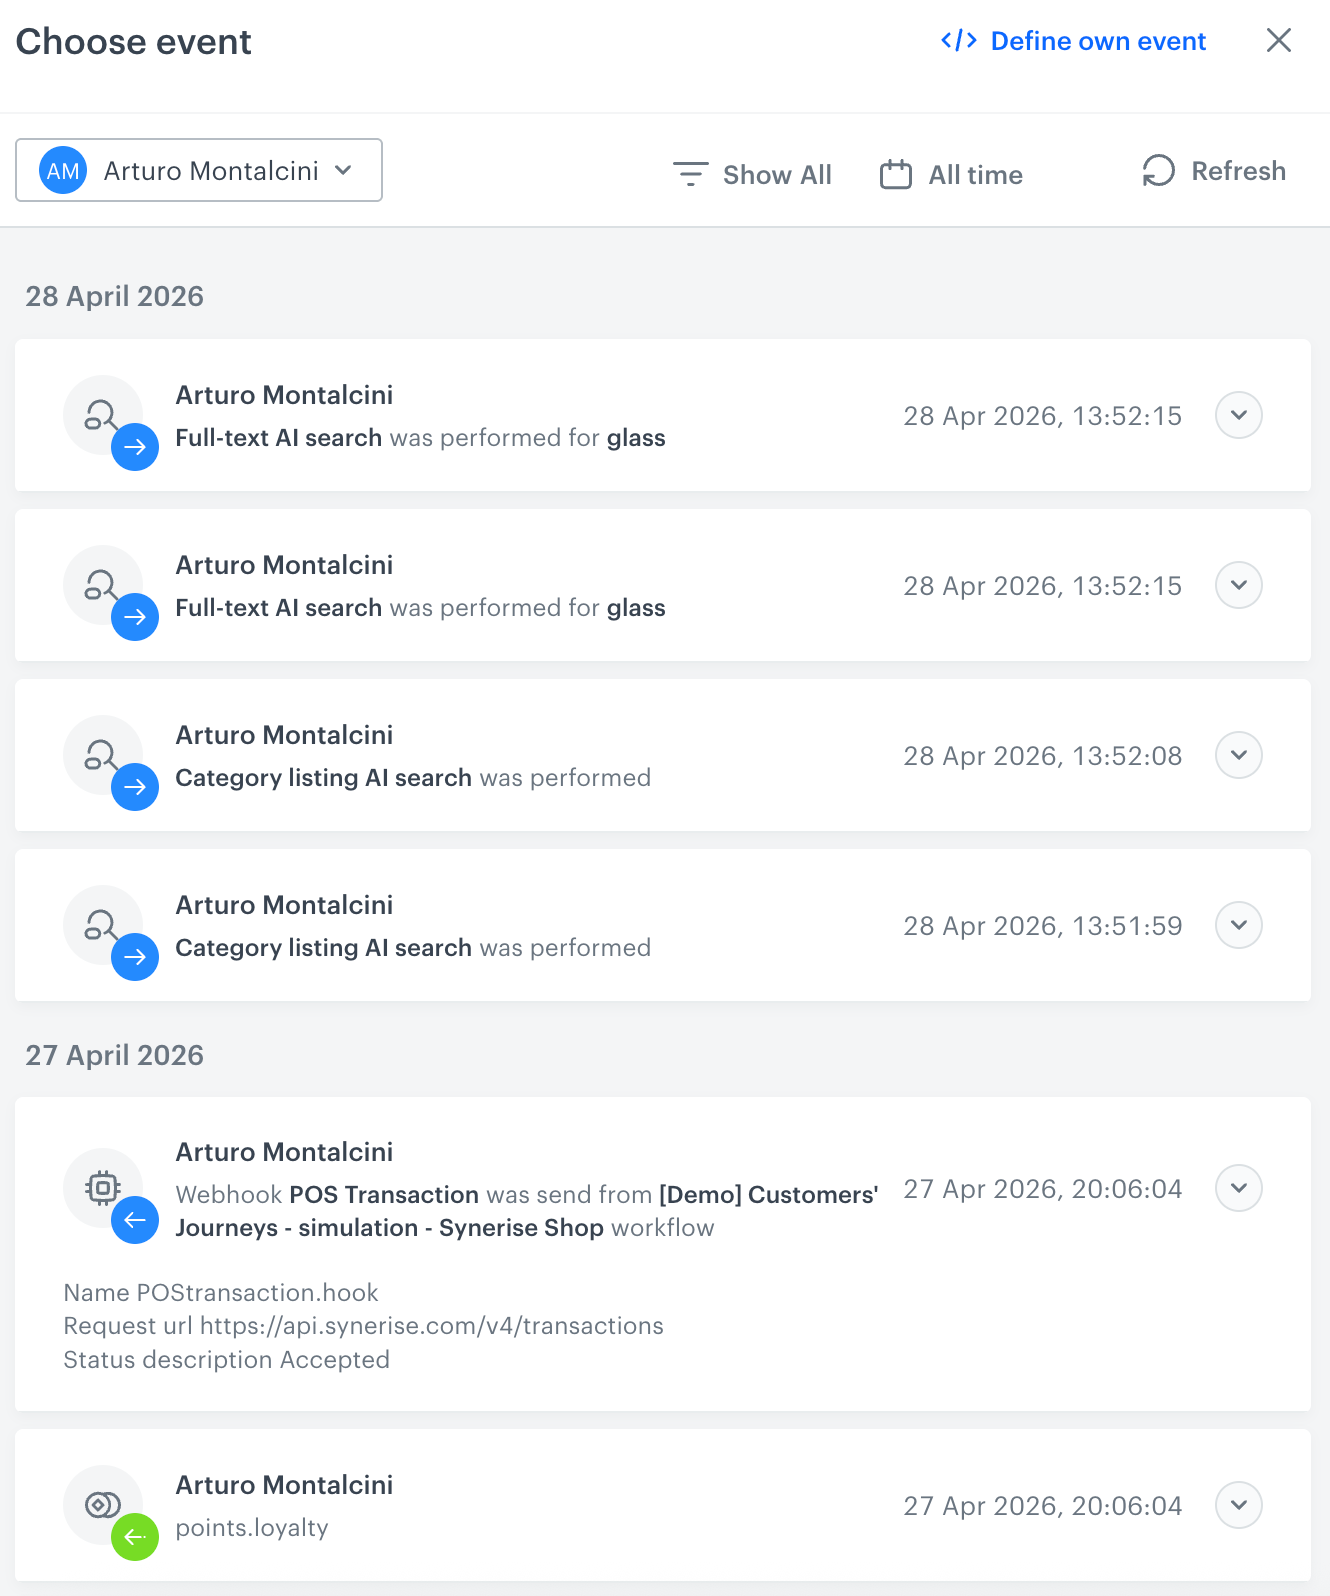
A stream of events of a test profile - From the list of events, select one whose data you want use as a context. If there is no event you can use, in the upper-right corner of the pop-up, click Define own event and provide the body of the event.
- Confirm by clicking Apply.
- Select a test profile.
- Verify the request body. If there is something you want to change, come back to the node settings from previous steps.
- If the request body is ready to test, in the upper-right corner, click Send request.
Result: The response section appears and the Update response event button becomes active. - Optionally, you can update response event with new parameters by clicking Update response event in the upper-right corner.
Example of use

The purpose of this automation is to send a notification on a Slack channel every time a user submits a form on a website.
- It starts with a Profile Event trigger node. In the settings of the trigger, select the
form.submitevent. This event may not be the Synerise default event. In such case, you need to add this event to Synerise on your own in Data Modeling Hub > Events. - Add the Outgoing Integration action. Configure the Webhook settings by defining the Endpoint URL, body request, and so on.
- When the message is sent to the Slack channel, the automation process is completed.