Web push notifications
Web push notifications allow you to maintain communication with customers through a web browser. The unobtrusive character of web push notifications will keep your message away from spam folders or ad blocking software. The notifications will always be displayed to users who have agreed to receive them.
The following combinations of operating systems and browsers are supported for web push notifications:
- Windows: Chrome, Edge, Firefox, Opera
- macOS: Firefox, Chrome, Edge, Opera
- Android: Chrome, Samsung Internet, Firefox, Brave
Benefits
- Good way of increasing the number of your subscribers - users more eagerly agree to receive web push notifications rather than share their email address.
- Great deliverability in real time
- Good engaging results as directing traffic to a particular URL is only one click away
- Good way to increase the traffic (for example, with a catchy notification title)
- Good way to increase conversion as users can subscribe to web push notification to be informed about the product availability or discounts
- The possibility of personalizing content of notifications by using Jinjava variables (such as the first name of the user, the number of collected loyalty points, and so on).
Examples of use
See examples in web push notification use cases
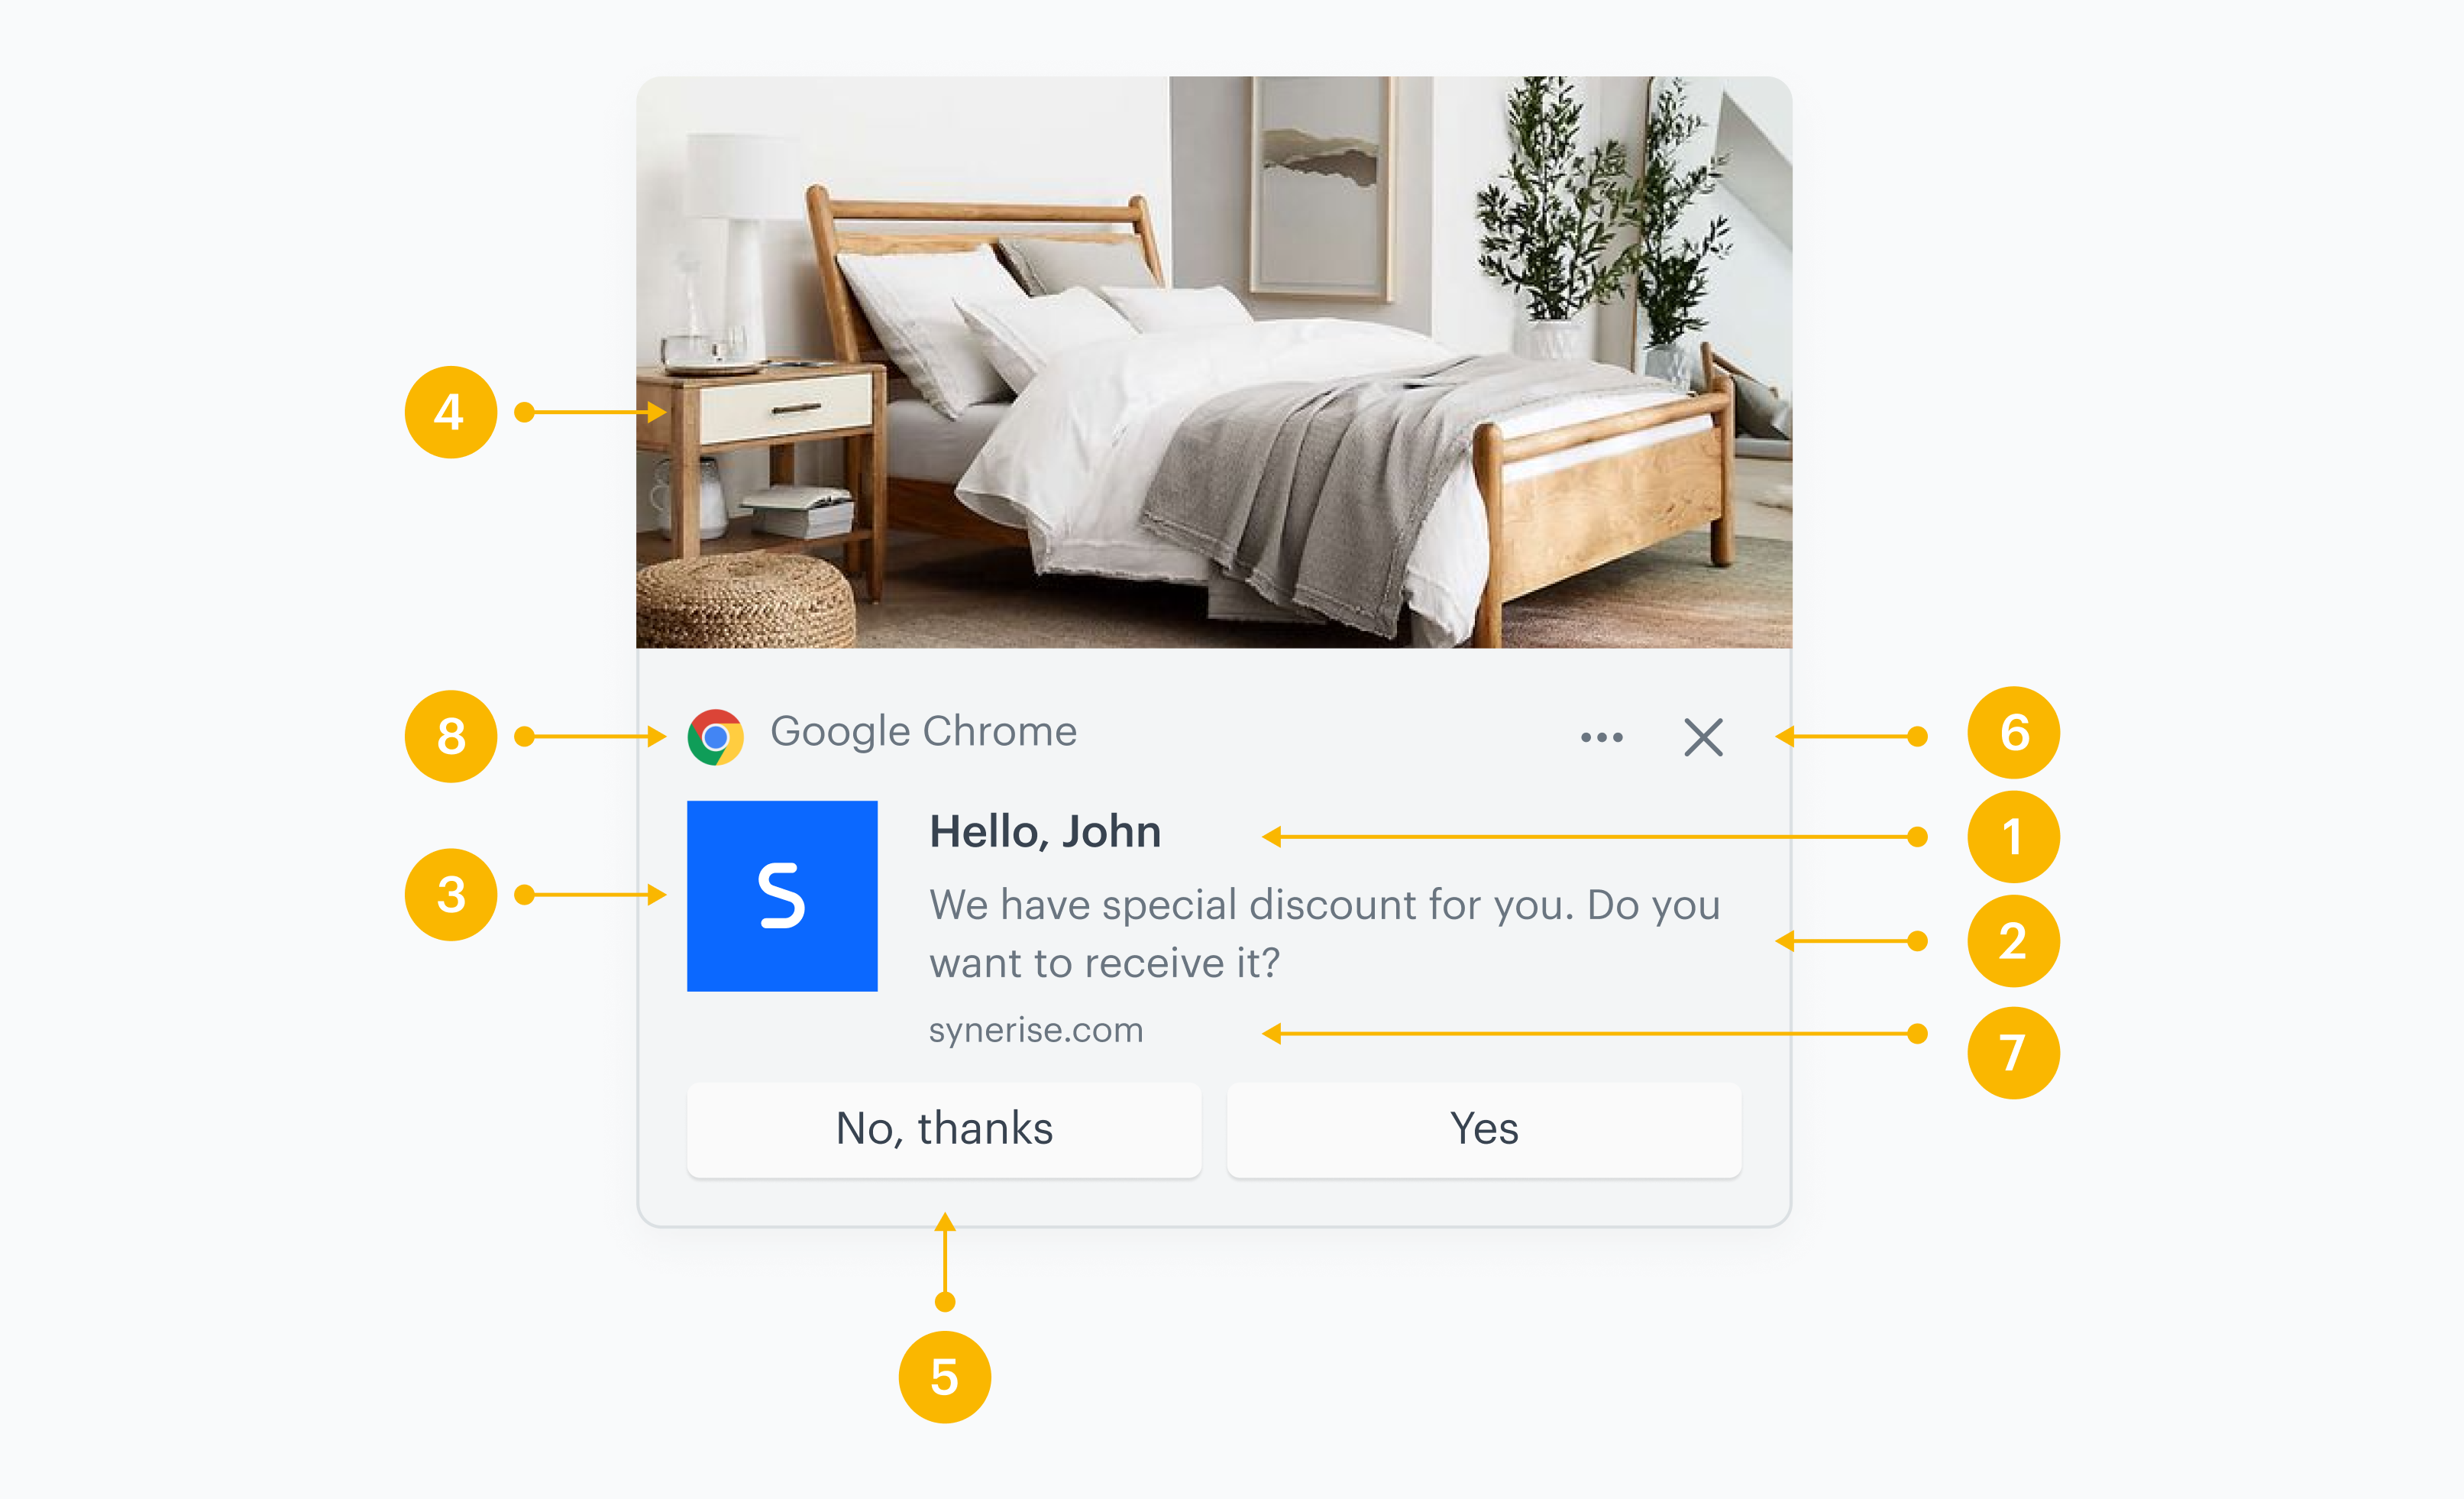
Anatomy of web pushes
A web push notification consists of the following elements:

| No. | Web push element | Function | Recommendations & possibilities |
|---|---|---|---|
| 1. | Title | This is the top text of your notification | - We suggest a 50-character limit to avoid being cut off, but the length depends on the browser - You can personalize the title using inserts and emojis |
| 2. | Message | This is the main content of your notification | - We suggest a 100-character limit to avoid being cut off, but the length of the text vary across different browsers - You can personalize the message using inserts and emojis |
| 3. | Icon | An icon helps in brand recognition | - We recommended using a size of 192x192 - To use an icon in the notification, upload the icon first in Synerise > Data Management > File. |
| 4. | Large image | On macOS, it serves as an expanded icon, while on Windows and Android, it acts as a custom image | - Make sure to follow the image requirements for optimal display - To use a large image in the notification, upload the image first in Synerise > Data Management > File |
| 5. | Action buttons | They redirect users to a URL you indicate | - You can add up to 2 action buttons - You can personalize the text on the button by using inserts and emojis -You can add inserts to the URL |
| 6. | Close button | This button closes notification. The browser adds a close button to the notification. | n/a |
| 7. | Domain | The domain is automatically included in the notification. | n/a |
| 8. | Browser badge | The browser defines the browser badge. | n/a |
Requirements
- Integrate with Synerise JS SDK
- Create an account in Firebase
- Integrate Firebase with Synerise
- Enable web push notifications in Synerise
- Prepare an agreement form
How it works
Synerise uses Firebase Cloud Messaging (FCM) as a platform for real-time messaging and data exchange between servers and client applications. The process starts when Synerise sends messages to FCM, which manages the delivery of notifications to customers’ browsers. To facilitate this process, the Firebase SDK is integrated through the JS SDK to generate a unique customer token. This token is then shared between Synerise and FCM.
FCM dispatches messages to customers with assigned FCM tokens. To display these messages in a browser, a service worker acts as a kind of proxy between the browser and the network, allowing for the interception and management of network requests, caching of files for offline use, and receiving web push messages from a server. Then, if a customer has provided consent for receiving web push notifications through a browser pop-up, the notification will be presented to the customer.
FCM token
An FCM token is a unique identifier which lets mobile and web applications receive messages from Firebase Cloud Messaging. It is generated by Firebase SDK and saved in the browser’s storage. The token is also sent to FCM and to Synerise together with UUID of a customer who agreed to receive web push notifications through a browser’s agreement form.
Tokens can be generated only when all the following conditions are met:
- Synerise and Firebase are integrated
- Web push notifications are enabled in the Synerise platform
- The service worker has been implemented into a website
- A customer agreed to receive web push notifications
FCM token as attribute in Synerise
The status of a profile’s FCM token is stored in the snrs_has_web_push_devices attribute. When the token is assigned, the value is true. This attribute is available:
- on the customer’s card in Synerise > Profiles, this way you can see the status of this attribute for each customer
- for use in Analytics
Token TTL
Tokens generated by FCM for web push notifications remain valid until the customer revokes notification permissions or clears the browser/application data. In case when the token is inactive for 270 days, it is expired (change introduced by Google Firebase since May 15, 2024).
Every time a new token is generated for a customer, the webpush.tokenUpdate event is generated and added to the activity list on their card in Profiles.
Discrepancies between the number of customers with FCM token and the actual number of recipients of the notification
Differences may occur between the number of customers who have an FCM token in Synerise and the actual number of recipients who receive notifications. This is because Synerise isn’t notified immediately when a customer withdraws an agreement in the browser settings or clears browser data and at the moment of sending, all the conditions in Synerise are still met. After a failed delivery, webpush.notRegistered and webpush.tokenDelete events are generated. As a result, the snrs_has_web_push_devices attribute is set to false, but the marketing agreement status remains unchanged.
The table below provides information what happens while customer profiles are merged. The table contains only allowed merging combinations and each mention of agreement refers to the web push marketing agreement.
FCM token migration
Token migration is a process in which the assignment of a FCM token is transferred from one user to another, along with associated changes in web push marketing consent. This migration occurs when a customer context changes in the browser, such as when a user logs out and a new user logs in, causing the FCM token to be reassigned to the new user or when customer profiles are merged.
-
An anonymous customer is recognized
Token and marketing agreement will not change because the UUID of the customer is still the same. This customer can receive web push notifications. -
A customer context changes in the browser - In the following scenario, both customers will not receive web push notification:
- A customer is logged in as
john.doe@example.com(further referred to as John Doe) in the browser. This customer has been assigned a Firebase Cloud Messaging (FCM) token and his marketing consent is enabled. - John Doe logs out.
anna.smith@example.com(further referred to as Anna Smith) logs in (the customer context in the browser changes). A new user, Anna Smith, has been added, and the FCM token that was previously assigned to John Doe is now passed to Anna Smith.- Anna Smith now has the FCM token, but her web push marketing consent is disabled. To receive web push notification, Anna must enable her agreement through an agreement form.
- When attempting to send a web push notification to John Doe, the value of the
snrs_has_web_push_devicesattribute is changed from true to false, the marketing consent remains unchanged.
- A customer is logged in as
-
Customers are merged
The table below provides information what happens while customer profiles are merged. The table contains only allowed merging combinations and each mention ofagreementrefers to the web push marketing agreement.Column: Source profile Row: Target profile From: Anonymous, agreement disabled From: Anonymous, agreement enabled To: Recognized, agreement enabled Result: After merging the profiles, agreement is enabled. The token remains the same. Result: After merging the profiles, agreement is enabled. The token from the recognized profile is kept. To: Recognized, agreement disabled Result: After merging the profiles, agreement is disabled. There is no token. Result: After merging the profiles, agreement is disabled. The token from the anonymous customer is rejected.
Marketing agreement
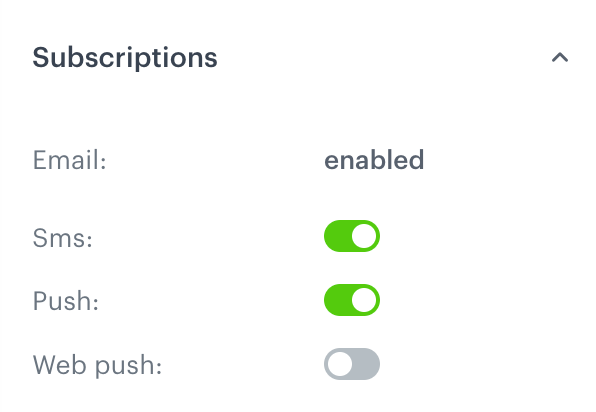
Marketing consent is the permission in the browser to receive notifications. The customer can provide such consent through the native window displayed at the top of the page. The agreement is stored in the receive_webpush_messages attribute (this is the backend name of the attribute) which can be found in the profile card, in the Subscription section:

You can prepare such an agreement in Synerise, more information about that is in Prepare an agreement form article.
Marketing agreement across multiple browsers
Customers will receive web push notifications on any browser where they have consented to receiving them. If customers have provided consent on multiple browsers, they may receive the same web push notification on each of those browsers.
Events related to web push notifications
As a result of implementing JS SDK, various types of events are automatically generated. These events can be triggered by both the customer’s actions (such as clicking on the notification or dismissing the web push consent) and by the infrastructure (such as failed notification delivery due to invalid Firebase tokens or exceeding message limits). By analyzing these events, you can measure the effectiveness of your messages and their deliverability. See default events associated with web push notifications.
Creating web push
- Define the recipients of the web push notification.
- Prepare the content of the web push notification (web push templates).
- Schedule the web push notification.
- Define the UTM parameters.
Sending methods
Web push notifications are sent in two ways:
- Automatically by using the Automation module. In response to customer activity, update of profile data, or other events (check the list of triggers that start a workflow), a web push notification can be sent to customers.
- Manually by clicking the Send button while creating web push notification.
Web push status
The status of web push communication is available on the list of web push notifications. In the Communication statuses article, you can check the statuses which can be assigned to web push communication.